Garage owners sometimes face the problem of high humidity in the cellar arranged there. This affects the properties of the metal and the storage conditions of the products. Sometimes these situations occur at certain times of the year. But it also happens that the appearance of water is associated with omissions during construction work. Regardless of the reason for the appearance of condensate, the question arises - how to dry the cellar, removing condensate and dampness.
Prevention methods
In order not to encounter the occurrence of moisture in the cellar, it is worth considering the following conditions when designing a room:
- When choosing a wall material, preference should be given to hydrophobic materials characterized by poor water conduction properties. Such materials include concrete grade M 400 and higher. And you can also use additives in plain concrete, which increase water-repellent qualities.
- The use of external waterproofing prevents the penetration of groundwater from the outside.
- Installing a blind area around the garage will lead to the removal of water resulting from rain or snow melt.
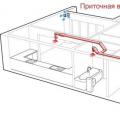
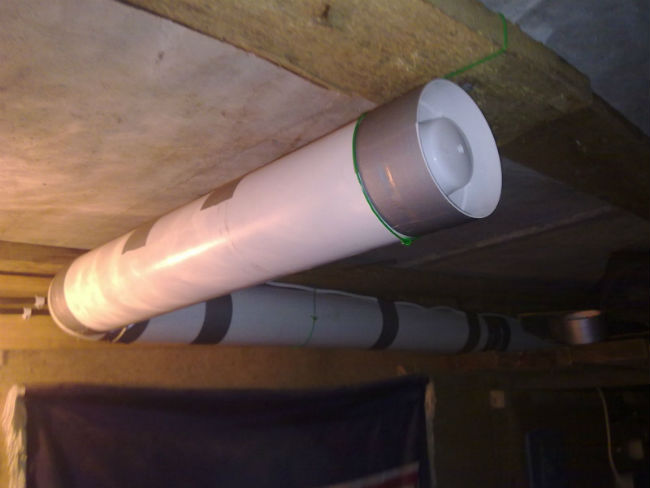
- Ventilation pipes should be placed in the cellar. The air inlet channel should be almost at floor height (more than 10 cm). The exhaust pipe is located under the ceiling surface (10 cm lower). Equipping pipes outside with an umbrella will protect against rainfall inside the cellar. To create a large traction force, the air ducts should be made in a straight shape. If it is not possible to install pipes in a straight position, the side outlet is located at an angle of at least 60 ° with respect to the horizon. The slope should have a length of no more than 100 cm.
- The presence of a vapor barrier between the basement and the room above will prevent moisture from entering.
- In the presence of an earthen floor, the ingress of moisture into the cellar increases. When tamping and covering the floor with plastic wrap, the humidity indicators decrease. Installing a concrete floor with waterproofing will protect against condensation.
- The presence of waterproofing and vapor barrier of the walls will lead to a decrease in the hygroscopicity of the material. External insulation is carried out by coating the outer sides with mastic. For internal insulation, cement-based compositions are used.
Drying a ventilated basement
Before draining the basement, preparation should be made. To do this, you need lime and copper sulfate. After removing all shelves and drawers, you need to check for the presence of mold deposits. If they are, then wooden surfaces are treated with copper sulfate dissolved in water. The concentration of the solution is 5-10%.
The area inside the cellar is whitewashed with lime. A thick mixture of lime composition is taken with an admixture of copper sulfate (5-10%). Corners should be well lubricated. Sprinkle the surfaces in the room with a thick solution of whitewash. After the lime has dried, apply another layer again. When the walls are dry, you can dry.
How to dry the cellar in the garage, if at first there was no condensation, and then it appeared. The cause may be clogged air ducts. When cleaning pipes, moisture disappears. But it happens that moisture remains. Then, it is necessary to carry out the process of activating the movement of air masses in the following ways:
- Install a high power fan on the draft pipe. Open existing hatches and windows. The drying period lasts 3-10 days.
- Apply heat with a candle. To do this, the duct for the outflow in the cellar is extended and a burning candle is placed under it. It is possible to use dry alcohol. Under the influence of heat, the pipe dries out and good traction appears.
- Heating the room by means of a "brazier". A bucket with holes or another metal tank can serve as it. Smoldering coals, coke, coal are placed in the container. Then the bucket is placed in the cellar, the door and windows are closed. Sometimes the doors need to be opened slightly to let in fresh air. After the coals are extinguished, they must be re-ignited. After burning all the coals, the bucket is removed. The usual one such bucket is enough to dry the cellar.
In hot weather, there are situations where an increase in air movement leads to an increase in condensate. This is due to the temperature difference between inside and outside the room. In this case, ventilation is not carried out. On the contrary, it is necessary to close all hatches and windows. After lowering the air temperature to + 10 °, perform ventilation actions using one of the methods.
You can dry the cellar in winter using other heaters:
- Heat gun for 3-5 kW;
- Kirogaz;
- Potbelly stoves;
- Propane burners.
When using such methods, one more person is needed for safety net.
The process of drying the cellar in the absence of ventilation
In the absence of a ventilation system, some pipes should be equipped. You can lead the pipe into the wall or ceiling. Another option is to purchase a fan with a supply and exhaust mechanism. A cellar without ventilation is dried using hydrophilic materials:
- Dry sawdust, the scattering of which contributes to a decrease in moisture indicators.
- Hydrated lime, laid out on shelves and along walls, removes moisture and helps to kill fungus.
- Calcium chloride with moisture absorbing properties. For 1.5 liters of water, 1 kg of the substance is required. After calcining the wet composition, you can use it again.
- Dry cardboard boxes used to prevent condensation on the ceiling.
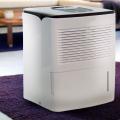
You can also purchase special equipment - a household air dryer.
The cellar after flooding should first be pumped out. And then take everything out. After drying with open doors and hatches, whitewash with lime. After that, already apply the described methods.
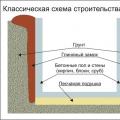
Moisture isolation with drainage
When insulation is installed during the construction period, moisture problems disappear. But it happens that moisture still appears. Then methods of external and internal drainage are applied.
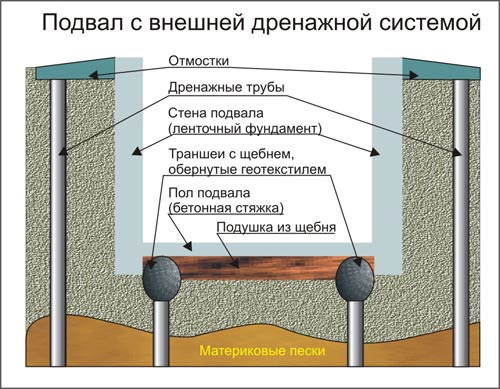
External drainage involves the diversion of water into sewer outlets. Stages of external drainage:
- Digging a trench below the level of the cellar floor by 40-50 cm;
- Wells are made through separate two-meter distances, where tubes are inserted.
- Geotextiles are laid in the trench to prevent flooding.
- Backfilling with gravel or sand trenches, geotextiles are laid on top.
- Compacting the soil over the trench.
Internal drainage is used when draining a large cellar. Stages of drainage:
- Digging trenches indoors with a depth of about half a meter.
- Geoseptic material is laid at the bottom of the trench.
- Trench gravel at a distance of 15-20 cm.
- Laying drainage pipes with a slope of 3 mm per meter of pipe.
- Coating pipes with gravel.
- Laying geotextile material.
- Backfilling trenches with sand or earth.
- Installing the block at the lowest point of the floor. You can buy it or make it yourself, providing a hose for water outlet.
- Equip the well with a pump for pumping water.
Drainage systems are best equipped during the construction of the cellar.
For different cellars when removing moisture, different methods are suitable. You can use a do-it-yourself dehumidifier for the basement, or consider removing excess moisture at the construction stage.