Repair of a digital camera Kodak cx7300 step by step instructions.
If water gets into your camera, you need to disassemble it as soon as possible and wash the places where the water got into with alcohol.
We disassemble the camera in the following sequence:


3. Open the cover of the flash card compartment;

4. We take out the flash card;

5. Turn off the three bottom screws;

6. Unscrew the two screws in the flash card compartment. Note that they are longer than the bottom cogs;

7. We turn off two screws from the left side of the camera;

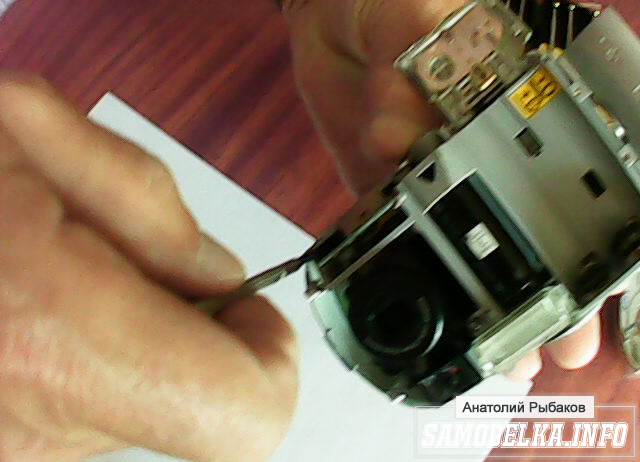
8. Slightly move apart both halves of the camera body at the bottom and ...

9. … separating them with a plastic card;

10. Remove the front half of the camera body;

11. We unscrew the lower screw securing the rear half of the case to the board;
12. Unscrew the top screw securing the rear half of the case to the board. I draw your attention to the fact that both screws are in recesses and therefore it is difficult to see them;

13. We pry off the protrusion of the rear half of the case with a screwdriver and ...
14. We remove it;

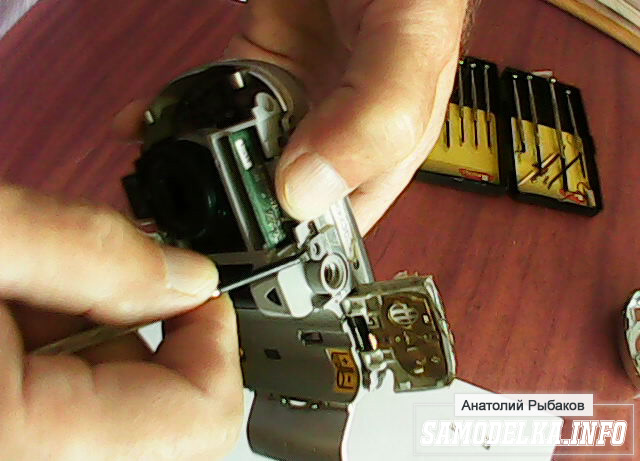
15. Unscrew the screw securing the start button board;

16. We remove the fee. It is connected to the large board with a plug that can be easily disconnected.

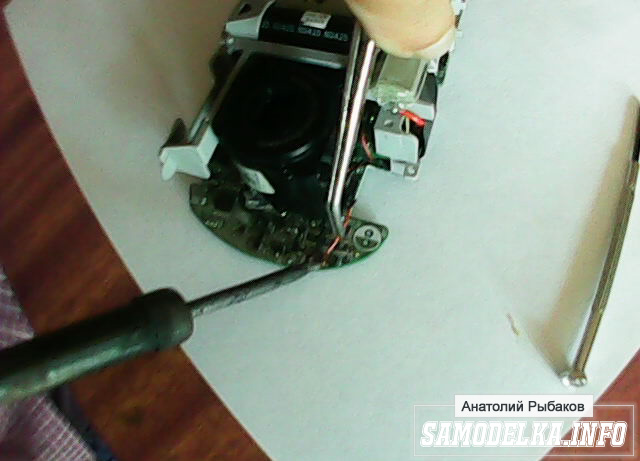
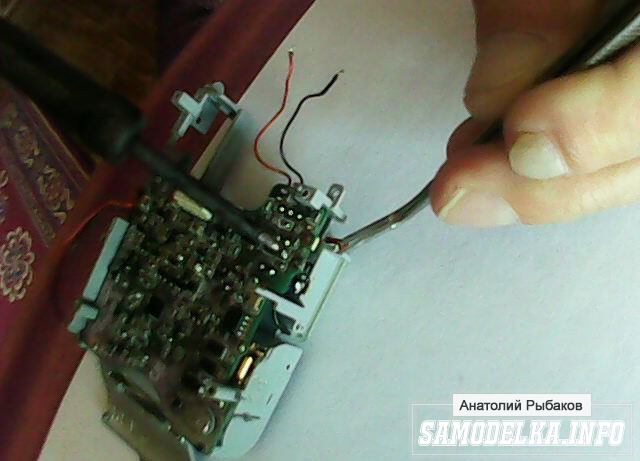
After I disassembled the camera, I found that on this small board sea water some paths were eaten away (the camera fell into the sea, and therefore it became necessary to disassemble it). Very carefully, with the help of a soldering iron and thin wire, I managed to restore these tracks. This is how this board took on (the soldering points are visible);

Due to the fact that the detail is small, and there was no camera to shoot it, a familiar computer scientist helped me to remove it. That's why she's so pale. My camera (and I used a video recorder in photo mode) turned out like this (top view);

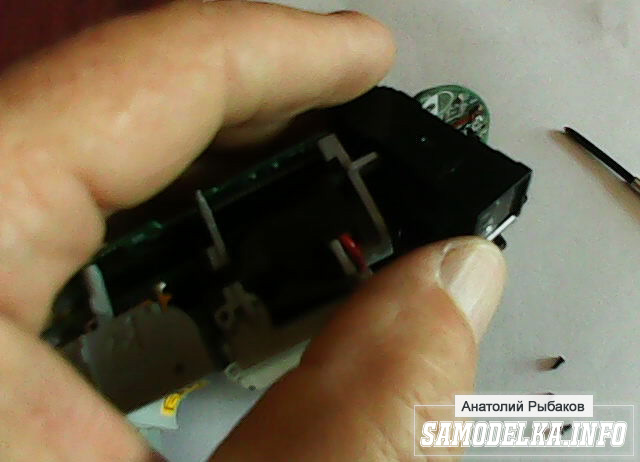
17. Remove the cover of the power compartment. It goes towards the display;

18. Unscrew the two screws securing the diagnostic block;

19. Remove the block. It is connected to both boards with plugs, which are disconnected with some effort;

20. Carefully solder two wires (red and black) from the display. I used a regular 25 W soldering iron and an alcohol solution of rosin (as a flux). Before soldering, wires must be marked so that they cannot be confused later;

21. Turn off the display mounting screw;

22. Raise the display (it enters the board with pins) and move it to the left. Under it is a cable with which it connects to the board;

23. Raise the bar and..

24. Disconnect the cable;

25. Remove the display;

26. Unscrew the three screws securing the viewfinder;

27. Remove the viewfinder. To do this, it needs to be slightly tilted and raised;
28. Unsolder the two wires (red and black) going to the descent delay warning light. These postings also need to be labeled first. They, like the display wiring, can not be soldered, but you need to constantly monitor the disconnected parts. And this is inconvenient and, besides, they can be damaged.
29. Remove the board with the lens. The wires that go from the lens to the board can not be soldered;

30. Remove the protective film on the flash lamp;

31. Solder two wires going to the flash lamp;
32. Unsolder the third output of the flash lamp from the transformer;

33. Lifting the bottom edge of the board, ...

... squeezing contacts and ...

... drowning the capacitor, ...

... we separate the board from the case;

34. The camera is disassembled.

Assembly is carried out in reverse order.
Our service center professionally repairs digital cameras (camcorders) under the manufacturer's warranty: CASIO, and also provides services on a paid basis for products from the following manufacturers: Canon, Casio, Fujifilm, HP, Leica, Nikon, Olympus, Panasonic, Samsung, Sigma, Sony, Kodak, Pentax and others, and with qualified service we guarantee not only reasonable prices and short deadlines, but also high-quality service.
Our service center employs only highly qualified service engineers who can carefully and carefully deal with breakdowns of your camera and perform fast and high-quality repairs.
Repair of such complex equipment as a digital camera should be carried out by an experienced specialist who detects a malfunction of the product after carrying out complex diagnostic work. In this case, the Client receives all necessary information to make a decision on the advisability of repairing your camera or camcorder. Free diagnostics is made without printed detailing. After the diagnostic work, if necessary, the replacement of failed parts is carried out. Our Service Center has necessary components requiring replacement.
List of works performed:
- Lens repair cameras of any complexity, including SLR cameras;
- Standard repair, elimination of non-critical defects without installing new spare parts;
- Complicated repair. This procedure includes complex diagnostics with the replacement of various components, electronic elements, optics and mechanisms; Replacement of components - microphone, optical parts, cables, connectors, LCD displays, speakers, electronic boards and control buttons;
- Technical restoration after ingress of water, dust, sand, including the overhaul of the lens mechanism;
- Preventive actions– testing, cleaning, lubrication, setting options;
- Electronics repair at the component level;
- Replacement software .
Digital Camera Problems
The main causes of repair and malfunction of digital cameras.
Camera repair becomes necessary after improper or careless handling of a high-tech device. High-quality repair is possible only if the exact cause of the malfunction is identified and its further elimination using professional equipment. In general, there are a number of main reasons for the repair and breakdown of digital cameras, which are typical for any brands and models of this type of electronics. Consider the main reasons for the repair.
Physical impact is the main reason for repairing cameras.
Due to the portable nature of the device and the high degree of mobility, the likelihood of mechanical damage to the device increases, and this in turn leads to the need for professional repair. Mechanical damage as a result of physical impact is the main reason for the repair of most digital cameras. The most common repair in this regard is a fall. Hitting a hard surface can severely damage the internal components of a digital camera, as well as cause significant damage. appearance. Scratches and cracks on the case are not as terrible as malfunctions in the operation of Zoom or the display - without them, the camera will not be able to work normally. You will certainly understand if your LCD screen is broken as a result of an impact or a fall. More difficult is the definition of failure motherboard or camera matrix. These elements are located inside the camera body, and only a specialist can accurately diagnose their malfunction and repair it. In any of the above cases, repairs are possible, in some of them, with the replacement of damaged elements.
Water ingress is a common cause of camera repairs.
water ingress
The second most popular reason for contacting service centers is the ingress of moisture into the case, which leads to serious internal damage to the electronic device and urgent camera repair is required. Even at the slightest contact of the liquid with the electronic elements of a digital camera, the process of electrochemical corrosion occurs and repairs are indispensable. The salt in the water is deposited on the internal elements of a digital camera, and this in turn leads to serious damage and the need for urgent repairs. If you have a suspicion that the camera might get wet or you see that nothing happens when you press the control buttons, then this definitely indicates the penetration of moisture or heavy condensation inside the camera, you should urgently apply for professional help. In this case, it is unlikely that it will be possible to avoid serious repairs in a specialized service center. The only way you can help your camera is to quickly turn off the device, remove the battery and take the camera to us.
Sand ingress is a very common cause requiring camera repair.
This reason for the repair is also widespread, as the camera is usually widely used during the summer holidays, and these are beaches, nature and dusty roads. Even the smallest particles of dust or sand can render your digital camera inoperable and require repair. First of all, the camera lens suffers from this, the movement mechanism of which becomes clogged and stops working, if this happens, immediately contact a service center for qualified help. Thus getting sand in requires immediate repair. Do not try to use such a camera for shooting, clean it yourself and, even more so, try to repair it. Seek professional repair.
Overheating in the sun can also lead to the need for repair of a digital camera.
Violation of the thermal operating conditions can seriously affect the performance of your digital camera. The inside of the camera overheats, and high temperatures even melt, so repairs due to overheating cannot be avoided. So, as a result of careless handling of the camera (forgotten on the beach, left under direct sunlight), you get an absolutely non-working camera that requires serious repairs, professional equipment and a qualified specialist. Remember that from getting inside the camera moisture, dust or overheating, and as a result of the need for repair, you can save the usual observance of the instructions for use.
Lens damage
The main reason for contacting camera service centers for many years is damage to the camera lens. As a result of a drop, impact, moisture or dust, the lens of your digital camera stops working normally. This manifests itself, most often, in the incorrect operation of the zoom and poor focusing of the image. As a result, professional intervention by a specialist may be required, and in severe cases, its complete replacement. At times, it is enough to replace only individual components of the camera lens and not make expensive repairs to the entire camera. Urgent repairs may also require failed gears of the lens, which are responsible for its movement. This can happen as a result of breakage of gear teeth, which have increased brittleness. If the smallest grains of sand get between the teeth of the zoom lens drive gear, it can clog and fail. Not to mention the physical impact on the teeth of the mechanism and lens pins. Do not try to "help" the lens move, you will only harm and damage one of the fragile mechanisms that will later have to be repaired along with the camera. In this case, it is easy to break some other part of the camera and costly repairs cannot be avoided. Repairing a damaged zoom requires more skill than simply replacing it. Many services do not even try to repair damaged camera lenses, offering to replace them with new ones. Which ultimately results in "a pretty penny", and sometimes even becomes unprofitable.
Lens in a digital camera is a complex optical-mechanical device that requires proper care. It is the quality of the resulting image that depends on the operation of the lens - clarity, sharpness, lack of distortion, etc. Camera lens repair accounts for the majority of all calls to digital camera repair shops. The cause of damage, in most cases, is improper operation or careless attitude to the device. The camera has been dropped, spilled, stepped on, or left to play with a child, all of which will eventually lead to serious camera lens failure and require professional repair. Full diagnostics and repair of the camera lens is required.
Lens problems are typical for almost all manufacturers of this type of electronics, which is why it is important to carry your camera to a service center if such a breakdown occurs. Especially often with damage to the retractable lens mechanism, Canon and Nikon digital cameras come to us for repair. This is due to the most complex assembly (mechanics, electronics, optics) of cameras from these manufacturers.
Damage to the camera display.
Display damage
A frequent case of mechanical impact on a digital camera is damage to the camera display. Dropping or impacting the LCD may crack or shatter, which will undoubtedly require professional repair or replacement. Most at risk of display damage and digital camera repairs that lack protective glass. A slight external influence (for example, light pressure) is enough for you to urgently resort to the help of qualified specialists. Repairing displays without a protective coating is a fairly common occurrence.
Here are a few characteristic features malfunctions of digital camera displays: cracks or spreading of liquid crystals, display of only part of the information on the display monitor or its complete absence. In any case, you need a quality repair, which is impossible without the use of high-precision equipment.
Camera flash repair.
Almost all modern cameras are equipped with a built-in flash that can illuminate the foreground. Flash malfunctions are among the most common problems with photographic equipment, while not causing much difficulty in the repair process, provided that it is carried out by a qualified specialist using modern equipment and using the latest technologies. Only if all these conditions are met, you are guaranteed a high-quality repair of flash cameras of cameras of any modification.
Most flash units today are equipped with additional features that include the red-eye reduction function. Professional and semi-professional cameras have a contact for connecting an external flash, the so-called hot shoe, which also often needs to be repaired. Damage to this seemingly insignificant element can lead to a complete failure of the digital camera flash. Shoe failure is the most common flash problem. This can happen due to banal negligence or careless use.
To maintain the full operation of your digital camera, it is necessary from time to time to visit specialized service centers, where experienced specialists will carry out general maintenance work and check the flash lamps and the flash mounting mechanism, that is, the shoe.
Repair of camera interfaces.
In addition to the varieties described above, there are also frequent problems in the interfaces of this electronic device, which include the USB connector (Universal Serial Bus), audio outputs and video outputs of cameras. Damage to at least one of these elements, important for external access, can seriously spoil the mood at the most exciting moment. Camera interfaces can be damaged by inaccurate use of the device, regular bumps, drops, and frequent use of connectors, which contributes to the rapid wear of elements. Repair of the camera interface in this case consists in replacing a loose connector and does not present any particular difficulties with the necessary skills and abilities. Compliance with the manufacturer's recommendations for the care, storage and use of your camera will help prevent unforeseen breakdowns, save on repairs and extend the life of your camera. Care of the camera includes several elementary rules: respect for the device, protection from drops and shocks, and prevention of sand or moisture getting inside.
Control board repair
This problem is not among the most popular, it accounts for only a small percentage of the total number of all works, but, nevertheless, it has a place to be. This type of damage occurs when liquid is spilled onto the control panel or when it hits a hard surface. The consequences can be quite deplorable, because it is with the help of the board mechanisms that all the numerous functions of the software of any digital camera are controlled. The lack of response when pressing the camera control buttons or their inadequate operation most likely indicates a malfunction of the control board caused by moisture or heavy condensation inside the camera body. Some panel buttons may fail, or the camera does not turn on completely and does not respond to any actions of the owner, you must contact the service center. In this case, you simply need the help of a qualified specialist who, as a result of a complete diagnosis of the camera, will be able to accurately determine the cause of the malfunction and repair it. If it turns out that the problem is a malfunction of the control board, then the service center masters will repair the damage by component repair of this element, or replace it with a new one.
Malfunction of the power circuit or power connectors of the camera and its repair.
Most modern digital cameras are equipped with rechargeable batteries that allow you to use the device for a long time without additional power. Over time, they either wear out or become unusable as a result of the negligent attitude of the owner. As a result, the camera power system may require technical diagnostics. We carry out all types of work on the repair of cameras and the replacement of power connectors and other circuit components.
The reason for the repair of the camera is a broken microphone.
Modern digital cameras have all the features of a real camcorder, capable of producing continuous recording, in a volume that allows a memory card, and at the same time record sounds. In most cameras different models, manufacturers and price category, today there is a built-in microphone, which, like other electronic and mechanical elements of the camera, tends to break. And, instead of children's voices, when watching a recording of a New Year's party, you hear at best a hiss, and at worst - an oppressive silence. To prevent such a malfunction, it is enough to replace the defective element (repair the camera microphone), in our case it is the camera microphone, and enjoy the happy moments of life.
Both amateurs and professional photographers are faced with the fact that the SLR gives an error or photographs are no longer as high quality as they used to be. If the user did not drop, did not “drown” photographic equipment, then it is difficult to determine the cause “on the move”. To help with this, we have reviewed the classic malfunctions that occur with SLR cameras in this article. Read on to find out how to determine the cause, when you can fix the problem yourself, and when you should “fly” to the workshop.
Common Camera Problems: Causes, Diagnosis and Troubleshooting
Depending on the type of problem, the method of checking the camera is determined: diagnostics will help determine why the camera is not working.
Classic malfunctions that are inherent in cameras arise either due to assembly features, or due to time, dust and water ingress. By default, the most common problems with the camera are that the user cannot turn on the camera, the image quality is reduced, the flash does not work, or the shutter does not work.
Also, photographers are faced with a typical problem, which lies in the breakage of the screen. This happens more often with displays that support touch-type input: it becomes impossible to control the camera.
The camera does not turn on
Often photographers turn to a service center or specialized forums with a problem related to turning on the camera. There are several reasons why the device cannot be turned on: the device was dropped to the ground, hit, drowned in water, there were problems with the battery or.

How to find where the problem is?
To find out why the user does not turn on the camera, you should check the battery. It is advisable to supply a replacement that is definitely working to make sure the battery is the problem.
If there is no substitute, you must use a tester: the user measures the level of charge. If the value indicated is higher than the tester, then the battery is broken and will have to be changed.
It happens that a failed flash drive does not allow the camera to work correctly and even turn on. The user can find out that the matter is in a flash card only by changing it to a working one.
Important: just like a flash card, the lens affects the ability of the camera to turn on. To make sure that the matter is in optics, put a replacement option.
If, after the manipulations made by the user, the camera still does not turn on, it is necessary to check whether all covers are closed tightly enough: a loose or broken latch prevents the microswitches from being pressed.
Here are mini-problems that do not require the photographer to take the camera apart to diagnose. If all of the above components of the camera work, then the device will have to be disassembled.

Features of diagnostics and repair of cameras that are not included
Turn-on problems also occur due to the breakdown of the microswitches themselves. Checking the sensors for serviceability is possible only when disassembling the camera. Having disassembled the camera, a repairman or an ordinary user finds sensors that serve to switch the main functions of the camera among themselves, and “rings” them with a tester.
Are the micro switches OK? - It's about pay.
The most frequent breakdown, which the user can detect and fix only after disassembling, lies in the board. Repairing the main board on your own is not easy, but it all depends on the breakdown. The board contains fuses that fail over time: they are not repaired, but replaced with new ones.
When repairing and diagnosing at a service center, the master uses an oscilloscope, with which he checks the correctness of the pulses emitted by the elements of the camera. After checking the components and determining why the camera does not work, the master names the terms and price of the repair, which depends on the cost of the part and the level of complexity of the work.
Shutter not working

Incorrect functioning of the camera, which belongs to the type of SLR, is caused by a broken shutter. It is not difficult to determine that this is the case: a shutter malfunction leads to a “black picture” (images are not viewed - only a black background) - the matrix does not light up.
Important: when the shutter is stuck, only system-type data is displayed on the display, and on a black background, even if the screen is color. The flash is working at this moment.
How to determine that the case is in the shutter
It only takes two steps to make sure that the camera is malfunctioning due to a stuck shutter.
- Seal the flash with electrical tape, colored tape (the limiter option, which is used for apartment repairs, is suitable).
- Try taking a photo while looking into the camera lens.
If the shutter is working properly, then the user will see the shutter moving in the lens. But if the hole, which is located in the center of the lens, is closed, and no movement is observed during the picture, the shutter is stuck.
Features of repairing the shutter of a SLR camera
To begin with, the photographer should try to fix the DSLR shutter without disassembling the camera. To fix the problem yourself, the user will need to take an object equipped with a rubberized sheath: a screwdriver handle equipped with a rubberized coating will do.
The user needs to press the “shutter” and tap the handle on the side or bottom of the camera casing. By doing this, the photographer will eliminate sticking.
Important: if the manipulations described above do not help, the shutter needs to be cleaned. To do this, you have to disassemble the lens. Trust this procedure to a professional.
Lens breakage

The lens jams if sand enters the gaps: the problem is corrected by disassembling and cleaning. The camera is cracking, and its motor is making noise, if the photographer has problems focusing, it's about.
The user, including the camera, hears gears crackle or buzz, but the lens does not move out, which means that the camera was dropped / knocked, which caused damage to the drive gearbox (the position of the mechanical parts was disturbed), or the gears related to the gearbox simply wore out.
Important:the user has the opportunity to repair the fixings of the gear casing by handicraft, but the mechanical parts (gears) are not.
The lens remains motionless, but the user does not hear extraneous sounds - a breakdown in the drive motor. Unprotected and caught in snow or rain, the lens let water into the motor - a part that is not resistant to corrosion.
Because of this, the rotor, collector are oxidized and wedged, and contact with the brushes of the apparatus is broken. In this case, the oxidized components are cleaned, but if the malfunction is not eliminated, the parts, or even the entire optics, will have to be changed.
You should know: the camera turns on, and the lens extends to the end, but a message appears on the screen indicating an error - the problem is in the sensor. The problem is corrected as follows: the lens is disassembled, and the broken sensor is replaced with a new one.
The SLR camera focuses and photographs slowly, and the sharpness in the pictures is not enough - these problems are caused by a “dried” focus motor. So, the lubricant in the focusing mechanism freezes, so there is not enough of it for the lens to move. To fix this, you will have to disassemble the photo lens, clean the mechanism that relates to focusing from thickened grease, and lubricate it with a new one.
A consequence of the fact that the camera lens does not focus on the object is the ingress of water.
Scientific name: Picea
Common names: Spruce
General information:
From firs it is very good to form small and medium-sized bonsai. For beginners, spruces are not very suitable, as a lot of fine detail work must be done to make a natural bonsai. For the formation of bonsai, spruces grown in nature from the highlands are especially suitable, where the plants grow very slowly and develop beautiful powerful trunks. Thanks to many years of breeding work, a lot of dwarf forms of spruce trees have also been obtained, which are distinguished by an extremely dense form of growth. These varieties are also great. source material for bonsai, as they grow very slowly and most often form branches with dense needles. Often, after 3-4 years after the formation, full-fledged bonsai are obtained from them. Similar cultivars are "Nidiformis1" or "Pumila glauca1" in Norway spruce (Picea abies). The dwarf variety "Conica" ate gray (Picea glauca) is less suitable, because on inside branches poorly develop young shoots. Anyone wishing to form a bonsai of spruce with "Conica1" should use a small plant for this, which is easier to give the desired shape. Wintering: small and medium-sized spruce bonsai should overwinter under a film or in a greenhouse. containers can spend the winter outdoors, provided the plants are healthy.Use of wire: wire can be applied to spruces from September to April.The wire remains on the plant for about 2 years, after which it is removed and re-applied if necessary.On thin side branches the wire should be allowed to grow slightly into the bark, this will prevent stretching (elongation) of the formed branches.However, the wire should not grow into the bark so much that deep scars remain after its removal.
Some varieties suitable for bonsai are:
Piecea excelsa
- Looks like a fir tree. The crown is conical, branches drooping almost to the ground. The needles are needle-shaped, hard, shiny, dark green, located in a spiral around the shoot. Hanging cones, spindle-shaped, thin with red scales.
Picea glauca
- a low tree with a slender trunk tapering to the top, long spreading branches and a pyromidoidal crown. The needles are needle-shaped, gray-green, the cones are small, turn brown as they mature. Exhausts strong resinous aroma.
Peace nigra
- the crown is conical, narrow, dense. The needle needles are bluish-green, the cones are first red, then brown.
Picea jezoensis
- can reach a height of 50 m. A characteristic feature is the long crown. The needles are needle-shaped, green and shiny on the upper side, silver-white on the underside. The tips of the shoots are turned towards the tree itself. The buds are red, turning brown as they mature.
Pisea orientalis
- the trunk is straight, the crown is dense, pyromidal. The needles are very short, thick, not prickly, dark green. Violet cones with hard scales turn brown as they mature.
Temperature:
Many types of spruces start their growing season early, already at the end of winter. They are afraid of night and late frosts, but they love fresh air.
Lighting:
Bonsai formed from fir trees need a light location. Plants must be located at a considerable distance from buildings, walls and trees so that the lower and inner parts of the crown are not exposed. If possible, spruce bonsai should be placed on a raised platform so that they receive sufficient light from below as well.
Watering:
Spruces need slightly more water than all other conifers. They do not tolerate overdrying of an earthen coma, but also stagnation of water in containers. Water quality does not play a special role. Plants can be watered with tap water straight from the hose.
Top dressing:
Spruces that are well rooted in containers, but have not yet developed the desired stem thickness, can be fed with liquid fertilizer for the first time in spring, as it is absorbed by the plant faster and helps to get stronger shoots. After the appearance of leaves and young shoots, you can continue feeding organic fertilizers in powder form or in the form of pellets, since they are easier to dose correctly and the danger of overfeeding is much less. spruces can be transplanted from March to the end of April. The next transplant period is from September to October. In this case, care must be taken to ensure that the cutting of the roots is not too strong. Spruces are dug up in April, since it is at this time of the year that the rooting guarantee is highest. Old yamadori from highlands with complex root systems must be dug up gradually over several years to survive.
Transfer:
Spruces prefer slightly acidic, poor soil and tolerate short-term light waterlogging of an earthen clod, but do not put up with stagnant water in containers. Spruce bonsai soil mixes are somewhat different from those commonly used for other bonsai. For young plants, a mixture is prepared from rotted leafy soil, burnt clay granulate (grain size 2-4 mm) and Japanese clay (Akadama) of medium grain size in equal parts. For old and large bonsai, pure Japanese clay (coarse-grained) with a small addition of humus is used.
Pests and diseases:
Large pine weevil - galleries of passages are gnawed under the bark, needles and buds are eaten away. Control measures: the affected parts of the plant are cut and destroyed. At the first sign of damage, young plants are treated with an oil emulsion. In late March - early April, they are sprayed with insecticides.
Horntail wasp (horntail) - galleries of cylindrical passages in the trunk and skeletal branches. Control measures: During the emergence of adult insects, the plant is sprayed with insecticides.
Sawyers - the needles are eaten away, young shoots are deformed. Control measures: as soon as the shoots begin to lengthen, the plant is sprayed with insecticides.
Hermes - the formation of galls on the tops of young shoots. Control measures: at the end of winter, the plant is sprayed with mineral insecticides, at the beginning of spring - with organochlorine or organofluorine insecticides.
root nematodes.
Bark beetles.
Ognevka.
Leaf rollers.
Silkworms.
Aphids.
Browning of needles - the needles dry out, black pads appear on its underside. Control measures: affected plants are treated with fungicides. During planting, plants should not be placed too closely.
Septoria - the needles dry out. Black pads appear on the dried parts of the plant. Control measures: affected shoots are pruned and destroyed. The plant is sprayed with a fungicide based on copper sulphate.
Spruce cancer - the roots of the tree rot, become covered with a white bloom, the needles turn pale, turn yellow and dry out. Control measures: an earthen ball is shed with a fungicide based on cyben. It is necessary to avoid waterlogging the soil and feed the plant with a balanced fertilizer.
Rust.
Reproduction:
Seeds - collected from September to January, the cones are dried. In the gray spruce (Picea glauca), cones are harvested at the end of August or in September. The seeds are allowed to ripen in cones for as long as possible, and then germinated for 10 days in wet sand. Sowing is done in moist loose soil in April, when the seeds begin to germinate. Usually the first sprouts begin to germinate after 3 weeks. Seedlings are kept under glass, in a shaded, damp place. Glass is removed in June. Seedlings are transplanted into pots next spring.
Cuttings - apical cuttings are cut from the end of June to the beginning of August, cutting off annual shoots along the base with a budding knife. It is not necessary to remove needles from their lower part. Planted cuttings in a warm shaded place. Rooting can take up to 2 years.
Layering - to obtain layering, flexible branches are chosen.
Styles and shapes:
Spruces can be formed into very filigree and natural bonsai. Thanks to this, many forms are possible. With the exception of the broom style, almost all basic shapes can be formed from spruce.
Spruce is quite difficult to grow in the bonsai style, as it is necessary to constantly do a lot of small work on care and shaping. Shaping a spruce trunk is easy enough because of its flexibility.
Some species of Common Spruce (Picea abies) - "Nidiformis", "Pumila glass" and Spruce with gray (Picea glauca) - "Conica" are used as bonsai.
The soil:
Spruce is tolerant of nutrient-poor soil. Use the ratio clay soil and peat.
Lighting:
Light-loving plant. Grown outdoors all year round.
Temperature:
Grown at outdoor temperature, but in winter should be protected from extreme cold.
Watering:
Water spruce regularly in spring and summer, do not let the soil dry out in winter.
Top dressing:
Feed the spruce during the entire period of active growth, with early spring until autumn.
Formation:
Unlike others coniferous plants pinch spruce when young shoots grow a little. Prune old branches in January and February, during this period resin production is minimal. When applying the wire, make sure that it does not grow into the bark.
Buying a plant:
You can take a young plant in nature, but rooting is very rare, so get spruce in nurseries or specialized stores.
Pests and diseases:
Spruce is susceptible to all ailments of coniferous plants. In case of yellowing of the needles, it is possible to be affected by spruce-fir hermes. Pests are usually located on the underside of the needles and resemble cotton wool, to destroy it, treat the spruce with an antio or rogor solution.
Branches are treated with colloidal gray or Bordeaux liquid from rust (yellowing of needles, orange spots, swelling on the branches). If the disease does not go away, it is advisable to prune the affected branches, in last resort uproot the plant to stop the spread of the disease.