Installing a faucet in the bathroom with your own hands is an option for those who are used to doing everything themselves. In this case, you will have to learn not only about the correctness and sequence of performing this work, but also take into account all the nuances and features. Only in this case can you replace your faucet yourself and efficiently. The work is actually not difficult, but responsible. Let's take a closer look at how to properly install a faucet in the bathroom and where to even start?
Insulation and tools
Before installing a faucet in the bathroom, you need to prepare some tools and consumables. In order for the work to be done quickly and efficiently, you will need the following:
- pliers;
- adjustable wrench;
- masking tape;
- Teflon sealing tape.

Masking tape is used to wrap the mounting nuts to prevent damage to the nickel plating during installation or removal. The key will be needed to dismantle the old mixer. In most cases, Teflon tape, called fumka (FUM), is used for waterproofing. Despite the availability of modern materials, some plumbers use the heel the old fashioned way, but the fumka is still preferable.
Insulation is wrapped around the threads clockwise in several layers. When screwing on the nut, the tape will be pressed in, sealing the connection. It is important to remember in which direction to wind the insulation. Otherwise, it will slip and you will have to wind it again - the old tape is removed and a new one is wound in the right direction. In most cases, the listed tools and materials are quite enough to replace or install a faucet in the bathroom.
Installation methods and preparation for installation
Its installation will depend on where you plan to place the new product. For example, it is possible to embed a mixer or mount it on a wall. If we consider the first option, then it can be built directly into the wall or installed on the side of the bathtub. You can mount the mixer on a stand. This installation is possible if there is free space in the bathroom or if pipes are laid through the floor. The most expensive products today include rack-type faucets, the choice of which is very diverse.

The faucet is installed on the wall when the washbasin and bathtub are located next to each other. This option allows, if necessary, dismantling without much difficulty, for example, to replace the mixer. The advantage of wall mounting is a more attractive appearance, but there will be no access to the connecting hoses. It is worth noting that if the sink or sink is easily removed, then the faucet is attached first, and only then the plumbing fixture.
Before installing a faucet in the bathroom, you need to prepare the device itself, which will be discussed below, as well as water sockets in the case of wall mounting. Basically, the fittings for installing the mixer are already present. If they are not there or old pipes are being replaced, then when installing new ones, the following important points must be taken into account:
- hot water is supplied to the left, cold water to the right;
- the distance between the fitting axes should be 150 mm;
- if the bathroom faucet is installed on the side, then the optimal height will be 150-200 mm;
- To disguise the faucet connection area, the fittings should be recessed into the wall.
Dismantling the old and assembling a new mixer
Removing the old faucet in the bathroom should not cause any problems. The main thing is to turn off the supply of cold and hot water to the mixer. Next, you will need to drain the water remaining in the tap, and you can begin to remove it. When dismantling, you do not need to exert much effort so as not to damage the threaded connection on the fitting located on the wall.
If the thread is damaged, you will need to disassemble part of the wall to remove the fitting. There is no other way to replace this element. Therefore, you need to be careful and don’t rush. After disassembling the old tap, you need to thoroughly clean the fittings of insulation.

In most cases, products are sold unassembled, so the bathroom faucet will need to be assembled after purchase. At the time of purchase, you need to check the completeness. All items must be packed in cellophane. The complete kit should consist of the following parts:
- main block;
- gander;
- gaskets;
- decorative cups;
- eccentrics;
- shower heads;
- hose
During assembly, nuts may need to be tightened. To avoid damaging the surface, wrap the wrench jaws or the nut itself with electrical tape or masking tape in several layers. If the part is damaged, then replacing it will be problematic.
Installation process
Let's figure out how to install a faucet in the bathroom? First you need to screw in the eccentrics. A distance of 150 mm is left between the centers of the inlet fittings. If installation is carried out with an error, it will be necessary to install transition eccentrics. A sealant is wound around the threaded connection and screwed into the fittings.

Next, the crane body is fastened, and it is necessary to control the horizontality. To keep the connection point with the water main hidden, decorative cups are used. When connecting the faucet in the bathroom, be sure to insert rubber seals to prevent water leakage. Then you can begin the final installation of the valve body, which boils down to tightening the nuts, which ensures a reliable connection.

After installing the mixer in the bathtub, you will need to check the correct installation, for which cold and hot water is supplied. If there is a leak, then the nuts need to be tightened further, but the main thing is not to overdo it. The gander is attached next. Water will flow through it. It is attached from below to the installed mixer body using a threaded connection with a nut.

The hose and watering can are fixed from above. The shower hose is secured to the faucet using a standard nut. To assemble it with a watering can, a cone-shaped connection is used. When assembling, do not forget to install the O-ring. Next, choose the place where the watering can holder will be mounted on the wall and drill holes. Screws are used for fixation. This was the final stage of installing the mixer.
How to install a faucet on the side?
In addition to what is described above, it is possible to install the mixer on a bathtub or sink. This is usually done on board the specified plumbing fixtures. Installation can be carried out by the following types of pipes:
- Metal. Provides a high quality connection. Installation is possible in a wall or concrete. The installation is labor-intensive and complex.
- Heat-resistant metal-plastic. Used for a reliable connection, but used quite rarely.
- Flexible hose. Refers to a simple and inexpensive option for connecting the water main to the mixer. The connection is characterized by reliability and flexibility. But such a hose should not be placed in concrete or a wall because it will fail relatively quickly.

How to install a faucet on a sink or bathtub? First you need to find out and determine the length of the supply pipes. To do this, the faucet must be temporarily attached to the sink or bathtub. Afterwards, measure the distance between the inlet holes of the mixer to which water will be supplied, taking into account angles and bends. Basically, a flexible hose is used for supply. It is necessary to avoid a tense state, but there is no need for too much length. Attention should be paid not only to the dimensions, but also to the quality of the parts.
- The rubber seals are mounted in place, and the supply hoses are secured to the tap with nuts.
- A rubber liner is placed into a special recess in the mixer body for sealing.
- The supply hoses are passed into the hole in the bowl, and a gasket is placed between the bowl and the mixer. Afterwards the device is mounted in place.
- The device is fixed using a bolt and nut. Care must be taken to ensure that the installation is secure. Next, tighten the nuts, but the applied forces should be controlled so as not to overtighten.

The subsequent steps are similar to mounting the device on the wall. Installing a faucet in a bathroom is not a complicated procedure. The main thing is to adhere to the recommendations described above. Also, before assembling the mixer, you need to read the instructions supplied with the device. This will avoid unforeseen situations and damage to the product.
Video instruction
Installing a faucet in the kitchen with your own hands is a common task that virtually every man faces at least once in his life. The rules for installing ball valves are not particularly complicated, however, you need to know the procedure and treat the work responsibly.
We decided to help you understand this issue and have compiled detailed instructions.
What you need to know before installation
Set of consumables and tools

Before you begin installing the mixer, you need to decide the availability of all consumables and necessary tools. For work you will need a small set of them, however, in addition to this you need to provide it.
Some sets of taps are equipped with flexible water supply hoses, but they are not always of a satisfactory level of quality and the required length. Products made from silumin are considered the most unsuccessful.
In order to find out its presence, it is enough to hold the hose in your fist and pull it through your palm with some hardening: if a gray mark remains on the skin, then it is a silumin hose - it is better to replace it with a better one.

Note! It is better to measure the distance from the mixer to the water pipes in advance. The length of flexible hoses must be greater than this distance so that they freely reach the pipes and are installed without tension.
In addition to the hoses, we will need FUM sealing tape or tow. This is necessary to seal the threaded connections when connecting hoses to pipes so that there are no leaks.

Installing a ball valve with your own hands will require the following tools:
- Adjustable water wrench. Can be replaced with a set of keys of various calibers. If the installation will be carried out on a sink mounted into the countertop, then it is more ergonomic to use ring or tubular wrenches; if the sink has not yet been installed, you can get by with open-end wrenches;
- For some models of mixers, a screwdriver and a hexagon may be useful; in addition, it is convenient to use a screwdriver to create some procedures, for example, placing sealing gaskets in the corresponding grooves;
- Pliers, a file, a hammer and other standard tools will not be a hindrance, but will most likely help you in your work.
Note! To seal tow, it is better to use a special plumbing paste, especially since its price is cheap. You should not apply oil-based paint to the connection, as this will cause problems later when replacing or repairing the faucet.
Types of faucets

When choosing a mixer, you need to know what specific main types of these devices exist and what their differences are.
It is possible to distinguish three main groups:
- Taps with worm-type rubber seals and locking mechanisms;
- Cranes with ceramic crane axle boxes;
- Single lever faucets with ceramic cartridge.
The first are the most classic and familiar to the older generation models, in which the valve is locked with a thread.
The main difference is that to lock it you need to make a couple of revolutions of the flywheel. Such products are optimally adapted to low-quality water, but they often make noise and leak.

Models with ceramic crane axle boxes are distinguished by a half-turn stroke of the flywheel, they are more reliable and ergonomic. Along with this, this class of plumbing fixtures is more demanding on the quality of water; therefore, for their operation, a filter is needed at the entrance to the apartment.

Single lever faucets are the highest quality and most durable. They are easy to use, completely silent and quite reliable. The only trouble that may arise is a discrepancy between the water supply pressure and the manufacturer’s design requirements.

Note! Despite the fact that the estimate for installing a ball valve is small, it is still better to do the work yourself, so you will be confident in the quality of the installation and, in the event of a breakdown, you can quickly figure out how to fix it.
Installation of a faucet on a sink

Now let's chat about how to install a faucet in the kitchen.
For your convenience, we have compiled step-by-step instructions:
- Turn off the water supply, remove the mixer from the box, read the manufacturer's instructions and attach the gander to the body. On the reverse side, screw the flexible hoses into the corresponding holes;

- We put the rubber o-ring on the hoses and insert it into the groove on the base of the mixer, where it will fit against the sink;

- We stretch the hoses into the hole in the sink body and place the faucet in the installation position, covering the hole in the sink with its base. We take a threaded pin (there are possibly 2 of them) and screw it into the hole on the base of the mixer;

- We install the sealing gasket, then take the mounting bracket, put it on the pin and tighten it with a nut. Make sure to tighten it so that the faucet rests firmly on the washbasin and does not wobble, but there is no need to tighten it beyond that;

- If the sink is not installed, we will install it. After this, we wrap FUM tape around the couplings of the water pipes and screw on the ends of the flexible hoses. Tighten with an adjustable wrench.

- We connect the sewer drain, turn on the water supply and control the operation of the tap.

Note! Do not mix up warm and cold water hoses when installing. They must be connected in accordance with the markings on the wings of the device.
Conclusion
Installing a faucet on a sink is a fairly simple, but still important task that requires a certain set of actions. The rules outlined will help you avoid common inaccuracies, and the video in this article will make it easier to understand the instructions.
The kitchen faucet is one of the most intensively used plumbing equipment. Any, even the highest quality, device of this kind requires some maintenance over time - replacing a leaking cartridge or loose valve axle boxes. However, it also happens that the body itself becomes unusable from the kneader - from constant exposure to water, irreversible processes of surface erosion begin, the threads in the sockets for valves or cartridges are “eaten”, and the chrome coating is erased. And if the product is made of low-quality silumin, then complete destruction of the body with the appearance of cracks and breaking off fragments is quite possible.
It may not be such a fatal situation - the owners simply decided to update the interior of the kitchen, and this issue cannot be solved without installing new modern plumbing fixtures. was described in a special article on our portal. Now we will talk about how to change the faucet in the kitchen yourself, without calling a specialist.
This process , Although and very responsible, but still quite accessible to the average apartment owner.
What you need for work
To carry out work on replacing the mixer, you must immediately prepare the necessary components, accessories, tools, and consumables.
- We assume that the mixer has already been purchased. However, you definitely need to check whether the flexible hoses included in the kit are long enough. As a rule, those that come in the kit have only 300 mm, which may clearly not be enough. In addition, if the faucet is not “branded”, then the quality of these metal braided hoses usually leaves much to be desired, and they should be replaced immediately.

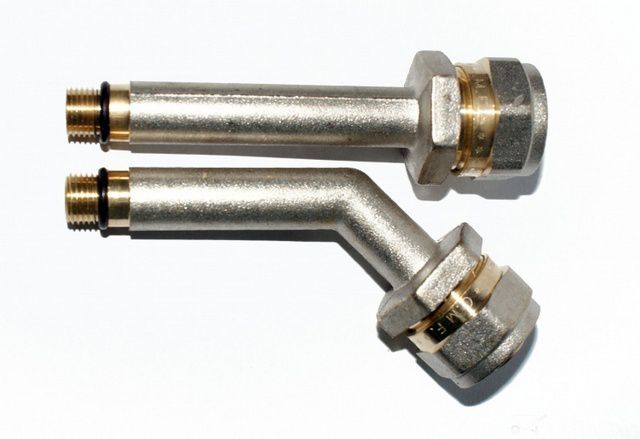
When choosing and purchasing such hoses, be sure to pay attention to the fact that the length of their fitting (otherwise it is often called a needle) should be different - this will make assembly easier, since the hexagons will not interfere with each other.
In addition, you need to choose the right type of threaded connection to the water pipe. This applies to both the diameter and the type of threaded part (“male” or “female”). Most often, of course, “female” hoses with a ½-inch nut are used - for direct connection in the corresponding pipe. Nevertheless, options are possible, for example, if a manifold comb or a ball valve with a “female” outlet is installed.
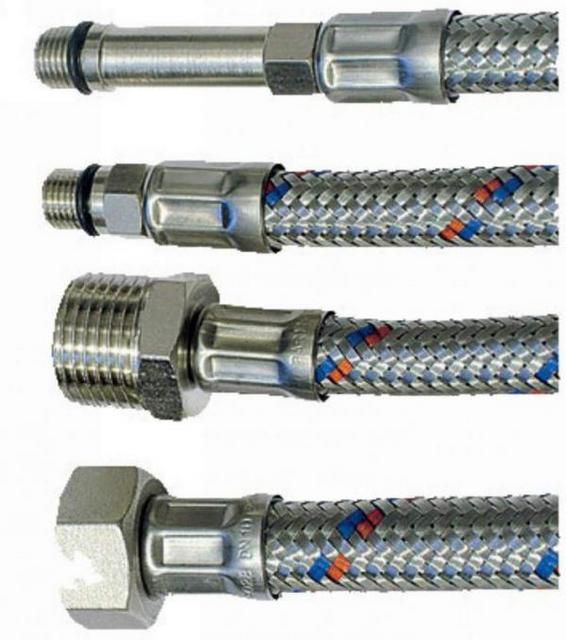
The hoses should not be placed under tension or tightness, but they should not be purchased with a very large margin of length. When pressure changes (opening and closing the tap), they will twitch and vibrate, and this causes rapid wear of the rubber tube located under the steel braid. It begins to wear out and may leak in the near future.
 Schematic diagram of a flexible braided hose
 Corrugated stainless hoses are more durable and reliable in this regard.
They are, of course, more expensive, and they are somewhat more difficult to install. But such hoses have excellent rigidity - they will retain the bend given to them during installation.

Some craftsmen prefer to make do with flexible hoses, making the water supply to the mixer from a metal-plastic pipe. To do this, you need to purchase a set of fittings with fittings for metal plastic.
Such a line, of course, is also more difficult to implement than with flexible hoses, but once you have installed such pipes, you won’t have to worry about this section in the future.

Video: how to choose really high-quality hoses
- Tools for work you will need:
- Spanners. It is guaranteed that you will need a 10 and 22 × 24 wrench. Very often, fastening nuts on studs require an 11 wrench. If the mixer is attached to the sink with a large diameter nut, then it is better to prepare an adjustable wrench.
— Screwdrivers with straight and figured tips.
— Pliers.
— In some cases, you cannot do without a gas key.
— If installation will be carried out on a new sink, which does not yet have a hole, or on a countertop, you will need an electric drill with appropriate bits (usually with a diameter of 35 mm).
— To work in low-light conditions, under the sink, you will most likely need a backlight - a flashlight.
- Materials you may need:
— Seals for threaded connections. They will be needed when there is a need to install a coupling, adapter on a water pipe, pack a fitting under metal plastic, etc. You should not trust fum tape - it is better to use ordinary flax tow and sealing paste (such as Unipak) - such a connection will be guaranteed against leakage.
— If the installation of the mixer will be carried out with temporary dismantling of the sink, then it is necessary to prepare silicone sealant and, of course, a syringe for ease of application.
— situations are possible when old “stuck” threaded connections cannot be disassembled. Can help in this case atomizing cylinder of universal lubricant “WD-40”.
Once everything is prepared, you can proceed to further actions.
Prices for popular faucet models
Faucets
Dismantling the old mixer and preparatory work
- Before starting work directly under the kitchen sink, it is necessary to: Firstly, turn off the supply of both cold and hot water. To do this, the valves at the entrance to the apartment are closed, or, if this is provided for by the internal wiring system, the water supply from the collector to the kitchen is shut off. Sometimes taps are installed directly under the sink. Of course, theoretically it is possible to block only them. However, practice shows that when working in tight spaces, the possibility of accidentally opening a ball valve with an awkward movement of the hand or elbow cannot be ruled out. To prevent such a misunderstanding, it is better to completely shut off the water supply to the kitchen.
- After the valves are closed, you should open the tap on the mixer - this normalizes the pressure in the pipe. It is necessary to place a basin or other container of suitable dimensions under the area where the old hoses are connected. The hoses are twisted, allowing the remaining water in the pipes to escape.
- Now you need to remove the old one. This matter is not as simple as it might seem at first glance.
— Firstly, working in an awkward position, in a very cramped space, lying on your back is very difficult, especially if the sink is embedded in a kitchen cabinet.
— Secondly, the “classic” location of the mixer is between the wall and the sink bowl. In such a narrow niche it is very difficult to use a wrench - there is simply no room for it to be placed and turned.
- Thirdly, almost certainly all the connections have rusted due to time and dampness, become “stuck” and will not easily give in.

In numerous Internet articles on replacing the faucet, this stage is sometimes described in passing, like “unscrew the pin with a screwdriver and pull out the faucet.” Experienced craftsmen know the value of such statements - with a very high degree of probability, these same studs will not yield to a screwdriver; rather, the rusted slot will be cut off. This means you will need a key, and the “convenience” of working with it in these conditions has already been discussed.
Which exit? If it is possible to remove the sink (and this is possible in the vast majority of cases), then there is no need to hesitate - both the dismantling and subsequent installation of the mixer will be completed faster and with much better quality. It is better to spend a very small amount on purchasing sealant and carry out fairly simple steps to remove the sink and then install it in place - in the end you will still win.

- To dismantle the sink, of course, you will need to disconnect it from the sewer. You can remove the flexible corrugated hose from the sewer pipe, or, which is probably more convenient for further work, simply unscrew the retaining ring on the siphon and remove this “glass” from the drain pipe of the sink.
- Now, having sat comfortably, it will not be difficult to remove the spent yours mixer. Depending on its design, either a large lock nut or studs are unscrewed. You may need to spray these assemblies with WD-40 to get them to yield. There are situations when this does not help - then you will have to take radical measures - cut them off with a hacksaw or a grinder. The main thing is not to damage the sink.
Sometimes you have to resort to cutting with a grinder when replacing an old type mixer installed on a rigid liner made of steel pipes.

It is extremely difficult to disassemble rusted or covered with several layers of paint. Therefore, it may be more profitable to simply cut off the higher threaded part. Next - by circumstances. If you manage to free a high-quality threaded pipe for further connection of a flexible hose, then the issue becomes simpler. If not, then, apparently, you will also have to cut the thread with a tool.
- In order not to delay until later, it is necessary to immediately inspect the condition of the water pipes suitable for washing, in particular, those threaded sections on which flexible hoses are planned to be screwed. In order for the hose gasket to fit tightly to the pipe cut, it must be smooth around the entire circumference, not have sharp or protruding edges, or geometry violations due to corrosive effects. If in doubt, it is better to “pack” a factory-made threaded extension in this place - this will guarantee a reliable connection to the hose.
 It is advisable to “update” the threads on pipes by installing similar extensions
 Installation is carried out on tow, the fibers of which are wound clockwise along the threads on the pipe, and then coated with sealing paste. The extension cord is tightened with an open-end or gas wrench until it stops.
- If you wish and have the funds, you can immediately install shut-off valves if they were not installed previously. This will allow you to subsequently carry out any repair work in the kitchen, for example, in the event of an emergency, without turning off the general home water supply network.
- If you plan to supply water with metal-plastic pipes, it makes sense to immediately “pack” transition fittings onto the steel pipes.
- If you intend to install a new faucet on an old sink, then you must thoroughly clean the area around the mounting hole from scale build-up, accumulated dirt, traces of rust, etc. This cleaning is carried out on both the front and bottom sides.
- If you plan to install a new sink, you must, of course, immediately try to purchase one that already has an installation hole. However, some models are not equipped with it, and appropriate measures will have to be taken.
If the sink is made of stainless steel, then a special tool is used for this, which cuts perfectly even holes in the metal up to 1 mm thick.

The diameter is selected based on the mixer model. So, if it is mounted on studs, then 28 or 32 mm will be enough. When attaching to a nut, the hole must have a diameter of 35 mm.
 The process of cutting a hole is simple
 It is easy to use - just drill a hole with a diameter of 8 mm in the intended location. The device is inserted with the cutting part from below, twisted with a bolt so that the cutting edges fit tightly to the metal. Then, turning the bolt with a wrench, ensure the rotation of the knives in a circle.
The situation is more complicated if the sink is ceramic. To cut the hole in this case, you will need a diamond crown. But even its presence in the home arsenal does not guarantee success - such a sink can easily be damaged if there is no experience in such work.
Advice - in both cases, it is better to turn to professionals. Usually, good plumbing salons will definitely tell you where and how this can be done, and in some cases such a service can even be provided on the spot.

If the mixer is installed on a countertop, then a hole is drilled in it. To do this, you can use an electric drill with a hole saw Ø 28 or 32 mm. Making the required hole with such a tool in a wood composite panel will not be difficult.
Installation of a new mixer
As has already been mentioned several times in the article, faucet models may differ in the way they are attached to the surface of the sink or countertop.

- The diagram shows a mixer that is mounted on threaded rods. The kit of such a product includes the studs themselves with brass nuts, a crescent-shaped clamp with holes for the studs and a rubber or polymer gasket of the same configuration.

There are models of mixers that use only one pin, but such a design will not be particularly stable (rotation around the axis is not excluded), and it is better to purchase one with two.

This design ensures reliable installation on surfaces up to 30 ÷ 35 mm thick, which is especially important when installing the mixer on a countertop.
- Another option is that the mixer has a cylindrical threaded part and a nut at the bottom, usually M 34.

Such models are more suitable for installation on a metal sink. It is important that there is no complex relief configuration at the bottom in the hole area - an absolutely flat area is necessary, otherwise a tight fit and reliable fixation will not be achieved.
Installation of different types of mixers has its own characteristics.
A. Installation of a mixer with mounting on nut
The elongated lower cylindrical part will not interfere with the screwing of flexible hoses, so installation begins, in fact, with attaching the mixer itself to the sink.
- The faucet kit always includes a rubber sealing ring, and there is a special groove for it at the lower end of the body. The first step is to install the gasket into this groove.

- The threaded cylindrical part is inserted into the hole in the sink. In this case, it is necessary to ensure that the rubber ring remains in place and does not move.

- Then, a wide rubber gasket is installed below, which should also be included in the delivery set.
 The sealing gasket is put in place...
 - The brass fixing nut is screwed on. It has a kind of “skirt” - a washer-shaped extension that will provide maximum pressure through the already installed rubber gasket.
 ...and then the clamping nut...
 - The nut is tightened with an adjustable wrench so as to ensure that the mixer does not move on the sink. In this case, it is necessary to check the correct orientation of the spout - it should be positioned so that the sectors of rotation to the left and right from the central position are equal, and the switch lever or valves are positioned exactly relative to the sink. When the mixer is positioned at an angle, the spout position is selected diagonally.
 ... which is tightened with a key, fixing the position of the mixer on the sink
 - Adjusting the position is easy - you can loosen the nut, align the mixer and fix it again.
- Now you can proceed to installing the hoses. To begin, screw in a hose with a short fitting and tighten it with a 10mm wrench.

No winding of the threaded part of the fitting with tow or fum tape, as a rule, not required - it has one or two sealing rings, which should ensure reliable sealing. The fitting is screwed in all the way with medium force - it is dangerous to overtighten, as the rubber ring may be damaged. Usually, hand effort is enough, and only then no more than one turn with the key.
 ... and then, in the same way - with an extended
 - The next step is to install the second hose in the same way - with an extended fitting.
- If you plan to supply water through a metal-plastic pipe, then the fittings with fittings are screwed in in the following sequence - first the one with a bend, and then the straight one.
- After the hoses (fittings) are screwed in, the sink can be installed in place.
Find out how to choose the right one from our new article.
B. Installation of a mixer with mounting on hairpins
The peculiarity of the installation in this case is that the hoses are screwed into the hole in the countertop or sink before installing the mixer, otherwise it will not be possible to tighten it properly.
- First, the brass nuts are removed from the studs, and the studs themselves are screwed into the corresponding holes at the bottom end of the mixer. The studs usually have slots for a straight or figured screwdriver, but, as a rule, they are easily tightened by hand, without much effort. A strong tightening is not needed here - it is enough to simply screw them all the way to a depth of 8 ÷ 10 mm so that they stand steadily, without play.

You can immediately try on how the shaped gasket and pressure plate will fit onto the studs, but then these elements should be removed - they will be installed later.
- Both hoses are threaded into the hole in the sink (countertop) with the fittings facing up.
- Be sure to check the presence and correct installation of the sealing ring on the mixer body - exactly as described above.
- The next step is to screw in the flexible hose fittings. The sequence of work does not change - first short, then extended.
- Mixer with connected hoses and screwed-in pins are inserted into the installation hole of the sink or countertop.

- From below, a shaped gasket is first put on the studs, and then a metal pressure plate. The brass nuts are baited and tightened by hand as far as possible.

- After checking the correct location of the sealing ring on the body and the direction of the spout, the nuts are tightened with a 10 (sometimes 11) wrench until they stop, so that the mixer is securely fixed to the surface, without the slightest play.
 Neatly installed faucet - bottom view
 - It is important to ensure that there is no gap left near the housing, not covered with gasket– this sometimes happens when the hole in the sink is too large and the mixer is not centered correctly in it.
That's it, the mixer is installed, you can install the sink in place.
Let us repeat that all of the above actions, of course, can be carried out under certain conditions and due dexterity without dismantling the sink, but this is unnecessary difficulty.
Find out which one to choose, as well as consider the nuances, from our new article.
Video - Installing a faucet in the kitchen
Prices for components for mixers
Accessories for faucets
Connecting the mixer to the water supply
Installation of a sink is a separate topic that requires detailed consideration in a dedicated article. We can only note that if it is mortise and mounted in the old place, then a strip of sealant must be applied to the cleaned surface of the countertop around the perimeter of the installation. After pressing, it should reliably close the gap to prevent water from penetrating through it.

If the sink is overhead and adjacent to the wall, then after installing it, the gap between them is also sealed with sealant.
Now all that remains is to connect the hoses to the water pipes. Hose nuts are usually already equipped with rubber gaskets, and no rewinding or excessive force is required to securely seal the connection. On the contrary, tightening it too tightly can lead to the destruction of the gasket and the appearance of a leak. It is enough to tighten it by hand until it stops, and then tighten it only ½ turn with a 22 or 24 key.

Of course, there will be some fuss with the metal-plastic eyeliner a little more– it is necessary to carefully measure the required segment, give it the required bend, and then tighten it in the appropriate compression fittings.
Video: connecting a mixer with a rigid connection
Usually, when connecting hoses or supply pipes, the following scheme is followed: on the left is hot water, on the right is cold.
If the sink was removed, then do not forget to connect it back to the sewer by replacing the siphon and inserting a corrugated hose with a sealing collar into the designated outlet of the sewer pipe.
In fact, that’s it, you can turn on the water supply and try the mixer in operation. There is, however, one more subtlety - it is recommended to start by pouring water with the tip removed - the aerator. The fact is that small inclusions can accumulate in pipes, hoses, or even in the mixer itself, which can quickly clog the holes of this nozzle. After several liters of water have drained, it is easy to install the aerator in its normal place.
When starting up for the first time, be sure to check all connections for leaks. If there are signs of leakage, these deficiencies must be corrected immediately with a small tightening.
The article discussed the most common ways to install kitchen faucets. However, you may encounter more complex options.
- So, for example, if the faucet spout is a shower head on a retractable hose, then you will have to make another switching and adjustment.

At the bottom there will be a hose (position 1 in the diagram) with or without corrugated braiding, about 1.5 m long, with a fitting at the end. This fitting, after installing the mixer in its regular place, is screwed into the socket intended for it on the body. A sinker is installed on the most flexible hose (position 2) - it will return it to its place and hold it in this position, and at the same time will serve as a limiter on the length of the hose. The position of this sinker can be changed using a locking screw.
- Another option is when the mixer spout has two channels - for regular tap water and for purified drinking water. On such models, an additional fitting is provided (item 3) for connecting another hose coming from the system installed under the sink and for post-cleaning.

The mixer for drinking water is turned on using a separate tap or lever (item 4).
There are also more “sophisticated” schemes - with thermostats located under the sink, autonomous boilers, electronic control units, with mechanical traction connected to the drain plug of the sink bowl, and others. The installation technology in this case should be described in detail in the proposed product data sheet. However, if there are any ambiguities in this matter, you should not engage in amateur activities - it is better to invite a specialist.
The faucet is one of the important attributes of the kitchen and bathroom. It creates comfort for the owners and guests of the house and performs an aesthetic function. Modern sets are created from various materials that fit harmoniously into any interior.
The plumbing market today is quite extensive, so an inexperienced person will most likely get confused. In addition to choosing the right option, you should pay attention to installation. If you have never done this yourself, then it is better to call a plumber, and for a small fee he will do everything carefully and quickly. After all, in this matter everything depends not only on the availability of tools, but also on the type of fastening of the mixer. Skills, knowledge and availability of required components are required.
Various models and design options, a wide range of product prices give the potential buyer the opportunity to choose the right item.
First you need to understand the types of mixers and find out how they differ.
The initial parameter during selection is the length of the spout. Most often, shorter options (20-25 cm) are chosen for bathrooms, but elongated ones (30 cm or more) are well suited for the kitchen. There are also shortened versions that are compact and neat. You should also immediately decide what will be more functionally convenient: if the tap is rotary or fixed.
According to the form, there are two main options: cascade and traditional. They differ only in the size of the liner section. The most common pipe shapes are oval, triangular and round.
It is important to pay attention to the placement of the faucet in the bathroom. For example, if the sink and bathtub are adjacent, then the best option may be one elongated swivel faucet, which will be located right in the middle. In general, the choice is individual, and everyone decides for themselves.
Types of faucets
Based on functionality, they can all be divided into two types: valve and ball. The first ones are well known to customers, since they are most often used to work with hard chlorinated water, which is supplied to apartments. Repair of this option usually consists of one replacement of the seal.
Ball ones are more common than single lever ones. They appeared on the domestic market recently and are distinguished by their ease of use and elegance. To adjust the temperature and pressure of the water supply, the lever is simply raised or lowered and then turned in the desired direction. A significant disadvantage of this model is the low tolerance of salt deposits in the water. Over time, they clog the mixer module, which negatively affects its further operation. Its repair consists of completely replacing the ball module. The cost of work is much more expensive than that of valve devices.To reduce the risk of plaque on the ball system, special filters are installed. As a result, already purified water is supplied to the tap. Thanks to this mechanism, the mixer works much longer.
- Single lever mixer.
A device that has a lever that allows you to control the pressure and temperature of the water. It's easy to use. Its cartridge is usually ceramic or metal and serves as a seal and also distributes the water stream.
- Two-valve mixer.
In this case, the water supply is adjusted using two handles, which are placed on the sides of the tap with a bend. Each of them contains faucet axle boxes, where there are also rubber gaskets or special ceramic rings that act as seals. In case of a sharp drop in water pressure, this model is more stable and convenient.
- Thermostats.
This is a panel with handles that help you quickly adjust the temperature and pressure. This model is more modern and convenient. In addition, it combines all the advantages of previous types of mixers.
After studying all the offers on the market, you should pay attention to installation options.Types of faucet mounting
It is according to this characteristic that all models can be divided into four groups: for a bath, for a sink, for a bidet, for a shower.
- For Bath.
In this situation, there may also be two separate mounting options - on the bathtub or on the wall. In the first option, there will be only adjustment knobs and a spout on the surface. Most often used for acrylic bathtubs.
But still, most owners prefer the second mounting option. This is true in small bathrooms, where the bathtub is very close to the sink, so you can save on buying two taps and limit yourself to one with an extended spout and a swivel mechanism. But their significant disadvantage is unreliability. They often leak at the mounting points because the mechanism wears out quickly.
- For the sink.
The mixer can also be mounted either on the wall or on the surface of the washbasin itself. But still, most buyers give their preference to the second option.
- For shower.
These are models that do not have a spout. Instead, they are equipped with a hose for a watering can, as well as knobs for adjustment. They are mounted exclusively on the wall. The attachment points are masked with special reflectors for greater aesthetics.
- For bidet.
These faucets are similar to sink models. Most are installed directly on the side thanks to special mounting holes. Additionally, it is equipped with an aerator. This design is equipped with a ball joint that allows you to adjust the direction of the water.
Faucet installation methods- Flexible connection.
The first thing you need to take care of is turning off the cold and hot water.
Next, you need to unscrew the clamping nut using a wrench and remove the fastening screw with a screwdriver. The mixer is removed and the installation site is cleaned. If installation is taking place for the first time, then it is necessary to consider the location and make marks if necessary.
The installed equipment must first be assembled and the reliability of the connections checked. A seal is pre-installed on the faucet.
Connection to the pipeline is made using adapters and union nuts. Flexible hoses are inserted into the holes in the sink. Then the mixer is fixed in place.
Additional fixation is provided by a gasket and a pressure washer underneath the sink. The faucet is then reliably “tightened” without any effort. As a result, its stability is ensured. In the event that the input axes of the coupling and the device do not fit together, eccentric adapters are used for connection, which have different threaded diameters at the ends.
Flexible hoses are used to supply hot and cold water. The nuts are first tightened by hand, and then using an adjustable wrench. When choosing a size, it is important to remember that you cannot twist, bend or stretch them. The strength of the thread connection is achieved using FUM tape or linen sealant.
The check is carried out with the mixer turned off, but with water supplied. First cold and then hot. This way, it will be possible to notice a leak if it occurs. If drops of water appear on the threads, then you just need to tighten the nuts a little with a wrench.
- Rigid connection.
It often happens that flexible hoses do not “reach” the entrance. In such situations, a fitting nut acts as an alternative for connection.
A rigid installation is more durable, but if it breaks, it will be more difficult to repair than a flexible connection.
The preparatory period during installation is not fundamentally different from the previous version.To access the collet, an angled needle is screwed into one of the entrances to the mixer in such a way that its direction is oriented towards the free area. This will make further work easier.
Having determined the length of the pipe, the remainder is removed with a pipe cutter. The pipes are secured using keys and clamping couplings.
Types of pipes used for flexible and rigid connection
Depending on the financial capabilities of buyers, the quality of the required connection, pressure power, and size of the sink, connecting pipes are divided into three types:
- Chrome plated copper tube.
Used for rigid and high quality connection. During installation, high-precision and careful bending is required, which takes a lot of effort and time. But this connection is the most stable. It is also possible to place pipes in a wall cavity or in concrete.
- Flexible bellows hose.
The cheapest option, the most accessible type. It is a metal hose without rubber internal inserts made of stainless steel, completely flexible. A tube shaped like an accordion. Used for flexible connection of water pressure fittings with a mixer.
- Heat-resistant metal-plastic pipe.
Mount connections of medium rigidity. Provides for the mandatory use of additional needles for transitions to metal-plastic pipes, as well as end caps with internal threads. This type of connection is used less frequently, only when it is impossible to use any other fastening option.
First you need to decide on the design of the bathroom, and then choose a sink and faucet. A properly installed system will last much longer due to the reliability and tightness of the connections.
Most manufacturers try to add features such as limiting water pressure and temperature in each new model. This significantly reduces consumption and makes it safe for children to use hot water. On the modern market you can find faucets with a compensator or with a thermostat, sensor faucets, as well as models with two short spouts, and so on.
The base material used for the manufacture of kits is of great importance. Among them are brass, bronze, chrome. They have all the necessary consumer characteristics, are resistant to wear, corrosion, reliable and durable.
External parts are nickel-plated, additionally chrome-plated or enameled. They do this to prevent the development of microorganisms and pathogenic bacteria.
To obtain additional information on this topic, you can use the feedback form, which is available on the Remontik information portal. It is enough to briefly state your question and you will receive a complete professional answer.
The variety of mounting and connection options for faucets is due to the large selection of models on the modern market. They differ in structure, material, functions, price and quality. To ensure that all work is done reliably, you should seek the services of a professional. He will help you choose a suitable kit, select seals, adapters, tubes, and also tell you where exactly it is best to place the structure. This is especially true for those moments when installation difficulties arise, which are much easier for a specialist to solve than for a beginner in this matter.
The faucet is integral to the kitchen sink and the work involved in installing the sink includes installing the faucet on the sink. Read about options for installing a faucet in a kitchen sink in this article.
Two options for installing the mixer
There are two fundamentally different options for installing a sink mixer. These options for the selected sink differ, or more precisely, whether there is a hole in the sink for installing a mixer.
In the next two photos we see two different types of kitchen sinks. The first sink has a standard diameter factory hole for installing a faucet. The second sink does not have such a hole. This means that you can make a hole for the faucet yourself or install the faucet on the countertop next to the sink.

The option of drilling a hole yourself is possible, but has a number of disadvantages. First of all, in the place of the factory hole for the faucet, manufacturers of metal sinks strengthen the sink. Thanks to this, the mixer stands firmly on the sink and does not “play” with the metal. If you drill a hole yourself, the mixer may vibrate after installation. In addition, drilling the sink yourself will damage its anti-corrosion coating at the drilling site.
Therefore, if there is no hole in the sink, then the mixer is placed on the countertop. In the photo we see options for installing a mixer next to the sink.
Stages of installing a faucet on a sink
The mixer is installed on the sink before it is installed on the countertop. It is more convenient and technologically better.
Connecting the mixer to the water supply is carried out after installing the sink with the installed mixer on the countertop or kitchen cabinet. It is better to assemble the mixer on a comfortable surface.
To assemble, prepare yourself, a mixer with an installation kit and a flexible hose. The installation kit is included with the mixer and includes:
- Gaskets;
- Fastening washer;
- Studs (stud) fastenings with nuts.
This is the most common option for attaching the faucet to the sink, which can be called standard.
The flexible hose is screwed to the faucet before installing the faucet. There is no need to wind the flax under the thread.
To tighten the liner at its end there is a hexagon for an open-end wrench No. 10. The tightening must be done with a slight increase in order to avoid cracking the gaskets on the hose.
After attaching the hose, screw the fastening sleeves into the mixer body (if they are included separately and not assembled at the factory).
After assembling the mixer, it is installed in the sink hole. Don’t forget to install the gasket between the sink and the mixer, which comes with the mixer. The gasket can be pressed into the mixer body.
On the back side of the sink, we put a special gasket and a washer of the same profile on the mounting bushings. Next, screw the faucet to the sink with nuts, tightening the nuts until they stop.
 Installation of the faucet on the sink is completed
 To ensure that the fastening does not weaken over time, we fix the first nuts with second nuts, which are not included in the mixer kit and must be purchased in advance.
The result of the installation should be a strong fastening of the mixer, it should not wobble, the liner should be on the mixer.