A folk dance lesson consists of two main parts: exercise at the barre and in the middle of the hall. Exercise in the middle of the hall includes:
- fractional tapping in place and in progress;
- male tricks in place and in promotion;
- rotations in place and in motion;
- sketches in various characters.
Before studying the types of rotations, it is necessary to give students the concept of a “pivot point.” Explain the correct positions of the arms, body, neck and head while performing rotations.
"Rotation point"- this is the direction of looking forward to one point at the level of your eyes. If the “point” is kept below eye level (low), then during rotations the performer will move forward. If the “point” is kept above eye level (inflated), then the shift will occur backwards. And at the same time it may be accompanied by dizziness. The main thing to remember is that the rotations were performed in one place without displacement.
One way to practice the “pivot point”:
Muz.r-r 2/4
Preparation(preparasion) - preparatory movement performed before the start of the exercise:
1-and-
2-and-
1-and-
2-and- pause.
In the initial stages, it is possible to perform preporation at 4 T (twice slower).
The main points to consider when performing a rotation:
- the neck should always be straight when turning, without bending or tilting;
- the amplitude of the head is clear and sharp;
- arms extended to the sides (no need to bring them back beyond shoulder level);
- the body is smooth.
"Axis of rotation": give students the opportunity to feel how supposedly two strong straight rods pass inside the body, one of which runs from the top of the head to the tailbone area, and the second from the fingertips of the left hand to the fingertips of the right hand. And these rods intersect at one point (the area of the cervical vertebra). And feel that these two rods are even. This will help avoid arching in the lower back, protruding shoulder blades, and relaxed abdominal muscles.
When learning how to rotate to the right, you also need to practice the technique of rotating to the left (in parallel). This will help develop the vestibular apparatus to perform rotation in all directions.
"Pirouettes"
Muz.r-r 2/4
Starting position (IP):
Preparation :
Hands in preparatory position (p.p.) - lowered down. Takes 2 cycles (T)
1-and- hands from pp. move to position 1 (position), gaze directed at the right hand, tilt of the head slightly to the left;
2-and- From position I, open your hands to position II (palms up), follow the movement of the other hand with your gaze, turn your head to the right.
1-and- turn the palms of your hands down, turn your head straight, direct your gaze to a point in front of you at eye level;
2-and- pause.
One rotation takes half a beat, performed “per beat” (the number of turns depends on the age of the children):
-And- transfer the center of gravity from both legs to the right leg (supporting leg), at this time make a push from the floor with your left leg (l.n.), bending it at the knee;
-1- the gaze is directed to point No. 1 of the hall (forward. There is a 360° turn on the ball of the right foot, the l.n. is bent at the knee and tucked under itself. After the turn, with a sharp movement, put the l.n. in IP (I straight pos.).
Extend the knees of both legs, tighten the hips. Distribute the center of gravity again on both legs. Turn your head sharply and direct your gaze to point No. 1. Point your arms to the side, palms facing down. The back is straight, the neck is elongated.
-and 2- repeat everything.
Make sure that after turning the left leg (foot) is exactly next to the right in the first straight position (it is a mistake if the foot is placed to the side of the supporting one, thereby losing the axis of rotation).
"Abertas"
Muz.r-r 2/4
III free position legs, arms in p.p.
Preparation :
Hands in the preparatory position (p.p.) - lowered down. Takes 2 cycles (T)
1-and- hands from pp. move to the first position (position), gaze directed to the right hand, tilt of the head slightly to the left;
2-and- From position I, open your hands to position II (palms up), follow the movement of the other hand with your gaze, turn your head to the right.
1-and- pr.n. place the epaulment (epaulment) croiser (croise) at the point of hall No. 8 through the half toes (p/p) on the entire foot, bend at the knee on the demi plie (demi plie). Press the left knee bent from behind onto sur le coup de pied (sur le coup de pied). The body is directed to the point in hall No. 8. The left arm remains extended to the side, the right arm is bent at the elbow and pressed lightly to the chest;
2-and- l.n. place the entire foot behind on a demi plie, right open to the side 25° with the knee and foot extended, body en face (en frontal), look at the point of hall No. 1, open the right hand to the side in pose (palm facing down).
One rotation takes 1T, performed “per beat” (the number of turns depends on the age of the children):
-And- With your right foot, make a demi rond (demi rond) back with the foot extended;
1- make a dismount on the left leg on the demi plie (demi plie), bend the right leg at the knee and press the back of the left leg on sur le coup de pied (sur le coup de pied). Keep your gaze in the direction of point No. 1 of the hall, at this time the body turns 90° to the right, the neck is straight;
-And- step onto the right leg on the demi plie (demi plie), lift the left leg off the floor
2 - rotate the body by 90° (turn the body en fase to point No. 1 of the hall). At the same time, lunge onto the entire foot of the left leg on a demi plie, open the right leg with the foot extended and knee to the side 25 degrees, turn your head straight.
Make sure that during the execution there is no jump on the supporting leg, but that everything is performed on a dismount - at the same level in demi plie (demi plie), and with a full rotation of the body, otherwise the opening of the leg will not occur exactly to the side.
Rotation with shortened foot
Muz.r-r 2/4
Starting position (IP):
I straight line pos. legs (feet together, toes pointing forward), hands in p.p.
Preparation :
Hands in the preparatory position (p.p.) - lowered down. Takes 2 cycles (T)
1-and- hands from pp. move to position 1 (position), gaze directed at the right hand, tilt of the head slightly to the left;
2-and- From position I, open your hands to position II (palms up), follow the movement of the other hand with your gaze, turn your head to the right.
1-and- turn the palms of your hands down, turn your head straight, direct your gaze to a point in front of you at eye level;
2-and- demi plie (demi plie)
1- jump onto the right leg (transfer the center of gravity from two legs to one), press the foot of the left leg in a shortened position with the ankle to the ankle of the right leg, maintaining the first straight pose (toes point forward), the knees of both legs are extremely extended , hips pulled up, simultaneously make a 360° turn to the right. The head is turned sharply, arms are directed to the side, palms are turned to the floor;
-And-
2-and- repeat the movement " 1-and-».
Make sure that your legs are straight and taut during the turn, the ankles of both feet are together.
Spin with a jump
Muz.r-r 2/4
Starting position (IP):
I straight line pos. legs (feet together, toes pointing forward), hands in p.p.
Preparation :
Hands in the preparatory position (p.p.) - lowered down. Takes 2 cycles (T)
1-and- hands from pp. move to position 1 (position), gaze directed at the right hand, tilt of the head slightly to the left;
2-and- From position I, open your hands to position II (palms up), follow the movement of the other hand with your gaze, turn your head to the right.
1-and- turn the palms of your hands down, turn your head straight, direct your gaze to a point in front of you at eye level;
2-and- demi plie (demi plie)
One rotation takes half a beat (the number of turns depends on the age of the children):
1- Jump onto your right left leg, shift the center of gravity from two legs to one, at the same time stretch the knee of your left leg to the maximum and tighten your thigh, and bend your right leg at the knee, pressing your outstretched foot to the knee of your left leg (the supporting leg in this case). case), the knee of which should be directed forward in the first straight position. At the same time, make a 360° turn to the right “on the ball” of the left leg, while turning the head sharply, clearly focus the “rotation point” on point No. 1 of the hall at eye level;
-And- after turning, sit down again in demi plie (demi plie) in the first straight position, center of gravity on both legs, gaze directed to point No. 1 of the hall at eye level, arms directed to the side, hands turned to the floor;
2-and- repeat the movement " 1-and-».
Make sure that during the turn the movement of the right leg is sharp while bending at the knee, the foot presses against the knee of the opposite leg, otherwise there will be a “skid” in rotation away from the axis of rotation.
Spinning with falls
Muz.r-r 2/4
Starting position (IP):
III free position legs, right leg in front, hands in p.p.
Preparation :
Hands in the preparatory position (p.p.) - lowered down. Takes 2 cycles (T)
1-and- hands from pp. move to position 1 (position), gaze directed at the right hand, tilt of the head slightly to the left;
2-and- From position I, open your hands to position II (palms up), follow the movement of the other hand with your gaze, turn your head to the right.
1-and- turn the palms of your hands down, turn your head straight, direct your gaze to a point in front of you at eye level;
2-and- demi plie (demi plie) on the right leg, left foot. press your legs from behind to sur le coup de pied (sur le coup de pied).
One rotation takes 1 beat, performed “per beat” (the number of turns depends on the age of the children):
-And- step onto the right side of the left leg, slightly raise the foot of the right leg from the floor, at the same time make a 90° turn of the body to the right so that the body is directed to point No. 3 of the hall, the knees are free and slightly bent, the arms are stretched to the side, the head remains in en phase position;
1 - step onto the entire foot of the right leg, lift the foot of the left leg from the floor (do a demi-plie on the other leg), turn the body another 90° to the right, keep the head in the en fase position, avoiding bending in the neck during this time;
-And- step onto the right side of your left leg, lift the foot of your right leg off the floor, make another 90° turn of the body (in the position of point No. 7 of the hall), at the same time, with a sharp turn of the neck and head 360°, return your gaze to point No. 1 of the hall ( en phase) at eye level;
2- make another turn of the body by 90°, as a result the body returns to its original en phase position, arms pointing to the side, head straight, neck straight.
First, let's define the terms. I don’t pretend to be strictly academic, I’ll just try to define the key concepts as dancers use them.
Let rotation– circular motion of a body relative to a fixed axis. A turn is a rotation in progress, although it is very often used among dancers as a synonym for the word rotation.
Axis- a straight line around which rotation occurs
Pulse, aka force– short-term application of force in a certain direction.
There are three types of turns in salsa: simple, or separated; rotation, or spin turns; And turns as such, that is, rotations in advancement.
In its simplest form, split turns are right and left turns, and advancing turns are inside and outside turns. However, these types of turns are based on spin turns, so let’s look at them in detail.
Spin turns
These rotations occur in one place, consist of preparation, impulse, actual rotation and stop.
Pulse
An impulse, as follows from the definition, is a short-term thing. It appears as a result of a “potential difference” between different parts of the body. You can grab it with your hands, shoulders, hips, knees and much more. The whole trick is that no matter where the impulse comes from, it must come to the body, into the frame (shoulders + hips) and start the turn independently. It is important to know that if the core muscles are relaxed, then the impulse will not pass and will not work. The same is true if the muscles are too tight: in this case, the impulse will be extinguished in them. Before, during and after the turn, the whole body should be collected, as if running.
Too many people stretch out the momentum, causing it to “pull” the turn. Imagine that you need to roll a ball from point A to point B. If we are not talking about the accuracy of the trajectory now, then it would be more logical to push the ball, give it an impulse that would roll it to the finish line on its own. A person who stretches an impulse is like someone who rolls a ball with his hand all the way from point A to point B.
Turns with extended momentum tend to be heavier, slower and less controlled.
So, it is necessary to collect the impulse in the body. For this we have the abdominal and chest muscles. If we take the impulse with our hands, then we need to try to “stop” our own hand with the chest muscles, and then immediately relax them. This will cause the impulse from the hand to pass into the body. If the latter is in good shape, then the impulse will pass to the thigh opposite the hand.
If the impulse is taken from twisting the shoulders relative to the hips, then the abdominal muscles allow you to create the proper level of coupling, and now, after the shoulders and hips come to an even position, an impulse appears in the body, directing the rotation.
We find the most effective method of creating momentum is to connect the arms between the arms in the chest muscles. In order to do this, you must first become familiar with the spring. A spring is a condition in the muscles when they are not relaxed, not clamped and “connected” to each other. You can feel it if you stand a person and open your arms to him in the style of free hugs. If he holds a spring, then when you begin to move one hand outward, you will feel resistance in the other. If not, then only the muscles of the arm on which you are pressing will resist your pressure. When the hands are in conjunction, they become a system that reacts and works together, redistributing tension between its parts.
This system has two states – zero (neutral) and non-zero. In the zero state, the chest muscles are relaxed, in any other state they are collected and seem to strive to return the arms to a neutral position. This concept of a spring is one of the components of volume during guidance.
So, in order to gain momentum, we spread our arms into a free hugs position, gathering the muscles of the chest and the entire body. Now comes the hardest part. It is necessary to release the pairing in one of the hands on the opposite side of the turn. That is, if you turn to the right - in your left hand. The arm will immediately go to the neutral position, and the moment it comes to it, you need to stop it with the chest muscles and immediately relax them. Congratulations – the impulse to turn is already in your body! Pairing allows you to multiply the strength of the impulse you receive, and stopping the arm with the pectoral muscles sends it into the body.
So, let me once again define the basic principles regarding impulse control:
The impulse is carried out only in the collected body: it is impossible to overstrain, as well as completely relax the muscles
The impulse is short-lived and arises only from the “potential difference” in different parts of the body, that is, turns a la “door” will most likely be incorrect
The impulse must be carried into the body so that it “turns” into a turn. Rotation cannot follow momentum
A spring in your hands allows you to increase the strength of the impulse. Spring is good
Body position and foot function. Preparation
There is one important point that spoils turns for many people. This moment - incorrect foot function.
The foot is essentially what your entire body rotates on, so it rightfully deserves a portion of the chapter in this article. The foot cannot be separated from the entire rotation; it is the first to react to frame displacement. In simple terms, this can be defined as follows: the directions of the foot and body should always coincide. Otherwise, the axis immediately shifts and the rotation is distorted. It is also important to note that if the weight when turning goes to the middle of the foot, that is, on the balls of the foot, then the foot itself will rotate around this middle during the turn. Not the heel around the toe, but the toe and heel around the center.
In order to make the right turn, it is very important to sit correctly. You sit on your foot, your weight should be in the middle of your supporting foot. This can be easily checked by stretching your arm straight to the tips of your fingers along the seams. The direction of the toes will indicate the position of the weight relative to the foot. The next step is simple. All in, back straight, shoulder blades back, gather all the muscles you can find.
Hands in front of you at chest level, palms down, fingertips touching in the middle of the chest. Try to maintain this body position while turning. If you plan to create a joint in your hands, then it is better to extend them forward, keeping the joint in the index fingers. If the impulse is taken from the body, then it is better to bend the elbows. Begin to slowly repeat the trajectory of the future turn, making sure that the foot rotates with the body. Well done.
Now about the preparation.
Proper preparation is the key to a good turn. As a rule, in order to turn, it is enough to twist the upper part of the body relative to the lower part (shoulders relative to hips) by 45˚. With the press assembled, this twist is more than enough. The rule “the longer the swing, the better the turn” works very conditionally and only for extended, smeared impulses.
If the impulse is taken by connecting the hands, then twisting is not at all necessary, although this helps psychologically. It is important that in this version the entire body rotates, since the impulse comes from the hand.
Watch the volume in your hands. If you pull your elbow back while twisting, your shoulder will come forward and break your entire volume. The body will become asymmetrical, and most likely the impulse will be crooked.
Rotation. Focus
This stage, as a rule, passes too quickly and imperceptibly, so there is no point in describing it in detail. It is important to know that your condition and your preparation are 90% of the turn. Rotation is a result of how you hold your body and how you take momentum.
It is also important to note the moment of concentration here. For many people, spin is stressful. Therefore, when they start to turn, such people tense their muscles, stand on their toes, close their eyes - in general, they do everything to ruin their turn. When turning, it is important to be concentrated, but not tense. It's like using a pottery wheel - any wrong move and that's it. The slightest distortion or change in position or level during a turn can ruin it.
In order to make the turn easier to control, and also to avoid falling from the spin and fainting, a trick was invented. Focus is the point that is held while turning the gaze. Focus has many benefits. In particular, the functioning of the vestibular apparatus is improved. Of course, after a certain amount of training. It becomes much easier to endure a large number of turns if you hold the point than if you don’t hold it. The focus also greatly structures the entire turn. The body knows where it came from and where it needs to go. This gives him the ability to turn sharper and easier.
To catch a focus, you must first select a point that will become it. It is better if this point is at the level of your gaze. Get ready to turn and slowly begin the turn while keeping your gaze on that point. Your head will remain in place and will soon be level with your shoulder. From this moment the fun begins. If you try to turn your head now and return the point, you are unlikely to succeed: the body is not yet turned enough. Therefore, you need to continue turning your body and at the same time quickly move your head to the other shoulder. Now you see the point again, and the body calmly rotates to the head.
The whole secret is in the ability to correlate the speed of rotation of the head and body. From the moment when the head still cannot catch the point on the other side until the moment the focus is fixed, you need to force the body to rotate exactly at such a speed that the head is comfortable. Something like this =)
Axis
Actually, now about the most important thing. The axis of rotation is the straight line about which your body rotates. It should pass along the axis of symmetry of the body and, if you stand on one leg in preparation, along the inside of this leg. It is important to keep the axis straight. Any tilt causes asymmetry and distorts the axis. Turning with a distorted axis requires additional and very different balancing. We will not touch such rotations.
Rotation is largely determined by where its axis is. For many people, this axis is located on the supporting leg itself during rotation. Not to say that this is critical, but this style of turning deprives its owner of many advantages. First, time: the turn around the leg has a larger radius, so it takes longer. Secondly, speed, actually for the same reason. The large radius does not allow for high rotation speed. Third, balance: since the turn around the leg is longer and takes longer, the likelihood of losing balance in it increases.
In other words, rotation around the axis of symmetry is better controlled, faster and more precise.
Turning around the leg often happens when a person tries to turn on their tiptoes. Standing on his toes, he automatically shifts the axis to his foot.
In general, in order to rotate around an axis, your body must twist the rotation with one part (shoulder + hip), and unwind it with the opposite one. Then the axis will remain in the middle.
And a little more about weight. If you lower your entire body weight to the floor during rotation, the axis will also shift to your leg. That is, it is not recommended to put pressure on the supporting leg while turning. During the rotation, the weight should be “lifted” to the center of the body, as if you were dancing a twist.
So, let's briefly list the basic principles of rotation:
- The key to a successful turn is proper preparation. Set yourself up for the turn, concentrate, collect your body. Sit on your supporting leg, weight on the ball of your foot. Now lift the weight off the floor, into the center of your body. Hands in front of you, head straight, eyes focused. Twist your shoulders or create a spring. Remember: the spring lasts as long as your muscles are collected.
- Twisting the body creates a joint in it if the press is assembled. Start rotating with your shoulders, then, after the body comes to a level position, with the entire frame. The impulse will already be in your body. Remember: the foot rotates around itself - this is the key to maintaining your axis. While spinning, move your head and catch the focus.
- To stop the turn, place your foot on the floor or squeeze your pectoral and abdominal muscles. Remember: tight muscles dampen impulse
- Exhale and smile
Thank you for your attention!
Turns - Shane(From choreography. The principle of independent rotation due to the body and screwing into the floor. We were taught this way: stand in front of the mirror, move both arms to the left and the body also partially turns, the hips “remain in place”, feet together. With force, as if with a jerk, you turn to the right using your hands and spin on your feet. Don’t forget to choose a point where to look), and you can develop speed in a turn at the expense of your partner, as the coach told my partner - if your partner can’t spin quickly, then you spin her, and showed how to hold my hand correctly so that there is speed in the turn. What happens now, TTT
(A partner for turns is not an option; there are games where a partner will not help. To increase speed, you need to use your body to “swing” (you need to show it, otherwise you will misunderstand the pressure on the floor. “Roll” into the floor).
For me, it doesn’t matter where to “screw in” up or down. And I was taught by a man who was a professional ballet dancer. He said that you need a side swing while maintaining volume. To begin with, the arms are placed as in a ballet (I don’t remember what position) with the elbows above the hand, as if encircling the trunk of a tree (large. During rotation, the arms seem to press the trunk towards themselves. The head turns with a “click” of the very last one (after the whole body). Spine straightened as much as possible (as if he had swallowed a stick). By the way, I usually make an “upward” turn (screwing into the ceiling).
Turning upward is fraught with loss of balance. In order to perform rotations better and more accurately without a partner, you also need to use your feet - pressure on the floor, rotation comes from the floor. and not the shoulders, not the hips start first, but all together.
As far as I understand, this topic should first be bothered with weight transfer and correct foot placement, after all, it comes first with the end point
Most importantly, the head starts moving last and finishes first. That is, it overtakes the body. Well, in general, we probably saw fouetté (I don’t know how to spell it correctly) in ballet. Just like that.
The head is moved by the muscles. Without using inertia. You need to work it out slowly. Slowly, evenly turn your body, and your face (eyes) are constantly directed to one point, and when you can no longer look (the neck does not turn further), quickly turn your head and fix your face in the direction of the selected point (of course, the same one. Fix it with your nose) , where the nose is directed there and the whole face... If you just grab with your eyes, then due to the mobility of the eyes, the face will constantly shift (relative to the direction to the point) and balance will be lost.
The legs never go first, the body always starts moving, the torso, and the legs follow the body, the head starts moving last, and the head comes first in the reverse order, then the legs and body are placed, and finishes the movement. Naturally, the movements of these body parts take a fraction of a second.
About rotations. How to deal with dizziness that occurs when spinning?
As the choreographer taught me, it is necessary to “keep the point” for centering! This leads to balance appearing on its own. And most importantly, always reach up with the top of your head up! When the top (crown) moves upward, the entire back is stretched and, firstly, the posture of the back appears cool, and secondly, stretching the back as a rod (hence the name Spin) to an even and vertical position leads to good balance. Holding the point helps in all types of rotation, and in any direction!
As my coach told me a long time ago, so to speak, he came up with a formula for double chanes to the sides: point - point - mirror. That is, you stand facing the mirror and, for example, when turning to the left, you deliberately choose a point for yourself, make the turn yourself, looking at it, one more and the last (stopping your gaze at the mirror). The head is the last to turn. By the way, when rotating, the body in ballroom dancing is extended, not upward as in classical choreography, but vice versa
The head is a rather heavy part of the body, so it is often the head that pulls down and the balance is lost. So you need to keep your head straight and up. And first your arms wide, then pull them closer to you. And turn on one leg, the second is pressed for the illusion, but we lower ourselves onto it.
A skater's arsenal includes a large number of rotational movements that occur naturally and are performed relatively easily. Such movements include support rotations - pirouettes. They add variety to the free program and allow the athlete to demonstrate the ability to maintain balance in difficult positions. A pirouette is a long rotational movement of the body around a vertical axis. Depending on the direction of rotation, a distinction is made between forward pirouettes, when the rotation occurs towards the supporting leg, and backward, performed towards the free leg.
From the point of view of posture, pirouettes are divided into three main groups: standing pirouettes, squatting pirouettes (tops) and pirouettes in the “swallow” position (Fig. 49). The original variety of pirouettes are the so-called bends. These rotations can be performed in any of the positions listed above, but the main sign of a tilt is the characteristic bending or twisting of the body during rotation. Among the bends there are pirouettes with a leg grab (Fig. 50).
There are simple pirouettes, in which the rotation occurs in a relatively unchanged position, and complex pirouettes with a change of position (for example, with a transition from a standing position to a sitting position) or with a change of the supporting leg during rotation. In short and free programs, combinations of rotations with changing positions and the supporting leg occupy an important place.
Pirouettes can be performed on one or two legs. In the latter case, the concept of “direction of rotation” (forward or backward) loses its meaning, since both legs are supporting.
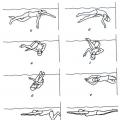
Basics of spinning technique. A pirouette consists of approach, entry, rotation and exit. In Fig. Figure 51 shows the marks left when performing a forward pirouette. Arcs 1, 2, 3 and 4 correspond to approach, arc 5 to entry, point 6 to rotation, and arcs 7 and 8 to exit.
An approach. There are several possible approaches. The most convenient and therefore appropriate for initial training is the combination of a forward-outward three with a backward dash. They use approaches in the form of a three forward-inward - back-outward, as well as forward-outward. In the approach, it is important to maintain smooth gliding and good posture so that the rotation is natural and the preparation for it is unnoticeable.
Entry. This is the most difficult and responsible part of the pirouette. This is where rotation occurs. If the skater has imparted a stable rotation to the body, then, as a rule, maintaining and maintaining it is no longer so difficult. The trail left by the skate upon entry is a line with a smoothly varying curvature. Enter with a bent leg and do not straighten it until a stable rotation occurs.
Rotation of the body can be imparted in two ways: by pushing the leg during the transition from the last arc of the approach to the entry arc, as well as by a circular swing movement of the free leg and arm during the entry. Both methods are used in standing spins and spinning tops. When rotating in a swallow, the flapping motion is not always effective. Here it can lead to bringing the free leg forward, and in order to assume the “swallow” position, the skater will be forced to sharply move the free leg back at the end of the entry. This movement often causes loss of balance. The simpler and more reliable entry is with the free leg pulled back and the arm of the same name.
When entering the top, the circular swing motion is very appropriate and effective. The swing, that is, moving the arms and legs forward, should begin only when the arc reaches its maximum curvature. Entering a standing spin is essentially no different from entering a top, but the supporting leg is straighter here. However, you should not straighten it completely, as this can lead to imbalance.
For stability of rotation, it is very important to correctly perform the final section of the entry arc. In forward pirouettes, at the end of the entry, when the arc reaches maximum curvature, a forward-outward three-way turn occurs, followed by a circle with a diameter of 20-30 cm, and only then does the rotation begin.
Rotation. In this phase, the accuracy of body position, stability of the axis and center of rotation are important. In a swallow, you need to rotate on the plane of the skate without touching the ice with the teeth. Beginner skaters often lose their balance already at the beginning of the rotation, as they excessively move the center of gravity of the body forward. To avoid this, it is necessary to pull your free leg back throughout the entire rotation, especially at the beginning.
Rotation in a top occurs on the front third of the skate. To increase stability at the beginning of rotation, a light touch of the ice with the teeth is permissible. The most common mistake here is falling backwards. To avoid this, you need to open your free leg and stretch your arms forward. The supporting leg is bent and the shoulders are lowered. The standing rotation also occurs on the front third of the skate with the teeth lightly touching the ice.
Complex pirouettes require body grouping. Let's look at how tuck is performed in a standing pirouette, called a screw. When rotating on the left leg, the extended right leg, without lowering it, is brought forward, bent at the knee and crossed with the left. Then the right leg is lowered, sliding the back of the shin along the left. At the same time or a little later, a grouping of hands occurs. In the final phase, the arms are pressed tightly to the body, and the slightly bent supporting leg is straightened, which gives an additional increase in the speed of rotation. It is necessary to monitor the symmetry of the group, because unequal movements of the arms cause imbalance. In this pirouette, the rotation speed is the highest - up to 2 or more revolutions per second.
Departure. Its execution is always preceded by a movement opposite to grouping - ungrouping. This is done to reduce the rotation speed, which makes it easier to exit. It is important that the ungrouping ends with a slight bending of the supporting leg.
Typically, the exit is performed with a change of leg: the previously free leg becomes the supporting leg, and the rotation ends with a push, similar to the back-out push in the obligatory figure. This type of departure is the most common; it is recommended when learning pirouettes. In the masters' programs there are more complex exits (for example, forward-outward with a change of foot, back-inward without a change of foot, entering a stop, entering a jump). With any option, you should strive for the unity of all movements, for such an execution in which the exit is a natural continuation of the rotation.
Declines. They are performed with a significant bend back or to the side with the head thrown back. Rotation with an unusual position of the head complicates spatial orientation, causes poor coordination of movements, and is sometimes accompanied by dizziness. At the same time, bending over is a very valuable exercise for improving balance. Before mastering bending, a skater must learn to confidently take the desired pose without skates.
Approach and entry are done as in normal rotations. The tilt position is taken after the rotation begins. Next, it is recommended to increase the deflection and at the same time, if possible (unnoticed by the observer), perform grouping. Experienced skaters sometimes raise one arm up or down so that its position coincides with the position of the axis of rotation: this provides additional tuck, which increases the speed of rotation.
Backward pirouettes. Backward pirouettes are extremely valuable for further mastery of jumps. They are performed in the same poses as forward pirouettes. But they also have some features. So, despite the fact that the direction of rotation of the body in back and forth pirouettes may be the same, the sensations experienced by the skater are different. Backward pirouettes most accurately imitate the body movements in flight when performing jumps, therefore they are important as preparatory exercises. They are very spectacular, which is why they are included in various combinations.
When teaching backward rotations, it is recommended to perform the approach (Fig. 51) in the form of a sharp forward-inward arc (arc 1). The entry is a forward-inward arc on the other leg (arc 2), describing which the skater makes an energetic rotational movement with his free leg and arms. Rotation (point 3) can be performed in any position (swallow, top, standing), as well as in intermediate positions. The exit (arc 4) is best learned on the same leg on which the rotation occurred: this helps to improve the exit from multi-rotation jumps.
Mastering forward and backward pirouettes opens up great opportunities for performing various combinations: top with a change of leg, rotation in a swallow with a change of leg, options for changing the position of the body and leg.
Rotation training. To successfully master pirouettes, it is important to determine the side of rotation that is comfortable for the athlete. Most skaters master left spins faster and tolerate them better. The simplest and most accurate way to determine “your” direction of rotation is to perform a backward pirouette with an exit without changing legs. If the pirouette and exit are more confident and easier on the right leg, you should plan the best versions of your rotations to the left, and vice versa.
An important area of off-ice spin training is working on. flexibility. In this case, it is necessary to combine exercises for the development of passive flexibility (splits, swings, etc.) with exercises for the development of active flexibility. For example, to improve the “swallow” position, it is advisable to use a weight attached to the foot of the free leg: it allows you to achieve good results in developing both passive flexibility (performing backward swings) and active (holding the free leg with a load in the required position).
The same method is also effective in ice training. A good way to improve body position during rotation in a swallow is to learn the so-called swinging swallow, alternately on both legs.
To improve the accuracy of posture and sense of balance, it is advisable to use the “Grace” simulator. Special trainers in the form of rotating platforms with an electric drive and smooth adjustment of rotation speed up to 3 rps or more help increase the level of a skater’s general endurance to rotational loads.
In training on ice, the main attention should be paid to finding the optimal option for entering the rotation and analyzing the nature of the marks on the ice, paying the main attention to ensuring that the teeth do not scrape or touch the ice.
A good way to improve the entry into rotation and increase the stability of its execution is training with vision turned off. Wearing special opaque glasses, the skater performs the required rotation. At the same time, the activity of the motor, vestibular, tactile and auditory analyzers intensifies. Such exercises increase the stability of the skill, make the execution of rotations more confident and stable.
Learning forward and backward pirouettes in various positions helps prepare the skater's body for the rotational loads that he constantly experiences while skating.
]In swimming, a turn refers to a change in direction of movement by 180°.
All turns are divided into open and closed (based on inhalation during rotation), as well as simple and complex (high-speed) - based on the number of axes of rotation.
In order to simplify the analysis of movements during turns and to more successfully solve problems during training, turns are conventionally divided into phases (parts) of movements:
- 1st phase - swimming up and touching the wall of the pool;
- 2nd phase - rotation;
- 3rd phase - push;
- 4th phase - sliding;
- 5th phase - first swimming movements under water;
- 6th phase - reaching the surface of the water and swimming movements.
Phase 1- swimming up and touching the wall of the pool. You must approach the turn without slowing down. Highly qualified athletes typically perform five consecutive cycles of movement without changing their tempo.
Phase 2- rotation occurs in a dense group, which helps convert the speed of translational motion into rotational motion. The rotation speed depends on the radius and torque. The smaller the radius of rotation, the faster the turn will be completed. The radius of rotation is determined by the distance of body parts from the center of mass of the body. The denser the grouping, the less resistance the water has to this rotation. It is important to ungroup in a timely manner and take the starting position before the push.
When performing the rotation phase, it must be remembered that a slight rotation impulse is set from the very beginning of the movement. So, for example, when swimming front crawl, the arms move down and back, and the swimmer strives to touch the ankle joints of the legs with the hands, and the chest with the chin. The rotation of the body around the transverse axis occurs slightly ahead of the rotation around the longitudinal axis. The movement of bent legs is carried out in an inclined or vertical plane and is performed with acceleration at the end of the movement.
Phase 3- push. Before the push, the body is immersed under water to a depth of 0.4 -0.6 m, the longitudinal axis of the body is located almost horizontally, arms are together, the head is between outstretched arms. Legs bent, feet on the turning wall. Too low (high) position of the legs will lead to an increase in water resistance when sliding. The greatest pushing force is achieved when bending the legs at the knee joints to a right angle.
The effectiveness of the push-off phase is determined by the level of development of the athlete’s speed-strength capabilities. The distance and speed of sliding and the effectiveness of subsequent phases depend on the direction of the push and the force of repulsion. The push should not be sharp and short, but should be optimal in time with ever-increasing effort until the legs lift off the wall. The swimmer pushes himself away from the wall, constantly increasing the repulsion force.
Some athletes use “going under the flow” of water in order to reduce the resistance of the oncoming flow of water to body movement.
Phase 4- sliding. After performing the push, the straightened arms are in front, the head is between the arms, the legs are straightened, and the swimmer takes a streamlined position. The length of the slide depends on the strength, direction and speed of the push.
Phase 5- swimming movements under water are different for different swimming methods and are performed depending on how they are regulated by the competition rules.
The first swimming movements under water in all swimming methods, except breaststroke, are allowed to be performed only up to a mark of 15 m from the turning wall of the pool. When swimming freestyle, they are done with the legs or crawl, or butterfly, and when reaching the surface of the water, movements are performed with the arms - first with one, and then with the other. When swimming on your back, the first movements under water are performed with your legs and torso in a butterfly style. The swimmer's head should appear on the surface of the water no further than this mark, and after this the stroke movements of the arms begin. The first butterfly swimming movements are the same as on the back, only in this case swimmers can be on the chest or on the side without turning their back down. When swimming breaststroke, the athlete can make the first cycle of movements underwater with the arms stroked to the hips, but after the start of the second cycle, when the hands take the widest position during the stroke, the head should appear on the surface of the water.
Currently, improving this phase of turns is given great importance in the training of high-class swimmers.
Phase 6- access to the surface of the water and swimming movements. Simple turns are mastered during initial training in sports swimming methods and represent touching with one hand when swimming crawl on the front and back and simultaneously touching the wall of the pool with both hands when swimming butterfly and breaststroke. But with all swimming methods, a simple turn is performed by rotating around only one vertical axis, i.e. The swimmer's body during the entire turn in all swimming methods except the method on the back is with the chest down, and on the back with the back down.
If a simple turn is open, then at the moment of rotation the swimmer’s head is above the water and at the same time it becomes possible to inhale. If a simple turn is closed, then the swimmer performs the rotation with his head down without the opportunity to inhale, which allows him to rotate faster.
In modern competitive swimming, swimmers use three types of complex turns.
Rice. 4.6. “Pendulum” turning technique (explanations in the text)
Rotate with a pendulum is a difficult open turn. It is performed by breaststroke and butterfly swimmers. The athlete, having not reached the wall of the pool 0.5 - 0.7 m, performs an energetic stroke with his hands and touches the wall with his palms 20 - 30 cm above the surface of the water. Then he turns on his side, simultaneously taking a tuck position and pushing down with one hand, performing a rotation. The rotation on the chest around the longitudinal axis of the body is completed during the slide. This method of turning is quite slow, but it complies with the regulations of the competition rules, since when swimming breaststroke and butterfly, when touching, you must lean on the wall of the pool with both hands at the same time, below or at the surface of the water (Fig. 4.6, a, b, c). During this phase, the swimmer rotates around the transverse and longitudinal axes, simultaneously lowering his bent legs down and raising his shoulders up. The lower hand is brought out in the direction of the reverse movement, and the upper hand is carried through the air in the direction of rotation (Fig. 4.6, d, e).
This is followed by placing the legs bent at an angle of 90° at the knee joints on the wall of the pool, the upper arm enters the water, a push is performed with a turn to the chest and takes a streamlined position (Fig. 4.6, f, g, h). When performing a rotation, the swimmer's torso and legs must be in the same plane. If the legs lag behind the movement of the shoulders, the duration of rotation increases noticeably.
The first movements when swimming breaststroke begin with the arms, then the legs move, and the head should appear on the surface of the water by the middle of the second arm stroke.
When swimming butterfly, the first movements after sliding begin with the legs and the head should appear on the surface of the water at a distance of no more than 15 m from the turning wall of the pool.
In 1964, the International Swimming Federation (FINA) by a special decision allowed athletes specializing in freestyle swimming to make a turn without touching the wall of the pool with their hand. This turn was called "high-speed somersault turn".

Rice. 4.7. Technique of “high-speed somersault turn” (explanations in the text)
The swimmer, without reducing speed, swims up to the rotary shield (Fig. 4.7, a), finishes the stroke with one hand, and with the other begins it in the back-up direction, helping with this movement to begin the rotation of the body (Fig. 4.7, b). In this case, the swimmer moves his feet down, straightening his legs at the knee joints, thereby increasing the speed of the initial rotation of the body. Having received an impulse for rotation, the swimmer tilts his head to his chest, maintaining the speed of rotation by supporting him with his hands down (Fig. 4.7, c, d, e). At first, rotation is performed only by the torso, and then the legs bend at the knee and hip joints. The end of the rotation coincides with placing the legs on the side of the pool and turning the body on its side (Fig. 4.7, f). The athlete places his feet on the wall and the push begins. At the moment of pushing off with the legs, the body turns onto the chest, and the swimmer begins to slide (Fig. 4.7, g, h).
When performing a turn at high speed, the swimmer does not need to create rotation through the movement of the arms and legs.
When swimming up to the turning wall of the pool, it is enough to lower your head and shoulders under the water in advance. The swimmer's back will rest on the “water cushion”, and a rotational moment will arise. The arms, which are located along the body, remain in a stationary position and at the end of the rotation of the body will take a position for sliding, then during the period of rotation the muscles of the arms and body will be in a state of rest, which will have a positive effect on their performance.

Rice. 4.8. Technique of a simple open twist on the back (explanations in the text)
Open simple turn when swimming backstroke. The open turn is the simplest in technique and is used in initial swimming training. When approaching the rotating board, the swimmer in a supine position touches the wall at the end of the next stroke, without reducing speed (Fig. 4.8, a). Immediately before the turn, a full breath is taken with the last stroke.
The turn can be performed in any direction, depending on which hand touches the wall - if the right hand, then the turn is made towards the same hand, and vice versa. When turning, the swimmer must touch the wall with his hand bent at the elbow joint so that the palm under the surface of the water is directed slightly in the direction of the turn, the other hand after the stroke remains at the hip (Fig. 4.8, b). At this moment, exhale.
The rotation is performed after touching the wall with the hand, then the swimmer assumes a tucked position. In this case, the legs move sideways so that the knee joints protrude from the water. Rotation is facilitated by the support of one hand on the wall and the raking movement of the other towards the body. In the second half of the rotation, the supporting hand is removed from the shield and moves forward; at this moment an inhalation is performed (Fig. 4.8, c). At the same time, the legs are placed on the wall with the feet located parallel at a width of 0.15 - 0.20 m as close as possible to the surface of the water, and the hands are joined in front (Fig. 4.8, d, e).
The push is done immediately after the feet are on the turning board (Fig. 4.8, e). This is followed by sliding, swimming movements under water and reaching the surface of the water.
"High-speed backflip". When swimming on the back, for a long time it was allowed to turn only when touching the wall of the pool with your hand. Rotation was allowed in any plane, but before repulsion, the swimmer had to assume a position on his back until his legs began to separate from the wall of the pool.
The backstroke rules (1991) allow “any part of the body to touch the wall of the pool.” Turning without touching the pool wall with your hand is 0.3 -0.5 s faster than with touch. The technique for performing a complex turn without touching the wall with your hand is as follows: two strokes before touching the wall of the pool, the swimmer must perform a flip onto his chest simultaneously with the beginning of a rotational movement with his head down, making a stroke with one or two hands. The last stroke is performed similarly to the front crawl stroke. The rotation is performed in the same way as when swimming on the chest, with the only difference that at the moment after the rotation the swimmer does not turn over on the chest, but remains in a position on his back. The hands should meet behind the head before the push-off begins, with the back of the head positioned between the hands in an extended position. When analyzing the backstroke technique, it was found that footwork after dolphin (butterfly) gliding under water gives the swimmer a time advantage compared to freestyle footwork. If the technique of moving the legs of a dolphin is not sufficiently developed, then the swimmer is recommended to immediately float to the surface after pushing off and begin working with his arms without delay. The importance of the dolphin's swimming method in applied swimming is small.
In medley swimming, after swimming the butterfly distance, the transition to backstroke occurs by touching the wall with both hands at the same time, and the turn is performed by rotating the body backwards. Having completed the stage of swimming on your back, you need to touch the wall with your hand and rotate forward, ending up in a position on your chest. When finishing the breaststroke stage, you need to touch the wall with both hands at the same time. Here it is possible to perform a forward somersault, or “pendulum”.
Common errors: lowering or raising the head, being late when performing the first movements and irrational execution of the first movements.