Do-it-yourself molds
With large volumes of modeling and making the product more realistic and natural, it often becomes necessary to use molds with imitation of leaf veins and petal texture. Often, the price of such molds and viners is very high, and not everyone, especially a novice master, can afford it. That's why we often ask ourselves the question.In this lesson, I will tell you how, using polymer clay and live leaves, you can make them, which, in terms of their characteristics, will not be inferior to purchased ones.
For sculpting we need:
- The freshest polymer clay, ideally slightly viscous and the toughest plastic (you can take the leftovers from previous works);
- Any cutting object: a thin blade or a clerical knife;
- Rolling pin or pasta machine;
- Living leaf with clearly visible and palpable veins;
- Work surface: ceramic tile, glass or a plain sheet of paper;
- Needle or toothpick;
- Talc or cornstarch.
How to make molds. Master Class
Before you start sculpting , thoroughly knead the plastic, the softer it is, the better the casts we can make.1. On the thickest setting of the pasta machine, roll out the polymer clay. Attach a leaf to the surface of the layer (with veins on the plastic).

2. Roll the rolling pin well on the surface of the leaf so that the veins are imprinted on the clay.

3. Pry a live leaf with a needle and remove it from the plastic surface.

4. Cut out a leaf along the contour - this will be a negative for the future home-made mold with your own hands.

5. In the same way, I made a cast of another living leaf, but with different veins and shapes.

6. We send both negatives for the first baking. Strictly observe the time and temperature conditions for firing clay, follow the manufacturer's recommendations.

7. After firing, let the blanks cool. After we wet their surface with water or sprinkle with talc (cornstarch) so that fresh clay does not stick to the negative.

8. We roll out the plastic on the largest thickness of the pasta machine and apply the negatives with the veins down.

9. Roll the rolling pin over the surface of the negative. If the workpiece was well moistened with water or sprinkled with talc, then you will remove the negative without any effort and deformation.


10. Similarly, take a cast from the second workpiece.


11. Again, cut out the final versions of future molds with your own hands along the contour of the casts and put them in the oven for firing. Now you know, how to make molds with your own hands using polymer clay and live leaves. But what about the petals?

12. For flower petals, we will make another mold with our own hands: for this we will take the hardest plastic, you can take the remnants of previous work. Form a shape out of polymer clay that resembles an iron. The flat part will apply texture to the surface of the petals, and the leg (in an iron this is a handle) will be convenient for the press when pressing the plastic.

13. With a needle or toothpick, from the sharp part of the sole of the “iron” to the bottom, we make notches and broken lines. The lines should not be too deep.

14. When you see that the mold is ready with your own hands, you can send it to the oven for firing.

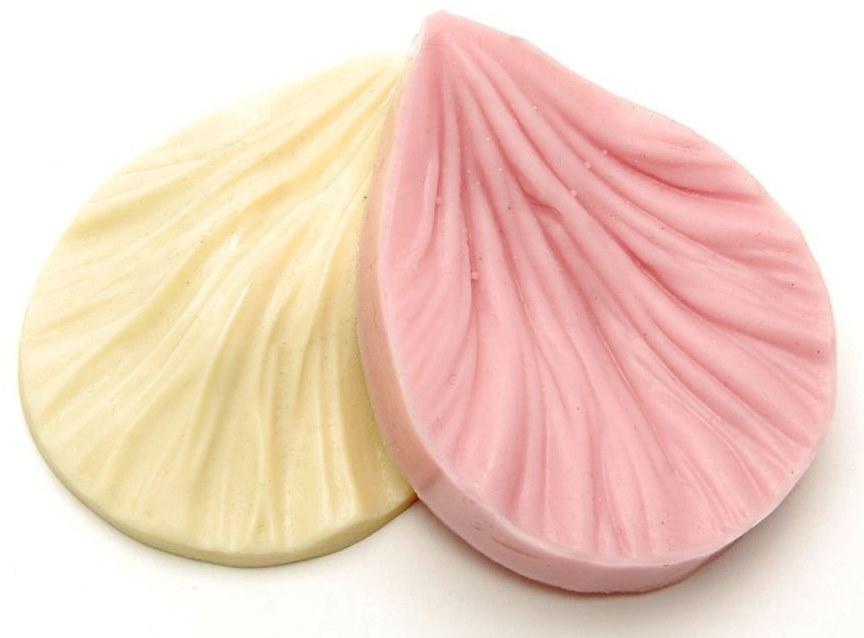
15. And now let's check home-made molds in work on fresh plastic or on.


As you can see, the texture is preserved - the leaves look natural and realistic, and the mold intended for the petals is also great for stamping the surface of citrus fruits.

Do-it-yourself molds helped me in creating not only these, but also many other works. 
For those to whom the master class seemed complicated, I give a link where you can buy very good ready-made molds. By the way, on the same site handmadeart.com.ua, I found a lot of useful products for needlework.
If you like our site, express your "thank you" by clicking on the buttons below. Tell your friends. Thank you:)
I offer you a step-by-step master class on how to make silicone molds at home with a photo and a detailed description. Trust me, making your own silicone mold at home is as easy as shelling pears! And it is suitable for sculpting flowers from polymer clay, flowers from mastic, homemade soap or making plaster figures at home.

I did it! From mastic!
When I went to mastic cake courses, I immediately wanted to try making mastic flowers at home. But I didn’t have any molds, and buying everything that I wanted is quite expensive, especially since I’m going to make cakes for myself. And then I decided to try to make a silicone mold for mastic with my own hands from sealant. Of course, it’s better not to eat such flowers (and it’s a pity to eat them), so it’s better to use food sealant molds for food. I went to the hardware store in search of silicone rubber for molds.
I replaced the silicone paste for making molds with the cheapest sealant, on which “Silicone” was written in large letters. The sealant cost about 100 rubles, it seems the whole can is 120-130, you can make a bunch of molds, and in addition there will be a dozen silicone molds for soap. I immediately bought the so-called bottle pistol for 35 rubles. (Bought in Obi-dybenko). In general, for casting silicone molds with my own hands, I didn’t need anything else, except for the large leaves found on the street (probably chestnut), a drop of the simplest sunflower oil, an old credit card to even out the mass and a substrate - a transparent folder. It is convenient to make molds in all sorts of disposable plastic containers, in which salads and the like are put by weight, then the mold will be beautifully shaped from the bottom and sides.

So, How to make a mold from silicone sealant with your own hands!
Squeezed out the paste, approximately the size of the leaf leveled. An old credit card came in handy.

Lubricate the leaf with sunflower oil. I think that it needs to be washed after the street, everyone already guessed it 😉
I attached it to the sealant, stroked it well with my finger so that the leaf pattern was printed. Excess sealant is easily collected with the same card.

Squeezed out more silicone on top. Smoothed over the sheet. Another stick came in handy to hold the leaf, which "stretched" after the credit card.

Just a couple of minutes later, I carefully removed the sheet from the bottom of the mold.

And I put it with silicone down to make the bottom part flat for him. You can still gently press the sheet against the silicone to print the pattern more clearly.

A few minutes later she took off the sheet. However, you can't take it off. It won't stick with oil.

Here is our mold of our own making and ready!

The main thing now is not to touch for a few days! From above, the silicone dries up, but the silicone sealant mold will be ready for use only when it dries completely. It took me 3-4 days.
After drying, the resulting mold must be cut off with scissors along the edge, giving it a prettier shape and you can use it! I also tried silicone on the first one that came to hand - I turned up a plastic photo frame, smeared the edge, and it turned out to be a silicone mold. At a cost, such silicone molds are cheap! And you can use them for soap, cakes (only for decoration), polymer clay, etc.

How to use silicone molds:
Working with silicone mold is also easy. If the form for making homemade soap is filled, turn it over after the soap has been completely expelled.
If for a leaf or petal made of mastic or polymer clay - I cut out a leaf, attached it, closed it with the second part of the mold, opened it - you're done! True, my mastic was not flower (especially for sculpting flowers from mastic, keeps its shape), but Creativity and master classes!
And for those who have already thought about how to decorate the New Year's table in an original way and what can be prepared for the New Year, the heading Master classes "About delicious!" with detailed step by step recipes with photos of cupcakes, pastries and more!
Wonderful realistic flowers from foamiran are not obtained by everyone. In order for leaves, buds, various small elements to be approximately the same shape and have a clear texture, special forms are used. They are called molds and have a flat surface with a noticeable relief. Viners are also distinguished - this is another type of form, most often made of silicone and having volume.
If you look at the photos of beautiful molds, it becomes clear that with their help you can sculpt any detailed copy of a plant. Such blanks are not cheap, and the work will require forms with different textures. That is why many craftswomen tend to spend quite a bit of time and money to make the right molds with the right relief on their own.


Available materials for creativity
The most obvious option for making molds at home is polymer clay. It is sufficiently viscous and plastic to accept an imprint in the smallest details, it hardens well. The blanks made from it are used repeatedly without losing their properties.

As an alternative material for veiners, some needlewomen take silicone sealant. Its advantages:
- hardens quickly;
- is able to fill the slightest cracks, which means it gives a clear impression;
- available at any hardware store
- suitable for continuous use.

Sometimes the sealant is used not in its pure form, but in a mixed one. To do this, it is combined in a 1: 1 ratio with potato and corn starch. And after thorough mixing, you can start making molds with your own hands.

We make molds from sealant
The silicone mold for bulk impressions is made simply and with a minimum set of tools. We will need:
- the sealant itself
- small container
- small spatula,
- sheet to be printed
- scissors,
- transparent film (you can take it from a stationery folder),
- paper A 4 (1 sheet).

Instructions on how to make molds are simple. First, on a sheet of paper, the contour of the leaf is outlined, from which an imprint will be made. Lay a transparent film on top of the drawing.

Squeeze the silicone composition in a small amount into the prepared container. We take the silicone with a spatula and carefully apply it to the film so as to close the contour, following all its curves.

The leaflet from which the mold will be made is lubricated over the entire surface with a layer of oil and applied to the silicone mass. Now it remains to wait until the workpiece dries. This will take at least two days. The maximum drying time is 4 days, it all depends on the composition of the selected sealant.

After drying, the leaf is easily removed with a needle and removed. And you will have a wonderful mold, which should be slightly trimmed with scissors to adjust the shape. With it, you will definitely be able to create naturalistic leaves from foamiran.

Making molds from polymer clay
Working with polymer clay is a pleasure. It has the perfect consistency to absorb all the slightest veins and relief of the sheet. If the mass you have is not plastic enough, it should be well kneaded in the palms with a small amount of fat cream or petroleum jelly. Then it will acquire the desired viscosity.


It is better to take a living leaf from a plant that has a clear relief with many veins. Experts advise begonia, blackberry or raspberry.

Still need to prepare:
- an unnecessary ceramic flat plate (or a tile left after repair),
- sharp knife with a thin blade (clerical is suitable),
- rolling pin,
- baking tray,
- needle.

The manufacturing process is not complicated, and soon you yourself will be able to give a master class on how to make molds with your own hands.

First, roll out well-kneaded clay on a tile in a thick layer. Then firmly press the selected leaflet to it. It should be gently straightened, significantly pressing with your fingers, in order to transfer the pattern as much as possible. At the end, it is worth rolling over it with a rolling pin several times.

Gently pry the edge of the sheet with a needle and remove it. We cut off the excess mass with a clerical knife so that the workpiece acquires a shape close to the original. We have received a mold negative, which should now be baked as written in the instructions on the clay packaging.

Note! 
When the negatives are "baked" and cooled down, we moisten them with water from the side where the veins were imprinted. We put them on the second rolled piece of clay. We repeat the operation with pressing with fingers and a rolling pin.

We remove the negatives, and cut the resulting molds with a knife and send them to the oven. That's all. After cooling, you can start sculpting.

Another way to create molds
Every housewife has potato starch in her kitchen. If you add corn to it, plus silicone sealant, then a composition will appear in order to realize another idea on how to make molds. The mixture must be combined in a small cup, first stirring with a stick. Then you should put on medical gloves and knead the composition to the end by hand.


We separate one part from the resulting mass and sculpt 2 balls of a larger and smaller size from it.

We roll out the first blank so as to obtain a plate 0.5 cm thick. Put a dry leaf or an artificial leaf with a clear relief on top.

Roll out the second blank on top and leave a kind of puff cake to dry a little. Now you can separate the two parts of the mold and remove the leaf.
Note! 

We leave everything until the final drying, after which you can correct the edges of the forms. They will turn out elastic, will bend well, give a clear impression.

We simplify the process of sculpting petals
A lot of flower petals are always required. For them, you can also make a mold, and speed up the sculpting process.

From polymer clay it is necessary to sculpt a complex figure: its upper part resembles an elongated leg, and the bottom looks like a thickened drop. Press the workpiece against the table, making the base flat.

Now, with a thick needle or toothpick, we begin to draw longitudinal stripes on a flat drop. They should be of different lengths, interrupted and bent. After that, we send the stamp to the oven and start using it immediately after cooling.

The notches made with a needle imitate the natural pattern on the flower petals well. Add to this the leaves made with the help of wonderful homemade molds, and you can collect chic bouquets.
Note! 

Do-it-yourself photo of molds


Molds, which were originally used for ceramic floristry, conquered foamiran masters, greatly expanding their capabilities. So, thanks to these simple, embossed forms, you can quickly and easily get a clear, natural relief of flower petals and flowers. What are molds and make these useful forms with your own hands - read below.
So, mold is a cast, flat mold for making relief elements on the front surface of a foamiran blank. Weiner is a voluminous silicone mold, which makes it possible to obtain not only convex veins, but also to make the edges of foamiran blanks curly. Such forms are great for creating floral elements of plants with curly petals and leaves (rose, dahlia, lily, etc.).

There are a huge number of Moldovans and viners, and sometimes it is incredibly difficult to choose the right one from such a variety. What molds are better? Experienced craftsmen say that the best forms that give clear impressions and do not tear the fom are Thai. But the price of such products is quite high.
If there is no opportunity to purchase a ready-made mold, then, for the first time, you can replace it with improvised means (for example, plates with a floral texture, a cutting board, ceiling tiles). Some craftsmen adapted themselves to work with needles and toothpicks, applying relief by hand. But, it’s better to make an element with your own hands: the cost of such a mold will be much lower than the cost of purchased ones, and the result is much better than from improvised means.
Mold for flowers from foamiran
The simplest, most versatile way to make molds with your own hands is with the help of viscous and plastic polymer clay. For work, we need: fresh polymer clay of any color, a live leaf with well-protruding veins (it is better to choose blackberry, raspberry, begonia leaves), a clerical knife or a thin blade, ceramic tiles or unnecessary earthenware utensils, a metal baking sheet for baking clay, a needle.

Making molds:
- Roll out the clay in a fairly thick layer.
- We apply a sheet to the clay and press it tightly with our fingers, in order for the veins to be better imprinted, we pass over the sheet with a rolling pin from above.
- We hook the leaf with a needle and carefully remove it from the workpiece.
- We cut off excess clay with a clerical knife or blade, giving the workpiece the shape of a leaf.
- We send the negative mold to the oven and bake according to the instructions for the polymer clay used in the work.
- Roll out another layer of clay.
- Wet the cooled negative with water (from the side of the veins) and lay it on the rolled out layer.
- We press it with our fingers and roll it out with a rolling pin.
- We separate the negative and cut off the excess from the workpiece.
- We send the relief form to the oven for baking.
After the double forms have cooled down, you can safely use them in your work. In this way, you can make leaves of various shapes and sizes.
If the clay is not viscous enough, you can knead it with your hands using petroleum jelly or a greasy cosmetic cream.
How to make molds for foamiran with your own hands from silicone sealant
Another way to create molds for making flowers from foamiran is with the help of silicone sealant, which allows you to transfer the relief from any voluminous leaf. Making a silicone mold is quite simple: for this we need a sealant, a small spatula, a transparent sheet from a stationery folder, an impression sheet, scissors, a sheet of A4 paper.

Let's get to work:
- We attach a sheet of paper for taking an impression to an A4 sheet and circle it.
- We remove the leaf and put a transparent sheet on the pattern.
- Squeeze out the silicone into a container and use a spatula to transfer it to a transparent sheet so that its size corresponds to the size of the sheet for taking the impression.
- Lubricate the leaf with oil and apply to silicone.
- We leave the silicone to dry for several days (from two to four, depending on the sealant).
- After drying, with a needle, remove the leaf from the silicone.
- With scissors, we give the silicone molds the shape of a leaf.
The work is ready: as a result, we have convenient, high-quality, double-sided forms for quickly creating attractive, natural foamiran leaves.
With what else can you make molds for foamiran
You can quickly and easily make molds from corn or potato starch and ordinary silicone sealant (available at every hardware store). In order to directly start creating stencils, we will need to prepare a mixture for taking impressions: in an unnecessary container, we knead the materials in a one-to-one ratio, first with a wooden stick, and then knead the mass by hand until completely homogeneous (we put on disposable gloves to protect our hands).
Let's get to work:
- Separate a small part from the total mass, form two balls of different sizes from it (one is larger than the second).
- Roll out one ball with a rolling pin so that you get a flat surface 5 mm thick.
- Top with a dried leaf of the desired plant or a handicraft store-bought artificial copy with a good texture.
- Roll out the second ball on top of the sheet.
- Set the workpiece aside: let the mass grab well.
- After some time, separate the top layer from the workpiece and remove the sheet.
- Leave molds to dry. If necessary, you can adjust the edges of the molds to the size and shape of the sheets with scissors.
Even a novice master can easily repeat this master class, and the resulting molds will not only come out inexpensive, but will also give high-quality prints due to their elasticity and flexibility. You can use these forms more than once.
We make molds for foamiran with our own hands: a master class (video)
Molds and viners are incredibly useful stencils for working with foamiran, allowing you to easily and quickly transfer the relief to the workpiece. Such forms can be purchased in stores, or you can make it yourself, saving, at the same time, a little money. Make molds and viners with your own hands, and get original, attractive, expressive textures to create high quality works!
Hello everyone! Today I will touch on a delicious and beautiful topic - decorating cakes. For those who did not get stuck with plasticine in childhood and just love sweets, this topic should be interesting. Beware, cakes are under the cut))
I am writing this review not only for dear readers, but also for myself to some extent. So that everything is in one place and I do not have to scour the Internet in search of information.
I'll start, perhaps, with the definition of mastic and, of course, the recipe.
What is mastic, recipe
Confectionery mastic - thick putty, sweet confectionery cream.(Wikipedia)
An obligatory component of mastic is powdered sugar with starch or powdered milk.
Gelatin, glucose (condensed milk, marshmallows (chewing marshmallows), chocolate, honey) can act as a link. Of all the recipes I tried, I liked marshmallow mastic. It is elastic, does not dry very quickly (as from gelatin, for example), but at the same time keeps its shape well (which I could not achieve with milk mastic) Here is a recipe for marshmallow mastic (video from the Internet)
Personally, I did it according to the recipe. I replaced glucose with honey. I liked this recipe more.
And even easier: 200 gr marshmallows + 2 tbsp. spoons of water + 400 gr of powdered sugar. It also turns out quite well.
To work with mastic, we need tools.
I ordered them from different sellers at different times. Well, I'll tell you about everything in order ...
For 4.29 USD 
Material: ABS Plastic
Color: Purple
The size:
Length 27.5cm
Diameter 5.3 cm
How to use:
1. Roll out the mastic
4 Get a beautiful pattern)

I liked this rolling pin. The patterns are clear and deep. The only thing, for some reason, I expected it to be silicone and heavier. And it is made of ordinary plastic. But the result did not get any worse.
For 2.95 USD 
material: plastic
weight: 35g
color: transparent
How to use:
1. Roll out the mastic
2. Sprinkle the rolling pin with starch so that it does not stick
3. Walk the rolling pin over the mastic, pressing firmly
4 Get a beautiful pattern)

It’s also a good purchase. First of all, it pleases with its compactness. The patterns are not as deep as the first rolling pin. But it copes with its intended purpose. be careful.
silicone molds
Silicone molds are special molds that have the necessary structure to create shapes and flowers of the required shape for decorating confectionery. Designed to work with mastic, marzipan, caramel, chocolate, sugar mass, gelatin and other products at your discretion.
Silicone molds are made of food grade silicone, no smell, can easily endure high temperatures.
IMPORTANT ADVICE FOR USING MOLDS!!!
1. Mold must be dry. Before filling the mold with mastic, it should be carefully sprinkled with starch.
2. Fill the mold with mastic. If you use a 3D mold, which consists of two parts, then after filling, you need to slightly lubricate the mastic with water (only the joining parts), fold the mold and crimp it.
3. Place in the freezer for 15-20 minutes. Massive molds need to be kept in the freezer longer.
4. Gently, slowly, remove the figure from the frozen mold.
After you have taken out the figurine, it is important to let it dry for a couple of hours, and after that you can already decorate.
For pouring chocolate, the mold does not need to be sprinkled with starch. The form filled with liquid chocolate needs to be shaken very, very hard (like a thermometer) to release air bubbles. Shaking, unfortunately, is not always effective because the chocolate is quite thick. It is better to take a softened hard brush and remove the bubbles from the internal cavities. If the figurine is difficult to remove, you can freeze it to a lower temperature.
Packed like this 
, for 3.87 c.u. 
Material: food grade silicone
Weight: 60g
Size: 15.7cm* 4.5cm*1cm
Pink colour
Permissible use temperature: from -40 to +210 degrees Celsius
How to use:
2. Put the mold in the freezer for 5-10 minutes
3 Cut off excess mastic
4 Carefully remove the "chain" 
Video MK with a slightly different mold (from the Internet)
For 2.24 USD 
Material: food grade silicone
Weight: 70g
Size: diameter 8 cm, thickness 1 cm
Pink colour
Permissible temperature during use:
-40 to +210 degrees Celsius
How to use:
1 Press the mastic into the holes
2. Put the mold in the freezer for 10-20 minutes
3 Cut off excess mastic
4 Carefully remove the figurines
Items 3-4 can be swapped 
For 2.85 c.u. 

Material: food grade silicone
Weight: 80 g
Pink colour
Permissible use temperature: from -40 to +210 degrees Celsius
Dimensions:
Length 8cm
Width 5cm
Height 3cm
How to use:
1 Press the mastic into the hole
2. Put the mold in the freezer for 20-30 minutes
3 Cut off excess mastic
4 Carefully remove the figurine
Items 3-4 can be swapped 
Video-MK
In general, I liked all the molds. Soft, elastic, without notches. The only thing, as always, is that the sizes are very small.
For a long time I wanted to try to make a mold myself. Sometimes you need some kind of figurine, but there is none. So I tried to make home-made molds. I found a few "beautiful things" at home. And this is what came of it.
Do-it-yourself mold)))
I must say right away that the ingredients that are used are not entirely food grade. Rather, these molds are suitable for working with liquid plastic, polymer clay, etc. Therefore, I do not urge anyone to use them for mastic. I will rarely use them, in exceptional cases.
And so, we need:
1. Silicone sealant (I had white)
2. Potato starch
3. Any cream (for lubricating parts, so as not to stick)
4 Items that we will "copy" 
We squeeze out the silicone and begin to mix starch into it until it stops sticking. As a result, a plastic mass should be obtained. Approximately this. 
Then we form our mold and press objects into it, having previously lubricated them with cream. 
Then we leave them to dry for 24 hours. We remove the items, wash them and get the result. I did it) 
 It's crooked, but they do their job well.

For 1.82 USD 
Material: plastic
Weight: 30g
Color: Came white
Length:13 cm
It is used when cutting small details of complex shape according to a template or by hand.
It has three knives. One is for cutting mastic, the other two are for creating patterns. 


To be honest, a little useless purchase, since the knife does not cut very well. It is better to take an ordinary pizza knife to replace it. You can also make such patterns yourself.
For $3.80  As you can see, there are still figures in the picture. In real life, they are not. But I noticed this when I sat down to write a review. In principle, I don’t need them.


Material: ASB plastic, can withstand temperatures up to 70 degrees.
Color: yellow-purple
Complete set: figurines + holder
Size:12*7cm, figure holder 13cm
The size of the letters is approximately 0.5 * 0.5 cm
How to use:
1. We place the letters we need in the holder
2. We print a word or phrase on mastic, dough, etc.
3. We get a beautiful inscription) 
The same problem, everything is very small in size. It was also not convenient to cut the letters. To insert them into the holder, the letters must be perfectly smooth. To do this, I had to spend half an hour to cut everything off ... There would also be a Russian alphabet ... And so, I don't even know if I'll use it
For 11.64 USD 


What is a notch and a plunger
Punching - a tool that allows you to cut a certain shape from the mastic
Punch example 
How to use cutting:
1 We press on the mastic by cutting
2 We get the necessary figure (we get it manually from the cutting)
The plunger is a cutting with an ejector (for the convenience of getting the mastic)
Plunger example 
plunger device 
How to use the plunger:
1. We press on the mastic with a plunger
2 Click on the top button
3. We get the necessary figure (she herself jumps out of the plunger)
Material: ABS plastic
Contents: 33 pcs
I tested them a little in my own way to show you. I'm still far from the original colors)
The set includes
3 cuttings "Cup of a flower" (30mm, 40mm, 50mm)

3 cuttings "Carnation" (32mm, 42mm, 47mm) 
4 cuttings "Rose Petals" (37mm, 43mm, 50mm, 57mm) 
3 plungers "Stars" (diameter 6mm, 9mm and 12mm) 
3 plungers "Heart" (diameter 6mm, 8mm and 11mm) 
3 plungers "Butterfly" (40mm, 48mm, 58mm) 
4 plungers "Daisies" (20mm, 25mm, 34mm, 40mm) 
4 plungers "Plum blossoms" or "Forget-me-nots" (18mm, 20mm, 22mm, 30mm) 
3 plungers "Rose Leaves"" (35 mm, 40 mm, 50 mm) 
3 plungers "Chamomile" or "Sunflower" (46mm, 55mm, 68mm) 
They can also be used to create texture on mastic instead of rolling pins and mats.
For example like this 
In general, I am very pleased with this lot, since we would have such a cost of 50 bucks, or even more.
The tools themselves are of good quality. Although, sometimes they don’t cut through the mastic, and springs periodically pop out of the plungers. I already lost one.
For 3.93 USD 
Material: plastic
Weight: 80 g
Yellow color
Quantity: 8 pcs
Tools length:15-17cm
To make it clearer to everyone, I made such a sign about the function of each tool. So to speak, a cheat sheet for beginners (including me).  And this is for clarity.
Video-MK (from the Internet)
And of course, for completeness of the review, it is necessary to show the result of working with the tools.
I am far from being a professional in this business. So far, baking such cakes is very rare, as it is very time-consuming and money-consuming. But for the sake of your beloved children, you can’t do anything. 

lower tiers
Vanilla biscuit:
5 eggs
1 tbsp sugar (or less)
sachet of vanilla sugar
1 tbsp flour
Beat the whites separately until fluffy foam, gradually adding sugar. At the end, stir in the yolks. Then add the sifted flour (you can with 1 teaspoon of baking powder) and gently mix everything with a wooden spatula (you can use your hand). Bake in an oven preheated to 180 degrees 40-60 min.
Cream soufflé with bananas:
Sour cream-200 g
condensed milk-100 ml
vanillin
gelatin-20g
Gelatin pour 4 tbsp. water, let it swell. Add condensed milk + vanillin to sour cream. Heat gelatin until dissolved - do not BOIL. Cool slightly and add to sour cream. Stir vigorously.
Assembly: Cut the biscuit into 2 cakes. Put 1 cake in a detachable form, covered with cling film. Put whole bananas on it in a circle. Pour cream. Put another cake on top. Put in the refrigerator. Decorate the cake as desired.
Upper tier according to this video, I only added a few tablespoons of cocoa to the dough.

Cake "Air Snickers"
Recipe
Only I added less sugar and made a double portion of the cream. I also baked all the cakes at the same time so that the whipped proteins did not fall off and not be beaten several times.
If you cover with mastic, then the upper cake does not need to be smeared with the main cream.
Cream for fondant on top of the cake(for leveling the cake and isolating it from the main cream so that the mastic does not “float”)
100 gr butter
100 gr chocolate
Melt in a saucepan, let it harden a little in the refrigerator. Apply on top and on the sides of the cake with a spatula or knife until the surface of the cake is perfectly even.
Conclusion: The tools are good. It's worth taking. Especially for such money.
In the near future I plan to take this matter more seriously, so I ordered another batch of tools. So, I will try to continue writing reviews on this topic.
Good luck to all! I plan to buy +72 Add to favorites Liked the review +167 +290


