Crispy breadsticks have gained popular love for their versatility. Children love them because their fragrant long “fingers” can replace the usual bread, men enjoy crunching salty straw over a glass of beer, and housewives are simply glad that with the help of one recipe, adding minor nuances to it each time, you can prepare an interesting dish to feed even the pickiest eater!
How did such sticks appear?
Three countries are vying for the championship in inventing breadsticks. These are: France, Italy and Asia. In Russia, this simple and light snack is also far from new, but we, of course, cannot compete with the three-hundred-year history of the Italian recipe for the famous grissini. The Italians, unlike their competitors, even name the inventive baker - Antonio Brunnello, who, by order of King Victor Emmanuel II, first served a type of bread that did not burden the stomach on the royal table.
Arguing their claims, the French place emphasis on the main culinary national feature - sophistication, and do not want to put up with circumstances in which someone can bypass them in this feature. As for the Thais, they simply state the fact that breadsticks have been their national dish since time immemorial.
Classic
Grissini sticks are considered a classic crispy bread dough strip. They are often called an instant snack. But this is not entirely true - breadsticks of Italian origin are quickly disappearing. But kneading the dough, proofing and baking will take time - and no less than an hour.
When baking snack breads, take care of a suitable sauce - as a sweet dish for tea it can be honey, chocolate spread or nougat, as an option for lunch - tartar sauce, remoulade or any other sauce you like.

Technological data
In the language of technologists, breadsticks are a yeast (or yeast-free) baked product prepared using the oven drying method. When manufacturing products, it is possible to use various additives that change the taste characteristics of the finished dish.
The most common seasonings and additional ingredients popular when making breadsticks at home:
- Sesame, cumin, rosemary, coarse salt, sugar.
- Pieces of carrots, bell peppers, garlic, onions.
- Son - hard or soft.
- Caramel, nougat, chocolate, honey, condensed milk.
Bread sticks can be prepared in large quantities at once, as their shelf life is about a week. The aromatic and taste qualities of products at the end of their shelf life can be restored by briefly drying them in a heated oven.

Nuances and secrets of cooking
Breadsticks can be prepared unplanned! Sometimes, while baking or frying pies, the filling runs out and the dough remains unused. Or you will simply find a long-forgotten briquette of dough in the freezer. In this case, all that remains is to form a straw, enhance its taste with the necessary ingredients, and excellent snacks are ready.
Here are some more interesting features of making sticks:

How to prepare chopsticks in silicone mold
Now silicone molds for preparing Italian breadsticks have appeared on sale, which thus turn out more evenly and at the same time they all come out the same size and equal bakedness. You can even use the form in the microwave or on the middle rack in the oven, but not in the grill mode.
Before first use, the mold must be washed, dried and slightly oiled. Then fill the grooves with the prepared dough to the marked line and place in the microwave. After 2.5 minutes, the sticks are usually ready. Before removing them from the mold, the silicone needs time to cool.
Grissini: recipe
The real grissini sticks are made long, from 20 to 30 cm.
Ingredients:
- 100 ml yogurt, kefir or sour milk;
- 150-160 g white flour;
- ½ teaspoon instant yeast;
- ½ teaspoon granulated sugar;
- ½ teaspoon of medium salt and 1 teaspoon of coarse salt, for sprinkling.
Stir the flour into the fermented milk product heated to 40 0 with a wooden spoon, but do not achieve homogeneity. Place the bowl of dough in a plastic bag and wait half an hour until gluten forms in the dough. Only now can you add all the bulk ingredients to the dough and knead the body until plastic.
Place the bowl in the bag again, this time for 40-50 minutes, as the dough should rise well. Then, after kneading the mass a little, form 16 oblong twisted strips with a thickness of 3 to 8 mm and place them on a baking sheet covered with parchment.
If you grease the sticks with lysien or yolk, you do not need to moisten them additionally, but it is advisable to lightly sprinkle the dry dough with plain water and sprinkle with spices at the same stage. Bake the sticks at 180-200 0 for 15-18 minutes.

Grissini with mustard and onions
Another interesting grissini recipe - for lovers of a subtle mustard aroma.
Ingredients:
- 1.5 cups flour;
- ½ glass of water;
- 5 g dry yeast;
- 1 teaspoon each (without a slide) - salt and sugar;
- 6 tbsp. spoons of olive oil;
- 3 tbsp. spoons of hot mustard (ready);
- 1 small onion;
- 4 tbsp. spoons of sesame seeds.
How to cook
Fry finely chopped onion in oil until golden brown, cool. Knead an elastic, plastic dough from all the ingredients, and at the very end of the kneading add the cooled onion. Form the entire dough into a ball and roll it into a thin cake about 8 mm thick. Cut into thin strips, twist each strip with a flagellum and carefully place on a parchment-lined baking sheet. Now the sticks should be generously sprinkled with sesame seeds and baked at 200 0 C for 15 minutes.

Cheese sticks
Breadsticks with cheese are simply ideal for a large beer party, where other bread products look out of place, and some alternative to chips and “kirieshka” is still needed.
Ingredients:
- 150 ml water;
- 2 cups of flour;
- 120 g hard cheese;
- 9 g dry yeast;
- 1 teaspoon each of honey, salt, olive oil;
- 3 tbsp. spoons of milk;
- 3 teaspoons each of sesame and poppy seeds.
Making cheese sticks
In water heated to 40 0, dilute the yeast, and then honey. In a separate bowl, mix flour with salt and olive oil. While stirring the dough in one direction, pour the honey-yeast liquid into the flour and vigorously knead into a tight, elastic dough. When it almost stops sticking to your hands, pour finely grated cheese into a bowl and continue kneading until the dough is completely ready.
The dough will only need half an hour to proof. The formation of bread sticks is carried out similarly to the previous recipes, with the only difference - each stick on the baking sheet needs to be greased with a brush dipped in milk, and only then sprinkled with sesame seeds.
Unscrupulous tanned restaurateurs force staff to display Grissini ritorti (Grissini breadsticks) without fail. Pursuing multiple goals. Firstly, crispy bread sticks exude an incredible aroma, and secondly, this is a rule of good manners. And, of course, it causes an acute feeling of hunger. All! It is done.
To bake this creation of Italian bakers, you need yeast dough. And three hours of time, at least. I don’t have that much time, so Pudov self-raising pastry flour comes to the rescue. The only negative in this case is that the flour is a bit sweet. But this can be easily corrected with salt and seasonings. Moreover, the sticks should be salty and spicy. You also need good olive oil.
In order to knead the dough, you need to combine flour, one egg, spices, salt, half a glass of water and almost all the olive oil (4 tablespoons, and leave the 5th spoon for kneading the dough and for your hands).

Then add all the seeds. Quite a bit of.

Knead our bun. It will look like a very old bun, but this has its own charm. Now you can add the last spoonful of oil.

You can simply knead with a spatula.

This is what an old man looks like.

The dough should not float; if necessary, add flour and knead again. In a bag and in the refrigerator of our retired Kolobok for half an hour.

We prepare a baking sheet and a place where we will roll out the dough into a layer.

Real grissini sticks are very long and not thick. I will "roll" to the width of my baking sheet. We take out the dough and roll it into a layer.

Cut into long strips.

Then we fold each strip in half and begin to wrap the grissini using the following method: half up and half down. That is, we do not braid the braid with our hands, but twist and stretch the workpiece right on the table.

We place our preparations on a baking sheet.

Just before placing in the oven, lightly brush with olive oil and garnish with your choice of sesame seeds and paprika. For contrast and flavor.

Bake Grissini Ritori breadsticks in a preheated oven (200 degrees) for 15-20 minutes. It depends on what degree of blush suits you.

It’s almost impossible to spoil it; the grissini will simply become drier. We take it out, let it cool slightly and start trying.

And just like that, with sauce and vegetables. It’s delicious in every way: with milk, and with beer, and with kvass, and with light wine. And on a picnic, in nature, and with sausages or kebab - it’s just magic! Bon appetit!


Grissini are crispy bread sticks originally from Italy. They are baked mainly from a yeast base, sprinkled with seeds or salt. This elegant dish is served in restaurants and bars as an aperitif, a snack to accompany alcohol, or to end a meal.

In our publication we will talk about these interesting snacks:
- you will find out where they came from,
- what is Italian grissini made from?
- what they season with
- what they eat with and how they serve it.
We will reveal the most delicious cooking options and show you the most appetizing photos.

Everything about grissini sticks - from history to recipes
Origin of the delicacy: two versions of its origin
- Let's move to Piedmont (one of the territories of Italy) in the nineteenth century. The ruler of the country lived in sadness due to the illness of the young heir. The prince had been ill for a long time. To alleviate the boy's plight, the father ordered his cook to prepare bread that would not harm the prince's digestion. The baker presented ghersino. History is silent whether the crowned heads managed to solve their human problems, but the new dish quickly spread throughout Italy. And after some time, nice bread grissini began to be baked outside the kingdom.

- There is a second version available online. You will have to travel back to Turin in the fourteenth century. A practicing doctor, whose last name is not mentioned, treated his wealthy patient for gastritis for a long time. But all attempts to bring relief to the nobleman failed. Then the healer decided to apply a special diet, the basis of which would be light food. It was important to make the bread as light as possible. To do this, the doctor divided the yeast dough into small pieces and baked them in the form of sticks. This amount of bread was enough to satisfy hunger without overloading the digestion. This is how the Italian grissini sticks appeared - dietary aid for a sick stomach.
How to prepare grissini breadsticks - features and recipe tricks

Grissini dough
It is made with yeast - unleavened or rich. Accordingly, with or without the addition of oil (vegetable/butter). Granulated sugar and egg components are also at the discretion of the hostess. In general, if there is dough left over from yeast pies/pies, it can be used for grissini.
What sprinkles traditionally decorate the top of breadsticks?
- coarse salt;
- nuts;
- sesame, flax, anise, caraway seeds;
- herbs, spices;

What do they put in the dough?
These can be different hard cheeses, grated; chopped black olives, garlic, sun-dried tomatoes, Parma ham. Its slices can be wrapped around finished products when serving, or, very finely chopped, rolled into the base.
The shape depends on the cutting of the base, its thickness, and length. Italian grissini sticks, according to recipes, can be different:
- thick/thin;
- long/short;
- smooth/twisted.
It seems that even if braided, the products will not lose their attractiveness. A golden-brown crispy crust and a minimum of crumb – a childhood dream of bread consisting only of crusts. And it was successfully realized in overseas food.

The most delicious grissini - recipe with photos
Ingredients
For the base:
- wheat flour – 420 g;
- dry yeast – 5 g;
- granulated sugar – 25 g;
- vegetable oil – 40 ml;
- warm water – 250 ml;
- salt – 3 g.
For filling No1:
- olives – 20 pcs.;
- garlic – 2 cloves.
For filling No2:
- grated cheese – 200 g;
- sun-dried tomatoes – 100 g;
- black pepper – 1⁄2 tsp.
Making Italian Grissini Breadsticks

Mix the sifted flour with sugar, salt and yeast. Pour out warm water (30-40 degrees) and oil. Stir and knead. First, use a spoon clockwise, then use your hands. You need to knead for at least ten minutes. Pour a little flour onto the table, put the mixture out of the bowl and knead with your hands intensively and slowly. If you add too much flour component, you run the risk of making the dough too tight. It should ultimately be elastic and light. At the end, you need to put it in a bowl under cling film and put it in a warm place for 20 minutes.

For filler No. 1, chop the olives and mix with chopped garlic.
For filler No2 – mix grated cheese and very finely chopped tomatoes and pepper.
During this time the mass will have time to approach. Remove it from the bowl, place it on the table and divide it into two halves.
Gather one part into a ball, roll it into a rectangle 0.5 cm thick, sprinkle with olives and garlic (take 2/3 of the part).
Place one third of the wide side on the olives, sprinkle with the remaining olives, cover with the remaining layer so that the filling is inside something like a flat pie.
Cut the resulting long rectangle into smaller rectangles one and a half to two centimeters wide. Let's stretch each piece a little and roll it into a twisted stick.

Place these pencils on greased parchment paper. At this time, we will make grissini with cheese and sun-dried tomatoes. We repeat the steps as indicated above.

Place the baking sheets with breadsticks in an oven preheated to 210 degrees for 10-15-25 minutes. It all depends on the thickness of the products and the capabilities of the oven. The indicator that determines readiness is their rosy color and delicious aroma.
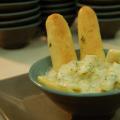
Place the finished cheese grissini and olives in a basket or on a dish. Serve with sauces. The crispy crust and soft, aromatic flesh with a spicy filling will not leave your household or guests indifferent.
The simplest grissini - a quick, easy-to-understand recipe
- Place 20 g of fresh compressed yeast in a cup. Add 2 tsp. sugar and pour 100 ml of warm water. If you add it hot, nothing will come of it. Yeast does not work in boiling water. The temperature should be up to 40 degrees. The mixture should stand for 20 minutes in a warm place and turn into a cap.
- Sift flour (1 tbsp) into a bowl, pour in the yeast mixed with sugar, add 1⁄2 tsp of salt, stir. Add more flour (2-3 cups) to form an elastic dough. Leave it to rise, covered with film. Line a baking sheet with parchment greased with vegetable oil.
- Knead the mixture and roll it into a sausage, which is cut into small pieces.
On a note
Before cutting, you can roll grated hard cheese into the dough during the kneading process and get grissini cheese sticks.

- Roll each lump with your hands into a sausage 15-25 cm long and 3-7 mm thick. You can twist it a little, like a flagellum. You will get a more interesting shape. The thinner the breadstick, the crispier it will be when it comes out.

Crispy breadsticks may become your favorite snack. They are easy to prepare and each time you can add variety to the recipe and get new flavors. You can add cheese to the dough, sprinkle with sesame seeds, herbes de Provence, chili pepper, rosemary, oregano, paprika, cumin, whatever you like. You can combine these same additives to your taste and get something unique every time. In addition to additives, you can also play around with the shapes: try baking thin, thick or twisted and choose which one you like best.
Step 1: Prepare all ingredients
7 gr. dissolve salts in 280 ml. warm water. Take warm water, but not hot, the temperature should be around 32-36 degrees.
Weigh 500 gr. flour in a large bowl (I used a mixer bowl) and mix with 1.5 teaspoons instant yeast. Mix the contents thoroughly.

It is advisable to sift old, stale flour.
If you use dry yeast, increase the amount to 4.5 teaspoons; live yeast, in turn, you need to take about 35 grams. Do not forget that both require preliminary dissolution in water. How to do this - read on the packaging.
Step 2: Knead the dough
Add water to the flour, pour 2 tbsp there. spoons of olive oil.

Stir the resulting mixture and knead the dough.

I used a planetary mixer for this. If you don’t have an assistant, place the dough on a floured surface and knead with your hands for about 15 minutes until it becomes elastic and pleasant to the touch.
After this, transfer the dough into a large bowl, cover with cling film and leave in a warm place to ferment for an hour and a half until the volume doubles. Do not forget that the container in which the dough will “grow” must be taken with a reserve so that nothing escapes.

An important point that applies to any bread dough, as well as pizza dough: do not try to make the dough less sticky by adding flour. You can add 2-3 pinches of flour maximum, and then more to sprinkle the work surface. If you overdo it, the dough will become too dense and lose its airiness. You need to achieve the desired consistency solely by kneading.
As a warm place, you can use the oven on the “light bulb” mode or by first turning on the heat for a couple of minutes.
Step 3. Shape the sticks, leave to proof
This is what the dough should look like after fermentation:

If during this time your dough has not risen well (but has risen at least a little), don’t be upset. Try waiting some more time. If there is no result, look for a problem in the ingredients, room temperature and yeast pitching technology.
You can make grissini in any shape you like. The easiest option is to roll out the dough into a layer slightly less than 1 cm thick.

Using a pizza cutter (or a regular one), cut the layer into strips 0.5-2 cm wide, depending on how you want the finished sticks to look: thin, medium or thick. In turn, roll the strips along the work surface with your hands to give the workpieces a cylindrical shape and then move them to a baking sheet for proofing.

Also, when cutting a layer of dough, you can make strips about 2 cm in width, and then twist them with a screw.


Length - vary at your discretion. If the resulting workpiece seems long, cut it with a knife. You can also change the thickness: if you see that it turns out too thick, stretch the product out in length.
After the stick is formed, transfer it to the baking sheet on which you plan to bake, and do the same with the rest of the pieces.
Leave for 30 minutes, covering the baking sheet with cling film or a kitchen towel.
It is advisable to cover the baking tray with baking paper. Also, do not place the dough pieces close to each other - during the proofing and baking process, it will increase in volume.
If you want to add spices, herbs and other aromatic additives to the dough, it is better to do this at the stage of rolling out the dough: first roll out the layer 1.5 times thicker than you plan to get in the end and season it to taste, then roll out to the desired thickness, and give desired shapes. The additives are imprinted into the dough and flavor it perfectly.

Another option: flavor olive oil and apply it to the dough before baking. To do this, pour about 80 ml. oil in a deep plate, add spices to taste and let it brew for a while. The longer it sits, the more flavors and aromas the oil will absorb.

Step 5. Preheat the oven to 200 degrees, bake for 15-20 minutes
Remove the cling film (or whatever you covered) from the baking sheet and place it in an oven preheated to 200 degrees.
Depending on the size and desired degree of goldenness, bake the grissini for 15-20 minutes. If you made very thin sticks, 10-12 may be enough, so don’t miss the moment of readiness. It is very easy to understand that the sticks are ready - their crust will acquire a beautiful golden bread color.

After you remove the baking sheet from the oven, do not rush to immediately tear off the sticks. Let them lie there for about 5 minutes, this will make it easier for them to move away.
This is what I ended up with:


And here is a rolled-butter variation:

Use ready-made grissini with tea, beer, instead of bread... In general, whatever you want.
Hello, honorable citizens!
So, in the heat of the moment, I came running to write down for you the recipe for Italian grissini in Greek, which I just pulled out of the oven.
Awesome thing!
I cooked in the PP version, but this is not important.
In general, this is a snack that is open to any impulse of imagination and now you will see it. But first let's figure it out what is grissini.
Grissini are crispy bread sticks originally from Italy, about the thickness of a finger and about the length of a pencil. Typically made from a yeast dough similar to making bread.
If you've ever been to an Italian pizzeria or trattoria, then you've probably tried them and probably couldn't tear yourself away from them either. And by the time they bring this unfortunate pizza, you have already polished off these grissini with olive paste and wine, and to hell with this pizza.

The Italians claim that the first grissini was baked back in 1679 by a baker from Turin, Antonio Brunero, on the instructions of a local doctor treating the Duke of Savoy for food poisoning.
The doctor ordered to get rid of poorly prepared bread and give the Duke only dried flat breadsticks.
Grissini comes in both savory and sweet varieties.
The basis of grissini is flour, water, olive oil and yeast. But today they are rarely made without additives.
Let me give you some ideas here about what can you add to grissini?.
Onions, garlic, olives, sun-dried tomatoes, pesto, tomato paste. sesame seeds, poppy seeds, sunflower seeds, flax, fennel, turmeric, coriander, cumin, black pepper, dried herbs: basil, oregano, thyme, rosemary, hard or soft cheeses: parmesan, pecorino, feta.

The classic is cinnamon sugar.
As for flour, you can experiment here too.
I make grissini in the Greek style, without yeast. Here they are called kritsinha and are very common here as a quick snack. In any store or kiosk you come across, you can find several types of these breadsticks.
Ideal to serve with a cheese plate, wine, salad, prosciutto, soup, spreadable cheeses and appetizers, cheese fondue, or simply take to work/school/on the coffee table in front of the TV as a light snack with tea or coffee. These grissini can also be combined with sweet additives such as honey, Nutella and jam.
Grissini recipe
for 30−40 pieces
Required Products:
- flour - 500 gr. (I have whole grain)
- baking powder - 2 tsp.
- water - 100 ml
- salt - 1 tsp.
- sugar or honey 1 tsp.
- wine - 150 ml
- soda - ½ tsp.
- olive or sunflower oil - 150 ml
- sunflower seeds - 50−60 gr. (optional)
- ground black pepper - 1 pinch (optional)
If you use white flour, then it is better to use white wine so that the grissini does not darken. In the whole grain version, this does not matter.
For breading, I used a handful of:
- raw sunflower seeds
- sesame
- oatmeal
Cooking method: