The clock from the Soviet times broke down, or rather the mechanism of the wall clock itself. I don't want to throw away the clock for my own reasons. Perhaps they fit the interior and there is no way to buy the same ones, or the clock is important as a gift for a long memory, but buying new ones is expensive or you don’t want to. In general, it will be faster and cheaper to completely replace a broken clockwork (which keeps time) than trying to fix it.
Then I decided to look for a clock mechanism for sale separately.
For some reason it seemed to me that the clock mechanism was expensive and made up a large
part of the cost of the watch. It turned out that the watch mechanism can be bought in bulk from 60
rubles! True, it is with a discrete course and noisy. Moreover, these mechanisms
standardized and have the same mounting dimensions. Find a store that
I would sell the watch mechanisms I needed at retail, it turned out to be difficult. V
in the end, for 150 rubles I bought a silent mechanism with floating fur in the Bangood store Coupon(12% off) Code: BGHome
The old mechanism worked for 20 years.
 New silent clock mechanism.
 s, everything I put it in the old watch case, everything fit fine and the hands also came up, except for the second in my case.You can change the mechanism yourself, since now the repair of wall clocks has become very simple and cheap. I bought it, unscrewed the old one, put the new one in, and you're done.
Arrows packed in a separate bag

The task is to remove the old mechanism from the watch case. Then install the new mechanism. After that, install the arrows on the axis of the mechanism: the first is the hour, the second is the minute, the last is the second.
.

This mechanism is very quiet and takes several steps in a second. I am writing after a couple of months - it works perfectly, does not run away, does not knock, and does not interfere with sleep at night.

If your quartz wall clock is brokenor tired of their loud ticking, the most cheap way get workingsilent clock is to buy a separate clock mechanism and install it yourselfhim to the old building.You can also create on the basis of the clockwork

Let's start to figure it out!
Most of the mechanisms (almost all) presented in various hobby shops are quartz watch movements. They trace their history back to 1957, have high accuracy (plus/minus one second per day) and are perfect for everyday use. Such a mechanism can be called an electromechanical type.
Once per second, the quartz crystal transmits an impulse to the electronic unit. From there, it is transferred to the engine, which pushes the arrows. An ordinary finger-type battery (AA battery) is used as a power supply for the electronic unit.
Among the shortcomings of such a mechanism, one can single out that after a few years of use, the crystal loses its properties, and the watch begins to rush. However, this problem is easily solved by purchasing a new mechanism (since the main advantage of quartz watch movements is their inexpensive price) or by replacing the crystal in a watch shop.
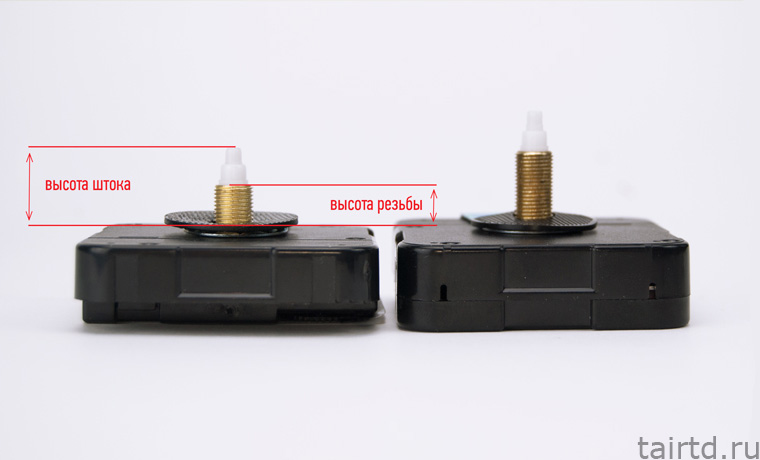
Stem and Thread Height
To choose the right clockwork, you need to build on the thickness of the workpiece first.
The main parameters that are indicated in the clockwork are the overall height of the rod and the height of the thread.
After you put the clock base on the stem, the thread should rise above the base for a few more turns (about 2-3 mm) so that its height is enough to put a metal washer and tighten the nut.
In the name of the watch mechanism, the first digit is the stem height, and the second is the thread height (16/9, 18/12, 20/14, etc.).

When buying a watch movement, it is better to know in advance the thickness of the workpiece that you will be decorating in order to select a watch movement with a suitable stem height. By the way, do not forget to consider the decor itself! The number of layers of primer, paint, varnish and especially relief elements can greatly increase the overall thickness of the workpiece.
Example. We have clockwork 15/6.7. This means that we need to subtract two millimeters from the height of 6.7 (to secure the nut). It turns out that for such a mechanism we can use a workpiece no thicker than 4.7 mm.
Simple and reinforced watch movements and hands
Watch mechanisms are simple and reinforced.
Reinforced watch movements have increased torque, parts made from materials of higher quality. Such mechanisms are more reliable and designed to interact well with large hands (up to 35 cm, up to 50 cm, and some manufacturers even up to 1 meter) and large diameter bases. When choosing hands for clockwork, it is important that they match each other! Arrows for normal and reinforced mechanisms are different, and are not interchangeable.

If you are going to decorate a workpiece of a rather large diameter, it would be more logical for you to take a closer look at reinforced clockwork and hands.
Quiet: discrete and smooth running
Watch movements are distinguished by the type of movement of the second hand:
Watch movements with discrete movement - the second hand makes 60 movements per minute, making a characteristic sound when changing each division, the clock is ticking. However, there are so-called "silent" models, the sound of which is almost imperceptible.
It is best to check the clockwork upon purchase to assess how quiet it is. In our showroom you can always ask for a battery and check the clockwork :)
Movements with a smooth running - the second hand makes 360 movements per minute and visually it seems that it "floats" smoothly. Such models are called silent, but they still make some kind of sound and this must also be taken into account. In addition, mechanisms of this type cost at least twice as much as discrete ones, and due to the fact that the number of pulses per minute is six times higher, the batteries in them run out much faster.
Choosing hands for watch mechanisms
Like mechanisms, watch hands are simple and reinforced. Simple arrows fit mechanisms simple type, and reinforced hands are specially designed for reinforced mechanisms.
Arrows can be purchased individually or in sets.
The hands are traditionally hours, minutes and seconds.
However, the second hand can be neglected, and a stub stud can be put instead.

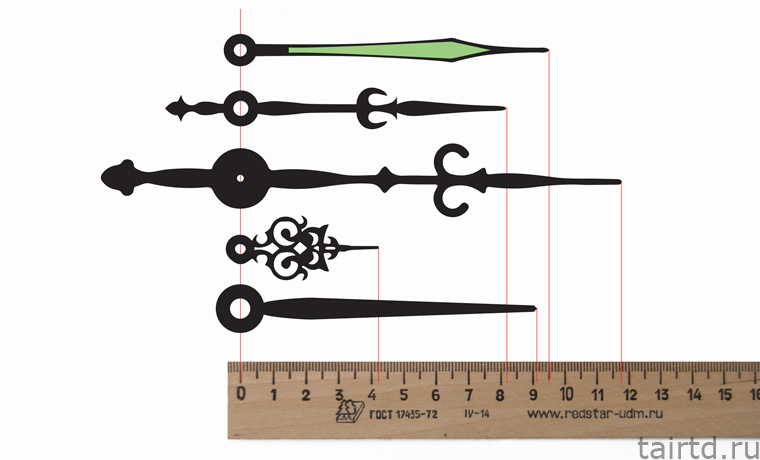
Arrows come in a wide variety of shapes, colors and sizes. The length of the arrow is indicated from the center of the hole to the tip of the arrow.

Sometimes a protective transparent film is stuck on the arrows - do not forget to remove it before using the arrows.

After the film is removed, the arrows can also be decorated, for example, aged with bitumen or painted in a different color.

Assembly order of the clockwork
So, we chose the mechanism, the arrows too. It remains quite a bit: to collect all the details together and start the clock.

Step by step with photos, consider the process of assembling the clock mechanism.
1. We take the clockwork.

2. We put on a metal loop. If you will use the clock in some other way, and not hang it on a carnation in the wall, then this step can be skipped.

3. We put on a rubber washer-gasket.

4. We put on the base for the clock! We carefully scroll the entire thread. Sometimes, due to layers of primer, varnish and paint, the hole in the workpiece is clogged and the threaded rod does not fit into it.
In this case, clean the hole with something sharp, or sand off the excess with sandpaper rolled into a tube.

5. We put on a metal washer.

6. And we fix the mechanism by tightening the metal nut.

7. Putting on hour hand.

8. Now put on the minute hand.

9. We put on a second hand or a carnation plug.

10. We turn over our clock and insert the battery into the clock mechanism. Ready!

Now you know how to select and assemble watch movements and hands. It's time to decorate the clock!


It is always nice when the thing you decorate can be useful and find application in the household. That is why craftsmen and craftswomen of all stripes love to choose watch blanks as the basis for creativity. After the decoration process is completed, all that remains is to choose the clockwork, assemble it and voila! - the hands began to move and began to count seconds, minutes, hours ...
However, this very moment can create difficulties for a novice creator. The range of watch movements is large and for the first time it is quite difficult to figure out what a stem is, how to choose the appropriate diameter and thread height, what is the difference simple mechanisms from reinforced ones, and, most importantly, in what order to assemble all these nuts and arrows? ..
Let's start to figure it out!
Most of the mechanisms (almost all) presented in various hobby shops are quartz watch movements. They trace their history back to 1957, have high accuracy (plus/minus one second per day) and are perfect for everyday use. Such a mechanism can be called an electromechanical type. Once per second, the quartz crystal transmits an impulse to the electronic unit. From there, it is transferred to the engine, which pushes the arrows. An ordinary finger-type battery (AA battery) is used as a power supply for the electronic unit.
Among the shortcomings of such a mechanism, one can single out that after a few years of use, the crystal loses its properties, and the watch begins to rush. However, this problem is easily solved by buying a new mechanism (since the main advantage of quartz watch movements is their inexpensive price) or by replacing the crystal in a watch workshop.
Stem and Thread Height
To choose the right clockwork, you need to build on the thickness of the workpiece first.
The main parameters that are indicated in the clockwork are the overall height of the stem and the height of the thread. After you put the clock base on the stem, the thread should rise above the base for a few more turns (about 2-3 mm) so that its height is enough to put a metal washer and tighten the nut.
In the name of the clock mechanism, the first digit is the stem height, and the second is the thread height (16/9, 18/12, 20/14, etc.).
When buying a watch movement, it is better to know in advance the thickness of the workpiece that you will be decorating in order to select a watch movement with a suitable stem height. By the way, do not forget to consider the decor itself! The number of layers of primer, paint, varnish and especially relief elements can greatly increase the overall thickness of the workpiece.
Example. We have clockwork 15/6.7. This means that we need to subtract two millimeters from the height of 6.7 (to secure the nut). It turns out that for such a mechanism we can use a workpiece no thicker than 4.7 mm.
Simple and reinforced watch movements and hands
Watch mechanisms are simple and reinforced.
Reinforced watch movements have increased torque, parts made from materials of higher quality. Such mechanisms are more reliable and designed to interact well with large hands (up to 35 cm, up to 50 cm, and some manufacturers even up to 1 meter) and large diameter bases. When choosing hands for clockwork, it is important that they match each other! Arrows for normal and reinforced mechanisms are different, and are not interchangeable.

If you are going to decorate a workpiece of a rather large diameter, it would be more logical for you to take a closer look at reinforced clockwork and hands.
Quiet: discrete and smooth running
Watch movements are distinguished by the type of movement of the second hand:
watch movements with discrete stroke- the second hand makes 60 movements per minute, making a characteristic sound when changing each division, the clock is ticking. However, there are so-called "silent" models, the sound of which is almost imperceptible. It is best to check the clockwork upon purchase to assess how quiet it is. In our showroom you can always ask for a battery and check the clockwork :)
watch movements with smooth running- the second hand makes 360 movements per minute and visually it seems that it "floats" smoothly. Such models are called silent, but they still make some kind of sound and this must also be taken into account. In addition, mechanisms of this type cost at least twice as much as discrete ones, and due to the fact that the number of pulses per minute is six times higher, the batteries in them run out much faster.
Choosing hands for watch mechanisms
Like mechanisms, watch hands are simple and reinforced. Simple hands are suitable for simple types of movements, while heavy-duty hands are specially designed for heavy-duty movements. Arrows can be purchased individually or in sets.
The hands are traditionally hours, minutes and seconds. However, the second hand can be neglected, and a stub stud can be put instead.

Arrows come in a wide variety of shapes, colors and sizes. The length of the arrow is indicated from the center of the hole to the tip of the arrow.
Sometimes a protective transparent film is stuck on the arrows - do not forget to remove it before using the arrows.

After the film is removed, the arrows can also be decorated, for example, aged with bitumen or painted in a different color.

Assembly order of the clockwork
So, we chose the mechanism, the arrows too. It remains quite a bit: to collect all the details together and start the clock.

Step by step with photos, consider the process of assembling the clock mechanism.
1. We take the clockwork.
2. We put on a metal loop. If you will use the clock in some other way, and not hang it on a carnation in the wall, then this step can be skipped.
3. We put on a rubber washer-gasket.

4. We put on the base for the clock! We carefully scroll the entire thread. Sometimes, due to layers of primer, varnish and paint, the hole in the workpiece is clogged and the threaded rod does not fit into it. In this case, clean the hole with something sharp, or sand off the excess with sandpaper rolled into a tube.

5. We put on a metal washer.
6. And we fix the mechanism by tightening the metal nut.

7. We put on the hour hand.

8. Now put on the minute hand.
9. We put on a second hand or a carnation plug.

10. We turn over our clock and insert the battery into the clock mechanism. Ready!


Our Community has collected excellent material about painting and decoupage of watches.
But we missed one moment - clockwork installation.
Helpful information about clockwork:
The clockwork case has the following dimensions: width: 56 mm, height: 56 mm, thickness: 16 mm, stem diameter: 8 mm (diameter of the hole for the stem in the dial).
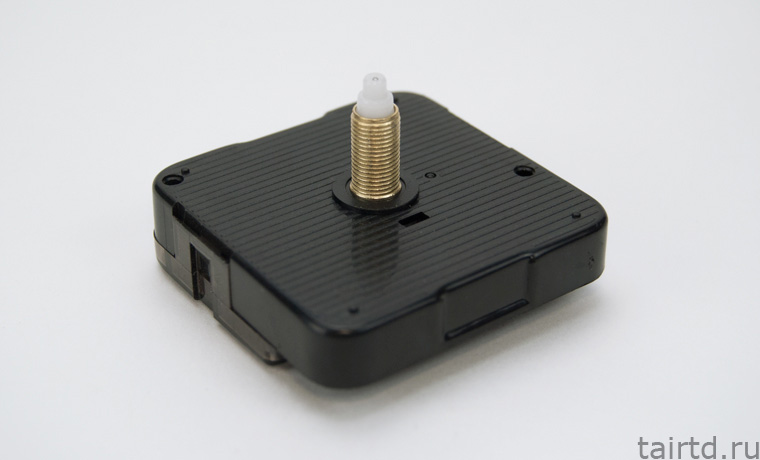
The stem is the part of the mechanism that is threaded through a hole in the center of the dial. It consists of a threaded part, a seat for the hour hand, a seat for the minute hand and a hole for installing the second hand.

The threaded part of the stem must be at least 2 mm larger than the thickness of the dial. This is necessary in order to secure the mechanism (install the washer and tighten the nut).
For example: stem 16/9 means that the height of the threaded part = 9 mm. This means that the thickness of the dial must be no more than 7 mm so that the mechanism with such a stem can be fixed.
In the name of the movement, the first is the overall size of the rod, and the second is the size of the threaded part (12/6, 16/9, 18/12, etc.)
Watch mechanisms differ in the course of the second hand:
For a metal loop, the clock can be hung:

The size of the arrows is indicated from the center of the hole to the tip of the arrow:


It happens on the arrows protective film, which must be removed during installation:

Installing the clockwork and hands on the workpiece:

1. Install the mounting loop on the mechanism
2. Pass the rod of the mechanism into the hole on the product. Fit the washer, tighten the nut.
3. Put arrows on the rod: first the hour hand, then the minute and second (it must be inserted into the hole). In order not to damage the arrows during mounting on the stem, it is recommended to use a tube of the desired diameter. If there is no special tool at hand, you can use a simple ballpoint pen.
Install a metal hanging loop if needed. The loop is installed on a special ledge ("piglet") at the base of the stem. The protrusion is part of the body of the mechanism, so the load is on the entire body, and not on the stem. 
Watch weight in use metal loop must not exceed 10 kg.
For plastic loop no more than 5 kg.
Install the sealing rubber washer. The sealing washer does not allow the mechanism to rotate on the product. And also relieves excess "stress" with a strong tightening of the nut. 
Pass the stem of the mechanism through the hole in the dial. About the thickness of the dial, you need to say ...
The diameter of the hole for the stem in the dial is 8 mm.
And when using a curly nut 9 mm.
Install brass washer 
Tighten the nut. 
Don't tighten the nut too tight. Overtightening the nut may damage the mechanism or affect the accuracy of the movement.
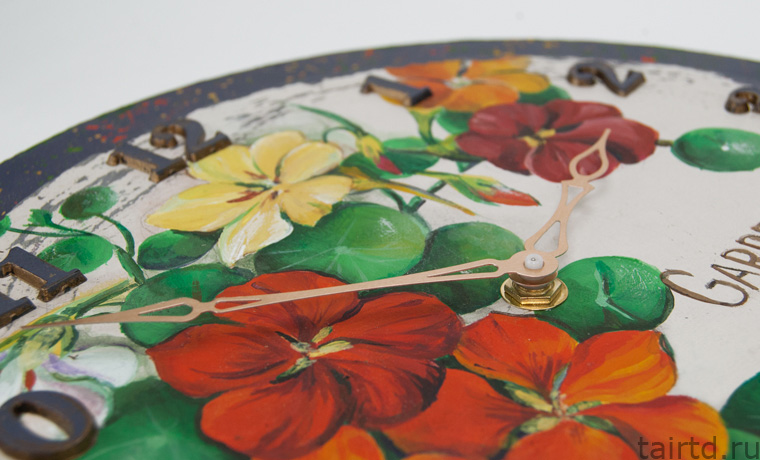
Set the hour and minute hands on the minute hand.
To install the arrows, it is most convenient to use a tube of a suitable diameter. A simple ballpoint pen can work for this. 
The hour and minute hands must be set to 12 o'clock. Otherwise, the time will not be displayed correctly.
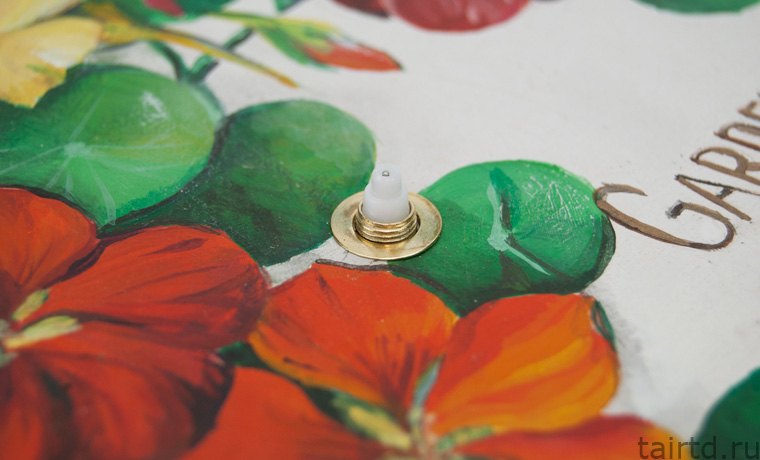
Set the second hand.
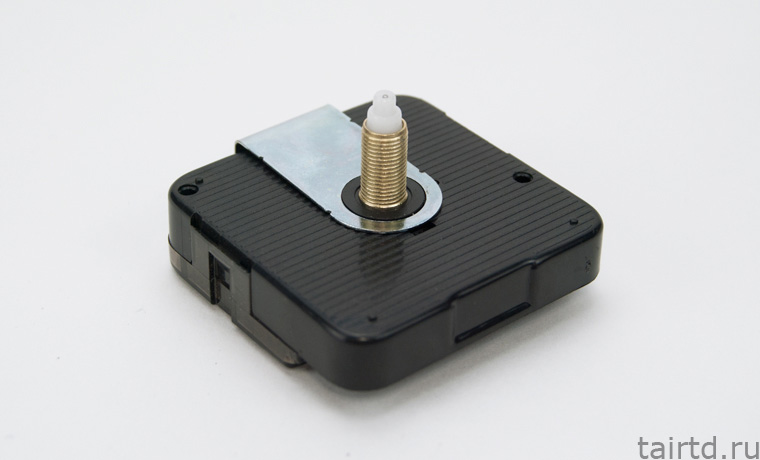
When setting the second hand, when pressing, it is necessary to hold the mechanism with reverse side(shown in the photo). Thus, in order not to squeeze out the pin on which the second hand is mounted. 
figured nut
The curly nut is used for two reasons:1. Some people find it appearance more careful. Indeed, it looks more compact than a standard washer with a nut.
2. Curly nut allows you to "increase" the height of the threaded part by 1-2 mm. This becomes relevant when, for some reason, these millimeters are not enough. For example, there is no mechanism with a suitable thread height.
As seen in the figure, dial thickness when using a figure nut (on the right) can be more than when using a conventional nut when installed on a mechanism with the same thread height. The only limitation on the amount of "extension" is the fit of the hour hand - it is necessary that the curly nut does not interfere with the rotation of the hand.
The diameter of the hole in the dial for a figured nut = 9 mm (1 mm more than for a conventional nut), because she goes deeper into the dial.

 The stem has two parts:
 threaded part- for fastening the mechanism on the watch. A nut is screwed onto it.
minute clock- to install shooters on it.
Threaded part
There are different "heights" for different dial thickness.Below are options for mechanisms with different threaded parts. You can experiment and choose the height you need. (here you can pick up a stock ...)
Stem selection for dial thickness:
Thread height: 6 mm
Thread space distribution:
Sealing
washer: 1 mm
Washer and Nut: 1 mm
Remaining space for dial: 3 mm
Available stems:
Items 1-10 out of 14.
| View | Name | Minute clock type | Overall Height (mm) | Thread height (mm) | Max. dial thickness (mm) |
|---|---|---|---|---|---|
 | S1 12/6 | S1 | 12 | 6 | 3 |
 | S1 16/9 | S1 | 16 | 9 | 7 |
 | S1 18/12 | S1 | 18 | 12 | 10 |
 | S1 Seiko 13/5.2 | S1 Seiko | 13 | 5.2 | 3.2 |
 | S1 Seiko 15/6.7 | S1 Seiko | 15 | 6.7 | 4.7 |
 | S1 Seiko 17/9 | S1 Seiko | 17 | 9 | 7 |
 | S2 15/6.7 | S2 | 15 | 6.7 | 4.7 |
 | S2 17/8.7 | S2 | 17 | 8.7 | 6.7 |
 | S2 22/11.7 | S2 | 22 | 11.7 | 10.7 |
 | S2 23/14.7 | S2 | 23 | 14.7 | 13.7 |


