Page 1 of 2
This electrical appliance - a hair dryer - is very popular and is often indispensable in everyday life. Due to high consumer demand, the designs of most hair dryers have become very similar, and the workmanship and price have dropped. Today it is very difficult to buy a truly durable hair dryer. The practice of repairing hair dryers of various brands suggests that the breakdowns that occur are of the same type and, as a rule, are not fatal, but are easily removable without serious financial expenditures.
Any electric hair dryer in its design contains two main, large elements: a fan and a heater. The fan drives air through the heater (heating element), sucking it in behind the hair dryer and ejecting it from the front when heated.

Hair dryer device for drying hair.
1 - propeller; 2 - electric motor; 3 - heater; 4 - thermal protection; 5 - mode switch; 6 - power cable.
For household hair dryers, the fan is built on the basis of low-voltage (12-18 V) collector DC motors. Such a motor cannot be powered directly from the 220 V network. alternating current... To achieve the required voltage drop, a separate coil (let's call it a step-down coil) is used inside the heating element. To rectify the voltage, a full-wave rectifier (diode bridge) is used, mounted by a hinged mounting on the contacts of an electric motor. A plastic propeller is mounted on the metal shaft of the engine, which consists of three or more blades.


The heating element of the hair dryer is a frame made of non-combustible material with several windings of nichrome wire (spiral). Depending on the number of operating modes of the hair dryer, there can be two or three windings, one of which is lowering.

Heating element with two windings.
The hot coils of the heating element must be constantly blasted with cold air, especially when operating at maximum power. If, for any reason, the air supply has become insufficient or has completely stopped (for example, the engine has failed), then, for reasons fire safety and in order to avoid burnout of the heating element, the hair dryer should automatically shut off. Such an emergency shutdown occurs due to the presence of two temperature-sensitive elements in the hair dryer device at once - two "protection lines" inside the heater.
The first "frontier" is the thermostat. It is a pair of closed contacts attached to. Being close to the outlet of heated air, the contacts are intensively blown by it. When the outgoing air reaches a critical temperature, the contacts move away from each other, the power supply circuit of the hair dryer is opened. After a few minutes, when the bimetallic plate cools down, the contacts close again and the hair dryer turns on.

Bimetallic thermostats.
If the above protection for some reason did not work at the right time, then a few seconds later the "second line" of protection - a thermal fuse - is activated. This fuse is disposable and needs to be replaced after blown.

Fusible thermal fuse.
Hair dryer Rowenta CV 4030.
To see the internal structure of a household hair dryer, let's take a look at its typical representative - Rowenta CV 4030. This model is equipped with a fan based on a low-voltage motor, the heating element consists of one downward spiral and two heating ones. The hair dryer has three operating modes, in the first mode the fan speed is lower than in the other two. A schematic diagram of this hair dryer is presented below.

In the first position of the switch SW1 mains supply passed through the plug XP1, filter C1R1, protective elements F1, F2, diode VD5(necessary to cut off one half-wave of the alternating voltage) goes to the downward spiral H1, through it the electric motor is powered M1... Diodes VD1-VD4 necessary for straightening a lowered spiral H1 alternating voltage. Inductors L1, L2 and capacitors C2, C3 serve to reduce interference arising from the operation of the brush motor. Through diode VD5 power is also supplied to the heating coil H2.
When flipping the switch SW2 to position "2", diode VD5 short-circuits and goes out of the game. The engine starts to run at maximum speed, the spiral H2 heats up more. Third position of the switch slider SW2 corresponds to the mode of maximum power consumption when parallel to the spiral H2 the spiral is connected H3... In this position, the outlet air temperature is at its highest. The "cool" button is included in the break of both heating coils, when it is pressed, only the electric motor remains on through the coil H1, helix H2 and H3 are de-energized.


The process of opening the hair dryer Rowenta cv4030.


Hair dryer in semi-disassembled form.
19.02.2018
Today, the popularity of self-repair of small household appliances is steadily increasing. Besides, there are different situations. For example, you urgently need to disassemble a Bosch, Philips or Rowenta hairdryer, but there is no instruction at hand. What to do in this case? Today we will try to tell you more about this.
How to disassemble a Philips hair dryer?
Sometimes, after an unsuccessful fall or after another mechanical impact, this device stops working. A great way out of this difficult situation will be a complete disassembly of the hair dryer. Do you want to know how to disassemble a hair dryer? There is nothing difficult in this, the main thing is to follow the steps of the instructions.
The first step is to disassemble the case. In most models (for example, rowenta pro 2300 and braun 3536), it opens into two identical halves. To comply with safety rules, before unscrewing the screws, be sure to unplug the power cord from the outlet.
Usually the body of the device is held by simple metal screws. They can be with non-standard heads in the form of a plus sign, a pitchfork or an asterisk. Therefore, before disassembling a philips hair dryer, you will need to take care of the availability of the necessary tools.
After opening the device, you will discover the internal mechanisms of the device, which are responsible for its smooth functioning. If the hair dryer breaks down, then the cause of the breakdown will be hidden in these details. In addition, some models have additional fasteners in the form of latches and hidden screws hidden under decorative strips.
Would you like to know how to disassemble the philips salondry control hairdryer? To do this, you need to get acquainted with its internal structure and carefully inspect all the details. The most common failure of many devices is a damaged power cord. If there are burnt parts or kinks, it will be necessary to re-solder it.
The main internal element of any hair dryer is the fan. It is driven by an electric motor and draws in air through a special opening with a grill. In some cases, the breakdown of the device is associated with its contamination, therefore, if there is dust, it should be thoroughly cleaned.
If, when the device is connected to the power supply, a crackling sound is heard and sparks are visible, then this indicates a breakdown of the engine. This problem can be solved by replacing the copper windings and the diode bridge. However, it is difficult to carry out such repairs at home, so in this case you should contact a workshop.
Do you want to know how to disassemble the rowenta brush activ 1000 hair dryer? The design of this device has several nuances compared to a conventional hair dryer. In order to inspect the internal elements and mechanisms in the event of a breakdown, you need to perform a few simple steps:
- Remove the plastic cap from the front of the device as it will interfere with disassembly later on. To do this, it must be smoothly moved left and right until it is completely disconnected from the device;
- When removing the plastic ring, it is not recommended to use screwdrivers and other tools, as they can damage the case and leave visible scratches on it;
- After that, it is necessary to remove the rear nozzle-mesh, which interferes with the disassembly of the device. In this case, you should not make much effort, since this can lead to its breakdown;
- Modern models of hair dryers of many brands (Rovent, Remington, Scarlet and others) do not have metal bolts on the body. The fastening of the two parts of the hair dryer is done with latches. To separate them, the two halves of the case should be pulled away from each other, while rotating.
So that you do not have to repair household appliances yourself, do you need to buy from all the variety on the market? Before buying, you need to pay attention to the reputation of the brand, since only well-known manufacturers are engaged in the production of quality products. Other selection criteria are power, number of operating modes, cold air supply function.

We told you about the main features of the internal device of the hair dryer, so you shouldn't have any questions about how to disassemble the hair dryer rovent brush asset and other brands. However, remember that when you repair a small household appliances Be sure to follow the safety precautions and be sure to remove the power cord from the outlet.
- The main breakdowns and their causes
- Hair dryer repair: correct diagnosis and treatment
With the help of a hair dryer, you can heat up old varnish or paint to remove them from the surface. During construction, it is used to solder metal, as well as to facilitate work with plastic pipes... In a heated state, they lend themselves well to bending. This tool is very whimsical, and in case of improper use it will have to be repaired, and this is not an easy task.
Consider how to repair a building hair dryer with your own hands. A person can always contact specialized service centers for such a service, but this is not always advisable. In some cases, breakdowns can be diagnosed independently, respectively, and the repair of the construction hair dryer itself can be done. Before that, it is imperative to get acquainted with the device device. This is where the instruction should begin.
The device and its basic principles
Opening the device reveals a small motor, heating element and fan. The heated air exits through the nozzle. Everything is simple enough. Basically, the structure does not differ from an ordinary hair dryer. The only difference is the higher power of the device. The performance of the equipment directly depends on how many liters of air it can pass through itself in 1 minute. Many hair dryer models on the market today have a number of additional functions. These include:

- temperature control;
- air flow regulation;
- selection of the required operating mode;
- numerous additional attachments that will significantly simplify the work with this or that material;
- LED indicator that determines the heating temperature.
Of course, these are not all the options that a building hair dryer can have. There are others. You should always remember that the more there are, the more difficult it is to make repairs.
Back to the table of contents
The main breakdowns and their causes
Breakage of such a tool can occur at any time of its operation. It is especially unpleasant if this is in the midst of construction work. In most cases, the person himself is to blame, who is often negligent about the power tool. The main breakdowns are considered to be the bend of the power cord, a malfunction of the button for turning on the tool and adjusting the temperature. Of course, more global breakdowns can also occur.

For example, a motor or fan may be damaged. The heating element is not eternal in this respect. Most of the faults can be diagnosed on their own, but there are those that have to be identified for a long time. In this situation, it is best to contact a specialized service center.
If a person is confident in his abilities, then he can repair the hair dryer on his own.
The most difficult breakdowns include engine or fan breakdown. In most cases they need to be replaced and it is difficult to find the right spare parts.
The other day, my irresistible, unique and intimate Wife began to complain that her beloved the Remington hair dryer does not work... This manifested itself as interruptions in normal operation depending on the position of the power cable. That is, if the cable is pulled, the hair dryer turns off, if you press it against the hair dryer, warm air starts to flow. I immediately realized what was what and began to tear off my shirt and wave my favorite soldering iron - they say, let me disassemble and repair the hair dryer right here and right now.
In general, after a short groan, my screwdrivers clashed with her hairdryer in an epic battle before the first ... soldering. I will say right away - this instruction can be used for most hair dryers from Rowenta, Braun, Philips, Bosch and Scarlett... Of course, all hair dryers are disassembled in different ways, but they have the same device principle. Go.
Remington hair dryer disassembly
First you need remove the plugs on the handle or all over the body of your favorite hair dryer. In my case, these are three plugs on the handle of the hair dryer. Lately it became fashionable to make the case of the hair dryer on snaps or even to fuse the two halves together.
The latches can be defeated, but if the halves are soldered, then only cut along the seam, and then glue it with epoxy, in general, is unpromising. So when buying a hair dryer for your beloved, pay attention to its design. It is convenient to remove the plugs with a needle or sharp thin knife... Be prepared for the plastic to bend around and immediately warn your Wife about this. The problem with burrs on the plastic can be solved at the end of the repair using the same knife.
 Under the plugs I found U-screwdriver screws as in the photo. In general, such screws were invented against vandals for outdoor equipment and to protect technology from curious children. They are called Security.
Such screws, only larger and with round holes stand in an elevator in my house. It's good that I had the right two-bit bit just for these screws. Okay, elevator, just try to get stuck between floors one more time.
 If you do not have such a screwdriver, then you can make a U-shaped screwdriver from an old slotted screwdriver, simply by making a cut in it with a hacksaw.
 After disassembling the handle of the hair dryer, we see the picture as in the photo - the hot air supply switch (blue), the power mode switch of the hair dryer (red), twisting of wires 220 V.
Everything is attentive here inspecting for a cliff any wire or burn marks, melting on the switches.
 If everything is in order here, then unscrew the two screws of the wire holder at the very bottom of the hair dryer handle. Need to find a broken wire- usually it is located near the exit of the wire from the handle of the hair dryer.
Such weakness immediately visible if the wire is bent in half.
Hair Dryer Repair Remington
 For check we clean the braiding of the power cable in the place of inflection and we see burnt copper wires.
 Boldly cut the wire and prepare it for installation.
As a rule, hair dryers are quite often subject to various breakdowns, and you have to buy a new one. The device is not the most expensive, of course - it is quite possible to purchase another hair dryer, but at the same time it is quite simple, and quite a few will be able to restore its performance without much effort.
Principle of operation
All hair dryers, regardless of the brand and type of case, have the same operating principle - the electric motor drives the fan, which drives air through the heating coils. Typically, hair dryers have a heating level switch, providing various thermal modes, - the switch switches the serial connection the right amount spirals - the fewer there are in the circuit - the greater the current flowing - the more heating. Also, hair dryers are equipped with thermal protection that turns off the device when the permissible temperature of the spiral is exceeded. If such protection has worked, be sure to disconnect the hair dryer from the network, because when the temperature drops, the thermostat will restore the electrical circuit - and the hair dryer will work.
Major malfunctions
Troubleshooting involves disassembling the case. It is usually held together with a pair of self-tapping screws and latches on the halves of the case, which are quite easy to break, so you need to proceed with caution. Although there will be no special tragedy with a broken latch - the case may well hold on to self-tapping screws, or you can apply dotted glue in several places during assembly, but quite a bit - all of a sudden you will have to disassemble it.
The smell of burning- quite often occurs when a hair dryer is operating, since the fan sucks in not only air through the air intake, but also hair, which then gets on the hot coil and, burning, causes an unpleasant odor.
Another reason is also possible - insufficient air flow passing through the fan. This can be caused by overlapping the ventilation grilles by hand, or clogging of the filter, if such is provided in this model, - hair, fluff, dust, etc. A weak flow can also be caused by slow fan speeds.
Slow fan rotation- This is usually caused by hair being wrapped around the motor shaft, which interferes with its rotation. As a rule, the fan is tightly mounted on the shaft, and it is impossible to remove it for the convenience of hair removal, since it is risky to apply great efforts - fragile plastic can easily be broken. Therefore, it is convenient to use tweezers - gradually pinching off the coiled hair until they are completely removed.
The opposite situation also occurs (much less often) - the fan does not sit tightly on the shaft, as a result, the engine runs at normal speed, but the shaft rotates in the fan housing. The solution is simple - to put the fan on the shaft using a suitable glue.
The air comes out cold- in this case, there may be several reasons:
- Poor contact in mode switch - Remedy depends on switch design. Often open-type flexible elastic contact strips are used - it is enough to bend them correctly or clean the contact points. If the switch is closed - replace it - is inexpensive.
- Broken wiring - the conductor leading to the spirals or the switch may well be broken off or fall off at the soldering point.
- Breakage of the heating coil. It will not break off just like that - most likely it is a burnout. It can be restored simply by twisting, but such a connection will not be durable - poor contact will gradually provoke carbon deposits, which will further increase the resistance at this point - as a result, sooner or later, it will have to be repaired again. It is better to do the same twist, but then press it with a copper or brass tube of a suitable diameter (a thin tube from a refrigerator compressor works well). Soldering in this case is useless - the heating temperature of the coil will melt the solder.

- there can be many reasons and almost all of them are easily removable - a break in the power cord, a lack of contact in a sliding contact pair at the point where the cord enters the case, a break in the internal wiring, a lack of contact in a switch, etc. The worst thing that can happen is Is the combustion of the engine. If you have something to replace - good (so do not throw out old faulty hair dryers - after all, spare parts), but no - then you really need a new hair dryer - there is little chance of repairing the engine.


The design and electrical circuit of the hair dryer are not very complicated and will be too tough for any beginner in the study of electrical engineering.
So, unscrew the two screws and half the handle.
This hair dryer stopped holding the blower impeller on the electric motor shaft and was fixed with auto-sealant.Consider completely its device and possible breakdowns.
The hair dryer consists of two circuits connected in parallel (after the switch).1. Consecutively trace the passage of current through the first circuit from the point of connection of circuits "A" to point "B":
(point "A" - working heating element "PH" (green) - diode bridge "D1-D4", from which the electric motor "M" is powered - point "B").2. Second chain:
(point "A" - additional heating element "DN" (red) - thermo-switch (thermocouple) "T" - micro-switch "Vmkr" - point "B").
The three-position switch performs actions in the common circuit in three positions:1. 0 - the common circuit is broken, the power is off;
3. II - the switch connects the circuit directly to the network;
Consider a circuit No. 1 of a working heating with an electric motor.
The heating element is a wire wound with a spiral, which has a high resistivity to current (for example, nichrome).The electric motor is supplied with a DC voltage obtained by means of a diode bridge consisting of four diodes.
Let us single out two elements of the circuit that are consumers (loads), these are the spiral and the diode bridge (we do not consider the motor, since it is the load of the bridge).
In the circuit, the elements are located in series (one after the other), which means that the voltage drop across each of them will depend on its own resistance and their sum will be equal to the mains voltage at the third position of the switch.
We conclude:
The resistance (depending on the material and length of the wire) of the element is calculated so that during normal heating, the difference between the voltage of the 220V network and the voltage drop across this element is equal to the voltage drop required for the operation of the electric motor, i.e. to power the diode bridge.
U network - U spiral = U bridge.
If this equality is not observed, work is impossible, i.e. if for some reason the spiral burns out, it should be replaced with a similar one with the same resistivity.If the electric motor fails, we replace it with an identical one.
An open or breakdown of diodes may occur in the diode bridge.


The repair of any hair dryer begins with its complete or partial disassembly, but before we start this process, let's find the answer to the above question.
Absolutely any hair dryer can be divided into two main elements - a heating element and an electric motor. The heating element is usually a nichrome spiral, it is she who heats the air. And DC motors generate warm, directional airflow.

Electric motors in hair dryers are 12, 24 and 36 Volt, but sometimes 220 Volt electric motors are found in very cheap Chinese models. A propeller is attached to the rotor of the engine, which ensures the removal of warm air from the spiral. The power of the hair dryer varies from the thickness of the spiral and the power of the electric motor.
Let's consider the design of the hair dryer in more detail:

1 - nozzle-diffuser, 2 - body, 3 - air duct, 4 - handle, 5 - cord twist protection, 6 - "Cold air" mode button, 7 - air flow temperature switch, 8 - air flow rate switch, 9 - Turbo mode button - maximum air flow, 10 - hair dryer hanging loop.
The body of the hair dryer consists of two plastic halves, a front and back ring and a mesh. The mesh hemisphere is dismantled by slightly turning it counterclockwise. The hardest part is to pull out the back ring where the power cord enters the base. This ring has lugs with holes and latches. The front ring is removable, although it is a little easier, it also has two latches on the body halves and recesses in the ring (in the photo below, only one protrusion is clearly visible and the ring is worn before it).

the main elements of the hair dryer and the diagram in the photos below:

Rowenta cv8525 hair dryer works, but does not heat the air |
Hair dryer Rowenta repair and disassembly: First, the front metal ring is removed, then the rear mesh hides two self-tapping screws under it, unscrew them and remove the rear cover from the handle (on latches). There are five self-tapping screws under the cover, unscrew them.

Inspection revealed a classic contact violation in the button that turns off the heating of the air. The contact moved a little and stopped closing the heating circuit of the spiral. The renovation boiled down to correct installation contact position and melting the top of the plastic rack with a conventional soldering iron
Dismantling and repair of the Remington hair dryer |
Instability of work. The hairdryer was switched off periodically. First you need to remove the plugs on the handle of the hair dryer. You can remove the plugs with a sewing needle or the sharp end of a thin knife.

Under the plugs there are screws for a special U-shaped screwdriver. After disassembling the handle, we see - the switch for the supply of warm air (blue), the power switch for the hair dryer (red). Here you need to carefully inspect everything in case of a very probable breakage of conductors or melting on the switches.

The hair dryer consists of a motor, a fan, heating elements, electrical circuit that makes the elements work consistently. Depending on the number of modes, the manufacturer, the element base, appearance, and the composition of the switches are different. But nothing more complicated than a semiconductor thyristor will not be inside. Therefore, we will carry out home repair of hair dryers with our own hands.
The body is held in place by screws. The heads are often of a non-standard design. This is a plus sign, an asterisk, a pitchfork. Therefore, first of all, before fixing the hair dryer, let's take care of a tool that can cope with such a task. Fortunately, a set of bits costs 600 rubles today.
Sometimes the case flaps are additionally fastened together with special latches. This is a separate problem: experienced craftsmen often break plastic, desperate to cope with civilized methods. There are no subtleties, they come up with hidden screws hidden under stickers, plastic inserts, removable regulator caps. The fasteners are fictitious. There are no useful functions.
The hair dryer motor is powered by direct current 12, 24, 36 V. A diode bridge is used to rectify the mains voltage, in cheap models - a single diode. The filtering of power harmonics is carried out by a capacitor connected in parallel to the motor windings or as part of a more complex filter. Inductors are rarely used in hair dryers due to their exorbitant mass. Therefore, knowledge of the principles of smoothing pulsations with RC-chains is enough to cope with the construction of a schematic diagram of a hair dryer being repaired. Sometimes a single coil (inductance) is used by the filter element.
The hair dryer switch simultaneously closes the circuit through which the spirals will be powered, starts the motor. Further schematic of the intervention is determined by the complexity:
- only the rotation speed or only the temperature is regulated;
- the ability to select heating and air flow rate separately.
In most models of hair dryers, in parallel, there is protection against turning on the heaters when the motor is inactive. Protects the spiral.
Optionally available thermostat in the form of a special resistance or other sensitive element. Let's describe the breakdowns encountered by the faithful helpers of the beautiful half of humanity.
Typical inspection procedure
If the device is devoid of signs of life, it is unstable, the inspection begins with the power circuit. The repair of Rowenta hair dryers is schematically described below.
Attention! The described types of work require skills in handling electrical appliances... The authors disclaim responsibility for damage to health, property, arising from attempts to follow the recommendations given for repairing hair dryers.
Cord
Inspection of the power cord begins with a socket. There is a part of the malfunction: there is no voltage - the hair dryer does not work. If there is voltage in the outlet, the inspection of the cord begins with the entry point into the case, walk towards the plug. Work is performed on a de-energized device. A visual search for fractures and irregular formations - burners, insulation damage, fractures is carried out.
Then the case of the hair dryer is disassembled. Inside you have a chance to see the options for electrical resistance:
- A pair of detachable contacts.
- Soldering.
- The wiring is sealed in plastic caps.
One-piece connection
The last element of the list characterizes a non-separable connection, therefore, the case for testing is too complicated. Skillful hands, or rather, smart heads, Ukrainian brothers in mind are advised to use an ordinary needle to repair a hair dryer. Those who immediately grasp the train of thought will skip the next paragraph, start testing directly.

Do-it-yourself hair dryer repair begins with a continuity of the wiring. A Chinese tester, a light bulb, an indicator will do. A needle is attached to one terminal, which is then inserted into the power core in the area of the cap through the insulation to copper. The second terminal probes the legs of the plug. The call goes through for both cores. It is not worth doing more than 1 puncture per core when repairing a hair dryer (some will try to look for the breakage point as well), since the nature of the operation involves the ingress of moisture from wet hair.
Contact area
Even a child can ring the wire, having visually distinguishable docking points in front of his eyes. If damage is found, it is recommended to buy a new cord fitted with a non-separable plug. The likelihood of moisture ingress imposes restrictions on the choice of insulation of conductive parts used to repair a hair dryer.
Cases are common: the first glance reveals the place of damage to the cord entrance into the case. Slabs, carbon deposits, black insulation indicate the location of the fault.
At the junction with the body of the hair dryer, there is a vulnerable point of the wiring. The hostess takes the delicate device by the cord, shakes it from side to side, winds the cable around the handle. A vein with a crack sparks, the insulation heats up, burns out, the copper melts. This is the mechanism of damage to copper conductors.
On / off switch and switch
When updating, it is useful to short-circuit the switch, check: the hair dryer will change the behavior radically in response to an uncomplicated step. There are three-position switches, each position in a short-circuited state is checked separately. Remember, sketch out the original wire layout before you start fixing the hair dryer.
Checking the speed, temperature switches uses a similar circuit.
Examine the defective element identified during the restoration of the hair dryer. The carbon deposits are cleaned off with a file, sandpaper, eraser. The contacts are wiped with alcohol. Defective components are replaced with equivalents. A radical method is to short-circuit the power button while searching for suitable components.
Fan
Relatively often, the air duct is clogged with a hair dryer. It is necessary to remove the filter, if any, and clean it thoroughly. Remove dust from crevices with a soft brush.
Lack of blade rotation or low rpm is often observed when the hair is coiled around the motor shaft. The propeller must be carefully removed from the shaft, in every possible way avoiding extra effort and distortions. After that, foreign objects are removed.
Spirals
A hair dryer usually has several heating elements. Visually, they should all look uniform. Make sure of this when fixing the hair dryer by opening the case. The detected breaks are eliminated by twisting the ends, soldering and tinning. You can also get some thin copper tubes and squeeze the ends of the broken spiral inward.
We observe defects in heating elements during repairs visually. A close inspection will tell you how to fix your hair dryer. Replacement of spirals with similar purchased ones or homemade products from nichrome wire.
Engine
The electric motor of the hair dryer can be powered by both direct current and alternating current. If the diode bridge is burned out, the windings are damaged, normal functioning is impaired. A terrible crackle and sparks when turned on indicate a malfunction of the motor.
The motor windings are desoldered when repairing the hair dryer from the electrical circuit. Find a pair for each wire that rings. The conclusions are connected in threes, none should hang in the air. Replacement of the winding when repairing a hair dryer is carried out only in a workshop. However, folk craftsmen shake not worse than machine tools. Those who wish will try.
If the windings are in good working order, the brushes are examined, the copper surface under them is cleaned, and the tightness is estimated.
The axis should rotate freely. When repairing a hair dryer, it will not hurt to lubricate the rubbing surfaces, manually break in problem areas.
Chip
The getinax backing sometimes cracks, tearing the track. Tin the damaged area, lightly cover with solder.
Broken capacitors swell slightly. The top face of the cylinder contains shallow slots, when the product breaks, the sidewall inflates, bending outward. Replace such a capacitor first if you find a characteristic defect.
Burnt-out resistors darken. Some remain operational, it is advisable to replace such a radio element.

Thermostat
Some hair dryers are self-regulating. The effect is achieved by using a resistive divider, one arm of which is an element that responds to temperature. Further actions are determined by the parameter control implementation scheme. We recommend:
- eliminate the sensor altogether by breaking the circuit, try the device's reaction;
- short-circuit the wires after that, turn on, see what happens.
There is a great chance of failure if the device is trained to respond only to a fixed resistance value. It remains to search schematic diagram on the Internet or draw it yourself.
Repairing professional hair dryers is more difficult. Structural elements are often complemented by smooth controls and additional options such as the Care button. The spirals are made of special alloys that create negative ions when heated, which have a beneficial effect on the hair. The technique remains the same:
- cord;
- switches and buttons;
- dust removal;
- spirals;
- motor;
- visual inspection of capacitors, resistors.
Before repairing it, it is advisable to get a schematic diagram.
Industrial models are not much different from household ones. But drying your hair is not recommended. Such products are distinguished by their increased resistance to dust, shock, vibration, humidity, and other climatic factors. Home restoration of industrial hair dryers will not end well.
Electric radio products used in household models are not suitable for use in harsh environments. Requirements apply to wires, power cord, motor and coils.
It is no exaggeration to say that a hairdryer lives in every home today. This softly humming accessory, blowing with warm air, has forever entered the women's arsenal, has become a must-have item and is used not only for drying hair, but also for styling and creating certain hairstyles. However, sometimes there comes a moment when something inside the hair dryer starts to crunch ugly, a wave of a warm breeze turns into a north wind, and inner voice persistently suggests that an urgent repair is needed.
Hair Dryer Design
The basic structure of all hair dryers can be considered identical. Dealing with it is within the power of every person who owns a screwdriver and basic school knowledge of electrical engineering.
Each hair dryer consists of four main parts:
- Electric motor .
There are several types of motors - 12, 24 or 36 volts. This is done to keep the user safe. The current from the network has a voltage of 220 V and is dangerous to human health. With the help of an electronic circuit, the voltage is reduced, due to which the impeller, which injects air to the nozzle, is powered by a small DC motor, which is absolutely safe for humans.
The hairdryer is powered by an electric motor, which is supplied with reduced power for safety reasons
- Fan. Its task is to create an air flow. In the case of the hair dryer, special holes are made through which the impeller sucks in air and directs it in the desired direction. Usually the propeller is made of plastic and rotates on a metal rod that serves as its axis. On the one hand, the axle is connected to an electric motor, on the other, it is attached to a support equipped with a sliding sleeve.
The impeller draws in air through the slots in the body of the hair dryer and drives it towards the nozzle
- A heating element. As a rule, this is a nichrome spiral. When current is applied, it begins to heat up and heats the passing air to the desired temperature. In a good hair dryer, the spiral is designed so that the heated air does not burn the hair, that is, its temperature does not exceed 50-60 o C.
In advanced models of hair dryers, several spirals are installed to ensure the operation of the device in two or three heating modes
- Electronic circuit. Serves for converting current and adjusting the operating modes of the device. Using the keys located on the body of the hair dryer, you can turn off or connect the spiral, increase or decrease the air flow rate.
It should be noted that the efficiency of the device as a whole depends on the coordination of the work of all structural components. If, for example, the air channel is clogged and the flow rate is slowed down, the spiral will certainly start to overheat, and this will either lead to its failure, or elevated temperature outgoing stream. A malfunction of the electronic circuit can lead to a voltage drop on the electric motor, as a result of which the hair dryer will not work at full power.
The first mention of a hair dryer is associated with the name of the French hairdresser Godenfroy (A. Godenfroy). It was he who, in 1888, offered his clients to dry their hair using a patented device that works from "any heat source." In 1908, the well-known Berlin electrical engineering firm AEG registered the Föhn trademark, which means “warm alpine breeze” in German. The first devices were rather bulky and heavy, the body consisted of a metal casing and weighed about 2 kg.
The prototypes of the modern hair dryer were large and heavy.
Possible hair dryer malfunctions and their elimination
Unfortunately, technology tends to break down. And often - at the most inopportune moment. Even expensive models from reputable firms can fail. The reason for this can be both non-observance of operating rules and factors independent of a person. For example, power surges, children playing or pets who are teething. Situations are different, but in any case, you should not rush to the store to buy a new device. Perhaps, having figured out the cause of the breakdown closer, you can restore the normal operation of the hair dryer without outside help, with your own hands.
The following repair information does not apply to new generation models equipped with air ionizers and infrared emitters. The device of such hair dryers is much more complicated; it is not recommended to repair them at home.
Lack of power
In case of malfunctions in operation, first of all, you need to pay attention to the condition of the power cord and conduct a visual inspection. It should not get warm while working. If it has any damage to the insulation, fractures or swelling, you need to check whether the current flows to the device.
Hair dryer may not turn on due to damaged cable insulation
For this you need:
- Disassemble the case and use a voltage indicator to test the power contacts inside the hair dryer. For disassembly, you need to find and unscrew all the screws on the casing. Sometimes, besides them, latches are used - they must be carefully disconnected so as not to break the fragile plastic. On some models, the screws are covered with decorative caps or stickers. In this case, they are carefully removed by picking up the edge with a screwdriver. Before disassembling the hair dryer, do not forget to disconnect it from the mains by unplugging the power cord..
Having unscrewed all the screws, you need to carefully pry off the plastic plugs and separate the case
- Next, the wires go to the power button. It is necessary to check that the switch moves freely, is not clogged with foreign debris or sticky dust. If the contacts are working properly, their color will be even, without signs of charring. Overheated copper turns from yellow to dark blue, which is a sign of malfunction.
All contacts should be checked for charring or discoloration, which is also a sign of malfunctioning power circuit.
If damage is found, the contacts should be cleaned with a knife or sandpaper, but never with a damp cloth. Sometimes this is enough to restore normal operation of the device.
Connect the device to the network for a few seconds. In this case, the power key must be in the "Off" position. or Off. To check the presence of voltage, bring the indicator to both terminals of the button.
If there is a "phase" on the tested contact, the indicator lamp will light up
The best solution to the problem of a damaged power cord is to replace it with a new one. But if it is not possible to replace the cable, you can get out of the situation by stripping the "bad" contacts and connecting them with a twist. The junction must be carefully insulated with dielectric adhesive tape.
If you have repaired the damage to the power cord by twisting the wires, be sure to wrap the open area with electrical tape.
If the problem is in the button, you need to clean it and tighten the terminal screws. V last resort you can temporarily disable the button by connecting the wires directly. In this case, the motor will start immediately after plugging in the power cord.
If the hair dryer control button is out of order, before purchasing a new part, the wires can be connected directly, however, some modes of the device will stop working.
Fan does not work
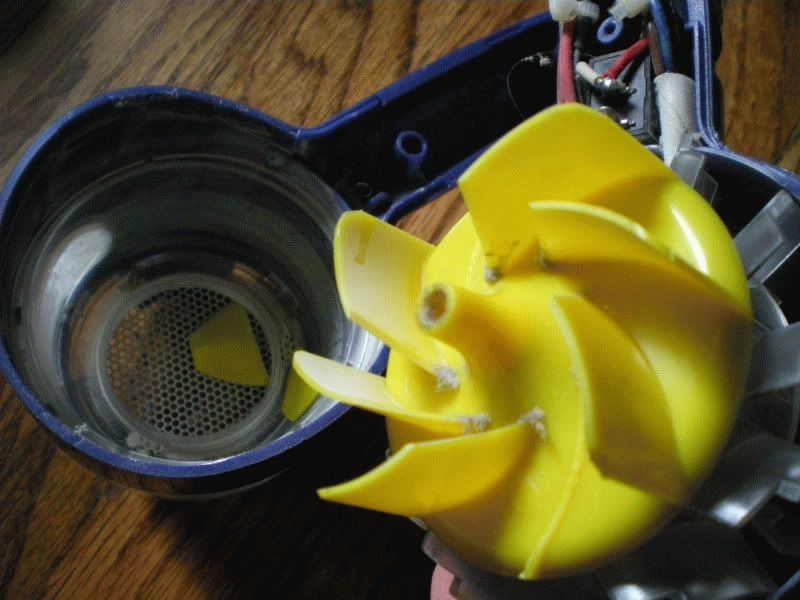
The most common reason for a fan to stop is hair. During operation, the hair dryer draws small hairs inward and they are wound around the propeller shaft. Rotation slows down over time and eventually stops altogether. Obviously, it is better to periodically clean the fan and not bring the situation to a critical one. Moreover, this is easy to do - it will not be difficult to remove the hairs from the impeller with tweezers or a small brush.
Outside, you can clean the air intake holes, and in order to get to the fan, you need to disassemble the case
The criterion for the normal operation of the fan is the free rotation of the propeller on the motor axis.
If the situation is repeated often, you need to carefully examine reverse side air pipe. The air intake grille may be damaged and too much foreign objects... You can get out of the situation by sticking on the grate mosquito net or gauze, but it must be held firmly so that it is not sucked inside. Some models have an input air filter... It might be time to clean or replace it.
The filter is located at the back of the hair dryer, on the side of the air intake
Outgoing air does not heat up
The spiral is one of the most vulnerable points of all hair dryers. Despite the fact that modern heating elements are quite reliable, they are strongly influenced by the good condition of all others. structural elements... It is good if the device provides for automatic shutdown of the spiral in case of overheating. If not, then it can burn out if, for example, the propeller clogs or the electric motor is faulty. The first sign of exceeding the load on the spiral is the characteristic burning smell that occurs when the hair dryer is in operation.
The smell can persist even after turning off the device, which indicates the need to check the serviceability of the electric motor.
Another indirect evidence of excessive heating of the spiral can be heat housing. It should not heat up. An abnormal rise in temperature indicates a malfunction.
When overheated, the heating coil breaks
Repairing the heating element also begins with disassembling the hair dryer. Most often, the gap is visible to the naked eye. If the damage is not total (melting of large areas or ruptures in several places), it is not difficult to repair it. You just need to reconnect the ends of the spiral. It is best, of course, to solder them, but if there are no special skills, you can twist it tightly by squeezing the connection with pliers. Because nichrome wire rather thin, when turned on, a microelectric arc is formed at the joint and the ends of the spiral are welded.
It is important not only to restore the integrity of the heater, but also to determine the cause that led to overheating. Otherwise, everything will be repeated very soon. If the autopsy showed that the coil is damaged in several places, it is better to replace it entirely. At the same time, you need to select a heating element from the same manufacturer as the hair dryer.
Interestingly, having originated as a hairdressing accessory, the hair dryer soon found application in such industries as construction and electrical soldering. Technical hair dryers are used in many processing processes building materials, to speed up the drying process, heating of adhesive compounds, heat shrinkable tubes, etc. Today, even to ignite coals in the grill, a special high-temperature hair dryer is used.
Video: disassembly and repair of the Maxwell hair dryer
Motor problems
The motor is designed to rotate the fan. Usually a good hair dryer has a speed switch, with which the optimal air supply mode is selected. The control is carried out by changing the current supplied to the motor. For this, an electronic circuit is located inside the case, which, by the way, can also fail.
The electric drive of the hair dryer fan rotates at different speeds depending on the selected operating mode
The characteristic signs of a damaged motor are crackling when turned on and uneven operation. Dry discharges occur due to breakdown of winding insulation. Sometimes a hum can be heard inside the unit, but the fan does not rotate. There may be a smell of burnt wiring.
A DC motor has several windings, the break of which is itself common reason its failure
Repairing the engine at home is quite difficult. This is due to its small size and the need to use special devices for diagnostics. If the armature windings are burnt out, then you can rewind them only using special devices. It is much easier to simply replace the damaged part. Here you just need to carefully remove the old motor, and mount a new one in its place.
Video: how to disassemble and repair a Scarlett hairdryer
Control box problems
The work of all the nodes inside the hair dryer is interconnected. And the main coordinating link is the electronic control unit. In addition to the transformation of alternating current into direct current, it changes the operating modes of the motor, regulates the degree of heating of the spiral. The scheme is relatively simple, but only a specialist can professionally understand it.
The electronic circuit is located near the control buttons inside the handle
Due to voltage surges in the network, violation of operating rules or ingress of moisture on the electronic board, a malfunction of the unit may occur. Visually, this is expressed in a change appearance details. Capacitors are deformed, swollen. Resistors (resistors) darken and char. Connecting tracks on the printed circuit board can melt and break. If you have spare radio parts and soldering equipment, you can replace and restore the electronics. But you can replace the entire block.
To repair an electronic board, you must have special devices and qualifications
If we talk about the procedure for diagnosing a broken device, then it should be carried out according to the principle "from simple to complex". This means that first you need to inspect the mechanical part (cord, buttons, impeller). Then - electrical, check the integrity of the connecting wires, contacts and terminals, the operation of the electric motor and spiral. And, finally, to revise the electronics - the control unit, other systems and interlocks. If the inspection of the microcircuit did not give intelligible results, it is checked using a tester.
Video: diagnostics and repair of a hair dryer
How to remove the fan impeller
Impeller blades are often damaged in hair dryers. This happens gradually, as foreign debris accumulates, drawn in by the air flow through the separator. Once the amount of foreign interference exceeds the critical state and the blades crack. This happens when the device is turned on, when the motor picks up speed and the rotational force becomes maximum.
As debris and dust accumulates inside the hair dryer, the fan blades experience more and more resistance when rotating and finally break
The first sign of a broken impeller is vibration. In addition, you can hear the cracking of plastic fragments inside the case. If this happens, the impeller must be replaced. It is necessary to remove the protective cover, carefully inspect the device for attaching the propeller to the motor. V different models connections are different. But the principle, as a rule, is the same - the impeller axis is pressed onto the drive of the electric motor. In most cases, it can be easily removed by gently prying it off with a screwdriver. Sometimes for this you need to remove the motor with the propeller from the housing and then disconnect the blades.
Everything renovation work carried out only when the power supply of household appliances is turned off. This is the best security guarantee. If the hairdryer is on warranty service, it is more expedient to solve all current problems in specialized organizations. Self repair and misuse will void the manufacturer's warranty. Before using the device, it will be useful to carefully read the recommendations of the manufacturer.


