A plastic bottle is a versatile material from which you can make a lot of all kinds of crafts. Especially if the conversation is about summer cottages. In this article, we'll show you how to create a small oasis in your personal plot... We will create a lake, but at the same time it will not be necessary to change the water in it and carry out seasonal cleaning.
Raw materials for creativity
... A few dozens plastic bottles the same volume. Their number depends on the size of the future lake.
... Digging shovel.
... Sand.
... Blue car paint (it will hold up for a long period of time).
... Decorative birds and water lilies for decorating a plastic reservoir.
... Stones and lime.
Getting Started
We start the work by filling the bottles with sand. Of course, you can leave them without it, just screw the cap tightly. Or use water. This is necessary to give the container rigidity when we dig it into the ground. Next, follow the next steps:
1. We paint each bottle blue. It will be easier to use a can or spray.
2. We outline a place for the future reservoir. It is necessary to dig a pit a little and soften the earth by digging it up. This is so that the bottle can easily enter the ground. Ideal option will become the use of a sand base. It is easiest to insert objects into such raw materials.
3. Now carefully stick the bottles with the lid down. We should have only the tops sticking out. The bottles need to be pushed tightly together. You get the impression that a natural reservoir has spilled out in front of you, which will still give glare in the sun.
4. Place stones that are covered with lime in a circle.
5. The final touch will be the decoration of the plastic reservoir with various water lilies, storks and frogs. Do not limit your imagination and decorate the lawn as you see fit.
This decor can be used on the site kindergarten... It will look attractive and cute. Yes and country cottage area transform if such a fabulous lake with inhabitants appears on the flowerbed.
Taking care of him is easy too. Periodically wash your masterpiece with a stream of water from a hose.
The reservoir is always a decoration of the suburban area. But the sizes of the plots are different, different and the possibilities of the owners of these plots. Therefore, not everyone can afford to arrange a full-fledged reservoir or pond on their site. Sometimes, with a limited area of \ u200b \ u200bthe site, it is enough to arrange a pond from plastic bottles.
In addition, the same bottles can be used to make very beautiful crafts that will revitalize both the water surface and the pond shore.
How to make a pond from plastic bottles with your own hands?
From plastic bottles, an imitation of a reservoir is usually arranged. In order to make such a pond on your site with your own hands you need to perform the following operations:
- choose a suitable place for the pond;
- dig up the bottom of the future pond so that the soil becomes soft;
- overlay the future mirror of the pond around the perimeter with stones;
- collect the required number of transparent plastic bottles;
- cut each bottle one third of its bottom;
- paint the bottom of the bottle from the inside with blue, blue or turquoise paint;
- stick the bottoms of the bottles with slices into the ground, close to each other.
Photo of a pond made of plastic bottles, which you can make with your own hands.
Registration
In order to make the pond more picturesque, you can make many crafts from plastic bottles with your own hands.
For example, you can plant in a pond funny frogs... To make a frog, two plastic bottles are taken. The frog making process consists of the following steps:
- the bottoms of the bottles are cut off - one 4 cm long, and the other 5 cm long;
- 4 frog legs are cut from the upper cut-off parts of the bottles;
- all cut out parts are painted with green paint;
- after the parts have dried, the figure is assembled, for which one of the bottoms is inserted into the second bottom, and the legs are attached to the lower part of the frog's body. At the same time, sand is poured into the lower part of the body for stability;
- with the help of a brush, the eyes, eyebrows, mouth and nose of the frog are drawn.

To revive the flora of the pond are made from bottles chamomile that can be installed as in a water mirror artificial pond, and on its shore.
For more exoticism on the shore of the pond, you can install palm tree made from plastic bottles. In this case, the trunk of a palm tree is made from dark bottles with a cut-off bottom, for example, beer or kvass bottles. Green bottles are used for the branches, and palm leaves are made from pieces of green plastic.


Other crafts for a summer cottage
 If there is a reservoir with real water in the country, then to revive it, you can make crafts from bottles that would float on water and imitate real aquatic plants. For example, you can make a water lily. To make it with your own hands, you need to prepare 1.5-liter bottles of white and yellow and a large bottle.
Making a water lily is done as follows:
- the core and stamens of a water lily are cut from a yellow bottle;
- the stamens are glued to the center of the water lily core;
- water lily petals are cut from a white bottle, which are attached with glue to the neck of the flower;
- a water lily leaf is cut from the bottom of a large bottle. It turns green;
- a water lily flower is placed on a leaf and floated into the water of the pond.

Bottles can be reused not only for their intended purpose, but also for the manufacture of all kinds of crafts. The elements of landscape design made from bottles are in special demand.
These can be fences for flower beds, pots and flowerpots, lampshades, animal figurines, as well as decor for a garden or a pond.
On the water surface, handmade water lilies from plastic bottles will look unusual and elegant. Making them yourself will not be difficult, there would be a desire and a little skill!
Required materials and tools
To make a plastic water lily from used bottles, you will need:
- three white plastic bottles - for petals (for example, containers for dairy products);
- a yellow plastic bottle - the core and stamens of a flower (you can take a mustard bottle that matches the shape);
- five-liter bottle - a water lily leaf (bottle from under drinking water; later it turns green);
- sharp scissors;
- a candle (to melt the edges and give them a natural floral shape);
- waterproof green paint (e.g. acrylic);
- glue.
If you don't find a white bottle, you can take a transparent one and paint it
Also read about.And how to make a pool from a tire, read.
DIY plastic bottle water lily step by step
Step 1
The neck of a yellow plastic bottle should be cut off. We use the rest of the plastic to make the stamens, which will be in the center of the flower.
Step 2
Now you can start decorating the water lily core. We fold our workpiece and carefully melt it over the candle fire. Do not bring the workpiece too close to the fire: even if you manage to avoid ignition and melting, the black soot on the yellow core will not add beauty to the craft.
If you did everything correctly, then the stamens will bend inward. We process the flower itself in the same way, making sure that the petals are bent in the right direction.

The stamens should bend when reflowed
Step 3
Using plastic glue, we connect the flower with the stamens. Our middle of the water lily is ready!
Step 4
Now let's start cutting out the rosette of our water lily.
To do this, we take white plastic bottles (if there are none, we will have to paint transparent ones), bend their corners and attach them to the neck of our flower. Secure the structure around the neck with glue for strength.
 Make your child happy - do it.
 See also manufacturing garden path do it yourself.
Step 5
We cut out the sheet on which our water lily will flaunt from the bottom of a large five-liter bottle. Its color does not matter, since you still have to paint it in saturated green. It is better to apply the paint in two coats so that streaks are not noticeable.

You can cut a leaf for a water lily from a bottle of any color, and then paint it green
Glue the flower to the sheet.
Our original craft ready, and now you know how to make an adorable water lily in a short time!
As you now know, decorating your garden with exquisite flowers is not difficult at all.
All that is required is junk material and a little patience.

To make a lake you will need:
1. Cement.
2. Water.
3. Sand.
4. Small stones.
5. Large stones.
6. Plastic wrap.
7. Paint and brush.
Method for making an artificial lake:
First you need to decide on the place where you will do it. Then we will put plastic wrap on this place, where you decided to make the lake. Why do you ask, but why - when time will pass you suddenly want to remove the lake, it will be difficult for you to do this, and if the film is easier to remove stones, cement, etc. We laid a film, now we put small stones (crushed stone) on it in the shape you want your lake to be, round, oval, etc.
Now we will make a cement mortar - 1 part of cement + 2 - 5 parts of sand (see the brand of cement and from this draw conclusions how much cement you need to put) and add water. Mix the solution thoroughly and pour it onto the stones, distributing it evenly. Then we take large stones and put them around the lake, we also put them on the cement mortar. Everything artificial lake ready for the swans, it remains to paint it.
We take blue paint and paint our lake, then paint the big stones brown. When the paint dries up, put the swans and stick in the reeds from plastic bottles. Reeds are made easily, we take small plastic bottles of 0.5 ml. paint them brown. We take a thick wire, paint it green, also cut out the leaves from plastic bottles and put them on the stem. If the leaves were cut from a transparent bottle not from green, then they must also be painted green. All the reeds are ready, we also fix them cement mortar so that they hold securely.
Our lake is ready))) If you have any questions, I will be glad to help. If you liked my idea, share it with your friends. THANK YOU.

Copyright © Attention !. Copying of text and photos can be used only with the permission of the site administration and indicating an active link to the site. 2019 All rights reserved.
Content
Making a swan from plastic bottles is a painstaking job. But, after completion, you put it in a conspicuous place and it will look very beautiful and natural. Manufacturing takes about 30 hours, but if you have someone to help you, you will be done in half the time. Basically, you need waste material to work.
Making a case for a swan from bottles
The body will be based on an old car tire with a diameter of 50 - 55 centimeters.
Do not injure yourself while handling the tire, steel bars may protrude from the tire.
After selecting the appropriate tire, cut it in half, then cut 10 centimeters off one side of the tire. Twist both halves of the tire to form an egg shape and 45 centimeters in diameter. Our corps is ready and waiting for all other parts.
Swan head
To make a head, you will need styrofoam, putty, and paint. First, we take a large piece of foam, measuring 20x12x10. From it we will cut out the very head and beak. We process the finished parts with sandpaper until all roughness and irregularities disappear. On the back of the head, we make a small hole 5 centimeters deep for attaching the neck. After completing work with sandpaper, take the putty and apply it evenly over the entire head. After the putty has dried, we bring the surface to a perfect one with finer sandpaper. After that we start painting. We need paint in three colors: white, blue and black. We cover the corresponding parts of the head with paint, leave to dry. Our head is ready. The head is the most difficult to make of all the details, but with a desire and a little skill, this is not a problem.

Neck
To make the neck, we need a rod and corrugation. The corrugation can be taken from an old unnecessary vacuum cleaner or, if one is not available, bought at a store. Length 70 - 80 centimeters. Since we will paint the corrugation white, it must first be cleaned. As for the rod, we do not recommend taking a steel rod - it is very difficult to bend it and it can burst. The length of the rod is 2 meters. On one side of the corrugation, we make cuts, the head will join these cuts. Using self-tapping screws, we attach the corrugation to the body and head, thereby covering the rod.


The next stage is the wings and tail of a swan from plastic bottles
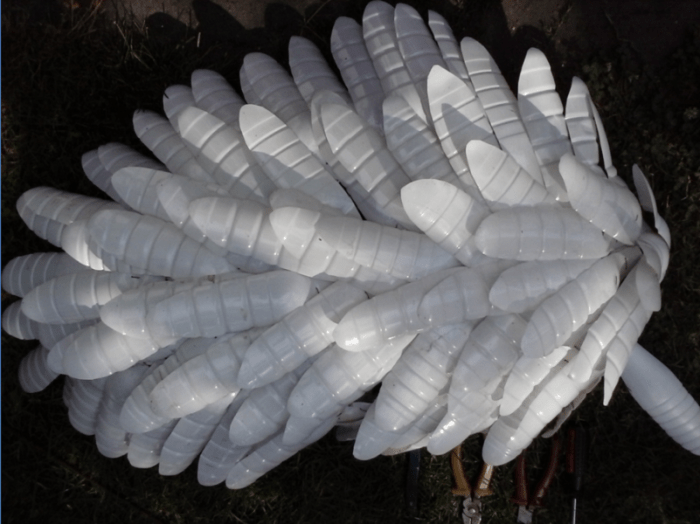
To make the wings, you will need 35 - 40 white plastic bottles, a construction net and tools. It is advisable to paint the mesh white so that it does not rust. Tools: pliers, wire cutters, screwdriver, copper wire, knife. You can buy plastic bottles at shops that sell packaging containers. One bottle will produce 4 - 6 feathers. Cut the bottle into pieces and form a feather. On one side of the pen we make four holes into which the wire is inserted.
It is better to take copper wire, as it will be easy to bend.
You can buy construction mesh at a garden supply store. We carefully wire the feathers, overlaying one feather on top of the other so as to hide the joints. One wing takes about 2-3 hours of time.


Tail
To make the tail of the swan, you will need the same mesh that we used to make the wings. The manufacturing time will take up to one hour. You need a 45 x 20 mesh with pointed tips. The process of making the tail is no different from making the wings: we take feathers pre-cut from plastic bottles and fasten them to the net.
When you close the feathers, they will not give in well and stick out in different directions. Try to align them to one side.

Connecting and installing the finished swan
After all the details are ready, you can work on the connection. First, choose a place where you will put the swan and install a board, bricks or an old one. car tire on which it will then be installed. Connect the body to the neck with self-tapping screws. Bend one end of the rod so that it can be anchored in the ground. Next, attach the wings and tail, connect the wings in front with a wire, and in the back with a twig. Then secure the tail. And finally, screw the head with screws to the corrugation.
Good afternoon, dear friends, today we will consider two interesting master classes for making swans from plastic bottles and isolon. Instead of isolon, you can use plastic bags or ordinary film. Greenhouse film is familiar to everyone, because it is a common covering material. But quite unusual crafts can be made from this material, pleasing to the eye and attracting attention. Do you want to DIY birds? Try it, it's not that hard. Today we will show you the works of Svetlana Antakova and Stella Chizhova. You are already familiar with the works of Svetlana, if not, then they can be found on the site. And look what wonderful swans and peacocks Svetlana made. According to her works, many craftswomen have already been able to create such beauty for their garden.
* Wire.
* Plastic bottle.
* Izolon.
* Scotch.
* Glue.
* Insulating tape.
Swan making method:
First you need to make a wire frame and a large plastic bottle. Form a wire beak immediately.

Now we take a white isolon (this is a substrate for linoleum) and cut it into strips 5-6 cm wide and begin to wrap it around the body of our bird. We fasten Izolon with tape and then wrap the whole body with tape for strength.


The drake must immediately attach the wings to the frame firmly and wrap it with isolon and tape.

For the plumage of a swan, we take a transparent six-meter greenhouse film with a thickness of one hundred and fifty microns and cut it into strips of seven to eight centimeters, and then we cut each strip like a fringe, not cutting one centimeter to the edge. It is convenient to cut such a film folded in several layers with fish scissors.

Now, starting from the tail, securing the film with tape, we wrap the swan with this fringe. The film must be burned to the body. Svetlana does it with a screwdriver heated on gas. If the film is simply secured with tape, then the whole swan will be disheveled and dispersed from the strong wind. The drake's wings must be wrapped after wrapping the torso and neck.

When our swan is almost ready, let's start decorating it. Wrap the nose with red and black tape. The eyes can be cut out of leather and glued with a heat gun or with Moment glue.


For the winter, the swans must be brought indoors. Svetlana pre-washes them with shampoo and rinses them under the pressure of water in the shower.
Peacock from bottles

Peacock, flomingo and other birds are made according to the same principle, only the peacock needs to attach its tail from steel wire... We make a frame.


For a peacock, you need to take a greenhouse film of blue and green colors. When you wrap the entire frame with tape, then glue a self-adhesive green and blue film on top for brightness. And then also wrap with foil and cauterize it. Feathers must be cut from plastic bottles. And we cut out the droplets for the feathers from the CD disks. Feathers to the tail are attached in a circle with a heat gun.

That's it, the peacock is ready.


Check out our website more often and you will see many interesting master classes. We thank the author for an interesting master class on creating a swan from a bottle and film.


As I wrote above, many interesting works have already been created for this master class by Svetlana. But today I want to add one more work, this swan was created by Stella Chizhova. Stella created wonderful swans for her garden and also shared her work with us.
For manufacturing you will need:
* Wire (wire from the "Light" store).
* Clay Titan.
* Red duct tape.
* Scotch.
* Double greenhouse film.
* Izolon.


Swan making method:
We make a frame from wire, a plastic bottle and electrical tape.

We take isoline (linoleum substrate) and cut into strips.

We begin to wrap the frame and fix everything with tape.


Cut the plastic wrap into strips.

We begin to wrap the film from the tail. Wrap and secure with tape. Greenhouse film for a large swan with a width of 5-7 ms, for a small one 3.5 cm.


That's it, the swan from the film and the bottle is ready, you can put it in the garden.


Copyright © Attention !. Copying of text and photos can be used only with the permission of the site administration and indicating an active link to the site. 2019 All rights reserved.
It will take patience and perseverance to create such a masterpiece. But if there are assistants in the matter, you will cope much faster, and a swan made from ordinary plastic bottles, also with your own hands, will look like a real one.
DIY master class on creating a swan from plastic bottles
In order to complete this product, you will need the following, readily available and common materials:
- Old car tire (diameter 55cm).
- A piece of styrofoam measuring 25x15x10.
- Putty and paint (white, red, black)
- Corrugated waste vacuum cleaner (length 80 cm)
- A rod made of easily bendable and durable material (length 2m). It is not recommended to take a metal one, it is best to take a copper one.
- Plastic bottles (40-45 pieces).
- Construction mesh (size 45x20 with pointed ends).
- At the very beginning, the body of the swan should be made, for this we need a car tire. Having cut it in half, cut off 10 cm from one end. And connect both halves so that they have the shape of an egg.
- A head and beak must be cut out of a piece of styrofoam. The parts should be sanded with sandpaper so that all irregularities disappear.
- Make a hole a few centimeters deep on the back of the head (the neck will be attached to it). Sand the resulting material.
- Apply the filler evenly over the entire head. Let dry, bring to perfect condition with fine sandpaper.
- After that, paint over the corresponding parts of the head and let dry. The hardest part of the job is done.
- Clean the corrugation thoroughly, preparing it for painting. Make cuts to secure the head of the product.
- Attach the corrugation to the torso and head, covering the cane.
- The plastic bottles and nets that will be used to make the feathers and tail are painted white and allowed to dry.
- Cut the bottle apart to form the feathers of the bird. One bottle usually produces about five feathers. On either side of the pen, make four holes to accommodate the mesh wire.
- Wire the feathers in such a way that it is not visible, superimposing them on top of each other.
- The tail of a bird is made in a similar way. The feathers cut from plastic bottles are simply screwed onto the mesh.
- Before you start connecting the parts of the swan, you need to choose a place where it will stand. There you need to install a car tire, bricks or plank.
- Use self-tapping screws to connect the body to the neck.
- Bend the rod for easy reinforcement into the ground.
- Connect the wings with wire and twig.
- Attach the bird's head to the corrugation with twigs.


A wonderful and majestic swan is ready.
Video tutorials on the topic of the article
You can get additional information about all the details of this process by watching a video on how to make and install a swan pots in your garden.
Having done everything right and patiently, you will definitely achieve an excellent result. And your swan will be just amazing.
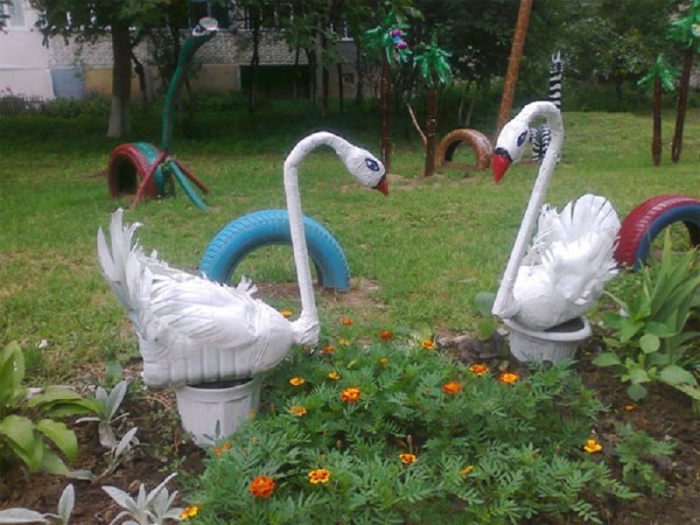
The swan has always symbolized beauty and graceful grace. There is no such person who does not admire the regal curve of his long, thin neck. This bird is an adornment of any body of water, wherever it lives. You dare not even dream of such a bird settling in your garden. But this is quite real. You will need patience, perseverance and free time. From our side will be presented detailed instructions... The main material for the craft will be a plastic bottle. Are you intrigued? Then we start our master class.
Create a composition
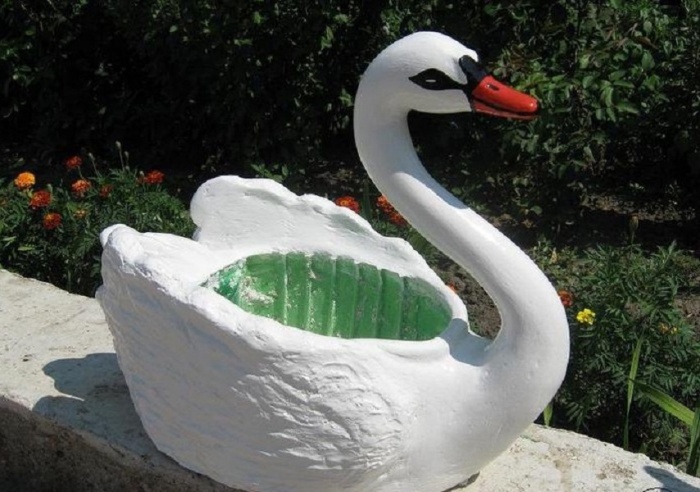
First, determine where your swan will be in the garden. This will not be just a garden decoration, the swan will have a completely functional purpose. This is a swan flowerpot made from a plastic bottle, in which you can plant flowers. Just imagine how great it will look.
A swan made of plastic bottles: a master class
Prepare the following materials:
- large plastic bottles for 5-6 liters
- wire with a diameter of 0.6 mm
- metal mesh for wings
- putty
- putty knife
- sand
- brush
Cut the bottle lengthwise into two, keeping in mind that there should be as much space for planting flowers as possible. Bend the wire with the number “two” and insert it into the hole made in the plug. Fix with ceramic tile adhesive and sprinkle with stones or broken brick from the inside for greater reliability.
Fill the resulting hole with sand, which was previously moistened.

Under the weight of the sand, the container should round out and take the shape of the body of a future swan.

Cover the place of work on the future swan with foil. Now knead the putty. The solution should turn out to be quite thick, because we will have to sculpt from it. The first layer is applied directly to the film - this will be the bottom of the flowerpot.

We put the bottle on the solution and trim the solution with a spatula, moving from bottom to top. The spatula should be constantly wet, so it will be more convenient to work with it.


We trim everything with a wet brush.

Thus, we cover the entire surface of the bottle with a putty with a layer of about two centimeters.

We already have a 15x30cm mesh for the wings. We will bend it, giving the shape of a swan wing, attach it to the side part and press it down. On top, immediately apply a little putty for fixing. Now you can rest a little until the putty sets.

After the putty has dried, we begin to coat the wing with the moistened hands with the solution. One hand works with outside wing, and the second supports inner side... Don't worry if you feel like you're not doing very well. We will fix all the flaws later.

Now let the wings rest, and we will move on to making the neck. With a solution of putty, gradually coat the neck.

We help ourselves with a damp brush all the time.

In the process, wrap a wet bandage around your neck and lightly press down with your hands. At this stage of work, you can already form the beak, slightly flattening it. When you're done, you can go back to the wings and correct any errors.

Form the tail. Bend a piece of mesh at an angle of 40-45 degrees and fix it with mortar. You can prop it up with something while it dries.

Also, now it will be necessary to fix the head and leave the swan alone for about half an hour.


We do the top of the tail part in several steps, periodically returning to making the neck with the head.


Cover the upper open cut of the planter in the shoulder area with a layer of putty and smooth it.


This is what the ponytail looks like from above.

And so on the side.

This is our semi-finished product. Inspect it carefully and fix all the shortcomings with a putty solution. Now he will need to completely dry out in the sun. It will take about two days. At the end of this time, we will clean it first with sandpaper for plaster, and then with simple zeroing. Let's prime the workpiece before painting. And then we already apply two layers of ordinary white enamel. Only the beak and eyes are drawn in the corresponding colors. After painting, it is necessary to varnish the surface, also in two layers.

So our craft Swan from plastic bottles is ready, the master class on which was so detailed that you can easily repeat it.

You can make him a girlfriend, because what kind of swan is without a pair, they are an example of loyalty.

Final chord
We have presented you one of the techniques for making a swan pots. But if you want to know about other options, watch the video on how to make a swan from plastic bottles video just below - you will be given a choice different variants similar master classes, among which you can choose what you like.
Video lessons
Be sure to check them out!
The graceful bird has always fascinated with its grace. It became possible to place a symbol of fidelity in your garden, having at hand for everyone the material available. The information on how to make a swan from plastic bottles, offered in three options, will allow everyone to choose the most acceptable method.
Swan flowerpots from bottles
Crafts based on plastic bottles differ in different categories of complexity. Step by step guide will help to cope with the task of decorating a swan even for a novice master. The main thing is to be patient. One 5 liter bottle and a lot of 1 liter white plastic containers are the main material for this spectacular craft. You will also need:
- metal rod for the swan's neck;
- fishing line, scotch tape and thin wire for connecting individual parts;
- metal mesh serving as the base of the wings.
Preparation of individual parts
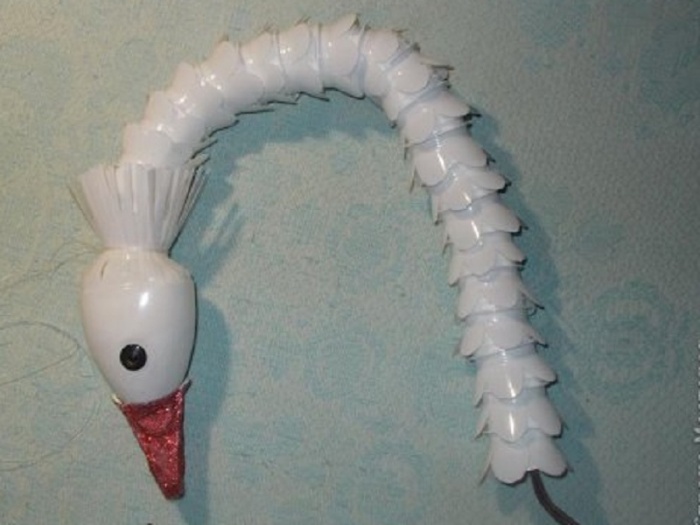
Swan making precedes preparatory stage... The work begins with cleaning plastic bottles from the remnants of labels and glue. On a clean container, markings are made according to the photo. The upper line is 2 cm below the neck, the lower line is 1 cm higher than the corrugated part of the plastic bottle. There is a perpendicular line between them. The cut is performed as smoothly as possible.

For the neck, parts from plastic bottles with a neck are cut into 6 parts, the cylindrical elements are divided into 8 fragments.
Attention! All corners on the workpieces are rounded off, 3 paired holes are formed at the base of the petals.
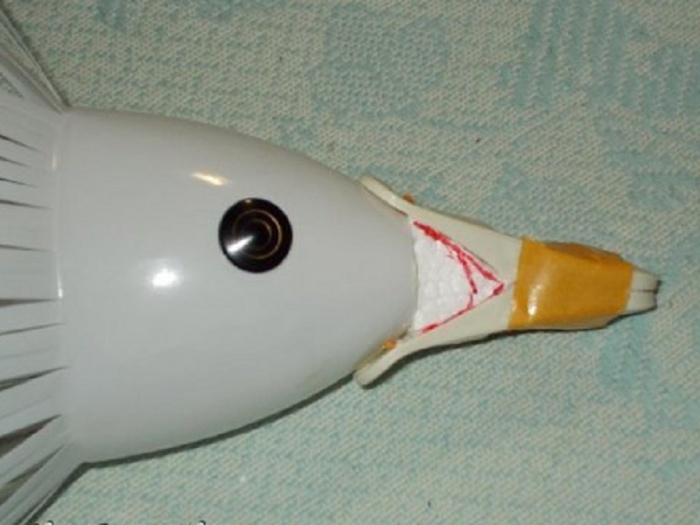
A neat swan head is obtained from a 0.5L plastic bottle as follows:
- the neck with a stopper is removed;
- an incision is made along the seam on the tapered section;
- all other notch lines are at intervals of 0.5 cm;
- the ends of the clothespin, which will play the role of the swan's beak, are melted over the fire;
- holes are pierced on them with an awl, holes are formed in a plastic bottle at a similar distance.
The base of the swan's body is a 5-liter container, on the bottom and lid of which holes are made to fix the neck. The opening on the side should allow the hand to freely enter the container.
Build process
When individual elements swan are decorated, you can proceed to the assembly of parts:

The result of a painstaking process will be a spectacular swan made of plastic bottles, similar to the photo below:


Combined version with bus
There is another interesting and affordable option making a bird with a majestic bend of the neck.
Frame
According to the proposed master class, a swan made from plastic bottles will turn out to be no less bewitching. The main difference is that the function of the body is performed by a tire with a diameter of 50-55 cm.
Corps formation:
- The tire is cut in half. Work carefully so as not to get hurt by the cord.
- One part is shortened by 10 cm.
- Both parts are connected in the shape of an egg about 45 cm wide and securely fixed.
The result will be the blank shown in the photo:

Head
Making a swan head:
- The basis of the part is foam plastic 20x12x10 cm.
- The head with the beak, after cutting, is thoroughly sanded with sandpaper.
- On the back of the head, a 5 cm depression is prepared for fixing the neck.
- The swan's head is evenly treated with putty.
- After the solution has dried, the surface is sanded with finer-grain paper.
- The workpiece is coated with white, black and blue paint. An example is the following photo:

Neck
The process of creating a bird neck based on plastic bottles:
- A rod about 2 m long is given the desired shape.
Advice! It is better to refuse the steel part, it bends too hard and is capable of bursting.
- The corrugations will need about 80 cm. When using old material, it is thoroughly cleaned of dirt.
- One edge of the corrugation is made with cuts for mounting the swan's head.
- The swan's neck is fixed to the body and head with self-tapping screws.

Plumage
The plumage of a swan will require:
- plastic white bottles - about 40 pieces;
- construction mesh;
- pliers and knife;
- wire, wire cutters.
Avoid corrosive processes by painting the mesh with white paint for outdoor use. One plastic bottle serves as a base for 5-6 swan feathers. On each workpiece from a plastic bottle, 4 holes are prepared for the wire. It is best to use copper material that bends easily. The feathers are overlapped with wire to hide the connection areas. The process of formation of the wings and tail of a swan is identical, the difference lies only in the outline of the mesh.

Assembly and installation
When all the parts from the tire and plastic bottles are ready, they start assembling the swan. The plot on which it is planned to place a decorative figure is decorated with bricks, a board or a car tire. This will be a kind of podium.
The neck is connected to the body with self-tapping screws. The end of the rod is bent in such a way that it is possible to fix it in the ground. The wings are fastened to each other with a wire, from the back they are clamped with a rod. Then the swan's tail is fixed. The head, made from a plastic bottle, is screwed to the corrugation with screws. Do-it-yourself graceful bird from plastic bottles will become a worthy decoration of the site.

Grace in the garden
Another craft option based on a large plastic bottle is also practical, thanks to the possibility of placing flowers inside.