Acoustic foam rightfully considered the most effective material for the device of high-quality sound insulation of premises. It perfectly dampens (absorbs) sound waves and significantly improves interior acoustics. Soundproof polyurethane foam has other advantages, these are:
- flexibility and light weight, so that the installation of panels is not difficult;
- environmental friendliness;
- resistance to mechanical stress;
- lack of smell;
- original appearance that does not require additional finishing.
Acoustic foam is produced in the form of rectangular panels standard size 1x2 m, with relief in the form of a pyramid, peaks, waves. Their scope is inclined, vertical and horizontal surfaces of any shape.
Installation of acoustic foam rubber: workflow
- prepare the surface to be glued. Level and clean it of dust and debris. Walls made of laminated materials and concrete sand and prime;
- draw up on paper a layout of foam rubber sheets and, in accordance with it, mark out the wall and ceiling. Mark cut lines on the material. Since acoustic polyurethane foam has a textured pattern, it is better to determine in advance the location of the cuts and adjust everything so that they are inconspicuous and look beautiful. Attention: glue from the middle of the ceiling or wall;
- treat the foam with adhesive. Use an atomizer or spray gun to apply the adhesive to cover the surface of the material with a thin layer. A brush or spatula can create a thick layer when smeared and the foam will "slide" down the surface after gluing. Spot application of glue is also allowed, but with this method of fastening, the material does not fully use its sound-absorbing potential. Attention: to work with acoustic polyurethane foam, choose contact adhesives on a butadiene-styrene, neoprene basis. Means containing trichloroethane are not suitable for fixing foam rubber on the surface;
- press the foam sheet treated with adhesive to the surface at a predetermined place. Wait for the glue to set. Fix the rest of the panels to the wall in the same way.
Shops of the company "Vinyl Tex" carry out acoustic wholesale and retail from 1 sheet. Consultation of the manager and acceptance of the order by the phone number indicated on the website page.
Everyone who is engaged in sound engineering and arrangement in an acoustically unprepared room sooner or later comes to the idea of the need to “drown out” the room. There are many "folk" and, by the way, effective means:
- Lot upholstered furniture in the room
- Bookcase
- blackout curtains
- Carpets on walls and floors
However, in most cases this is not enough. For example, when recording a voice, even in a filled “living room” one feels “echo”, resonances (“bank”), which often makes it impossible further processing and use of recorded material.
There are at least 2 ways out of this situation:
- Professional preparation of the premises
- The invention of the "bicycle"
As inquisitive and greedy minds, we will not take path 1. (about 700 euros per 1 m2 of premises), although it is the most correct one. We will try "on the knee" to assemble the acoustic design of a living room with low material costs.
We will need:
- Foam rubber 30-100 mm or foam-pyramid 70 mm
- IKEA padding blankets or similar material
- Metal braided cord (cable) with a diameter of 3-4 mm
- Carabiners for pulling a metal cord
- Nylon braided cord with a diameter of 5 mm
- Screw hooks 8-10 mm, dowels
- Perforator, drill
- Stepladder (preferably two when working together)
- Sharp knife for cardboard / paper (cut foam rubber)
The cost of materials is from 30 to 40 tr. (except 7.8)
It is better to work together, this increases the assembly speed by 3-4 times. If the area of \u200b\u200bthe room allows - (more than 30 m2) - then the three of us.
Graphic plan
Those. in fact, we hang the panels on the walls like curtains, and on the ceiling we simply lay them on cables. Why can't foam rubber be glued to the ceiling - yes, because foam rubber generally does not normally stick to anything without changing its structure (primer, chemical soldering, etc.).
Stages of work:
- Marking the position of the "hooks" on the walls
- Drilling, installing hooks
- Stretching a metal cable
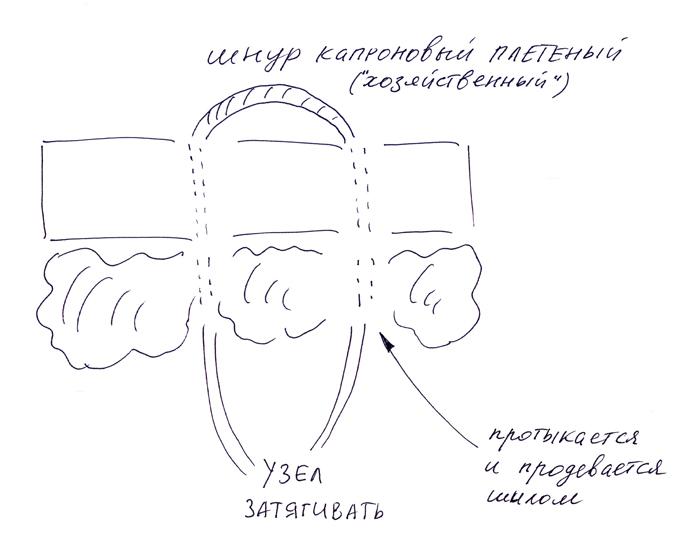
- Assembly of “panels” foam rubber + blankets 1m by 1m or other convenient size up to 1m by 2m by stitching with a nylon cord
- Attaching panels to the wall
- "Throwing" and threading panels on the ceiling on stretched cables
- Alignment of panels and additional stretching.
Special attention:
- Cord fastening of “wall” panels - there is a high risk of foam rubber rupture, so the distance between the cord entries (Fig. 2) should be greater, you can also make a bundle through a plastic plate to reduce foam rubber stress at the attachment points. Even more reliable option- nail foam rubber to wooden lath and cling to the rail.
- Sockets - should get to the junction of the synthetic winterizer or immediately provide for the absence of a synthetic winterizer on the outlet (it is difficult to “gnaw through” to the outlet).
- Chandelier - calculate the hit of the chandelier on the joint of the panels, cut a recess for it and use ONLY ENERGY SAVING LAMPS, because. they heat up a little and will not be able to melt (or, God forbid, set fire to) foam rubber.
- 2-3 days - ventilate the room from the "smell" of foam rubber.
- The room must be empty for the convenience of assembling the panels on site.


For better dispersion, the fact that the foam rubber goes in waves and sags a little is in our favor, in any case, it is important to avoid excessive stress on the foam at the attachment points!
When using dark foam rubber in the room it will become very dark - use additional lights and light curtains.
In the room it is desirable:
- availability of upholstered furniture
- filled corners (furniture, closet)
- carpet on the floor
- thick curtains on the window
results
Now you can enjoy listening to music in the room on acoustics up to 100 watts, there is significantly less echo, voice recording is much better, comparable to studio recording. Important - the ceiling is not damaged, theoretically - the panels can be installed elsewhere.
Hygiene
With blankets, everything is clear - they are hygienically safe. With foam rubber - this approach: you need to buy "furniture" foam rubber and require a hygiene certificate. It is also important that the room has normal humidity, because. this significantly affects the quality of the foam rubber "to break".
Recently, acoustic foam has always been on guard for silence and purity of sound. It got its name from Porolon, the main supplier of polyurethane foam during the Soviet Union. It was first made in 1929.
Today it is used in recording and editing studios, theaters, television companies, restaurants, as well as in apartments, cafes, restaurants, offices. In short, wherever it is necessary to prevent chaotic sound vibrations or noise pollution.
Beware the noise!
Noise is a set of sound waves that are able to transfer their energy to physical bodies and be reflected from them. A noise pollution- acoustic vibrations of different origin and spectrum, whose intensity and energy violate the acoustic comfort. These fluctuations can come from outside and form within premises. And internal are more dangerous than external. After all, the noise coming from the street is kept by the walls of the building and double-glazed windows. And there is almost no protection from internal noise in the room.
The only thing that can neutralize the internal noise load is soundproofing rooms with acoustic foam. It eliminates two types of noise. The first is sound vibrations that propagate between free gas molecules, the second is vibrations.
In other words, acoustic foam prevents the release of vibrational energy that can cause vibrations in solids.
Types of acoustic foam
Acoustic foam rubber is made in the form embossed and embossed soundproof panels different forms, sizes and colors. The first ones are used to combat noise and correct acoustic conditions in rooms. They not only absorb sound, but also suppress those oscillatory impulses that could not be dissipated, neutralize powerful sound waves.
Embossed acoustic panels produce with "wave" and "pyramid" profiles, which give the studio or home cinema an original look.

Second - universal- Eliminate any noise that is created by nearby roads. They improve room acoustics much less than embossed panels, so they are used for soundproofing load-bearing and non-bearing walls, complete and incomplete partitions from any materials.
Acoustic foam rubber: we use it for efficient work in the office

Offices are known to generate and spread indoor noise pollution - footsteps, banging of drawers, doors, furniture, office equipment, phone calls and conversations - even if workers try to be as quiet as possible. All this reduces productivity and makes it difficult to focus on work.

However, if you equip the room with acoustic foam rubber, you can minimize sound vibrations.
According to experts, in small office rooms it is enough to place acoustic foam panels only on the ceiling which will reduce the noise pollution by half. And if you also cover the walls (in particular, two neighboring ones), the problem will be solved fully.
Thanks to the soundproofing of the room, people hear and understand each other better. It relieves nervous system from stress that causes various disorders, including chronic fatigue syndrome.
Video on how acoustic foam works:
Soundproofing apartments with acoustic panels
 The apartment is also limited space. Work contributes to its noise pollution household appliances and the movement of people. thin walls reflect sound and transmit it, converting noise energy into vibrations of solid bodies, which causes vibrations., which can also spoil the lives of neighbors.
So in any apartment, especially where a family with small children lives, one cannot do without installing acoustic foam rubber panels.
In addition, vehicles and industrial equipment are powerful sources of sound vibrations.
If your house is located near a factory or a busy highway, you need to install in your apartment sound absorbing panels acoustic foam.
Acoustic foam rubber is an effective remedy not only against noise, but also against sound impulses that are below the limit of hearing. Speech about infrasound, which is very harmful to the body: it negatively affects the heart, kidneys and lungs, and ultrasound, which inhibits biochemical processes in tissues.
Quality sound recording

The main field of application of embossed acoustic panels is the premises where rehearsals are held and phonograms of vocalists' songs are recorded. It's about about recording studios, where acoustic foam rubber can be placed not only on the ceiling and walls, but also on specialized sound-absorbing screens.

This is due to the fact that great attention is paid to the control of acoustic parameters in such rooms: they are tuned to different frequencies.
Installing acoustic foam panels
Acoustic foam panels set exclusively indoors. In particular, their installation is carried out under floor coverings, false ceilings and inner lining walls.
Acoustic foam rubber is attached with glue or double-sided mounting tape to the base. As an option, you can make a supporting frame from light metal profiles, on which sheets of gypsum fiber are attached, which are the basis for gluing foam panels.
The thickness of the foam panels also means a lot. Today you can buy acoustic foam rubber thickness from 5 to 100 mm, which is selected in such a way as to eliminate not only noise pollution, but also to prevent the propagation of sound waves in the room in order to achieve an ideal, clear and without overlapping sound of the human voice and musical instruments.

In other words, the thickness of the acoustic foam panels depends on the intensity of the sound. That is, the stronger the sound stream, the greater should be the thickness of the acoustic foam rubber. For example, for effective protection office and residential premises located in the city, there are enough foam rubber panels with a thickness of 50–70 mm.
It should be added that acoustic foam panels are produced in the form of mounting sheets different sizes, which are called mats. Maximum Width and the length of the mats is 2000 mm.
The price of acoustic foam "Pyramid" for a mat 2 * 1 m is from 1180 rubles (30 mm) to 2500 rubles (100 mm).
Price for acoustic foam "Wave"(1m * 2m) - from 770 rubles. (25 mm) up to 1850 rubles (65 mm).
By the way, the colored acoustic foam "Volna" is produced in gray and dark gray, "Pyramid" - in brown and purple, and when made to order, you can order any color of the panels.
Another important parameter to consider when choosing acoustic foam is material density. Respectively, the smaller it is the better.
It remains to be added that the acoustic foam panels do not require any maintenance and repair, the period of their use is not limited.
The acoustic panel is cleaned with a vacuum cleaner. Its frequency depends on the purpose of the room.
So the ideal sound quality and the absence of noise pollution depend not only on good and expensive equipment, but also on correct finish the room where it is installed with acoustic foam rubber.
Acoustic foam rubber and its application are discussed in great detail in the following video review:
Acoustic foam
Acoustic foam is an acoustic treatment material widely used in automobiles. The open-cell material itself is capable of attenuating sound wave vibrations in air, regardless of their frequency.
Foam rubber acoustic pyramid, as it is also called, thus reduces the amplitude of the waves, turning energy into heat. From this publication you will learn what the main purpose of acoustic foam rubber is, what types it can be and what are its features.
Note. Immediately, we note that this material is universal. It can be mounted to the doors, ceiling or even entirely in the trunk of a car.
Application
Acoustic pyramid foam rubber can be used in cars in order to improve the sound quality.
It's simple:
- Certain surfaces are glued with this material;
- Due to this, residual overtones in all frequencies are removed, which interfere with the perception of sounds normally.
Note. It is necessary to use acoustic foam rubber skillfully, not forgetting about the correct placement of the panels in the car.
This material can be used for various specific purposes, but main task is an:
Note. Foam rubber migrated to cars from large and small recording studios, where it is often used as a soundproofing material. In such rooms, foam rubber in the form of large panels in the form of triangles is placed on the walls.
In automobiles, so that the material can better cope with absorption, especially low frequencies, it is also recommended to use in large pieces, and most importantly, the material must be thick.
Secrets of working with foam rubber
bass traps
Note. Large pieces of acoustic foam placed in the interior of a car or other room create so-called acoustic traps or bass traps.
Bass traps work by capturing the energy of the bass that tends to cluster in the corners of rooms, in our case the corners. After that, the bass starts to deafen already.
If you use bass traps, you can get an amazing effect of reducing unnecessary reverb. The bass will get more clarity and quickness of impact, which will allow you to control low-frequency energy.
As mentioned above, there are many types of acoustic foam rubber. In cars, special foam rubber is used - automotive.
Note. Typically, automotive foam rubber is combined with carpet. Together, these two materials create excellent sound insulation and car audio rises to a completely different level.
To glue the car with these materials in a complex, you will have to do the following:
- Disassemble the entire interior;
- Remove all decorative trim;
- Start sizing from the doors, as the most difficult elements of the car in terms of sound insulation.
Note. As a rule, in the process of soundproofing car doors, materials are already used, the basis of which is foam rubber. In this case, the foam rubber is on the substrate, and with front side it is covered with foil or polyethylene terephthalate film.
- Carry out sizing and floors, also as the main parts subject to external noise and are surfaces from which the sound can change for the worse.
Note. Material based on acoustic foam rubber must be applied to a dry, fat-free surface. On top, you can glue another material, for example, polyethylene or acoustic felt.
- Carry out the sizing of the torpedo. Over time, some parts of the panel become loose and create an unpleasant creak that interferes with normal sound perception.
For this reason, the torpedo is disassembled, the old foam rubber is removed, and a new one is put in its place on a substrate or with a mesh. Self-adhesive tape will help hide the joints of the torpedo and the body.
An example of processing car doors with foam rubber
So:
- We purchase acoustic foam rubber on a self-adhesive basis;
- We also buy an acoustic lens to increase the effect of improving the sound.
Note. As you know, an acoustic lens is able to equalize the sound output of the speakers, and in combination with foam rubber, it will be an “explosive” mixture.
- We disassemble the door, first removing the windows;
- We degrease the surfaces with which we will work;
- We glue the foam rubber, then the lens.
More detailed information on how sound insulation of doors is carried out can be found in other articles and instructions on our website. In the process of doing the work with your own hands, we highly recommend watching the video, studying the photo.
As a rule, the price of acoustic foam rubber is low, but this material gives an incredible effect.
Application:
- Remove the protective surfaces from one side of each self-adhesive;
- Stick the required number of self-adhesives on the panel;
- Remove protective layer from each self-adhesive;
- Gently lean the panel against the wall, then press evenly over the entire area;
Note:
- This installation method is applicable only to absolutely flat, non-crumbling surfaces;
- Dismantling the panels after gluing destroys the adhesive properties of the self-adhesive (the second time will not hold);
Push pins and pins
Installation process:
 1. We mark places on the surfaces of walls or ceilings based on the area of the panels;
2. Glue must be applied to the finishing area evenly distributing with a spatula;
3. Next, you need to press the panels and hold for 40 seconds. During this time, the glue will have time to soak into the panel.
.
It is necessary to purchase "liquid nails" and a special dispenser gun for
its application.
This adhesive is well suited for long-term installation of many materials, including sound-absorbing panels. To apply glue, you need to use a special dispenser gun, which is sold in many hardware stores.
 Installation process:
1. We prepare the surface on which we will mount the material from dirt and dust;
2. We put marks on the surface according to the size of the panels;
3. Slowly apply glue gently to the area in stripes;
4. Press the panel to the plane and hold for 40 seconds.
hot glue
We will need: glue sticks and a thermal gun for them.
The use of hot melt adhesive is one of the fastest and most simple ways gluing acoustic foam panels. The advantage is that the panels can be installed on any hard surface.
This method is suitable mainly for panels that are not large in area, because. hot glue has a lower degree of adhesion in contrast to acrylic glue.
Installation process:

1. Insert the glue pin into the heat gun;
2. After connecting, the device should heat up for 10-15 minutes;
3. While the device is heating up, it is necessary to prepare the surface by cleaning it from dust with a napkin;
4. We set marks for the dimensions of the panels;
5. We quickly apply heated glue to the marks;
6. We press the material.
Spray adhesive based on acrylic
It's very comfortable, but not the best. cheap way install acoustic panels.
Installation process: 
1. Wipe the original plane;
2. We put notes;
3. Spray the glue gently on the plane;
4. You need to press and hold for about 40 seconds, during which time the glue will grab well.


