Installing heating radiators with your own hands is a decision that should be taken seriously: after all, not everyone can do it. At the very least, you need to be prepared for such a process. Usually, if you look at the situation only amateurishly, you can get negative emergency consequences at the exit.
Installation of heating radiators
If you live in an apartment in a multi-storey building, then it is best to call specialists for this, as there is a risk of flooding not only your apartment. In a private house, you can try to carry out the installation and install home-made heating batteries with your own hands - however, for this you need to deal with the main points of the installation.
Preliminary preparation
First, you need to decide what type of wiring was used to install the heating system. Those who arranged it should know this - one-pipe or two-pipe wiring.
And before you start installing heating radiators with your own hands, you also need to find out which heating circuit is one-pipe or two-pipe.
After all, the choice of parts and their number will depend on the wiring diagram of your heating system, photo diagrams below.
What you need to install
Depending on what design features has a heating system, the number and list of parts required for installation will depend. For example, if it is single-pipe heating, then a bypass is required. In the event of a malfunction, it will be possible to turn off only the device that has this element, and the entire system will not need to be shut off - this is especially true in winter situations, when it is not very convenient to turn off the heating in frost.
The number of parts for installation is also determined by the connection diagram and the type of radiators. According to the scheme, couplings, adapters, corners and nipples are selected.
Also, installing a heating battery with your own hands will require shut-off valves. You need to select a radiator type of fittings, you should not get carried away with complex ball valves with the so-called "American", which require professional knowledge. And it will be difficult to ensure tightness without special experience in this area. To connect heating radiators with your own hands to the pipeline, you will need spurs that will correspond to the dimensions of the radiator and pipes along the thread. A sleeve will also be wound onto the sleds - after twisting it is inserted into the battery. It is worth noting that when you buy cast iron radiators, you need to check before installation whether the brackets match the material of the wall on which they will be mounted.

In order to be able to release air from the battery, you need to put a Mayevsky crane on it. As a rule, it is in the factory configuration, but if not, then buy it.
We calculate the location
Those who are going to install a heating radiator with their own hands should take into account that the sections of pipes that lead to the devices must be placed with a slope (slight) - in the direction of the movement of the heat carrier. If the gasket is strictly horizontal or there is a skew in the installation, then air will be concentrated in the batteries made of cast iron and steel. You will have to regularly blow it out manually so that the heat transfer does not decrease.
It is better if the central axis of the battery coincides with the axis that goes through the center of the window.
Deviations can be no more than 2 cm, such that will not be determined visually. But such a recommendation does not apply to strict requirements.

Do-it-yourself installation of heating batteries involves the implementation of several strict rules:
- The components of the connection to the heating radiators should be placed so that the slope is 0.005, it is recommended to increase it to 0.01. So, 1 m of the pipeline will have to slope towards the circulation - and at least 0.5 cm. The angle of inclination must be determined by the length of the pipe sections that are installed.
- From the floor surface to the radiator should be 6-10 cm or more.
- From the lower outline of the window sill to the upper outline of the battery - 5-10 cm.
- From the plane of the wall to the battery - 3-5 cm.
- Be sure to observe the horizontal and vertical directions.

To increase the performance of the radiator, it is possible to install a specialized shield made of a special heat-reflecting material before installation. Or you can just take and cover the plane of the wall with such a composition that has similar characteristics.
Marking radiators with brackets
Due to the fact that the batteries have a sectional device principle, this allows you to accurately determine the number of sections that will be needed to heat a room that has specific conditions. Information on how to correctly calculate this amount should be studied in advance - even before buying radiators. If you follow the installation rules, then 1 square meter of the heating surface of the radiator will be equipped with 1 bracket.

Do-it-yourself heating battery should be marked taking into account the following nuances:
- We mark the mounting points of the brackets, taking into account the rules that are given above.
- Before drilling holes, all distances must be checked again.
- Dowels are inserted into the drilled holes, then fasteners are screwed into them.
If you did the markup correctly, then the radiator should lie tightly on all the supports that are installed and firmly rest on each of them.
Tools and materials
You will need torque wrenches with dimensions - they will allow you to follow the torque torque with high accuracy. And since the heat carrier will flow through the system under pressure, if there is insufficient tightness, a jet will appear from the junction.

Over tightening will cause thread stripping.
That is why it is necessary to thoroughly study and follow the instructions for each device - it is here that the values \u200b\u200bof the torque moments will be indicated. You will also need sealant, tow with oil paint or sealing tape.
Radiator installation process
Before starting work on the installation of heating batteries, you need to completely shut off the circuit, drain the water from the system (the pump will help to completely remove the remaining water). Carefully check the level of the battery, which is hung on supports vertically and horizontally.
So, we unscrew all the plugs from the device. We connect the bypass with a valve (only a single-pipe circuit requires this). For a two-pipe, only a drive with a valve connected to it is used. With the help of threaded rods, we connect the radiator to the heating system, and in order to seal the joints, we use tow or another type of sealant.
Bypass is required in order to turn off the heating device without shutting down the entire system. The valve serves to regulate the circulation of the heat carrier. The bypass is installed between the inlet and the pipe and the return pipe with taps.
It is worth noting that you should not remove the packaging film from aluminum, steel and bimetallic devices until the installation is completed.
After installation, a pressure test will be required. But this can be done by a specialist - one as he has not only experience, but also a special apparatus.
Independent replacement or even installation from scratch of heating radiators is not so much a complicated process as painstaking. What a plumber will do in a couple of hours, an amateur can take several days. However, do-it-yourself work will stimulate new achievements, save a lot of money and may even give you pleasure, especially if you prepare for the process in advance and foresee all the subtleties.
When is the best time to install batteries?
Installation of heating batteries, if it is, of course, not emergency, should take place in the off-season. Centralized heating is turned off in the spring, within a few days - a couple of weeks, the utilities drain the water from the system and will feed it only in the fall. In general, the time for installing radiators is from April to October.

In a house with its own heating or an apartment in which there is always water in the system, battery installation work should begin with emptying the heating system. In parallel, you can think about what batteries you need to buy.
It is important! If you have to install new batteries in place of the old ones, then you need to choose those that will be identical in size to the previous ones. And for the parts that will be needed during installation, it is also important which heating system in the house is one-pipe or two-pipe.
How to choose batteries?
There are four metals from which heating radiators are made:
- Pure cast iron.
- High quality steel.
- Aluminum.
- Combination of steel (copper) and aluminum.
To say that some battery will be perfect is wrong.
Cast iron batteries
This is the heaviest metal with a fairly high heat transfer. Cast iron warms up longer than other metals, but also retains heat longer. most often set. One section weighs 10 kilograms (in Soviet samples - 12). The cost of one section is 500 - 600 rubles. However, a designer model can also have a price in dollar terms, indicated by three or even four digits.

The minimum thermal power of one cast-iron section is 150 W. Operating pressure at the level of 15 atm. To heat a room with an area of 15 m2, with a standard ceiling height and one double-glazed window, you need to buy about 10 cast iron sections. Information on how to more correctly calculate the number of battery sections will be in the subsection below.
The indisputable advantage of cast iron, as a metal for a battery, is that it can withstand coolant temperatures up to 150 ° C and is unpretentious to the composition of the water that will be in the battery.

The disadvantages of cast iron batteries are that they are very heavy and will have to be painted periodically.
Detailed review - read on our website.
aluminum batteries
Manufacturers claim that aluminum radiators are the most common.
- The main advantage of aluminum is its excellent ability to conduct heat.
- The second advantage is that it is from aluminum that the most unusual designs heating batteries.
- And the last. Relatively inexpensive price.
Aluminum radiators have the highest heat output. The power of one section is 192 W, the working pressure is 16 atm. This means that the aluminum battery heats up very quickly.

However, there are also disadvantages. Aluminum battery:
- Sensitive to pressure drops from the system. Experts say that with a sharp increase in pressure, an aluminum radiator can burst.
- Needs only purified, softened water. Acidity liquid leads to faster internal corrosion of the metal.
In general, aluminum radiators are best installed where the quality of the supply water is monitored.
Steel Batteries
Steel radiators do not work in the form of sections, these are most often square or rectangular panels. The working pressure here is low - no higher than 8.7 atm. Power from some manufacturers is declared within 20 watts. Steel radiators are best used not for central heating.

Advantages of steel batteries:
- With small sizes, they have a high heat transfer. This means that a small battery will heat up a large room very quickly.
- For high-quality heating of the room in the system should not be very heat coolant.
These two advantages are balanced by disadvantages.

Attention! Steel radiators rust quickly. They must not be installed in rooms with high humidity. To prevent extensive corrosion, in a system where there are steel radiators, there must be shut-off valves for draining water in the off-season.
Bimetal radiators
The connection of metals can be as follows:
- Steel and aluminium.
- Copper and aluminium.
Steel or copper core (this is inner part batteries) quickly heats up and gives off heat to aluminum (the battery case is made of it). The combination of two metals significantly improves the thermal performance of the radiator. The power of the bimetallic radiator is 185 watts. If the inside is made of copper, then the rated power should be 200 watts.

Advantages:
- Chemical resistance to coolant.
- Increased fortress.
- Lightness of weight.
- High heat dissipation.
Flaws:
- High price.
Having decided on the price and quality for which they are ready to pay, it is worth making calculations the right amount radiators.
Calculation of the number of sections for high-quality heating
A comfortable temperature for human life is 18 °C (unless, of course, you are lucky enough to live in Ukraine, where it is reduced to 14 °C due to the lack of gas). This temperature regime can be sustained as follows: for 1 m2 of the area that is heated, there should be 100 watts of heating radiator power.

The required number of battery sections for a comfortable temperature is calculated using the following formula:
S*100/P where
S = room area
P = power of one heating section.
Room area - 15 m2, capacity of one section cast iron battery- 150 W. Means,
15 * 100 / 150 = 10
In total, 10 sections of a cast-iron battery are needed to heat one room.

Table: an example of the number of radiator sections depending on the area of the room
It is necessary to apply certain coefficients that take into account:
- Ceiling height.
- The presence of double-glazed windows.
- Number of storeys (upper and lower floors have the highest ratio).
- The number of windows in the room.
- Has insulation been done?
- Where is the room. Does it matter if it's angled?
So, for example, the coefficient (K1), which depends on the quality of the windows:
- K1 = 0.85. This is triple glazing.
- K1 \u003d 1. Such an indicator with a double-glazed window.
- K1 = 1.27. Regular windows with double glazing and possibly wooden frames.
The coefficient K2 depends on the walls.
K2 = 0.85. New walls with insulation
K2 = 1. brick walls and a heater.
K2 = 1.27. Panel house with walls without insulation.

Table of the required power of the heat supply radiator
Payment. To get the number of sections, divide the data from the table by the power of one section of the selected radiator (KW).
This is an incomplete list of coefficients. But the ratio of digital indicators and, for example, the height of the ceiling or the quality of heating is the same as in the examples above. Each of the coefficients is multiplied by the original number of radiator sections. In the end, it turns out that battery that will really heat the space.
Installing a heating radiator
After the literature has been read, advice from experienced people has been received, the size of the radiators and the number of sections in them have been determined, the order has been placed and the car with the batteries is already on the way, it's time to prepare something without which they cannot be installed.
Preparatory stage
In practice, the batteries are always located under the windows. If access to this part of the room is difficult, you need to free up space as much as possible. Move the cabinets, remove the TV, remove the curtains.
You need to know! If you have to remove old batteries, then in any case, at least a little, water will flow out of them. It will not be clean, as from a spring, and the likelihood that the water will stain with rust flooring, very high. Therefore, it is better to remove carpets and rugs before replacing batteries. And cover the laminate and parquet with a thick film.
When installing the battery you will need:
- Bypass (if the heating system is single-pipe).
- Adapters.
- Couplings.
- Nipples.
- corners.
- Mayevsky cranes.

Mayevsky crane - for venting air from radiators, opens with a special key or screwdriver
Sealant, winding, sealing tape, adjustable wrenches will not interfere with work. The remaining parts must be purchased based on what wiring is installed in the room.
Types of heating wiring
In total, there are 5 main types of wiring:


Options for connecting radiators
Now you need to choose the right distance from the wall and window sill for each battery.
Distances to the wall and window sill
In addition to the fact that all nuts and valves must be tightly tightened (without overdoing it), it is also important to fulfill the following conditions:
- From the top of the battery to the window sill there should be at least 5, and preferably 10-15 centimeters.
- From the bottom of the battery to the floor, a distance of at least 10-12 centimeters must be observed.
- From the radiator to the wall should be at least 5 centimeters.

Compliance with these rules will allow hot air to circulate better and go up unhindered.
All modern radiators are designed in such a way that any owner can connect them. This process must be carried out in compliance with the requirements of SNIP.
Connection methods
According to SNIP, the installation of heating batteries may provide for such connection ways:
- Lateral.
- Lower.
- Diagonal.
The first way is the most common. It provides for connecting the inlet and outlet pipes to the same side of the radiator. The inlet pipe is connected to the fitting located at the top, and the outlet pipe is connected to the lower fitting.
This connection method requires a large center distance, that is, the distance between two fittings. If it is small, the sections at the other end of the battery will not heat up well. When installing a radiator with a large number of sections, in order to avoid the problem of poor heating of the last sections, it is necessary to use a water flow extension.
The bottom connection provides for connecting the inlet pipe to the lower fitting located at one end of the radiator, and the outlet pipe to the lower fitting located at the opposite end.
There are radiators in which both fittings are placed in the bottom and are vertical. In this case, always carry out the bottom connection. It is not recommended to perform it, because heat transfer is reduced by 5-15%.
The diagonal method is the most profitable type of connection. This installation of a heating battery allows you to minimize losses. It provides for connecting the inlet pipe to the fitting located at the top and connecting the outlet pipe to the fitting located on the lower contour of the other end.
Connection can also be:
- Consistent.
- Parallel.
In the first case, the batteries are connected so that the outlet pipe of one of them is the inlet pipe for the other. As a result, a closed system is formed, and in the absence of a bypass, repairing one of the radiators will require shutting down the entire system. is a tube that connects the inlet and outlet pipes near each radiator. During the supply of water to the working battery, the bypass does not create any obstacles. If it is necessary to carry out repairs to any radiator, they independently close the shut-off valves, and the water moves through the bypass.
Read also: Calculation of heating radiators
Parallel connection consists in diverting pipes separate for each heating device from the main pipe.
Connection diagram
Any connection method can be used in one- and two-pipe heating systems.  In the first type, the batteries are installed so that they form a single chain through which water flows from top to bottom. It is unprofitable to make such a heating system in a private house, since the first radiators will heat up very well, and the rest badly. This is due to the receipt of the cooled coolant to the last devices.
The two-pipe system is more advantageous, since hot water comes from one riser, and cooled flows into another. Such wiring of pipes of the heating network is performed in all private houses, because it allows you to maintain a constant predetermined thermal regime and makes it possible to control this regime.
Installation rules
Installation must take place in compliance with the following rules:
- The position of the radiator must always be horizontal without any distortion.
- The upper grate and the window sill should be separated by 5-10 cm. This space is necessary for the movement of heated air, as well as maintaining high heat transfer.
- The bottom panel and the floor should be separated by 8-12 cm.
- The distance between the rear wall of the radiator and the wall should be 2-5 cm. This norm should be maintained even if reflective thermal insulation is installed behind the radiator.
- Tightening the valve with a force of not more than 12 kg. Since it is very difficult to determine the feeling of such an effort, it is recommended to use a torque wrench. It will allow you to correctly tighten all the valves without constrictions and undertightening.
Mounting Features
The sequence is simple:
- Dismantling the old radiator.
- Determination of the location of the fasteners for the new battery and marking.
- Fixing brackets.
- Preparation and canopy of the radiator.
- Installation of shutoff valves.
- Pipe connection.
Dismantling the old radiator and fixing the mount
If the heating system is being created in a new house, then immediately you need to start marking the places where the brackets are fixed. If the housing is old, then you will have to dismantle it.
Read also: Heating element for heating radiators
It is easy to do when there is a shut-off valve (ball or shut-off valve) on the inlet and outlet pipes. They are blocked and the battery is unscrewed. If they are not there, you need to block the riser and drain the water.
It happens that they block and drain water from the wrong riser that is needed. Then, when cutting pipes (if you plan to replace them) or while unscrewing the nuts, you can stumble upon difficulties. The first situation can be dangerous, since the pipe is cut by a grinder connected to the mains. The contact of water with electricity ends with sad consequences. Therefore, before cutting in the outlet pipe, it is worth making a hole with an autogenous.  You need to stock up on a container to collect water.
In the case of installing a new radiator, it is necessary to change the position of suitable pipes. They should be opposite the contours. They are placed at an angle. In this case, the inlet pipe is tilted towards the radiator, and the outlet pipe is tilted away from it. The distance between them at the radiator should be less than near the riser. This allows air to easily enter and exit the radiator. Battery air will be minimal.
Brackets are usually fixed on bolts fixed in dowels. For them, holes are drilled in the wall. Brackets are:
- Wall mounted.
- Outdoor.
Most of the wall-mounted ones cannot change height. There are those that consist of a base, a moving part and a bolt. Turning the bolt, you can raise the moving part up or down. The curved end of the bracket must be located so that it goes between the battery sections (when sectional batteries are installed). Panel radiators have special fasteners, and it is in them that the brackets should be included.
Floor brackets can also be fixed or movable.
Wall brackets are set so that they are on the same horizontal line. Horizontalness is checked with a level.
Radiator preparation
In many ways, this process applies to bimetallic and aluminum sectional radiators. They are made in such a way that two vertical holes are right-handed, and the other two are left-handed.
Any heating system is a rather complex “organism”, in which each of the “organs” performs a strictly assigned role. And one of the most important elements are heat exchange devices - it is they who are entrusted with the ultimate task of transferring thermal energy or to the premises of the house. In this capacity, familiar radiators, convectors of open or hidden installation, gaining popularity of water floor heating systems can act - pipe circuits laid in accordance with certain rules.
You may be interested in information about what is
This article will focus on heating radiators. Let us not be distracted by their diversity, structure and specifications: on our portal on these topics - enough comprehensive information. Now we are interested in another block of questions: connecting heating radiators, wiring diagrams, installing batteries. Correct installation heat exchangers, rational use embedded in them technical capabilities- This is a guarantee of the efficiency of the entire heating system. Even from the most expensive modern radiator there will be a low return if you do not listen to the recommendations for its installation.
What should be considered when choosing radiator piping schemes?
If you take a simplified look at most heating radiators, then their hydraulic design is a fairly simple, understandable scheme. These are two horizontal collectors, which are interconnected by vertical jumper channels through which the coolant moves. This entire system is either made of metal that provides the necessary high heat transfer (a striking example is), or “dressed” in a special casing, the design of which assumes the maximum contact area with air (for example, bimetallic radiators).

1 - Upper collector;
2 - Lower collector;
3 - Vertical channels in the radiator sections;
4 - Heat exchanger case (casing) of the radiator.
Both collectors, upper and lower, have outlets on both sides (respectively, in the diagram, the upper pair B1-B2, and the lower B3-B4). It is clear that when a radiator is connected to the pipes of the heating circuit, only two out of four outlets are connected, and the remaining two are muffled. And now, the efficiency of the installed battery largely depends on the connection scheme, that is, on the relative position of the coolant supply pipe and the outlet to the "return".
And first of all, when planning the installation of radiators, the owner must figure out exactly what kind of heating system is functioning or will be created in his house or apartment. That is, he must clearly understand where the coolant comes from and in which direction its flow is directed.
Single pipe heating system
In multi-storey buildings, a single-pipe system is most often used. In this scheme, each radiator is, as it were, inserted into the “gap” of a single pipe, through which both the coolant is supplied and its removal to the “return” side.

The coolant passes successively all the radiators installed in the riser, gradually wasting heat. It is clear that in the initial section of the riser, its temperature will always be higher - this must also be taken into account when planning the installation of radiators.
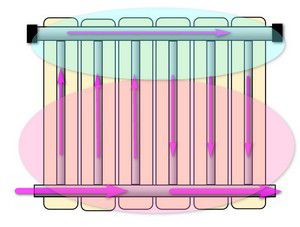
There is another important point here. Such a one-pipe system apartment building can be organized according to the principle of top and bottom feed lyre.
- On the left (item 1) the upper supply is shown - the coolant is transferred through a straight pipe to the upper point of the riser, and then sequentially passes through all the radiators on the floors. This means that the flow direction is from top to bottom.
- In order to simplify the system and save Supplies often another scheme is organized - with a bottom feed (pos. 2). In this case, radiators are installed in the same series on the pipe ascending to the upper floor, as well as on the pipe descending. This means that the direction of the coolant flow in these "branches" of one loop is reversed. Obviously, the temperature difference in the first and last radiator of such a circuit will be even more noticeable.
It is important to deal with this issue - on which pipe of such a single-pipe system your radiator is installed - the optimal tie-in scheme depends on the flow direction.
A prerequisite for piping a radiator in a single-pipe riser is a bypass
The name “bypass”, which is not entirely clear to some, refers to a jumper that connects the pipes connecting the radiator to the riser in a single-pipe system. What is needed for, what rules are followed when installing it - read in a special publication of our portal.
The single-pipe system is also widely used in private one-story houses, if only for reasons of saving materials for its installation. In this case, it is easier for the owner to figure out the direction of the coolant flow, that is, from which side he will be supplied to the radiator, and from which side he will exit.

Advantages and disadvantages of a single-pipe heating system
Attracting with the simplicity of its device, such a system is still somewhat alarming due to the difficulty of ensuring uniform heating on different radiators house wiring. What is important to know about how to mount it with your own hands - read in a separate publication of our portal.
Two-pipe system
Already on the basis of the name, it becomes clear that each of the radiators in such a scheme "relies" on two pipes - separately for supply and return.
If you look at the two-pipe wiring diagram in a multi-storey building, you can immediately see the differences.

It is clear that the dependence of the heating temperature on the location of the radiator in the heating system is minimized. The direction of the flow is determined only by the relative position of the branch pipes cut into the risers. The only thing you need to know is which particular riser acts as a supply, and which one is the “return” - but this, as a rule, is easily determined even by the temperature of the pipe.
Some apartment residents may be misled by the presence of two risers, in which the system will not cease to be one-pipe. Look at the illustration below:

On the left, although there seem to be two risers, a single-pipe system is shown. Just one pipe is the upper supply of coolant. But on the right - a typical case of two different risers - supply and return.
The dependence of the efficiency of the radiator on the scheme of its insertion into the system
Why was it all said. what is placed in the previous sections of the article? But the fact is that the heat transfer of the heating radiator very seriously depends on the relative position of the supply and return pipes.
| Scheme of inserting a radiator into a circuit | Direction of coolant flows |
|---|---|
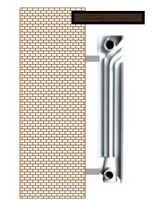
| Diagonal radiator connection on both sides, top inlet | |
 |  |
| Such a scheme is considered the most effective. In principle, it is she who is taken as the basis for calculating the heat transfer of a specific radiator model, that is, the battery power for such a connection is taken as a unit. The coolant, without encountering any resistance, completely passes through the upper collector, through all vertical channels, ensuring maximum heat transfer. The entire radiator warms up evenly over its entire area. | |
 |  |
| Such a scheme is one of the most common in multi-storey building heating systems, as the most compact in vertical risers. It is used on risers with an upper supply of coolant, as well as on return, descending - with a lower supply. It is quite effective for small radiators. However, if the number of sections is large, then the heating may be uneven. The kinetic energy of the flow becomes insufficient to propagate the coolant to the very end of the upper supply manifold - the liquid tends to pass along the path of least resistance, that is, through the vertical channels closest to the entrance. Thus, in the part of the battery farthest from the entrance, stagnant zones are not excluded, which will be much colder than the opposite ones. When calculating the system, it is usually assumed that even with the optimal length of the battery, its overall heat transfer efficiency is reduced by 3–5%. Well, with long radiators, such a scheme becomes inefficient or will require some optimization (this will be discussed below) / | |
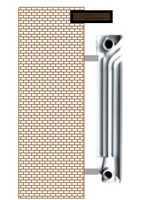
| One-way radiator connection with top inlet | |
 |  |
| A scheme similar to the previous one, and largely repeating and even reinforcing its inherent shortcomings. It is used in the same risers of single-pipe systems, but only in schemes with a bottom supply - on an ascending pipe, so the coolant is supplied from below. Losses in the total heat transfer with such a connection can be even higher - up to 20 ÷ 22%. This is due to the fact that the difference in density will also contribute to closing the movement of the coolant through the near vertical channels - the hot liquid tends upwards, and therefore it is harder to pass to the remote edge of the lower radiator supply manifold. Sometimes this is the only connection option. The losses are compensated to some extent by the fact that in the ascending pipe the general level of the coolant temperature is always higher. The circuit can be optimized by installing special devices. | |
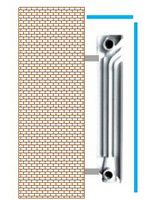
| Double-sided connection with bottom connection of both connections | |
 |  |
| The scheme of the lower, or as it is often called the “saddle” connection, is extremely popular in autonomous systems of private houses because of the wide possibilities to hide the pipes of the heating circuit under the decorative floor surface or make them as invisible as possible. However, in terms of heat transfer, such a scheme is far from optimal, and possible efficiency losses are estimated at 10–15%. The most accessible path for the coolant in this case is the lower collector, and distribution along the vertical channels is largely due to the difference in density. As a result, the upper part of the heating battery can warm up much less than the lower one. There are certain methods and means to minimize this disadvantage. | |
| Diagonal radiator connection on both sides, bottom inlet | |
 |  |
| Despite the apparent similarity with the first, most optimal scheme, the difference between them is very large. Efficiency losses with such a connection reach up to 20%. This is explained quite simply. The coolant has no incentives to freely penetrate to the far section of the lower radiator supply manifold - due to the difference in density, it selects the vertical channels closest to the battery inlet. As a result, with a sufficiently evenly heated top, in the lower corner opposite to the entrance, stagnation often forms, that is, the surface temperature of the battery in this area will be lower. Such a scheme is used extremely rarely in practice - it is even difficult to imagine a situation where it is absolutely necessary to resort to it, rejecting other, more optimal solutions. | |
The table deliberately does not mention the lower one-sided connection of the batteries. With him - the question is ambiguous, as in many radiators that suggest the possibility of such a tie-in, special adapters are provided, which essentially turn the bottom connection into one of the options discussed in the table. In addition, even for ordinary radiators, you can purchase additional equipment, in which the lower one-sided eyeliner will be structurally modified to another, more best option.
I must say that there are also more “exotic” tie-in schemes, for example, for high-height vertical radiators - some models from this series require a two-way connection with both connections from above. But the very design of such batteries is thought out in such a way that the heat transfer from them is maximum.
The dependence of the heat transfer efficiency of the radiator on the place of its installation in the room
In addition to the scheme for connecting radiators to the pipes of the heating circuit, the place of their installation also seriously affects the efficiency of these heat exchange devices.
First of all, you must comply certain rules placement of the radiator on the wall relative to adjacent structures and interior elements of the room.
The most typical location of the radiator is under the window opening. In addition to the general heat transfer, the ascending convection flow creates a kind of " thermal curtain”, preventing the free penetration of colder air from the windows.

- The radiator in this place will show maximum efficiency if its total length is about 75% of the width of the window opening. In this case, it is necessary to try to install the battery exactly in the center of the window, with a minimum deviation not exceeding 20 mm in one direction or another.
- The distance from the lower plane of the window sill (or other obstacle located on top - a shelf, a horizontal wall of a niche, etc.) should be about 100 mm. In any case, it should never be less than 75% of the depth of the radiator itself. Otherwise, an insurmountable barrier to convection currents is created, and the battery efficiency drops sharply.
- The height of the lower edge of the radiator above the floor surface should also be about 100÷120 mm. With a clearance of less than 100 mm, firstly, considerable difficulties are artificially created in carrying out regular cleaning under the battery (and this is a traditional place for the accumulation of dust carried by convection air currents). And secondly, convection itself will be difficult. At the same time, it is also completely useless to “pull up” the radiator too high, with a clearance from the floor surface of 150 mm or more, since this leads to uneven distribution of heat in the room: a pronounced cold layer may remain in the area bordering the floor surface air.
- Finally, the radiator must be at least 20 mm away from the wall with brackets. A decrease in this gap is a violation of normal air convection, and in addition, clearly visible dust marks may soon appear on the wall.
These are indicative indicators that should be followed. However, for some radiators, there are also recommendations developed by the manufacturer on the linear parameters of the installation - they are indicated in the product manuals.

It is probably unnecessary to explain that a radiator located openly on the wall will show heat transfer much higher than one that is completely or partially covered by certain interior items. Even a window sill that is too wide can already reduce the heating efficiency by several percent. And if you consider that many owners cannot do without thick curtains on the windows, or, for the sake of interior design, they try to cover up unsightly, or their eyes, radiators with the help of facade decorative screens or even completely closed casings, then the calculated battery power may not enough to fully heat the room.

Heat transfer losses, depending on the installation of a heating radiator on the walls, are shown in the table below.
| Illustration | The influence of the shown placement on the heat transfer of the radiator |
|---|---|
 | The radiator is located on the wall completely open, or installed under the window sill, which covers no more than 75% of the depth of the battery. In this case, both main heat transfer paths - both convection and thermal radiation - are completely preserved. Efficiency can be taken as a unit. |
 | A window sill or shelf completely covers the radiator from above. For infrared radiation, this does not matter, but the convection flow is already facing a serious obstacle. Losses can be estimated at 3 ÷ 5% of the total thermal power of the battery. |
 | In this case, not a window sill or shelf on top, but the upper wall of a wall niche. At first glance, everything is the same, but the losses are already somewhat greater - up to 7 ÷ 8%, since part of the energy will be wasted on heating the very heat-intensive material of the wall. |
 | The radiator from the front is covered with a decorative screen, but the clearance for air convection is sufficient. The loss is precisely in thermal infrared radiation, which especially affects the efficiency of cast iron and bimetallic batteries. Heat transfer losses with such an installation reach 10÷12%. |
 | The heating radiator is covered with a decorative casing completely, from all sides. It is clear that in such a casing there are gratings or slot-like holes for air circulation, but both convection and direct thermal radiation are sharply reduced. Losses can reach up to 20 - 25% of the calculated battery power. |
So, it is obvious that the owners are free to change some of the nuances of installing heating radiators in the direction of increasing the efficiency of heat transfer. However, sometimes the space is so limited that you have to put up with the existing conditions regarding both the location of the pipes of the heating circuit and the free area on the surface of the walls. Another option - the desire to hide the batteries from the eyes prevails over common sense, and the installation of screens or decorative casings is a matter already decided. This means that in any case, it will be necessary to make adjustments for the total power of the radiators in order to guarantee the required level of heating in the room. Correctly make the appropriate adjustments will help the calculator below.
Installing a radiator is far from simple task, since any error made during the installation process can cause serious consequences. But if desired, the installation or repair of the heating system can be done with your own hands. For success, you need: the study of theory, the availability of tools, careful adherence to recommendations.
First you need to decide on the choice of the radiator model that is suitable for installation in a particular case. To do this, you need to familiarize yourself with the technical parameters of the proposed types of radiators and compare them with your needs and capabilities.
Important Rules installation of heating radiators:
- type of material;
- wear resistance;
- resistance to corrosion;
- the diameter of the pipe through which water circulates;
- price.

After the radiator model is selected, it is necessary to determine the location where the heating radiators will be installed. This activity should be carried out in accordance with general rules installation of batteries "the best option is the space under the window."
At the same time, the length of the heating device should be within 50-75% "according to SNiP" of the width of the window under which it is mounted. Compliance with this rule will guarantee that the window above the battery will not “sweat”, and condensation will not appear on the walls.
In addition, the installation of heating radiators provides for the location of the device in areas with maximum air circulation, for example: under a window or near doors.
How to properly install heating devices:
- we install brackets on the wall under the window, having previously determined the location of the fasteners “the battery must be installed strictly in the middle of the window block”;
- the bottom panel of the radiator should be at least 10-14 cm above the floor. This optimal distance for cleaning and eliminating the possibility of cold air to collect;
- the bottom panel of the battery should lag behind the wall by 3-5 cm. Otherwise, the heat distribution will not be correct and the heat exchange of the internal energy of the device will be disturbed;
- if you fix a heat-reflecting screen containing a foil layer on the wall surface, then it is allowed to reduce the gap between the radiator and the wall within 2.5 cm. Due to this, warm air will be repelled from the wall, and this measure will increase the heat transfer power, allowing you to save heat in the room by 10 -15%.
- from the upper heating grate to the window sill should be 5-10 cm (according to SNiP). This arrangement preserves normal convection and supports heat dissipation.

When it comes to installing heating radiators with your own hands in a private house, the most suitable options will become: aluminum radiators or bimetallic batteries.
Aluminum radiators:
- possess modern design;
- have a high thermal power;
- easy to install;
- have the ability to work at a pressure of 10 to 25 atm, at a maximum temperature of up to +110 degrees;
- the power of one section of the device is about 200 watts.
Bimetal radiators have the same advantages as aluminum, but in addition:
- have increased impact resistance;
- operated at a pressure of 35 atm;
- their maximum temperature is about +120 degrees.
Heating system installation technology
Before the installation of heating radiators begins to gain momentum, it is necessary to prepare special tools, and these are: an impact drill and a screwdriver with victorious drills, a building level and a tape measure, pliers and wrench, pencil and ruler.
- a strapping scheme is being developed, which it is desirable to entrust to a specialist. He also draws up a list of materials needed to install a radiator with his own hands;
- before the installation of heating radiators is started, it is necessary to carry out work to prepare the wall. To do this, it is leveled with plaster and puttied;
- the marking of the place of fastenings is carried out, holes are punched and dowels are installed;
- the installation of components on the battery is carried out, namely, they are: equipped with an “automatic or manual” air vent, which is screwed into a specially made adapter and installed in a free upper manifold;
- free outlets are closed with radiator plugs or plugs;
- two adjustable shut-off valves are installed at the inlet and outlet. In the event that it becomes necessary to remove the radiator, then thanks to these locking elements, the device can be removed without turning off the entire system “with vertical wiring, a bypass is required”;
- to change the intensity of the heat flow, you can put control valves in the form of thermostats.
- fastening of the wall heating device is carried out on brackets. The floor radiator is located on a special stand;
- hanging the radiator on the wall is controlled using the building level;
- to connect the battery, the plugs are removed from it. If the connection scheme is single-pipe, then a bypass must be connected. With a two-pipe scheme, the device is connected to the pipe with the help of a squeegee and a valve;
- when performing a pressure test, it is desirable to have a plumber equipped with special equipment.
Connection methods
Before starting work on the installation of the heater, first of all, it is necessary to determine the type of wiring of the system “one-pipe or two-pipe”.
The principle of a single-pipe system has become more widespread in apartments of houses with several floors. With such an organization, hot water flows through pipes from the upper floors to the lower ones.
A significant drawback of this wiring is that temperature control is impossible without the installation of additional devices.
Do-it-yourself installation of heating radiators in a private house is most often performed with a two-pipe heating system. In this case, water circulation is carried out through two pipes, i.e. hot flows through one, and cooled flows through the other. With such a wiring, unlike the one-pipe version, the temperature of the heating system is always stable, and can also be regulated.
Connection options
According to SNiP, the battery connection scheme can be carried out in the following ways:
- Lateral. Is the most popular method. It allows you to connect the inlet and outlet pipes to the same side of the device.
- Lower. This diagram looks more neat. The inlet and outlet pipes are placed at the bottom where they are connected to the central pipe. However, this installation method has its drawbacks: there is a decrease in heat transfer by 5-15%, compared with the side scheme. In addition, when a pipe breaks, a leak can occur.
- Diagonal. Water enters through the top pipe on one side, and exits through the bottom pipe on the opposite side. The diagonal option is well acceptable for a private house, which is equipped with autonomous heating and where the coolant circulates at a slower rate. A significant drawback: the circuit is not designed to remove the device without completely turning off the entire heating system. If the device consists of 12 sections or more, their diagonal connection scheme is recommended, since in systems with a lateral connection, the coolant cannot keep the temperature after passing through a multi-section device.
Installation of bimetallic heating radiators should begin with the calculation of the number of required sections. For example, to heat 1 sq.m of a room with a height of no more than 3 m, a thermal power of 100 watts is required. To calculate the number of sections required to heat a room, you can use the formula:
Q=S*100*k/P;
S- the area of the room where you want to install a radiator; k- correction factor depending on the height of the ceiling; P- power of one section.
If the ceiling height does not fit into standard parameters, then special coefficients are applied in this case:
- at a height of 3 m, a coefficient of 1.05 is applied;
- if the height is 3.5 m, it is 1.1;
- with a room 4 m high, the coefficient becomes -1.15;
- with a room height of 4.5 m - the coefficient is 1.2.
Example:
h = 2.7 m - "ceiling height"
P = 0.138 kW
Number of sections?
Solution: Q = 20 x 100 / 0.138 = 14.49
Answer: 14 sections are required.
V this example the coefficient is equal to one, since the height of the room is less than 3 m.

Installation or installation of bimetallic heating radiators involves the use of a level.
Such measures are necessary to ensure that the battery is mounted as evenly as possible, without distortions. In addition, it is important that the device is mounted strictly horizontally, or with a slight deviation towards the pipe, which will make it possible, by the end of the heating season, to drain the water without residue. Installed brackets must be checked for strength, and then hang the radiator.
Lightweight batteries are hung on two hooks. If the device is not very large in length, then the brackets can be installed between the extreme sections on both sides. The third holder is determined in the middle of the radiator from below. With an odd number of sections, the third hook is installed to the right or left of the nearest section. After mounting the brackets, they should, if possible, be hidden with mortar.
Before starting the installation of hooks, holes are drilled in the intended areas, into which the dowels are determined. Then, with the help of self-tapping screws 6 x 35 mm, “options are possible” fix the brackets. For panel radiators, the kit has its own fasteners. Their number depends on the length of the heater.
The specifics of installing batteries in an apartment
Before starting the installation of new heating appliances in the apartment, in without fail you need to obtain permission from the operating company in charge of this house. Since the centralized heating system in public houses is a common house property, all unauthorized interventions related to the distribution of heating require approval, otherwise such arbitrariness threatens with a punishment in the form of an administrative fine.


