Do you like to make various crafts with your child, are you constantly looking for something new and interesting to interest the baby and involve him in working together? Then you will certainly like this article, because in it we will give several examples of how to make a flying saucer with your own hands. Your son will not only get great pleasure from the process itself, but will then be happy to play space travelers with his new toy. In addition, with the help of such crafts, you can tell him about the structure of galaxies, stars and planets, as well as exciting space travel. The main advantage of such a craft is that it can be made from the simplest materials, and the kid himself will be able to come up with a spaceship shape, texture and color.
Do-it-yourself flying saucer from improvised materials
In order for you to get an original do-it-yourself flying saucer, made with great interest and enthusiasm, you will need to take care of preparing all necessary materials. In the process of work, there will be no problems, because even a three-year-old child can cope with it, and parents will only have to do all the gluing work.
Work materials
To make a real spaceship, you will need the following tools and materials:
- Unnecessary disk.
- Two foam hemispheres.
- Colored paper with self-adhesive strip.
- Decorative carnations.
- Several bamboo sticks or toothpicks.
- A couple of plastic flat stars.
- Acrylic paint.
- A few fairly large beads.
- Sequins.
- Chenille wire, designed for crafts in a silver or golden hue.
- Glue.

Operating procedure
If you follow this work technology, then you will get the perfect do-it-yourself paper flying saucer:
- Take a leaf self-adhesive paper desired shade, circle the disc. Cut out a circle according to the resulting contour, glue it to the upper side of the disk.
- Paint one of the foam hemispheres acrylic paint leave to dry.
Important! Let the baby choose the color on his own, because thanks to this, independence and imagination will develop in him.
- Decorate the second hemisphere with decorative carnations and shiny sequins. To do this, you need to string sequins alternately on studs and stick them into a hemisphere.
Important! You can start decorating both from the edge and from the center, but it is better, of course, from the base, so that it is more convenient to form straight parallel rows. If your sequins are of different shades, then you can even make some kind of pattern out of them, such as waves, circles or stripes.
- After the top is decorated, you can begin to form the antenna. You need to stick two pieces of fluffy wire directly into the foam.
- Assembling the ship's hull. It is necessary to glue on both sides of the hemisphere disc. At the same time, a hemisphere with sequins should be attached to the shiny side, and a painted hemisphere should be attached to the side sealed with paper.
- We make legs for the ship. It is necessary to string the beads on the edges of the toothpicks so that they go into them as deeply as possible, but do not stick out from the opposite side.
Important! If the hole in the bead is too wide, then you can seal it with plasticine, glue or chewing gum to prevent the beads from sliding on the toothpick.
- Insert the finished legs as supports into the painted lower part of the ship so that they are at the same distance from each other, otherwise the craft will not stand evenly.
- Glue plastic stars on the shiny side. You can additionally cut out decorations in the form of alien figurines from paper.
Our plate is ready!
Even a child can figure out how to make a flying saucer out of paper according to the presented scheme. If you do not rush and carefully study each item, then the craft is guaranteed to turn out to be beautiful and quite durable.
Do-it-yourself flying saucer made of natural materials
If you like to create compositions and all kinds of crafts from natural materials, in particular vegetables, branches and cones, then it will not be difficult for you to make a ship for aliens yourself, guided by this technique. Below it will be described in detail how to make a flying saucer with your own hands from the materials present in any modern kitchen.
Work materials
You will need to implement this idea:
- Oblong-shaped vegetables - it is better if it is patisson, because it is most suitable for this purpose and does not have to be cut.
- Colored push pins.
- Small plastic bottle.
- Colored paper or cardboard.
- Foil.
- Scissors.
- Transparent tape.

Master Class
Having prepared all the materials according to the list, feel free to get to work:
- Wrap the patisson with foil - do it carefully so that there are no empty and free areas. Use tape to secure the edges of the foil.
- Make portholes on the sides of the vegetable by attaching pushpins - you need to place them around the whole circle.
- Cut off the neck from the bottle, leaving some side walls for the cabin of our spaceship to come out. The bottle can be inserted directly into the pulp of the vegetable or glued with tape.
- Cut out decorative elements in the form of stripes and stars from colored paper, glue them on the walls of the ship.
- You can also make space travelers out of cardboard.
Good day everyone! How are you guys and girls? In the last article, we did it with you, and in this one we will make the plane of your dreams))). True, it will be made of paper, but such that it flies fast and far and no one can catch it.
And then you can arrange a competition and let all the paper planes rush to the distillation, how do you like this idea? Probably just great, because spring is coming soon, and there will be summer, when there will be much more fun and entertainment than now.
Everyone knows this toy, even kids, who also love and willingly sit and fold A4 sheets with great interest to get a wonderful craft and at the same time a flying machine above the ground.
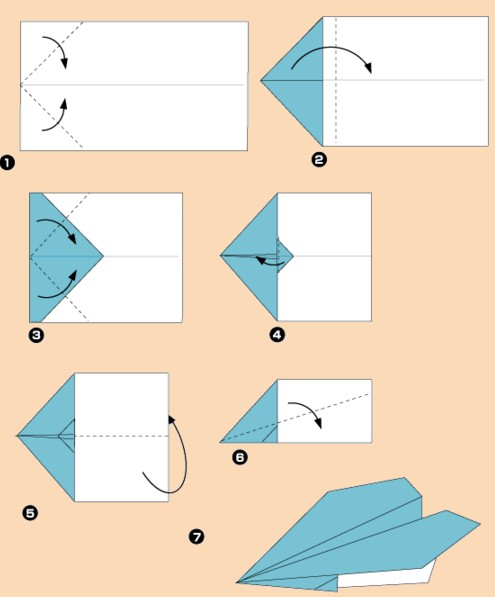
The easiest way is familiar to all of us from childhood, absolutely everyone remembers it, both moms and your dads. Take a look at this picture.

First of all, we will make such an airplane that flies far, the main thing is that it flies straight and beautiful. Just what you need to have fun and be able to watch him))).
We will need:
- A4 sheet - 1 pc.
Stages of work:
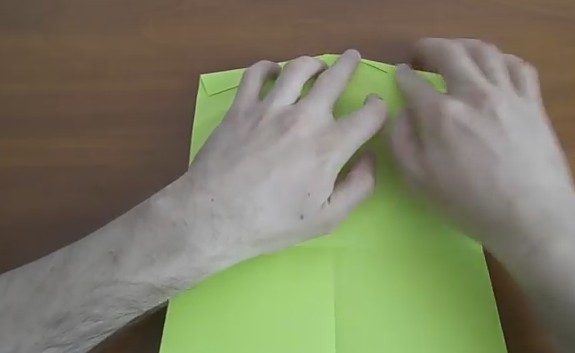
1. Take a sheet, our toy will be made from it. Decide on the color, you can take the traditional White list, but you can take for example green or blue.
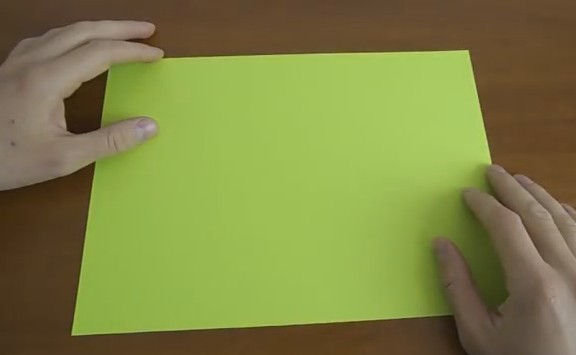
2. Lay the paper horizontally in front of you and fold it in half. We will do it using the origami technique.

3. Then open and rotate vertically. Begin to bend to a straight line.
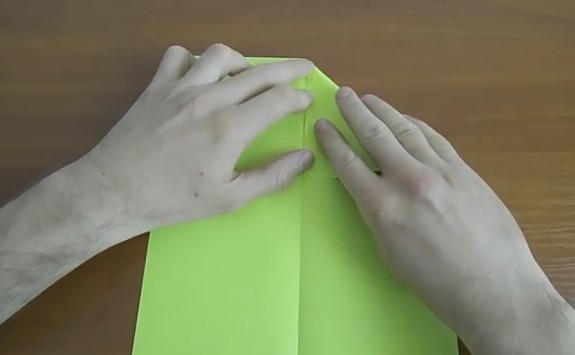
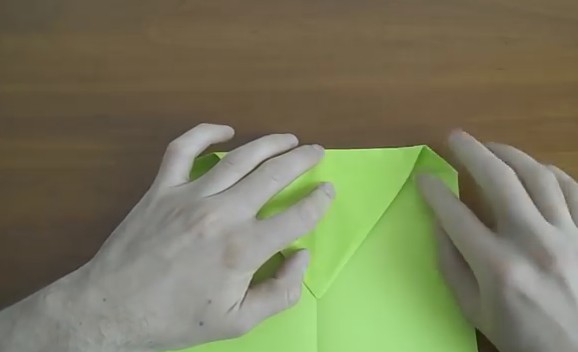
4. Thus, at the top you get a triangle.

5. Now fold the resulting line back to the outside. Do this on both sides.

6. Repeat the steps again.
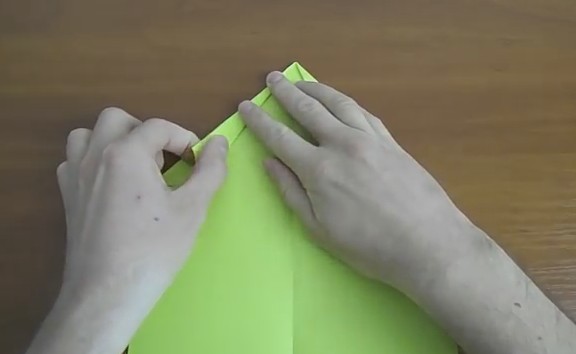
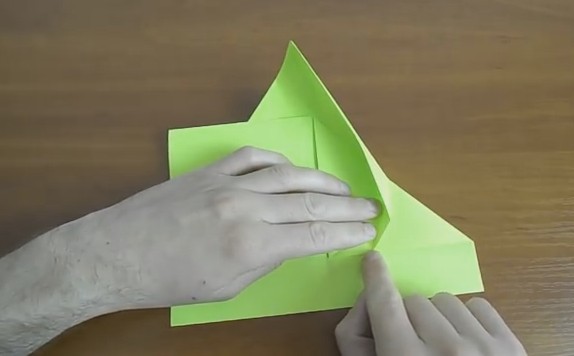
7. This is what should happen.

8. Then open all folded parts.

9. Fold the paper on both sides, where you have two marked lines to the center strip.

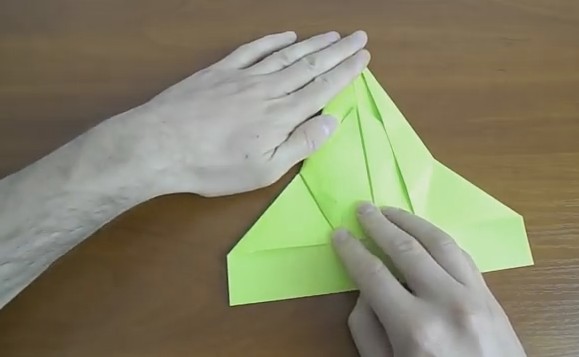
10. At the intersections, fold the sheet of paper forward.
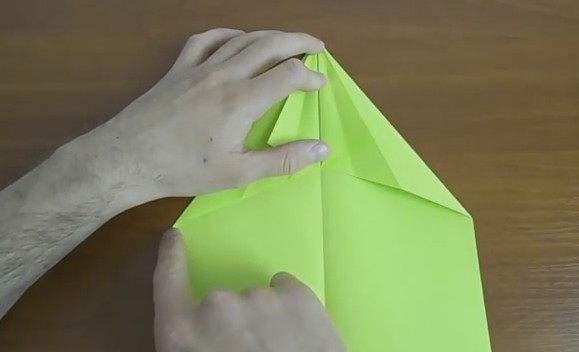
11. Press the line with your fingers.
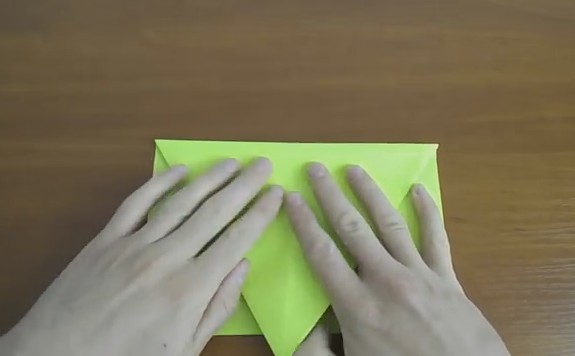
12. Open and return the sheet to its original position.

13. After bending along the first top line.
14. Fold to the center horizontal line.

15. Place the resulting corner exactly on the line.
16. Then turn the sheet over and fold along a horizontal line.

17. Turn the sheet over again to the other side and make the triangle look up.

18. Bend the upper parts of the center line, when you begin to do this, the product will begin to gather.
19. Therefore, you have to push the paper very carefully with your own hands.

20. You need to do these actions from two sides.

21. Fold in half in half.
22. Bend the airplane's wings.

23. After, on the wings themselves, make folds of 1-1.5 cm.

24. Open the airplane and align your wings. Here is such a handsome man turned out, and ready to fly. Look, just don't fly too far))).

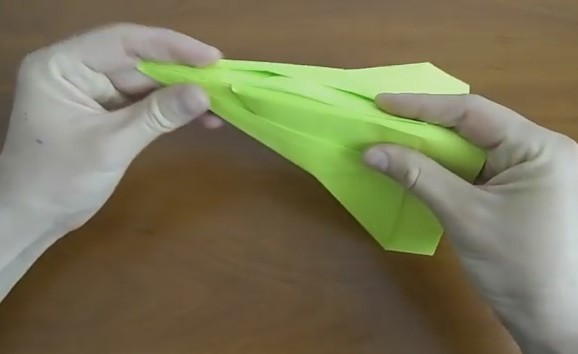
Origami paper plane in 5 minutes
For the smallest fidgets, there is, of course, a simpler instruction, such souvenirs turn out just as well and they fly very well, depending on how to launch, you can not catch up and fly away by 100 meters, you are tormented to search later).
Most importantly, you need to make the two sides the same in the mirror image so that they turn out to be even and then everything will work out for sure.
On one of the forums, I looked at a craft called Piranha, and it looks like the truth? Also, the author chose the color red. See how cleverly you can turn such a miracle. No special skills are required. The most primitive version with a simple model.

It turned out to be a cool little thing, my boys really liked it).

By the way, you can get a little creative and give dad a little surprise.

In general, do such a craft with your child so that there is something to do in the circle of your beloved family, because such work is very close.

Step-by-step instructions for a flying toy for beginners
It is interesting that almost any aircraft can fly a sufficient number of meters above the ground, it can be 10,000 or even more than 1,000,000, the most important condition is, depending on what height it will be launched from and whether there will be wind outside and how it will pick it up.
If you want your airplane to never fall over, then use this scheme. Such a toy will show you a uniform and very fast flight. You yourself will be very surprised.

If you like such air transport with big wings, then fold this kind of airplane.

You can also build with a blunt nose, there will be no collisions for this.

Well, if you don’t understand diagrams and instructions at all, then watch this step-by-step video from the YouTube channel:
How to make a paper plane that will fly very far up to 10,000 meters?
In fact, there are a fairly large number of various paper models of this air transport. The leaders at the moment are the Hawk, Eagle Owl, Falcon and Albatross.
And this is not all to say, I propose to lay down a powerful and beautiful airplane called Thunderstorm.
Stages of work:
1. Be sure to bend a sheet of paper symmetrically, spread the resulting line very well with your hands, then turn it back.

2. Make a triangle at the top, as we did in the first example.

3. Bend the leaf to the center again on both sides, you get a sharp triangle.

4. Then bend the sheet where the fold point formed.


6. Next, roll the triangle forward again.

7. Turn over the resulting masterpiece and bend again.

8. Bend the plane in half. Bend the top of the wings a little, as shown in the photo.

9. And then bend so that you get real ones, like an airplane.

10. Voila, and that's what happened, it looks cool and cool, but how it cages, well, it's definitely fast and far).

DIY paper airplane model for kids with folding patterns
Do you want to make a bunch of beautiful and pretty sharp or blunt-nosed airplanes with your kids?
First of all, learn how to make these yourself, and then teach your little helpers this easy task. Start with the simplest model.
If you do not understand this scheme, go to the next one and choose.

We make a Glider from an A4 sheet easily and simply
If you want another look, which is obtained in a matter of minutes, and it will not be necessary to fold and bend much, a completely different technique is used. It turns out cool and original. In general, a cool option for a child who will gladly launch it in the air.
We will need:
- paper
Cooking method:
1. Bend sheet A4 in half and draw a line well with your hands. Take scissors or a clerical knife and cut along it.

2. You will get two small leaves, fold one sheet in half again and draw a blank with a pencil, which you can ask me for free, and then print it on your printer.

3. Cut out the template and don't forget to make gaps on the wings and tail as shown in the picture I sent you.


5. Take your time, iron the lines neatly and evenly.

6. There is no need to hurry, otherwise it will turn out to be a blunder.

7. Put a piece of plasticine into the nose of the air transport and close it.

8. Where the cuts were made on the tail, bend and straighten the paper.

9. Do the same with the wings.

10. To give flying ability, you need to smooth out the wings with a pencil and wrap them up a little.

11. It should turn out something like this. To test the elevator, lower the plane vertically down, it should take off like the wind, but don't overdo it.

If your plane tends to one of their sides, then adjust it, because you can lower or raise the traffic controllers.
Volumetric cardboard craft
We will need:
- cardboard - 2 sheets
- PVA glue
- ruler
- pencil
- scissors
- Matchbox

Stages of work:
1. Mark two strips on cardboard with a pencil, their width should be equal to a matchbox.

2. Then cut them out with scissors. From these strips make the wings of the plane. On another sheet, mark two strips 1.5 cm wide and also cut them along the length of the cardboard.

Move one such thin strip aside, and cut the second into two parts of 8 cm each, remove the rest, it will not be needed. Here's what happens:

3. Now start building. Take a matchbox, bend a long thin strip in half and attach, glue it to the box.

4. With the help of two identical strips that are wide, like boxes, make wings.

The corners can be rounded, cut them with scissors.
5. From one short narrow strip, make a tail and also round it, glue it inward. And glue the second one on top, make a triangle out of it.

6. After you can cut the propeller and glue it.
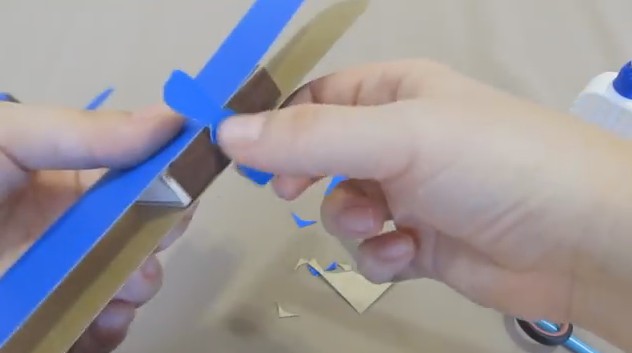
7. The craft is ready, enjoy your work!

Video on how to roll a Fighter without glue

Of course, it will be difficult to do such a craft if you are doing it for the first time, so I suggest starting by watching a video that will definitely teach you how to create such a charm.
Well, how did it work out for you? Is it really easy and simple and also without glue, and not difficult, as at first glance?
And if you have problems with the Internet, then you can always use the scheme, especially if you suddenly forget something, too, as an option.


P.S. By the way, craftsmen even make such airplanes from one match, see for yourself:
Well, that's all I have. I wish you creative success and good luck! Create for health, play and rejoice! All the best and joyful. Bye everyone!
Making such a paper airplane that will fly is very simple. It is important to follow the instructions provided on how to make the plane and make the curves carefully.
Any person in childhood loved to make such paper airplanes, and then launch them, and the higher the point from which the plane was launched, the more interesting the lesson was.
Assembling an airplane is not only a fascinating process, but also developing a child's fingers.

Instructions for creating an aircraft
It is worth starting with the fact that the product can be made from almost any paper.


Start with simple designs, and then smoothly move on to more complex ones:
- Position the sheet of paper so that its short side is facing you.
- Mark exactly the middle on this side.
- Fold the paper so that the top corners meet the center.
- Fold the top right down the middle.
- Bend back a small part of the triangle, in order to subsequently fold the corner of the airplane again to the middle, and fix the resulting structure with a small triangular one.
- At the end of all stages, it is necessary to bend the result in half and bend back the wings.
- The plane is ready.

To better understand how to make such an origami product, check out step by step photo homemade aircraft.
Making a modern airplane model
When you can easily learn how to make simple airplanes, you can move on to more complex models.

One of these is the Glider, which flies very high and far, while it can maneuver well in the air:
- Fold the sheet in half.
- As in the first option, it is necessary to fold the corners of the plane to the middle.
- Imagine visually a line in the middle of the product, then make a bend in this place. It will turn out a very sharp nose of the aircraft.
- The wings of the nose must be folded in such a way that they look back a few millimeters.
- Fold the product in the center so that the reverse side becomes the inside.

The last step is to bend the wings, which can be made narrow, or vice versa - wide. By experimenting, you will learn how to make the plane more maneuverable with your own hands.

military aircraft
The next view of the aircraft model is more complex than the first two, but you shouldn't have any problems building it:
- The first item is repeated from the first model.
- Bend in the middle. Fold up the corner at the top. Repeat the action with the other side.
- As a result, you should see a detail that resembles a cross. Fold the sides together towards the center on both sides.
- You should see the horns, fold them in half, and wrap the rest of the paper inside.
- The bottom corners must be bent in the opposite direction from you.
- We fold the product in half and the plane is ready for battle.

How to make a flying paper plane?
When you get tired of making airplanes, and it will happen pretty soon, but your child will not leave you behind with a request to make him a new airplane, then show him a couple of lessons on independent creation simple model.


It will also be possible to add a separate propeller to such an airplane, which will give some realism to your product:
- Fold the paper diagonally twice
- Fold the resulting sheet along the visual lines, which divide the diagonals into two even parts.
- Both corners must be folded back
- On both sides, fold the edges one more time so that the new part is lightly flush with the previous one.
- The edges should be folded over the received parts
- Bend one more time towards the center, and then tuck the corners into inside
- Both lower corners must be bent into the holes obtained
- For the propeller, it is necessary to cut a square sheet of paper diagonally, leaving the whole core
- Fold the propeller, all the time securing it with a thread and a needle
- The last step is important to fix the propeller on the tail of the aircraft.

How to make a model aircraft that will fly fast?
We bend the sheet in half and open it back. Now we bend the sheet across and fold the two edges to the bottom side, and then bend only half of what was bent before.

We unfold the sides that are found on the sides and bend each part to the inside. small plot wings are bent and bent from the underside. In the middle, where the fold line is located, carefully seal with your fingers or with a ruler.

We bend the resulting bends so that they are parallel to our wings and the plane is ready.

Try to create your own version based on the instructions given. original idea airplanes and methods for making paper airplanes.


Any, even the most primitive folded paper plane, will fly perfectly if done correctly and carefully make bends.


If the child wants something new, then you can always show him how to make a plane that will have a folded tail and flaps. Airplanes endowed with such parts fly high and very far.

These examples of creating aircraft are far from the only ones, on the Internet you can find a fairly large number of diagrams and descriptions, as well as tips that will help you make a new type of aircraft every time and delight your child.

From what you can make an airplane at home, it's up to you. Try experimenting with various materials that lend themselves to such bends and you will notice that each aircraft made from a different material will have completely different flight skills.

Be symmetrical, as an error of just a couple of centimeters can throw your plane to the side, so that it will not fly or will fly, but only downward in a spiral.


The presented master class on making aircraft will help you and your child get a lot of pleasant memories and emotions. Create a whole squadron and go out into the street - let them all into the sky.

DIY aircraft photos


If your child comes up to you with the words: “Mom, I don’t know what to do!” or "I'm bored!", invite him to help you make the next flying objects, and then have fun launching them into the air!
Helicopter from a disposable plate and straws for a cocktail
What you need:
- plate (made of paper, foam or plastic)
- 4 straws for a cocktail
- Scotch
- scissors
Let's get started:
scientific explanation : By rotating the “leg” of the cocktail tubes, we set its speed. Since the “leg” is attached to the cymbal, the speed is transmitted to it too, but the diameter of the cymbal is much larger than the diameter of the “leg”, so one turn of the “leg” sets several turns of the cymbal, thereby increasing its speed. The same thing happens between bicycle pedals and wheels.
Exercise: Experiment with the thickness of the “legs” (take not 4 straws, but, for example, 8) or the size of the plate (you can make it smaller by cutting off the excess with scissors). Which variant stays in the air the longest and why?
Flying Rings!
What you need:- two strips of paper measuring 10 x 2 cm and 16 x 2 cm
- wooden stick (skewer) or plastic stick 15 cm
- Scotch
- scissors
Let's get started:
Glue the strips of paper with tape so that you get two rings. Glue the rings to the stick in such a way that they are at its ends, and the glued sides touch the stick itself. The glider is ready! Launch it, smaller in diameter, ring forward and you will be surprised how long and far it can fly! Believe me, this toy will captivate your child's attention for a long time.

scientific explanation: The principle of operation of the flying rings is the same as that of a glider (non-powered aircraft heavier than air), they are kept in flight due to the aerodynamic lift that is created on the rings by the oncoming air flow.
Exercise: Experiment first with the thickness of the rings (the width of the strip), then their diameter (the length of the strip). Which variant stays in the air the longest and why?

It turns out that you can make a helicopter at home yourself. It was great and exciting. If you like making crafts and having a good time, then let's experiment some more. I suggest you organize a home laboratory. I will tell you about what is needed for this.thisbook. This is my gift to you. And in the book you will find 15 exciting experiences with which you will surprise your parents, friends and have a great time. Write what you got and send a photo report on the experiments. Let's have fun together. After all, science is fun.
How to make a flying saucer from a disk, disposable tableware, bake such a cake? Right now you will learn this and be able to make an alien out of a cucumber and an apple, out of socks.
How to make a flying saucer with your own hands
It can be made from unnecessary items that are available at home.
Option number 1

To create such a UFO you will need:
- CD disk;
- foam ball;
- decorative carnations;
- flat plastic sprockets;
- self-adhesive colored paper;
- sequins;
- 2 wooden skewers or 3 toothpicks;
- acrylic paint;
- beads;
- chenille wire of golden or silver color;
- glue.

- Put a disk on a sheet of self-adhesive paper, circle it, cut it out. Glue this circle on front side disk so that the reverse shiny remains open.
- Cut the styrofoam ball in half. If you have two hemispheres, use them.
- Paint one of these blanks, and decorate the second. To do this, take one sequin, pin it with a decorative carnation. Attach the rest of the elements in the same way.
- Here's how to make a flying saucer next. On the decorated hemisphere, you need to attach two antennas, which will be 2 pieces of chenille wire. To do this, just stick their edges into the foam.
- Now this decorated semicircle is glued to the shiny side of the disc, and the second is attached to the side of the disc on which the self-adhesive film is located.
- The legs for this device are made as follows: if from toothpicks, then beads are put on their tips, but so that the sharp edges do not stick out. To do this, you need to drop a little glue into the holes of the beads. If they are large, then cover them with pieces of plasticine.
- When using skewers, you need to cut each one in half, take 3 parts, and also put a bead on their tips. With other edges, these supports are threaded into the lower foam part of an extraterrestrial flying object.
Option number 2
That's how shiny and sparkling it will turn out. And not everyone will guess what is hidden inside. To make this type of UFO, take:
- colored pushpins;
- foil;
- small plastic bottle;
- colored paper or cardboard;
- Scotch;
- scissors.
- Put the foil on the table, place the vegetable on it. Close it with a shiny sheet so that the peel does not show through on any side. To fix the foil, fasten its edges with transparent tape.
- Turn the buttons into portholes of a flying object by sticking them in a circle into the protruding part of the squash, after piercing the foil.
- To make a transparent cabin for a flying saucer, cut off the bottom of the bottle along with the edges. Attach this piece to the top of the spaceship with tape.
- You can decorate this work if you cut out strips, stars from cardboard or colored paper.

Option number 3
The photo shows what the next flying saucer looks like. To create it, take:
- disposable plastic plate;
- glue;
- 2 disposable cups;
- small plastic salad bowl

To make the legs more stable, use two pairs of glasses for each. Together salad bowls you can take another transparent plastic container such a form.
Turn the salad bowl upside down, stick it in this position on a plate using tape. With it, you attach 2 legs to the bottom of the structure.
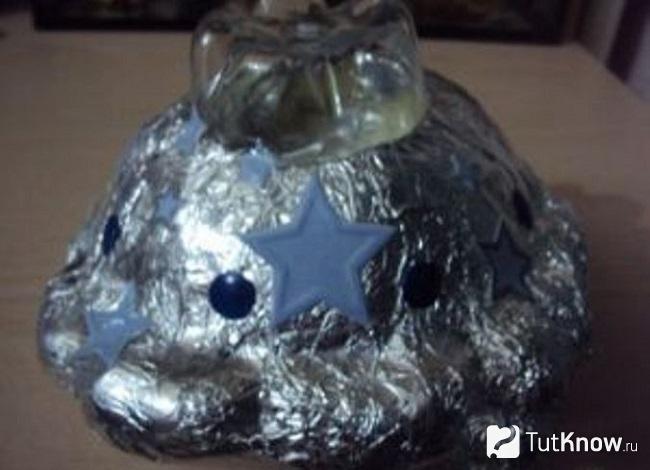
Option number 4
If you want to see other ideas, then look at the fourth. To recreate it, take:
- thing round shape(for example, a plate);
- silver cardboard;
- artificial stones;
- glue Titan transparent;
- stapler.
If you have ordinary cardboard, then have the child paint it with silver paint. Or cut out 2 circles from a fabric of this color, stick it on this paper base.
On the top of the flying saucer, glue the cockpit made of the same material. It consists of a rectangle that wraps around a small circle. Using clear tape, attach the cab to the top plate. Decorate these two details with artificial pebbles by gluing them.
Connect the 2 halves of the flying saucer with a stapler.

Option number 5
And here is another flying saucer toy that will help the development of children's creativity.

So that the child can make it, give him:
- 2 paper plates;
- paints with a brush;
- transparent convex lids from baby yogurt;
- glue.
- Showing imagination, he will color the cardboard plates. When the coating stops sticking to the hands, glue these two blanks so that the convex middles are outside. And the parents will help to attach the cabins of aliens in place. After all, for this you need to use strong fixation glue or a “hot” gun.
- But first, you need to put an alien in the cabin, which the child will make himself. If he wants to get it sometimes, then attach a transparent lid to the center of the top plate, outline it. At this mark, make 4 small cuts with a knife, at the same distance from each other. The same gaps should be at the bottom of the cap.
- Cut it out here so that these 4 elements become protruding. Then you will put them into the slots in the plate, turn, and the cabin will be fixed. To open it and release the captain of the spaceship, turn the porthole to the other side and raise it.
- CD or DVD disc;
- colored paper;
- a transparent convex lid from a milk dessert.

Let the child attach the disk to the paper folded in half, cut out 2 round blanks at once. WITH reverse side one of them will draw the same circles according to the template. Will cut them out.
As a template for drawing holes, you can use a 5-ruble coin, a large button. But these items should not be given to small children!
Now you need to cut holes with small scissors. If you have a hole punch of this shape, use it. A paper circle designed in this way is glued to the shiny side of the disk, and not cut through to the back.
The cockpit is attached on top, and now you can take the work to the competition or play with such a flying saucer.
How to make a frisbee with your own hands?
This is a kind of small flying saucer, with which you can play with your children. If you have dogs, they will be happy to catch this flying object and bring it to you.
To make it, prepare:
- disposable cardboard plates - 2 pcs.;
- glue;
- markers, felt-tip pens or pencils;
- Scotch.
The containers prepared in this way are stacked on top of each other with the concave sides inward and firmly fastened along the edge with a stapler and/or adhesive tape or with glue.

You can make a frisbee so that in flight, ribbons of fabric or paper develop. They are pre-invested between two containers and glued to their edges.

How to make an alien - master class
Such a character will certainly come in handy. The child will put him in the porthole of a flying saucer and play with pleasure.
From kinder eggs and socks
To create this character, give your child:
- container from kinder eggs;
- dry peas;
- socks;
- wire;
- threads;
- 2 buttons;
- scissors;
- cotton wool.
- Let the child pour dry peas into a plastic container from kinder eggs. Then the alien's head will rattle when shaken.
- This blank is embedded in the sock. To designate the neck, you need to tie a thread below it. Trim the sock just below this spot.
- Together with the child, twist the body of the future character from the wire, wrap it with cotton wool, sheathe the remains of socks. Pass the upper end of the wire to where the neck is.
- Show your child how to create hair from threads, sew on buttons instead of eyes and nose. The eyes should be large, so take buttons of the appropriate size.
- You can sew clothes for an alien or leave a little man as if he were in a tight spacesuit.
You can wrap the body of a representative of another civilization with foil, dressing him in this way.
If the child is fascinated by this game, make a big Martian with him. How to make an alien using a different technology, tells the next master class.
From cardboard boxes
Prepare:
- two boxes;
- colored paper;
- clothesline;
- sponges;
- scissors;
- Balloon;
- colored threads;
- PVA glue;
- buttons.
- Put the box on the box, glue them in this position. This is the body of a Martian. Cover it with colored paper. His arms and legs will be ropes that need to be glued to the boxes. There can be as many as the child wants to make.
- He will make his palms and feet out of sponge.
- To make a head, let the child inflate balloon, wrap it with colored threads, coat them with PVA. This design will dry overnight. After this time, pierce the ball, remove it.
- In place of the eyes, nose, the child will attach buttons or pieces of colored paper, glue the ball-head in place. It remains to color the alien and you can make a virtual journey, going with him into space.
From plasticine
The child will need:
- plasticine;
- matches - 3 pcs.;
- plastic knife;
- modeling board.

The child rolls his hands from plasticine in the form of a sausage, cuts on one side to indicate fingers. Attaching his hands in place, he rolls 6 balls - 3 for the antenna and the same number for the eyes. He will attach the latter to the face of the Martian, then stick 3 matches on the top of his head, attach a ball to the end of each.

From cucumber and apple
Such an edible option is good because you can first play with it, and then crunch on vitamin fruits and vegetables. To do this, we suggest taking:
- green apple;
- cucumber;
- board;
- toothpicks;
- a plate;
- pumpkin.

From another piece of cucumber, you need to cut 2 strips of skin along with the pulp, which will become antennas. Cut out triangular eyes, feet.

Sticking one end of the toothpick into the apple, the other into the antennae, attach them. Attach the arms and legs to the body in the same way. And attach it yourself to the apple with three toothpicks.

To make a flying saucer for this alien, cut the top off a pumpkin.

The work is completed, you can admire the result.
Chocolate flying saucer cake
Surely, the child will want to taste a sweet craft on this topic. Here, the chocolate flying saucer cake will come in handy.
Its surface is shiny, as if it reflects a distant planet or a piece of space.

Such a cake in a slow cooker can be baked in the oven too. For the test you will need:
- 6 eggs;
- 1 cup - 180 g flour;
- 200 g of granulated sugar;
- 4 tbsp. l. cocoa powder;
- salt - on the tip of a knife;
- 2 g vanillin.
- 3 art. l. Sahara;
- 4 tbsp. l. cocoa;
- 2 tbsp. l. flour;
- 260 ml of milk;
- 2 g vanillin;
- 1 egg.
- 3 tsp granulated sugar;
- 50 ml of squeaky water.
- 3 art. l. Sahara;
- 60 ml of water;
- 1 st. l. butter;
- 1 st. l. cocoa.
- Separate the whites from the yolks. Put the whites in the fridge for now. Beat the yolks with sugar, vanilla. When they become lighter, add 2/3 of the norm of flour, cocoa, mix.
- Squirrels add a little salt, beat until a stable foam. Carefully combine them with the egg mass, gradually adding the remaining flour.
- To make the biscuit rise well, do not grease the detachable form with oil, but cover it with baking paper.
- Pour the dough into the mold, gently twist it so that it spreads evenly over it, and does not rise in the center.
- Here's how to make a flying saucer, delicious, chocolatey next. If you want to bake a cake in a slow cooker, then set the “Baking” mode to 50 minutes. If using an oven, bake at 180 degrees until done, about 40 minutes. She is being checked wooden stick. Pierce the center of the cake with it, if it remains dry, then the biscuit is ready. But so that it does not fall off, you can not immediately remove it from the oven. Cool down gradually. At first, just open the door a little. A few minutes later, a little more. So, gradually opening it wider and wider, keep the biscuit in the switched off oven for 15 minutes.
- Then take it out, cover with a towel, and while it cools completely, prepare the cream. Mix all ingredients for it. Put on fire. Boil, stirring frequently. When it begins to thicken, stir more intensively, when boiling, remove from heat. Place the container with the cream in a bowl with cold water. Stir it occasionally so that a film does not appear on the surface.
- To make the impregnation, mix sugar with boiling water, pour this mixture into a plastic bottle, close the lid, in which holes are made with a needle.
- Cut the cake into 3 layers and it's time to make the chocolate flying saucer next.
- Lay the first cake on the dish, sprinkle it with impregnation, grease with the contents of half a can of condensed milk on top. Put a second cake on it, which is also moistened with impregnation, and then grease with cream.
- Place the third cake on top, sprinkle it with impregnation, brush with the remaining condensed milk and smooth the surface with a long knife.
- Melt the ingredients for the glaze, let it cool slightly, pour it over the condensed milk in a thin stream. After hardening, it will shine.
- Then the “Chocolate Flying Saucer” cake should be removed for at least 3 hours in the refrigerator, and preferably overnight, so that the cakes are soaked.
How to make a UFO toy with your own hands?

You could see a similar one in the passages, near shopping centers. Private sellers deftly manipulate such a toy, it either freezes or pirouettes in the air. Passers-by stop, stare, spellbound.
They do not know that this is not a miracle, but a fishing line that is not visible, but it allows the toy to behave in such an unusual way. You can make it yourself, and then surprise your friends and acquaintances. To do this, take:
- whatman paper or cardboard 5 mm thick;
- fishing line;
- scissors;
- glue;
- awl.

Now you need to make a hole in the middle of the upper part of the body with an awl, skip the end of the fishing line here. A pair of beads is put on it, and the edge of the fishing line is tied in a knot.
After measuring the length of the fishing line, cut off the excess. Attach it to the collar with a pin, throw it over the right ear, then lower it so that it is between the index finger and thumb right hand. Take the upper part of the UFO toy with your left hand, spin it like a top. It will rotate, and you will learn to do various manipulations. After training, you can surprise your friends and family.
In continuation of this topic, we offer you to see the process of creating a flying saucer with your own eyes. After all, it can even be made from a plastic bottle.
You can also make a UFO out of paper, using the origami technique.