If you have a need to perform work on the facade, you need to do without scaffolding.
They are temporary structures metal constructions, which are used in construction, finishing and restoration work on buildings and structures. The advantages of these structures are that their installation and dismantling is carried out directly on construction sites. If necessary, the structure can be easily moved along the wall. Besides scaffolding are a convenient construction for temporary use, being on which you can perform work related to the facade: insulation, finishing, painting. You can perform minor work on the restoration of wooden window frames, make slopes of window openings.
Not only professional builders, but also many ordinary summer residents, as well as owners of private houses and country cottages need to purchase scaffolding with removable decking (scaffolding) - after all, when there is a need to tint the gables of the roof or renew the facade decoration of the house, you may need not just a ladder or stepladder, but something more serious.
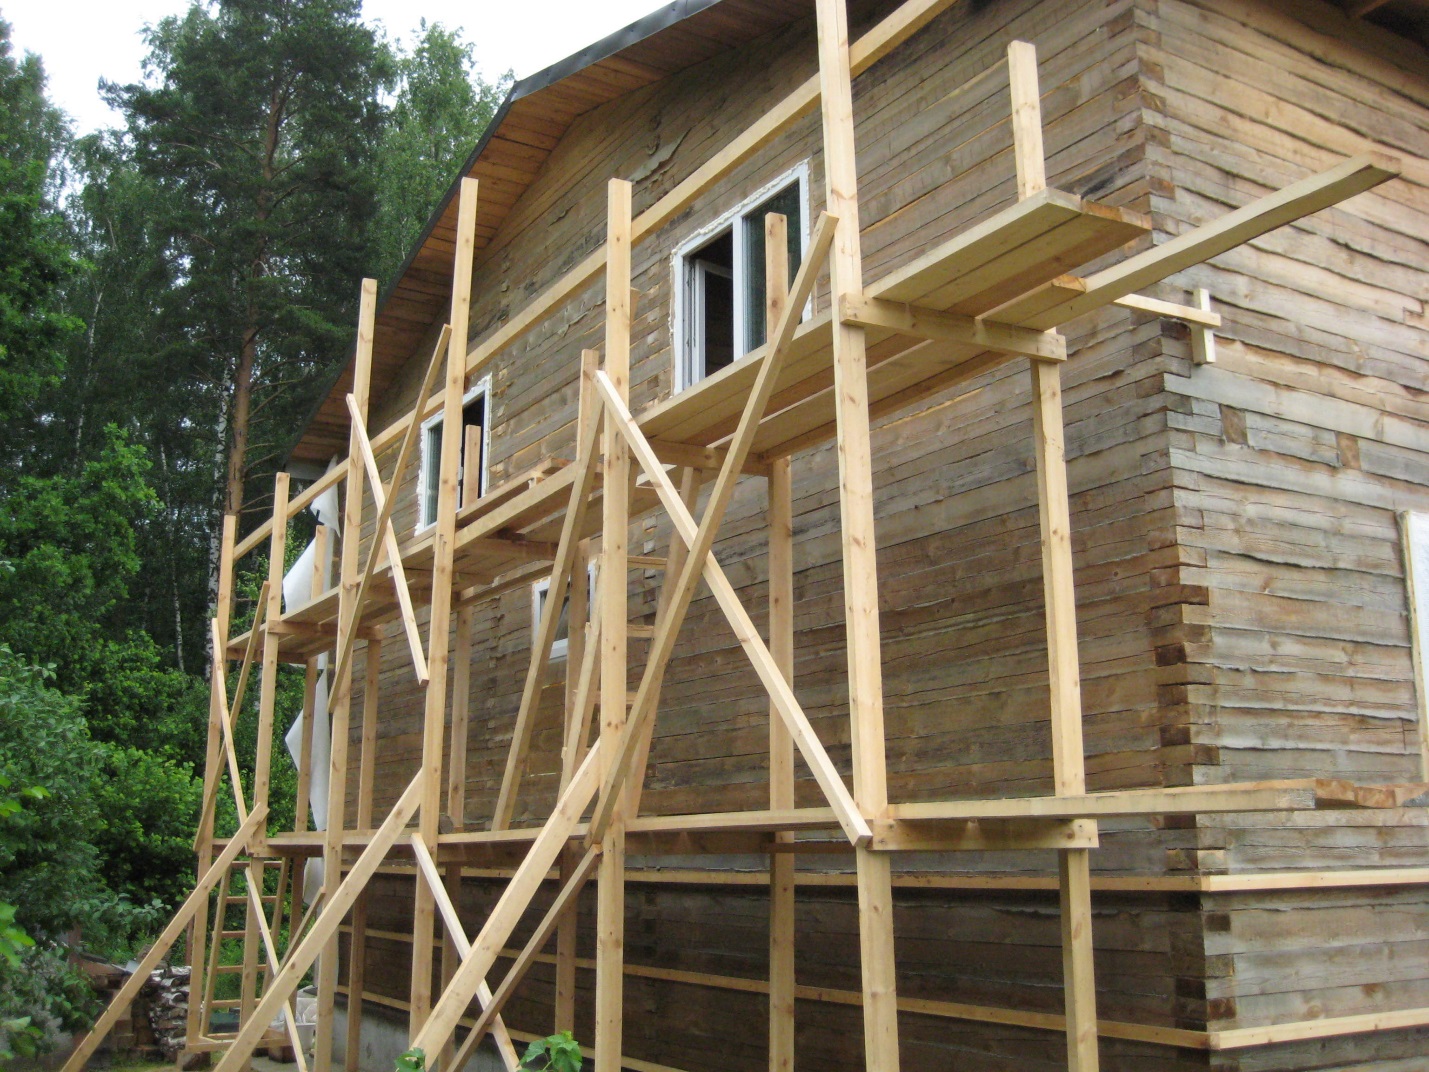
Scaffolding on "envelopes" in Lately have become quite a popular option that you can make yourself. As you can see in the photos below, such building scaffolds have a wide range of applications, from production brickwork before finishing works. Due to the simplicity and low cost of their design, it is easy to organize paving at the desired height and perform painting, whitewashing, surface restoration, window cleaning, installation of slopes and trim, etc.


Why is this option popular among builders?
The main advantage is that the scaffolding can be made independently. At the same time, not much building material is spent at all. Well, plus everything: simplicity and ease of assembly / disassembly of the structure. After completing the work, they disassemble and fold until better times in a secluded corner of the barn.
What are scaffolding with "envelopes" made of?
"Envelope" is a scaffolding, which is a support platform in the form of a triangle. Supports are made from various lumber, which are on the construction site, for example, edged boards. The main thing is that the board is strong, with a minimum section of 50x50 mm. (see fig. 1).

Rice. 1, Supporting platform - "envelope". 1 - L-shaped bracket; 2 - jibs.
Then, it is necessary to build L-shaped brackets - the boards are knocked down, after which they are sheathed on the sides with wooden slats.
The dimensions of the site must be constructed based on the safe operation of the structure. On the support platform, it is not large in size, it is quite inconvenient to work, and besides, you will often have to move it. Having made scaffolds of a large area, you can expose yourself to a traumatic situation, there is a possibility of envelopes tearing off the wall. Taking this into account, the size of the platform must be calculated in this way: the size of a human leg is on average 350-400 mm, taking this size of the horizontal platforms of the scaffold, a person can become a full foot, while not being afraid to fall from a height.
Now that the platform is ready, the support platform is fixed, it remains to set it to the desired height so that you can reach the required level. You will also need a couple of props, it is quite possible to use edged board 150x50 mm. Before installing them, the supports must be made sharp at the base so that they rest against the ground, and the upper ends along the contour of the "envelope" cornerslightly beveled for a tight fit, as shown in Figure 2.

Rice. 2 Installation of scaffolds: 1 - prop-slightly; 2 - "envelope"; 3 - flooring boards; 4 - supporting surface.
Then, after the flooring from the "envelopes" is raised to the required height, it must be fixed. The vertical part of the L-bracket should be nailed to the wall with ordinary long nails. It is advisable not to hammer the nails all the way, otherwise it will be difficult to pull them out during dismantling.
Now you can lift and install the flooring itself. The boards are laid at the desired height and nailed to the horizontal shelf of the brackets. Nails in these places can be driven completely into the boards, this will make the structure more durable.
Advice: to make it easier to get the nails, they can be driven into the boards through thin spacer rails; when dismantled, they are simply split with a nail puller.
!Attention Be careful when working at height. Follow the safety precautions for. Remember that when making your own construction scaffolding, it is necessary to check the strength of each of the structural nodes.
If you decide to make scaffolding, then you will have to choose from two materials: wood or metal. In the first case, you will get a one-time design, which can be done by any person who knows how to work with wood, and in the second, it is reusable, but also quite easy to manufacture. In this article we will tell you how to make scaffolding with your own hands from metal (profile pipes), as well as from wood (boards), we will demonstrate diagrams, photo and video instructions.
Although metal or wood is mainly used for the manufacture of scaffolding, they may differ in the method of fastening, and, accordingly, have different functional elements in their design. So, consider the main types of forests.

The constituent elements are connected by a special wedge fixation. Scaffolds of this design are highly reliable. They are able to withstand fairly large loads. At the same time, they are easy to use, they are quickly assembled and disassembled. Especially important is the use of wedge scaffolding in the construction and lifting of heavy materials and components.

The main element of this design is a rigidly installed frame. They are mainly used for painting or plastering works. The frame in this design is connected with horizontal uprights and diagonal ties due to nodal connections. The main advantage of frame scaffolding is their low cost. Their construction does not require large investments.

In these forests, the connection node, as is obvious from their name, is a pin. This type of scaffolding is very popular with builders, as it is very easy to assemble and disassemble directly on the construction site. It often takes a day or two to assemble scaffolding. In this case, assembly pin scaffolding won't take long.

If the object on which the repair work is being carried out has a complex configuration, then clamp scaffolding is an excellent solution. The fastening method used is professional. And for their manufacture, height and size play an important role. working area, the distance between the tiers and the pitch of the racks. All this is selected individually for each object.

We suggest that you familiarize yourself with a simple guide to making scaffolding from planks. To do this, follow a few simple sequential steps:
- Lay out 4 racks or boards parallel to each other on a flat area. Their size should immediately correspond to the height of the scaffolding.
- You connect the racks with each other with horizontal jumpers, on which the flooring will be laid later.
- Place the 2 frames made horizontally opposite each other, tie them diagonally and horizontally with boards that will serve as ties.
- Lay the flooring from the boards on the horizontal screeds and attach it to the lintels with self-tapping screws.
- Attach the railing to the racks and fix the ladder.
If necessary, lengthen the structure of the scaffolding, connect several similar sections of boards to each other. The boards are stuffed on the support posts.
When assembling wooden scaffolding, if nails are used, it is recommended to pre-drill holes so that the boards do not split.
Design

All forests consist of the following elements:
- racks;
- diagonal and horizontal struts (they give spatial strength to the structure);
- jumpers for flooring;
- flooring from boards, on which a person will stand;
- stops (to create the stability of scaffolding and prevent them from falling away from the wall);
- enclosing element (so that a person, standing on the floor, does not fall down);
- ladder (ladder) for climbing to the desired level of scaffolding.
From wood and planks

There are a lot of tips on how to make scaffolding on the Internet. Moreover, the recommended designs differ mainly from each other only in the thickness of the board and the size of the scaffolds themselves. So that you do not get confused in all this "diversity", try to focus on the following values:

Let's get to work:
- Prepare the necessary materials in advance:
- boards with a thickness of at least 50 mm and a width of 100 mm (or round timber, or timber 10x10 cm) - for racks and stops;
- boards for spacers and fencing 30 mm thick;
- boards for lintels and flooring 50 mm thick;
- nails (self-tapping screws in this case are less reliable).
Photo instruction
We bring to your attention to view a series of photos on the topic of how to make your own wooden scaffolding:


From a profile pipe

Now about how to make scaffolding (collapsible) from metal (dimensions of one section: height - 1.5 meters, width 1 meter, length 1.65 meters). Determine the number of sections based on the height of scaffolding you need.
- Prepare the necessary materials:
- for racks - a profile pipe (square section) 30x30 mm - length 1500 mm;
- for spacers - a pipe with a diameter of 15 mm;
- for connecting inserts (adapters) - profile pipe 25x25 mm;
- make the flooring from boards 40-50 mm thick and 210-220 cm long.
- for diagonal elements - 2 meters each;
- for horizontal elements connecting racks from the sides of the structure - 96 cm each.
"Pros and cons"

Firstly, scaffolding is not a small scaffolding-goat, but a rather bulky structure that will need to be stored somewhere after the need for it disappears.
Wooden scaffolding, of course, can be dismantled later, but the work is laborious, and the boards, if you don’t need them in the near future, also need to be folded somewhere. Keep in mind that wood scaffolding is assembled with nails, not self-tapping screws, so the boards will no longer be completely intact. In addition, when performing work on scaffolding, wood is often stained with mortar or paint.
Homemade metal scaffolding can be not only dismantled, but also rented out in the future.
Secondly, non-factory-made scaffolding is designed to work at a maximum level of the second floor (from the ground). At higher altitudes, the exploitation of makeshift scaffolding becomes dangerous.
Thirdly, scaffolding is required quite rarely (only to repair the facade of the building), so the assembly and disassembly of such a temporary structure is not profitable in terms of the time spent on this work.
Fourthly, scaffolding often has to be made long (for example, at least 6 meters for siding installation). Accordingly, their weight increases, and rearranging home-made wooden scaffolding to the other side of the house becomes a problem even for three or four people.

It is worth thinking about forests at the stage of designing a house.
If you do not plan to perform facade work yourself (but are going to hire construction team), then you don’t have to think much about scaffolding, since builders usually come to the site with their scaffolding and scaffolding.
However, at the end of construction (and after some time has passed), scaffolding may be needed to carry out small facade repair work. Can this be avoided?
Certainly. And to begin with, make sure that the facade of your house does not require repairs for many years. To do this, it is enough to use when building walls facing brick. Now it is produced by many manufacturers and at the same time in a fairly large range of colors.
But other facing materials (such as siding, plaster and others) will periodically require your attention and, accordingly, additional costs, since you won’t be able to make scaffolding (buy or rent) for free.
Video
From this video you will learn how to make scaffolding for apartment renovation:
A photo
The photographs show various designs scaffolding:


Schemes
The diagrams will help you design your own scaffolding:


All photos from the article
When carrying out various works at height - from laying walls to cladding the facade or applying plaster, the construction of structures is required that will allow you to perform work comfortably and at the same time ensure safety.
Professional builders use metal scaffolding, which is a prefabricated modular systems who may have the most different size, but for private use it is easier to build a structure from boards, it is this option that we will consider in the article.

What is required for work
Before you build scaffolding from boards with your own hands, you need to prepare all the required materials and tools:
| Racks | For them, either a board with a size of 50x100 mm or a wooden beam with a section of 100x100 mm is used, these elements will carry the main load and hold the entire structure, therefore, only high-quality lumber without large knots, damage by woodworms and rot should be used, this is very important to ensure safety |
| Flooring and lintels | For these elements, a board with a thickness of 40-50 mm is used, it is important that the flooring can easily withstand the weight of several people and a small supply of materials (if necessary) |
| Spacers | Elements that give rigidity and maintain the geometry of the structure being erected are made of a board 30-32 mm thick, it is also used to create fences, which are essential to ensure a safe work process, because it is never excluded that someone will slip or stumble on the scaffolding |
| fasteners | Either nails or self-tapping screws of large thickness are used to ensure maximum reliability and strength of all connections. Can also be used modern version- mounting angles and plates, with their help, the structure can be made even more reliable and durable, besides, the price of these elements is low |
Important!
Do not forget about the tool, as it will require cutting wood, hammering nails or screwing screws, as well as taking measurements, for this it is easiest to use a tape measure, a square and a construction pencil.

The working process
The instruction on how to make scaffolding with your own hands from boards is quite simple, it is important to follow all the recommendations and requirements, it is with them that we will begin to consider the issue.
Basic design requirements
There are several generally accepted rules, the observance of which guarantees the reliability of the scaffolding you collect and ensures the highest safety:
- The distance between the posts should not exceed 2-2.5 meters, since with a longer span, the wood will not be able to provide adequate rigidity, especially under high loads;
- The width of the decks to ensure comfortable work should be at least 1 meter, but it is also not recommended to make the structure wider than one and a half meters, as the stability of the system will suffer;
- The maximum safe height of the structure is 6 meters, this is due to the fact that the maximum length of the lumber is the same, and it is not recommended to build up the elements.

Stages of work
The whole process consists of several operations that must be performed in a certain sequence:
- First you need to connect the first 4 racks, for this, the long side is first fastened, this is done with the help of diagonal struts, the second element is assembled in the same way, after which the end sides are connected using all the same struts, then the resulting structure must be put up and checked for stability, if necessary, reinforcement is made using additional jumpers and perforated corners;

- Next you need to fix the jumpers, their location depends on the level at which the work will be carried out. It is important to calculate everything correctly in order to ensure the convenience of the process, if two rows of flooring are used, two rows of jumpers are made accordingly, they will also serve as elements that provide rigidity, it makes sense to mount on corners with stiffeners to further strengthen the support;
- The flooring is arranged on fixed jumpers, for its device, only a reliable board is taken without cracks and damage, it is necessary to cut it into pieces of the desired length so that the extra parts do not stick out at the edges, these elements are best fixed with self-tapping screws, since the wood cracks much less from them, and fixation is obtained much better;

- Next, you need to attach the elements of the fence, their location directly depends on the location of the flooring. The general rule is that the elements should be at least waist level, sometimes it makes sense to nail two rows of board for even more security. Here lumber is used with a thickness of at least 30 mm, so that, if necessary, it can withstand a sufficiently large force and not break;
- The next step is installation supporting elements , their number and configuration depends on the characteristics of a particular situation, the height of the forests and the reliability of the soil around the house. Here it is important to learn one simple rule - the supports are installed as much as necessary to ensure the best stability of the system you have built. The elements rest well on the soil, after which they are attached to the support posts;
Advice!
If the structure is wooden, then for additional reliability the system is attached to the walls, this will significantly strengthen the structure, everything is very simple: the bar is fixed at one end on the rack and the other on the wall.
Wood is one of the easiest and most inexpensive to process. building materials. Making wooden scaffolding with your own hands is quite simple. The production of scaffolding will consist of 5 successive stages, after which you will receive a structure that is completely ready for work. Tools needed for work:
Wooden scaffolding is much cheaper to make yourself than to buy in specialized stores.
- screwdriver;
- plane;
- drill;
- wood saw;
- roulette.
Preparation and selection of materials
The design of the scaffolding is such that it is necessary to use several types of wood for different parts. In order to prepare the supporting supports, you will need a bar measuring at least 10x10 cm, otherwise you will not be able to perform heavy work from such scaffolding. The platforms themselves are made of fairly thick boards (preferably at least 50 mm thick). Stiffening ribs are made of boards from 25 mm thick. It should be remembered that the wood used must be processed by special means protecting the material from decay and mold. It is desirable that there are no cracks and knots on the material, then the scaffolding will last longer. For security reasons, railings can also be added to the design.
Calculation of the dimensions of the frame and the beginning of the collection

Scheme of scaffolding made of wood.
In construction, there are restrictions on the minimum allowable width of scaffolding, it must be at least 50 cm. The recommended length of scaffolding is 3-4 m, and the safe height should not exceed 6 m, otherwise the scaffolding may tip over during operation. When choosing a material for supports from a bar, preference should be given to a solid rather than a composite bar, as this will increase the strength of the future product. To increase the stability of the entire structure, the end sides are best done at a converging angle.
Do-it-yourself scaffolding can be assembled from a small amount of materials. At the beginning of the first stage, two six-meter support beams are placed on a horizontal surface. The distance between them is equal to the planned length of the future structure. Two of the same beams are stacked side by side in the same way. In this case, the upper ends of a pair of beams should converge slightly, i.e. if the distance between the lower ends of the pair is 3 m, then the distance between the upper ends should be 2.4 m. This is necessary to increase the stability of the structure. Further, sidewalls are attached to the support beams, which will serve as a support for the decking (ordinary self-tapping screws are used for fastening). Supports should be installed with inside. In total, there will be 4 sidewalls from the timber, since it is not recommended to make scaffolding above three "floors". Three sidewalls will be used for decking, and one, the lower one, will be used to strengthen the strength.
Jointing into a single structure and final assembly
Next, it is necessary to connect the side trapezoids obtained at the previous stage with side crossbars. If you nevertheless decide to assemble scaffolding with your own hands, then in order to avoid injuries and loss of accuracy during docking, this operation should be performed by two or three people. It should be remembered that stable wooden scaffolding should be pyramidal, but the angle of convergence should not be large. The side crossbars are fastened with self-tapping screws, this is justified by the fact that after the construction work is completed, the wooden scaffolding can be quite simply disassembled by unscrewing the screws and stored for storage.
Traditionally, metal or wood is used for the installation of scaffolding. Wood structures are suitable only for one-time work. They have a simple device, so anyone with basic woodworking skills can handle their assembly. Metal devices are reusable and collapsible, they can be reused on other objects. If you have a tool and knowledge of metal processing, it will be very easy to assemble scaffolding with your own hands.
Types of scaffolding
In addition to the type of material, scaffolding differs in functionality, method of fastening and construction. According to these features, the structures are divided into several main groups.
Wedge
To connect the parts of the structure, a special wedge lock is used. Such devices are very reliable, and, most importantly, durable. Their rigidity withstands heavy weights and mechanical loads. It is very easy to assemble wedge scaffolding with your own hands, and most importantly, after disassembly, it is also easy to assemble it like the first time. This design significantly speeds up and facilitates the lifting of large loads and materials.

frame
The basis of frame scaffolding is a rigid frame in the form of a frame. Similar devices are used in finishing and painting works. Horizontal and diagonal elements of the scaffolding are connected by nodal fasteners. The advantage of such scaffolding is their low cost, they allow you to create a convenient fixture without high costs.

Pin
Details of pin scaffolding are fastened with metal pins. Such structures are most often used in conventional construction work due to the fact that they are more convenient to assemble on site. The time for the assembly of pin scaffolding depends on the length of the object, as a rule, the process does not take more than a day.

Clamp
For buildings of an unusual, complex structure, clamp scaffolding is used. Parts of the frame are connected in a specific way, which is very popular in professional construction. An important characteristic in the installation and construction of drawings of such scaffolding is the step between the uprights and the crossbars. This distance is chosen depending on the configuration of the building and its dimensions.

General structure of forests
Regardless of the type of connection of parts of the structure and its type, all scaffolding consists of similar elements, such as:
- vertical ribs (racks);
- diagonal stiffeners (make the whole structure strong)
- horizontal crossbars;
- jumpers under the flooring;
- boardwalk for moving workers;
- stops that give the device stability and prevent it from falling back and forth;
- safety fence to protect workers from falling during work;
- ladder for moving between rows.
The number and size of elements varies depending on the scale and complexity of the object. To facilitate the assembly of scaffolding, a schematic drawing can be drawn.
Plank scaffolding
Perhaps, many builders and professionals have their own tricks for assembling and designing scaffolding, there are also a lot of similar instructions on the Internet. Most of the designs do not differ in anything, except for the size of the racks and the thickness of the flooring. To understand such instructions, you should be guided by several dimensions:
- the step between the racks is 2-2.5 meters;
- the average width of the flooring is 1-1.2 meters;
- the structure should not be higher than 6 meters.

Following these rules will create functional and secure forests. To construct scaffolding with your own hands, you will need:
- boards for thrust structures and beams 5-10 cm wide, square and round beams can be used;
- material for spacers and protective structure 3 cm thick;
- boards for lintels and wooden flooring - 5 cm thick;
- nails (screws in such structures are not recommended).

After preparing all the materials, you can start assembling. First, 4 racks are fastened at a distance of 2-2.5 meters; diagonal struts are used to connect them on all four sides. Then, jumper boards are mounted at the required level, and floor boards are attached to them. For protection, a fence board is installed on the racks. The final stage is the installation of supports and the installation of a ladder to go to the top of the scaffolding.
When assembling scaffolding from boards, the following nuances should be considered:
- racks and supports are mounted in parallel, their location is checked by a building level;
- horizontal jumpers are used to fasten the racks to each other;
- the protective railing can be stuffed with cross bars for better protection.
To lengthen wooden scaffolding, several sections are used; boards are used to fasten them. Fastener boards are stuffed directly onto the supports.
Advice! Often, when fastening with nails, the wood cracks at the points where the fasteners are immersed. To protect the boards from such damage, it is worth drilling grooves in the places where nails will be driven in.
Metal profile scaffolding
Metal products are more convenient if you plan to build several objects. They can be disassembled and reassembled at a new place at any convenient time. To mount the simplest scaffolding with your own hands (150 cm high, 100 cm wide and 165 cm long), the following instructions are suitable:


At the end of the work, it is enough to remove the bolts and disassemble the scaffolding into frames. The service life of such a structure is tens of times greater than the service life of wooden scaffolding. And when proper care they can last for many years.
Pros and cons of different designs
Building fixtures are convenient when creating an object, and after the work is completed, the issue of their storage is acute. Even when disassembled, the design takes up a lot of space.
Wooden fixtures can also be collapsible, but this is not easy to do, especially if the boards were fastened with nails. And even plank scaffolding needs to be stored somewhere. In addition, small cracks and crevices remain in the places where the nails are attached after parsing, which will contribute to decay. Often, solvent or paint remains on such structures.

Advice! If you still have collapsible metal scaffolding after construction, you can sell them at a good price or rent them out.
Self-assembled scaffolding is not suitable for working on large objects. As a rule, they are intended for buildings with 1-2 floors. Exploitation of forests at high altitudes is dangerous.
Such structures are used infrequently (for repairing or finishing facades), therefore their installation is not always appropriate. You can perform painting work without scaffolding.
Often, scaffolding is made with a length of 6 meters, which increases their weight and cost. It will be problematic to transfer such a design from place to place, and its disassembly and assembly will take a very long time.
Alternative to scaffolding
The assembly of scaffolding and their design should be considered even before building a house. If you hire specialists for finishing and repair work, then you should not even think about how to make scaffolding. Usually professional teams have the entire list of equipment and tools, including scaffolding.
Often, when disassembling scaffolding and after construction, scaffolding is left idle and thrown away or sold. However, they may still be required for repairs or finishing work. There are many other construction aids that can replace traditional scaffolding.

Before dismantling or renting scaffolding, you should make sure that the facade is in proper shape. Do not save on finishing work, otherwise you will have to restore the decorative layer. Brick is considered one of the most durable and easy-to-clean facing materials. Today you can find a lot of varieties of this material, differing in colors, size and texture.
Typically, others Decoration Materials(plaster, paint and panels) will need frequent repairs, which will result in significant costs. To do this, you will have to hire a brigade or rent scaffolding. If you have your own design from a profile pipe for finishing work, you can significantly save on cosmetic repairs. To store this design, you can take a separate room or build a simple barn.


