Last summer, I decided to improve the summer cottage a little. I slightly reduced allotments for garden beds, but allocated additional meters for a recreation area. The freed up space was enough for a small flower garden, a couple of shrubs, an inflatable pool. But this was not enough for a good rest. Need a gazebo. I decided to build it during my vacation.
Initially, I planned to do something very simple, like a canopy on four pillars. But then, after consulting with familiar builders, I realized that it is quite possible to build more complex structure. Also on poles, but with walls and a full roof.
I had to sit down for the drawings, sketch out the project. On paper, the following happened: a wooden gazebo 3x4 m, on a columnar foundation with gable roof covered with slate. The project was approved by the family council, after which I rolled up my sleeves and set to work. He performed all the stages of the work alone, although, I must admit, at some points an assistant would not interfere. Bring, file, cut, hold ... It would be easier to work together. However, I managed on my own.
I will try to describe the stages of construction in detail, since the little things in this matter turned out to be very important.
According to the plan, the gazebo should be light in weight, built of boards and timber, so the most optimal foundation for it is a columnar one. I started my build from there.
For this, he took a suitable platform near the fence for the size of the gazebo 3x4 m. In the corners he put pegs (4 pcs.) - there will be foundation posts.

I took a shovel and dug 4 square holes 70 cm deep in a couple of hours. The soil in my area is sandy, it does not freeze much, so this is quite enough.

In the center of each recess, I set up a reinforcing bar, 12 mm in diameter, 1 m long. These will be the corners of the gazebo, so they need to be set clearly in level. I had to measure the diagonals, the length of the perimeter and the vertical of the reinforcement.

After dismantling the old buildings on the site, I was left with a bunch of broken bricks. I poured it to the bottom of the recesses, and poured liquid concrete on top. It turned out a concrete base for the posts.

A cushion of broken bricks under a concrete base will contribute to an even distribution of pressure between the foundation and the ground

Two days later, the concrete hardened, on the bases I received, I built 4 brick columns according to the level.
4 columns are ready in the corners, but still the distance between them turned out to be too large - 3 m and 4 m. Therefore, between them I installed 5 more of the same columns, only without reinforcement in the center. In total, there were 9 supports for the gazebo.
I plastered each support with mortar, and then I smeared it with mastic. For waterproofing, 2 layers of roofing material were laid on top of each column.

Brick posts-supports will serve as a reliable foundation for the base of the gazebo
Stage 2. Making the floor of the gazebo
I started with the bottom strapping, on which, in fact, the entire frame will be held. I bought a bar 100x100 mm, cut it to size. To be able to connect half a tree, at the ends of the bars I made gashes with a saw and a chisel. After that, I assembled the lower harness, according to the type of designer, stringing the timber onto the reinforcement in the corners. I pre-drilled the holes for the reinforcement with a drill (I used a drill for wood with a diameter of 12 mm).

The bars were laid on the foundation posts - 4 pcs. around the perimeter of the gazebo and 1 pc. in the center, along the long side. At the end of the process, the tree was treated with fire protection.

The lower harness, laid on the foundation posts, will serve as a crate for the plank floor
It's time to cover the floor. For a long time, oak boards have been gathering dust on my farm right size- 150x40x3000 mm, I decided to use them. Since they were not quite even and a little crumpled, I had to drive them through the reymus. The tool turned out to be available from my neighbor, it was a sin not to use it. After the alignment process, the boards turned out to be quite decent. Although the chips formed as many as 5 bags!
I nailed the boards to the strapping bars. The result was a flat plank floor made of oak.

Stage 3. Wall construction
From the existing timber 100x100 mm, I cut 4 racks of 2 m each. They will be installed in the corners of the gazebo. From the ends of the racks, I drilled holes and put them on the armatures. They did not particularly hold the vertical and strove to move at the most inopportune moment. Therefore, I fixed them with jibs, specially cut for this business in the miter box. The jibs were nailed to the floor boards and racks. Only after that, the racks no longer leaned to the side and did not sway from the wind.

When corner posts were installed, I fixed 6 more intermediate racks. Also fixed them with jibs.
The turn of horizontal railings approached. They will form the walls of the gazebo, without which the whole structure will look like an ordinary canopy. I cut the railing from a 100x100mm timber, and for the back wall I decided to save a little and took a 100x70mm board. Exclusively for crates, such a lightweight option will fit.

To install the railing, I made cuts in the posts, installed horizontal bars in them and hammered nails. Since it is assumed that they will lean on the railing, such a connection cannot be left. Additional fastening parts are needed for rigidity. In this capacity, I used additional jibs, which I knocked out from the bottom of the railing. I didn’t put jibs on the back wall, I decided to fasten the railing with corners from below.
After all that was done, I appearance wooden elements of the gazebo. To begin with, I sanded the entire tree with the help of a grinder. I didn't have any other tool. So I took a grinder, put it on her grinding wheel and set to work. By the time I cleaned everything up, a whole day had passed. I worked in a respirator and glasses, because a lot of dust was formed. At first, she soared into the air, and then settled where she pleased. The whole structure was covered with it. I had to take a rag and a brush and clean all the dusty surfaces.
When there was no trace of dust left, I varnished the wood in 2 layers. For this I used Rolaks stained lacquer, chestnut color. The design shone and acquired a noble shade.

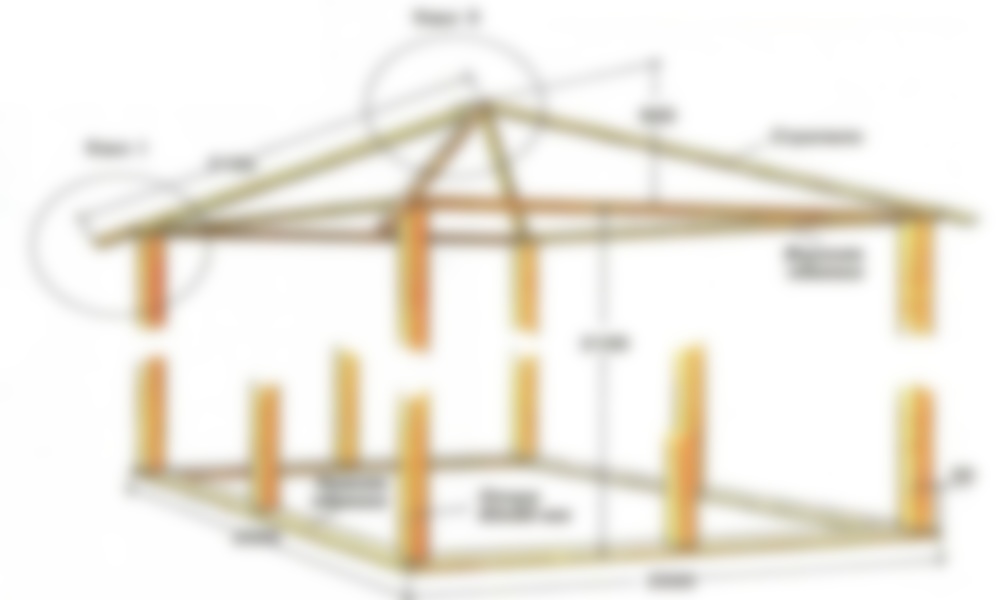
Stage 4. Roof truss structure
It's time to lay the foundation for the future roof, in other words, to expose truss system. The roof is the usual gable, consisting of 4 triangular roof trusses. The height from the ridge to the harness is 1m. After calculations, it turned out that it was this height that looks proportionally on the gazebo.
For the rafters, boards of 100x50 mm were used. I made each truss from two rafter boards connected by a coupler. Above, on both sides, there are OSB linings, nailed around the perimeter. According to the plan rafter legs they rely on the upper harness, so I made tie-ins at their ends - in size suitable for the harness beam. I had to tinker with the tie-ins a little, but nothing, I managed with this in 2 hours.

Rafter trusses assembled from boards and fastened on top with OSB overlays
Farms I installed every meter. At first, he set it up, maintaining the vertical, then fixed it with self-tapping screws. It turned out that it was not so easy to cope with the rafters on your own. Then I regretted that I did not take anyone to help. After suffering for an hour, I nevertheless put them up, but I advise everyone who follows in my footsteps to still ask someone to help at this stage. Otherwise, you can get a bias, then you will definitely have to redo everything, which obviously will not add enthusiasm to your work.
Since the roof of the gazebo will not be subjected to increased loads, I decided not to install a ridge beam, but to fasten the rafters together with a crate made of a 50x20 mm board. There were 5 boards for both slopes. Moreover, I filled 2 of them on both sides of the ridge at a distance of 2 cm from the tops of the roof trusses. In total, the crate for each slope was made up of 2 extreme boards (one "holds" the skate, the second forms the removal of the slope) and 3 intermediate ones. The design turned out to be strong enough, it will not be possible to loosen it.

The crate connects the roof trusses and will serve as the basis for attaching the slate
At the next stage, I opened the roof trusses and the floor with two layers of stained varnish.
Stage 5. Wall and roof sheathing
Next, I started lining the sidewalls with pine clapboard. At first, I stuffed bars of 20x20 mm under the railing along the perimeter, and nailed the lining to them with small nails. The back wall was completely blocked, and the side and front walls were covered only from below, up to the railing. At the end of the process, I painted the lining with varnish-stain.
Only the roof remained unfinished. I covered it with painted slate with 5 waves, the color is “chocolate”. 9 sheets of slate went to the entire roof, on top - a ridge element also brown (4 m).

Wall cladding with pine clapboard will protect inner space gazebos from wind and sun

Colored slate looks no worse than modern roofing materials, and in terms of durability - far exceeds them
A little later I plan to make removable windows in the openings to protect the gazebo space in winter period. I will put together frames, insert some light material into them (polycarbonate or polyethylene - I have not decided yet), and then they will install them in the openings and remove them as necessary. Maybe I'll do something similar with the doors.
For now, perhaps, everything. I think that this option will appeal to those who want to build a gazebo quickly, simply and inexpensively.
Further activities that you will carry out in the gazebo will depend on the location of the structure. That is why it is not advisable to install it in an open place, because it will be very hot and stuffy inside - it is best to choose small plot in the shade of a tree. If your site has a small pond or fountain, you can start building there. The simplest gazebos for summer cottages are built of wood - it is about the creation of such a structure that we will talk today.
It is very important to prepare the material for a long service life if you do not want the gazebo to fall apart after several winters.. So, wooden bars to create supports from below, it is advisable to cover it with impregnation against decay and wrap it with roofing material and film so that the tree does not rot. And boards for sheathing are pre-treated with drying oil or mastic, which protect the material from rotting and attack by pests.
The simplest do-it-yourself gazebo - instructions and construction steps
Surely you can buy already finished structure, but it will be quite expensive. Moreover, the construction of the gazebo, which we will tell you about, will take you a maximum of a week! The main thing is to do everything according to the rules.

Interior decoration: how to decorate a place of rest?
Knowing how to build a simple gazebo, you can start working. However, upon completion, you will find that something is missing inside. Finishing the construction will help you interior decoration. From the inside, the beams should also be sheathed with plywood or drywall sheets, which are pasted over with wallpaper or painted on top. For reliability, the laid floor can be closed with linoleum, which does not allow water to pass through.

Dacha is a place of predominantly summer recreation, where children can safely walk all day on the street, there healthy fruits and vegetables straight from the garden, and adults arrange pleasant gatherings over barbecue or just a cool cocktail away from the bustle of the city. It is for such gatherings that it is necessary to have at least a small, but comfortable, gazebo. An inexpensive gazebo for giving with your own hands in a short time is not a myth, but a real reality! From what it can be made, we will consider in this article.
Materials for the gazebo
A gazebo with your own hands can be made from the following materials:
Price finished product will depend not only on the selected materials, but also on the complexity of the project. An ordinary quadrangular arbor will come out cheaper than a hexagonal or non-standard author's design. Any construction must begin with a drawing, selection of materials and coordination of the object with the relevant authorities. Even if you want to make a small garden gazebo with a brazier, despite the ownership of the site, it is not recommended to build without agreement, since if the norms are violated, the building may be required to be demolished, and the owner may be fined for unauthorized construction.
Wooden gazebos
The design of a wooden gazebo can be either simple - four supporting pillars with a roof, or complex, including carved elements, bends, more corners and a floor.
Wooden arbors are usually covered with wood, but reeds, slate, metal profiles or other roofing materials may well be used.
Advantages of wooden gazebos:

Metal gazebos
- the second most common type of these structures. This can include both gazebos made entirely of metal, and combined structures with a metal base (skeleton) or forged.
There is nothing particularly difficult in creating a metal gazebo, but unlike the same wooden one, its cost is much higher due to the cost of materials, and the bases (pillars) of the structure must be concreted, which makes the process longer. Of course, in some cases, with proper planning, the structure can be welded and buried in the ground, and the foundation (floor) can be completely absent, but then it’s not entirely clear why it was necessary to deal with such a difficult material to work with ...
For the roof and floor, any materials can be used.
Advantages of gazebos made of metal:

Brick gazebos
If you know exactly where you want to see the gazebo, your house is built of brick and you would be happy to have a solid composition on the site, then brick will serve as an ideal material for a garden gazebo. Of course, the construction of such a structure will require a lot of time and money, but its comfort fully compensates for all this.
Advantages of a brick gazebo:

Arbors made of polycarbonate
In recent years, sheds and awnings have become increasingly popular. There is nothing strange in this, since the designs are attractive and with a good margin of safety. Of course, at a cost they are more expensive than wooden ones and cannot be called cheap. But it is quite possible to do it yourself, using metal or wood as a base.
You should be very careful and responsibly approach the waterproofing of the sheet cut. When water gets in, polycarbonate darkens, which negatively affects its aesthetic appeal.
Any material can be used as a foundation. Polycarbonate itself is excellent as a roofing and wall material.
Advantages of polycarbonate gazebos:

On sale you can also find ready-made small inexpensive polycarbonate gazebos: 

Prefabricated gazebos
You can buy prefabricated gazebos. Their price is fully consistent with the quality, and the ease of installation is ahead of all the designs listed above that you can do yourself.
Most often, ready-made gazebos are awnings or, which can be equipped with various kinds of walls made of the same material that covers the roof. These walls can be equipped with "windows" made of durable transparent plastic, mosquito nets and doors with a zipper or Velcro.
The price of the simplest awning without walls starts from 3,500 Russian rubles and depends on the quality of the materials used and the dimensions.
Advantages of prefabricated gazebos:

Foundation (floor) for the gazebo
You can build a gazebo cheaply if you do not plan to make it for any weather and protect it from rain and wind from the sides and floor. A big savings will be the absence of a foundation for this structure.
If you still decide to make a gazebo for any weather with your own hands, it is better to make the foundation from concrete using reinforcement. This design will last for several decades. But for the price and labor costs, this option, of course, is not the cheapest. 
A cheap pergola with a floor can be made from almost any material at hand or with the help of wood. It is enough to dig in a few bars and lay the base of them on them, as is done in wooden houses, or make a base using boards with a thickness of 40 mm or more. The floor is mounted on them. With the right attitude and quality materials, such a garden gazebo will be operated for two or more decades. However, the more expensive the materials and the better the performance, the closer the cost wooden base gazebos to the cement foundation, and in some cases it may be even more expensive. For example, when using larch or cedar. 
Of course, that's not all possible options the foundation for the gazebo, but the simplest and most frequently used. You can do without it at all and just make the floor out of paving slabs or boards. This will be enough if the base of the structure is well concreted.
So the choice of materials for the foundation of the gazebo with your own hands should be made based on the preferences of the owner and the budget.
Gazebo with barbecue
If the design of your gazebo provides for the use of a barbecue on its territory, then take care of fire safety:


Arbor decoration
A gazebo in the country is not only a place to relax. Sometimes it becomes a full-fledged room for celebrating an event. In such cases, the same materials that are usually used to decorate any other festive premises will help to decorate the gazebo: balls, textiles, natural and artificial flowers. 
Real or forged can become a chic decoration of any gazebo. decorative elements. Both are suitable for any building, regardless of the materials used for construction. 

The opening of the summer season implies not only the beginning of land and planting work, but also outdoor recreation, away from the bustle of the city. And so that no bad weather or the scorching sun interferes with a good rest, on suburban area you should get a small house or a summer gazebo.
It is good because it consists of a simple and lightweight design. In addition, the gazebo will not only be protection from inclement weather, but also the highlight of the site. There are an incredible number of options for summerhouses, both in design and in price category.
But if there was a decision to build a miracle house with your own hands, then before this undertaking it is recommended to inquire about some of the intricacies of work, to consider projects.
From the article we will learn how to build a summer gazebo cheaply and beautifully.

Choice of materials and design
Wood remains the most budgetary material for the manufacture of a summerhouse. But despite the low cost, such a summer house will last for a long time. Especially if the wooden bars are also treated with various antiseptic impregnations, which will save the wooden structure not only from exposure external environment, but also from unwanted woody pests and prevent fires.
The creation of such a gazebo will not take much time and will not be difficult. The approximate production time with unhurried work will be about three days.

A country gazebo based on metal structures will also last for decades, but the cost of such an invention will be many times more expensive. And besides, periodically it will be necessary to process metal pipes various protective agents for metal.
And the owners of summer cottages are more concerned about the creation of high-quality, low-cost gazebos that do not require much effort to manufacture.

Therefore, before building a gazebo with your own hands, it is recommended to draw up an estimate and a drawing of the future design, where all measurements and materials for manufacturing will be indicated. And then you should familiarize yourself with the projects of buildings. So, how to make a summer gazebo cheaply and beautifully for and what is needed for this? Before construction, you need to choose a suitable place for the structure, where, before starting work, the top layer of earth should be removed by about 10-15 cm and compacted.

It is important to know that the cheapest option will be a gazebo made of wooden structures without the use of metal components.

But before creating it, some nuances should be taken into account. For example, if a concrete foundation is made for a wooden gazebo, then the service life of such a structure will be no more than 5 years. Since prolonged contact of wood with concrete leads to further decay due to damage, despite the previous treatment with antiseptics. And, as a result, further destruction of the structure.

The best way to protect a wooden gazebo is to treat wooden supports with bitumen or roofing material.
If you still decide to make the base of the structure concrete, then it is recommended that small metal pipes be placed in the right places when pouring, so that the ends are at least 30 cm from the base of the concrete. Further, holes are made in them for fasteners, which will later support the structure for many years.

For further protection from strong winds, it is not necessary to build brick fences. It will be enough to make a fence from eurolining about 80 cm high, strengthening it with two longitudinal bars. Such a fence will completely protect against gusty winds.


Polycarbonate structures
Protected from wind, sunlight and rain will help cellular polycarbonate. They can easily sheathe the wooden structure of the gazebo. Cellular polycarbonate has a lot of positive qualities:
- shockproof;
- waterproof;
- sunscreen;
- lightweight;
- flexible;
- variety of color (from transparent to dark tones).

With the help of cellular polycarbonate, you can not only sheathe a gazebo, but also build quality fence. In addition, it is not necessary to make a frame out of wood, to metal structure polycarbonate is attached no worse. When creating such a gazebo with your own hands, you can resort to the help of the Internet. You can find a large number of photos of polycarbonate gazebos with complete instructions for manufacturing.


Usually, polycarbonate gazebos are installed near dense trees. Due to its transparency, sunlight will flow in sufficient quantities.

You can sheathe a gazebo from a wooden or metal structure using wave slate.
Do you know how to build gazebos?
Vote
But there are several nuances:
- The arbor should have a length that is a multiple of one meter.
- The slope of the structure is made 1.75 m long.
- When laying the ramp in several rows, it should be overlapped by about 10-15 cm.
Let's find out how else you can build a summer gazebo, consider cheap and beautiful projects.

Features of the construction of simple arbors
A gazebo made of cellular polycarbonate is not only low-cost, but also easy to manufacture. For its construction based on metal frame, you will need a corner of a metal structure, a strip of metal, polycarbonate and a planed board. And also you need to pre-fill the foundation base, concreted into it the corner supports. The next step is welding.
It is necessary to weld a corner of metal to the supports. One corner band should be welded to the bars for the roof base. Two belts are welded in the middle part.

The flexibility of honeycomb polycarbonate makes it easy to work when creating an arched roof. It should only be bent with light movements and fixed to a metal structure in the form of an arch.
The roof of the gazebo will look gorgeous from the pieces shingles. You just need OSB panels 3-4 pieces. They will serve as the basis for the future roof. The panels are quite rigid, even at a thickness of 10 mm. So additional protection in the form of bars is not required. The panels can be fixed on the strapping beam of the structure.


This gazebo does not need an additional frame frame, as it is quite light. floor covering usually is, reinforced metal mesh, concrete screed. On such a surface, you can easily install a barbecue.
In order to use such a gazebo in winter, it is recommended to insulate the floor with wood, and sheathe the walls with cellular polycarbonate. Thus, this building will be protected from snow and rain getting inside.


Advice! Having installed a fireplace inside, as well as creating comfort and coziness, you can not only spend here in the future, but also just relax with your soul and body.

Garden gazebo made of wood
It is not difficult to build a garden gazebo with your own hands. Wooden structures look very beautiful and expensive. Using simple drawings and projects, it is possible to build a fairly high-quality and cheap gazebo. How to do this, see below.


For the construction of a wooden gazebo, you will need materials such as:
- timber 1 cm x 1 cm;
- roofing sheets;
- packaging of self-tapping screws;
- edged boards;
- slats.
For the construction of the structure, you will need a screwdriver, a circular saw and an electric planer.
In such a gazebo, you can build a safe place for a future barbecue or make a summer kitchen.
It is better to install such a summer building away from a residential building, so that in the future smoke and noise do not cause inconvenience.

Construction of a wooden structure
To create a cheap and beautiful wooden structure with your own hands, you should thoroughly study all the nuances and understand all the intricacies of such arbors. So, how to build a summer mini-house, consider the original project below.
For the future construction of a gazebo from wooden structure 11 recesses should be made in the ground under the racks for further installation of the columnar foundation. To do this, you must have a construction drill in your arsenal. Then, the recesses are filled with reinforcing strapping and poured with concrete.

The next step is to assemble the frame. With the help of metal corners, at a distance of half a tree, it will be necessary to fasten wooden blocks together. Then, you should lay the logs under the flooring.
The assembled frame from the timber must be treated with protective antiseptic agents.

The next step will be laying the floor boards.


Installation of rafters
Before installing the rafters, cuts should be made on the bases of the gazebo at the points of contact and sign the products with a marker.

- To fix the vertical racks, it is recommended to use building corners. It is always necessary to check the perpendicularity of the position of the racks.
- Then horizontal screeds are mounted along the contour from above and fastened with self-tapping screws to the supporting logs.
- All the main parts for the final installation of the roof are tightened and fixed, and after that the support should be sawn off flush in the center.
- In the future, lay the crate and it is allowed to proceed with the installation of a fireplace or the manufacture of a summer kitchen.
- Before this, it is necessary to prepare the harness to the base in order to install the crate later.
- The walls of the structure are covered with roofing felt for safety and poured with concrete.
- After this procedure, when everything dries up, you can do wall cladding with clapboard or blockhouse.
- The roof can also be covered with soft tiles and proceed to interior decoration. The gazebo can be painted in all sorts of bright colors to make it stand out from other buildings, or simply treated with a protective impregnation and leave the wood structure, which is now very fashionable.

Interior decoration can be done at your discretion, the main thing is that it is comfortable and cozy with family and friends.
Gatherings with guests, dinner with the family in the open air, relaxation after work in the garden and garden - an economy class summer gazebo in any of these situations will be very useful to you. It is far from always advisable to make it large-scale and roomy, in most cases a small and budget building is enough, which will delight you and your guests.

The classic dimensions of the summer gazebo
The optimal size of a small summer gazebo is 3 by 3 meters. This is enough for a family circle, and for a small group of people.
Today's problems are:
- How to build a budget summer gazebo with your own hands?
- What materials can be used to make a summer structure at the lowest cost?
- How much would such a construction cost?
This publication will review step by step process erections with photo and video small gazebo from a bar with dimensions of 3 by 3 meters. This option is one of the cheapest and most practical for construction, but if for some reason it does not suit you, at the end of the publication I will provide links to similar articles on construction.
Before proceeding with active actions, I propose to study the final result of the work and its technical characteristics.
Most budget gazebos are built on the same principle, the cost of materials is also about the same, but still I would like to focus on this - it is important to understand what and from what we are going to build.
Technical characteristics of the finished gazebo
The photo is presented to the right of the characteristics. Clicking on a photo will open it in a larger size.

End result of construction
- Material: Beam 100 by 100 mm;
- Dimensions: 3 by 3 meters;
- Foundation: columnar (made of bricks);
- Roof: single slope;
- Roof: euroslate (ondulin), but you can use a more budget option - corrugated board;
- wall cladding: oriented strand board (OSB);
- Floor: board 40 by 100 mm "magpie";
- Painting: antiseptic Senezh Ultra in 3 layers.
Materials for construction are used the simplest and cheapest. Nevertheless, they are quite enough for a reliable and strong building, which will stand for more than one year and withstand more than one hundred rains.
Foundation
For such a structure was chosen columnar foundation. It consists of nine brick pillars, which are the basis for the entire gazebo. The process of building the foundation is as follows:
- 9 holes are dug with a depth of 70 cm;
- The first 30 cm are covered with sand (ideally put a little crushed stone on the bottom) and compacted;
- The remaining 40 cm are covered with construction waste and poured with concrete;
- Two bricks are laid on top of the concrete (ideally, fired ceramic red);
- A layer of bitumen is applied over the bricks and, ideally, a sheet of roofing material is laid.

Finished foundation pillars
Such a foundation is extremely reliable for small buildings. A summer gazebo is an ideal building for such a foundation. Therefore, it was he who was given preference during construction.
Bottom trim
On top of the foundation, the lower harness is laid, which consists of wooden bars fastened together. The fastening of the beam to each other is carried out "in the floor of the tree." The connection must first be treated with an antiseptic or bitumen. Four self-tapping screws are screwed over the connections for reliability.


In addition to the four beams along the perimeter, one additional one is installed in the center - the so-called "lag". In the future, it will be needed to attach the floor board to the harness (more on this in the chapter on the floor).

Finished bottom harness
Poles and top trim
Poles are installed on the lower trim, which will serve as the basis for the walls and the upper trim. Four posts are installed at the corners of the gazebo, and one additional post is installed next to the entrance to the height of the railing.
The height of the front pillars is 230 cm, the height of the rear pillars is 200 cm. This is done for the further construction of the roof slope.

Attaching the poles to metal corners
The upper harness consists of two beams that are installed parallel to each other on top of the pillars. The fastening is identical to the lower harness - to the floor of the tree.

Installed poles and top trim
Roof erection and roofing
The whole process will be more clearly described in the form of a phased approach:
- We fasten 9 rafters on top of the lower strapping in increments of 30 cm;
- Parallel to the rafters, we install 9 boards also in increments of 30 cm;
- If you did everything clearly according to the instructions, then you should get a roof in the form of bars;
- We lay sheets of ondulin or corrugated board on top of the roof, depending on your capabilities.

rafters

crate
The rafters are attached to the strapping on metal corners and self-tapping screws. It turns out pretty robust construction, which can withstand not only the roof, but also winter snow.

finished roof
Floor
After installing the pillars, you can start laying the floor. You will need about 30 boards 3 meters long, some of which will need to fit under the posts. The floor is fastened with self-tapping screws to the lower trim and the log in the center.
The secret to a level floor is to place the first plank evenly. If you succeeded, then the process will go more fun.

finished floor
Railings and sheathing with OSB boards
For railings, a beam with a section of 50 by 50 mm is used, which is mounted at a height convenient for people. In addition to the beam, it will be necessary to install additional supports, on which the oriented strand board will be attached in the future. All this is clearly shown in the photographs that will be presented below.

Attaching railings to corners

Finished railings
The OSB board is attached to self-tapping screws, plus they are additionally pressed down with bars in the center. This creates not only reliability, but also additional aesthetics.

Laying the first OSB boards
A few words about antiseptic and paint
Suggested option inexpensive gazebos turned out to be extremely beautiful and effective. The main secret lies in a well-chosen color, which plays in contrast between the dark and light shade of the tree.
You can use your tree protection options, but the owner of this building recommends antiseptic Senezh Ultra, which is applied to three layers. This will allow you to achieve reliable protection of the tree and a beautiful appearance.
Video
I express my deep gratitude for the submitted video to the user of the channel with the name " Vasya Vasin". It was he who prepared this video on construction, and also commented on some of the questions that he was asked in the comments.
If you have any questions, you can ask them both in the comments to his video and in our feed after publication. We can send him your questions, and then receive and write you his answer.
Photos of summer arbors

Wooden gazebo with decor for summer holidays
In one of the publications on our website, we examined in detail the variety of summer arbors made not only of wood, but also of other building materials.
View options from different type and design, as well as pick up some idea for your dacha, you can follow the link below.
Construction options for other structures
For various reasons, this construction option is not suitable for everyone. In view of this, I offer you building instructions similar in style to writing, in which the process of building a gazebo with your own hands is also clearly and clearly chewed.

Several links are provided below.
Among the options presented, all buildings are made of wood and in a fairly budget format. Any elite Construction Materials supposedly decorative plaster or wild stone are not used here.


