In the country, it is not customary to sit in a house when it is sunny and warm outside. Only during bad weather can a summer resident hide under a roof. However, you can resort to another option. You can stock up on excellent impressions in the open air if you build your own gazebo.
Such a building will become an ornament garden plot as well as a place for pleasant communication with family and friends. There are many ready schemes light gazebos. If you assemble the structure yourself, its cost will be 50% lower than that of the finished building. The simplest do-it-yourself gazebo is assembled quickly enough. With unhurried work, it can be built in 2-3 days.
Materials and designs
Cheap and practical option- a gazebo made of wood. Such material looks beautiful and is easily processed. If wooden elements are impregnated with special solutions, they can serve for a long time. In addition, construction country gazebo will not take more than 3 days, even if the work is done slowly.

Another material that is used for the construction of such structures is metal. When making a frame from profile pipe and steel corners gazebo can serve for many decades. It can be built with your own hands. The work is done quickly enough, and the materials are quite cheap.
DIY gazebo
How to build a simple gazebo with a minimum of cost and effort? For the construction of such a structure, it will be necessary to create a frame and a floor. If it is wooden, the bases are made of bars. The floor covering is constructed from boards. As a base, it is better to pour a concrete screed. This version of the foundation will be simple affordable. Before work, it is necessary to choose the right place for installing the gazebo. The area for concreting should also be leveled.

Important! For a simple gazebo, you should not combine wooden and metal frame elements.
Practice has shown that even when protecting wooden supports with roofing material or bitumen, when placed in concrete, the elements begin to rot. Subsequently, this can lead to their destruction. For this reason, it is better to immediately exclude the contact of wood and concrete.

For this purpose, you should:
- Concrete round metal pipes.
- Then fasten wooden posts to them. Metal rods should protrude from the concrete base by 30 cm.
- Holes are made in them for fastenings.
On such supports, the gazebo can stand for more than a dozen years. Any roof can be mounted on the obtained supports. Building a wooden structure with your own hands is quite simple.
For an ordinary light gazebo, it is not necessary to erect brick fences. You can limit yourself to a simple fence from eurolining. Its height usually does not exceed 90 cm. Such a fence is attached to longitudinal bars. The gazebo will help to hide from the scorching sun, and will also avoid blowing your back with a strong wind. The fence for the walls of the structure is fixed to wooden supports using self-tapping screws.
Eurolining can be replaced with cellular polycarbonate. This material looks great and does not obscure the gazebo space too much. It is also easy to install. The material is not afraid of sudden changes in temperature and high humidity.
Roof
For the roof frame, it is better to find a beam of 50x50 mm. From it it is necessary to create a frame on which the crate will be installed, and then roofing material. The frame is installed on the top harness. The roof is covered with such materials:
- ondulin;
- metal tile;
- slate.

When choosing optimum width the roof should be calculated in such a way that when installing the roofing, you do not have to cut the sheets. To do this, you first need to measure the dimensions of the panels used, and then subtract the sheets overlapping each other, which will be performed during installation. The result will be taken into account when calculating the length and width of the roof. It is also worth considering the side overhangs and end overlap. You can make a gazebo with your own hands quite quickly. The main thing is to choose the right materials, including for roofing.

For example, for a slate with 8 waves in each panel, the length of the gazebo is chosen as a multiple of 1 meter. In this case, the length of the slopes can be equal to 1.75 m. If several panels are laid along the slope, the estimated length of each of them is reduced by 15 cm - this is necessary to create an overlap.
Choosing best option for roofing, special attention should be paid to polycarbonate.
Distinctive features of the material:
- It is an excellent option for the construction of lightweight structures.
- It also makes a fence.
- Polycarbonate is a transparent plastic with a small mass.
- In combination with it, a metal profile is often used.

Such gazebos are especially attractive and practical if they are located in the shade of trees. In the presence of a translucent roof and the shadow created by dense foliage, the atmosphere in the gazebo will be as comfortable as possible for relaxation.
Garden gazebos made of polycarbonate are simple and affordable. To create them, you need to have several tens of meters of steel angle, as well as polycarbonate panels and a steel strip. Also, before erecting such a structure, it is worth preparing planed boards, which will be needed for the manufacture of benches and a table. original photo gazebos can be seen below.

Manufacturing steps
To understand how to make a gazebo with your own hands, you should get acquainted with the main stages of work. It is better to choose an easier option. First you need to equip the foundation. In it, the support posts of the gazebo are concreted. After that, they should be scalded with a corner of 25x25 mm. After that, 2 belts of corners are welded to the racks. One of them is placed in the middle of the supports. The second should be put on top - the roof will rest on it.
Polycarbonate sheets have the ability to bend perfectly. For this reason, they can be used as an arched roof. For this purpose, steel strips must be welded to the racks, which have a width of 50 mm. They are mounted on support stands. And then holes are made in them to fix the polycarbonate. You can assemble a simple gazebo for a summer house with your own hands (as in the photo) quickly enough.

Also, roofing is often made of tiles. For the basis for it, OSB sheets should be prepared. The material does an excellent job of holding shingles on the roof. The thickness of such sheets can be 10-12 mm. It has a fairly high strength and rigidity. That is why it does not have to assemble a spatial frame from wooden elements. It is only necessary to firmly attach it to the harness.
Features of simple gazebos
A simple gazebo for a summer residence does not have to be done with a frame frame. Its foundation is concrete screed which was reinforced with steel bars. On such a surface, you can put a barbecue. The safety of such a design is quite high, because concrete floor not afraid of hot coals. In the case of the winter version, it is better to equip the floor with planed boards, and sheathe the area around the barbecue with steel sheets. This winter design looks simple and beautiful.

Inexpensive in construction and easy to install is a columnar foundation. In order not to overpay when building a gazebo for a summer house with your own hands, you can prepare a red brick. To install the foundation, it is necessary to dig holes for the supporting pillars, and then lay them in brickwork, place reinforcement and pour concrete. Anchor bolts of 20 cm are laid in the masonry. There should be a thread at their free end.
Supports are placed on the pillars. The frame is best made from a bar 50x100 mm. If you put antiseptic boards on it, you can get an excellent warm floor. Subsequently, the gazebo can be equipped open hearth. With such a finish in the room, it will be possible to rest comfortably even during severe frosts.
To figure out how to build a gazebo, you should get acquainted with the main features of simple structures, as well as learn more about popular materials. You should also understand the sequence of erecting simple arbors.

Conclusion
As you can see, build simple design you can do it yourself, without resorting to the help of professional builders. First, an exact drawing is made, and then, in accordance with it, all necessary work. It is important to consider the capacity of the gazebo, its location and materials. In order to avoid mistakes in the process of work, it is worth performing the correct calculations.
Today it is becoming more and more popular to buy summer cottages, but even more fashionable is to equip them yourself. For example, a do-it-yourself gazebo is not just cozy and beautiful, but also proof to yourself that you can do everything if you just want to. So where to start?
Stages of building a garden gazebo

First of all, we carefully clean the selected area on which we plan to build a gazebo with our own hands, from various garbage, unnecessary building materials and all sorts of rubbish.

If there are any hemp or snags, it is better to get rid of them immediately, as it will be much more difficult to do this later.

Then we determine what size we want to build our gazebo. Let's say the total number of people that the building can accommodate is 15-16 people. We make our own drawings or take ready-made ones. Below in the article you will find drawings of a garden gazebo, but they are suitable for a different type of gazebo, not the same as in the photographs in the article. We outline the places where our foundation will be poured, then we should dig a hole right size and arrange formwork.

Do-it-yourself gazebos for summer cottages do not require such a volume of work as, for example, the construction of a country house or other premises, but some procedures in all construction processes are still similar.

Despite the fact that the gazebo is the most open room, the structure must be strong enough to protect those in it from rain and wind.

The next stage is the installation of load-bearing vertical structures, then floor beams. Vertical structures are connected with special lags and all this is covered with ordinary floorboards.

Wooden structures are covered with a deep penetration primer and finally painted in any color you like. As a rule, most people who make summer gazebos with their own hands prefer pleasant, unobtrusive shades of pastel colors, close to beige-brown.

In combination with green foliage looks very harmonious. It is worth remembering and taking into account the fact that no matter what the weather conditions are, every year the gazebo should be repainted so that it is minimally destroyed.

A do-it-yourself roof for a gazebo, as shown in the photo, is best done flat and slightly recessed into the structure. In order for rainwater falling on the roof not to accumulate there, but to drain, a homemade downpipe is installed.

Next to the main gazebo, you can dig a small pit, if you can call it that, which can go deep below ground level up to 70 centimeters. A small amount of crushed stone is added to the sandy soil to form a natural drainage for sufficient drainage of sewage. Here you can equip a small special barbecue area (the only thing you need to immediately make sure that there are no branches on top).

If you decide to build a wooden gazebo with your own hands, do not forget about the area for children - another small area where you can install.

The final stage is the improvement of our gazebo: the installation of barbecues, tables and other necessary accessories. You can put soft bright pillows on the benches, put massive candles in elegant candlesticks on the tables. Since the gazebo is a predominantly open structure, its virtual walls should be protected from prying eyes and create comfort. This can be done with light light tulles or special awnings.


It is noteworthy that do-it-yourself modern wooden gazebos are not just a dull little “hut” with cracked green paint, as we remember from childhood, but entire entertainment mini-centers in which there is a place for barbecue and for quiet, solitary conversations, and for the entertainment of children.
Drawings of a garden gazebo
We offer you to familiarize yourself with the drawings of the garden gazebo:


A cozy gazebo in the garden is the dream of many homeowners. Wooden and metal, polycarbonate or wrought iron, square, round and hexagonal, these structures are found in almost every garden. To make garden gazebos with your own hands, it is not at all necessary to hire specialists or be an experienced builder, it is enough to have minimal skills in working with a tool.
How to choose a gazebo design
The construction of a garden gazebo will be cheaper if you immediately carefully think through everything to the smallest detail. The main parameters are the dimensions of the gazebo, its shape, the type of foundation and roof, materials for building walls. The size of the building depends on the number of residents of the house and the planned guests. It makes no sense to build a structure of a large area for 2-3 people, in this case it is better to choose a 2x2 m structure.
The level of complexity of its installation depends on the shape of the gazebo. - rectangular, but round or hexagonal ones require more skill and time to build. If there is no experience at all, it is not worth taking on the construction of such a structure right away.

The foundation for the gazebo can be columnar, tape or slab. Most cheap option- besides, it is the easiest to install. The strip foundation is widely used for both small and large buildings, but is practically not used for gazebos. round shape. Base from monolithic slab ideal for any gazebos, but the larger the area, the more expensive the slab foundation.

Roofs on garden arbors are single-pitched, gable, pyramidal, in the form of a tent. The most budgetary and easy to install is a pitched roof. It is suitable for rectangular buildings, as well as gable. Cone-shaped and pyramidal roofs are installed on hexagonal and round arbors.

A variety of materials are used for construction: brick, stone, timber, logs, polycarbonate sheets, metal pipes, forged gratings, and some craftsmen assemble gazebos even from bottles. The easiest way to build from timber and metal racks; the assembly of the frame is carried out in a matter of hours, the sheathing also does not take much time. Working with logs is a little more difficult, because you need to cut and connect them correctly. To lay out walls of stone and brick, it is advisable to have the appropriate skills, otherwise the masonry will turn out to be sloppy and unattractive.

Prices for garden tents
garden tents
To avoid serious mistakes and minimize construction costs, you need to start with the simplest. For example, a rectangular gazebo with a pitched roof and on a slab foundation is taken.

Necessary materials:
- large stone or rubble;
- sand;
- formwork boards;
- timber 100x100 mm and 50x50 mm;
- boards with a section of 30x150 mm;
- primer for wood;
- dye;
- slate or corrugated roof;
- self-tapping screws and bolts;
- reinforcing bars.
You will also need tools:

Marking the base of the gazebo


Choose a flat open area of the garden and make markings. To do this, determine the location of one of the corners of the gazebo and mark it with a peg. They measure the distance to the other corners, put beacons, pull a twine between them. Diagonals are measured in the resulting rectangle: if they are the same length, the markup is correct.
Pit preparation

The soil is selected with a shovel to a depth of about 25-30 cm, the bottom is leveled, and it is carefully rammed. The walls of the pit must be strictly vertical. Next, coarse-grained sand is poured in a layer of 10 cm, it is well leveled and moistened abundantly for compaction. Along the perimeter, formwork is laid out from boards up to 10 cm high, reinforced with timber.
Foundation pouring
More about the foundation of the gazebo
The pit is laid out with large flat stones or covered almost to the top with large rubble. At the corners of the perimeter between the stones, segments of reinforcing bars are driven in; the rods should rise at least 10 cm above the finished foundation. A concrete solution is prepared and the foundation pit is poured. The surface is leveled with a rule or smoothed with a trowel.

Frame installation
For the frame, take 4 beams of 100x100 mm and cut the gazebo to the height. The front bars are left 15-20 cm longer than the rear ones to make the roof slope. After that, the supports are well treated with a primer and dried. In the lower end of each support, a small hole is drilled along the diameter of the reinforcing bars that protrude from the concrete at the corners of the base. They put the bars on the rods, set them vertically with the help of a level and additionally strengthen them with metal plates and anchor bolts.

After installation, the side supports are interconnected with 50x150 mm boards, and then the braces for the rafters are mounted. At a height of 10 cm and 0.5 m from the floor, the racks are connected with horizontal jumpers from a 50x50 mm beam. Vertical bars are fixed between the lintels in increments of 40 cm. The doorway is left free. All fastenings are carried out with the help of bolts and steel corners, which are screwed to the tree with self-tapping screws.


Prices for various types of timber


On the boards connecting the support bars, logs are stuffed in increments of 30 cm. From above, the logs are sheathed edged board 30x150 mm. Between the boards leave gaps from 5 to 15 cm wide. Of course, all roof elements must be treated with a primer and dried well. On top of the board, you can cover with glassine and fix it with stapler staples. Thin slats are stuffed over the film so that a ventilation gap remains between the roofing and the film. Slate is laid on the rails and fixed with 120 mm nails with galvanized caps.
Arbor arrangement

After installing the frame and roof, everything wooden surfaces needs to be painted. When the paint dries, put inside the gazebo wooden table and benches along the walls. From the house to the gazebo they conduct electricity, hang a light bulb or a lamp. To give the room coziness, you can hang the walls with a dense light fabric. The interior decoration is completely dependent on the taste and capabilities of the owners of the house.
This version of the gazebo is basic. If desired, you can improve the design: install wooden gratings between the supporting beams, sheathe the walls with clapboard or waterproof plywood, lay logs on a concrete base and make a wooden floor. Instead of beams for the frame, you can take metal pipes, and replace the slate with polycarbonate or soft tiles.

A hexagonal garden gazebo always looks very elegant and is an adornment of any site. During its construction, the accuracy of calculations is very important, because errors at any stage will significantly affect the final result. You need to start with a drawing of the future building, which will allow you to correctly mark the site and calculate the amount of materials.

For construction you will need:

Step 1. Markup
To mark the site, you will need two wooden slats and a rope about 2 meters long. The selected area is leveled, freed from vegetation and stones, a rail is driven into the ground in the middle and tied with a rope. The second end of the rope is tied to another rail and, using such a home-made compass, a circle with a radius of 1.75 m is drawn. The resulting circle is divided into 6 equal parts and beacons are placed on the marking line. Here will be located the support posts for the gazebo.
Step 2. Making a column foundation
In place of the beacons, pits are dug 0.5 m deep and rectangular in shape. River sand is poured at the bottom with a layer of 10-15 cm, then a layer of coarse gravel of the same thickness. In the middle of the pit, a steel bar 70 cm long is driven in, after which everything is poured cement mortar. A brick is laid on top in 3-4 rows with obligatory dressing. The reinforcing bar should be in the center of the masonry. In the same way, lay out the remaining 5 supports and allow the solution to dry well.
Step 3. Mounting the base of the gazebo

Measure the distance between adjacent posts and cut the beams according to the measurements. You should get 6 beams of the same length and thickness. For reliable connection of the supports to each other, cuts are made at the ends in half the thickness of the tree. After that, the lumber is primed and dried, and then laid on poles in the form of a hexagon. Pieces must be laid between the beams and pillars of the foundation.

When the beams of the lower trim are fixed, logs are attached inside the hexagon. The central lag is placed exactly in the center of the structure, aligned horizontally and fixed to the beams using metal plates and bolts. Next, 2 logs are mounted perpendicular to the central one, and all the rest are inserted at an angle, for which small cuts are made at the ends of the boards on both sides. In conclusion, the logs are strengthened with lintels made of timber and sheathed with boards.
Step 4. Building walls

The frame of the gazebo is made of 6 bars 100x100 mm of the same length. Each beam is installed on one of the corners of the base and fixed with anchor bolts. Be sure to check the verticality of the support posts so that the structure is not skewed. A strapping of thick boards is mounted along the upper edge, and at a height of 70-90 cm from the floor, the racks are connected with horizontal lintels made of timber, leaving the entrance free.
Walls can be made in several versions, depending on the materials available. You can close the gazebo up to half with sheets of waterproof plywood, sheathe it with boards, fix wooden figured lattices on the lintels between the racks. You can make two or three walls blank, and decorate the rest with forged elements.
Step 5 Mounting the roof


When the walls are ready, proceed to install the rafters for the roof. Boards 50x100 mm are taken as rafters; for convenience, assembly is carried out on the ground. Since there is no central pillar in the gazebo, it is rather difficult to neatly connect the rafters. To simplify this process, a hexagon cut from a bar will help, each side of which will correspond to the thickness of the rafters. The ends of the boards are cut at an angle and fastened with nails to the hexagon; and on inside strapping cut grooves for installing rafters. After that, the structure is sheathed with boards in a circle, leaving small gaps, lifted up and fixed with bolts. Now it remains only to lay.

Prices for various types of fasteners for rafters
Fasteners for rafters
Video - DIY garden gazebos
Video - How to build a gazebo
in the scorching heat is not a very pleasant pastime. Sometimes you want to sit quietly in the shade, relax and dream. And if guests come, then sitting at home in the summer heat is also a dubious pleasure. And at such moments the thought comes that it would be nice to put in the yard, where you could relax in the fresh air yourself, and together with a large company. In our article today, we will talk about how to build a gazebo with your own hands. In it we will consider drawings with the dimensions of such structures.
PHOTO: sdelais.ru
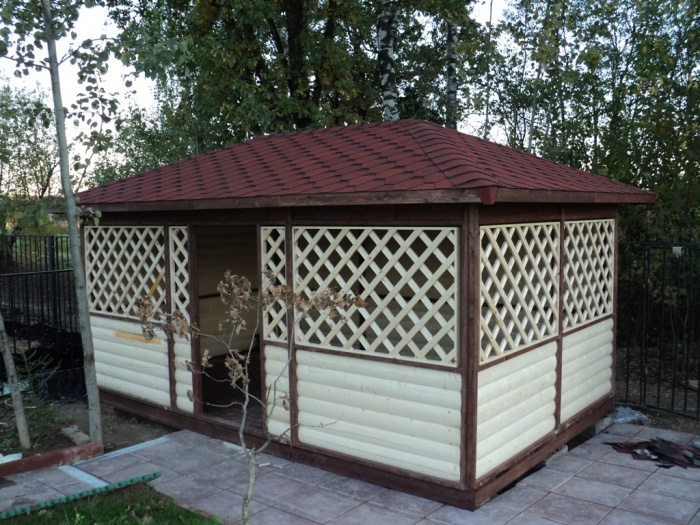
In order for the respected reader to understand in general terms the direction in which we have to move today, we suggest considering several ready-made garden and country arbors made by craftsmen with their own hands.
Such gazebos can be found very often, the form of such structures is usually of the same type. But there are also more interesting specimens.

PHOTO: pinterest.ru
In addition, other materials are used to build gazebos. For example, polycarbonate or metal, but they cannot be compared with natural raw materials, although the cost of their construction is much lower.

PHOTO: tdgroup.rf
Although, in fairness, such a building looks much better than some wooden ones, which the language will not turn out to be a gazebo. Despite this, the owners are proud of their "brainchild".

PHOTO: yandex.by
To begin with, it is still worth dividing all such buildings into ordinary ones (not different from others), and into those that can surprise a person with the most demanding taste.
Simple gazebos for summer cottages, built with their own hands: photo
Most of these buildings. After all, usually people don’t want to invent something new, it’s easier to do it like a neighbor’s, just paint the roof in a different color. Therefore, it turns out that throughout the country, gazebos resemble one another.

PHOTO: build-experts.ru  PHOTO: landshaftnik.com
 PHOTO: drive2.ru
Recreation areas unlike others: when the master's fantasy works
Although rare, but in Russia in summer cottages you can see amazing, unlike arbors. At the same time, home craftsmen do not hide how they made this beauty, and they themselves tell the whole algorithm of work. But most people find it more convenient to say, “I can’t do this.” And retreat, content with being placed under a canopy.
 PHOTO: koffkindom.ru
  PHOTO: stroy-podskazka.ru
  PHOTO: crosslan.build2last.ru
 Do-it-yourself step-by-step instructions for building a wooden gazebo with photo examples
Let's try step by step to figure out how to make a gazebo near country house or . For the first example, let's take the most common manufacturing material -. Of course, the first step is to draw up a drawing and think about what the foundation of the building will be. And the choice will already depend on the density of the soil and the approximate weight of the structure. But, let's not get ahead of ourselves, but let's go in order.
Construction of a gazebo from a bar: the nuances of construction
For the construction of such a gazebo, a beam with narrow edges is not suitable, which means that even the weight of one frame will be decent. And if you add here the roof truss system, corrugated board or tiles, as well as low walls, it becomes clear that such a structure will not stand on ordinary supports made of cinder blocks or foam concrete. Naturally, there is no point in doing strip foundation, the weight of the building will not be so great. But the pile-screw is perfect. In this case, the depth will depend on the flowability of the soil. The more sandstone in it, the deeper the screw piles will have to be driven.
The advantage of such a foundation can be called the fact that it is quite possible to equip it manually, without the involvement of heavy equipment.

PHOTO: stroy-podskazka.ru
Project of a future gazebo: how to make a drawing without involving specialists
In fact, it makes no sense to pay designers to draw up a drawing. You can sketch the project yourself. Essentially, it serves to general idea about what should happen in the end. Additionally, the blueprint makes it easier to calculate the amount of material needed for construction. If for some reason the home master does not have the opportunity to draw up a project and a drawing, it is quite possible to use ready-made examples, which are very numerous on the web. We bring to your attention a few ready-made ideas.
 PHOTO: stroy-podskazka.ru
  PHOTO: ld-stroy24.ru
  PHOTO: 1asku.ru
 Do-it-yourself construction of a wooden gazebo step by step with explanations
A step-by-step similar construction is as follows. Having chosen a place and having drawn a sketch of the future structure, we take up the foundation (in our case, a pile-screw). Piles must be located under each support beam of the gazebo. A strapping of timber is laid on them.
When this work is done, load-bearing racks are installed on which the roof will be held. Between the power vertical structures, depending on the project, low walls or an entrance can be located. After the load-bearing beams are installed, the logs and the subfloor can be laid. Although in arbors it is usually also fair.

PHOTO: vetas.cz
The final work on the construction of the gazebo is the installation of the truss system and the roof, which can be any material. Some, in order not to spend money, cover the roof of the gazebo, removed during the renovation of the apartment. But such a coating will be short-lived - temperature changes have a bad effect on it.

PHOTO: sk-vibor.ru
Related article:
To build a structure, you need to carefully consider every nuance, carefully select the material, and take into account the features of the landscape of the site. How to do this is described in detail in the material.
Building a gazebo from pallets with your own hands: how difficult is it
Such buildings are considered the lightest of the wood arbors. In addition, a special impregnation of the boards can be called a plus, which prevents the appearance of fungus and mold. Due to the light weight of the finished building, it does not require a solid foundation. Many even install it on the same pallets. If their lower part begins to rot from dampness, then the gazebo can be rearranged to new ones by inviting several friends to help you on the site.

PHOTO: 1001pallets.com
Drawing of a wooden gazebo: is it worth it to do it yourself
Everyone must find the answer to this question for himself. But you need to understand that the cost of professional services can result in a tidy sum. As for the Law, it does not say anything about this. The gazebo is not a living space, does not require constant electricity (it is enough to throw a temporary carrying as needed). This means that nowhere and nothing needs to be approved during such construction. So, it's best to sketch yourself.

PHOTO: andreyprindyk.ru
Is it possible for one person to build a wooden gazebo for a summer residence
The answer to this question is unambiguous - even one person will be able to build the building itself, but working with rafters and roofing is more difficult. An assistant is required here to avoid injury. Therefore, before you start making a wooden gazebo with your own hands, you need to think carefully about such moments.
Solid wood structures have always attracted our people. And in the photo, even simple wooden gazebos look beautiful and somehow at home.

PHOTO: andreyprindyk.ru
Other materials from which you can build a gazebo for a summer residence
Although wood is more good option for the construction of gazebos, in order to save money, other materials have increasingly been used, including:
- profile pipe - it is used both for the manufacture of the frame and for walls;
- - a relatively inexpensive translucent material that can be bent;
- sheet metal profile - it is often used for roofing;
- improvised materials - here any remnants after the repair can be used.
Let's try to study each of these options in more detail in order to understand which one is better to give preference to.
Do-it-yourself gazebo installation from a profile pipe
Such a structure will be much lighter than a wooden one. That is why a gazebo from a profile pipe does not require a full foundation. In fact, it can be called mobile - even a fairly large structure can be moved manually to a new location if there are several people. Most often, such gazebos protect only from direct sunlight. They usually have no walls at all. But their popularity is growing quite rapidly, which is due not only to mobility, but also to minimal material costs.
Experts warn that in areas where strong winds often blow, such gazebos are not recommended. It is precisely because of their low weight that buildings are very often blown away by a hurricane, which leads to damage to other people's property and more sad consequences.

PHOTO: legkovmeste.ru
Do-it-yourself polycarbonate gazebo: photo examples, advantages and disadvantages
Polycarbonate is a translucent, flexible material. Subject to the rules and regulations of operation, it is quite strong and durable. Gained popularity due to low cost and low weight. It is quite convenient for laying on the roof of the gazebo, as well as as walls. Everything seems to be very good, if not for the ubiquitous "BUT".

PHOTO: azh.kz
When purchasing this or that design, the consumer does not delve into the characteristics of the purchased polycarbonate, trying to find a cheaper product. And after that, people are surprised that after a year it begins to crack and crumble. But the fact is that different compositions have their own range of temperature differences, as well as the maximum degree of tension during bending. Failure to comply with only these two parameters is already a guarantee that polycarbonate will not last even a year.

PHOTO: maximum71.rf
Drawings and photo examples of arbors from profile sheet metal
The sheet metal profile also has a low price and is relatively light. But if you lay it on the roof, and also make walls slightly above average from it, it will be very dark in the gazebo, sunlight will not penetrate inside at all, and this is not good. Twilight, dampness - not best neighbors while resting. In addition, such an option can lead to colds. If such a gazebo is placed where sunlight constantly falls, it is unlikely that anyone in it will be able to escape from the heat. The metal heats up, and the resting place turns into an oven.
Such gazebos are often made with a shed roof to make it easier to lay roofing material, and are used as a temporary option.

PHOTO: forum.mtbtula.ru
Photo examples of gazebos from improvised materials erected by one's own hands
This is a separate issue in such buildings. For structures of this type, everything that can fall under the hands is used, ranging from old boards and snags, ending with tarpaulin, linoleum or the remains of a floor. Sometimes it turns out very interesting design. Here it is important that House master approached the work with fiction, but at the same time he calculated everything very seriously. Otherwise, you may end up with a structure that looks more like a barn or warehouse for garden tools. The most interesting design ideas can be seen in the photo below.
 PHOTO: krov-torg.ru
  PHOTO: skalice.ru
  PHOTO: hmongdisk.com
 Article
Today, few people are limited to a summer cottage just a house and a garden. Such a cozy building for recreation, like a gazebo, adorns every second courtyard. This article is for those who are ready to independent construction country house on your property.


Location selection
Before choosing a place to build a gazebo, you need to consider the purposes for which it will be used. For many in summer time the gazebo serves as a dining room or summer kitchen, then it makes sense to make it closer to home. If it is needed solely for relaxation and solitude, then it is better to put it on the outskirts of the site.
But wherever such a country house is located, it must match the style and design of all buildings on the site and not stand out from the overall picture. Therefore, it is necessary to consider not only the issue of location, but also the detailed configuration.
A great place for any gazebo will be the bank of a river or other body of water, but not everyone country cottage area has similar charms.


If you put a gazebo in the yard in the shade of tall trees, it will certainly become an ideal place for reflection and relaxation.
If the area in front of a private house is very small, then you can place it in the very center, having previously laid a path, for example, from the gate. So that the open gazebo is not an object of observation for passers-by, you can plant dense tall shrubs around it.
During construction, it is worth remembering that not only the view of the gazebo from the side is very important, but also the view from it, because nothing should interfere with a comfortable stay. So, for example, a view of the neighbor's fence or even on the wall of the house will not create the proper atmosphere. But in any case, the situation can be corrected with the help of flowers and the right furniture.


Before installing the gazebo, you must definitely find out the depth ground water on the site and the degree of soil freezing in winter period. Information about the prevailing wind direction will also be useful, especially if the gazebo provides a place to install a barbecue. If necessary, for this information, you can contact the surveyors.
The place for installation should be relatively flat. If there are stumps on the site, then it is better to uproot them, because overgrown roots can ruin the foundation.
To install a gazebo with a stove / barbecue, it is worth considering all fire safety standards.


Varieties and designs
All country arbors can be divided according to the criteria of the form and material from which they are made.
According to the type of material used, 5 types of arbors are distinguished.
Wooden
The most common option for self-manufacturing. Such structures do not require a solid foundation and are quite easy to install, environmentally friendly and multifunctional. If desired, even a large wooden gazebo can be made collapsible and moved if necessary.


brick
This is a much stronger and more durable building when compared with a wooden one. But for its construction, a strong foundation is simply necessary. A brick gazebo can serve as a summer kitchen, as well as a place for receiving guests and organizing a barbecue. If the gazebo provides rest with children, you can hang a swing or a hammock inside.


Polycarbonate
The main advantage of this material can be called cheapness. But pleases the presence of mobility, and resistance to temperature extremes. Outside, such gazebos are often covered with paint.


metal
Suitable for any foundation, but making it yourself is quite difficult.


Forged
An option close to metal, but more beautiful and, accordingly, more expensive. In addition, a wrought-iron gazebo is only suitable for use in the summer. They are also not made glazed. Ideal for summer residents who care more about appearance than about functionality.


Distinguish arbors and in form.
Rectangular (square)
A versatile solution that can be made from any material. It will fit into every area, regardless of whether it is placed in the middle or around the perimeter.


multifaceted
Often this is a hexagonal or octagonal arbor, but theoretically you can improvise with the shape. It also requires a foundation and is difficult to design on your own, but it looks much more original than a standard-shaped gazebo.
A multifaceted gazebo is often decorated with a domed roof.


Arbor-canopy
It looks like a kind of tent, which can be easily disassembled if necessary. Fits well into small plot because it won't take up much space. The design of the canopy itself is very simple, but again, a foundation is required for installation. The roof is usually made of tarpaulin or a special canvas.


Round
This form will appeal to lovers of romance. Fits perfectly in the gazebo round table, benches or flower arrangement around the perimeter. Such an arbor is comparable in versatility to a square one and will fit any landscape.


corner
This form is very practical and allows you to install a gazebo even in a small area.


Also, all gazebos according to the type of construction are divided into open and closed. Everything is clear here: in the first there are no walls (or some of them), and the second are designed like a real country house: with a roof and walls.


Materials and accessories
Foundation materials
It can be brick, stone or concrete.
Filler required for concrete mortar which can be gravel, crushed stone or sand. The required proportions are often indicated on the cement packaging and should not raise questions.
For the construction of a brick foundation for a wooden gazebo, many use red brick. It must be of high quality fired and resistant to moisture.
Roofing felt or roofing material will do a good job of waterproofing the foundation.


Floor materials
For a building without a foundation, the floor can be well-packed soil, a lawn, or even a neatly laid slab. True, this can cause inconvenience during rain, for example. Therefore, more often the floor is made of boards or laid out with tiles (artificial stone).
Materials for floor covering should be chosen so that they are combined with the overall design of the gazebo.
If the choice is made in favor of tiles, then ceramic or matte will be optimal. This will reduce slip and make cleaning easier. Together with the tile, you need to purchase a special mastic for sealing the seams.


concrete mortar
Concrete is formed by hardening a concrete mortar that has been pre-mixed and compacted. A concrete mortar is a cement mixture mixed with water. You can make this mixture yourself or buy ready-made. Today, there is a huge variety of concrete mixtures on the market: they are divided by density, frost resistance, strength and other parameters.
When buying and calculating the quantity concrete mix it is worth remembering that after mixing the solution, it will significantly decrease in volume.
During the production of the foundation screw piles it is worth taking care of buying high-quality piles, having previously studied the brand of goods.


Fasteners
These include nails, bolts, screws, staples, dowels, nuts, screws and more. Of course, not a single stage of construction can do without the use of nails, so they need to be purchased in sufficient quantities. The most common nails are construction. There are also galvanized, which are distinguished by a protective coating against corrosion. For fixing roofing there are special roofing nails: their hat is wider than that of ordinary ones.
The fastening of volumetric parts of the building is usually done using screws.


Means for the protection and processing of wood
Wood must be treated regularly with an antiseptic to prevent rotting. This should be done in a special suit, protecting the eyes with goggles, and the respiratory organs with a respirator.
Cinder block does not require special means for care.
sometimes before finishing work the rounded log needs bleaching. To do this, you first need to deresin it with special solutions that dissolve it. So the amount of resin on the logs should be paid attention at the very beginning of construction.
If wood parts need to be glued together, there are a wide range of adhesives to choose from: synthetic, casein, epoxy or gluten.


At the stage of finishing the gazebo from the log house, paints and varnishes are needed. They are of two types: opaque and transparent. The first includes all kinds of paints and enamels. To the second - various varnishes. Before applying paints and varnishes, the surface must be puttied.
If the frame system of the gazebo is made of plastic or pvc pipes, 2-piece 180 degree extensions, elbows and tees to connect three pipes can be useful. The upper trim in such structures is a polypropylene perimeter.
For outdoor gazebos in a natural style, the design of the roof with reeds is more suitable, for example, without the use of corrugated board. It also needs to be properly prepared before laying: dry, check for the presence of insects and beetles, tie it with high quality.
If the roof is covered with corrugated board, you need to choose the right one.
It differs in four ways:
- sheet thickness;
- sheet width;
- wave height;
- wave width.
The value of these figures is directly proportional to the quality of the material.


Projects
Any construction work begins with drawing up drawings. You can find a suitable ready-made project or create your own, taking into account all the features of a particular site and your preferences. If a sufficiently skillful master starts construction, then he can use a freehand drawing, that is, a simple diagram. In other cases, it is necessary to take into account all dimensions and proportions in the sketch on paper. Naturally, at the design stage, you need to decide on the location of the gazebo.


According to the type of construction, open gazebos (beams with a roof), half-open (the presence of one or two walls) and closed (all walls with windows are present) can be distinguished.
When choosing the shape and dimensions of the gazebo, you need to take into account the size of the adjacent territory, the number of people who will be relaxing inside, the size of the furniture and the proposed placement of the barbecue / oven.
If the summer cottage is quite large, a small gazebo can get lost on it. In this case, it is better to build a whole set of gazebos, pools, verandas with panoramic windows- in a word, everything that is enough for imagination.
Of course, there are also ready-made kits for self-assembly of such country houses, but this reduces creativity to zero.


When calculating the size of the future gazebo, you need to consider that for each person you need about 2 square meters. So, in a gazebo measuring 6x4 m, up to 10 people can comfortably accommodate. If the gazebo is built exclusively for the recreation of a small family, then you can get by standard sizes similar buildings - 4x4 or 3x3 square meters.
The type of gazebo directly depends on whether it will be used in winter time. If so, you need a warm glazed house with all amenities. An all-weather polycarbonate gazebo with sliding windows can also adjoin a blank wall on the back of the house.


How to do
Build beautiful gazebo at the lowest cost with your own hands is easy if you follow the recommendations of experienced builders and step by step perform all the stages of work. A simple summer gazebo will work for any summer resident and will allow you not to spend extra money on making it. It is worth starting with a review of the standard work plan.


The base of the gazebo
Even a lightweight gazebo with the simplest design needs a fulcrum and must be fixed in the ground.
Let us consider in more detail the stages of building the foundation.
- On the selected site, markings are made along the perimeter of the future building. This is usually a small area, so you can get by with standard measuring instruments.


- Most The best way level the surface under the foundation - dig the top layer of turf to a depth of 200 mm.
- Further, in the right places, you should dig holes with a depth of at least 50 cm and fill their bottom with gravel, which must be compacted.
- The pits are placed log or concrete supports which are later leveled and concreted.
- After the concrete has completely dried, it is necessary to cover the supports with waterproofing and lay the bars on top, which can be connected using metal pins.


floor laying
The laying of wooden flooring begins with the fastening of the bars to the bottom trim. Concrete blocks or a cranial block should be placed under them to avoid sagging. A floorboard is mounted on top of the bars.
If it is decided to cover the floor with tiles or tiles, it is necessary to level the floor surface with a cement screed and cladding.


Frame erection
When the foundation is completely dry, you can start building the frame.
- Vertical posts are placed in the corners, which can be fixed with protruding metal pins.
- The supports should be carefully aligned vertically and fixed with braces.


- Further, the upper parts of the racks are interconnected by strapping. For greater stability, you can connect opposite corners with boards crosswise.
- Rafters are attached to the side trim at a distance of about 50-60 cm from each other. The attachment point can be made by cutting in both parts and fastening with nails and metal plates.
- The protrusion of the rafters beyond the bounds of the strapping should not exceed 40 cm. But it should not be made too small either, because then the protection against precipitation will deteriorate.


Finishing
When the foundation and frame are ready, we can say that the main stages of work are behind. Finishing allows for more freedom and creativity, so installation can hardly be called laborious.
The process of finishing the gazebo:
- vertical racks should be installed between the supports, to which the filling is attached;
- if the lining is made of lining, then fix it with carnations with small hats;
- The grate is mounted with self-tapping screws from the inside.


The installation process of the roof depends on the material chosen:
- a solid crate is needed for tiles or wooden plates, that is, for piece roofing material (the optimum is a grating made of moisture-resistant plywood with a thickness of at least 8 mm);
- under the metal tile, ondulin and polycarbonate, a sparse crate of wooden beams will be required;
- the roof is fixed on the crate according to the manufacturer's instructions, additional protection (drainage system) is mounted at will.
The final stage of the work will be the arrangement of furniture, the elimination of minor flaws, the cleaning of construction debris, and so on.


It is not so difficult to carry out all the above points in stages by yourself, especially if you have at least some experience in construction. It is quite cheap compared to projects that are carried out by professional craftsmen. Moreover, a homemade gazebo is another reason to be proud of yourself. If, over time, the usual construction seems not enough, you can complete the top floor (near closed gazebos) or design a full-fledged recreation area that can be attached to the house.


Foundation
In order for the gazebo to stand for many years, you need to seriously approach the choice of foundation - this is the most important part for any building.
The most common mistake novice builders make is purchasing low-quality building materials in an attempt to save money. There is also an opinion that if the gazebo is made of wood, then it is light enough and does not need a strong foundation - this is a delusion.
Here are some tips for building a foundation.
- First of all, you need to clear the area on which the gazebo will be built in the future. To do this, the top layer of soil is removed to avoid exposure to excessive moisture on the materials.

- Then you need to draw the outline of the future building and select the type of foundation: columnar, tape or pile. More often summer residents make a choice in favor of the first.
- Particular attention should be paid to the degree of freezing of the soil. For column foundation this is especially important since it lies deeper. In sandy soil, the foundation should be 40-60 cm deep, for mobile soil - about 80-100 cm.
- Do not forget about waterproofing: without it, no foundation will be strong.
- Additional materials for the foundation can be metal pipes filled with concrete, concrete blocks, wooden beams And so on.


frame
The frame can be made of timber, metal or natural stone. In any case, it must be stable and withstand not only the weight of the roof, but also the precipitation that may accumulate on it.
The most popular materials are wood and metal. Less commonly used plastic and brick.


Metal advantages:
- high strength;
- ease of installation on any foundation;
- mobility (if necessary, such a frame can be disassembled into beams and moved);
- fire resistance (in such a gazebo you can install a barbecue and not be afraid of fires).
Flaw metal frame- the likelihood of rust. But with proper care, this can be easily prevented.
Wood is used more often than metal. One of its main advantages is environmental friendliness.
It should be remembered that not only moisture can harm wooden structure but also numerous insects.


Floor
The material for flooring should be chosen based on the type of gazebo: not all coatings that are used in closed gazebos will withstand the tests that coatings for open structures are subjected to.
Having assessed your financial capabilities, you can proceed to the choice of material, because the design of the floor can result in a rather large amount or, on the contrary, be performed independently from improvised materials.
It is also important to consider the design and surroundings of the building.


Wooden
In a wooden country house, a wooden floor will look more advantageous than a tile or concrete floor.
Often, wooden boards are used to decorate the floor in gazebos: it is beautiful, eco-friendly and cheap. In addition, its installation does not require any special skills, and even a novice builder can handle it.
Installation of a wooden floor begins with laying and fixing the timber. To ensure additional reliability, several types of fasteners can be used at once.
The flooring is made with a not very thick board, leaving gaps for ventilation. They should not be made too large in order to avoid deflection of the boards.


After finishing the work on laying the wooden floor, it must be covered with an antiseptic, and then with paint or varnish.
The wooden floor is ideal for closed gazebos, as they are protected from moisture.


In addition to wood, there are several coatings from which you can choose the right one for a particular gazebo.
- decking- material for any flat surface without a concrete base. Its huge plus is that after the end of the season it can simply be disassembled, and in the spring it can be re-layed.
- Terrace board Suitable for those who value durability. Such a coating will last more than a dozen years. With it, you can create a perfectly flat floor.
- material such as deck board, very convenient in that it is not subject to rotting and the formation of fungus. And these indicators are very important for a gazebo of any type.


The cost of these boards is much higher than usual, but the quality corresponds to the price.
But the wooden floor, along with many advantages, has some not very pleasant features. These include the need for careful and regular maintenance of the coating: treatment with antiseptics (1-2 times a year) and control over the appearance of fungus.


Concrete
Suitable for brick buildings, especially after the completion of the construction of brick gazebos, there is already a rough concrete floor (the top layer of the foundation). Many leave it in this form, but it will look more aesthetically pleasing if it is poured a second time with cement mortar.


Porcelain stoneware
This material is pressed clay that has been fired at a very high temperature. It can be compared with tiles, but porcelain stoneware is more durable. Often used for finishing a large area. Refers to the most simple solutions, as it is quite easy to equip.
These tiles are simply laid on top of a concrete floor. The main advantages of porcelain stoneware are durability and wear resistance. The only drawback is that the shape and colors are presented in a small assortment. And when cutting, you can completely spoil the material, because it is difficult to process.


Can also be used as flooring paving slabs. You will have to tinker with styling, but it is easy to wash. Before laying such tiles, you need to carefully prepare the surface. To do this, it is necessary to successively pour 3-4 layers of sand, then a layer of gravel, then another layer of sand. Only then can tiles be laid on the surface.
Immediately before laying, the soil should be wetted in the place where the tiles are laid. Keep in mind that paving slabs can be very slippery in winter. Also, with not quite accurate laying, the tile deforms over time and lies unevenly, which can increase the risk of injury in winter.


Roof
The gazebo can have a roof of absolutely any shape. The main requirement is that it should not be too heavy. If there is a desire to make a massive roof, then at the design stage it is worth considering a suitable foundation.
The shape of the roof should go well with the style and material of the gazebo., as well as with the weather features of the area. For example, it is illogical to build sloping structures in snowy areas: snow will collect on the roof, which can lead to a complete collapse of the building. Also, do not build roofs with a large slope in places with strong winds.
But, in addition to functionality, it is also worth considering the aesthetic features of one form or another of the roof.


Shed
The simplest form for self-manufacturing design. Often shed roofs built for structures of four walls. Appropriate shapes: rectangular, square, diamond-shaped or trapezoidal.


gable
Ideal for rectangular buildings. truss system(inclined or hanging) depends on the project and the material of the roof.


Four slope
It is this form that is used to cover most summer arbors. There are two types: in the form of four triangles connected at the vertices, and in the form of two trapezoids and two triangles (hip).
If the soul does not lie with the most common forms, you can show your imagination and make a roof with a complex geometric shape. For example, a Chinese-style multi-tiered roof will look very colorful and unusual.
There are also hipped roofs. They have the same principle as the four-slope, but it looks much more original and is perfect for round and polygonal buildings.


Particularly inventive summer residents erect gazebos with domed, spherical, tower, combined roofs.
The reed roof will be an excellent design solution. Since ancient times, reeds have been used as roofing. And it is no coincidence: the material has a water-repellent and heat-insulating property.
Such a roof correct styling save from the hot sun and heavy rain.


Wiring
The minimum complete set of a country arbor provides the conducted light and one or several sockets.
The main thing to focus on is the type of wires used. It can be round or flat cable. The second one is often better and more durable, but it has some nuances in installation and a rather big price. These nuances are the poor flexibility of flat wires. Accordingly, placing them in the corners, on the folds, the outer layer of the wire must be carefully cut. But still, most summer residents make a choice in favor of flat wires.


You should buy a cable with a margin of at least a meter, because design errors are almost inevitable. This will save time and avoid connecting different cables together, which can be unsafe.
When installing wiring yourself, you do not need to neglect the use of an asbestos sheet. It is laid between the wire and the wall, which will serve as protection (though not one hundred percent) in the event of a sudden fire in the electrical wiring.
The cheapest and easiest way to conduct electricity is open. This means that the wires will not be hidden in the walls. With a quality work done, this nuance will not spoil the appearance of the building.


First you need to make a drawing. It will detail where and how the wiring will run. Next, with a pencil, you need to make markings on the walls along which the wires will be attached.
After that, strips of asbestos are attached to the walls of the gazebo, and the cable is already laid on them. It is necessary to pay attention to the fact that the fasteners do not strongly pinch the wire, but also do not allow it to hang out.
Many self-taught masters choose a very unsafe method of fastening: they simply drive nails into the wiring itself, attaching it in this way to the walls of the gazebo. In no case should you do this, because in this case the likelihood of a fire or a short circuit increases many times over.


After attaching the wires, the installation of sockets, switches and other elements follows. The reverse end of the wire must be connected to a separate machine and connected to the network.
Hidden wiring will require large material costs and more installation time, and the appearance will not change much. Therefore, all novice masters prefer an open type of wiring.
If the skills to work with electricity are completely absent, it would be wise to turn to professional electricians.


Finishing inside and outside
The assembled country house is only half the battle. When the main stages of construction have been completed, it is worth thinking about interior and exterior decoration. Its main part is the lining of the ceiling, walls and floor of the gazebo. There are many options for cladding.


Polycarbonate
This material has conquered the domestic market relatively recently, but still remains very popular with craftsmen due to its undeniable advantages.
- Low thermal conductivity. This means that the walls will be able to retain heat inside the gazebo in winter and coolness in summer.
- Quality soundproofing. Extraneous external noise will not be a problem for a closed gazebo if it is sheathed with polycarbonate.
- UV protection. A special film on this material protects well from the heat of the sun. When laying, you need to pay attention to the fact that the film is outside, otherwise it simply will not perform its function.


- Waterproof. In a gazebo sheathed with polycarbonate, you can even be in a thunderstorm or heavy rain: it definitely will not get wet.
- Wear resistance. Even without special care, the material will last at least ten years.
- Flexibility. Due to plasticity, polycarbonate is convenient for finishing round arbors.
- Affordable price. Any summer resident can afford this material.
- Ease of installation. You can handle the sheathing yourself without the involvement of builders., And this is an additional savings.
- Large palette of colors. Opportunity to find suitable color material will help save on paint.


Polycarbonate parts are most conveniently mounted on a metal frame that can be pre-welded or assembled with bolts.
Polycarbonate cannot be called ideal for finishing a country house because of its shortcomings.
- chemical origin. For lovers of environmentally friendly materials, it is not suitable.
- The polycarbonate roof in the gazebo during the rain will respond to the impact of the drops with a very loud sound, which can disrupt the rest.


clapboard
Wooden lining- a good alternative to wood trim, while it costs much less. Often made of oak, pine, linden or aspen.
The advantages of lining:
- high thermal insulation;
- relatively low price;
- ecological purity and natural origin of the material;
- beautiful and versatile appearance that will fit into any interior.
For the outer skin, conifers will be optimal: spruce and pine. They contain a lot of resin, which creates additional protection from moisture.


Some features of the process self installation lining:
- before starting installation, it is necessary to treat the lining with an antiseptic to protect it from rotting and the appearance of fungus;
- often at the beginning repair work a lattice is installed on the gazebo wooden slats at a distance of 50 cm from each other, a lining is attached across these rails;
- you need to start laying from the corner of the gazebo (this should be done especially carefully, because the final result depends on the correct fastening of the first boards);
- screws or nails are used to fix the boards;
- during the laying process, from time to time it is necessary to check the evenness of the panels using the building level;
- the work is completed by coating the lining with varnish.


Siding
Siding is called a kind of plastic lining.
Advantages:
- moisture resistance;
- It does not require special care;
- resistance to temperature fluctuations;
- large color range;
- long service life;
- suitable for both interior and exterior decoration;
- fire safety.
Laying siding is similar to laying lining. Therefore, having such a skill, it is already possible to choose a material based on financial capabilities and color schemes.


Reinforcing mesh
If the issue of inexpensive seasonal design of the gazebo is relevant, then the reinforcing mesh will cope well with this. Its appearance cannot be called attractive, but it can become the basis for growing grapes, which later independently forms the natural design of the walls of the gazebo.
First of all, you need to purchase a mesh with section sizes of approximately 10 by 10 cm, and the thickness of the rods should be 7-8 mm. The next step is to cut the grid into pieces of the required size. It is better to bend all sharp edges to avoid cuts.
TO wooden wall the mesh is fastened with nails, to the metal - welded.


Rail
This material can only be used for buildings made of wood. In terms of functionality, it is close to the reinforcing mesh, but it looks a little prettier.
When sheathing a gazebo with rails, you need to consider several important rules:
- you need to choose parts no more than 5 mm in thickness and about 2-4 cm in width;
- on the wall of the gazebo, it is necessary to make a clear markup at the same intervals, depending on how it is decided to make the cells in size;
- installation is best to start from the upper left corner of the gazebo, attaching the slats diagonally according to the markings;
- laying the slats in this way, you need to reach the opposite corner of the building, after which you can proceed to the second layer, which is located perpendicular to the first.


Sheathing winter gazebos
If the gazebo is being built for year-round use, you should take care of its high-quality insulation. Here the standard exterior finish will not be enough - additional insulation is needed.
It could be:
- Styrofoam - inexpensive material with good ability to repel moisture;
- mineral wool - a natural moisture-resistant material that is good for its low thermal conductivity;
- felt is a more expensive material that has excellent thermal insulation.
For decoration inside the winter gazebo, a wooden lining is best suited.


How to decorate: design options
Now it has become fashionable to create a gazebo arrangement not just at random, but according to some particular style. Fortunately, people have been building gazebos for more than a year, and there are a great many original examples that can be taken as the basis for your construction.
A great idea would be to place a small oasis in oriental style in a large gazebo. It can be a fountain with fish or just an aquarium.
Draped mattresses will become ideal solution for sheltering seats and benches on the site near the gazebo.
A variant without textiles is also possible: carved elements or forged lattices as one of the walls of an open-type building.


Summer residents with artistic abilities often decorate their gazebo with openwork carving on wood, unusual designs from the roots and knots of trees, paintings from straw, statues from plaster or wood.
For stone gazebos, steps lined with decorative stone will be an excellent solution.
For a stylish design of a shaded corner, it is enough to plant climbing plants around the perimeter of the building. It can be a vine or a grape. These plants grow quite quickly, framing the hedge and enlivening the entire ensemble. Not only the walls and roof of the gazebo can become alive, but also benches, if plants are also planted near their backs.


When developing a design, you need to remember not only the appearance of the gazebo, but also its functionality. You should decide in advance where to equip shelves for storing dishes or, for example, place special wicker boxes for blankets and pillows.
For those who like to retire for reflection in a garden house and mentally merge with nature, a gazebo in Japanese style. Its main principles are the naturalness of materials in manufacturing and aesthetic minimalism in design. The Japanese style does not tolerate frills and pretentiousness, but at the same time, any building looks original and interesting in itself. Suitable for its construction stone blocks, wooden bars, slats.


Color is of great importance in the Japanese style. No bright solutions are allowed here, otherwise they will simply “block” the whole idea with themselves. Optimum shades - beige tones, pastels. The contrast of black and white is also appropriate. If the gazebo is made of wood, it would be logical not to puzzle over color solution, and leave it as it is, just varnishing the surface.
Many fans have a passion for oriental culture, but they do not understand how the Chinese style in design differs from the Japanese. And there are quite a lot of such differences, so these two styles cannot be put on a par.


The main feature of the Chinese gazebo is the bizarre shape of the roof with raised corners and unusual color and decorative solutions. The Chinese style is characterized by an abundance of gold and red, which is simply unacceptable in the Japanese style.
There is also no talk of minimalism here either: the Chinese gazebo should shine with wealth and an abundance of decorations. To decorate the gazebo from the inside, you can choose a Chinese-style sofa with many pillows decorated with different fabrics. Inside such a building, you can light aroma lamps or incense sticks to create a special atmosphere.


styles and design solutions there are a lot of them, you can even combine them competently if you have taste. Increasingly rare are pavilions in the classical Russian style, made of timber, with minimal finish and abundance natural materials, because every summer resident wants his site to be original and unique.
How to build a gazebo with your own hands, see the following video.