Do-it-yourself window installation will save up to 50% of the money that would be spent on installation by a third-party company. But it is very important to do everything right, otherwise the savings will be doubtful. For wooden houses, there are some features that you should be aware of.
Possible problems with incorrect installation of windows
It is advisable to adequately assess your strengths in advance, because some mistakes can become very expensive:
- lack of casing - a house made of timber during shrinkage “walks” and begins to put pressure on window frames;
- the use of mounting foam in the shrinkage gap between the top in the casing and the wall of the house - the hardened foam is very hard and will transfer pressure from the upper bars to the window frame, nullifying the functions of the casing;

- incorrect calculation of the dimensions of the plastic window frame - not taking into account the mounting gap, you will have to expand the window opening;

- too large a gap between the frame and the wall - with a simple foaming of such a gap, the slopes will always be cold, it is better to insert an additional expansion profile;
- lack of external protection of the mounting gap - foaming the distance between the frame and casing, with outside it is better to close the gap with PSUL tape, which provides foam protection from ultraviolet radiation, but allows moisture to evaporate;

- lack of waterproofing from the outside and vapor barrier from the inside - the foam is destroyed when exposed to the atmosphere, which leads to a deterioration in the insulating properties;

- placing the window in the "cold zone" - is the reason for the freezing of the slopes and the formation of condensate with inside

If there is the slightest possibility of making one of these mistakes due to inexperience, it is better not to save and order the installation of windows. For an experienced builder, do-it-yourself installation should not be a problem.
Pitfalls that plastic window manufacturers do not talk about
The tightness and high sound insulation of plastic double-glazed windows is presented as an undoubted advantage. But, unfortunately, not everything is so rosy. After all, the humidity in residential premises is constantly increasing, and thanks to leaky wooden frames, a constant flow of fresh air is ensured. Of course, too large gaps can make the house very cold, so euro-windows have long become a very popular product.
How to solve the problem with high humidity? One option is to make forced ventilation. But in the absence ventilation holes this can be problematic - you have to redo a lot.
It was for such cases that window supply valves were invented - special profiles that are installed on plastic windows. What is especially pleasing is the ease of installation. It is enough to replace part of the standard seal with a special one and fasten the valve to the window sash with several self-tapping screws. Unfortunately, the system will not work without an exhaust vent.
Another unpleasant surprise for owners of wooden houses is that companies that install plastic windows often do not guarantee their work, citing the unpredictability of wood behavior. So even with all the installation rules, you can find that after a few years the windows stopped opening. And you won't be able to sharpen the plastic with a file.
Manufacture of casing (pigtails)
The first thing that begins with the installation of windows - with the installation of casing. But is it always needed and how to do it right?
When you can do without pigtails
A new wooden house made of logs or timber will shrink in any case. And no one canceled the seasonal heaving of the soil. In this case, casing is required - it will protect the window from distortions, torsion or bends.

It is important to use only dry and durable material for casing boards - edged board 50 mm thick and edged timber 150x100 mm or 50x50 mm. The width should be equal to the thickness of the wall.
But in a frame house, you can not make a pigtail - the frame itself is already formed for window and door openings and provides the necessary rigidity. In a log house that has stood for more than 10 years, some builders also do not mount the casing, arguing that it has already undergone shrinkage and is not deformed. But for peace of mind in your home, it is better to do it, this process is not so complicated.
How to do a squash correctly

The last option is the most time-consuming, but also the most reliable. If there are doubts about your own carpentry skills, it is better to make a casing in a mortgage bar. For this:
- In the window opening, in the middle of the timber, two vertical furrows 5x5 cm in size are selected. This can be done both with a chainsaw and with a hand circular saw, chisel and axe. The second option is preferable if the hand is not stuffed for precise work with a chainsaw.


- On top of the mortgage bar is laid edged board and fixed with self-tapping screws flush - two at the top and bottom. To do this, a small recess with a diameter slightly larger than the screw head is pre-drilled.
- If the “thorn-monolith” casing option is chosen, then the previously sawn T-shaped element is simply driven into the groove and also screwed on with self-tapping screws.
- Vertical elements should not reach the upper edge of the opening by 8 cm - so that the top laid on them with a thickness of 5 cm is at a distance of at least 3 cm from the wall beam. This will be the shrink gap.
- The tip should enter the grooves with little effort, and not move freely in a horizontal plane. It is also fixed with self-tapping screws screwed in at an angle.
- The insulation is laid in the shrinkage gap and closed on the inside with a vapor barrier, and on the outside with a windproof membrane. In no case should the insulation be covered on both sides with vapor-tight films - the accumulated condensate will cause mold to form on the wood adjacent to the insulation.

And this is how the casing is done “in the deck”:
When the pigtail is ready, you can proceed directly to the installation of double-glazed windows.
Do-it-yourself installation of plastic windows
The installation of double-glazed windows is not very complicated, but it requires precise adherence to the technology. Otherwise, the window will almost certainly condense, and the frame will warp.
Checking the delivered double-glazed window
In no case should you neglect this moment! First, the dimensions of the window opening and the double-glazed window are checked. So, if the opening is 184 cm, then the window frame should be 180 cm - the gap between the side posts and the wall cannot exceed 2 cm on each side. The height of the window opening, for example, is 120 cm, then the frame itself should be 116 cm, and at the bottom there is also a support profile (clover) of 3 cm. Thus, the gap on top will turn out to be 1 cm. it needs to be left a place at the window calculation. It is needed so that the window sill can be installed from the inside, and the ebb can be screwed on the outside.

If mosquito nets are planned on the windows, it is also necessary to check the presence of fasteners. Handles are often “lost” as windows are transported without them. But pins - special fasteners, you need to select yourself.

Their length should be such that, when fully screwed in, they reach only to the middle of the casing. And that's with clearance. If the dowel is screwed into the wall wooden house, the window will begin to deform regardless of the presence of a pigtail.
Often they do not pay attention to small elements - decorative overlays, fittings and drainage holes. They also need to be counted. But the window sill and the ebb must be ordered - forgetting to clarify their need, you can find that the windows arrived without them. For installation, you will also need special linings for the glass itself - their presence can only be seen by disassembling the double-glazed window.

They may not be included in the kit, so it is better to order them in advance. Wedges are convenient because, thanks to their different sizes, you can set the frame evenly by simply placing a wedge of the desired thickness under the corners and racks.
Dismantling and preparation of double-glazed windows
The finished double-glazed window is brought assembled. But to install it, you have to disassemble everything to the frame. For this:
- when closed, the upper pins holding the swinging sash are removed with a special key;
- the window handle is inserted, the sash opens and is removed from the lower mounts;
- glazing beads are knocked out from the inside of the window and double-glazed windows are removed - you can use a hammer and a regular knife;
- you need to remember or designate the right and left glazing beads;
- from outer side removed protective film- under the influence of the sun, after a few months it will no longer come off;
- external elements are mounted - mosquito net holders and decorative plugs for drainage holes;
- holes for pins are drilled - first at a distance of no more than 20 cm from the corners of the frame, and then no more than 60-70 cm from each other;

Once the preliminary preparation is completed, you can proceed directly to the installation.
Installation of the frame and assembly of plastic windows
First, the frame is simply inserted into the window opening and temporarily fixed in it. For example, temporary jibs nailed on the outside. But it is much easier to do everything with an assistant - he just holds the frame until it is leveled and screwed to the casing. Frame installation also requires the correct sequence:
- The lower edge is aligned according to the level - the laser level is more convenient in this regard. Wedges of different thicknesses are placed under each rack so as to achieve a perfectly even position. Even minimal distortion will create problems during operation.
- Side braces are inserted to ensure the same distance from the walls. If the width of the window frame is too small and literally "falls out" of the opening, you can use a special expansion profile. This is much better than foaming the resulting huge gap.

- The frame is also aligned vertically. Do not forget that you need to install it in a "warm" zone - for wooden walls without external insulation, this is clearly in the middle.
- Once the frame is level, you can begin to mount it, starting with the side racks. First, holes are drilled in the tree through those already made in the frame, and then the dowels are baited. First, the upper and lower, with a mandatory check of the vertical, and then between them.
- As soon as the frame is fixed, the ebb is attached outside. Of course, this can be done as a last resort, but on the second floor it is not so easy to approach from the outside. The tide is inserted into a special groove under the frame, screwed on with two self-tapping screws along the edges, and under it the gap is filled with mounting foam.

- Decorative trims are put on the fasteners of the sash. The lower ones are put on the frame, the upper ones - on the sash. First, the sash is installed on the frame, and only then the handle is attached in the open state.

- Double-glazed windows are placed on special gaskets. Without them, the window may simply burst due to the emphasis on the metal parts in the corners of the frame.


- The mounting seam around the perimeter is foamed.
- The window sill is installed. To do this, a finished window sill is placed on the window sill, wedges are placed under it for leveling. The window sill is removed, its end and delivery profile are smeared with sealant, and the free space between the wedges is foamed. Again, the window sill is placed, pressed tightly against the profile and left until the foam hardens.

- In some cases, they do the opposite - first install the window sill, align it in level and screw it with dowels to the casing. And then a double-glazed window is placed on top of it. In this case, it is no longer necessary to align the frame horizontally. The only inconvenience is that the window sill material must withstand the action external environment. Of course, you can fix the ebb outside on top of the window sill and foam everything under it, thus protecting the wooden element.
Once the mounting foam has hardened, you can start finishing the windows.
Slopes for a plastic window in a wooden house

The easiest option that even girls can handle is to close them plastic panels. For this you will need:
- L-shaped or starting profile - it is screwed to the wall close to the window frame;
- decorative plastic corner - it closes the end of the panel from the side of the room and is also screwed with self-tapping screws;
- the plastic lining itself for the slopes.

And you don't even need to froth anything. But in order to provide the necessary protection of the mounting seam and good insulation, it is necessary to lay a heater between the wall and the slope and cover it with a vapor barrier. From the outside, the seam is closed with a windproof film - waterproofing with good vapor permeability.


And in order for the windows to please with warmth and comfort, it is very important to protect mounting foam from exposure to ultraviolet radiation, as well as from being taken away by birds. You do not need to restrain your soul's impulses if you want to start doing something with my own hands. And everything will definitely work out!
An integral attribute in the construction of a house are windows, which can be made of wood, metal structures and various kinds of polymers. Although the process of installing windows in log house seems simple, it can bring a lot of grief, if you do not take into account certain patterns when working with wood products.
An integral attribute in the construction of a house are windows, which can be made of wood, metal structures and various kinds of polymers. Despite the fact that the process seems simple, it can bring a lot of grief if you do not take into account certain patterns when working with wood products. The principle here is the same and it does not matter what the house is made of, from a log or a bar. In both cases, a casing bar is placed in the window opening.
Mark the window opening with a plumb line. In this case, a simple building level is not enough. For sawing a window opening, it is better to use a chain saw, which is now a large selection in specialty stores. Cut an opening to size with a saw so that the hole captures at least half of the upper and lower logs in the log house.
Using a chain or circular saw, or even better a milling cutter, select a groove 50mm wide and 50mm deep at the end of the wall. With a chisel and a chisel, manually clean the ends of the groove and nail the bar 50mm. It is important to take into account the humidity of the log house. Whether it is a fresh log house or already stood-shut down. In the presence of a log house made of fresh wood, the length of the bar should be 5 cm less than the length of the groove. In case the log house has shrunken by 2 cm.
Take a wide board, 50mm wide and nail it to the bar. The width of the board should correspond to the thickness of the log in the log house. Nail the boards to the top and bottom logs to form the window opening. It is better to use special nails for this, which are then drowned and the holes can be processed with putty.
For the accuracy of determining the angles, use a square when installing the window frame. Install the window on the mounting foam. Using a sheathing board, close the window from the outside around the perimeter. From the inside, close the layout. Sheathe the window opening with a board. Nail the board only to the lower log so that it does not create obstacles when the log house shrinks.
Mount the window on self-tapping screws and mounting foam. Mounting foam is best chosen in relation to weather conditions. It must be remembered that ultraviolet rays have a destructive effect on the mounting foam. Be sure to impregnate all wooden components with an antiseptic, which is sold in a wide range in hardware stores. Adhering to this technology and order, you will independently cope with this seemingly difficult task.
in a wooden house
Currently, more and more often PVC windows are installed in wooden buildings - it does not make sense to install ordinary log buildings wooden windows with extremely low thermal insulation properties. Specialists who deal with the problems of applying new construction technologies agree that it will be much more practical to use modern heat-saving structures.
Plastic windows consist of several key elements:
plastic frame made of PVC profile;
sealed double-glazed window with two sealing contours between the sashes and the frame;
fittings, thanks to which the inhabitants of the house have the ability to close and open the window.
It is extremely important that the installation of all these components takes place in compliance with the technological process - the installation of plastic windows in wooden houses has a number of features that are not taken into account by all specialized companies. At the same time, improper installation will have an extremely negative impact on the duration of the operation of the structure, therefore it is worth considering step by step how this process should be carried out.
In the first year after the construction of the house due to the shrinkage of the tree log house settles quite noticeably, sometimes losing up to ten percent of the height, because PVC windows cannot be installed directly into the openings. A drying log will put pressure on the profile, which can not only make it difficult to open it, but also damage the frame - and the owner of the house will need urgent window repairs.
To prevent such an unpleasant incident, the window is installed in the "casing" or "pitting" - that is, a special frame is assembled from the timber, which compensates for the shrinkage of the house walls. The frame ensures unhindered vertical movement of window blocks and enhances the strength of the entire building. Casing boxes are attached to the walls not rigidly, but through sliding bars. Therefore, it is necessary to pre-arrange vertical grooves in window openings.
Unfortunately, only a small number of organizations pay attention to this item during work, which means the inevitable repair of windows in the near future - unless the owner himself monitors the installation of the “pigtail”.  In addition, false covers should be used to give the windows a traditional look. They are a thin decorative profile glued on both sides of the glass.
Wooden windows in a wooden house: installation rules
Most people don't think wooden country houses no wooden windows. They warm the room and the soul, do not disturb the favorable microclimate in the house, and harmonize with nature. But the most important thing (if the windows are installed in accordance with all the rules) is the “tree-tree” principle: when the house shrinks, the structures of walls and windows behave the same way. The main thing to remember is that installing windows in wooden house differs significantly from the installation of windows in houses built using any other technology.
Theory
When installing windows in a wooden house, the main features should be taken into account natural material- drying out of wood and shrinkage of house structures. In houses made of rounded or chopped logs, solid planed or profiled timber in the first 3–5 years, shrinkage can reach from 6 to 15% of the height of the building. In houses made of glued laminated timber, shrinkage is much less - only up to 2%, but this will inevitably affect the integrity of windows and doors if they are installed. in the usual way. If the window structures are deformed, the sashes become tight (or completely stop) tearing off and closing, the double-glazed window is cracked, interventional cracks have formed in the walls, which means that the windows were installed in violation of the technology. To prevent this from happening, several rules should be observed.
Rule #1
In chopped houses, houses made of logs, planed or profiled timber, it is better to install window (and door) carriages after the house has given the main shrinkage, that is, after 1–1.5 years. It is not recommended to install windows and doors immediately after assembling the log house, since in this case it is impossible to calculate the shrinkage of wall structures. The amount of shrinkage depends on the moisture content of the wood: the higher it is, the greater the shrinkage of the house.
In houses made of glued laminated timber, windows and doors can be installed immediately after the assembly of wall structures and roofing. In such houses, the percentage of shrinkage is easier to calculate.
Rule #2
It is possible to install windows and doors in any wooden houses only using sliding joints (the so-called casing boards or casing and sliding bars). Fastening window blocks and casing to logs or timber is unacceptable! Rigid fastening during shrinkage will certainly lead to deformation of the window (door) and wall structures of the house.  In fact, window structures should move separately from the walls. To do this, cuts 50x50 mm in size are made in the window opening at the ends of the logs (or timber), and the so-called slip bar is inserted. A casing board (or box) is attached to this bar on tow or a tape seal (for example, from jute), and a window block is already attached to it. In this case, the screws with which the window block is attached must be screwed into the sliding bar (but not through). This technology will allow the walls to settle freely, without putting pressure on the window structures and without deforming them. Doors are installed in the same way.
Rule #3
From above, above the boxes of windows (doors), a margin for shrinkage is needed - gaps of about 6-7 cm in size. They are also filled with insulation (for example, tow). By the way, incorrectly calculated gaps very often cause windows and doors that do not close, and logs or timber hanging over the boxes lead to the formation of cracks in the walls between the crowns.
Rule #4
Platbands (both on the inside and on the outside) should be fastened with nails to the casing board, and not to the wall of the house. And finally, different companies provide a guarantee for the installation of windows for a period of one to five years. Be careful: according to the requirements of GOST, the guarantee must be at least three years.
1. If the grooves for the slide bar were not made at the factory, then, before making a cut, guide bars are installed. With the help of special equipment, grooves are cut exactly in the center.
2. A sliding bar is driven into the groove. At the same time, it is necessary to leave gaps for shrinkage of the walls above and below.
3. Before installing the casing boards, a heater is laid between the end of the log and the casing board (in this case, tape insulation made of jute).
4. Casing boards are fixed with nails into the slip bar. Important: the nail must enter strictly into the sliding bar, without entering the end of the log!
5. The upper casing board is installed and fastened so that a gap of about 6-7 cm remains between the upper casing board and the log, so that when the walls shrink, the upper log does not press on the casing salary.
6. A window block is installed in the casing.
7. Space between casing and vapor barrier film around the perimeter of the window is filled with mounting foam. The distance between the upper casing board and the log is filled with insulation and covered with a casing.
8. Platbands are attached strictly to the casing salary. It is impossible to drive nails into log walls, this will interfere with the natural shrinkage of the walls, which will lead to deformation of the architraves. When the house shrinks, the casing must move along with the casing and the window structure, regardless of the walls of the house.
9. Install metal ebbs.
10. After installing the tides, the lower element of the casing is fixed.
11. The window is ready.
Do-it-yourself window repair and painting
There are no trifles in repairs, because every detail eventually adds up to a common whole, on which depends how the apartment will look after the repair is completed. An important stage is the repair of windows and painting windows with your own hands. Let's take a closer look at the window painting process. This type of work requires tangible financial and labor costs, but the result, with due diligence, will please the eye!
When repairing windows yourself, you must follow certain steps. There are five steps in total:
removal from window surfaces old paint;
polishing the surfaces of window profiles;
putty windows;
priming window surfaces for subsequent painting;
window painting.
Compliance with all these steps will allow you to get an excellent result. You should not skip any of these stages, since each of them is important in its own way and, to one degree or another, affects the final result. To appreciate the importance of each of the stages and understand the subtleties, we suggest that you familiarize yourself with them in more detail.
Stage 1. Removing old paint from window surfaces
When repairing windows on your own This stage is the most significant and time-consuming. It can take a long time to remove the old paintwork, but it must be done. Moreover, it should be done carefully, and not anyhow. To do this, you may need a variety of tools from abrasive paper to sophisticated electrical equipment. The method of removing old paint depends on its type, there are three options in total: mechanical method, chemical method and thermal removal.
The mechanical method involves the use of so-called "cleaning" nozzles on orbital and straight grinders, as well as angle grinders (angle grinders). This method is the most economical and fastest of all. The only negative is the fine dust that appears during the work. But if the tool is equipped with dust extraction systems and dust collectors, this problem will not be so acute.
The chemical method is reduced to the use of special compounds based on strong acids or trinitrochloromethane.  The thermal method is perfect for living quarters. Building hair dryers are used to remove the paintwork. This method is quite expensive.
Stage 2. Grinding the surfaces of window profiles
After completion of the first stage, there may be residual defects on the window surfaces. As a rule, these are small pieces of old paint that could not be removed. On the wooden structures"pile" of wood fibers may also appear. And of course, that these defects must be removed, this can be done with the help of finishing grinding. Thanks to grinding, the surfaces of window profiles become smooth, which has a positive effect on the service life of the paintwork.
Stage 3. Puttying windows
At this stage of self-repair of windows, surfaces are puttyed. This process allows you to get an almost even surface to be finished, to hide visible defects. Before starting work, it is necessary to remove dirt and putty an already clean surface. After the putty has completely dried, wipe off the excess with a fine-grained mesh or abrasive paper.
Stage 4. Priming of window surfaces
The penultimate stage of do-it-yourself window repair is the priming of surfaces. This is done so that the new paintwork fits well on the surface of the window. Please note that before starting the primer, it is necessary to degrease and clean the surfaces.
Stage 5. Painting the window
The final stage of window repair is the application of a new paintwork. The paint should be distributed evenly, painting can be done with, or using a spray gun. Fulfilling self repair windows, do not forget that the paint should be applied in 2-3 layers. Before applying the next layer, you must wait until the previous layer dries well.
As you can see, do-it-yourself window repair has a number of features, it requires certain skills and a lot of time, so we recommend resorting to the help of professionals. Processed
The correct pigtail in a log house allows you to get beautiful and warm window openings in a short time. Precisely beautiful, not requiring further finishing of the slopes. Such a pigtail (casing) is a high-tech product, the production of which takes weeks from the zero cycle.
Appearance
- Polished product impregnated with antiseptic. It is pleasing to the eye and pleasant to the touch.
- From the outside, a quarter is selected in the box for installing a window or door frame
- All parts of the installed casing are fitted to each other with minimal gaps.
- The width of the casing is equal to the thickness of the wall. This allows you to install platbands immediately after the installation of windows.

Scheme of casing a window opening in a log house.
Specifications
- The casing box moves freely in the grooves selected in the walls and does not prevent the house from shrinking
- The moisture content of wood is within 12-14%. Such moisture remains in the blanks after forced drying.
- The groove in the casing for the installation of plastic windows or doors is selected at the factory and corresponds to the width of the frames of future windows
- The places of contact with the wall are insulated with eco-friendly insulation.
- The parts of the pigtail are interconnected without nails, in a self-locking lock. It will be good if the locks are additionally smeared with sealant.
- A wind lock is arranged under the bottom board, also insulated with, for example, jute fiber.
- In 2018, a glued pigtail is considered more reliable, that is, made from separate bars glued together under pressure.
 Proper casing does not require finishing slopes. That is why it is also called pure.
  The groove for installing a plastic window is clearly visible.
  The window sill is part of the casing.
  The window looks nice. Platbands will give the opening a complete look.
 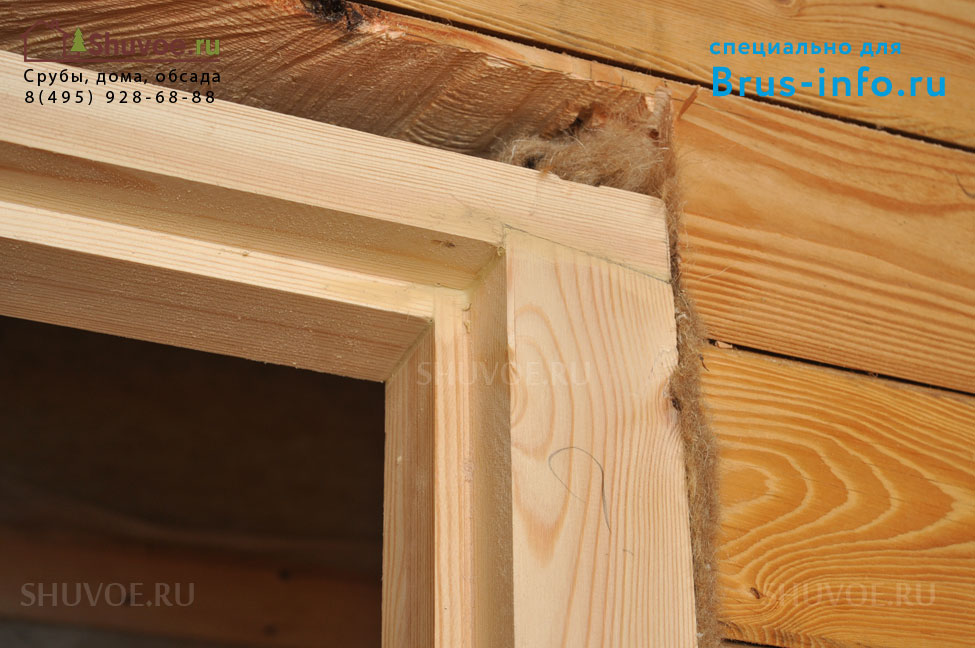 The seam between the casing and the wall is insulated. The lock securely fixes the casing details.
The finishing pigtail allows you to complete the stage of work with the closing of the warm perimeter log house in short time. At a cost, it can be more expensive than the windows themselves.
Draft casing
The only reason for the conscious choice of rough casing in a log house, in my opinion, may be the desire to install a plastic window sill and plastic slopes to match it. You can save only on the type of wood. Because in all other cases, imaginary savings end up costing more.
A quality draft pigtail should also be made from a dry board. Unlike the finishing one, a quarter is NOT selected in it. Windows are mounted on mounting plates, as in a stone house or ordinary apartment. Then these plates are closed with extensions, and the end face with platbands.

The option of finishing slopes with plastic extensions looks good along with plastic window sill.

Rough casing made of dry pine.
Mortgage bar
Unfortunately, out of ignorance, people often agree to low-quality rough casing. It is a board with a bar nailed along it, which is laid in a groove selected in the opening. Therefore, it is called "in the mortgage bar."

Poor casing
In addition to the cost of finishing slopes, you can get hidden problems:
- will lead the board when it dries, and it will pull the window with it
- the screwed bar can be bent and a gap is formed on the street
- self-tapping screws of the mounting plates can go through the casing and fix it to the wall of the house, thereby violating the very idea of the casing
Lumber for embedded casing is bought on the market. Board sizes are limited in width. So they can bulge out of the wall or be narrower than it. In this case, you will also get to the extras to the platbands.

Casing in a mortgage bar 1 year after operation. The bar moved away, there was little or no insulation at all. A gap was formed from the house to the street, it was impossible to sit near the window - it was cold!
Suitable formats and sizes
The pit of openings is necessary in houses made of ordinary, planed and profiled timber. It is highly recommended in houses made of dry and glued laminated timber. The main reason for its installation is the phenomenon of shrinkage, that is, a decrease in the volume of wood during drying. During shrinkage, the height of the sawn openings decreases, the timber in the walls can rotate and crack.
Ask a question about casing and windows in the comments and get a qualified answer. Questions are answered real people who have been working on the glazing of wooden houses for many years!
If you install windows without casing in a house built from freshly sawn or dried timber, then soon through cracks will appear between the bars on both sides of the window to the street - the timber will hang on the self-tapping screws that secure the window. A beam will also hang, which rests on the frame from above. That is, the entire upper part of the house will rest on the window frame. She won't last long. At first, the windows will not open well, then they will stop altogether. The frame will most likely warp and the glass unit will crack.
To prevent this from happening, casing boxes are installed in the openings. For log houses, a T and P type pigtail is suitable. It is easy to distinguish them, look at the end of the pigtail - it will look like the corresponding letter.

P-casing with a quarter.

T-casing made of solid wood with a glued spike.
Important! The dimensions in the tables are correct for standard window openings. If the length or width of the opening exceeds 2 meters, then set the casing with a thickness of 90 mm or more.
Differences in casing for windows and doors
The lower part of the casing of the window opening can serve as a finishing window sill. His appearance can be modeled to taste. For example, push the window sill into the room and expand the protruding part to the sides. It's called "with ears".
In another case, if the window is with a plastic window sill, the lower part of the window casing is made thinner than the rest of the parts. So it retains its function and does not interfere.
 Bottom with ears = excellent wooden window sill
 Window variant with plastic window sill. It also looks harmonious.
Door frame can be supplied without lower part. In this case, the bottom of the sidewalls is screwed to the wall with self-tapping screws - capercaillie. This method is optimal if a non-threshold floor is planned. Door casing without a threshold is often used. The technology has been worked out and the guarantee is preserved in full.
 Casing without a threshold on internal doorways.
This is where the differences between window and door frames end. The sides and top are the same.
How to make a casing with your own hands
It is difficult to make finishing casings for plastic windows on your own, but it is possible. To do this, you will need a planed dry timber or carriage with a thickness of 50 - 100 mm and a width equal to the thickness of the walls in your house. As well as jute tape, PVA glue, self-tapping screws, wood sealant, antiseptic impregnation, a brush. A construction stapler to secure the jute to the wall.
From simple tools you will need a hammer, chisel, building level, hacksaw, pencil or marker, ruler, corner. From power tools - chain or Circular Saw, electric planer, manual frezer. The help of one or two friends will not be superfluous at all.
Before starting work, decide what kind of casing you will do - P or T type. This depends on the size of the opening.
How to cut a casing profile
In a log house, we will make a T-pigtail, as it is easier to make with our own hands. Here you can do without a milling cutter, one manual circular saw, which can be rented.
Cut T - casing from a solid bar is too uneconomical. There will be a lot of waste. Therefore, we will use the option with gluing a spike into the sidewalls. In the market, such a casing is also called a thorn-monolith.
The final result of the work.
In a house made of profiled timber 150 x 150 mm, we need a planed board 150 x 50 mm, a bar 50x50 mm to make a pigtail. We mark the drawing as follows: on each part there is a quarter cut with a width of 73 mm (! frame width + 3 mm) and a depth of 25 mm, on the sidewalls in addition - a groove 53x10 mm for a spike.
Important: when marking the groove in the pigtail for installing the window frame, find out the thickness of the profile of this frame. Most often in middle lane Russia uses a profile of 70 mm. On the top we take a bar 150 x 50 mm.
 Windowsill. With a wind lock made of timber 150x90 mm and without a wind lock made of timber 150x50 mm.
Longitudinal cuts are made with a circular saw. If the depth of the cut is not enough, carefully cut down the remaining wood with a chisel. We also select the groove for the wind lock with a chisel or milling cutter.
And this is how the drawing of the sidewalls of a classic casing looks like. Her top and window sill are marked in the same way with the T-view.

Drawing of the side parts of the U-casing.
Size tolerance table
| Quarter Selection for frame installation |
The width will be equal to the width of the frame + 3 mm. The depth when casing a window opening depends on the height of the blind profile to the glazing bead and to the hinges. If the loop is close to the casing, then it will not be possible to fully open the window. Usually the frame goes into the quarter by 10-15 mm, another 10 mm is left on the mounting brackets. |
| Groove for stud insertion Lateral parts of the T-casing |
- 2-3 mm wider than the bar - depth 5-15 mm, depends on the thickness of the casing. |
| Groove for a wind lock in the bottom board | - 2-3 mm wider than the wind bar - depth 5-15 mm. On a thin window sill, the wind lock is not cut out. |
| Groove at the end of the wall of the house | Depth 10 mm deeper than the spike. The width is 5 mm wider than the spike. |
| Spike at the end of the wall of the house | The width is 5 mm less than the groove in the pigtail. The height is 5 mm less than the groove depth. |
Installation of classic P - casing
The technology for installing a pigtail in a house made of timber is as follows:
- Marking and cutting openings
- We mark a groove on the ends of the sawn openings. We select it. Or we form a spike if we chose P casing.
- We impregnate the openings and the part of the casing adjacent to them with an antiseptic, for example, Veres Base
- We warm the opening with jute tape
- We install the bottom part, then the sides and finish with the installation of the top
- Checking the geometry
- The free space above the tops is densely filled with jute
It seems simple, but as usual, the devil is in the details. I will try to show the process of installing the casing in a house from a bar 150x150 mm. If it is not clear, ask in the comments.

When marking openings, remember the golden rule "measure seven times - cut once."

Slowly and carefully form a spike on the side walls of the opening.

Use the building level. The window sill must be strictly horizontal, the sides - vertical.
When marking openings, proceed from the planned window sizes. Add to these dimensions the thickness of the casing (considering the chosen quarter) and the gaps for the jute. A sufficient groove width with a wall thickness of 150 mm will be 55 mm. How to correctly calculate the dimensions of the opening, wrote below on the page.
The groove is always 5 mm larger than the tenon. It will not hang out, you still need to insulate the opening with 1-2 layers of jute tape.


First, we insulate the lower part and install the window sill, then we insulate the remaining perimeter and mount the sidewalls. We close the casing by installing the top.

We coat the locks with wood sealant. No self tapping screws!

At the final stage, we knock protruding jute into the seams. The space above the top is also tightly plugged with it.

Let's check the geometry again. Profit!
The result of the work.
Installation video - very detailed
In the video, the house is not entirely made of timber. He is a monitor, but also with smooth walls. Well filmed all stages of the installation of the casing. A bonus is the visual installation of plastic windows and doors.
Video Timing:
- marking openings in the wall 0:20 - 1:07
- sawing 1:10 - 2:20
- marking the spike at the end of the opening - 3:30 - 4:05
- sawing a spike - 4:10 - 6:11
- impregnation of the opening with an antiseptic - 6:13 - 6:55
- casing impregnation with antiseptic – 6:56 – 7:06
- installation of casing with insulation of the opening with jute — from 7:08
- how it is mounted the last part casing - top - 7:54 - 8:05 and 8:20 - 8:30
- installation of doors and windows – from 8:35
- caulking seams with jute — from 11:06
Installation of T-casing in a log house
The technology differs only in that a groove is selected at the end of the openings. And the spike is formed from the side of the casing bar adjacent to the wall.
It is not difficult to make a groove in a bar or, in a simple way, a groove. In the drawing, I showed a view of the groove from above. After marking, you make two vertical cuts, then two more 45-degree cuts. Remove the cut out triangles and clean the middle with the tip of the chain. Or a chisel, if you are not confident in your abilities.

How and how to cut a groove in a bar - a view of the opening from above.
Making straight cuts with a chainsaw requires experience, a good eye, and strong hands. You can also cut a groove with a hand-held circular saw, and where it does not reach, modify it with a chisel.
Both types of pigtails are equally reliable. P-casing is a classic option that has been proven for centuries. T-casing appeared relatively recently, it is used for installation in houses with grooves cut during the construction of walls.
Tip: The cost of installing a pigtail for 1 opening in a log house from different companies is now in the range of 3500 - 5000 rubles. At the same time, you can order the production of casing without a proprietary installation.
Thus, you will receive finished casing profiles of the shape and size you need. To slowly install them in your free time, saving tens of thousands of rubles.
An additional bonus when ordering a finished pigtail is the choice of options, the independent implementation of which is very expensive. For example, you can order casing with the expansion of openings inside the house - this visually enlarges the openings and gives more light. Or order a final window sill.
How to connect pigtail parts - lock options
The locks connecting the parts of the casing vary in complexity of execution. The correct lock prevents the box parts from moving relative to each other. Both during the installation of a window or door, and during the shrinkage of the house. It also prevents connections from blowing through.
Options:
- connection in a quarter. The simplest in execution, often used for self-installation. Requires additional fixation with corners.
- connection in a quarter with reverse corners. A more rigid version also requires additional fixation. blown through
- dovetail or box tongue connection
- author's locks of casing manufacturers and installers.
 A quarter is the simplest and most unreliable lock.
  On the left is a box pin, on the right is a casing with an author's lock.
  The upper and lower locks in the casing, as a rule, are different in shape.
 Lock on top, factory cut.
How to calculate the dimensions of openings if there are dimensions of windows / doors
Take for example a window 1.4 by 1.2 meters in a house made of profiled timber 150x150. We will calculate the width and height of the opening for the U-casing with a thickness of 90 mm. The wooden window sill is the lower part of the pigtail.

Calculation on the example of a window 1400 x 1200 mm.
Initial data:
- window width 1400 mm, window height 1200 mm
- thickness of sidewalls - 90 mm, top and window sill - 60 mm
- depth of the selected quarter under the frame - 25 mm
- drank over the top - 70 mm
Formula:
Opening width \u003d window width + two casing thicknesses - two quarter depths + 5 mm for the gap between the casing and the wall on each side and 10 mm for the gap between the casing and the frame, also on each side.
1400+90+90+30–50 = 1560 mm
Opening height \u003d window height + window sill thickness + top thickness + 25 mm for gaps - two quarter depths + clearance above the top.
1200+90+90+25–40+70 = 1435 mm
The principle, I think, is clear. If so, ask in the comments.
Conclusions on self-installation
- Many install the casing with their own hands. So you can too.
- Always keep in mind that you need warm openings. An okosyachka is not an end in itself, but an intermediate stage when installing windows and doors in a wooden house.
- Remember that a house built from a bar of natural moisture shrinks by 10-15 cm per year. Leave enough free space above the top.
- The lifespan of windows and doors of your house depends on the quality of the pigtail.
- If possible, discard the rough casing in the mortgage bar.
FAQ
- When to install the casing, is it necessary to wait for the shrinkage of the house?
You can close the warm perimeter, that is, you can install windows and doors in the casing immediately after the construction of the walls and roof of the log house. Casing blocks do not interfere with shrinkage and at the same time keep your frames safe.
- Is it possible to install plastic windows without casing?
In a frame or stone house, you can. In a log house - you can't.
- Glued or from the array - which pigtail is better?
Now most companies work with glued wood (those who offer fine casing). Because on the market there is an array of pine and fir trees of low quality. Or at the wrong price.
- Do I need a pigtail in log houses built 5-10 years ago.
Need. Wood - natural material. Its humidity depends on weather conditions. And the timber in the walls will still "play".
- In a log house, we want to install the casing in a mortgage bar. It's much cheaper and faster. Why is that bad?
That's not bad. But it can be more expensive than proper casing. The draft box will require finishing - installation and fitting of extensions. check its quality too
- If you missed any points on the pigtail of a log house, ask in the comments.
Ask a casing expert!
measurers and managers of Shuvoe.ru LLC, the oldest casing manufacturing and installation company in the Moscow region, answer your questions. Since 1995, Shuvoe.ru has been professionally glazing wooden houses.
Thanks to their performance characteristics double-glazed windows made of PVC material have gained particular popularity among the population. They are mounted in buildings and structures built of concrete, brick, wood. It is necessary to insert plastic windows in a wooden house by following certain rules.
Important installation details
Starting the installation, you need to prepare the equipment that will be required: a building level and a plumb line, and also know how to insert a plastic window. It is necessary to install a PVC window, strictly observing the placement in the plane according to the level. This will provide correct work of all elements, the sashes will not open and close spontaneously.
PVC window installation technology involves its correct placement in the plane according to the level
When purchasing plastic structures, you need to buy additional special fasteners for installation. The frame is fixed in the pigtail of a wooden structure using self-tapping screws and special fasteners.. Observing technological process and correctly performing the installation of plastic windows in a wooden house, you are guaranteed to receive window blocks that will last for a long time.
 The window frame is fixed with anchor plates.
 If the sashes are dismantled, the structure will become much lighter and it will be easier to move it, however, mounting metal-plastic windows in a wooden house alone is still not recommended. To pull out the sash, you need to remove the pins from the hinges.
How to install PVC double-glazed windows
Do-it-yourself installation of plastic windows in a wooden house is carried out in stages:
- preparatory activities before installation;
- installation of PVC windows;
- control-checking the location in space;
- blowing foam.
To understand how to install plastic windows both in a wooden house and from a bar or log house, we will consider each stage in more detail.
Performing preparatory work
First of all, you need to remove exact dimensions, measuring the opening, and order a window structure from a trusted manufacturer. To do this, most often they invite a representative of a company that manufactures plastic frames. You can take measurements yourself. After that, they determine the color of the structure and the completeness of the fittings necessary for the functioning of the window.

When the manufacturer delivers the products to the site, the following steps must be taken:
- if the decision is made to replace installed windows in the old opening, first of all, it is necessary to dismantle the structure;
- after which they clean dust, dirt and remove debris that got into the opening from dismantling;
- it is worth aligning the opening if its geometry is broken.
Having finished the preparation, they insert a plastic window into a wooden house with their own hands.
Fastening the window structure in the prepared opening
We install the window sill first, it will be the basis for the double-glazed window, so you need to put it strictly in level (horizontally). For fastening strength, cuts are made on the sides of the box about 8 mm deep. Adjustment is carried out using plastic plates or planks. Fastening takes place with self-tapping screws to the bottom of the box. When screwing in, it is worth putting washers under the head of the self-tapping screw, this will prevent damage to the surface.
 The window sill is installed strictly horizontally
 The next step will be correct installation pens. The film that protects the structures should not be removed, it protects them from damage when windows are being installed. When attaching, the handle must be placed horizontally. When all the fittings have been assembled, the installation of metal-plastic windows begins.
First you need to set the PVC frame in level. A frame is placed on two-centimeter bars and leveled horizontally using a water level. After that, go to the vertical alignment.
Having obtained the ideal parameters at the water level, they fix the frame with self-tapping screws to the pigtail, using mounting fasteners that were specially bought in the store. It is important not to get a self-tapping screw into the crest of the log where the pigtail is installed.
 Fix the frame with self-tapping screws
After fixing the window element, we get 2-centimeter gaps around it for mounting foam.
Before applying the mounting foam, you need to hang the sashes so that after foaming the frame profile does not bend and damage the window. It is important to remember that foam can only be applied when the sash is closed..
Construction control and foaming
After hanging the sashes, you need to check how the double-glazed window opens and closes. If the window, which is half open, does not close and does not move further, then the frame is considered to be set correctly and the alignment is correct. Having closed the sash, foaming is performed with foam for installation and left for complete fixation for a day.
Why is casing made for plastic windows in a log house?
To obtain quality windows PVC in a wooden house, it is necessary to strictly observe the installation features, that is, to mount to a special frame (base). The need for such a design is due to the peculiarities of buildings made of wood. Unlike a building made of stone (concrete or brick), a wooden panel house is unstable over a long period.
 Casing prevents deformation of the frame during shrinkage of the house
 The building will sit in the first five years after its erection. In this case, the walls dry up to 6 cm. This important nuance must be taken into account when installing a plastic window in frame house. It is clear that it is impossible to simply insert a plastic window in a wooden house, it is necessary to create a structure for the opening, which has the name casing, they also say - a pigtail. Its direct purpose is to prevent wall shrinkage from affecting the frame, so the pigtail:
- strengthens the opening;
- bears the burden;
- prevents shrinkage.
An okosyachka looks like a box made of thick boards. The structure is fastened in the side rack to the groove, while fasteners are not used. Above the pigtail there is a shrinkage compensation gap for a wooden house. There are several options for installing it:
- a groove is cut in the log where the bar is placed. Self-tapping screws are screwed into the last element of the embedded beam;
- a groove is cut in the racks on the sides of the structure, a spike is cut from the end of the log in the opening;
- a groove is made at the end of the logs, a spike is located on the side posts of the box.
 Casing device options
 To get a high-quality design, you need to follow the technology for installing plastic windows in a wooden house. To begin with, they cover the ridges of the logs with insulation and fasten it with staples or small carnations. This stage is necessary to insulate the house and eliminate squeaks. Then the lower crossbar of the casing is mounted, and carriages (side racks of pigtails) are stuffed onto the ridges, the upper jumper is laid in the upper groove of the racks. After collecting the box, carefully connect it with self-tapping screws, it is important that they do not fall into the logs.

The cracks that are visible in the opening after the installation of the casing must be filled with tow or insulation. Then there is a standard installation of plastic windows in a frame house or log house.
 Cracks are sealed with insulation or tow
 The compensation gap is filled with flat planks pre-wrapped with tow. When shrinking, the walls are gradually knocked out. To do this, remove the upper casing and, having knocked out the plank, put it back.
The final stage in the glazing of a wooden structure
Finishing after PVC installations windows in a log house are made in the same way as wooden ones, that is, after installing the frame structure and insulation, wooden trim is installed. When ordering PVC windows in a wooden structure, you should look at the option for the wood texture, this will allow them to look harmoniously against the background of a logged structure.
Many manufacturers of PVC structures offer not only the classic white version of the frame colors. You can order any shade that the customer wishes. Colored plastic frames will cost a little more but become more suitable option for a house made of natural materials.
When ordering, it is important to correctly measure the opening and not make a mistake in the width of the window sill. Self installation PVC windows in a wooden house, knowing all the nuances, is not such a complicated process. You can do it yourself, without resorting to the help of expensive installers.
7732 0 0
Installation of a window in a log house: technology for self-fulfillment, plus a photo report on the work done
Greetings. In previous articles, I described in detail the technology of installing plastic and wooden windows in the opening of walls built of brick, concrete, foam concrete blocks and similar materials. But the installation of glazing in wooden buildings is carried out according to completely different rules, so installing windows in a log house with your own hands deserves a separate review.
Features of the installation of glazing in houses made of wooden beams
Installing windows in a wooden house is complicated by the fact that wood, unlike concrete, stone and brickwork, this is an unstable material that changes its geometry during the entire service life.
Someone will say that this is why a wooden house is built for shrinkage, after which the lumber demonstrates an unchanged configuration. But, in fact, walls built from rectangular or rounded timber sag slightly all the time.
These processes are less intensive in buildings erected using glued beams. But even this couple of millimeters, by which the wall will sag annually, is enough for the double-glazed window to deform and crack.
How to compensate shrinkage processes in wooden buildings and prevent breakage of plastic windows?
In fact, the solution to the problem was invented several centuries ago, when glazing began to be installed in the openings of the huts. The solution is simple - the window is not installed directly in the opening, but in a box, which is fixed in the opening by a floating method, that is, without direct fastening to the wall. As a result, the deformation of the walls is not transferred to the box and the window is not subjected to mechanical stress.
How windows are installed in timber houses
So, you decided to insert a window into wooden wall. Let's find out how to do it right.
In the following table, you can see the work that needs to be done in order for the window to securely take its place in the wall of a log house.

Let's take a closer look at how the work listed in the table is performed.
Manufacture of casing (pigtails)
Among the current varieties of pigtails, I note the following options:

- Casing in a mortgage bar (U-shaped) implies that a groove is made along the perimeter of the opening, into which the casing element is inserted directly;

- Casing in a deck (T-shaped) suggests that a spike is made along the side ends of the opening, directly on which the elements of the casing are put on.
At present, the U-shaped type of pigtail is most widely used, namely, such modifications as in a mortgage bar, in a tenon-monolith and fine casing.
The choice of materials for the manufacture of the casing is selected depending on the construction project:
- If the walls are built from a square or rounded beam without the need for subsequent finishing, a finishing material should be used to make a pigtail, for example, the same glued beam;
- If the wall is assembled from lumber for subsequent cladding with one or another finishing materials, for the manufacture of pigtails can be used draft materials, the appearance of which will be unimportant.
To make the opening and install the casing, you will need the following tools and materials:
- Chain Saw;
It is preferable to use an electric saw, as you will have to work indoors. But if there is no power tool, a chainsaw will do, but you will have to provide good ventilation inside the log house.
- Miter saw;
- Water or laser level;
- Plumb;
- Stapler with staples for mounting jute tape;
- Bar 150 × 100 mm for the manufacture of sidewalls;
- Board 100 × 50 mm for the manufacture of the upper jumper;
- Bar 50×50 mm
- Antiseptic solution for lumber processing;
- Jute tape to the width of the wall;
- Mineral wool for filling technological gaps;
- Window acrylic sealant.
Instructions for the manufacture of casing (pigtails) are as follows:

- In accordance with the ordered windows, we perform markup;
When marking, we make the width of the opening 150 mm larger than the width of the window. The height of the opening is marked with a margin of 50 mm for shrinkage plus the width of the board that will be used for the top lintel. To perform marking, it is best to use a laser level, however, if there is no such tool, you can use a plumb line in combination with a spirit level.

- According to the markup, an opening is cut out;
I do not recommend throwing out the timber selected from the opening. It is better to carefully assemble it and leave it for later to make any crafts, in last resort, if not useful, it will be possible to chop the bars on dry wood chips and use for kindling.

- We measure the height of the opening and, in accordance with the measurement, saw off two pieces of timber;
- We apply the sawn pieces of timber to the opening and level them;
- We mark the location of the leveled beam on one and the other side of the opening;
- According to the markup, we make a groove in the sidewalls of the opening for the width of the beam;
In order for the pigtail to last as long as possible, the groove must be treated with an antiseptic solution. If the price of special antiseptics seems high, the cut wood can be impregnated with mining, which has good penetrating power.

- We drive a beam into the groove made from one and the other side of the opening, so that a shrinkage gap of 50 mm remains in the upper part;

- We clean the bottom of the window opening;
- We saw off two boards along the height of the opening;

- From the end of each board, as shown in the photo above, we select a half-tree groove for installing the upper jumper;
- We fasten a jute tape on the sides of the opening with a stapler;
- We install pre-prepared boards on top of the jute tape, so that the notches made look inside the opening;

- We position the boards according to the level and fasten them with self-tapping screws, so that they enter the timber, previously hammered into the groove;
In order for the self-tapping screws to certainly not enter the wood in the groove, it is enough to correctly calculate their length. We have a groove depth of 50 mm and a board thickness of 50 mm, which is equal to 100 mm in total. As a result, to be sure that the pigtail will be held firmly and the beam will be floating, self-tapping screws with a length of 80 mm are enough.

- After the sidewalls are installed, we additionally measure the length of the upper jumper so that it goes into the recesses made in the upper part of the sidewalls.

- We cut the board according to the measurements taken and insert it into the upper part of the casing;

- We fix the installed board with self-tapping screws so that they enter the casing, but not into the opening;
- We fill the gap between the upper jumper and the upper part of the opening mineral wool or similar seal.
On this, the manufacture of the casing can be considered completed and you can proceed with the installation of the window.
Installation of a plastic window in a pre-prepared casing
At this stage installation work we need the following tools and materials:
- Electric drill and screwdriver with a set of drills and bits;
- Level and roulette;
- 5 mm hexagon and a slotted screwdriver for window disassembly;
- Metal shears for trimming the ebb;
- Plastic or wooden wedges for leveling the frame;
- Mounting foam.
Installation instructions are as follows:
- We measure the window that just arrived along the perimeter and correlate the resulting size with the dimensions of the inner perimeter of the pigtail;
According to the results of measurements in a wooden house, the gap between the frame and the pigtail should be at least 10 mm and not more than 20 mm on each side.

- Remove glass from frame

In order to remove the sash, we pull the pin out of the hinges. In order to dismantle double-glazed windows, you need to knock out the glazing bead around the perimeter of the glass. Look closely at the staple. For ease of dismantling, the manufacturer leaves a small gap between the frame and the glazing bead, into which the tip of the knife can be inserted.
- We carefully take the removed sashes and double-glazed windows to where they will not interfere and put them close to the wall so that nothing falls;
- We remove the protective tape, since there will be nothing to particularly stain the profile;

- We close the drain holes located at the bottom of the frame with plugs;
- We measure 200 mm from the upper corner of the frame and drill the first through hole with a 6 mm drill;

- We measure the same 200 mm from the bottom corner of the frame and drill a similar hole;
- Between two drilled holes we mark the location of the intermediate hole, with the condition that the holes are spaced apart from each other by no more than 600 mm;
- We mark and drill holes around the entire perimeter of the frame;

- After the holes are drilled, we glue the PSUL sealing tape along the end of the frame;

- Putting plastic inserts under each impost, we set the frame into the opening according to the level;
On sale are liners of various thicknesses, from 2 to 10 mm. But, if it is difficult to find special liners, you can use wood chips, which you can chop from the timber left after cutting the opening.
- Along the perimeter of the frame exposed in the opening, we pass with a drill along all through holes and drill holes in the wood;

- We fix the profile to the casing metal dowels 92 mm long (this length is enough to pass through the profile to enter the casing, but not to enter the perimeter of the opening);

- On the outside of the frame, we apply a low tide and make markings on it, along which it will be possible to cut it;

- We cut the ebb with scissors for metal, trying to ensure that the bend of the cut edge is directed downwards;
- At the bottom of the window there is a special groove into which the ebb is inserted;

- We fasten the ebb inserted into the groove with self-tapping screws to the profile;

- Raise the edge of the fixed ebb and apply mounting foam to the gap;
- Shutters are hung on the window and early dismantled double-glazed windows are installed;

- At the finishing stage, we blow mounting foam into the technological gap between the casing and the frame;
- After the foam dries, we cut off the influxes with a sharp one;
- In the subsequent stages, you can install trim or perform another type of fine finish at your discretion.
Output
Now you have general idea about how to insert a modern double-glazed window into the walls of the timber.
Of course, during the installation work, certain questions may arise. Indicate points that require clarification in the comments to this article, I will try to immediately give an exhaustive answer. If there is personal experience installing windows using a different method, tell us about it, I think everyone will be interested.
By the way, do not forget to watch the video in this article, maybe it will be useful for you.
October 9, 2016If you want to express gratitude, add a clarification or objection, ask the author something - add a comment or say thanks!