Pay attention to paving slabs. This material proved to be excellent, it is strong, durable, beautiful. Now there are many types paving slabs and everyone will be able to choose a suitable one for the facade of the house or just one that appeals to him. Laying paving slabs with your own hands may seem like a very difficult and troublesome task, but in fact everything is extremely simple. Paths in the garden can be paved with paving slabs over the weekend, and it takes about two weeks and a helper to cover a large yard.
Before proceeding with laying, you need to understand the main types of paving slabs. The main types of paving slabs are stamped and vibrocast. It is better to stop your choice on vibrocast paving slabs, which more than pays for a little more cost with a beautiful appearance and durability.
The thickness of paving slabs may vary. Usually the thickness of paving slabs varies between 20-60 mm. 20mm paving slabs are suitable for garden paths or areas that are guaranteed not to be driven by cars. In the yard, paving slabs with a thickness of 40-45 mm are most often laid. 60 mm tiles are laid where multi-ton trucks will drive.
The pattern of the tile can be anything, but it is not recommended for beginners to take on the laying of tiles such as "rhombus", "brick" and "paving stones". It is more difficult to lay such a tile, the masters ask more for working with it.
The color of the tiles can also be almost any, but it is worth considering that colored tiles are more expensive than gray ones.
This article discusses the technology of laying paving slabs with your own hands.
Materials and tools for laying paving slabs
- Sand. You will need quite a lot of sand (several tons), its amount depends on the area of \u200b\u200bthe yard, as well as landscape features.
- Paving slabs (the quantity is calculated by the manufacturer by quadrature).

- Border
- Cement

- Strong elastic thread
- metal pegs
- Hammer
- rubber mallet

- Shovel
- long rule
- Two steel pipes about an inch in diameter
- Rammer
- Wheelbarrow
- Level
- Master OK
- Buckets
- Broom
- Bulgarian with a diamond blade for cutting concrete

- knee pads

Laying paving slabs with your own hands
Decide on the slope of the site. A slope of several degrees must be present, otherwise, after rain, the water will stand in the yard. The slope is best done towards the street. If you decide to follow this advice, then the street level is taken as the zero point.
Drive two metal pegs into the ground along the zero line (the line to which the site will be inclined) and pull a thread between them. Check the levelness with a level. It is better to apply the level to the thread from below.

Tie another thread to one of the pegs and pull it perpendicular to the first. Tie the free end of the thread to a new peg and drive it into the ground so that the other end is slightly above the zero line. This can be controlled using a level (the angle of inclination should be a few degrees).

Tie another thread to the last hammered peg at the same level as the previous one and pull it parallel to the zero line, check the horizontal position with the level. Tie the free end to the fourth peg.

Connect the first and last pegs with a thread. As a result, you will get a rectangle marked with threads and lying in the plane of the future site with laid paving slabs.

Now we need to divide our surface into stripes. The width of the stripes is selected based on the length of your rule (the strip should be several tens of centimeters narrower than the rule). Set aside the selected distance from the zero line and drive a peg into the ground. Do the same on the opposite side. Connect the pegs with a thread, equalizing its height along the sides of the rectangle, perpendicular to the zero line. In the same way, divide the entire area into strips.
Now you need to align the site with respect to the markup. Where the thread is too close to the ground, the soil must be removed, and where the pits are too large, sprinkle. The gap between the soil and the threads should be approximately two tile thicknesses. All this is done by eye, no special precision is required.


The soil, especially where it was poured, must be carefully compacted. For this, a rammer is used. In our case, the rammer was made independently from a paw from a crane with a welded handle.

When the site is leveled, you can start laying paving slabs.
Prepare the sand-cement mixture. To do this, pour a bunch of sand right on the ground, gradually mixing cement there in a ratio of about 6 to 1. It is desirable that the sand be wet, so it is better to lay paving slabs in spring or autumn, when it is not very hot and rather damp.

Distribute the prepared mixture evenly over one of the strips.

Tamp thoroughly.


Under the threads marking the borders of the strip, lay the steel pipes. The gap between the pipe and the thread should be approximately one centimeter less than the thickness of the tile. The pipes must be strictly parallel to the threads and be at the same height.


Put on shoes and pants that you don't mind ruining, don't forget about knee pads. Kneel between the threads, pass the rule under them and draw along the surface of the pipes. You will see where you need to add the cement-sand mixture.


pour right amount cement-sand mixture. Start tamping it with your hands while stretching out the rule. You will have a flat strip, ready for laying. You can pick up some cement-sand mixture and sprinkle over the leveled area.


Prepare and carefully inspect the tiles, lay them in piles near the prepared area. The tile is basically all flat, but there are also defects. Some tiles can be convex (tortoise), concave (plate) and curved (propeller). It is better not to use such a tile and put it aside as a last resort.

Lay one tile, carefully leveling it along the marking axes.

Tap the tile with a rubber mallet, sinking it into the ground to the marking level.

Do the same with the next tile. The sequence of laying tiles is selected depending on the tile pattern.


Start laying paving slabs away from you. So, gradually moving forward, you will walk on a newly laid tile.

In the same way, prepare the base and lay the next strip of paving slabs.

If there are any obstacles on the way (in our case, a gas pipe and manhole), they need to be bypassed with whole tiles. The final trimming and fitting is best done at the end.


Tiles need to be swept after every working day. When laying between the tiles, gaps are formed that need to be filled. It is the process of filling the gaps that is called sweeping. For sweeping, we need dry sand and cement. They need to be mixed in a ratio of 1 to 6. Sprinkle the mixture evenly over the tile, and then brush it several times with a broom, filling the cracks.
Attention: sometimes when using a sand-cement mixture for sweeping, a white coating from the cement may remain on the colored tiles. This may be due to the quality of the tile, or the peculiarities of its production. Conscientious tile manufacturers in such cases are advised to sweep with clean sand. If in doubt, you can refuse to use a mixture of sand and cement, use only sand.


It is unlikely that your site will be perfectly rectangular, so you will not be able to do without pruning. Where to cut is determined locally. Trimming tiles is done using a grinder with a diamond disc for concrete.

If you want to make flower beds, mark them out with threads or chisels. Saw off the excess tile protruding beyond the borders of the flower beds.


Flowerbeds and edges of the site with laid tiles should be framed with a border. To do this, dig a trench along the edge with a trowel or a small spatula. The depth of the trench is selected based on the depth of the curb.


Install the curb sections and secure them to the screed with a thick mortar.


Near the curbs you will have cells where you need to lay the trimmed tiles. The soil in these places must be especially carefully compacted, as it could crumble when digging a trench.

Trim the rest of the tiles needed to fill in the gaps left by avoiding obstacles.
Where the tile comes close to the gate, it is better to lay it not on a cement- sand mixture, but on the solution, since in this place the load on the tile will be maximum.


This article discusses the process of laying tiles in the yard, but in the case of garden paths and a blind area, everything is much simpler and does not require such careful preparation.
Ennobling the local area, many owners often wonder how to cover the paths, front and back yards, recreation areas ... Paving slabs are great for these purposes. Functional coverage in landscaping is unparalleled. The price of the material is far from fabulous, and laying paving slabs with your own hands is quite simple to perform. So the design of paths and playgrounds on the site will not cost too much, and at the same time it will be a worthy frame for the garden and decoration of the local area.
Variety of colors, shapes and textures
This allows you to create a harmonious ensemble, combining all the elements of the site into a complete picture, and embody any design and architectural ideas.

Thanks to aesthetic appeal and excellent performance, paving slabs are indispensable in landscape design
Environmental friendliness and comfort
Paving slabs do not emit harmful volatile substances when heated and do not soften under the scorching sun. Sand-filled tile joints allow excess moisture to seep through after rain, preventing the formation of puddles.

The path paved with tiles does not violate the natural need of plants on the site for water and gas exchange
Ease of maintenance and durability
Paving slabs are an ideal coating in frosty winters, they have high strength and low abrasion.

At quality styling tiles can last more than 15 years
Both the technology of laying paving slabs, and the subsequent care of it, are quite simple. In case of damage to the coating, it is always possible to restore the area by picking up and replacing just a few tiles.
In order for the paved paths and platforms on the site to become not only an original addition landscape design, but also served regularly for many years, when carrying out work it is important to take into account a number of key points on how to properly lay paving slabs. For example, depending on the location and purpose of the coating, paving slabs can be laid both on mortar and on sand or gravel.
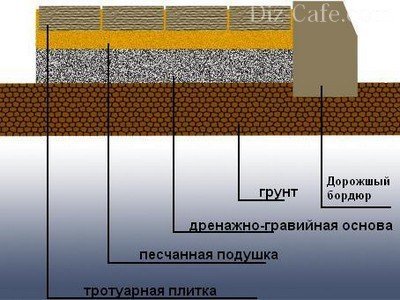
For the arrangement of garden paths and recreation areas, it is enough to use a sand-gravel "pillow"
Tiling work step by step
At the stage of preparation for laying paving slabs, it is extremely important to correctly select products from a wide range of goods and necessary tools which will be easy and convenient to work with. When choosing a tile, it is necessary to focus not only on taste preferences, but also take into account performance characteristics material. So, equipping a recreation area or a covered carport, you should ask the manufacturer: is the tile capable of withstanding heavy structures or is it designed only for human weight.

Attention is drawn to the surface roughness, the shape of the product: are there any rebounds, will it need to be cut
To carry out the work you will need tools:
- Master OK;
- wooden or rubber mallet;
- manual tamper;
- metal or wooden pegs;
- ordering cord;
- building level;
- I-beam or pipe of any diameter;
- watering can or watering hose with a sprayer;
- rake and broom;
- cement M500 and sand.
To determine the number of tiles and raw materials for the base, it is necessary to consider the layout of the site, taking into account the location and size of its paths and platforms.
One of the basic rules for laying paving slabs is the need to equip paths with a slight slope based on 5 mm per meter so that water flows freely from them into wells or lawns.
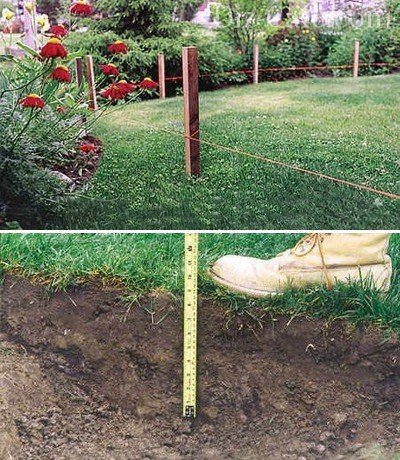
Foundation arrangement
The success of the entire construction directly depends on the reliability of the base surface. When arranging the base, along the edges of the location of the future path, stakes with notches at a height of 5-7 cm are hammered, at the level of which the cord is pulled. A layer of turf, stones and debris is removed from the construction site.
In order to lay any paving slabs with your own hands, you must first carefully prepare the base
To level the surface of the outlined area in elevated places, the excess layer of soil is removed, and on the depressions, pits and hollows, on the contrary, it is poured. The base leveled with a rake is carefully compacted. When working with soft soil, it is advisable to moisten the leveled soil surface with water before tamping. Careful tamping of the base will prevent uneven subsidence of the sidewalk.
The depth of the base is calculated with a margin of a couple of centimeters, taking into account the fact that shrinkage always occurs during compaction. On average, it takes from 20 to 30 cm to lay a layer of sand and the tile itself.

After excavation front side tiles must reach the desired level
The entire surface of the future track is given a transverse, longitudinal or longitudinal-transverse slope. At this stage of the arrangement of sites and paths, work is also carried out on laying communications. Laying geotextile before backfilling sand will prevent the growth of weeds between the tiles.
Creating a "pillow" of sand or gravel
Sand can be laid on the prepared base layer of soil, which will not only increase the stability of the sidewalk, but will also act as drainage system. The poured sand must be leveled with a rake and watered with water until puddles form on its surface. Already after 3-4 hours in sunny weather, the “pillow” can be given a smooth, even shape using a profile, which can also be an ordinary pipe or beam.
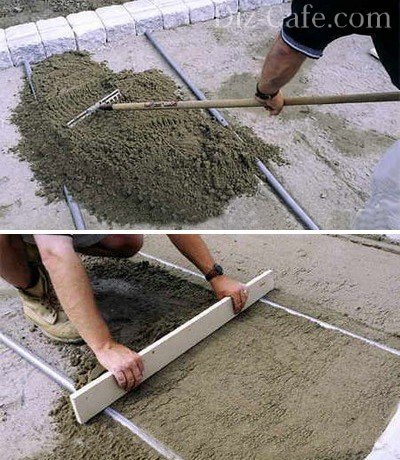
To level the surface of the sand layer, you can use inch PVC pipes
Pipes are placed like rails at a distance of 2-3 meters from each other. The gaps between them are filled with sand to the same height, providing a flat surface throughout the site.
To give greater strength to the coating, paving slabs can also be laid both on a crushed stone base and on a mortar. To do this, it is necessary to prepare a dry sand-cement mixture in a ratio of 3: 1. The mixture is laid out in an even layer on the base, the screed is performed with a channel. When working with “difficult” soils, it is advisable to use a combined laying consisting of a layer of cement-sand mixture and concrete.
Paving stone installation
Before laying the paving stones, it is necessary to stretch the cord-order along the chamfer. It is better to start laying paving slabs with your own hands from the curb. The first row is laid out strictly along the cord. The tiles are laid out in the direction "away from you".

It is necessary to place the "bricks" in such a way that they fit snugly against each other.
This will avoid an increase in the width of the seams. The use of crosses will make it possible to set equal intervals of 1-2 mm between the tiles. If the tile lays unevenly, you can use a trowel to remove or report a layer of sand under it and then compact it again.
It is necessary to level the paving slabs using the building level and a mallet. Upon completion of the laying of tiles, the seams are covered with a layer of cement-sand mixture and watered.

To give the path a neater and more attractive appearance, the tile joints can be “wiped” with quartz sand
If the tiles do not fit well with other buildings or landscape design elements, you can trim its edges with a grinder.
Upon completion of the work, debris and sand residues are swept away from the finished track. Installing the curb on the liquid mortar M100 will prevent the loosening of the tiles and the “spreading” of the track.
Video master classes with styling examples
In the future, it is enough just to renew the sand washed out by water in the seams of the paving stones. The path, decorated with paving slabs, will be an excellent decoration of the site.
This article discusses the principles of installation of curly paving elements (FEM), which will avoid errors and cost overruns.
The industry produces FEM different sizes, shapes, colors, produced using different technologies. Before laying the tiles, it is necessary to select and buy them in sufficient quantities, taking into account the cutting waste.
Manufacturing methods
Figured paving elements are made in several ways:

Color, shape and size
When buying a FEM, you should take into account some of the nuances of laying and operating paving zones:

Preparatory work
Before laying tiles in a parking lot or walkway, it is necessary to replace the arable layer with non-metallic material, provide slopes for gravity removal of drains, lay stormwater trays and storm water inlets, and mount curbs.
FEM is laid on granotsev, gartsovka or sand, adhesion with the base is completely absent. Therefore, before starting work, a rigid spatial box should be made from curbs or storm trays so that the tiles do not slide around the perimeter.
Breakdown of paving zones
The main tasks at this stage of landscaping are:

Important! The breakdown is made with cords / strings on pegs or cast-offs. For gravity removal of drains, a slope of 2 - 4 degrees on paths and recreation areas, 4 - 7 degrees on the blind areas is sufficient.
After stringing fertile layer soil is completely removed from the surface of the paving zones. After the organics inside it rot, the soil will inevitably sag, the FEM plane will be broken, and the coating will have to be repaired. When making a pit, you should consider:

Thus, for storm water and curbs along the perimeter of the parking lot or path, you will have to further deepen the trench by 10 - 15 cm.
Underlayment
For building underground structures, non-metallic materials are traditionally used as the underlying layer:

Soils are partially replaced by non-metallic materials, therefore, during the operation of paving zones, mutual mixing of sand / crushed stone with the adjacent soil occurs. There is a loss of bearing capacity, repair is required. To eliminate this process, geotextiles or dornite are laid under the underlying layer - an overlap of 10 cm, with a call to the vertical walls of the pit.
Important! Every 10 - 15 cm layer of sand in the underlying layer must be moistened before laying and compacted with a vibrating plate. Crushed stone does not need to be wetted, tamping is required.
Paving technology
The main nuances when laying paving slabs with your own hands on the site are:
- installation of a spatial box - stormwater trays and curbs around the perimeter;
- contact layer - washed sand, granotsev or gartsovka (a mixture of cement and sand in a ratio of 1: 6);
- leveling by beacons - backfilling the contact layer between the beacons and pulling with a rule;
- laying tiles - in front of you in the direction of travel;
- sealing and decorating joints - tamping with an areal vibrator and backfilling between sand tiles.
The main difficulties arise with layout schemes, facing steps and stairs, and trimming tiles.
Curbs and storm drain
Without rigid vertical elements along the perimeter of the paving area, paving slabs will inevitably begin to creep and lose their shape. Therefore, trays and curbs are deepened and mounted on the solution:
- laying the bed - the solution is leveled with a trowel;
- installation of a curb - the upper edge along a stretched cord;
- fixing the vertical level - a solution is applied to the side faces of the curb on both sides.

On straight sections, the curb is mounted close to each other; on turns, the concrete elements touch at one corner.
At the same stage, storm water inlets and storm trays are mounted:
- the storm water inlet receives water from the riser of the roof drain, therefore it is mounted directly below it;
- trays completely replace curbs, so there is no need to duplicate them;
- there are trays decorative grilles on which you can walk.

Storm drain inside the paving area.
Advice! It is forbidden to drain storm drains into the septic tank of the water treatment system country house to avoid overflow. Water is collected in a separate underground reservoir, then pumped out for reuse, such as irrigation.
Stairs and steps
FEM elements complete with curbs make it possible to manufacture stairs and individual steps on difficult terrain and when terracing a site:

Advice! Similar to sidewalks, it is better to adjust the width of the steps to the size of the tiles in order to avoid undercutting.
Solid tile and undercut
To put paving stones on your own without errors, you must perform the following sequence of operations:
- distribute the material of the contact layer over the base at a horizontal level, taking into account the thickness of the tile;
- lay solid paving stones close to each other, according to the layout scheme;
- cut the tiles to the size of the remaining unfilled areas at the junction with curbs, trays, storm water inlets, walls, wells;
- lay the pieces and fill the seams with sand.
The mixture of the contact layer is distributed over the beacons in two ways:

The second method is also used in the manufacture of dry screeds, the manufacturer produces kits that include a special rule and beacon rails. These kits are ideal for paving with FEM elements and do not significantly increase the cost per square meter of coverage.
Paving stones are laid from an arbitrary edge (usually from the bottom point) in front of you. The surface can be walked on immediately, which is very convenient for increasing productivity and reducing labor costs. Exists :

At intersections, any junction options are allowed with trimming and using FEM of a suitable format from other collections.
Seam backfilling and tamping
At the final stage of paving paving slabs, the following rules must be observed:

When laying on a carving or buying FEM, inside of which the hydration process has not been completed, it may be necessary to remove cement, white and other stains. It is better to do it right away, treat the surface of the paving zone with special compounds that increase the water, wear and frost resistance of the coating.
Thus, at each stage of paving paths and parking lots with paving slabs, several factors must be taken into account at once. However, the technology is available for self-fulfillment, but only if there is a vibrating plate that can be rented.
Advice! If you need repairmen, there is a very convenient service for their selection. Just send in the form below detailed description work that needs to be done and you will receive offers with prices from construction teams and firms. You can see reviews of each of them and photos with examples of work. It's FREE and there's no obligation.
Making paths or sites in the country or adjoining area It will be much cheaper if you do all the work yourself. After all, laying paving slabs with your own hands is simple and requires a minimum amount of time.
Materials and tools
For laying tiles you will need:The tile itself: to determine the amount required square meters, you need to multiply the length of the track or the future site by its width;
Sand: even for small area you will need at least a couple of tons;
Cement M400-500;
Elastic cord;
Construction rule (a tool for leveling the surface) or long enough and perfectly even wooden beam or metal rail;
Bubble or laser level;
Trowel for laying mortar;
Mallet (hammer with a wooden or rubber head);
Manual or electric tamper;
Wooden or metal stakes;
Border tiles, it can be replaced with a metal pipe or an I-beam (a profile with a section in the form of "H");
Which tile to choose?
The main types of street tiles are:stamped (vibropressed): more rough, has a huge margin of safety, are used mainly in public places, including for the design of parking lots; in its manufacture, the sand-cement mass is subjected to shock pressing using special hammers;
Vibropressed paving slabs
vibrocasting (vibrocasting): it costs a little more, looks more attractive, due to the smoothness it is easier to clean from dirt and snow, can have all kinds of shapes and rich, bright colors; shock effects and temperature changes are worse; in the manufacture of sand-cement mass pressing is carried out due to continuous vibration.

vibrocast tiles
Thickness different types pavers can vary from 20 to 60 mm. Thin tiles it is laid mainly on the footpaths of private houses and playgrounds. On the territory adjacent to the house, where the intensity of its use is higher, it is better to use tiles of 40-45 mm. In places where cars pass near garages, it is advisable to lay durable 60 mm tiles.
Advice. paving stones complex shapes it is more difficult to lay, and there will be much more waste after cutting it.
Preliminary work
Before you start laying, you should determine the size and location of the tracks and the site. All communications must be laid in advance.Designated sites are aligned: garbage is removed from elevated places, excess soil, depressions and pits are filled up, then spilled with water, leveled with a rake and carefully compacted. It is advisable to carry out this entire procedure in advance to allow the earth to settle and compact.
In the places of the future track or platform, stakes are hammered, between which an elastic cord is stretched. In the place where the track passes, it is necessary to provide deepening 20-30 cm for laying a sand cushion and the tile itself.
To prevent water from stagnating on the paths, it is necessary to provide for a small longitudinal or transverse slope of several degrees, preferably towards the street. To determine the level of the slope, pegs are driven in from the zero mark to the end of the track or platform, between which a cord or a strong elastic thread is pulled. The horizontal position of its location is regulated by the building level.
Pillow of sand or gravel
Such a pillow will serve as drainage - through a layer of sand or gravel, excess water will seep into the ground. To protect against weeds, before filling the sand, a geotextile.To equip the pillow, sand or gravel is poured into the prepared 20-30-centimeter recess, leveled with a rake, spilled with water and tamped with a rammer. So that the tile does not loosen, and the path does not spread, it is laid along the edges of the path before they are backfilled. border from metal pipes , I-beams or curb tiles. To strengthen it, you can fix it on a concrete solution.

Cushion laying and tamping
Mortar tiling
Paving slabs are laid both on a dry mix and on a solution. concrete base it is better to use in places of high traffic and the passage of a car, as well as in the presence of moving loose soil. On denser soil and for pouring transition paths, it is quite possible to use dry sand-cement pad.When laying on the mortar, a concrete base is first prepared:
1. Cement M400-500 and sifted sand in a ratio of 3.5: 1 are first mixed, and then water is added to them so that the mixture is not too liquid and does not drain from the trowel. It should not stick to the walls of the container in which the mixture was mixed. For 3.5 buckets of sand you will need a bucket of cement and about 7.5 liters of water.
2. The solution is poured onto the pillow in an even layer about 13 cm thick.
3. Laying paving slabs should be started only after the concrete has completely dried. This will take at least 3 days.
Advice. When arranging access roads to the garage, before pouring the concrete base, lay a reinforcing mesh on the rubble.

Preparation of the concrete base
After the concrete base is fully strengthened, we proceed to the laying of the tiles:
1. She lays out strictly along a stretched cord, starting from the curb.
2. If desired, any coloring pigment and adhesive can be added to the tile mortar to increase the strength of the concrete.
3. To ensure that all seams are the same, it is advisable to place special plastic crosses.
4. Each tile needs to be moved slightly in place to distribute the mortar, and then carefully knocked into place with a mallet.
5. Trimming and fitting of individual tiles is done at the end, when you are completely sure that all tiles are laid in right order. Cutting is done grinder with a diamond blade.
6. To give external appeal in the future, dried seams can be rubbed with sand.

Laying on mortar
Dry laying
Paving slabs can also be laid out on a dry mixture of concrete and sand without adding water. Also, as in the previous case, it should be located on a cushion of rubble.1. You can stir the mixture directly on the ground. First, sand is poured (it is desirable that it be slightly wet), then cement is constantly mixed into it.
2. The prepared mixture is evenly scattered over the entire surface of the track or platform and carefully compacted with a rammer.

Mixture rammer
3. A curb, steel pipes or an I-beam are laid along the stretched strings.
4. With a rule or any even and long rail, the dry mixture is ideally leveled on the surface.

To press the tile, tap it with a mallet
6. The tile is laid away from itself. On the already laid tiles you will move on.
7. If the tile does not lie too evenly, you can remove it and report a layer of mortar.

The tile is laid away from itself
8. If laying is carried out on more than one day, so that the cement does not harden on the surface under the influence of moisture, after each working day the prepared path must be swept. Naturally, in this case, the solution does not need to be kneaded much - if the mixture is already covered, the area is completely filled with tiles.
9. If the tile is laid without mortar, upon completion of work seams are filled with sand-cement mixture, leveled and spilled with water.
10. Since garage doors the load on the paving stones will be maximum, it is better to lay it not on a dry mix, for cement mortar.
Many owners of private houses are interested in how to lay paving slabs. This finishing material now very popular for the design of adjacent territories. Paving slabs allow you to create not only ordinary masonry, but also a kind of multi-colored mosaic of elements irregular shape.
The main advantages of paving slabs
Not everyone knows how to lay paving slabs correctly. After all, it is relatively new material. However, paving slabs have already become more in demand than the well-known paving stones.
Among the main advantages of paving slabs, one should name such properties as:
- low cost;
- simple laying technology;
- durability;
- environmental friendliness;
- resistance to aggressive environmental influences;
- variety of shapes and colors;
- the ability to create bright and original elements of landscape design.
To lay out a path or a platform with paving slabs yourself, you do not need special technical skills and knowledge, only the ability to handle conventional tools. If during the installation process you strictly follow the procedure and try a little, everything will definitely work out.
How to choose a tile
Thick tiles (more than 60 mm) can withstand the weight of a truck with a full body. Such tiles are usually in the form of small bars. This gives the cladding additional strength.
It is not difficult to figure out how to properly lay paving slabs. The main condition for a novice master is to choose a small area for the first experiments. Best fit garden path. It is better to choose a tile in one color, square or rectangular.
Site marking and base preparation
First you need to calculate the area of \u200b\u200bthe track or area. It calculates the required number of tiles. You need to purchase material with a margin of 10-15% in case of damage to the material. In order not to be mistaken in the calculations, you can draw a plan for the future site. This will facilitate the necessary calculations and calculations.
Curbs are needed along the edges of the path. This will help maintain the integrity of the structure. The border should be several times thicker than the selected tile. Laying tiles is necessary only on a properly prepared base, it depends not only appearance but also structural strength.
 The right base for paving slabs
 To fulfill all necessary work you will need the following tools:
- shovels - shovel and bayonet;
- grinder saw;
- spatulas;
- rule;
- building level;
- roulette;
- rubber mallet or mallet;
- twine or cord, woods;
- Master OK;
- rake;
- mixing container.
First you need to outline the location of the track or platform. To do this, pegs are driven into the ground on both sides of the track. A cord or twine is tied to them. You need to walk along the marked area in different directions in order to determine the correct marking and the optimal location of the site or track. In the course of work, the markup can be adjusted.
drainage system
Do-it-yourself technology for laying paving slabs requires drainage work. On clayey swampy ground with a high location ground water internal drainage required. To do this, in the process of excavation, the required slope is formed, drainage pipes are installed to drain the water.
On dry soil, it is enough to arrange external drainage. To do this, paving slabs on the path are laid with a slope of 2 or 3 ° towards the curb. Some of the water will seep through the seams between the tiles.
Foundation construction
Under the foundation you need to dig a ditch. The top layer of soil is removed to a depth of 20 cm. Remains of vegetation must be removed. The bottom must be leveled and compacted. If the soil is very weak, a concrete screed is laid under the future construction of paving slabs. This will strengthen the foundation and ensure the longevity of the walkway or playground.
 Reinforced concrete base under paving slabs
 Then the curbs are installed. Between them, a pillow of fine-grained (10-20) crushed stone or gravel is poured. Bulk material must be leveled and slightly compacted.
Borders on both sides of the track must be installed in parallel. Inner space between them should accommodate the required number of tiles. In this case, it is necessary to take into account mounting gaps of 2-3 mm. Then a mortar for concreting curbs is prepared. Cement grade M300 or higher and sifted sand are taken. Proportion 1:2.
The gravel pad at the bottom of the trench is covered with coarse wet sand, which must be leveled. The thickness of the sand cushion after sand compaction should be at least 3-5 cm. To control from the top edge of the curb down, you need to measure 1.5 tile thicknesses.
Tiles are laid on top. If its position exceeds the desired level by 1 cm, the sand can be compacted. To do this, the finished pillow must be moistened abundantly and left for several hours. Tamp tightly. A day later, you can start laying tiles. The main thing is that the concrete poured under the curbs is completely frozen.
Laying tiles on sand and gravel
Tiles are laid in clear, dry weather. Wind, rain, dampness complicate the installation process and can worsen the result, especially if the master does not yet have the necessary skills. The path is laid out in the direction away from you, it is impossible to stand on a sand and gravel cushion during work.
Before laying paving slabs with your own hands, you need to prepare the mounting mixture. For it, dry, sifted fine sand and cement are taken in a ratio of 3: 1 or a ready-made composition purchased at a building materials store.
 Laying tiles on cement-sand mixture
 So that the track can be dismantled later, the tiles need to be laid only on the sand. Dry mix or sand is poured to a thickness of not more than 4 cm, you need to level the pillow. When backfilling, you can use guides from reinforcing bars, tubes, etc. The mixture is distributed over the working surface with a trowel or rake and leveled using a rule.
If the path is narrow, sand is poured between the curbs and leveled with a trowel. With the help of the level, you need to arrange a drainage slope. During work, the master moves along the length of the path, holding a bucket of sand and tools at hand. On a wide path, the dry mixture is poured over the beacons. The height of the beacons is reduced by 1 cm every meter of the width of the future track to ensure water flow.
 Alignment of the base on the beacons
 On top of the finished masonry, you need to fill in the sand and grout the laid out surface with a hard mop. Instead of sand, you can use special grouts. The order of work with them is indicated on the packaging.
Laying tiles on a concrete base
Preparatory work for laying paving slabs on a concrete base is carried out in a similar way. First, the tile is laid on a work surface covered with sand.
To prepare the mortar, use M500 cement. It must be diluted with water to the desired consistency. It is better to mix the solution with an electric drill or a construction mixer. Gradually add sand to the mixture of water and cement. It should be 4 times more than dry cement.
When laying on concrete, a strict sequence must be observed. Tiles are removed one by one from the sand cushion. For 1 time, you need to remove 4 elements of preliminary masonry. A solution is applied to the vacated area. It needs to be evenly distributed. Having laid the tiles on top of the mortar, it is necessary to trim and lightly press down with a mallet. When laying between the tiles, special spacers made of wood are installed to obtain the necessary gap. When the entire track or platform is laid out, the remaining solution must be removed from the surface.
Some rules for laying tiles
To laid material was smooth and beautiful along the entire length of the path, it is necessary to carefully lay out the initial row of tiles. Across the track, you need to stretch the fishing line with a drainage slope towards the curb. The first tile is installed 0.5 cm from the curb. In the longitudinal direction, laying is controlled by the level.
On the path, the tiles are laid diagonally and rammed with a mallet. Between the elements you need to leave a gap of 2 mm. The laid out row must be carefully examined and all errors immediately corrected. It is usually enough to correct the amount of sand under protruding or sinking elements. An evenly laid initial row is a guarantee that the entire path will turn out neat and beautiful.
 Rammer will speed up the work of laying paving slabs
 If non-whole tiles are supposed to be laid out in the masonry, they should be laid out last. To correctly outline the cut line, the tile must be attached to the installation site. A hacksaw is good for cutting tiles, but the work will go very slowly. Therefore, you need to cut paving slabs with a grinder. A diamond disc is installed on it. You can use a special knife. You need to work in protective glasses.
Sealing seams and cracks
When the installation of paving slabs is completed, it is necessary to close up small gaps. To do this, you need to prepare a cement solution with a high content of liquid glass. This will give the structure resistance to aggressive environmental influences. In the mounting seams between separate elements a mixture of sand and cement or sand is poured.
Sand for filling cracks and assembly joints can only be used clean. A small amount of organic elements or salts will subsequently lead to the appearance of small flora on a paved area. Plants will spoil the appearance of the structure and reduce its strength.
Compaction of sand is carried out with a hose with a narrow spray. The procedure must be repeated several times. Bulk material is added each time. The density of the backfill of the assembly joints will ensure the strength and durability of the entire masonry.
Options for laying paving slabs
Paving slabs allow you to create various shapes and ornaments in the local area. Can be used ready-made schemes laying or come up with your own version of the design of the track or platform.
The most common options for laying paving slabs:
- herringbone;
- network;
- checkerboard;
- random mix;
- circular pattern.
Using colorful elements different shapes, alternating styling options, you can create interesting compositions on the principle of ordinary mosaics or puzzles.
 Geometric laying of paving slabs
 Curly masonry is best done first on a site near the work site. This will allow you to correct individual errors or change something in advance. When the work surface is ready, the tiles are gradually transferred to it and stacked in the desired order.
To tile a round area, you need to make a primitive compass from wooden slats with pointed ends. With its help, a circle is drawn on the prepared area over the sand cushion. Next, the tile is laid out from the outer edge to the center of the site.
Use and care
A freshly laid paving slab path will be ready for use 2-3 days after all work is completed. To remove dust and debris, the path is usually swept with a broom and washed with a stream of water from a hose. Deep patterns with bright colors need to be cleaned more often and more carefully than ordinary masonry.
The sand laid in the tile joints is gradually washed out as the path or platform is used. Therefore, it must be topped up as needed. Damaged structural elements (such as cracked tiles) are easily replaced with new ones.
Paving slabs are unstable to mechanical stress, so they cannot be cleaned with abrasive powder. It is better to use sifted river sand.
Do not use strong chemicals to remove stains. A mild soapy solution is sufficient. It is applied with a soft brush and then washed off with a hose.
V winter time snow and ice must be carefully removed without using metal tools. Can be used with rubber tip. This will save decorative tiles. So that the path is not slippery, it must be sprinkled with ordinary clean sand.