A canopy over the porch is not only an aesthetic part of the house, but also a necessary element that protects the entrance to the house from heavy rain and ultraviolet exposure. Therefore, when building a house, the porch is given special attention. Thanks to the simple design, even a beginner can make a canopy on their own. How to make a canopy over the porch, and what materials will be needed for this?
Types of visors
On the independent production a visor or canopy takes several days. The shape of the structure depends on how difficult the work will be. There are several types of visor designs:
- single slope visor. A slightly inclined support or suspension canopy can be of a straight or concave design.
- gable canopy. The most robust design visors. It consists of two inclined surfaces. Due to this, the snow is evenly distributed over the surface, without creating a large load on the structure.
- Visor - tent. The device has a semicircular shape, which resembles a tent. The canopy completely covers the porch on both sides.
- canopy arch. Canopy rounded, covering the porch from all sides.
Despite the fact that the canopy and canopy have a similar design, they are mounted differently. The visor is mounted directly to the wall of the structure, and the canopy is attached to the beams. How to attach the structure, directly or to beams, depends on the main structure.
Material selection
except design features visors differ in types of material. The material used is wood, iron, polycarbonate, PVC, corrugated board, metal tiles. Each material has its own advantages and disadvantages.

Mounting methods
How reliable the structure will turn out and how long it will last depends on a properly fixed frame. You can attach the canopy to the wall in several ways:
- With brackets.
- By welding to the fittings built into the wall.
- The support beam is bolted to the wall.
Visor requirements
There are several basic norms and requirements that canopies and canopies over the porch should have. The design, made according to the required standards, will last longer:

Canopy over the door on supports
You can make a roof visor on supports with your own hands from any material. All work consists of several stages: installation of supports, assembly and erection of the frame, sheathing.

Sometimes spotlights are sewn into the visor, which can illuminate the porch in the dark.
Visor made of polycarbonate
To make a polycarbonate canopy over the porch with your own hands, you need to prepare a drawing and the necessary tools for construction. The project specifies the following design parameters:

The material used is metal profile pipes and polycarbonate sheets. Sheet thickness can be from 1 cm or more.
From the construction tool you will need: an electric drill, a screwdriver and a welding machine, as well as a construction level, a tape measure and a pencil. Polycarbonate sheets are fixed with self-tapping screws.
- From profile pipes assemble the frame for the canopy.
- All parts of the frame are welded and additionally fixed with stiffeners. Depending on the size of the canopy, the number of ribs is determined.
- Using a drill with a metal nozzle, four mounting holes are made in the frame.
- Next, we mark on the wall of the house places for mounting supports and attach the frame.
- Pipes are treated with a primer, and then painted.
- All end points are covered with sealing tape.
- Polycarbonate sheets cannot be installed back to back, as they tend to expand. Therefore, when mounting, a small gap is left between the panels.
- The area between the canopy and the wall is carefully sealed. This will protect the porch from water ingress.
- When everything is ready, the polycarbonate is removed protective film.
What's in fashion?
 At present, instead of the usual canopy over the porch, awnings began to be used. Awnings are a fabric roof that is installed not only over the porch, but also over the windows. Advantages of marquis:
- It has waterproof functions, perfectly withstands hail.
- Does not fade in the sun.
Modern models are equipped with retractable systems. The angle of inclination and the level of opening of the canopy can be adjusted depending on the position and intensity of the sun. Along with the awnings, additional stands can be purchased. Racks are installed in front of the house in the ground, a canopy is attached to the top - it turns out a magnificent gazebo.
The surest way to do the work with your own hands with high quality and "for centuries" is to work with material in the processing of which there is certain knowledge and skills. The easiest and most reliable way to build and install using welded metal profiles and corrugated sheets. In the garage of anyone who loves to work, build, or just tinker, there will always be a grinder and a welding machine.
Choosing a canopy design
Most of the most whimsical and elegant wrought iron porch canopies are, in fact, identical in functionality to welded steel frame structures made of metal profiles. They are, of course, more elegant and beautiful, but in terms of functionality they do not have any special advantages.
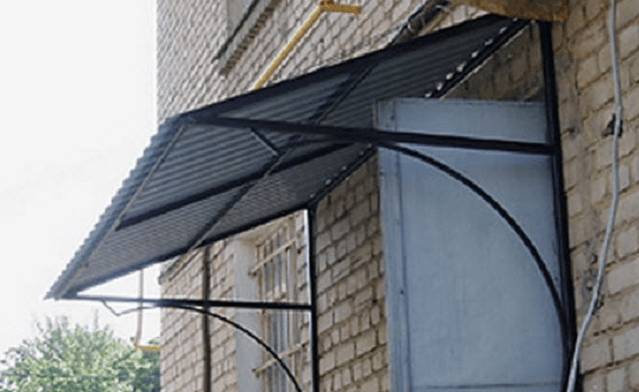
The most acceptable in construction, practical and affordable to make with your own hands is the design of a visor with a flat surface and a small slope angle:
- Welded metal structures can withstand even the weight of a person, therefore they are quite safe in any rain and gusts of wind;
- The small weight of the metal canopy does not require massive welded support beams, the entire system is placed cantilevered on the facade of the building;
- In comparison with other options, the cost of welded metal structures for the construction of a visor is simply miserable, it will not exceed several tens of dollars, while the bulk of the costs will go to acquiring a metal profile or metal tiles, a set of spillways with your own hands.
Important ! The dimensions of the metal structure and the cross section of the steel square profile were selected by hand empirically and tested repeatedly on practical built products.
Everything related to the size of the corrugated board and the design of the drainage system, everyone is free to choose independently from their own considerations, they do not particularly affect the safety of the visor.
Dimensions, tool and metal profile for the visor
First of all, we need a tubular metal profile with a section of 20-25 and a length of 11-12m. Next - three meters of steel strip 3x20mm, two or three sheets of corrugated board or metal tiles 120x90cm, metal corner No. 50 and a dozen bolts - dowels used to fasten metal to concrete or brick wall, wooden planks or boards 20mm thick, self-tapping screws for attaching a metal profile.
From the tool you will need an angle machine with a cutting wheel for metal, an electric welding machine, a device for profiling a metal strip. Welds should be made using dried electrodes on black iron, 4 mm in diameter. Almost all of the listed materials are available at any hardware store.
We make the design of the visor
The design of the metal visor, as can be clearly seen in the photo, is an L-shaped frame structure. The flooring itself is based on two longitudinal and four transverse welded posts. Two lateral welded metal posts of the structure are welded to the flooring frame at a right angle, which ensure the rigidity and strength of the fastening of the canopy frame on the facade of the building.
Canopy welding work
We cut out longitudinal elements 200 cm long and transverse ribs 120 cm long from the metal profile blanks with a grinder. In addition, with our own hands we cut out two metal side racks 100 cm long. We mark all the elements and cut them off with a grinder with an allowance of half a centimeter, as in the photo.
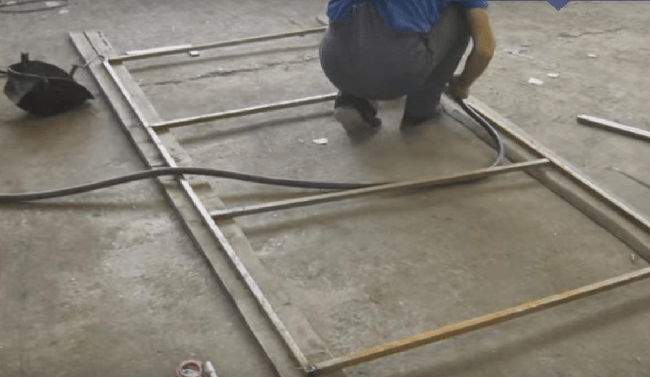
We assemble the set with our own hands in the following sequence:

Important ! The complexity of the work lies in the location of the welded parts in the same plane and maintaining right angles between the segments. Sometimes, before final assembly, you have to cut the ends of the racks to fit in size with other elements.
After completing the assembly work of the canopy frame, perpendicular to the plane, as in the photo, the side metal racks of the visor are welded, with which the entire structure will be attached above the porch.

Installing side consoles
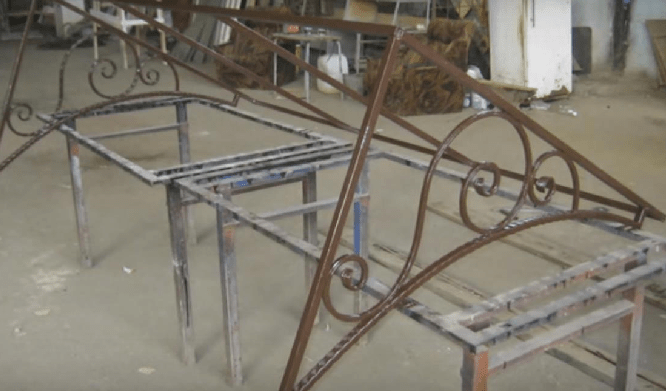
In the design of the canopy, designed for simple utility rooms, you can stop at the result and proceed to the process of fixing the flexible roof. But for the front porch, it would be nice to add small do-it-yourself decorative elements and be sure to install side arches or struts.
For each of the side racks, you will need one one and a half meter section of the profile. Both blanks are bent with an arc on a pipe bender, as in the photo, or using a manual machine along a radius of R = 3.5 m. If it is not possible to do it yourself, it is easier to order arcs in a locksmith's workshop. The arc can be fixed directly on the frame, to enhance the decorative effect it is better to use intermediate supports from the profile, 8-10 cm long, as in the photo.

Advice! Before assembling the arched struts, the side posts should be bent by 10-15 degrees so that the plane of the visor receives a slope or slope.
In the resulting space between the arc and the sides of the frame, you can insert several curls from segments of a strip of metal or scraps of wire rod. The drawing is selected with your own hands individually on a flat surface and, after assembly, is attached to the arc and the sides of the frame, as in the photo.

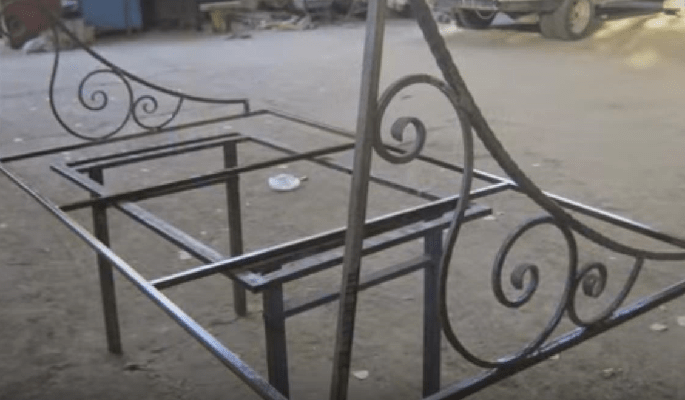
With a certain dexterity and imagination, they perfectly complement and decorate the appearance of the visor. After the assembly is completed, the structure should be primed and painted with “hammer” enamel with shades of old bronze.
Roof installation
At the final stage, the plane of the canopy is sewn up with a board with a section of 20x150mm every 15-20cm. This is enough to install corrugated board or sheets of metal. If you prefer to use soft roof, then the plane of the visor will need to be additionally hammered end-to-end with clapboard or OSB sheets.
The lower part of the visor, if desired, can be sewn up with a PVC profile used for wall cladding in the bathroom.
Installation of a canopy on the facade of the building
The weight of the visor structure turned out to be not small, at least 12 kg, which implies the use of at least 6-8 points of anchor bolted connections for fastening. This version of the visor is best fixed on a prepared base of metal strips.
Let's assemble an intermediate metal mount
According to the measured dimensions of the metal visor, we mark the fastening line on the facade above the porch of the building and according to the markings, using a perforator and dowels, we fasten strips of metal in the shape of the letter P.
For each side metal strip, 3-4 attachment points must be made; for a vertical longitudinal strip of metal, at least 3 attachment points to the wall are needed.
Next, with assistants, we hang out the metal visor with the help of a block at the place of the future fastening of the structure and fix it with improvised material. Using the building level, we adjust the horizontal position of the visor so that its side metal racks fit snugly against the previously fixed metal strips.
Most reliable way check the position of the visor above the porch - move a dozen meters away and make sure from afar that there are no distortions or tilts of the structure. In the absence of comments, we weld the corner points of the side posts of the canopy to the prepared metal base on the facade by welding.

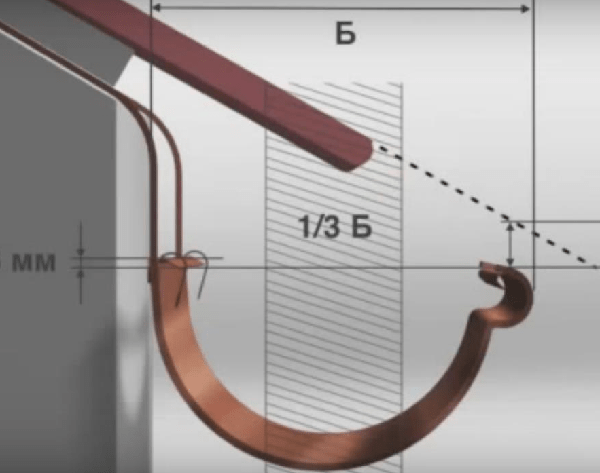
Installing gutters
Water flows are diverted from the surface of a metal canopy using a standard gutter made of plastic or metal with a set of fasteners. It is important not only to install the gutter, but also to properly adjust it.
The drain pipe is mounted directly on the metal longitudinal beam of the visor, they are not installed, as it often spoils appearance designs. It is considered more reasonable to use a second metal gutter, which will divert the main part of the water flow to a more convenient catchment area and will not affect the appearance of the canopy above the porch. In any case, one 2-meter main gutter and a 1.2-meter side auxiliary with an adapter to the drain pipe will be needed.
Conclusion
The metal canopy over the porch made of metal turned out to be somewhat heavy, but the metal frame is a 100% guarantee of a long service life of the product, high strength and resistance to rain and heavy snow. With proper work, the metal frame, if necessary, can easily withstand the weight of a person.

A similar design can be made from an aluminum profile, but for interconnection, you will have to use additional corners or adapters made of more durable metal. Itself metal structure this will make it twice as easy and beautiful.
The front door in a private house, or in a country house, is often exposed to bad weather: rain, snow, hot sun, wind. For these purposes and with a canopy. In addition to practical purposes, building a canopy over the porch with your own hands is a great opportunity to decorate the facade of the building, to give it originality.
There are those that differ in the materials of manufacture, the form of construction. In this article, we will look at how to make a canopy over the porch so that it serves as a reliable and beautiful protection for the house.


Why do you need a roof over the porch
A canopy over the front door is present in many homes. This building has several functions:
- protective. It is used as a structure that protects the front door from the scorching sun, moisture;
- ensuring the comfort of the inhabitants of the house. In bad weather, it is more comfortable to hide under a canopy by opening the lock front door;
- decorative. If the visor is designed to match the design of the house, it will decorate and complement the exterior of the structure.

The original design of the porch with a canopy, photo
Visor device
All canopies, regardless of their shape and material of manufacture, consist of two parts:
- frame. This is the base frame on which the entire structure rests;
- outer cover - roofing material.

Scheme of the structure of the canopy over the porch, photo
Types of visors for porches
According to the installation method
Depending on the design of the product and the method of its installation, canopies are divided into supporting and suspended. Suspended canopies are small in size and are fixed on outer wall building. The supporting structures are more massive, therefore they are installed on metal pipes or wooden beams.

Canopy mounting options
By shape
Peaks over the porch can be of various shapes:
- single and double slope;
- in the form of an arch;
- tented.
Also, the design can be open (without side walls) and closed (enclosed with blank walls that cover the area in front of the front door from the weather). Various options for the configuration of the visors will be demonstrated by the photo gallery.


According to the materials used
The frame of the hinged porch structure is most often made of metal and wood. Wood is more cheap material, easier to handle, but will not last long. have a long service life, but to make such a canopy over the porch with your own hands, you will need certain skills and special tools.
So for the manufacture of visors, rolled metal is often used. The base parts are either assembled by welding or bolted. In order for the metal frame to last longer, it should be well sanded, primed, and then painted before installation.
Attention: the metal base for the visor is quite heavy, this should be taken into account when drafting the canopy.Lighter are aluminum tubes and corners. The material bends well, can be easily cut, does not require additional processing.

Canopy over the porch made of metal (aluminum base)
The visors look luxurious. They amaze with a variety of shapes and configurations - carved leaves, curly stems, outlandish flowers ... The forged canopy over the porch is a real work of art. This is both a beautiful and reliable material that will add style and originality to any visor.
Please note: forged products - complex handwork so they are not cheap.
Various forged canopies over the porch, photo
A mansion made of logs or sheathed with boards will harmoniously complement the canopy above the wooden porch. This is an eco-friendly material that will emphasize the individuality of the building.
On a note: do not be afraid that it will not last long - there are special protective agents, impregnations that protect wood from decay.
Wooden canopy over the porch, photo
canopy cover
The materials for covering the visors are also striking in their diversity. Most often they are selected under the roof of the house, but it is not necessary to adhere to this rule.
Lightweight and durable material suitable for almost any coating is. From this material, you can easily make a canopy over the porch with your own hands. It is flexible and plastic, which allows you to make canopies for a veranda of any shape, even arched.

Canopies over the porch made of polycarbonate have a wide range of colors, which allows you to implement any design design
Coatings made of corrugated board (profiled sheet) look very practical and beautiful. This is a sheet of galvanized steel, profiled for greater rigidity. It is used for outdoor coatings. Sheds over the porch made of metal have similar qualities. But since this roofing material is quite heavy, the structures from it are made mainly of support, one or two slopes.
Advice: when making a canopy over a porch from a metal tile, when making a frame, take into account the pressure of the roofing material.
Profiled sheet, canopy over the porch, photo
Construction technology
How to build a canopy over a porch? First you need to decide on the materials. The easiest way for a novice builder to work with polycarbonate, so consider its installation. It is better for novice builders to start with a simple design without folds, with a slope for water flow.
Design
Before you make a canopy over the porch, you should make a design drawing. This will give a visual idea of what the porch of a private house with a canopy will look like after construction, help calculate the amount necessary materials, decorative elements.
The canopy over the porch should not be too narrow, as it will not protect from wind and rain. The optimal length of the overhang is 80 cm, and in width it should exceed the doorway by 40-50 cm. So that precipitation does not linger on the roof of the canopy, it should be slightly sloping.
Please note: the supporting structure of the porch canopy is constructed separately and installed ready-made.
Drawing of a canopy over the porch, photo
Preparatory stage
Immediately before installing a canopy over a polycarbonate porch, you should clear the construction site and prepare all the necessary materials:
- sheets of cellular polycarbonate with a thickness of at least 10 mm so that the roof of the canopy is stable;
- pipes from a metal profile;
- welding machine;
- screwdriver and drill;
- self-tapping screws;
- tape measure, level, pencil.

Cellular polycarbonate and special self-tapping screws with a thermal washer for its fastening
How to install a polycarbonate porch canopy
First, using a tape measure, a building level and a pencil, markings are made on the wall of the house. On it, according to the drawing, the main details of fastening the frame of the canopy are noted.

Further, the frame of the structure is made from profile pipes. It has a triangular shape. Pipes are connected using a welding machine. On the ground, the base is assembled completely or partially (it depends on its dimensions and weight).
The frame of the visor can have several jumpers, the longer it is, the more there should be. They significantly increase the rigidity and stability of the canopy structure.

Manufacturing scheme metal frame porch canopy
Advice: to make the welding seam less noticeable, it can be processed with sandpaper.Then holes are made in the pipes for bolts, and the structure is attached to the wall of the building. This is done using self-tapping screws or anchor bolts. In order not to make the structure heavier, polycarbonate sheets are fixed after the base is installed. The base of the visor should be fixed in four places: at the top and bottom from each edge of the product.

Mounting the hinged frame to the wall
Advice: installation of the base of the canopy should be carried out together with an assistant.After installation, the visor frame is primed and painted. After that, proceed to the installation of polycarbonate sheets. At the ends of the product, a special sealing tape is installed, which is inserted into the profile installed at the end of the frame.

Installation of polycarbonate sheets
Important: sheets of material should not be fixed back to back, under the influence of temperatures the material can expand. Also, the bolts should be fixed at least 4 cm from the edge of the sheet so as not to destroy it.To properly fix polycarbonate sheets, use this diagram:

Options for how the polycarbonate canopy roof is fixed
After installing the visor, the seams should be sealed where the canopy adjoins the wall. This will protect the front door from moisture. For these purposes, you can use a metal bar.

Joint sealing
After removing the protective film from the product - the canopy is ready for use. With experience, you can even build a rounded structure.

Polycarbonate canopy for the porch semicircular
Outcome
The porch is the face of every home. It gives the building uniqueness and originality. Therefore, the appearance of the mansion depends on it. And the roof of the structure will not only serve as an additional decoration, but also protection from the weather. There are many materials for its manufacture, and a variety of designs (from simple to more complex) allows you to install it yourself. With a little effort, you will create a practical and beautiful architectural element.
You can easily create on your own, armed with simple knowledge about technological processes. What should be the visor above the porch?
- A strong protector of the entrance area from weather surprises.
- A stylish handsome man who creates originality in the style of the porch.
In the manufacture of any interior detail, it is important to take into account not just your own preferences. From the entrance canopy, good indicators of durability and practicality are needed. To make a reliable visor over the porch with our own hands, we will act according to the plan:
- Let's choose the material of manufacture.
- Decide on the shape and design of the canopy.
- We will carry out the installation of the structure, taking into account the working nuances.
Material - everything is the head
The construction market pleases with its variety of roofing material, and we can only explore specifications and stop at the best offer.
Polycarbonate
Modern buyers most often choose this material. Beautiful, translucent polycarbonate visors have a number of advantages. They are:
- Resistant to temperatures (operating range is from -60° C to +110° C).
- Flexible. Polycarbonate is plastic, this feature makes it easy to design any shape of the future canopy.
- Impact resistant. Plastic canopies over the porch perfectly withstand falling icicles, snow clods, hailstones and heavy rain.
- Refractory. Such a visor is not afraid of fire - it is fireproof.
But this beautiful material, produced in a diverse color palette, has its drawbacks. Polycarbonate does not tolerate UV radiation well. If not cover it protective layer, your canopy will become cloudy after 1.5-2 years and lose its aesthetic qualities.
Metal
Inexpensive budget option. True, working with metal sheets is more difficult than with polycarbonate. Not everyone knows how to use welding machine, although welding can be replaced with mounting bolts. The metal canopy over the porch is durable, reliable, but also demanding. It will need to be protected from corrosion and more time spent on care.
metal tile
Excellent appearance of this material favorably distinguishes it from analogs. The canopy over the porch of has an unlimited service life. It is easy to install, lightweight, durable and does not require additional maintenance. Metal tile looks great with any kind of frame. And outwardly, such a visor will look very representative and chic.
Advice! If you make the construction of the canopy at the same time as covering the house, all work will be easier and cheaper. After all, the frame base can be made from residual materials.
But the metal tile also has disadvantages. It lacks soundproofing (if you like the sound of rain, this will only work for you). IN summer heat such material will get very hot, although this is not essential for a visor located above the heads.
Decking
A very popular material with the same advantages as a metal tile. It is easier to work with it, since corrugated sheets have a large area. The popularity of the material is due to affordability and ease of installation. The canopy over the corrugated porch is practical and will serve you for a long time without additional painting.
Keep in mind that corrugated board is mechanically weak material and even a small blow will remain noticeable on its surface. But you can always choose a thicker one for your favorite porch. sheet metal, with a pre-applied polymeric protective layer.
Choose a design
Our canopies above the front door should combine style and functionality. When choosing a design, consider the size of the canopy and the direction of the drain.
It is quite possible to make a lot of buildings in your house with my own hands, even without the help of masters - there would be a desire and patience to deal with the sequence of work. The canopy over the porch requires knowledge of the basics of welding, knowledge of the basic concepts of the strength of metal structures and design, and, of course, a good eye.
What should be the visor above the porch
In the modern variety of building materials, you can implement any of the visor options that you like, or come up with your own. There are not many basic design requirements:
- The strength of the visor and the reliability of protection over the porch;
- Reliable protection of the front door and porch from rain, snow, icing roof icicles, birds;
- Relatively simple and attractive design that organically complements the look of the house, photo;
- Ease of manufacture, availability and low cost of materials;
Advice ! The design of the slopes of the visor should direct and discharge rainwater in a convenient direction, without creating puddles and ice on the porch.
Optimal visor design
If we analyze the main structures and projects of the canopies, it becomes clear that some of the canopies were made for purely decorative purposes, and some are simple and primitive options that do not quite successfully close the porch and doors.
The most attractive in practical use is the do-it-yourself one with an arched, transversely curved roof, as in the photo.

You can list some of the advantages of this design over other options:
- The symmetrical arched scheme has high strength and rigidity to vertical loads, which is very clearly seen in the photo, painlessly endures strong gusts of wind in the lateral and opposite directions, which cannot be said about inclined and asymmetric structures;
- The low weight of the roof does not require a powerful skeleton and allows the visor to be made relatively light and openwork, with a large margin of safety, this reduces the risk of collapse of the structure in heavy rain or snowfall;
- A successful lateral direction of water drainage from the canopy does not require the use of special gutters and drains. If you use a shed canopy over the porch, water often flows onto the steps or by the scruff of those emerging from under the canopy.
In addition to practicality, compatibility of the design and materials used in the canopy project with the overall appearance and style of the building facade is of no small importance. For example, a nice version of a wooden gable canopy is not very suitable for a house with a pronounced urban architecture, but it will look perfect in country house, a photo. The arched visor is more suitable for buildings made of red ceramic brick with openwork fences, photo.

Making a canopy over the porch
Before you build a canopy over the porch with your own hands, you should acquire necessary equipment, materials and practice making individual elements designs.
List necessary tools and material
To build an arched version, we need:
- A manual device for bending metal strips along a given radius is the most complex and responsible mechanical operation, the beauty and strength of the entire structure depends on it;
- Electric welding with welding accessories, a dozen electrodes No. 4 for working with ferrous metals, a grinder with a cutting wheel, a welding vice-clamp for fixing the parts to be welded;
- tape measure, square, building level, puncher with a drill for drilling metal, brick and concrete, with a dozen anchor dowels and plugs for fixing bolts in the wall above the porch;
- Thin-walled steel profile of square section, No. 25, 15 m long, steel strip 50x4, 5 m long;
- Primer and paint to match your porch doors;
- A pair of sheets of cellular polycarbonate 8-10 mm thick, 2 or 3 pieces, depending on the size of the visor, a set of fasteners and compensating gaskets.
We make a frame-frame of the future visor
The first step is to accurately determine the dimensions of the location of the future visor above the porch. To do this, directly on the wall of the house above the porch, you need to make markings and determine the linear dimensions - the width and length of the frame, the height of the arch.

According to the measurements taken, it is necessary to make drawings and accurately calculate the height, radius of curvature and the length of the arched arcs. Cut off two steel strips of calculated length with a grinder and roll the strips in several passes on a bending device so that they match in curvature and the distance between the ends of the segments.
Well illustrates the process of rolling arcs for a visor over the porch video about the operation of the machine.

The next step is to cut segments from a square profile, from which we will later assemble the base of the canopy frame above the porch. Usually, welding work takes up the largest part of the time for making an arched visor, but you should not rush even if the simplest elements are connected, since the desire to do it quickly leads to a burn through of thin metal.


The assembly begins with the fastening of the arches on the upper part of the frame, then the structures are allowed to cool and the quality of the seams is checked by cleaning with a brush with steel bristles, it is necessary to make several control blows of the welded metal with a hammer. With the help of a clamp, the lower part of the frame is fixed relative to the upper one and is caught by spot welding in the outermost elements of the base. Next, the internal parts are welded and go to the external elements.

Next, you need to make vertical fastenings. These are the two vertical pieces that will be used to attach the canopy frame to the wall above the porch. They will have the main load, so it is better to use a steel square profile of 30 or 40 mm.

All completed welding seams must be cleaned as thoroughly as possible from scale, slag and a thorough inspection of the welding must be done. Most often, cleaning is carried out using a steel bristle wheel brush mounted on a shaft. Using an electric drill, the process can be completed in 30-40 minutes, while manual cleaning will take three times as long.
After finishing the stripping, we wipe the structure with a clean rag, then you need to mark the place for drilling holes for anchoring on the wall on the vertical racks. One of the holes must be made with a thin 5 mm drill at the highest point of the arc, which will directly adjoin the wall above the porch.

Painting and assembling the structure of the canopy over the porch
If a pin is driven into the hole drilled in the arc, this will help to correctly position the visor horizontally. We apply the frame to the installation site and mark it according to drilled holes places for anchor bolts. We drill holes in the wall above the porch and hammer plugs with bolts.

Before final assembly, the fabricated structure should be thoroughly cleaned from traces of corrosion and treated with a rust modifier. This drug is water solution orthophosphoric acid. After the solution dries, the traces of rust disappear, the metal can be primed and painted. Most often, soft colors are chosen for painting under old bronze or copper casting.
Installation of polycarbonate sheets is carried out with the installation of compensating washers and a gap between the joints, which allows the plastic to expand freely under the action of heat within the gap left.
Arched canopy over the porch
There are no ideal designs. At normal sizes, the arched visor is long and durable. But often a large area of \u200b\u200bthe porch is required, which must be covered with a visor. Therefore, in many cases, the owners deliberately deviate from the recommendations and increase - lengthen the reach of the visor over the steps and porch.
If you have a large stepped porch and some of the water and snow remains on the steps, it makes sense to make and install a more "adult" version of the arched porch. In this case, the longitudinal beams of the structure are simply lengthened, which makes it heavier by 20-25%, respectively, the weight of the frame and the weight of snow sticking to the roof increase.
When the canopy extension is extended by 15%, the load on the cantilever mount will increase by more than 50%, and there is almost no margin of safety left. Therefore, it is better to immediately provide for the possibility of upgrading the project in the design. Most often, two additional steel cups are welded in front of the frame, into which two additional supports will be installed and fixed.

Conclusion
Arched canopy options are easily modified and improved even without dismantling and making major changes to the main structure. They are easy to complement with a forged lace ornament or a porch step lighting system. Most simple designs can be improved and supplemented with a mass of details. In any case, they remain one of the most popular options for porch awnings.


