Artificial lighting is an indispensable condition, without which no enterprise or household can fully function, especially at night.
In our article, we will try to tell you in detail how to independently assemble, install and connect almost any chandelier, whether it be simple with one lamp, or a complex design for several lamps with a fan or LED backlight.
And thanks to colorful illustrations and videos, even a person who does not have an electrical engineering education can repeat the installation of a chandelier. The main thing is not to forget about safety when working with electricity.
Step-by-step instructions for installing a chandelier with one lamp
Step 1: Marking.
Skip this paragraph if the chandelier will be installed instead of an existing one, with a similar mount. If the chandelier will be installed in a new place, or the old chandelier has a different type of mount, it is necessary to re-mark the new chandelier mount.
You need to find the center of the ceiling. To do this, measure the length of the walls, divide the result in half and lay the resulting size on the ceiling with a cord and a pencil. A small hole is drilled in the suspended ceiling for wires. V stretch ceilings from PVC film, first special limiting plastic rings are glued, and then a hole for the wires is cut with a blade.
Step 2: Installing the ceiling beam.
In the case when the ceiling is made in the form of a complex design structure, in the form of a multi-level drywall construction, stretch PVC fabric or decorative hanging plates, which complicates the direct fastening of the chandelier to the surface, you must take care of the fastening system in advance. Otherwise, a wire break or even a part of the ceiling may be torn off.
If the chandelier is quite massive and its weight is more than 15 kilograms, then to support the chandelier on the ceiling, it is necessary to lay an additional beam behind the decorative ceiling in advance. It could be like wooden beam, and metal structure, the main thing is that it should be placed just at the installation site of the chandelier. You can also use a special metal chain if the distance from the main to decorative ceiling exceeds 1 metre.
Step 3: Installation junction box.
From the installation site of the future chandelier, the wires are brought out and lowered to the wall, a junction box will be installed here. Also, wires from the mains supply and from the light switch are brought to this box.
Important note! According to safety regulations, the installation of the junction box is carried out no closer than at a distance of 15 centimeters from the ceiling. The wires from the box should come out with a margin of 10 centimeters.
To connect the lighting line, you must use a separate group of wires coming from switchboard, she must in without fail equipped with a safety shutdown device.
The wires in the box are connected according to the chandelier connection diagram. The connected wires are insulated with PVC tape and laid in a box so that they do not intersect with each other. The junction box is closed with a lid and screwed on. From above it will be possible to plaster and glue wallpaper.
Step 4: Install the mounting bracket.
Most simple modern chandeliers for one lamp are equipped with a bracket in the form of a bracket. It serves as a supporting fastener and allows you to install a chandelier in a short time. Also, thanks to the two mounting bolts, maintenance of the chandelier becomes much easier than in older designs with unreliable hooks.
Photo: mounting bracket and terminal connection chandeliersAfter marking the middle of the ceiling, the mounting bracket is applied near the wire outlet. With the help of a pencil, the place for drilling a hole is marked for the future fastening of the bracket to the ceiling. If the chandelier is already equipped with fasteners, then the drill is selected according to the diameter of the dowel. The hole for the dowel should not be located in the place where the wires pass.
Step 5: Connect the wires and fix the chandelier.
The wires coming out of the ceiling must be long enough so that when the chandelier is removed, there is access to the junction of them with the wires of the chandelier.
The wires are stripped of insulation and connected using a terminal block according to the diagram. If there is no terminal block included with the chandelier, then the wires are stripped to a distance of 2 centimeters and twisted in pairs, then the junction is soldered with a soldering iron. After that, everything is isolated with insulating tape.
If the chandelier is made of metal and has a screw on the body for connecting protective earth Let's not forget about him either. The corresponding wire coming from the junction box is stripped, folded into a ring shape and screwed tightly with a screw.
After all the wires are connected and insulated, you can mount the chandelier. Make sure that the wires do not fall under the mounting bolts, attach the chandelier to the bracket on the ceiling, aligning the mounting holes and bracket screws - tighten the bolts.
How to connect a chandelier with two or three lamps
The procedure for installing a chandelier with two or three lights is not much different from installing a chandelier with one light, which is given above. The exception is the number of power wires. For a simple chandelier with one lamp, you need two power wires and a ground wire, if you are going to connect a chandelier with not one, but with two or three lamps, then you will need three power wires and one ground wire.
Video: How to connect the chandelier yourself
To connect such a chandelier, the wires from the lamp sockets must be connected in accordance with the diagram. One wire is taken from each cartridge and connected together - this will be the middle point, it is connected to the neutral supply wire.
If there are two lamps, then each of the remaining wires from the cartridges is connected to the corresponding phase power wire. If the chandelier is designed for three lamps, then the remaining wire from the third cartridge is connected in parallel with the phase wire from the first or second cartridge. The wires are also connected by terminal blocks or by soldering and insulated with electrical tape.
It should also be noted that to turn on such a chandelier, you will need a two-gang switch and, accordingly, three-wire wiring laid to it. In this case, when one key is turned on, one lamp will light up, when the second key is turned on, two other lamps will light up, and when both keys of the switch are turned on, all three lamps will light up.
How to connect a chandelier with 5 lights
If it becomes necessary to connect a chandelier with four or five lamps, this will also not be difficult. The technology is the same as when connecting a chandelier with two or three lamps, the only exception is the number of lamps in groups of phase conductors. The number of groups and lamps in them depends on your imagination and is limited by the number of supply phase wires and groups of keys on the switch.

How to connect a light switch
To turn on simple chandeliers with one lamp, a single-gang switch is used, its installation is as simple as possible. When connecting a chandelier, in which the number of lamps is two or more, two and three-gang switches are used.
If the wiring has already been laid, and the number of groups of lamps in the chandelier corresponds to the number of keys on the switch, it is changed to a new one, following the connection diagram.
 Wiring diagram two-gang switch
If the circuit breaker is installed on new wiring, attention must be paid to the structure of the circuit breaker. In two and three-gang switches there is one common terminal, it is necessary to connect the supply phase wire coming from the junction box to it. And each of the remaining terminals, in accordance with the location of the key and the desire to turn on a certain group of lamps, is connected to the wires going through the box to the chandelier lamps.
It should be noted that the switch must open exactly the phase wire of the power supply! This will protect you when you change a burned-out lamp with the switch off.
 How to connect a chandelier
 Chandelier with fan
There are models of chandeliers in which two devices are combined: a lighting chandelier and a fan. Such constructive solution will be a good help on hot summer days. Connecting such a chandelier is not as difficult as it might seem at first glance.
Before connecting, read the passport for the chandelier, the connection diagram and the color designation of the wires will be indicated there, the main thing is not to confuse anything.
 Ceiling Fan Diagram
 For easier connection, the fan outputs can be figuratively represented as another lamp. You can switch the fan on according to your desire, either together with the lighting, or with a separate switch button.
In the case where the fan is turned on separately from the lighting, you will need a three-wire power line and a two-gang switch. The connection in this case will be identical to connecting a chandelier with two lamps, only there will be a fan instead of the second lamp.
If you plan to turn on the fan at the same time as turning on the lighting, then you need to connect the wires from the fan in parallel with the terminals of the lamp holder.
In some modern models of chandeliers there is a decorative illumination on multi-colored LED light-emitting diodes. Such chandeliers create more interesting light thus emphasizing the interior of the room.

The connection of such a lamp is carried out strictly according to the scheme, which is given in the passport for this product. The LEDs are designed for low-voltage power, so a step-down LED driver is used in the chandelier kit. The power supply of such an LED driver is designed for a lighting network voltage of 220 volts.
When connecting such a chandelier, you can use the above instructions for connecting a chandelier with a fan, only here instead of the fan wires, the power wires of the LED driver are used.
The chandelier not only complements the overall design of the room, but also serves as a source of light in the dark. However, the maximum possible level of illumination is not used so often, is it? For the most part, there is a need to use the economy mode, when only a part of the lamps are functioning.
For this purpose, the chandelier is connected to a double switch, which allows you to adjust the intensity of lighting in the room. Do you want to install the switching device yourself, but do not know how to do it correctly?
We will help you deal with all the nuances of this process - the article provides diagrams for connecting the device to a switch with two keys, and discusses the main mistakes that beginners make. The correct connection of the wires will allow you to control, providing comfortable lighting.
The material of the article is provided with photographs, diagrams and recommendations in video format on how to correctly connect the chandelier on your own. Having studied the basic rules and installation schemes, you can get to work.
Work with electrical wiring must be carried out in compliance with safety regulations and with a clear sequence of actions.
First of all, the rules relate to de-energizing the wiring in the process of fitting and, mounting the working mechanism of the switch, connecting conductors to the terminals and other actions.
The main aspect that you should focus on when doing home electrical work is contact with bare wires. All actions in this case must be performed after turning off the general switch and using special tools
However, to determine the desired wire, the presence of power is still needed, therefore, in the work it is necessary to be as careful as possible and perform all actions only with special tools with high-quality insulation of the handles.
The only negative of the Vago terminal blocks is that they are not treated with quartz paste, which protects the contacts from oxidation. However, this problem can be solved by acquiring such a composition and self-syringing it into a clamp
As a result, 3 connection nodes are obtained at the output: the phase of the first and second groups of lamps is L1 and L2, the common neutral node is N. Given the marking of the wires, they must be connected to the corresponding lines on the ceiling.

There are two phase conductors coming out of the lamp (L1, L2), and there will be only one neutral wire (N) and it is connected to the second contact of the cartridge
At the finishing stage, it is necessary to lay all the wiring in the block of the chandelier bowl and install it. Fastening is carried out in one of the ways: hung on a hook or screwed with screws. Next, the decorative plugs of the lamp are tightened.
Using the ground wire
When arranging electrical communications in new homes in accordance with generally accepted standards, a ground wire will be present in the wiring.
In such rooms, when installing a chandelier, you can find that 4 wires come out of the ceiling: two phases from the switch, zero and ground.

The marking of the ground wire is carried out by a combination of yellow with a green stripe. In a single-phase network, it will be the third residential, in a three-phase network - the fifth
In most models of chandeliers with two groups of lamps and metal parts, a terminal block is provided in the package, through which the ground connection is made.
During the installation of the lighting device, you need to pay attention to this and connect the wire.
Connecting a halogen lamp
Chandeliers with do not always work on 220 V AC - these can be products designed for AC voltage of 6, 12 or 24 V. Therefore, in the second case, you will need a step-down transformer.
Sometimes the manufacturer in each model of a halogen lighting fixture builds in special transformers to lower the current.
The diagram shows the principle of connecting a chandelier with an electronic transformer. In this variation of the lamp there is a controller unit. The connection plan is shown on the back of its case. In the diagram: PE - ground, N - zero, L - phase
Chandeliers, which include a remote control, can be of various modifications: with halogen, LED or incandescent lamps.
There are models and combined type. Such a device is complicated by the presence of a radio control unit. In fact, this controller is a wireless device, which is controlled by a remote control or a standard key switch.
The connection of such a lighting device is carried out similarly to the previous model, however, one more wire will be added here, the thinnest of all.
This is the antenna through which the communicating actions of the console and controller are reproduced. It remains unchanged inside the glass of the chandelier.
Conclusions and useful video on the topic
The whole process of preparing the chandelier for connection and directly connecting the double switch to the power supply is described in the video:
Inexperienced craftsmen quite often make mistakes in the wiring process, which ones and how to avoid them, see the video:
If you correctly reproduce all the stages of installation and follow the diagram, you can protect yourself from unpleasant consequences during the direct operation of the lighting device. Moreover, it will be possible to create a unique light atmosphere in the room, adjusting it to your needs.
Share with readers your experience of connecting a chandelier to a double switch. Please leave comments on the article, ask your questions and participate in discussions. The feedback form is located below.
A chandelier with several lamps is not only an element of the interior, but also a device that allows you to create various lighting conditions, as well as significantly save on electricity. This is achieved by the ability to turn on the lamps in the chandelier in groups, using only a single switch with several keys.
However, the apparent complexity of connecting at first glance makes many abandon the idea of connecting the chandelier on their own and pay for the work of electricians. Meanwhile, after a careful study of all the rules, this event will be within the power of even a novice home electrician.
In order to safely complete the entire scope of work on connecting the chandelier, without being distracted by the search for the right tool or materials, you should take care of the following in advance:
- required to search for the "phase" in the wiring;
- a set of simple screwdrivers with Phillips and flat heads required for installation work and disassembly / assembly of the chandelier itself (if the latter is necessary);
- , with which it will be possible to check the correctness of the connections made;
- pliers for stripping and mounting wires;
- terminal block, which simplifies the layout of wires when connecting them.
In addition, you will need a knife, a marker, electrical tape, a passport for a chandelier and a reliable stepladder or other support with which it would be convenient to work under the ceiling.
Let's figure out what each wire coming out of the chandelier is for
To figure out which wire coming out of the chandelier, what it is for and how it is connected to the network, the easiest way is to use the instructions that came with the lighting fixture.
Since there are three or more wires from the chandelier block in this case, they can be divided according to their functional purpose.
- Phase - 2 wires. Connected to these wires are all the center pins of each of the lamp sockets. Moreover, the connection is most often implemented in two groups: one wire usually connects the phase connection to only two lamps, the second - to all the others. Such a scheme is necessary so that when using a multi-key switch, it is possible to independently turn on each of the groups of lamps.
- Zero wire. Most often, this is a single wire to which neutral wires from all the lamps in the lighting fixture are connected inside the chandelier body.
Visually, each group of wires can be recognized by color coding. If all the wires are the same color, then you can recognize them with a multimeter.
Wires for connecting a chandelier: types, characteristics and installation methods
 According to the current electrical installation norms and rules, only copper wires should be used in residential buildings and apartments.
The ban on the use of aluminum wires, so popular in previous decades, was introduced for the reason that aluminum can change its properties over time. physical properties, making electrical wiring unsafe in terms of fire. Therefore, when choosing suitable wires, you can only pay attention to copper options.
Since the maximum voltage supplied to the chandelier cannot exceed 220V, even if there are several powerful lamps in it, a wire with a cross section of 0.5 sq. mm will suffice. However, for electrical wiring in residential premises, they are mostly used with a cross section of 2.5 sq. mm., Therefore, it is worth buying wires and cables with conductors of just such a cross section.
In addition to the material of the electrically conductive cores, when choosing a wire, it is also worth considering the way they are brought to the chandelier. There are three such ways:
- concealed wiring, i.e. the cable is laid directly inside the walls and ceiling;
- when the wire is fixed outside the wall on special insulator supports;
- wiring using electrical wiring.
Therefore, when choosing a wire, you will need to take into account its mechanical properties. Thus, stranded cables are much more flexible, which makes it easier to work with them when laying open wiring. In turn, a solid core is beneficial for wiring inside walls and ceilings, as well as laying in a mounting box. Due to the rigidity, such wires will be laid more evenly, making installation more economical and safer.
To supply electricity to lighting fixtures, the following types of cables are allowed:
- VVG, a flat cable with two solid cores, with insulation and an outer protective sheath made of PVC. However, due to the connection to a chandelier with three or more wires, it is considered impractical to use this cable, since it will require at least twice as much;
- NUM (NYM)- a copper cable with a circular cross section, similar in design and materials used to VVG, but has a larger number of insulated conductors.
- PVA, round cable with stranded conductors enclosed in a vinyl sheath;
- SHVVP- a cable with vinyl-insulated wires placed inside a PVC sheath.
What to do if there is not enough wire length
Since the installation of a chandelier can be carried out not only in new houses and apartments, a situation is possible when it is necessary to extend the existing wiring or extend the wires from the chandelier itself. Best Option connections - using a terminal block. This device is a plastic block with conductive plates placed on it. On each side of the plate there are screw terminals, to which the wires are connected.
However, the terminal block must be serviceable. Over time, screw connections can loosen, which is fraught with loss of contact or heating that is unsafe in a fire sense. Therefore, if there is nowhere to place such a block, it is recommended to replace all the wiring in such a way that a single wire is laid from the switch to the chandelier. It is unacceptable to use twists, because. as they oxidize, they will inevitably begin to heat up.Various connection schemes
The connection scheme will depend on how many wires come out of the chandelier and how many wires are connected to it along the ceiling. Therefore, several options are possible.

- phase of the first group of lamps;
- phase of the second group;
- common neutral wire.
These wires, taking into account the marking and purpose, are connected to three wires running along the ceiling.
This connection scheme, in its essence, is fully consistent with the one in which three wires pass through the ceiling, and three or more are output from the chandelier. The fourth wire is the ground wire accepted in modern electrical installation practice. In the chandelier connection manual, this wire will be designated as "PE". Therefore, you simply need to connect the yellow-green wires to each other, and perform the rest of the installation according to the scheme described above. If an old-style chandelier is installed, then it may not have grounding. Therefore, the yellow-green wire on the ceiling is cut off and carefully insulated.
However, the purpose of the fourth wire on the ceiling may be different if it is used as another phase. This scheme is used to connect to a three-gang switch, which allows you to control three groups of lamps on a chandelier at once.
The final stage - we put the wires into the switch
 The switch is always installed on the phase wire, opening it or distributing it for each phase in the chandelier (when using multi-key switches). Ground wires, if any, are present in the apartment or house wiring, bypass the switch, directly to the chandelier.
As a rule, one-, two- and three-gang switches are on sale. Their connection scheme will be slightly different, so you need to consider three options.
- Connecting a single-gang switch.
- Connection to a two-gang switch.
- Connecting a chandelier to a three-gang switch.
This scheme is the simplest and only allows you to turn on and off all the lamps in the chandelier at the same time. It is used in the presence of two lead wires on the ceiling, regardless of the number of wires coming out of the chandelier.
The direct connection of the switch will consist in mounting it on the wall and including the phase wire in the gap. You can determine this wire at the connection point by sequentially touching the input wires with an indicator screwdriver. Upon contact with the phase, the indicator glow will be noticeable on the screwdriver. If the indicator is off, then this means a connection to the neutral wire.
Here the connection diagram will be complicated by the presence of two phases for two groups of lamps in the chandelier. Therefore, at the water point, the phase is connected to the switch in the manner discussed above. At the output of the switch, there will already be two conclusions. These will be the phases for each of the groups of lamps. They should be connected to the appropriate wires running along the ceiling to the chandelier.
Such switches are used to control multi-track chandeliers, in which it is possible to distribute the lamps into three independent groups. Accordingly, in the ceiling wiring, one more free core should be provided, if we compare the circuit with the connection of a two-gang switch. The rest of the steps will be similar: a phase is connected to the switch input, and phases are connected to the output for each of the three groups of lamps.
When installing the switch, it is necessary to carefully observe all safety regulations. Otherwise, repairs in the apartment can turn into a tragedy. Therefore, all work on laying wires, mounting switches on walls and connecting wires on the ceiling should be carried out only when the power is turned off. You can make sure that it is turned off with the same indicator screwdriver. At the input point, when it is connected to all of the available wires, the indicator should not light up.
In general, it is quite possible to connect a chandelier on your own even with minimal skills of an electrician. To do this, you should follow only a small list of rules:
- to carry out installation only with the power supply disconnected;
- even before starting to thoroughly study the connection diagram;
- try to use as few extensions and wire connections as possible, preferring solid cables.
The result will be safe and long-term operation of chandeliers with any number of arms in the most comfortable lighting conditions.
Short video with connection process
The chandelier is ceiling lamp, which should provide shadowless lighting in the room. Light is evenly distributed by spotlights located at a certain distance from each other. Light sources today are incandescent, fluorescent and LED.
Purchasing a chandelier is a pleasant moment when you finish furnishing your home and after buying a new piece of furniture, it remains to connect it. Assembly time depends on the complexity of the design and the type of fastening. Moreover, you can cope with this task quickly and easily, just follow the instructions and have simple installation tools in your arsenal, and in order to connect it, you also need to understand the electrics.

A multi-lamp lamp is available in all apartments and houses. For even distribution of light, it is usually located in the center of the ceiling. Let's see what knowledge is required to connect the chandelier with your own hands.

Where to begin?
First you need to figure out how many cords come out of the ceiling. Usually there are two or three. If there are two of them, then the design provides for the simultaneous inclusion of all the bulbs and there will be no difficulties with connecting the chandelier. And the presence of three cords makes it possible to turn on the bulbs individually and group them to change the level of illumination. As a result, the difficulty arises in the fact that you need to understand which wires to connect to each other. In order for the chandelier to work properly, it is important to connect everything correctly. Before starting work, be sure to familiarize yourself with the cable arrangement. So, let's proceed in order.
Observe safety precautions
The main requirement during the connection of the chandelier is the de-energization of the entire section of the electrical wiring. Simply turning off the light in this case is not enough, you need to completely turn off the machines in the shield.
Then you need to prepare the cables for testing. They should be opened to prevent further contact with each other.
According to the marking, cables are designated in Latin letters:

It should be noted that the marking is not always present, because it began to be applied not so long ago. In this case, you should use the machine located in the shield and turn the switch to the "ON" position. Then, with an indicator screwdriver, you need to touch the bare ends in turn - if the LED lights up inside during the process - the cable is energized and is a phase. After determining the types of wires, turn off the power again and proceed to connection work.
There are two ways to connect cables to each other:

Chandelier mounting options can be found by clicking on the link:
The following parameters can affect the way the chandelier is connected:
- the number of cords in the chandelier;
- the number of wires in the ceiling;
- number of keys on the switch.
Scheme one. Two cords on the chandelier and two wires on the ceiling
This method of connecting a chandelier is the easiest, because it does not require much effort. In this case, it is necessary to simply connect the cables to each other using a twist or terminal block, having previously determined where the phase is and where it is zero. Moreover, the connection order can be any.

The neutral cable (blue in the diagram) should be connected from the junction box directly to the neutral wire coming from the lighting device. And the orange cable, with a phase, should be connected to both the chandelier and the switch.
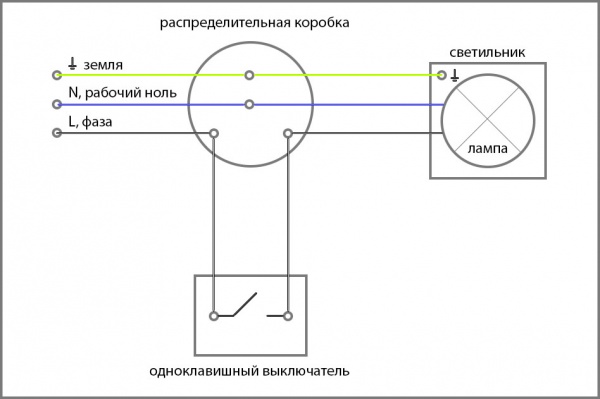
When connecting a chandelier with a large number of light bulbs to a switch with one key, you must first connect all the neutral wires of the chandelier, and then connect them to the neutral cable from the junction box. Then combine them with the phase and lead to the switch.
It's important to know! According to the requirements of the electrical installation rules (PUE), the phase must be connected to the central contact in the electrical cartridge, and the phase wire must be opened by a switch. Compliance with these rules will increase the safety of the operation of lighting devices.
Scheme two. Two cords on the chandelier and three wires on the ceiling
Today, in the construction of houses in electrical wiring, three-core cables with wires are used. different colors. It is logical to assume that three wires will need to be connected to the lighting fixture. How to connect a chandelier in this situation, if it has only two cables?
To begin with, using the indicator, you need to deal with the types of wires that come out of the ceiling. Two of them will be phase, and the third will be a conductor. Two phases in this case imply a switch with two keys. However, given the fact that the chandelier has only two cables, a switch with one key will suffice.
It's important to know! Before connecting, it is necessary to carry out insulation, having previously turned off the voltage.
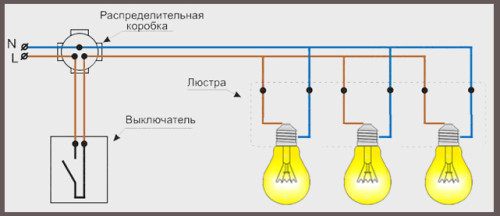
Scheme three. Three or more cords on the chandelier and two wires on the ceiling
In the case when only two cables come out of the ceiling, all the lamps in the lighting fixture will burn at the same time. To connect, you need to combine the neutral wires, and then lead them to the zero ceiling cable. Next, it is worth repeating the procedure with phase.
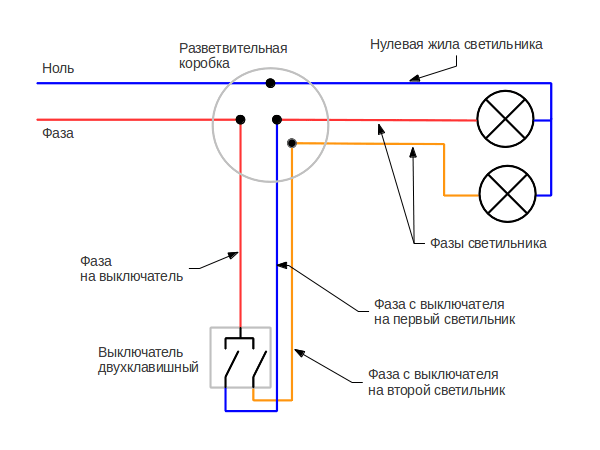
Scheme four. Three or more wires on the chandelier and three on the ceiling
This connection option can provide a more reasonable use of lamps. It will be possible to combine their work or turn them on in turn. In this case, a two-gang switch will be used.
The marking of the ceiling wires is as follows: phase - L1 (orange), phase - L2 (yellow) and zero - N (blue). Due to the fact that manufacturers of cable products do not always indicate designations, and electricians may not adhere to color scheme standards when installing wiring, it is better to double-check their purpose with an indicator screwdriver before connecting them.
It's important to know! Do not forget that phase cables are always laid to the switch, and zero cables to the lighting fixture.
Connecting a chandelier with several cords is carried out with a certain sequence of actions. First, the wires from the light bulbs must be divided into two groups. All sections are individually connected to only one wire, to which the phase leads, and then the sections are combined with zero.

With this setting, one group of light bulbs will light up with the first key, and another group with the second. This connection option allows you to connect one, two or three bulbs together using only one switch button.
The second way to connect a chandelier, for example, with six horns - the first key turns on 5 light bulbs together, and the second - the sixth.
With a large number of horns in the lighting device, the installation will proceed in an identical way. It remains to decide which combination of lamps you want to use in lighting this room.
Scheme five. Three or more wires on the chandelier and four on the ceiling
If it is necessary to connect a chandelier in a new building or a private house, most likely, a cord with a protection function will come out of the ceiling. As a rule, this cable is yellow-green and is marked in Latin letters PE, which literally means a grounding conductor. As a result, from the side of the ceiling there will be wires with phases L1 and L2, a neutral wire and a fourth pinching wire - PE.
In no case will such a cord interfere with the connection - just connect it to the yellow-green wire from the side of the chandelier. If the lighting device does not provide for the presence of this wire, then the cable is insulated from the ceiling side.
Installation of several chandeliers on one switch
This connection case is very relevant for lighting control in several rooms, large living rooms or in a room with false ceiling with a group of LED lamps.

In this situation, all lighting fixtures must be connected in parallel.
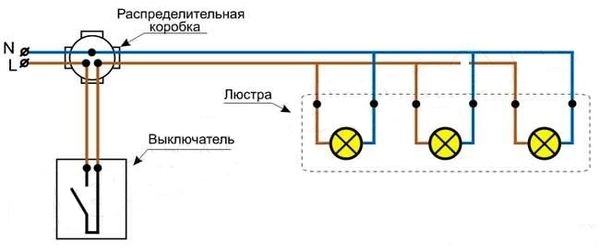
Moreover, each chandelier can have its own junction box.

Mounting three chandeliers on a three-gang switch
This connection method is used in kitchen, toilet and bathroom lighting, and the three-button switch is very convenient here.
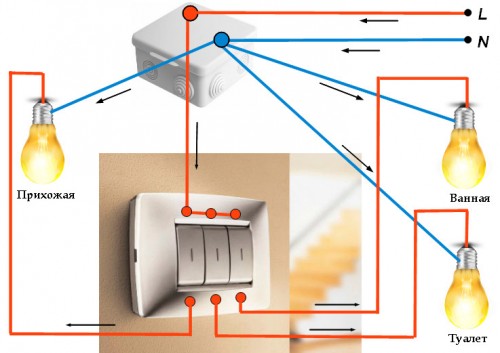
Also, a switch with three keys is used in the corridor to control the light in different areas.
Installation of a chandelier with a fan
Connecting such a model is a fairly rational solution, especially in hot weather. Before installing this type of lighting device, you just need to read the instructions, which will detail the connection diagram.
To make it clearer: the fan in this case acts as another lamp, which is connected in parallel.

At your request, you can also make a separate switch key for it.
As you can see, connecting a lighting fixture is a simple task if you know how to do it right. Follow the diagrams, follow the installation rules, and you can easily cope with the connection without outside help.
The arrangement of a modern home that requires the creation of a high level of coziness and comfort today is impossible without the installation of modern lighting fixtures. A new generation of chandeliers, which is distinguished not only by a more interesting, expressive design, but also very demanding on the installation of equipment that can fully ensure all modes of operation. One of the features is the ability to select the lighting mode during the operation of the chandelier, in other words, the ability to turn on both all the lamps at once, and a certain number of them, which allows you to use the lighting mode more rationally, while significantly saving on electricity. One such simple and affordable solution is to connect the chandelier to a double switch, thus distributing the number of lamps on.
Considering the possibility of including a multi-lamp chandelier or lighting distribution by zoning spotlights in the electrical circuit of a house or apartment, the simplest and most functional is the use of a two-gang switch as a switch.
Among the many types and models of light switches, it is the two-button device that is the most popular type of household light switches today. This type gained its popularity relatively recently, when chandeliers and lamps with several lamps began to come into fashion, which made it possible to turn on a different number of lamps.
At the same time, such a two-button switch in its design is not something special, just two devices are connected in its case, which allow, independently of each other, to connect and disconnect the electrical circuit.

The housing of the double switch, like the rest of the electrical fittings, has standard sizes and can be installed without problems, depending on the version of manufacture, in the outer or internal position. For interior views, the case holders are adjustable - with the help of a screw, you can adjust and fix its position.
Fixing the wires in modern versions of the devices is carried out using plate clamps or fixing the clamping bar with a screw.
Chandelier device
Modern luminaires, if we are talking about conventional luminaires that are designed for conventional incandescent lamps, energy-saving lamps and led types lamps have a similar wiring diagram connections. In principle, there is nothing complicated in their device, despite the differences in design solution or the shape of the fixtures themselves, the circuit consists of several electric lamps with wires connected in a certain sequence. The difficulty of connecting here is to correctly connect these wires first on the terminal strip, and then connect to the switch with two keys.

For clarity, you can imagine the installation diagram of a chandelier with five lamps. There are three wires at the output of the chandelier - one common for all five lamps, and two connected to 2 and 3 lamps. If these two wires connected to 2 and 3 lamps are connected as a lamp with two wires, then when turned on, all five lamps will light. This, it turns out, is due to the fact that all the cartridges have a common output to the zero phase, and the remaining wires, when connected, are included in the network as a conductive conductor. Closing or opening this conductor leads to turning on or off the light simultaneously in all lamps.

Turning on only the connection of conductors from two lamps will energize these lamps, while the remaining 3, although they will be connected to a common "zero", will not be turned on, since no voltage will be applied to them. Thus, by disconnecting a line of 2 or 3 lamps, you can turn on all, only 2 or only 3 lamps. On this principle, the connection scheme for a five-arm chandelier is based.
For the correct connection of the five-horn luminaire, all the wires are clamped into the terminal block into separate sockets - separately the common "zero" and separately each of the conductive conductors.
Safety rules
When working with electricity, and even more so when it is necessary to maintain a clear sequence of work, it is necessary to adhere to the safety rules as much as possible. The main point to which special attention should be paid when installing a chandelier should be working with bare wires. Such work is carried out only when the general switch of the house or apartment is turned off. Convinced of
Adjustment of wires, installation of a switch, must be carried out with the mains voltage turned off.
However, to select the required wire, it is necessary to check the presence of voltage on the conductors, this must be done with the utmost care and only with a serviceable tool with insulated metal parts and handles.
When testing the assembled circuit, it is allowed to turn on and off the devices only after they are finally fixed and the wire twists are insulated.
Work order
At the initial stage, for the convenience of further work, a connection diagram is drawn and a detailed plan is being worked out. All necessary elements and materials are prepared. The chandelier is being assembled and its fastening elements are being installed.

Practical work is carried out in the following order:
- According to the connection diagram, the presence of zero and phase in the wires is checked at the place where the switch is connected and the chandelier is installed;
- The mains voltage is turned off;
- The zero-phase wire is marked and connected to the common wire of the fixtures;
- On the terminal strip, the wires going to 2 and 3 lamps are connected to separate terminals;
- The luminaire is temporarily fixed on the fasteners;
- The wire leads from the chandelier are fixed on the switch in connectors with two outputs - each wire to a separate connector;
- The wire with voltage is fixed to a single connector on the opposite side of the body of the two-gang switch;
- The correct connection is checked;
- The voltage is turned on and the operation of the circuit as a whole is checked.

Checking the operability of connecting a chandelier to a two-key switch is carried out in all positions of the device - turning on one key, turning on the second key, simultaneously turning on two keys. Such manipulations make sure that all connections are working.
Connection errors and methods for their elimination
V Lately quite often when installing electrical wires internal wiring in new buildings, cable laying is carried out using an additional protective earth cable. For this, an additional cable with a yellow-green insulation marking is used. metal core(Option 2). The inclusion of this wire instead of zero or phase when you turn on the connection circuit of a two-gang switch to the network does not allow you to close the circuit and light the chandelier.

The absence of voltage when the chandelier is turned on on one or all circuit lines indicates an incorrect zero connection or no voltage on the switch. Checking the presence of voltage is carried out using an indicator on the input connector, when the switch is turned on, the presence of voltage is also checked at the output contact of the switch.
Malfunctions of the installed luminaire in the form of the failure to turn on the lamps of one or both branches for a five-arm chandelier require turning off the circuit for removing all connected devices and checking the operation of the switch, chandelier and the integrity of the wires, and only after that reconnecting.
Practical work on installing both fixtures and switches, sockets and other electrical fittings can only be done correctly.
You can practice assembling a circuit for switching on a device with 2 or more lamps for a two-gang switch using several pieces of wire, and connecting the assembled circuit to a regular outlet.

The stripping of aluminum wires when using a conventional terminal block should be about 4-5 mm, this is quite enough to clamp the adapter with a screw. The twisting of copper wires is additionally pressed with pliers, and ideally should be soldered.
Attention! When connecting a luminaire with copper wires to aluminum wires, it is imperative to use a terminal block. Direct connection twisting copper and aluminum wire forbidden!


