Apartments located on the ground floor suffer from moisture and cold more than other apartments in the house. It has to do with direct contact. floor covering with a floor slab that separates the apartment from the unheated basement. As a result, the floor is always colder than the air in the apartment, and if in summer it is not so noticeable, then in winter such a cold floor will cool the entire room, besides provoking the appearance of dampness.
Therefore, for the normal temperature of the floor covering, it is necessary to insulate the floors. This can be done by carrying out repairs with your own hands or with the help of hired workers. The essence of floor insulation is laying a layer or several layers of insulation on the ceiling between the basement and the apartment. In addition, a vapor barrier is needed, since due to the temperature difference, condensation is inevitable, and moisture negatively affects the insulating materials. Next, we will consider various options for insulation, insulation, talk about materials, prices, and explain how to do all the work yourself.
Types of heaters
Styrofoam
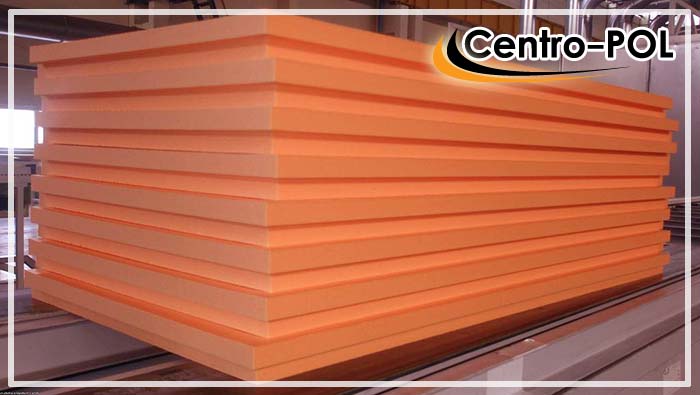
Expanded polystyrene, better known as polystyrene or its modified counterpart foam polystyrene, has excellent thermal insulation properties, is lightweight and easy to use. There is also extruded polystyrene foam. Its difference from the usual, in water resistance. If ordinary polystyrene foam can absorb a certain amount of liquid and deform due to this during temperature changes, then its more technological look is almost completely waterproof. The only disadvantage of expanded polystyrene is its combustibility.
Expanded clay

This bulk material is attractively priced and versatile. It can be used with a dry floor screed or mixed with cement mortar. Also, with its help, you can arrange a floating screed with your own hands.
Polystyrene concrete
Unlike expanded clay, polystyrene concrete requires a much smaller layer to create acceptable insulating properties. You can lay almost everything on it, including tiles. In addition, it has excellent soundproofing properties. You will learn more about this material from the video
Mineral wool
Mineral wool, as well as glass wool, are one of the most popular heaters, which are made in the form of tiles or rolls. The advantages include thermal insulation properties, reasonable price and vapor absorption. The disadvantages are the composition hazardous to health. When installing with your own hands, you should use respirators and avoid contact with open parts of the body. That's why mineral wool and glass wool needs to be carefully insulated to keep dust out of the rooms.
Cork

Cork material is perhaps the most expensive on our list. It is environmentally friendly, durable and moisture resistant. It can be used even for fine finishing, because in addition to its insulating properties, it looks beautiful as a top coat. Among the shortcomings can be noted instability to cuts and other mechanical damage.
Ecowool
It is made on the basis of cellulose, which means it is environmentally friendly and not hazardous to health. It has high heat and noise insulation properties, but does not tolerate moisture. Therefore, it is used in areas where there is no risk of contact with moisture. For more information about the advantages and disadvantages of ecowool, see the video
Penoizol
This is liquid polystyrene foam, about all the advantages of which we spoke above. The advantageous difference between the liquid form of such a material is the ability to penetrate into the most inconvenient places.
Warm floor

The option of installing underfloor heating is becoming more and more popular. It only repels its cost. There are several variations:
- Water;
- Electric;
- Infrared.
Water heated floor, heats with the help of communications with hot water under the subfloor. An electric underfloor heating is also installed and heats by converting electricity into heat. Infrared is the most modern, easiest option and you can lay it yourself without the involvement of specialists. Thin elements of the warm floor are laid under the finishing flooring. Only this type of floor can be realized with your own hands, without special skills.
Basement insulation

If the apartment is on the first floor, then most likely there is a basement under it. The obvious solution when insulating the floor is to make repairs from the basement, if there is no need to carry out repairs inside the apartment. In this case, it will be a big plus that the floor in the apartment will not rise, and also, if the repair has already been done, then you will not have to open the floor and redo it again. When insulating from the basement side, there is no need for a neat fine finish, which makes it possible to do the work with your own hands, even for an inexperienced builder.
Ordinary polystyrene foam or mineral wool is best suited as a material for such repairs, but its installation by one's own hands is more time-consuming and the price is higher.
- At the first stage, you need to find floor plans, and make markings around the perimeter of your apartment. It is better to do it with a margin, so that the area of \u200b\u200binsulation goes beyond the boundaries of the walls by several centimeters.
- Then conduct surveys of the basement walls. Most likely, they will have cracks and chips, and maybe holes. They should be sealed with cement mortars or simple polyurethane foam.
- The vapor barrier is glued with the first layer, on building glue or adhesive tape. The material used is polyethylene. Joints must be tightly sealed with tape.
- Then a frame is constructed from wood or aluminum profiles for fixing the insulation.
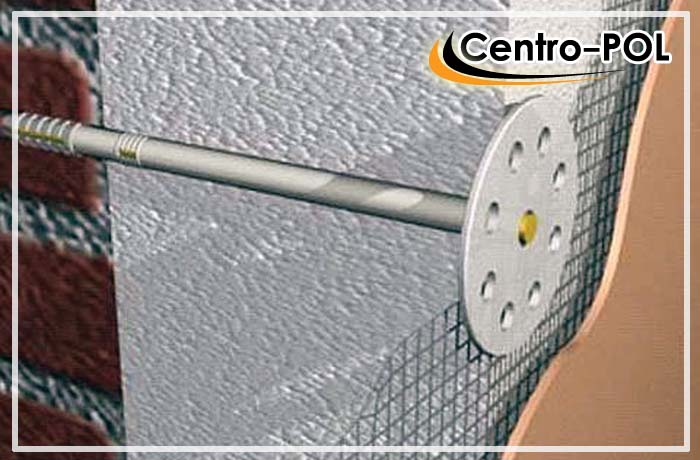
- Next, the insulation material is laid. If you use expanded polystyrene, then it is mounted in a frame and fixed with special dowels with a wide plastic cap as shown in the photo below.
If your choice fell on mineral wool, then logs from a bar are installed on the ceiling, in increments of 5 cm less than the width of the insulation, so that the wool enters more densely. The last step of the repair will be the installation of plywood sheets on top of the insulation on the logs, for greater reliability.
Warming in the apartment
Before carrying out repairs on floor insulation with your own hands, you need to calculate how high you can raise the floors. The higher - the thicker layers of insulation can be used.
- If the work will take place indoors after repair, then the first step is to dismantle the base.
- After removing all floor coverings, a thorough inspection of the carrier plate is carried out for cracks, chips, and holes. If any are found, they are sealed with cement mortar, or a ready-made mortar for repair. After hardening, it is recommended to treat the surface with siling, a special strengthening impregnation.
- The next step is waterproofing. This layer consists of polyethylene or a special primer with water-repellent properties.
- A layer of roofing material is laid on top of the vapor barrier, a beam is laid on it, and logs are already placed on the beam. The entire structure is anchored to a concrete base. Detailed description do-it-yourself lag devices on video
The floor is the coolest surface in the room. Through a poorly insulated floor, up to 20-30% of the heat can leave the room! This mainly happens on the first floors with an unheated basement. At the same time, heating bills increase, and the rooms are still cold. In this case, it's time to start thinking about how to insulate the floors in the apartment. This will help reduce heat loss and create a more comfortable indoor climate.
Floor insulation is relevant not only for a private house. Often it is necessary to insulate the floor in an apartment on the ground floor, in this case it is simply necessary. It is possible to do the work on thermal insulation with your own hands, the main thing is to choose the right material and familiarize yourself with the laying technology.
Materials for floor insulation must meet certain requirements: lightness, strength, durability, high thermal insulation characteristics.
Materials with the desired properties include: mineral wool, expanded polystyrene, foam plastic, expanded clay, wood shavings.
Mineral wool. Effective for sound and heat insulation. It is fireproof (has high fire resistance), is not subject to damage by a mold and a fungus. Flaw- this is hygroscopicity, the ingress of moisture reduces its properties.
Expanded polystyrene, polystyrene. Lightweight, durable, retain heat well, do not let external noise into the room. Not afraid of water ingress, not deformed, easy to install.
Expanded clay, wood chips. Bulk materials, inexpensive, environmentally friendly. They have significant shortcomings. The shavings are afraid of moisture and are prone to decay, insects and mice start up in it. Expanded clay is not afraid of water, durable, but can exert a strong load on structures if the insulation layer is too large.
Penoplex. Modern material, rapidly gaining popularity. simple technology installation, it is possible to perform the insulation yourself. Produced in the form of plates.
Ways to insulate the floor of an apartment on the ground floor
When choosing a method for conducting thermal insulation, one should take into account the structural features of the building and the peculiarity of the method of laying insulation. Insulation of floors in an apartment on the first floor can be done in several ways:
- Installation of thermal insulation from the outside, from the basement. For warming the floor of an apartment located on the ground floor, this method is very effective.
- Floor insulation along the lags. This will require complete dismantling old cover.
- With a tie over the insulation.
It remains only to choose more convenient way. After carrying out all the work, heat leakage will stop, a comfortable microclimate will be created in the apartment, heating bills will decrease.
Insulation of the floor of the apartment on the first floor from the basement side with foam plastic
In ordinary houses, concrete floor slabs are used, which border the basement on the ground floor. An unheated and damp room takes away an overwhelming amount of heat. To achieve the maximum result, it is necessary to carry out work on the insulation of the floor of the apartment from the basement. How to do it?
- You do not need expensive heaters. It is possible to insulate the floors in the apartment on the first floor from the basement with 50 mm thick foam.
- Before you begin to mount the insulation, it is necessary to blow out all the cracks between the plates and around the perimeter from the basement side with mounting foam.
- Further concrete surface Treat the boards with a deep penetration liquid primer. It is applied with a brush.
- It remains to insulate the basement with foam sheets. They are glued to the ceiling using Ceresit adhesive or construction adhesive, they will ensure reliable fastening of the insulation to the surface.
- When the glue has completely hardened, the gaps between the plates must be sealed with sealant or foam.
In this way, you can insulate wooden floors. Only in this case, it is recommended that the foam sheets be additionally fixed with the help of double umbrellas. This way you keep the heat in the house and additionally protect the wooden floors from the effects of dampness from the basement.
Thermal insulation of building envelopes most often includes wall decoration. However, insulation is also required for vertical surfaces such as floors. It will be especially important to carry out such work if there is an unheated basement under the apartment. Although the inhabitants of the upper floors of block buildings also face problems with cold floors, observing the freezing of corners and the formation of condensate in the premises. Before you insulate the floor in the apartment, you should choose the right material that will be used for this.
The choice of insulation
Heaters used for thermal insulation of floors, by origin are:
- chipboard (ecowool, plywood);
- polymeric (polystyrene, penoizol);
- mineral (mineral wool, cement mortars, expanded clay);
- silicate (glass wool).
The decision on which type of insulation material to choose depends on various factors. For example, some of them will better insulate a wooden floor, while others are not suitable for such a base at all, and still others can be used for any surface.

It is also worth paying attention to the thickness of the insulation, which can sometimes significantly reduce the height of the room.
Mineral wool and fiberglass insulation
Possessing good parameters of heat and sound insulation, mineral and glass wool allow you to insulate structures made of any material. In addition, their installation does not require special skills. And the service life of both insulation reaches 50 years. Mineral wool and fiberglass are often used for thermal insulation using logs, as well as laying under the subfloor.

Among the shortcomings of the materials can be noted:
- relatively high thickness;
- low mechanical strength;
- high water absorption. Moreover, in mineral wool it is 2 times more compared to glass wool.
Penoplex or expanded polystyrene
For polymeric materials such as expanded polystyrene and foam plastic, the following are characteristic:
- high thermal insulation properties;
- affordable cost;
- long operational period.

They are well suited for providing over basements or cold grounds. Although they have a number of disadvantages - the inability to use wooden floor without prior preparation, increased flammability and brittleness. In addition, moisture ingress leads to the appearance of mold and fungi on the surface of materials, therefore, after installing polystyrene foam or foam plastic, it must be carefully protected with additional waterproofing.
Application of polyurethane foam
It can be attributed to the most modern methods of insulation of structures. It is suitable for mounting on any type of surface, including wood, concrete and even tiled floors.

And for such a heater, a device for vapor and waterproofing is not required. The disadvantages of the method are the too high cost of both the material itself, and the performance of work (which cannot be done by hand), and further finishing of its surface.
Gypsum fiber boards, which are also called "dry screed", are a universal technology with a minimum increase in its thickness (up to 25 mm).

This results in a smooth finish that is compatible with all finishes, including electric floors.
Another advantage of choosing this particular method is the high speed of work - up to 5 square meters. m per hour.
And among the shortcomings can be called:

- relative high cost;
- the impossibility of an independent device.
Thermal insulation with expanded clay
One of the most inexpensive ways of warming is laying expanded clay over the floor. This material protects well from the cold, and absorbing moisture, it does not lose heat-insulating abilities.

At the same time, to ensure sufficient insulation, a large thickness of the insulation layer is required - up to 20 cm.
You can also make the room warmer with the help of self-leveling floors - special mixtures for leveling and warming. They are used in cases where it is required to ensure a minimum increase in the thickness (up to 50 mm) of a concrete structure.

At the same time, the heat-insulating properties of such floors are lower than those of most other materials, and making them yourself will not work without experience.
Stages of work
The choice of a specific insulation technique depends mainly on the location of the apartment. So, for premises on the ground floor, the work will be the most difficult - due to the high heat transfer and the likelihood of dampness (especially if there is a basement under the first floor). And for housing located above, it will take less time and materials.
Warming of the first floor
Before carrying out work on the insulation of the floor of the first floor, it is necessary to check the possibility of laying heat-insulating material from the basement side. If this can be done, it is possible to reduce the heat transfer of the floor without spending a lot of money. Ceiling non-residential premises the basement is insulated with inexpensive mineral wool, after which the thermal insulation of the floors of the apartment will require less investment and is carried out in the same way as for housing on the upper floors.

Mineral wool in the basement is laid in a metal crate, arranged according to the principle of plasterboard ceilings with vapor barrier. Device wooden frame in this case is undesirable due to high humidity premises, which will lead to a decrease in the service life of the tree and, accordingly, the entire insulating frame. True, metal profiles will not save mineral wool from damage, the condition of which should be checked before the start of the heating season.
If it is impossible to get to the floor from below, better insulation is carried out from the side of the apartment.
Before starting work, you should check the condition of the existing concrete screed under the main cover (which in any case will have to be removed). If it is damaged, the floors should be overhauled, and then the insulation should be continued in the following sequence:

- perform a vapor barrier over the base;
- pour a second screed (for example, from plastic concrete) with a thickness of 3-4 cm;
- install a crate;
- put a heater in its cells (for example, mineral wool or polystyrene);
- lay plywood 12–16 mm thick on the crate;
- restore the floor covering (parquet, linoleum, tiles) using the appropriate technology.
Top floor features
For all other floors, except for the first, it is much easier to insulate the floors. This is done by removing the old flooring, laying insulation, installing a layer of plywood on top and returning the original coating to its place.

The device of the floor over the plywood base can be performed with the preliminary creation of an additional base or without it (for example, when laying linoleum).
Features of the device "warm floors"
Warm floors, regardless of the location of the apartment, necessarily require the creation of a vapor barrier and screed with a thickness of 2–2.5 cm.

It is also desirable to lay on top of aluminized mats designed to prevent heating of the lower rooms. Features of the installation of the "warm floor" itself depend on its variety.
When installing a water floor, 20 mm pipes are laid on top of the metallized material, placing them in a snake.

With the help of cuffs, the system is attached to the floor, and its ends are connected to the riser.
Before the final introduction of the "warm floor" into operation, it must be checked within 15–20 hours. Only then can the screed be poured.
Electric heating
"Warm floor" electric type can be mounted in the same way as water - except that this does not require testing.
The advantages of such a system are simple temperature control and uniform heating of the room, the heat in which is evenly distributed first over the surface above the heating cable, and then rises.
12920 0 12
How to insulate the floor on the first floor - 5 proven ways
The folk wisdom that has been proven for centuries, which says that you need to keep your head cold and your feet warm, is relevant for owners of housing on the ground floor like no other. These people know firsthand what the consequences can be if the floor is not insulated in time. The indestructible smell of dampness, constant colds in children and general discomfort in the house are just some of these problems. In this article, I decided to dwell on how to properly insulate the floors on the ground floor in a city apartment and in a private house.
Suitable types of insulation
Insulation for the floors of the first floor, in principle, you can use any. Here you need to look at your financial capabilities, professional skills and, of course, on what basis the material is chosen for. It is one thing to insulate the floor of the first floor in a wooden house, and quite another, the arrangement of a concrete slab in a city apartment. I selected the most popular materials and combined them into a table.

| Type of insulation | Advantages | disadvantages |
| Slabs of mineral wool (slag wool, basalt wool) |
|
|
| Styrofoam slabs |
|
|
| Plates of extruded polystyrene foam (Penoplex) |
|
|
| Expanded clay (bulk material, is a porous granules of baked clay) |
|
|
| A mortar of sawdust mixed with cement |
|
|
| Liquid heaters. (Polyurethane foam and penoizol) |
|
|

Subtleties of installation of insulation
Since the wooden and concrete bases are quite different in their characteristics, accordingly, the methods of their arrangement will be different. Further, in order not to dump everything in one "heap", each instruction will be considered separately.
Method number 1. Floor insulation from below
The concrete floor of the first floor in multi-apartment city buildings from below, in the vast majority of cases, borders on an unheated, and often even a wet basement. Therefore, I am convinced that it is necessary to start work with insulation in the basement. Thus, you will completely cut off the access of moisture and at least half make your floor warmer.

- It is not worth spending money on some sky-high expensive materials here, ordinary polystyrene is quite enough. The thickness of the insulation in this case starts from 50 mm. As far as I have seen, the ceilings in the basements are not covered with anything, this is an ordinary reinforced concrete slab. Therefore, the first thing to do is to blow out all the cracks around the perimeter of the ceiling and on the ceiling itself, especially between the floor slabs, with mounting foam;
- The concrete slab itself is smooth, naturally the adhesion of such a coating is rather low. To increase it, we will need to walk along the ceiling with deep penetration soil;
- Then everything is simple. We take foam boards and glue them to the ceiling. As an adhesive, you can use the same mounting foam, building glue "Liquid nails" or dry building mix Ceresit CT83. Personally, I prefer Ceresit. After the glue has finally set, the remaining small gaps between the plates will need to be blown out again with mounting foam.

If you glue on mounting foam, then take into account the fact that it expands greatly, so every 15 to 20 minutes the plates will need to be pressed against the ceiling. Typically, the extension lasts about an hour and a half.
Some craftsmen prefer to mount the foam on the ceiling in the basement in 2 layers, with a shift relative to each other. Explaining this by the fact that a denser monolith is obtained, without gaps. I think it's redundant. More precisely, in the case when the facade insulation of the house is mounted, this measure is justified, and in the basement it is an extra waste of material, time and effort.
For an ordinary dry basement, this will be enough. But if there is water in the basement, then I recommend making additional waterproofing of the ceiling. This procedure is also inexpensive.

You will need to take Liquid Nails or some similar glue, apply it with a spatula to the foam and paste over the ceiling with technical polyethylene. So that the polyethylene does not fall off before the glue sets, it can be shot in places with a stapler to the foam.
Opinions of experts on whether it is necessary to install the so-called external insulation of the subfloor in wooden houses, diverge. Personally, I don't think it will get any worse than this. So you not only insulate the basement from below, but also protect the wood from moisture.

You need to act according to the technology described above. Only here it makes sense to fix the foam in addition to glue on the draft layer of the subfloor with plastic dowels-umbrellas. This is due to the fact that the tree is a living material, and when it starts to “walk”, the sheets may peel off.
Method number 2. Installation of insulation with a crate
For a novice master, this method is considered one of the easiest and most understandable. The only problem is that the thickness of such insulation starts from 50 - 70 mm. Therefore, in apartments with low ceilings this could be a problem.

- Work begins with the preparation of the concrete base. The old coating, if there is one, must of course be completely torn off and cleaned well to concrete. After that, all cracks and cracks will need to be caulked. This can be done using putty or the same mounting foam;
- On top of any concrete base, you will need to lay a layer of waterproofing. Too powerful protection is not required for an apartment, especially if you have already hemmed the ceiling with foam plastic in the basement. Here it is enough to lay technical polyethylene in one layer. But only polyethylene should be overlapped around the entire perimeter of the walls. From the start, I do an overlap of about 10 - 15 cm, then the excess will be cut off;
- The basis of the crate are wooden bars. Their thickness is selected according to the thickness of the insulation. The bars are usually laid parallel to the short wall of the room with a step of about half a meter. For fixing, anchors or self-tapping screws with “quick installation” dowels are used. I usually fix with an interval of no more than 1m, the support bars will not go anywhere anyway;

- Next comes the stage of installation of the insulation itself. If the basement is not insulated from below, then the thickness of the insulation starts from 50 mm. But for mineral wool slabs, the minimum is 100m. Filler from sawdust-cement mortar, expanded clay and other loose insulation should be taken at least 150 mm. Only dense foam, foam plastic and liquid modern heaters(polyurethane foam, penoizol) can be laid with a thickness of 50 mm;
- If you approached the matter thoroughly and first insulated the ceiling in the basement, then all these dimensions can be safely divided in half;
- Styrofoam or extruded polystyrene foam is selected or cut clearly according to the size of the gap between the support bars. With such a calculation that the plates were butt. Slabs of dense mineral wool should be a couple of centimeters wider than the gap between the bars. They will press down a little on the sides and you will get a solid, dense insulation;

- From above, a layer of such insulation can be sewn up with a tongue-and-groove floorboard with a thickness of 30 mm or more. If a top finish is planned, such as laminate, linoleum or parquet, then it is better to use plywood or OSB sheets. Moreover, under the laminate, one layer of sheets with a thickness of 12 - 16 mm is enough, and under linoleum or a package, sheets of 10 - 12 mm will have to be laid, in a double layer with a shift between the layers.
Method number 3. Floor insulation in a wooden house
The insulation of the floor of the first floor in a wooden house is somewhat reminiscent of the option using a wooden crate. In wooden houses, all interfloor ceilings, including those on the first floor, are made two-layer.
The design is based on massive wooden logs. From below, it is hemmed with a layer of subfloor, and from above, of course, there is a finishing coating. As you probably already guessed, in the middle we will have a heater.

- When the bottom draft coating is hemmed and all the wood is impregnated with protective compounds, you can proceed with the installation of the waterproofing layer. Unlike apartment option, waterproofing the subfloor in a wooden house is done more thoroughly. Moreover, it is laid not only on the subfloor, but also wrapped over the log, in a single monolithic layer;
- If you have chosen technical polyethylene, then it is covered in 2 layers and fastened with a stapler. Roofing material or modern rolled waterproofing can be installed in 1 layer, but they sit on bituminous mastic, which in turn is also a good waterproofing agent;

- In a wooden house, there is already enough to burn, therefore, in most cases, preference is given to non-combustible material. Dense basalt wool slabs are now considered the most popular. The depth of wooden logs, even in the lungs country houses taken at least 150 mm. Accordingly, basalt wool is laid either in one layer of 150 mm, or in two layers of 75 mm, always with a shift between the layers;

- Expanded clay is deservedly considered the second no less popular material. This is a popular, budget option. According to the rules, expanded clay should fall asleep a couple of centimeters below the finishing floor, that is, the upper cut of the log. But I always recommend from the start to fill up any loose insulation flush with the lags. In any case, over time it will shrink and you will get the same ventilation gap;
Expanded clay is produced in the three most popular fractions. The sand has a diameter of up to 5 mm, the diameter of the gravel does not exceed 2 cm, everything that goes beyond these limits is called crushed stone. So, in order for the insulation layer to be more dense and monolithic, before backfilling, you need to mix expanded clay gravel or crushed stone with expanded clay sand in a ratio of 1: 1.

- As I already indicated in the table, mineral wool and expanded clay are hygroscopic materials. Therefore, from above such a heater in wooden houses will need to be covered with a layer of vapor barrier or simple polyethylene. This is especially true for country houses with seasonal residence. Otherwise, in a periodically heated room, the insulation will quickly become saturated with moisture and lose its properties;
- The last stage of the arrangement of insulation, as usual, we are installing the final coating. In capital wooden houses, a tongue-and-groove floorboard is often used. In light country houses, plywood or OSB is mounted, and what is on top is laid.

Method number 4. Warming with extruded polystyrene foam
Extruded polystyrene foam is a special modern material, and its use should be discussed separately. To be honest, I think that as a heater for the floors of the first floor, this material is close to ideal. There are several variations of it, in our great power it is better known under the brand name Penoplex.

The uniqueness of penoplex lies in the fact that, in addition to all other characteristics, it absolutely does not let water through, and most importantly, it has a serious margin of mechanical strength. It is penoplex that now insulates highways and runways of airfields.

I have already mentioned that it can be laid in a crate, although, in my opinion, this is too expensive pleasure. In the case of a crate, it is quite possible to get by with dense foam sheets of more than 30 kg / m³. By the way, they are at least 2 times cheaper. There, after all, anyway, the lion's share of the load falls on the support bars.
Penoplex showed itself best in two cases. This is when arranging a laminate and as a heater under a screed. Thanks to the grooves located along the perimeter of each sheet, such flooring is mounted quickly and completely hermetically.

If you already have a basement insulated, then you can safely use sheets of extruded polystyrene foam with a thickness of about 30 mm. Even in a harsh climate, this will be enough. The preparation of the base is the same everywhere. Theoretically, you can not lay a layer of waterproofing under the penoplex, but it will not be a mistake if you play it safe and cover the room with polyethylene.
- The sheets of insulation are connected to each other through grooves, and these grooves are additionally glued with any suitable glue, this stuff is now more than enough on the markets;
- As you know, the laminate is mounted using a floating technology, that is, it is not rigidly connected to the base. Therefore, further we cover the insulation with a polyethylene foam substrate and already lay our laminate on it.

Penoplex has one weakness, he is able to easily transfer large loads only if they are evenly distributed over the entire plane. The material may not withstand point pressure. Laminate, in turn, provides a uniform distribution of this load.
By the way, using a similar technology, you can equip the base for linoleum or piece parquet. A foam layer is also laid there, a thin foam substrate is laid on it, and OSB is mounted instead of a laminate to evenly distribute the load. Sheet thicknesses up to 10 mm are sufficient here.

As I mentioned, penoplex, almost the best way for screed insulation. Moreover, the screed can be either ordinary cement-sand or modern self-leveling.

- The technology of arrangement here is also quite simple. After laying the waterproofing and the foam layer, a metal reinforcing mesh is laid on top. Reinforcement too thick for ordinary apartment not worth using. I usually take wire with a thickness of 4 to 6 mm;
- After all, the thickness of the screed itself often does not exceed 20 mm. This is only on large areas, ranging in size from 50 - 70m² concrete screed made up to 40 mm thick;
- If you are going to use cement-sand mortar, then you will first need to fix the beacons, and between them already lay the reinforcement. Lighthouses are easiest to fix with a stapler. When everything is ready, the solution is thrown on top and aligned with the beacons by the rule;

- A self-leveling screed is generally a “song”, you do not need to have any special talents and skills to install it. There are instructions on the package to prepare the mixture. Then this mixture is poured onto a layer of reinforced foam and slowly helped to level it with a spiked roller.
Important: Penoplex is allowed to be mounted exclusively on a flat floor. Insignificant, smooth differences in height within 3 - 4 mm are allowed.
Method number 5. Warming with a dry screed
The so-called dry screed is used exclusively for warming the concrete base. At a cost price, it comes out cheaper than many of its competitors. Expanded clay mixture (sand - gravel) is taken as the basis there.
The point is to align the loose base as evenly as possible along the horizon. After that, a rigid monolithic flooring is mounted on it, using floating technology. OSB sheets, waterproof GKL or thick, about 10 mm plywood are often used as flooring.

It is quite difficult to ideally level loose expanded clay without skill. Therefore, I recommend that you first mount the support beacons on the floor.
It is not worth biting into durable concrete with self-tapping screws. It is quite enough to plant beacons on alabaster pyramids. After that, you simply fill the room with expanded clay mixture and distribute it according to the rule over the lighthouses.
The sheet flooring is mounted in 2 layers, as usual with a shift between the sheets. Such installation will not be difficult, there you can safely drive through the screws, they will not damage the expanded clay pillow. And note that such flooring is called floating because it is not rigidly attached to anything. The gap between the wall and the flooring is left within 10 mm.

Output
Now you know how to properly insulate the floors on the first floor. In the photo and video in this article, I placed related information on the topic of floor insulation. If you have any questions, write them in the comments, I will try to help.

If you want to express gratitude, add a clarification or objection, ask the author something - add a comment or say thanks!
It is necessary to deal with the insulation of the apartment even at the stage of repair, although some people realize it a few years after its completion. And if it is still possible to correct the situation with the help of wall insulation, then doing the same with the floor is much more difficult. Therefore, insulating floors in an apartment should be a top priority, especially when the property is located on the ground floor.
In this article we will talk about how to insulate the floor in the apartment.
Types of floor for an apartment
In modern apartments, two types of flooring are usually installed:
- Concrete;
- Wooden.
We will talk about their features below.
Wooden floor
Wooden board remains one of the most common types of coatings. The advantage of such flooring is environmental friendliness, presentable appearance, practicality and affordable price. The wood coating makes the flooring warmer, but even in this case it is necessary to insulate the floor in the apartment on the 1st floor.
Concrete floor
In multi-storey buildings in apartments, concrete flooring is most often found. They are based on concrete slabs. If on the middle floors they warm up a little, since there are living quarters above and below, then the insulation of the floor of the first floor in the apartment is simply necessary in order to walk on it without fear of catching a cold.
Wooden floor insulation
For insulation, a warming material is placed under the rough coating of wooden flooring. The instructions for warming in this case are as follows:
- First, logs are installed on the interfloor overlap in one plane along the horizontal level - wooden bars, the size of which is 70 * 50 cm. The logs should be placed at intervals of 35-40 cm.
- Insulation is laid between the lags.
- A rough coating is installed on top of the insulation.
Advice! As a rough coating, you can use moisture-resistant plywood, floorboards, chipboard.
- At the end, a finishing coating (parquet, laminate, etc.) is laid on the rough coating.

Underfloor heating options
In order for the insulated floors in the apartment not only to retain heat, but also to heat the air, they can be used different types warm floors.
Such coatings are divided into:
- Electrical. They can be mounted directly into the screed (if a heating cable is used) or laid over a rough coating (if heating mats are used).
- infrared. They are a special film installed under the finish coating.
- Water. In this case, the coolant (water) circulates through pipes built into the screed. Water in this case is constantly heated and pumped into the heating system.

Warm floors in an apartment on the ground floor will not be superfluous, because the better it is to insulate the floor in the apartment, the more comfortable it will be.
Insulation of concrete floors
In order to insulate the concrete flooring in the apartment, the insulating material should be placed between the ceiling and the leveling screed.
The technology in this case involves the creation of a multilayer structure.
- First, a thick film is laid on the concrete floor in such a way that at the joints it overlaps by at least 10 cm. The film is used to create waterproofing.
Advice! To prevent the film from wrapping, you can fix it with tape.
- The selected insulation is placed directly on the film. Insulation sheets should be placed as close as possible to each other, as well as to the walls.
- Another layer of a thick film is laid on top of the insulation, which ensures the moisture resistance of the entire insulation structure.
- The floor surface is reinforced with a metal mesh.
- At the final stage, a cement screed is poured.

Floor insulation materials
In order to effectively insulate the floor, you need to choose the right insulation for the floor in the apartment. Today, the choice of such materials is quite large.
Vermiculite
Vermiculite is considered the most environmentally friendly insulation today. It is obtained by processing mineral products. Sold in the form of plates, the thickness of which varies from 20 to 60 cm.
Tiled vermiculite is a rather expensive material, but you can use its analogue - granular vermiculite, the price of which is much lower. Vermiculite does not accumulate moisture, which is very important for an insulating layer.

In the photo - tiled vermiculite
Mineral wool
This is a cheap insulation that provides low heat transfer. If you are thinking about how to insulate the floors in an apartment so that it is cheap and effective, mineral wool will be an excellent solution.
However, it also has disadvantages: over time, wool becomes denser, which means that its thermal insulation properties decrease. In addition, it is not entirely safe for health.
Styrofoam
Polyfoam provides low thermal conductivity, prevents the formation of condensate, eliminates air convection inside the insulation layer. In addition, it is cheap and environmentally friendly. The disadvantages of polystyrene include its fragility and susceptibility to aggressive environmental influences.
Expanded clay
The advantages of expanded clay include strength, low thermal conductivity, durability. However, it absorbs moisture to a large extent, so you need to consider a competent floor waterproofing system.
gypsum fiber
Most often used as . This material is ineffective as a heater.
Polyurethane foam (PPU)
This is an innovative material that can be used to insulate any surface. Unlike other materials, PPU is simply sprayed onto the surface. This type of thermal insulation is considered the most effective today.

Bulk insulation
For floor insulation, special mixtures are also used, called self-leveling floors. They provide high heat and noise insulation, as well as waterproofing and fire safety. These coatings are environmentally friendly materials, and they can be mounted by hand.

We talked about how to insulate the floor in the apartment. We also examined the types of insulation materials used today. We hope our tips are helpful to you.
You can get more information on the topic from the video in this article.


