- Practicality score
- Material preparation
- What lamps to use
Original interior items made of wood bring comfort and coziness to the atmosphere. If you don’t surprise anyone with solid wood furniture, carvings on the shelves, then a floor lamp, chandelier or sconce made of branches or driftwood will definitely attract the attention of guests.
However, wooden products are not cheap, especially original ones. We offer to save money and create a lighting fixture with your own hands. In addition, this is a great way to implement bold ideas, while spending very little time. For the manufacture of lamps and sconces, you will need standard carpentry tools.
Practicality score
To understand how good a wooden lamp is, let's weigh the pros and cons of this unusual piece of decor.
Advantages:
- The environmental friendliness of wood is an important advantage over polymers and other synthetic materials.
- When heated and in its normal state, the tree emits aromatic substances from the resin - ether, which relaxes and heals.
- From wood materials any forms are created - raw materials can be easily processed with carpentry tools.
- An unusual option for interior decoration. Wooden chandeliers in homes and offices are rare.
Flaws:
Disadvantages are reduced by using different impregnations and appropriate timber preparation. Therefore, a wooden lamp can be called a useful accessory that will emphasize the style of the room and give it charm.
Material preparation
Lamps and sconces are made from any wood materials. Boards, branches, snags, plywood are used - the choice is determined by the idea. Nevertheless, no matter what the design for the lamp is made of, it is important to properly prepare the lumber:
- The wood must be dry.
- The blanks should be treated with complex impregnations with refractory and insecticidal, antiseptic components.
- It is worth choosing solid lumber without traces of decay.
In addition to wood, lampshades, carpentry tools and glue (preferably epoxy) are prepared for the manufacture of lampshades.
What lamps to use
Since wood is a flammable material, you need to be careful with the choice of light source. It is better not to use an incandescent lamp for nightlights and lampshades - when burning, it heats up both the cartridge and the wood.
LED lamps and ribbons are suitable for such homemade products - they emit white light and do not heat surfaces, they are fireproof. Diode tapes are ideally combined with wood of any color and texture.
Master class: lamps from boards
There are countless ideas for making home lamps. We will tell you how to make a homemade chandelier - you can take it as a basis for creativity.

For manufacturing, you will need beams of any section, for example, 100 × 100 mm or less, depending on the desired dimensions finished product and also a mirror. We recommend that you make a drawing of the chandelier in advance, which will reflect the lengths of the sides and the area of \u200b\u200bthe mirror part (it must protrude beyond the inner perimeter in order to rely on the beams).
- We make a blank from 4 bars of the same length.
- Next, we form a “castle” - we cut out a rectangular cup for half the thickness. A cup cutter or jigsaw will help with this.
- We assemble the structure and glue the parts together.
- After that, we paint.
- From the upper edge we stretch the wiring with a cartridge and fix it to the inside with brackets or small nails.
- Attach a mirror on top. It will act as a reflector of light. We fix on the corners.
- It remains to attach a suspension, for example, a chain.
The accessory is ready.
The video shows a version of the manufacture of such a lighting item, the principle of operation is the same:
More plank lighting ideas:


Lamps built into false beams. To make them, we connect 3 boards in a U-shape, wires and cartridges will hide in the resulting niche.

The wheel will create the effect of antiquity or a hunting lodge, a forest bungalow. We fix the electrician on the upper side of the wheel facing the ceiling.


One more interesting solution from the boards, see the video
Master class: lampshades and lamps made of plywood
Plywood is a lightweight material that can be easily processed. From it you can create a variety of products. For example, an unusual night lamp for a children's room or hall. It will look equally good on the terrace of a country house and in a city apartment.

Or like this:

For a night lamp made of plywood in the form of a house, take a universal scheme on which you can make any pattern!

Now let's start making:
- We transfer the templates prepared for all 4 sides onto a plywood sheet of any thickness.
- We send it for cutting under an electric jigsaw (or a laser machine for the finest study of petals and small fragments). You can use manual, but with a complex pattern you will have to tinker.
- Sand the cut edges with sandpaper.
- Roofing works are carried out in the same way. We cut it to size, make a pattern and grind it.
- We glue the workpieces together. In order for thin sheets to hold securely with each other, inside the house in the corners we install bars on which we glue the walls.
- We start the cartridge and fix it on the desired side of the interior. The wire can be brought into the pattern or a separate hole can be made for it.
- We fix the roof, we make the bottom. We glue all the details also on the corner bars.
- We make a suspension or mount in a convenient way.
The house is ready. A homemade night light or chandelier can be simple with a simple ornament or designer with a complex idea, wall or table. We present a video master class on making a house from several sections.
A plywood lamp can be of any kind. The main thing in working with this material is the need to cut holes for the passage of light. More photos of nightlights and lampshades:


To assemble such a lampshade from plywood, you need to cut a groove lock on each blank. Then the connection of parts can be carried out without glue.

A wooden chandelier diffuses light throughout the room. Connection of details is carried out by decorative self-tapping screws.
Master class: lamps and chandeliers from branches
Branches are the most accessible material for creativity. You can collect them at any time in the park or in the square near the house and immediately start creating. The difference between branches and other wooden blanks is that they do not need to be dried. As long as they have moisture, they can be bent and created different forms. Over time, they will dry out and no longer straighten out.

Before harvesting twigs, you need to decide on the design of the lampshade or chandelier. Will it be weaving or tying thick sticks with a rope, will the tree be combined with other products - forging, metal frames etc. Introducing a few interesting ideas:


A master class will help to make such an accessory for the interior:


Generalized instructions for creating a ceiling lamp from branches:
It is easy to make a lampshade from branches; special skills are not required for this, as well as tools.
Master class: log lamp
An ordinary log and even a snag can act as a blank for a chandelier. The main thing is that the material is dried and neutralized from insects and microflora.
- We give the workpiece the desired size.
- In the places where the cartridges are inserted, we make holes of the same diameter as the hidden part of the electrical device.
- We attach hangers.
- Insert electrical.
The master class can be viewed in the video:
Driftwood or stick unusual shape can be turned into a masterpiece by adding a simple lampshade to it:

Chandelier bottles
Combined lamps look non-standard, for example, a wooden base and glass bottles as plafonds.

Glass diffuses light and creates shades different color. To make such a plafond is simple:
- In a wooden shield we form holes for bottles. The neck should fit tightly, so we select the diameter as accurately as possible.
- We attach a suspension to the top of the boards. Chains look original, for which the structure can be hung from the ceiling.
- Preparing bottles. In order for them to give off light, the bottom must be removed. This can be done by heating the glass with boiling water, then quickly transfer the bottle under a stream of cold water.
- We insert the bottles into the holes in the board, we stretch the electrician through the neck.
The video shows the process of creating an interesting table lamp.
Wood has been used by people for the manufacture of household items since ancient times.
It is an environmentally friendly material that is easy to process. It is affordable, its price is not high, and the texture is very beautiful with the right finish.
It is for this reason that DIY wood ceiling chandeliers will never go out of style.
We create beauty ourselves
Product from driftwood
Each snag that you found in the forest has its own, individual and unique shape.
It is perfect in every bend, because it was created by nature itself. The main thing is not to spoil it all during processing, to cut off the excess, but not to violate the natural beauty.
It is necessary to clean the surface of bark, damaged wood and dry well. Then you need to carefully sand it using sandpaper.
The next step is to choose the type of lamps and purchase the appropriate accessories.
Note. Since wood is a flammable material, it is better to use energy-saving or LED lamps. They heat up slightly.
In order to lay the wires, you can make a series of holes with a long and thin drill.

After laying the wire, the holes can be puttied by choosing a putty of a suitable color. You can use a chisel with a narrow blade to select the grooves for the wire on the upper (ceiling-facing) side of the branches.
Lighting cartridges are attached to the ends of the branches.

The snag can be hung from the ceiling with chains. All wooden parts are varnished in several layers.
Lamp from the board and cups and saucers

This design is attached to the wall, but it can also be hung from the ceiling.
Manufacturing instructions:
- A suitable board (made of oak, ash, but pine can also be used) must be treated with stain and varnish.
- Holes are made in the bottoms of cups and saucers with a diamond drill for glass.
Note. If you use thin, translucent cups, the decorative effect is higher.
- Wires are connected to electric cartridges (see), passed through holes in cups and saucers, and everything is attached to the board.
- On the back side, the wires are connected in parallel with each other and the supply wire.
- The board is suspended from the ceiling with chains or a twisted cord.
If you artificially age the board, and use clay pots instead of cups and saucers, the design becomes completely different.
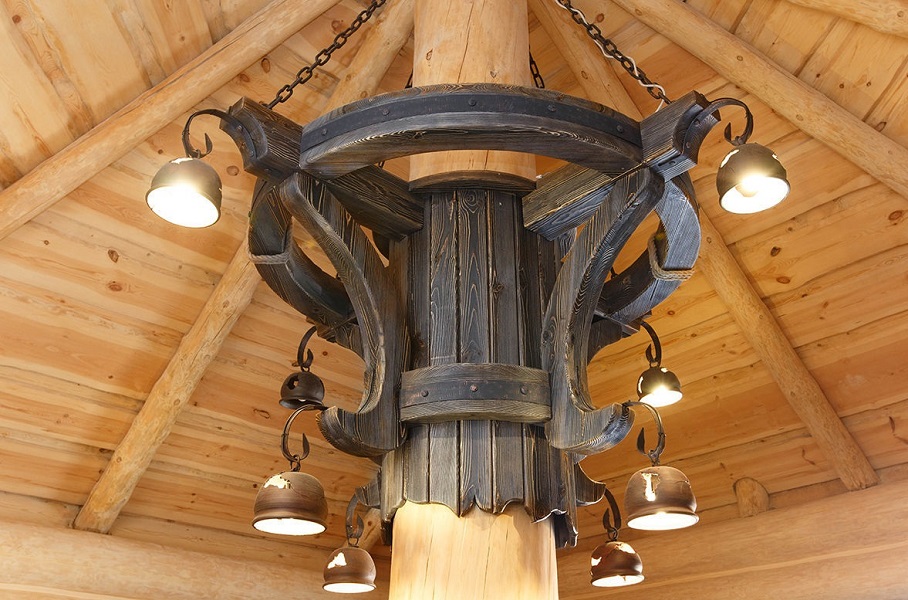
Country Style
Several boards irregular shape, processed using the brushing technique, covered with stain and varnish, a coil of hemp rope, several meters of chain and lampshades with cartridges - that's all that is needed to create an author's lamp with your own hands.
Do-it-yourself lamp - it's not difficult
Another design made by myself, in the video:
Previously, candles were used to illuminate the premises. They were mounted on the rim of a cart wheel suspended from the ceiling.
Wooden ones in the form of a stylized wheel with light bulbs in the form of candles are often found today.

Very often, forged details are used along with wood, emphasizing the style.

Forging and embossing in the finish. Here are the lamps in the house.
Clothespin lampshade
From what only people with imagination and skillful hands do not make crafts! Ordinary clothespins, opened with varnish or painted and attached to a wire frame or metal mesh- here is the lampshade ready for a completely unusual look.
Clothespin lampshade
Plywood lace
From thin quality (preferably birch) plywood using manual jigsaw you can create real masterpieces of applied art.
The manufacturing technology is very simple:
- On a sanded sheet of plywood, using carbon paper, transfer the pattern of details.
- Parts of the structure are cut along the contour.
- Inside each piece to be removed, a hole is drilled with a thin drill (1 mm).
- Cut out all internal parts.
- Clean the edges with small files of various shapes.
- Assemble the product with glue.
- Coated with varnish.
Advice. PVA glue turns yellow over time. It is necessary to carefully remove its residues on the visible parts of the product (it is better to use special glue for wood).
If you use incandescent lamps, their power should not exceed 40 watts. They should be placed as far away from wooden parts to avoid overheating and ignition.
Carved and chiseled chandeliers
In the Middle Ages, chandeliers were made of metal (copper, bronze or silver) and were very expensive.. It was then that wooden carvings with a coating imitating metal appeared.

Ceiling wooden chandeliers are often made on the basis of turned products.

Details are made on a lathe, photo
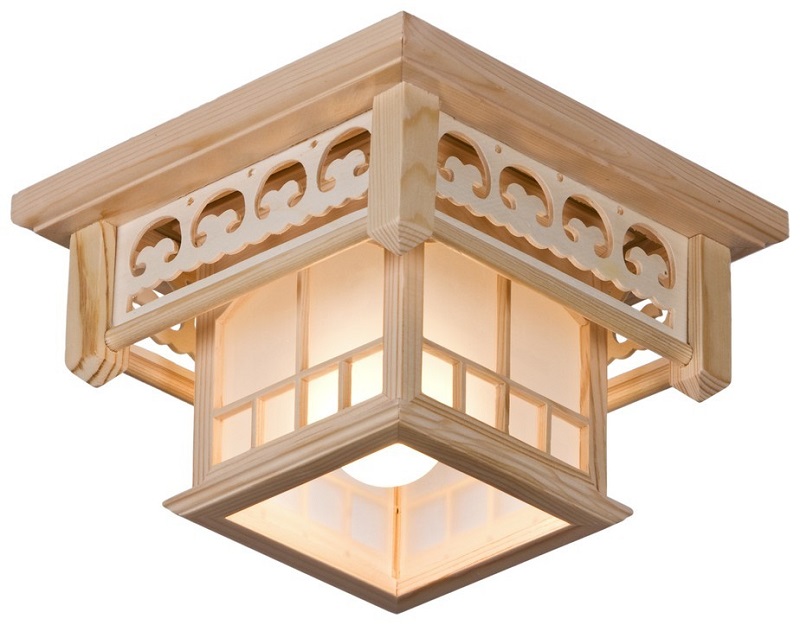
Oriental lamps
For a room decorated in Japanese or Chinese style, metal is not used in the design of wooden lamps (see). The shape is usually rectangular, and frosted glass is used instead of rice paper.
Chandeliers can be suspended or fixed to the ceiling.

In oriental style.photo

Ceiling lamp, photo
Design solutions from veneer or wooden plates
Often for the manufacture of wooden products, valuable species veneer or bars and plates of various shapes and sizes are used.


If you hang it from the ceiling - there will be a chandelier, photo
Wooden chandeliers can be matched to any interior style precisely because wood is a versatile material.
Light is one of the most important factors that affects our life. In addition to the main function of lighting, it can create a unique atmosphere, help to optically manipulate the size of the space, and also has great decorative properties.
Light is an important garden and terrace architect. He can create romantic mood, enhances the beauty of plants or simply dazzles the darkness, allowing you to spend time outside the house in the late evening and at night. The lighting itself can take on highly decorative forms, or, conversely, makes it possible to enjoy its elegant simplicity.
A brief overview of the types and styles of wooden lamp designs
Many people like classic lanterns that illuminate an open space. wooden part garden lamp will fit perfectly into a cozy composition. With the help of such lighting, you can create a real idyll, especially on hot summer evenings.
For owners of beautiful country houses made in the style of old wooden castles or taverns, lighting fixtures made with wooden elements would be appropriate. Large chandelier made from natural wood, will decorate the entire interior. For example, a wooden wheel chandelier.

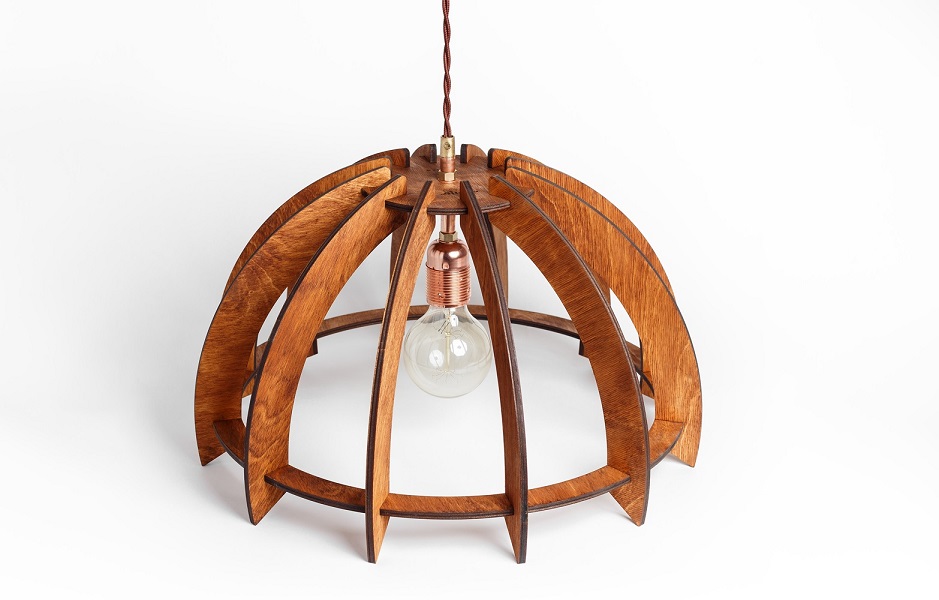
An original proposal for a wooden lamp for the living room is a chandelier that has been twisted with natural wood veneer strips. This three-dimensional, intriguing shape will provide a subtle play of light and shadow in every living room. And during the day it will be a decoration. Wood veneer coated with acrylic lacquer will delight others for many years.

An addition to the interior in the style of minimalism will be a wooden floor lamp or table lamp, made in a thin, simple and strict geometric shape without curls and various additional decorations. Finished with acrylic lacquer, they will add charm to any bedroom.

For a stylish decoration of the interior of the sauna (bath), it would be appropriate to use lamps in the appropriate style. decorative grille, made of wooden planks of various designs, will not only become an elegant and harmonious decor for the steam room, but will also protect the lamp from possible damage and will contribute to the soft diffusion of light, creating a relaxing effect.

If you are bored with the monotony of the interior, in particular, in matters of lighting, and you are ready to change the design of the lamps yourself, feel free to get to work!
Instructions for making wooden lamps
Consider a few master classes on how to make wooden chandeliers with your own hands.
To perform such work is simple, the result will conquer the elegance of forms.
Lamp in the form of wooden squares
What is included in the geometry of the room? Walls, furniture, curtains, doors and windows. But not only. You can refresh the design with an unusual chandelier, the shape of which will resemble rectangles connected by the sides of the faces to each other, inside each rectangle there is one diagonal.

To make a chandelier you will need:
- 1. 18 pcs. wooden planks.
- 2. staple gun and staples.
- 3. Finished metal lamp socket.
- 4. Paints for metal.
- 5. Ruler.
- 6. Pencil.
Step-by-step instruction:
- Preparation of the frame of the chandelier from wooden planks in natural color. You will need 4 pcs. long identical strips - for vertical elements, and 8 more pcs. smaller - for transverse inserts.
- Create a chandelier frame. You need to take 2 pcs. long strips and place them parallel to each other, 2 pcs. short slats are placed at the ends, perpendicular to the long slats. With the help of a staple gun, the strips are stapled together. It turned out one facet of the future frame. You will need to perform the same element again.
- Then, using 2 pcs. the remaining short strips prepared earlier, the rectangles are fastened together in the upper and lower parts. You can add a designer look to the entire structure by attaching a diagonal bar to the resulting frame inside each rectangle. To make the resulting frame look neater, before attaching the inner diagonal slats, their ends are cut at an angle of 45 degrees.
To fix the light bulb itself, you need to take a ready-made metal pendant for lighting. Metal parts are painted in the desired color. While the paint dries, you need to cut a hole in the frame to fix it to the factory hanger. The diameter of the hole should not be much larger than the diameter of the lamp suspension tube. But the inside must be secured with a washer or limiter. When the paint dries, you can fix the chandelier to the ceiling, fixing all the elements well. The last - the light bulb is screwed in.
The advantage of such products is that the wood is easy to work with, it is safe, because all parts that conduct electricity are hidden. A handmade chandelier can be adapted to any interior.
Chandelier-tangle
Making a spherical lamp (in the form of a ball), which can be used as a night light, if a low-power light bulb is provided.
Materials and tools:
- 1. Very thin wood veneer (the main element of the lamp).
- 2. Glue for wood (PVA can be used).
- 3. Clamps.
- 4. Electric holder for a low-power light bulb.
- 6. Pencil.
- 6. Scissors or stationery knife.
Stages of work - blanks, fastening, connection
If there are no ready-made veneer strips, then you can cut them from thin plywood or thick cardboard. The strips can be marked with a pencil or just cut out, as they don't have to be the same. All designs are welcome.
- Pasting blanks.

In a circle of a certain diameter, strips are folded, gluing them at the points of contact. For a good gluing effect, the joints are fixed with stationery clips (binders). In the process of such twisting and gluing, inserting veneered hoops of different diameters inside each other, a spherical structure is obtained.
- Cartridge mount.
From a piece of plywood you need to cut a square - a limiter. In the center of the square, a hole is cut out with a diameter the same as the electric cartridge, which must be threaded inside the cut out square until it stops. Inner part cartridge is fixed with reverse side square clamp chuck. A wire with a fixed holder for a light bulb is pulled through a model of a chandelier wound from veneer until it stops with a plywood limiter.
- Connection.
The wire is pulled out of the chandelier, taking into account how it will hang.
Then the light bulb is screwed in, gently pushing the strips apart and then returning them to their place. All fasteners are checked, and now you can turn on the finished chandelier in the network.
Loft lamp design
The simplicity of the details distinguishing feature loft style. It is quite easy to do the design of a lamp with your own hands - a sconce made of wood in this design.
You will need materials and tools:
- 1. Wooden bracket for mounting the lamp.
- 2. Electric cartridge, plug and light bulb.
- 3. Textile wire.
- 4. Spray paint for wood.
You can make a wooden bracket yourself, or you can buy a ready-made one. Drill holes in the right places through which the wire will be threaded and with which the lamp itself will be attached to the wall. The next step is painting the bracket. In accordance with the chosen design of the color palette, the wooden blank is painted.
After each layer of applied paint, you need to allow time to dry.
A wire is threaded through the hole, which is wrapped in a beautiful loop around the bracket. An electric cartridge with a light bulb is attached to the top of the wire. An electrical plug is attached to the other end of the wire. The lamp is ready.
Veneer Chandelier
Unique hanging lamp made of flexible veneer will decorate the dining room or bedroom - its rounded shapes and neutral colors will suit the design of any interior.
Would need:
- elastic plywood sheet (the length of the sheet determines the height of the chandelier frame + a small piece of plywood for attaching an electric cartridge);
- 2 pcs. wooden hoops (hoops can be of the same or different diameters);
- stationery or building clips;
- glue gun;
- ruler;
- pencil;
- stationery or construction knife or large scissors.
Execution technology
We prepare tools and materials, and proceed to the master class.
- Cutting strips of plywood for the frame of the chandelier.
With the help of a pencil and a ruler, parallel lines of the same length and 2 cm wide are drawn on the plywood - the borders of the strips of the future elements of the chandelier, which are then cut out with a clerical knife or strong scissors. You can diversify the design of the future chandelier by cutting strips of different widths. In addition to long strips, you need to cut 4 pieces. bands that are almost 2 times smaller than the main ones. The function of these short strips is to hold the structure of the chandelier together by holding two wooden hoops together.
- Making a limiter for an electric cartridge.
In order to get a limiter right size, you need to take the remaining fragment of plywood that was prepared earlier, put the hoop of the upper part of the chandelier on it and trace the outer contour of the hoop along the plywood with a pencil. Then, using large scissors, a limiter is cut out. In the center of the limiter, you need to cut a hole with a diameter such as an electric cartridge. A limiter with a hole is glued to the top of the hoop of the chandelier layout.
- Fixing the cut strips on wooden hoops.
First of all, 4 pieces are glued to the wooden hoops. short strips, strictly at 90 degrees to each other, to tighten the structure. The hoops should be exactly parallel to each other. For better adhesion, you need to use clamps. After the 4 main strips-holders are glued, the space between them should be evenly filled with the remaining long strips, gluing them in the same way, fastening them with clips on the upper and lower hoops.
An exclusive do-it-yourself wooden chandelier will become a worthy decoration of the interior. Unusual wooden lamp selected according to the style of the room. The variety of ways to design lighting fixtures is amazing. It is not at all necessary to purchase expensive models of recognized design experts. It is quite possible to assemble the original wooden chandelier with your own hands. The proposed ideas will make it easier to choose the shape of a wooden lamp.
Timeless classic
Massive wooden ceiling chandeliers appeared at the dawn of the 16th century. Most often, tree branches served as the main ones, the edges of which were crowned with candles. Castles of wealthy gentlemen and churches were the main area of application of original lighting fixtures at that time. But if earlier wooden chandeliers performed a purely practical function of lighting, now more attention is paid to appearance in terms of room decoration.
The emergence of new practical materials and the development of technology has not weakened interest in natural sources. The tendency to take care of the environmental friendliness of surrounding objects and one's own health is one of the reasons for the growing popularity of wooden chandeliers.
Attention! A variety of forms of execution of wooden lamps allows them to be used not only in traditional rustic styles, but harmoniously implemented in more modern trends interior.

Antique wooden chandeliers are still relevant for country and chalets. Adherents of a brutal interior can easily assemble a simple chandelier with their own hands, where a powerful frame acts as a frame. wooden beam. For lovers of original configurations, designers have prepared a lot of interesting ideas, and many ideas can be realized on their own.
The concern about the high cost of a chandelier is justified only when choosing complex configurations, where jewelry work is required to process an array or additional expensive materials are present. In most cases, the price is in the budget category.
A variety of wooden chandeliers are shown in the photo:

Advantages and disadvantages of wooden lamps
A wooden lamp is always stylish. Buying a ready-made model is not difficult. But if a decision is made to decorate a wooden chandelier with your own hands, it is better to familiarize yourself with all the positive and negative aspects of such a choice in advance.
Main advantages:


Numerous advantages of chandeliers are overshadowed by some disadvantages:
- Initially, the tree belongs to flammable materials, therefore, it needs special processing. Protection with fire retardants and insecticides will prevent ignition of the lighting fixture or damage to the frame by insects.
- If you want to do it yourself or buy a chandelier made of oak or mahogany, you will have to part with a large sum.
- The use of insufficiently dried wooden blanks in work or poor-quality pre-treatment of the material will lead to deformation of the chandelier.
- Even despite reliable protection, the use of wooden lamps in rooms with increased level humidity is undesirable.
Attention! When designing a lighting fixture, you should consider in advance the type of lamps used. For these purposes, LED spotlights or fluorescent lamps that are not prone to heat are best suited.
Wooden ceiling chandeliers various models presented in the photo:


Antique chandeliers
Antique wooden lamps can be conditionally divided into groups according to the category of complexity. Some are presented in simple forms and are available for making with your own hands, even for novice craftsmen. Others are complex and require specific woodworking skills and special processing tools.
Studying a wide model range will give an idea of the possible options for decorating a room with a wooden chandelier.

Simple geometric shapes, connected by chains and decorated with spotlights, are quite within the power to assemble on your own. The deliberate roughness of a wooden chandelier will look relevant in village hut, a simple country house.

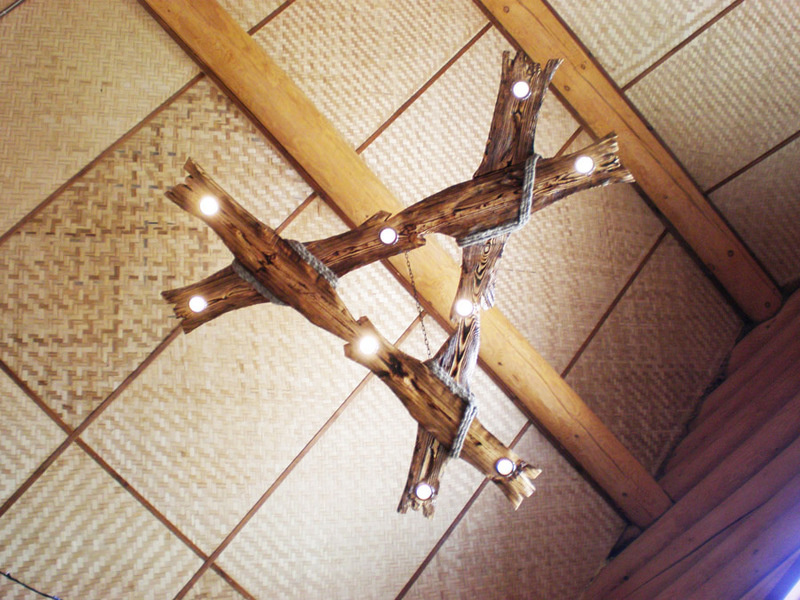
Another original model of a wooden chandelier, showing the simplicity of a rustic style. The zest of the lamp is given by light ropes, contrasting in color with dark wood. The configuration is ideal for do-it-yourself assembly. A suitable entourage for such a lamp is a country-style interior.

Another example of a laconic chandelier made of wood, which does not require significant effort to self-manufacturing. A pair of bars, a small piece of chain and 4 LED lamps s - and the main part of the kit is already at hand.

Artificially created contrasting veins are part of the designer's intention. You can assemble a similar model of a wooden chandelier in one weekend. The only thing you should take care of in advance is to find suitable shades, classic glass will not be appropriate here.

Working on numerous planks of plafonds can take a lot of time and effort, therefore, with insufficient experience, it is better to purchase such a wooden lamp in finished form.

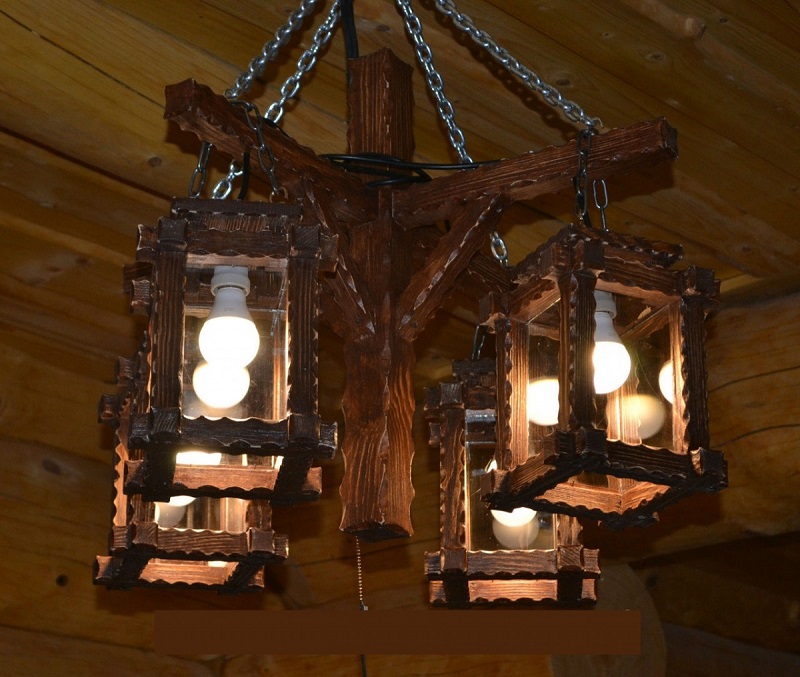
The chandelier, where wood, metal and glass are harmoniously combined, invisibly plunges you into the atmosphere of the Middle Ages, where you can meet a knight in armor along the dark corridors. This lamp will fit perfectly into the interior of a spacious living room. country house or a cafe where the theme of antiquity is interestingly beaten.
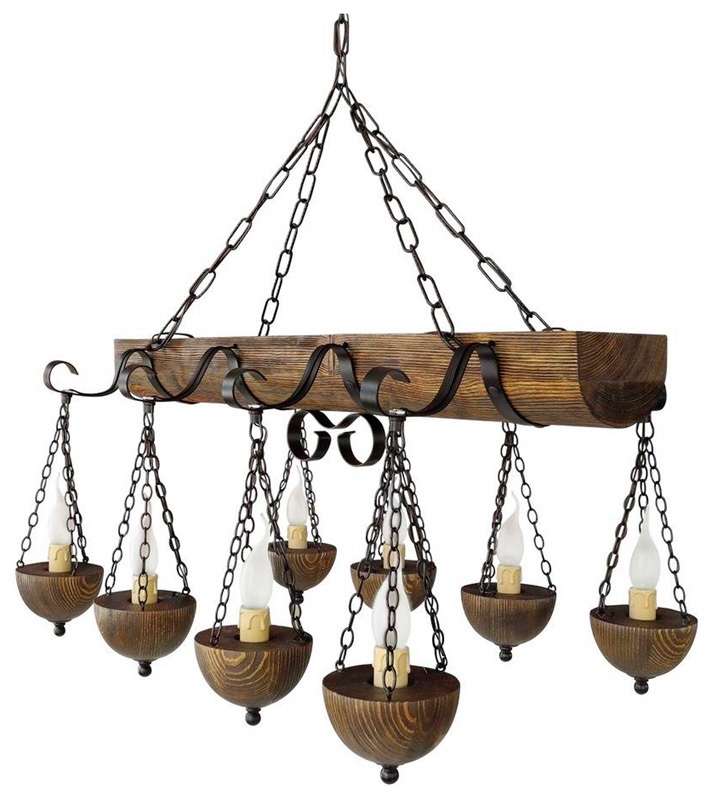
Candle-shaped lamps most closely match the theme of antiquity. ceiling chandelier made of wood with numerous hanging elements is able to dispel the darkness even in a large room. If you have experience working with metal, you can assemble a similar wooden model with your own hands.

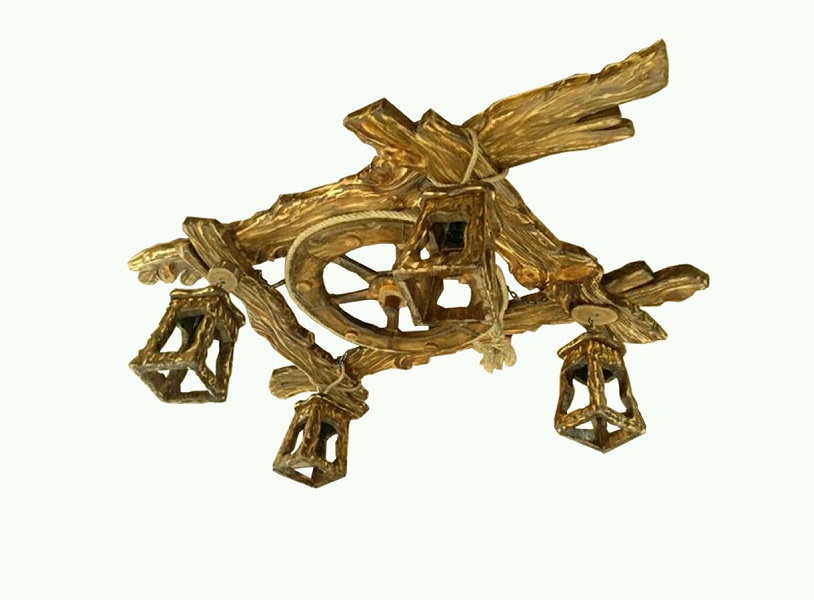
Another example of the designer's original idea, where everyday objects become an accent element of the interior. A hunting lodge or a rustic tavern is the right place for a non-trivial wooden chandelier.
Comment! Similar wooden models on chains are best hung in rooms with high ceilings. The standard height of 2.5 m will not be enough.

Peculiar torches are another easy way to find yourself in a medieval setting. The decoration of the wooden lamp with metal and candle-shaped lamps fully correspond to the idea of antiquity.

wooden chandelier, where the frame resembles the steering wheel of a ship, looks more sophisticated than previous copies. Such a model made of wood will harmoniously fit into the interior with a Mediterranean style. It will be difficult to translate the idea into reality with your own hands due to the presence of small details and glass shades.
Mastering the manufacture of such a chandelier made of wood will be within the power of experienced craftsmen. The lamp is ideal for an interior where eco-style dominates.

The horns of wild animals as the frame of a wooden chandelier - what could be more interesting. It will be difficult to find such a basis, so it is better to satisfy the vending idea with a finished copy of the lamp.
The section of semi-antique wood chandeliers is completed by a photo of a kind of combined copy of the two previously presented models.
Original design ideas
Country, chalet, eco style - not all areas where wooden lamps are applicable. The Art Nouveau interior often includes non-trivial solutions to familiar household items. This tradition extends primarily to chandeliers.
Each individual will determine the place and suitable design for the original models presented below.

The laconic outlines of a wooden chandelier topped with LED lamps along the edges of the branches are optimally suited for an interior where minimalism and functionality are at the forefront.

The complex-looking geometry of the next wooden lamp is quite simple to do with your own hands. LED lamps and bars corresponding to them in length are the main details of a non-standard wooden chandelier.

Another example of a concise and at the same time original form of a lighting fixture made of wood. Here you will need to prepare in advance the grooves in the wooden planks for laying the electrical cable. Lamps of a different shape give a completely different perception of the chandelier than in the previous sample. The undoubted advantage of both wooden models, which can be easily assembled with your own hands, is the ability to illuminate a large space around, so they are ideal for arranging a terrace or gazebo.
Another wooden copy designed for outdoor use. The unusual shape of a wooden chandelier is fixed on a pole and provides full illumination of the surrounding area.

A real wooden masterpiece, appropriately complemented by glass inserts, will adequately decorate the most presentable interior. The Scandinavian style or another eco-friendly direction will organically perceive a sophisticated wooden chandelier.
An identical model of a smaller luminaire is suitable for the interior of a small-sized room. It can be a kitchen or a children's room.

Returning to the topic of geometry, I would like to present another uncomplicated and at the same time interesting copy of a wooden chandelier, which is not difficult to assemble with your own hands.

An unusual combination of an openwork base, complemented by matte shades. Such a chandelier made of wood and glass will not go unnoticed and will successfully act as an accent element of the interior.

The lamp made of metal and wood is highly functional due to the ability to adjust the direction of the light fluxes. The idea is difficult to execute with your own hands, so it’s better to stop at buying a finished copy.
DIY wooden masterpieces
To assemble a wooden chandelier with your own hands, experience with wood will not be enough. You will need some basic electrical knowledge. You can take a ready-made model from wood as a basis or develop your own original design. Depending on the skills of handling metal, they select only a wooden lamp or a lighting fixture, supplemented metal elements. The photo gallery will once again demonstrate possible options DIY wooden chandeliers.


Wooden chandeliers are a stylish interior element that is suitable not only for rustic design trends with a national flavor, but also modern ideas decoration of the premises. Country and chalet, Scandinavian and eco style, modern and loft - for each style you can choose a successful model of a wooden lamp.
Such a product will look great in a country or country house, in the hallway of the bathhouse and even in an apartment furnished in a rustic style. But finding it in stores is far from easy, but affordable price and not at all possible. You should not rush to search for online stores, because you can easily do it yourself. Consider two variants of the product, which differ from each other in the degree of severity of manufacture.
Self-assembly of a product of a simple design
To make a wooden chandelier of a similar plan with your own hands you will need the following:
- Wooden beam of square section 10x15 cm.
- Battery powered LED lamps.
- Chisel.
- Hammer.
- Needle file.
- Drill.
- Antiseptic.
- Sander (sandpaper fine and coarse grain).
- Stain.
- Hanging hooks.
- Chain.
- Linen rope.
 DIY wooden chandelier
  Chandelier made of wood and bottles
The main energy-saving lamps and their features.
A wooden chandelier is assembled with your own hands as follows:
1. We mark on the beam the places of the future location of the lamps. We draw the contours of the appropriate sizes.
2. With a drill, we make many holes inside the contour, splitting the wood as finely as possible.
3. With a chisel and a hammer, we knock out excess wood. Holes are preferably made through.
4. Using a needle file, we align and grind inner sides squares.
5. We skin the entire surface of the timber by hand or with a grinder.
6. We treat it with an antiseptic in several layers.
7. We protect the surface with sandpaper of the finest grain, clean it from dust.
8. We cover the beam with a stain of the desired color.
9. On the back of the product and on the ceiling, we make holes for hanging hooks.
10. We cut off segments of the required length from the chain, attach them to the hooks on the beam.
11. To enhance the decorative effect, we wrap a linen rope around the edges and in the middle in several rows around the timber. The ends of the segments are fixed with liquid nails.
12. We insert light bulbs into the holes, which will be fixed in the sockets with liquid nails.
13. Instead of LED lamps, you can insert cartridges into which energy-saving light bulbs will be screwed. The wiring will be hidden from the top of the product and in the attachment chain.
 DIY veneer chandelier
  DIY chandelier from branches
DIY options for step by step master class from various materials.
Do-it-yourself assembly of a wooden chandelier of a more complex design
To make a wooden chandelier with your own hands of a more complex plan, you will need the following tools and materials:
- Raw or debarked logs.
- Shingles ( wooden slats) 2.5 cm wide and 0.5 cm thick.
- Linen rope.
- Ammo.
- Sandpaper coarse and fine grain.
- Stain.
- Chainsaw or manual.
- Drill and cutter.
- Screws with bolts.
- Solvent (turpentine, acetone or gasoline).


The production of the product is carried out as follows:
1. A third of its thickness is sawn along the log (a fourth part is possible). You will need three of these blanks.
2. Their length is determined individually depending on the desired dimensions of the product.
3. The bark is removed from the raw logs.
4. The surface of the blanks is wiped with a solvent from the resin that has come out.
6. Then they are folded into a triangle so that one edge of the workpiece overlaps the edge of the other, and the second lies on top of the edge of the third.
7. At the docking point, marks are made for drilling. In the center is a large hole for the cartridge, on the sides of it are smaller ones for screws.
8. The cutter cuts large through holes with a diameter that allows you to insert a cartridge into them. A drill drills through holes of smaller diameter for screws.
9. Closer to the vertices of the triangle, three more holes are drilled from the cuts of the logs for threading the ends of the rope into them, on which the product will be hung.
10. The surface is skinned with fine sandpaper.
11. The shingles are sawn into small parts of the same length.
12. Plafonds are assembled from chopped shingles, which was previously covered with an antiseptic and stain. Two parts are placed parallel to each other, two more elements are placed on their edges, which form a square. One plafond consists of 24 elements.
13. Fastening parts in the ceiling is carried out with liquid nails.
14. The blanks are covered with an antiseptic and stain, assembled together and fixed with screws and bolts.
15. Plafonds are glued to the blanks with liquid nails or wood glue.
16. The assembled product is varnished.
17. The edges of the ropes are threaded into the holes, which can be hung, for example, on a hook.
You can make a completely elementary version of the product, which is presented in the form of tightly interconnected branches. They can be painted or varnished, and cartridges with lamps are hung on top of long cords. This option is suitable for a home in a minimalist or eco-style.


