First of all, it is worth noting: learn to make knives from improvised means - pieces of iron, ceramics and, first of all, stones, of course. Survival conditions are conditions for which for some reason you are not ready, and you may not only have a knife with you, but nothing at all. Therefore, I advise in ordinary campaigns, not only to train to make fire with your bare hands, but also to learn how to find hard flint stones, distinguish them from a pile of other stones, and make primitive fishing tools out of them: knives, scrapers, arrowheads. In general, everything is like primitive people. Such skills will come in handy even if you have a knife with you.
Personal features
The knife should be comfortable for you - carefully select the size, balance, shape of the handle and blade. The easier it is for you to recover with a knife, the greater the chance of survival. The handle should fit comfortably in both your dominant hand and your secondary hand, with different grips. From this it follows that the handle should be symmetrical, without one-sided bevels. Sharpening should also be symmetrical. You should be able to handle your knife easily and freely. I also recommend developing a double hand, in case one of the hands loses functionality due to injury. One psychological point is also very important - good command of your own knife will give you confidence in yourself and in the future.
Functionality
Here you can argue about a lot, now there is a lot various materials, steel grades, you can buy, order a knife to your liking from the master, I'm just thinking from my own experience. The example below falls into the category of edged weapons, but the article is not about that.
1) Fulltang and only fulltang
The handle can burn, melt, crack in the cold, split when dropped, in short, lose its shape. It should be possible to dial the handle on your own in field conditions. The fultang increases the weight of the knife, but gives the handle strength, allows you to use the knife as a chisel, pierce various pieces of wood by striking the head.
2) Massive head with corrugation and through hole
The head should allow you to stun animals, break off pieces of stones, straighten tin, break locks, latches, break car glass, in general, be a hammer. Hole for lanyard, cord, paracord. I think there is no need to explain that if there is a hole, it is more convenient to make a spear or a harpoon.
3) Handle
As it was written earlier, a handle made of refractory material that is comfortable for both hands and various grips is needed. A small emphasis on both the side of the blade and the side of the head.
The material must prevent the knife from slipping out of the hand under a variety of climatic conditions, be it rain, heat, frost.
There should not be any hollow separate welded handles with repair kits and NAZ. The hollow handle breaks more easily when loaded or dropped from rocks. As a child, I gouged the handle just by throwing a knife at a tree. Therefore, the handle material should not be fragile. If the hilt is already hollow, then it should be forged from the continuation of the blade blade to form a single whole with it, not be too thick and round.
The color of the handle is poisonous yellow or orange, so that the knife can be easily found under water, on sand, on snow, in stones, in the dark, etc. The color should be different from the natural background, to unmask the knife. On the black recesses that you see in the picture, you can wind the fishing line.
4) Garda
The guard is necessary. I met the opinion that the guard interferes in everyday life (although this, in my opinion, is complete nonsense, you just need to train more in everyday terms ...), but its protective function is simply necessary, especially if there is no lanyard, and the hand is frozen or weakened from hunger.
The upper part of the guard, by the way, can be made in the form of a ring - with a wide hole (like a bayonet-knives) so that a spear shaft can be inserted into it.
5) Blade
Steel the blade and the band as a whole, since we have a fulltang, should not be too hard. Hardness is brittleness and brittleness. Naturally, the steel must be stainless. The width of the butt is 4-5 mm. Yes, there must be a thick, load-bearing blade, the knife must endure blows on the butt with stones and sticks.
Blade length- 18 centimeters (shorter in the picture). A fairly long blade, but with such a knife it is more convenient to split wood for a fire with both hands, chop bones, tendons of large game, it is easier to reach a predator that attacked you or a loop in which you are entangled. With a long blade, it is easier to go through thickets of some kind of nettle.
A little bit about splendor. A shiny, polished blade can give a signal, for example, to helicopter pilots. Once my friends and I were crawling over the rocks and local kites began to dive at us - quite large predator birds. Taking out our shiny knives, we waved them away. A simple example, but even simple crows can actively attack you, protecting their nesting territory. And if you show them that you have something big and shiny in your hands, they will moderate their ardor.
Another big shiny knife can be a powerful argument when meeting with the most dangerous animal at the negotiation stage...
Serrating- makes it harder to sharpen field conditions. Its functionality when cutting game tendons can be replaced by a protruding sharpened heel.
middle part blades- straight. It is easier to separate chips from logs.
Rise blade starts with a ledge. Helps to cut tight ropes, slings. The rise itself is rounded, which makes it easier to remove the skin from the carcass of the animal.
sharpening only bilateral with direct descents.
Saw on the butt - it will come in handy so as not to dull the blade once again, but at the same time keep the butt unsharpened.
Bevel- not sharpened, for your own safety, lightens the knife and increases its "pungency".
Tip it is better to harden the knife, the soft tip can bend under load, and it will still break off when unbent, so let it break off better with stronger loads.
Hole near the guard helps to fix the knife on the shaft. However, its presence can weaken the knife for a break, it is better to do without it.
6) Scabbard
Make it out of leather. Why? Well, they can be cut, boiled and eaten.
It is better if the knife sits in the sheath without additional fixation of the handle, i.e. without fasteners, because the knife should be reached in one movement and not two. But we have a large heavy knife, so the clasp will come in handy, the main thing is to keep it undone for normal upright movement and fastened for complex movement. I had such a case, I was climbing the slope in front of the group, when the wolves that quickly appeared blocked my way and stood up, as they say, “point blank”. The knife was sheathed, and the hilt was fastened, and I understood that I would not have time to get the knife if they jumped. It was lucky that at the wolf closest to me, and he was standing two meters from me, a stone jumped out from under his feet, on which he leaned. He looked down. these seconds were enough, in a second I removed the slingshot from my neck, pulled out a large pine cone that had accidentally been lying around and fired at the wolves. They, as it is not funny, got scared and ran away. But, suppose I didn’t have a slingshot, and the wolves would not be afraid and attack first. Seconds decide in general ...
Where should the knife be hung?
When hiking - on the belt from the side convenient for you. He's the least bothered. Can also be worn on outside hips, but when crossing rocky obstacles it will need to be fastened and it will be inconvenient to get it with the opposite hand. When kayaking - on the chest, but so that in case of an accidental hook, when raising arms or oars, the handle does not reach the face and neck (the knife itself should be shorter in this case, in short, this is already a rescue knife). I once got a knife hit in the tooth like this, well, not in the eye.
Conclusion
A knife should be a knife: to stab, pierce, cut, split, separate, nothing more. There are historical solutions for a long time - these are hunting and fishing knives, as well as modern bayonet-knives. These solutions are the result of centuries of practice. Therefore, inventing now special knives for couch survivalists is simply ridiculous. Flexible brains, a trained healthy body and a good experience survive. Better practice more. Learn to make cutting and piercing objects auxiliary to the main knife from improvised means. Learn how to make and use bows, slings and spears. Practice setting traps. It is always easier to get a capercaillie, a sparrow, a gopher, a squirrel, a hare, a pika, a chipmunk, a mouse, a rat, a fish, and for this a knife is not a necessity.
I repeat: hunting, fishing, army - these are real knives for survival. What is now sold under the guise of survival knives against the backdrop of the popularity of the survival subculture are variants of real knives trimmed to legally acceptable versions. Manufacturing companies are well aware that they cannot sell knives en masse, the possession of which requires licenses. And for mass sales, they sell various acceptable models, thus undermining the long noble history of survival.
It's good that in Russia we have a lot of recreational places where you can join the survival in a variety of conditions. May God grant you good luck in this difficult task, health, quit smoking, don’t drink too much, take care of yourself and nature.
Addition
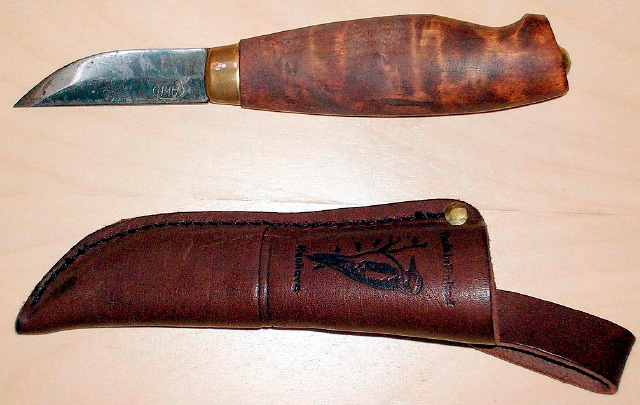
How to make a Finnish puuko knife with your own hands
Puukko is one of the main types of utility knives with thousands of years of history. This is a small (short blade, often less than the length of the handle), relatively easy to manufacture Finnish knife, the functionality of which is suitable for many tasks related to hunting and farming. Personally, I fell in love with this knife for its simplicity and asceticism: in its various variations, you can find yourself an excellent working tool, in which there will be nothing superfluous.
Search for information

This was my first knife making experience at all, so the whole process started with gathering information. Thanks to the site guns.ru, I learned the terminology and the main points in the manufacture of knives from the blade to the handle, I read an article about puukko on Wikipedia and studied links to third-party resources, from where sources for inspiration were subsequently taken, I watched a lot of videos on YouTube about manufacturing and features different kind Finnish An approximate drawing was made. I was ready to get to work and it boiled.

Main Ingredients
We will need: a workbench with a vise, a large file according to GOST 2 pcs., a wooden block (wood to taste), copper plates, an oven, emery, sandpaper, a hacksaw, a screwdriver, machine oil, pinotex, epoxy glue, marker, etc. small things.
Manufacturing
It all started with annealing in a furnace. With one of the files at a temperature of 800 degrees, a similar procedure was performed, followed by slow cooling.


Then, the blade and shank were brought to an adequate condition with a file and emery. A small jamb came out, I had to shorten the length of the blade. Cuts are made on the shank so that when inserted into the handle, epoxy glue fills them.

Since the bolster is strung on the shank first and only then the handle (suddenly), a hole was first drilled in a thick copper plate. She began to put on the shank with difficulty, which suited the role of a partition perfectly.

A hole was drilled in the block of wood a little more than the length of the shank and in the block of wood, then a slanted cut was made on its end part, which was a decision more for an aesthetic than for a practical purpose.

Both the blade and the bolster and the hilt were connected and fitted to each other in order to make sure that things were going right so far.

The blade was hardened in a furnace at a temperature of 900 degrees, followed by lowering into engine oil.
The blade, bolster and hilt were reattached and epoxy bonded. A rough markup was applied to the handle, which was further changed anyway, moving even further away from the original drawing.

All the most unnecessary was again mercilessly sawn off.


Another small joint was found in the handle, so I proceeded to fix it with the same epoxy and file. After subsequent processing with sandpaper, the knife acquired the following, almost final look.
In the end, the handle was impregnated with Pinotex.

Outcome
The product, although it came out quite rough, but still became a knife. The experience gained in the process of making this puukko is truly invaluable to me. I hope that from the information that I have collected here, someone more accurate and handy will be able to do something much better.

If you can’t imagine your life without outings in nature, are fond of hunting or fishing, go rafting or go on long hikes from time to time, then the topic of survival should be interesting for you. After all, any, even seemingly harmless exit into the forest, is inextricably linked with extreme conditions.
You need to be ready for anything, so you should take your equipment more than seriously. In your camping arsenal, you definitely will not interfere with a survival knife. Of course, on a hike you can get by with the usual one, but it’s also worth considering it as an option.
The topic of survival knives is already so well-traveled that it is quite difficult to add something new. But we'll still try. There are both supporters and opponents of this type of knife. Opponents give a bunch of arguments about the actual uselessness of a knife for survival - they say, why do we need all these stray things like a saw on the butt, which you can’t really saw off anything, a compass showing it’s not clear what, a disposable file, NAZ in a hollow handle and much more.
Maybe in some ways they are right, but it should be remembered that this is, first of all, a survival knife. And the maximum benefit of this knife is manifested in the most extreme conditions. When you don’t have an ax or a saw at hand, then this seemingly useless saw will greatly facilitate your survival process.
As for NAZ, keeping it in the handle is quite justified, because you always keep the knife with you, and putting an emergency supply in your pockets is not the best the best way. Yes, and you still have to manage to lose the knife, it is much easier to lose everything else. You can always find disadvantages, but in fact, survival knives have their advantages.
Let's list their advantages:
- The good thing about a survival knife is that it can do jobs that would be difficult to do with a regular knife. With it, you can easily chop wood chips for kindling a fire, it is ideal for driving stakes and chopping fairly thick branches. A survival knife will come in handy when building shelters (cutting branches for a hut). If desired, it can be used as a spatula for digging.
- Whatever they say, NAZ in the handle or in the sheath can also be attributed to the merits. Putting it in your pockets or storing it in a backpack is unacceptable, and so, wherever you go and whatever you do, you always carry a survival knife with you and in an emergency you will definitely not be left without NAZ. Using NAZ, you can start a fire, fix clothes, provide yourself or someone with minimal medical care.
- Thirdly, this knife will fit perfectly as a means of self-defense, you can fight back a wild animal. It is also perfect for hunting and they can easily butcher the carcass of a dead animal.
- With the help of this knife, you can make various tools, tools or weapons from wood - cut a club, sharpen a spear, build an oar.

Well, there are disadvantages, where without them:
- Not suitable for cooking. No, you can peel potatoes with it, but given the size of survival knives, this will be very difficult to do.
- Indeed, the presence of a compass on the handle loses all meaning if the handle itself is not made of a non-magnetic alloy. Yes, and when performing shock work, you need to be careful not to hit this place.
- You can’t cut much on the butt with a saw - as a rule, the teeth are almost not divorced and there is a big risk of injuring your hand when sawing.
survival knife design
In most cases, a survival knife has a hollow handle that serves as a pencil case for NAZ. Although many people think that the strength of a knife with a hollow handle is worse than that of a knife with a shank that passes through the entire handle, we do not agree with this. If the product is made with high quality, then it will be quite durable and reliable.
Sometimes NAZ is placed not in a knife, but in a sheath, in whole or in part, as a rule, these are various auxiliary things such as a sharpening bar, a signal mirror or many other useful gizmos.
The knife blade can be smooth or serrated. In our opinion, it is better to use a standard smooth blade, in which case it is easiest to sharpen it. There are almost always teeth (sawing) on the butt of the knife, with which you can make a small cut in wood, bone or even metal (depending on the pitch and setting of the teeth).

A survival knife can have a very different shape, this is influenced by many factors - the geography and climate of use, the independent choice of the owner and the specifics of survival.
What is usually included in the NAZ survival knife kit:
Compass. It can be placed on the handle or on the scabbard. Fire starter. Usually this is a fire starter, a lighter, a few matches soaked in wax and dry fuel. Threads. From kapron and ordinary. Minimum fishing set(5 meters of fishing line, sinkers and hooks) A set of needles (surgical and regular for sewing clothes), a few pins, tweezers. Water disinfectant- tablets or manganese. medical kit and adhesive tape.
This is an approximate set of NAZ, everyone completes it at their own discretion. Additional elements can be a whistle, a magnifying glass, a grinding stone, a heliograph mirror, a blade, a small knife.
Let's look at the most popular models of survival knives.
Aitor Jungle King II
King of the Jungle 2 is one of the most popular survival knives. Manufactured by the Spanish company Aitor.
Knife Features:
- Blade. Length - 13.5 cm. Steel - stainless chrome-molybdenum-vanadium. The hardness of steel is 54 HRC.
- Lever. Hollow, airtight, NAZ is placed inside.
- NAZ. The kit includes needles and pins, fishing tackle, blade, pencil, adhesive plaster, tweezers, flint, tourniquet, pocket mirror, skinner knife, whetstone.
- Cord wrapped around scabbard, which can be used for various needs, a small skinner-type knife can open cans, skin animals, it can also be used as a screwdriver or steel flint.
Basically a good survival knife. Very versatile, high quality and reliable. A compass is built into the cork of the handle, which will help you navigate in the forest. Sometimes he shows nonsense, but mostly working. A skinner knife can not only open beer bottles - strapped to a stick, it easily turns into a spear. On the scabbard there are folding horns for a slingshot (you can shoot small game).

There is a saw on the butt of the Jungle King II, it cuts pretty well, especially dry wood. There are no comments on the cutting part of the knife either - it cuts pretty well. The only thing is that the guard sometimes interferes with cutting meat, but this is a trifle. The weight of the knife is 460g, this is the weight of the whole set, in principle, it is quite light (this is due to the fact that the handle is hollow).
Some consider the dimensions of the knife to be a drawback, the length of the entire knife is almost 30 cm (27.5), and if you also take into account the sheath, you get a rather impressive unit (inconvenient when worn on a belt). The fastening of the blade in the handle is reliable, the method of fastening is that the blade is recessed into the handle by 35 mm and fixed in it with a transverse sleeve.
Survival knife HB-1-01
This blade came from the army knife "Basurmanin". According to the characteristics and appearance looks like the Jungle King described above.
Knife Features:
- Blade. Blued. Length is 16 cm, width 3 cm, thickness 4 mm. Blade steel grade - 8HF.
- Lever. Hollow, with NAZ inside. Material - steel.
- NAZ. The standard set is fishing tackle (hooks, fishing line, sinker), needle + thread (3 meters), set for making fire (3 hunting matches + shirkach for matches), 1 pin, awl, water disinfection tablets.
- Sheath. The scabbard has a hinged device, divided into cavities. A cord is wound on one half. The second cavity contains a saw (10 cm long) and a small skinner knife that can be used to open bottles and cans, it will also replace a screwdriver and wrench. The sheath also has a wire cutter and a built-in compass.
- Weight and dimensions. Knife weight with complete set- 750 grams, total length in sheath - 33 cm.
Well, now the debriefing. In principle, the HB-1-01 knife is quite suitable for hiking trips and small forays into nature, but for extreme conditions you need to look for something more serious. By personal experience and reviews of the owners of this knife, we can draw the following conclusions - the steel is not very good quality, poorly sharpened, subject to corrosion, burnishing quickly peels off.
It is advisable to completely change the NAZ to your own, because the quality of the standard kit is also not very good. Handle uncomfortable round shape. The blade is fixed in the handle quite securely, but the passport says that the load on the break is only 30 kg., Which also makes you think.

But here the scabbard is made really well, very simple and well thought out here. functional system pendants. Another plus is the presence of a compass not on a knife, but on a sheath. In general, it is up to you to decide whether you should buy such a knife, there are craftsmen who refine and eliminate some shortcomings themselves during operation, but think for yourself whether you need such hemorrhoids.
FALLKNIVEN S1
FALLKNIVEN S1 is an excellent Swedish survival knife. It was originally designed for US Air Force flight crews.
Knife Features:
- Blade. Blade length 130mm, thickness 5mm. Excellent three-layer Japanese steel, the central layer of VG-10 steel, the facings of steel 420. The hardness of the steel is 59 HRC.
- Lever. Material - Thermorun. In the lower part there is a guard. The material is very durable and pleasant to the touch.
- Weight and dimensions. Weight - 190 g. Total length - 247 mm. Pretty compact and lightweight.
The FALLKNIVEN S1 is a survival knife without any extra bells and whistles. It cuts perfectly, almost does not dull, it is easy to sharpen, it is not subject to corrosion, it is not scratched. The small handle gives more freedom to manipulate the knife. Comes with a leather sheath.

This knife + some good multitool is the most great option for a real survivor. Such a knife is good both in everyday life and in extreme conditions.
Wildsteer WX
Wildsteer WX is a survival knife from a well-known French company. The manufacturers themselves call their brainchild a folding tactical survival knife.
Knife Features:
- Blade. Blade length - 10 cm, thickness - 4.5 mm. Steel - brand X46Cr13 (our Russian counterpart - steel 40X13).
- Lever. Material - stainless steel, length - 16 cm.
- Weight and dimensions. The weight is only 270 grams, and the total length when unfolded is 26 cm.
The main feature of the Wildsteer WX is the unique patented blade lock - WX lock. This latch is so reliable that when opened, this unit can be safely called a knife with a fixed blade.

SOG D25
Another very interesting option- SOG D25 survival knife. This knife is more like a dagger, it has a two-sided sharpening and a spear shape. At the base, the blade has a serrated blade on both sides.
Knife Features:
- Blade. Blade length - 14 cm, thickness - 4.5 mm. Steel - 440A, hardness is 56-58 HRC.
- Handle. Made of wood and very compact size- 11.5 cm. The plastic guard is quite impressive, it will definitely not allow your hand to slip onto the blade.
- Weight and dimensions. This dagger hangs 240 grams and has a total length of 27 cm.
Perhaps this knife should be considered not as a survival knife, but as a combat one. Although why not, a good survivalist will find a use for him. But, you see, this instance looks quite exotic.

Mora 2000
And this handsome man from the Morakniv family is Mora 2000. This Swedish-made knife can be used both in extreme tourism and for domestic needs. The main feature of this blade is that from the middle of the blade the thickness of the knife decreases. Mora 2000 is a great option for survivalists, hikers, hunters and fishermen.
Knife Features:
- Blade. Blade length - 10.5 cm. Material - Sandvik steel (grade 12C27), steel hardness - 58 HRC.
- Handle. Plastic, molded, zonal rubberized.
- Weight and dimensions. Knife weight - 100 grams, total length - 22.3 cm.
- Sheath. Made of very durable plastic, there is a leather belt for carrying a knife on a belt.
This knife has proven itself among survivalists, it can easily cut meat, chop firewood, it easily opens tin cans and nothing is done to the blade after that, there is not the slightest scratch. Again, this option + multitool and you won't get lost anywhere.

Survivalist X D2 Gray Titanium
Consider another survival knife. Another option with a hollow handle for NAZ. It comes with a very interesting sheath with the MOLLE system.
Knife Features:
- Blade. Blade length - 18.5 cm, width - 3.8 cm, thickness - 4.9 mm. Material - stainless steel grade D2, steel hardness - 59-61 HRC.
- Handle. Duralumin, hollow.
- Weight and dimensions. Knife weight - 385 grams (with sheath 530), total length - 31.5 cm.
An excellent survival knife in its class. Good steel, comfortable sheath, on the butt of the blade there is a special bevel designed for cutting bones. Also, the knife easily turns into a spear, you just need to unscrew the cork of the handle and insert a stick of the appropriate diameter into it. In general, the knife is quite nice, although opponents of hollow handles and similar ramboids will find flaws in this knife. But here, to each his own.

Here, in principle, this is where we will end our review of survival knives. Very soon we will prepare full-fledged tests for specific models. best knives survival. We have also compiled a good selection of videos on this topic for you. You will see video reviews of specific HB models, blade owners will share their experience with you, talk about the advantages and disadvantages of certain survival knives.
Among the universal items that a person may need in extreme conditions is a survival knife. As a rule, it performs several important functions. Often such a knife comes in a set of emergency emergency stock or NAZ. It is difficult to use it in everyday life, since it is not designed to perform such tasks. But such a tool becomes a good helper if a person finds himself in a forest or other place far from civilization.
Initially, survival knives were called army knives. They were created back in the 60s specifically for military pilots who served in Vietnam. These tools were distinguished by a rather weighty handle and saw. The last element was located on the end part. The saw allowed pilots to do without other weapons while in the impenetrable jungle.
Survival knives gained the greatest popularity in America after the release of the legendary film Rambo. For a long time developed modern design edged weapons that meets all the stated requirements. These models are in great demand today.
Advantages and features of such knives
 Survival knives are very convenient for extreme tourists
 Knives of this type have certain advantages over other edged weapons that may be at the disposal of a person. This is a universal tool that can greatly facilitate the life of its owner if he finds himself in difficult conditions.
The main feature of survival knives is that they can perform several important tasks at once.
Survival knives can be used in the process of carrying out the following actions:
- Repair or complete construction of a temporary shelter. The knife is used during cutting branches, digging holes and processing turf, which is required for a hut.
- Extraction and preparation of food. The tool allows you to increase the chances of a successful hunt and helps to properly butcher the carcass of an animal.
- Self-defense. In this case, it is used as a military weapon.
- Create weapons or tools out of wood, metal, or bone.
- Breeding fire.
- Creation and repair of clothes. In this case, the knife is used when cutting the skin or any fabric. Additionally, a needle is used, which is in the NAZ set.
A survival knife can also help you navigate the terrain, as it often has a built-in compass.
What is included in NAZ (emergency emergency stock)
 The compass is indispensable for orientation in unfamiliar terrain
 Standard knives that are used for survival and have NAZ are quite different large sizes. They can be recognized by their wide blade and massive handle. The handle is usually hollow. It is in it that the traditional set of emergency supplies is located. It consists of the following items:
- Several matches that are pre-lubricated with wax. The complex comes with a grater for ignition. These components must be packed in moisture-proof packaging.
- A lens designed for use in sunny weather.
- Compass. This is not the most convenient item that comes with NAZ. But from him there is always a sense at the moment a person is in the forest zone.
- Fishing line about 3-5 m in size, several hooks, as well as a sinker.
- Sewing needle with ordinary thread and surgical needle with kapron thread.
- Scalpel.
- Safety pin.
- Small tweezers and adhesive tape. These items will help to provide a person with first aid in case of injury.
The set should also contain a small mirror, a water purification tablet, a small whistle and potassium permanganate. It is supplemented with a piece of sandpaper, which helps to sharpen the knife in the field.
How to choose a knife
Every person who periodically goes hiking knows that you should definitely take a knife with you. It is the most important item in your travel gear. That is why its choice must be approached with special care.
When choosing a good survival knife, be sure to pay attention to its convenience, functionality, reliability and other factors of suitability for use in the field.
First of all, it is desirable to decide on the tool system. Folding knives are considered more convenient to carry, as they are small and take up minimal space. However, most often preference is given to non-folding weapons for survival, as it allows you to perform many times more tasks.
Blade shape
 The shape of the blade of such knives can have a different modification.
 Knives for squeezing differ from each other in the shape of the blade. According to this feature, a whole classification of weapons stands out. The most popular are the tools of the following forms:
- spear-shaped;
- straight form with a butt;
- with a concave blade;
- butt with a falling or rising line;
- American tanto.
More convenient are knives that have a spear shape. They are called universal. Most often, such weapons are chosen by people who are fond of hunting.
Shank
The best survival knives have a strong tang. He happens different sizes and forms.
The shank is an integral part of the blade that remains hidden in the handle of the weapon.
Allocate different types shank of knives. They are presented in the table.
| A type | general characteristics |
| "Mouse tail" | This type of shank is made of a metal rod. It runs in a thin layer along the entire handle. In this case, the rod is a continuation of the blade. This shank has one significant drawback. Since it is too thin, it can easily break due to the high load. Therefore, knives with it are not intended for use in the field. |
| Not fully hidden shank | The shank does not go through the entire handle, as in the previous version. It is only in its separate part. The void zone is used for completely different purposes. It is in it that survival kits are hidden. Since the shank does not go through the entire part of the handle, it can also easily break under the pressure of an increased load. This point must be taken into account by the person who collects the basic equipment for the trip. |
| full shank | This shank runs through the entire handle. It is considered the largest in size. This feature provides high strength and resistance of the tool to increased loads. Knives with such shanks are considered the most practical and useful in the field. |
V without fail it is required to pay attention to the type of shank of a survival knife, since its strength and effectiveness in performing the assigned tasks depend on this.
Material
 The handle of a survival knife can be: wooden, plastic, rubber or other material and composition
 The best knives are made from steel. It should not be too hard, but not soft either. In this regard, you need to maintain the golden mean. It is this material that is considered the most practical in use.
The most profitable option is a knife made of medium hardness steel 58-50 HCR. It meets the basic requirements for the choice of material from which survival tools must be made.
Blades of medium hardness can be easily sharpened properly. And it often becomes necessary if the owner has to regularly use his knife for its intended purpose.
Separately, it is worth considering the materials that are used in the manufacturing process of the knife handle. It can be made from plastic, horn, bone, wood, or high-tech raw materials. The latter are considered more durable and practical, as they are produced according to modern standards. When choosing a handle, you need to pay attention not only to the type of material, but also to its comfortable position in the hand.
Additional options
Most of the models that made it to the top of the best survival knives have additional options. For the convenience of the user, they are equipped with a flint and a sharpener. Might come with a lighter. As a rule, these and other items are part of the NAZ set. The Russian version of these tools also provides for a number of similar additions that survivalists need.
Rating of the best knives
A man may be interested in the top survival knives. It presents interesting models that have already earned the trust of hunters and lovers of extreme hiking.
Jungle King
 For those who like to travel, the knife will be indispensable, as it has a built-in compass.
 The Aitor brand is engaged in the release of this model. The blade of the tool is made of a practical alloy based on chromium and molybdenum. Its hardness is 59 units. The length of the blade is limited to 13.5 cm. There is a NAZ in the handle of the knife. It also contains a compass, which will help the traveler not to get lost along the way.
There is twine on the scabbard. Its owner can use the knife at their own discretion.
HB-1-01
A variant of a domestic knife that has certain similarities with the Jungle King II model. The length of the tool blade is 16 cm. Steel grade 8HF is used in the manufacture. The handle of the knife is also steel. Inside it are placed items that are included in the NAZ kit.
The knife is equipped with a built-in compass. Its scabbard is divided into equal cavities. The first holds a saw and a skinner knife, and the second is wound with a cord.
Ganzo g8012
 The Ganzo knife is very sharp and has proven itself well on tourist trips.
 This model completes the top of the best survival knives. She was recognized as the best in 2017. The tool lies well in the hand and does not cause any inconvenience. The handle of the product is painted in a bright color, making it difficult to lose it in the snow, grass or foliage.
This knife comes with a fire starter, which is located in the butt heel area. The sheath contains a sling cutter designed for quick cutting of leather, fabrics and branches.
Is it possible to make a survival knife with your own hands
If a person is familiar with sharpening a flint and working with metal, he can try to make a survival knife with his own hands. If desired, it can be equipped with a flint and a sharpener.
- Preparation for the handle and blade of the product.
- Rivet metal.
- Sandpaper.
- Hacksaw that works on metal.
- Bulgarian or file.
Once all the tools and materials are prepared, you can proceed directly to work on the knife. To prepare the blade, it is permissible to use a file or car springs. On the workpiece it is required to draw the blade of the future product. A couple of holes need to be made around the perimeter. Before you start working on the handle, you should drill holes for rivets in a suitable area. Now you can start attaching blanks correct form.
 After making a blade for a knife, it must be hardened
 On the workpiece, it is imperative to outline the cutting edge. After it should be grinded to give the desired sharpness. For these purposes, it is desirable to use a file.
The workpiece at the time of working with the file must be fixed with a vice. This step will help you avoid injury. In addition, workpieces that are in a fixed position are much easier to work with.
Upon completion of this work, the cutting part should be treated with sandpaper. Also, the metal itself must be hardened. This procedure provides him with strength and reliability. To harden the metal, it is necessary to hold it on hot coals for 15 minutes.
After this stage is over, it is necessary to cool the knife with oil. Next, the future knife is placed in the oven for 40 minutes. At the same time, a temperature of about 300-400 degrees should be maintained in it. You need to bake the metal in the oven twice.
After the blade has fully baked and cooled, it must be carefully sanded. Next is the burnishing procedure. With its help, it is possible to protect the tool for survival from rust.
Now the master can start turning the handle for the knife. Next, the two main elements must be securely fastened to each other.
If during the course of all the work the master strictly adhered to the manufacturing technology, then at the end of his labors he will receive a high-quality knife. homemade product will serve him for a long time and help him cope with problem situations.
In everyday life, a knife is an indispensable tool. No business can do without it. The models presented for sale do not always meet the requirements for reliable and functional samples. To get a blade that combines best performance, you will have to make it yourself. V Lately information on how to make a knife with your own hands has become very popular.
Advantages of homemade models
There is a wide variety of knives on the market today. You can get confused in it, but with some effort you can always find a ready-made model suitable for specific purposes. However, there is always a chance to encounter a poorly made blade or an incomplete correspondence of the finished model to expectations.

If the required model is not available for sale, you can turn to the blacksmith for help, who will make the blade to order.
But such work, performed in accordance with the wishes of the customer, is quite expensive. Usually in such a situation, the idea comes up to make a knife with your own hands from start to finish.
If you make a blade yourself, you can achieve a number of advantages:

Assortment in stores
Any quality product is always expensive. In addition, the choice of really reliable and functional models is not as wide as we would like. More often on sale are models for which there are no increased requirements for mechanical characteristics and functionality. These fairly common items are often:
- do not have sufficient strength, so they break easily;
- they are made of the cheapest steel, therefore they do not have the necessary hardness for cutting hard materials, they do not hold sharpening well and quickly become dull, which makes it impossible to perform the necessary functions;
- do not have high durability due to low-quality assembly, which cannot cost more than the materials used.

These common knives are usually inexpensive. When they become unusable, they are simply thrown away and replaced with new ones. But this approach cannot be called rational, because it is not always possible to go to the store for a new purchase. Often the knife is used by tourists and hunters far from civilization. He must not only brilliantly cope with the duties assigned to him, but also be reliable enough not to let his owner down at a crucial moment.
To buy a quality blade at an affordable price, you need to carefully study the market and all the offers presented on it. It is imperative to have a minimum technical knowledge of knife steels, their characteristics and mechanical properties finished blade. However, you can go the other way, applying this knowledge in practice on your own. So many do, deciding to make a knife on their own.
Purpose and characteristics
The manufacture of any knife is always preceded by the choice of the required type. Not only the characteristics of the future product, but also the conditions for its manufacture depend on the purpose and operating conditions.
The following types of knives are most often made on their own:

 Often there is a misconception in which they confuse the appointments of marching and hunting knife. Among beginners in the field of tourism and hunting, there is an opinion that it is possible to make one universal blade that will cope with all the necessary tasks with equal success. However, this is not the case.
Tourist models are designed primarily for rough work. High hardness is also important for them, but brittleness when working on a fracture is categorically unacceptable. For hunting models, hardness is always in the first place, because their most important characteristic is the sharpness of the blade. Butchering prey with a tourist knife is quite problematic due to the relatively soft blade, and a hunting blade can simply be broken if you try to use it instead of a camping one.
It is impossible to create a universal blade for all conditions. You always have to improve some qualities at the expense of other characteristics. If you plan to solve a wide range of tasks, it makes sense to make several knives, each of which will perform its function.
When the first stage is completed and the type of future knife is selected, preparatory work not finished yet. Before you start manufacturing, you still need to choose necessary materials. The most important element of any knife is the blade. The next stage begins with the selection of the steel necessary for its manufacture.
Steel selection
The type of knife dictates the operating conditions. According to these conditions, it is necessary to choose the steel that will best meet the tasks assigned to the blade.
The most important characteristics of the blade, which should be considered when choosing a steel grade, are:
- hardness obtained as a result of heat treatment according to the required mode;
- impact strength, which is responsible for resistance to chipping and brittle fracture;
- corrosion resistance required for operation under special conditions and in contact with liquids;
- wear resistance required in conditions of increased loads on the blade.
Bulat and Damascus have earned great popularity as a material for blades. But to obtain such blanks, you need the knowledge and experience of a professional blacksmith. Even with the ability to use blacksmith equipment, it is quite difficult to produce them. Not every blacksmith with experience is capable of this. You can buy a ready-made blank, but it will cost quite a lot.
More often, more affordable alloy steels are used, which are much easier to work with. In our country, the following steel grades are most often used for the production of knives:

Other brands are used less often because they are less common or do not have the necessary characteristics.
The process of making a knife yourself contains a large number of steps. Each of them deserves detailed description, including all the nuances and advice of experienced craftsmen. Simplified, all actions can be divided into the following operations:

If you have experience working with metal, it is not so difficult to make knives with your own hands at home. Videos on this topic, shot by experienced craftsmen, will always help you understand the intricacies of all stages of production. With each new self-made blade, the level of skill will increase, which will allow you to create beautiful samples with high technological properties and decorative characteristics.


People who view the world negatively have some advantages. For example, they are always ready for some life problems, at least morally. And in order to be physically ready for such things, you will need to stock up or make some things with your own hands. For example, you can make yourself such a simple survival knife. It is durable, strong, it can be cut, chopped, and, if necessary, used as a spearhead.
The main requirement for such knives is their reliability. Therefore, in most cases, knives are made without finishing the handle, that is, this is an all-metal product. In this homemade product, the author decided to make small pads on the handle. But even if they are damaged, the knife will continue to function.
Materials and tools for homemade:
- a source of steel with a high carbon content (usually used in tools);
- wood for the manufacture of overlays for handles and pins;
- drill with drills (better drilling machine);
- grinder with cutting and grinding wheels;
- clamps;
- electric grinder;
- files;
- sandpaper with a grain size of 80 to 600;
- epoxy;
- Furnace for hardening and automotive testing.
It would be nice to have a tape grinding machine.


Knife making process:
Step one. Cut out the workpiece
We start making a knife with a template. You can draw it on paper and then cut it out. The author simply drew the profile of his knife on a piece of metal. Well, then we gain patience and slowly cut out the profile. It is not difficult to do this work with a grinder, but it will turn out faster if you have a tape cutting machine. In the very last resort some craftsmen carve a profile hand saw, however, before this, the metal is usually released.
Then using a sharpener, grind off burrs and other irregularities.


Step two. We cut cloves
The serrations on a survival knife simply have to be, they can crush something, saw it, and so on. First, mark them with a felt-tip pen, and then clamp the workpiece in a vise. Teeth can be cut with a grinder.


Step three. We form bevels on the knife
The bevels on the knife are responsible for its cutting data. For a survival knife, the blade must be strong so that it can cut, crush, and, well, it must cut well. In this regard, the bevel is made small so that the blade is moderately thick.


An interesting fact is that the author forms the bevels with the help of an ordinary grinder and a grinding disc. Clamp the blade in a vise and get to work. If you have a good eye, you can even not mark anything. But it is best to pre-mark the blade. Draw a line to indicate the width of the bevel. Also draw a centering line along the length of the blade to separate it into two halves. This will allow you to evenly grind the bevel on each side.
After the rough formation of the bevel with a grinder, you can proceed to the final processing manually. Here you will need a set of files and sandpaper. Make the bevels symmetrical and sharpen the knife. But do not sharpen the blade too much, as when hardening thin metal, it overheats greatly. The author makes the tip of the knife sharp so that they can pick something up, unscrew it, and so on.
Step four. knife grinding
At this step, the author cleans the workpiece before hardening. There was a lot of rust and other contaminants on the metal. To work, you will need a manual grinding machine, you can also use a stationary one. tape machine, if available. If you don’t have a power tool, don’t worry, the metal can be processed manually.


First, the knife is roughly sanded with 80 grit sandpaper, then 300 and 400 grit, and at the very end it is processed with 600 grit sandpaper.
Step five. Drilling holes for pins
To install the pads on the handle, you will need a drilling machine or a hand drill. This work must be carried out before hardening, since once the metal is hardened, it will be very difficult for you to drill through it. In total, at least two holes need to be drilled under the pins, the author decided to make three, since this is still a survival knife, everything must be strong. Also, at the end of the handle, the author drilled three more holes just in case. With the help of them you can tie a knife, if necessary.


Step six. hardening
To harden the knife, you will need an oven. good temperature can be obtained in ordinary coals, only a forced air supply is needed, which can be done with an ordinary household hair dryer.
I note right away that only steels with a high carbon content are suitable for hardening.

We heat the metal until it completely ceases to be attracted by the magnet. It should be bright yellow in color. It is important that the metal is heated evenly. Well, then we lower the metal into mining or into vegetable oil. Be careful, as the oil splatters and usually catches fire, it also produces a lot of smoke.
After hardening, a vacation must necessarily follow, this step should not be neglected. You will need a household oven, preheat it to 200 degrees Celsius and put the knife in for an hour. Let the oven cool down with the knife. Everything, now the steel will not be brittle, it will become elastic and the knife will not break when it hits the ground, stone, and so on.
Step seven. Metal cleaning
After hardening, the metal will have a lot of burnt oil, scale and other contaminants. You have to clean them well with sandpaper. Simplifies this process WD-40. Take a coarse sandpaper and use it to sand the part where the handle pads will be located. This is to ensure that the epoxy adheres well to the metal.


Step eight. Making a pen
The author makes overlays for the handle from wood. Attach the blade to the wood and circle around the handle area. Cut out two overlays. Next comes the grinding process. To polish all the bends well, make yourself a sandpaper nozzle on your drill, like the author’s. In addition, you may need files, sandpaper. Make the grips smooth.


It was decided to use steel screws as pins. It's simple and reliable. Drill holes in the pads and insert the bolts. With some margin, then cut off the excess.
Step nine. Assembling the knife
The knife is almost ready, it remains for us to glue the lining, make the final polishing, and also sharpen the knife.


