A hand router is an indispensable tool for most carpentry work. For those who want to master the skill of a carpenter and learn how to make with their own hands not only various wooden crafts, but also an original beautiful wooden furniture, decorated with carvings, it is advisable to familiarize yourself with the main features of using the device. In Russia, since ancient times, houses, furniture and other products have been decorated with wood carvings. In many cities there are museums of wooden architecture, the exhibits of which cause admiration and surprise.
A mechanized tool can significantly speed up the execution of work, production can even be put on stream if there is a sales market. Of course, in addition to a manual router, you will need a workbench, various fixtures, and high-quality material.
Basic Operations of a Hand Router
The use of manual wood routers allows you to perform the following types of processing:

- production of slots, folds, grooves;
- precise processing of laminate for furniture and other products;
- various types of carving on wooden surfaces, engraving works;
- cutting round and oval holes;
- the device of connecting spikes of various types;
- grinding work;
- cutting quarters;
- production of sockets for fittings.
With the availability of equipment, a wood router can be used to work with plastic, plexiglass, artificial stone, and non-ferrous metals. In skillful hands, the device will be able to show all its capabilities.
Manual milling machines are available in three types:
- for processing lamellas;
- for processing edges;
- upper.
A lamellar router is used to make connecting grooves in various parts. The edge router is designed for precise edge cutting and chamfering. Both devices are highly specialized and are rarely used for other work.

Type "top" is available in 2 versions: fixed and submersible. This type is the most versatile and is used for most operations.
Stationary - the device is an electric motor with the function of adjusting the depth of the cut. The depth of milling is set by moving the milling cutter relative to the sole and is fixed with a special clamp. When starting work, you need to hold the tool on weight above the selected point and slowly deepen the rotating cutter. At the first attempts, this operation is usually very difficult, the cutter goes away from the right place.
This drawback has been eliminated on submersible type milling devices. Rigid springs and guides for moving in a vertical plane are installed between the sole and the engine. The immersion depth is set and fixed with a special clamp. In the normal position, the cutter does not reach the surface of the material. In order for the cutter to begin to deepen, it is necessary to press the device with force. The clamp will limit the immersion depth. When the pressure disappears, the router will automatically rise and the workpiece will be stopped. This design greatly simplifies the work.
The most requested types of work
All types of surface treatment that a manual wood router can perform can be classified into several categories:

- Production of long longitudinal and transverse recesses with various section shapes. This category includes quarters, grooves, grooves. Slots can go to the edge of the product (open) or located inside (closed). They are mainly used with a constructive purpose in groove-ledge joints.
- Production of edges of various shapes (profiling). With the help of this operation, it is possible to produce glazing beads, platbands, skirting boards, cornices and other products with various surface shapes. In addition to the constructive function, these details are used as decorative elements.
- Production and processing of complex contours and surfaces. This operation is used in the manufacture of furniture, various interiors for premises, products of artistic craft. In the serial processing of products, templates are used that allow the manufacture of identical elements of parts with great accuracy.
- Device various elements for constructive purposes. Basically, these are holes for mounting parts.
The main operations that can be performed are listed. If you have tools and fixtures, the list can be much longer.
Router tool
Work with a manual wood router is performed using cutter nozzles with the shape of the cutting edge necessary for processing. Differently shaped surfaces have a cylindrical shank for mounting in a collet. The tool is made with fasteners standard size corresponding to the size of the collets. Trade enterprises offer a wide range of cutters of various shapes and sizes. When purchasing a tool, you need to pay attention to the material of the cutting edges. For wood of different hardness, different steel is used.
To process parts with the required accuracy, it is necessary to ensure a stable position of the tool relative to the surface in 3 planes. The vertical position is provided by a sole with an immersion mechanism.
A stable position in the horizontal plane can be maintained in several ways:
- use a cutter with a guide bearing;
- use the guide bushing on the support surface of the router;
- use accessories supplied with the device or purchased separately.
Milling cutters with a guide bearing in most cases are used for processing the edges of parts and have the corresponding name - edge cutters. The shape and size of the tool can be very diverse.
The guide sleeve and fixtures are used when working with groove cutters. Mounting a bearing on this type of tool is not possible because the cutting surfaces are in the vertical and horizontal plane of the tool.
Installing and changing tools

Installation and change of cutters can be performed on the device with the base removed or assembled. The main rule is that the tool must be disconnected from the mains. Shutdown does not mean the start button turned off, but the plug with the power cord of the router removed from the socket.
You can change the tool correctly in the following order:
- place the milling cutter in a position convenient for access;
- fix the spindle or motor shaft (some models are equipped with a special button for fixing, if not, fix with a key);
- loosen the clamping nut of the collet clamp, remove the cutter;
- insert a new tool to a depth of at least 20 mm or until it stops;
- tighten the collet clamp;
- unlock the spindle or motor shaft.
If there is no tool in the collet, it cannot be tightened with a nut. He might break.
Optimum rotation speed

Compared to other power tools, the router operates at higher speeds - over 10,000 rpm. At higher speeds, the quality of the machined surface is much better. Working at high speeds has its drawbacks - the tool and the surface become very hot due to friction. The surface of the part may be charred from high temperature. When using large diameter cutters, centrifugal force may cause the device to fail and break.
To eliminate these shortcomings, start buttons with adjustable rotation speed are installed on the motors of the milling cutters. On some models, the speed control is not combined with the start button.
The surface finish depends on 2 parameters that are closely related - the speed of rotation of the cutter and the linear speed of the surface of the cutter. At the same rotational speed, cutters with a larger diameter will have a higher linear speed. The regulator will help bring these ratios to the optimal value. To use the regulator correctly, you need to look at the table of manufacturer's recommended values for various diameters tool. When choosing a speed, the hardness of the material being processed must be taken into account. Here the ratio is inversely proportional - for hardwood it is desirable to use low speeds and vice versa.
If the router heats up when working at low speeds, for quick cooling, you need to run it at maximum idle speed. The air flow will quickly cool the engine and other parts of the device, as well as remove accumulated dust.
Direction of tool rotation

How to work with a manual router so that the rotation of the tool ensures maximum efficiency?
The rotation of the tool may or may not match (advance) the direction of movement of the device. The main and correct position will be counter milling, when the cutting edge creates a force directed against the movement of the device, pushes it back.
Climb milling can be used only in emergency situations, when material chips are formed during counter milling. When working with a passing direction, you must observe special care. Coinciding forces can pull the device out of your hands, causing injury.
Depth adjustment
For precise processing of the part in depth, many devices are equipped with special regulating and limiting devices. In spite of different designs the principle of operation is the same in most cases.
The procedure for setting the required depth is as follows:
- install the device vertically on a flat surface;
- set the disk with stops to the position of maximum depth;
- release the limiter fixing screw;
- disable the engine start blocking system;
- lower the engine until the cutter touches the surface;
- block the engine in this position;
- lower the depth gauge to the stop opposite;
- set the position indicator to the zero mark of the scale;
- raise the limiter so that the pointer on the scale matches the required size;
- fix the slider;
- unlock the engine.
Setting the required milling depth is now complete. A disk with 3 stops is needed for a large depth of processing of the part. In order not to create a large load on the tool and device, processing is carried out in several passes. First you need to select the highest stop (the first pass at the minimum depth), then the second (middle depth) and the third (maximum).
A milling cutter is a rather expensive and dangerous device during operation.
When working with a manual router, it is necessary to observe all the safety measures specified in the instructions.
Before using new untested methods of work, you need to carefully weigh all the positive and negative points so as not to be without a tool with injured limbs or other parts of the body.
Processing various wood blanks, inserting door hinges and locks, making technological holes, sawing figured wood carvings - all these works can be performed by a milling cutter. How to work with it, we will talk in this article.
Wood cutting. Lessons.
Milling is the process of processing a material with the removal of its parts of a certain shape and the creation of a configuration to obtain holes, grooves, joints, details. complex shape. A milling cutter is a tool with one or more blades that cut by rotating.
How to mill wood
Exists certain rules woodworking, following which you will save your health. They are simple in themselves, we list them below.
- The part intended for processing must be securely fixed on the desktop, without play. This condition will exclude displacement or disruption of the part from the socket.
- The movement of the blades of the milling machine should be directed along the wood blank. If this rule is not observed, the quality of the edges of the cut line, the evenness of its borders, will suffer.
- To perform milling of figures of complex shape, such as a circle, an ellipse, and others, it is recommended to use compasses that allow you to make roundings of various radii.
How to mill wood
For milling wood, there are such milling machines:
- Submersible - suitable for holes, grooves - the movement of the cutter occurs along the vertical axis.
- Edging - suitable only for edges, chamfers. They have a guide bearing.
- Lamellar - ideal for rounded longitudinal grooves.
- Dowels - suitable for grooves for dowels, for tongue-and-groove assembly.
What can be done with a wood router

It is quite possible to perform such manipulations with wooden blanks:
- To cut grooves and recesses of absolutely any shape, from simple rectangular to oval and complex bends in the form of polylines.
- Perform through and blind technological holes.
- To perform milling processing of edges and ends of wood blanks.
- Apply various ornaments, inscriptions on the surface of the workpiece.
- Copy the details of any shape using the so-called templates.
Work on the milling table
Having milling table, you will be able to facilitate many operations for yourself. The quality of the manufactured products will not be inferior to the level of professional milling machines. Here is a list of what can be made on the milling table:
- curly holes and grooves;
- connections and joints of parts;
- to process and profile edges and ends.
Tables are of the following types:
- portable (mobile, portable);
- stationary (personal) tables.
The working surface of the table is equipped with the following tools:
- Side stop - serves to limit the depth of cutter insertion. A comb and stops can be installed on the cheeks of the side stop to hold the workpiece.
- Positioner - comes with an emphasis. Helps to accurately set the emphasis relative to the cutter.
- Corner stop - helps to set the profile of the ends and make a tenon-groove connection.
The milling cutter can be attached to the tabletop in two ways:
- Permanently attached to the removable plate, which will subsequently facilitate its dismantling.
- It can be adjusted in height using a lift with a lever having a vertical axis. In addition, there is a design with a disk or lever on a horizontal axis.
Work with a manual wood router
Products made with a tool such as a hand mill:
- railing;
- racks;
- hangers;
- furniture elements.

Can be refurbished old furniture. Related works during restoration, which the cutter will cope with, will be the insertion of new locks, the formation of grooves for new connections, the application of various curly patterns.
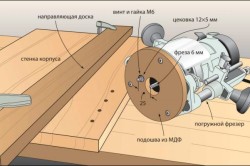
Cutting depth adjustable lifting mechanism(fixed distance between pin and washer), which connects the electric drive and the base of the router. To fix the distance from the edge of the workpiece, a straight guide is provided. The kit sometimes has a circular guide, which is used for milling circles with a large radius. When milling circles of small diameter, it is quite enough to get by with technological holes for inserting a centering pin at a given distance from the cutter. The corner stop will help with the selection of grooves.
What cutter to cut plywood
For cutting plywood, compression or straight cutters are suitable, since only when using them you are guaranteed the absence of chips. If you use laminated plywood as a workpiece, other cutter geometries are quite suitable. For high-speed milling, cutters with a chipbreaker are suitable.
How to work with a wood cutter. Video lesson.
Before starting work, you should make sure that the screws and threaded parts are how well tightened. It is necessary to remove the safety nut and clamping collet, make a control cut.
Open groove
If the groove is formed at the very edge, then it is necessary to install the tool in such a way that the cutting blade will be above the edge of the workpiece. Then the blade is lowered to a predetermined depth, the basket is fixed. After processing the edge, raise the cutter and loosen the lock.
deep groove
In this option, after driving through the area to be machined, it is necessary to re-adjust the new cutter immersion depth by turning off the milling cutter. The recommended depth should not exceed 5 mm, especially for hard workpiece materials.
narrow groove
A flat base is attached to the sole of the router. Guide rods are fixed on it from the sides, which are necessary for the straightness of the movement of the router.
end surface
To obtain a clean edge, it is necessary to initially make a gentle cut, leading the tool along the line of rotation of the knife. So the material will be selected evenly, after which the end face is cleaned in the usual way– it is necessary to drive the milling cutter in the opposite direction of rotation of the cutting element.
Curved edges

For milling edges, the master needs templates with a stop ring fixed with puffs on the sole of the tool. The template is fixed on the workpiece with double-sided tape, tightened with clamps to the workbench.
When working with the tool, there should be no sudden movements. As they say, the first pancake is always lumpy, you should not be upset at the first failures. If you enjoy working with a milling cutter, this activity can turn from a hobby into a very profitable business of a lifetime.
All photos from the article
Once wooden houses again began to come into fashion, and the tendency to decorate their facades with all sorts of patterns and ornaments was revived. has been used by people for many centuries and today, thanks to many technological innovations, it is becoming available to an increasing number of homeowners. Next, we will consider the main types of this direction and the nuances of wood processing with our own hands.

Varieties
It is worth noting that carved ornaments can decorate any wood product in general, whether it is a box, cornice, gazebo or facade of a residential building. So, if you want to experiment, then it is not necessary to build a wooden building for this, for the first time it will be enough, for example, a stair railing or the door of an old bedside table.
through thread

This is a very common method of creating patterns, which is most often used in the process of decorating houses. It implies the complete end-to-end removal of some elements wooden surface. If before everything necessary work were performed for the most part with chisels and chisels, now the task is performed mainly with a jigsaw.

blind thread

When implementing this method of applying patterns, the cutters do not pass through the wooden canvas, which is most conveniently done with a cutter.
In turn, blind threads are also divided into several types:
- Flat rimmed. In this case, there is a background plane, and the ornament goes deep into it. Subspecies:
| thread name | Description |
| contour | Most simple instruction execution, which consists only in cutting an even groove along the contour of the pattern, which does not change its size. |
| bracketed | Here, the main element is no longer a groove, but a semicircular notch created by a chisel in two approaches. It is from such peculiar brackets that the ornament is created. |
| Geometric | In this case, there are two fragments: a trihedral pyramid buried inside the canvas and a peg. First, the area to be processed is outlined, and then everything superfluous is cut off according to the intended figure. |
| Chernoglakovaya | Unlike the first option, here the primary plane is pre-coated with black varnish, and only then the grooves are removed, which results in a stunning play of light and shadow. |

- Embossed. Here fragments of the ornament are either on the same level with the background, or even above it. The method itself is similar to contour carving, but during its implementation, the edges of the grooves change their outlines, fitting into the general idea.

- Flat-relief. A very common way to decorate a wood surface in architecture and applied arts. It consists in the fact that a part of the material is removed with a depression of several millimeters and at different angles. The result is a voluminous composition.

sculptural carving

It goes without saying that the creation of wooden sculptures from wood is the most difficult type of its processing. But on the other hand, with such works of art, you can safely decorate not only the house, but also any place in the summer cottage.
Tip: after applying patterns to a tree, be sure to treat it with antiseptics, especially when it comes to external work. This will greatly extend the life of your masterpiece.
If you decide to decorate your own house or gazebo, then all of the above methods of applying patterns in combination can be used. But if you have touched on the implementation of such a task for the first time, then it is better to dwell on the simplest options.
First of all, it is worth considering patterns for wood carving for beginners:

Choice of wood

When choosing the right material, you should pay attention to the following factors:
- texture features. So if you want to create a complex ornament with a semantic load, then it is better to take a bar with a slightly pronounced woody pattern. And if you prefer only to emphasize the natural beauty of the tree with your pattern, then opt for a clearly defined texture.
- Try to place the pattern itself along the fibers. This will make it easier to apply.
- Pay attention to damage to wood by rotting processes or other diseases. Discard such samples immediately.
- It is also worth weeding out products with such defects as knots and pockets with tree sap.
Purpose
In the case of home decoration, remember the main functions performed by wooden patterns:
- Decoration appearance. This is the main purpose. It is noteworthy that in ancient times, many ornaments had a specific mystical meaning and served as amulets.
- Protection from direct sunlight. A visor with a through thread will do an excellent job of scattering light.
- Protecting dangerous places. Balcony or stair railings can become much more attractive thanks to this finish.

Training
Once you have chosen a suitable block or board and decided on the method of carving, prepare the place for work. You may need a vise or clamps, a pencil, a jigsaw, a chisel, and a router.

Next, draw a sketch of your drawing with a pencil on a wooden canvas. Securely fix it and start working. Be extremely careful in the process of applying the pattern, as the slightest miscalculation can ruin the entire workpiece.
At the end of the work, cover the resulting ornament with varnish and install it in the place where it will be. As a result, you will receive an original product that is made with my own hands. Even if the masterpiece does not work out for the first time, do not despair, a little practice, and your craft will become a real decoration of your home.
Conclusion
Patterns used to decorate wooden buildings hundreds of years ago are back in trend and gaining popularity. With their help, you can not only revive the same type of grayness of a classic facade, but also make it absolutely original, one that no one else had before.
A little fantasy right choice application method, the acquisition of a suitable blank, patience and care - the most important thing that you need to successfully complete your plan.

Patterns can not only decorate your home, but express your thoughts, create some business card for guests and passers-by.
In the tool kit of many home craftsmen, a milling cutter takes pride of place. The universal cutter is electrical device designed for surface treatment of wooden or metal products. The milling machine simplifies the work of manufacturing a variety of products, creating recesses for loops, various grooves.
For these works it is not necessarily expensive and professional equipment: a simple universal tool is sufficient.
With the help of a milling cutter, you can make a lot of household items and carry out any operations with wood or metal. Milling cutters are needed for processing flat and shaped surfaces. These tools create technological recesses, grooves for various connections, and even complex patterns that serve as decorations.
Milling cutters differ in the installation method - these are stationary machines and manual milling cutters. Machine tools, in turn, differ in the type of operations performed.
Stationary devices are placed in large factories or factories - where it is necessary to manufacture a large number of parts of the same type. The cutting nozzle in them is fixed motionless, and the part that is being processed moves.
The most versatile and suitable for a wide range of tasks are hand-held electric mills. When using a hand tool, the workpiece is fixed rigidly, and the tool itself moves. In milling cutters, there is a constructive ability to fix the tool, so manual devices are recognized as more versatile.
To change the type of work, it is enough to change or position the nozzle in a different way.
In particular, what can be done with a manual wood router, which has the right equipment:
The wide possibilities of this tool allow it to be used by both professional construction or repair teams, and novice home craftsmen.
It is indispensable in the manufacture of interior decorations, the production of furniture or the creation of various crafts.
Universal router device
To maximize the use of a manual device, the master must be guided in the design of the device and the purpose of its main parts.
 The main part is an electric motor hidden in the body. Holders with collets are inserted into the body. Collets are adapters for the use of milling cutters of various sizes.
The cutter is inserted into the collet and fixed with a special button or clamping bolt.
The body is placed on the platform with two rods. The platform is made of metal and is quite massive and stable. Attached to the bottom of the platform is a smooth sliding plate that allows the tool to move smoothly over the part.
The case also houses the "Start" button and the tool lock button. The operating mode is selected using:
- Knobs and setting scales that can be used to adjust the depth of milling. They allow you to adjust the depth with an accuracy of 1/10 mm.
- Speed switch. For those who are just starting to get acquainted with the tool, it is recommended to work at medium and even low speeds.
Some modifications have parallel stop, which allows you to move the cutting part to the left or right. This is very handy for some types of milling work on wood.
 According to their purpose, hand-held devices are conditionally divided into the following types:
- Upper.
- Kromochny.
- Lamella.
Top-type milling cutters are fixed or submersible. In stationary devices, the cutting part cannot move along the body. Therefore, to adjust the depth of processing, the master is forced to move the entire tool, which requires certain skills and experience.
When choosing a unit, preference is often given to plunge cutters. In them, the motor is located on guides along which it can move along with the cutting part. In addition, in the submersible type of devices there is a spring responsible for raising the nozzle at the end of work.
Milling wood with a manual edge-type router is the chamfering and processing of the edges of workpieces. When using different nozzles, it is possible to process not only straight, but also curly surfaces: for example, to make skirting boards or process curly door panels.
The lamellar type is used to create various grooves. Of all types of hand routers, it is the most highly specialized.
Tool selection rules
The choice of a suitable type of electric cutter depends on the technological tasks set. Based on them, a device with optimal functionality and suitable technical specifications. In addition, the need and availability of additional devices is taken into account. These are clamps, different stops, templates, with the help of which the workpiece is processed more accurately and safely.
First of all, a device with suitable power is selected. The mass of the tool depends on this characteristic. Therefore, manual routers are divided into light, medium and heavy.
 Lightweight devices with a minimum mass have a power of no more than seven hundred and fifty watts. The middle category has a power of up to one thousand one hundred watts. For heavy devices, this value is more than one thousand two hundred watts.
In the case of simple and non-intensive tasks, or if the processing material is exclusively wood, the acquisition of a high-power device is not justified. Very powerful tools have a low shaft speed.
The speed of rotation of the router is also one of the important characteristics of the tool. The speed indicator ranges from 7,000 to 24,000 rpm. Various materials and the types of work to be processed require different rotation speeds.
fragile and hard materials and large cutting depth require a low-speed powerful tool. High speed devices are suitable for polishing, grinding, engraving or for processing wooden parts.
When choosing a device, the location of the on / off button is important. The convenience for the hands, and hence the speed of processing the workpieces, depends on this.
Collets differ in material, workmanship and their design. The best collets are cone-shaped and made of hardened steel. Such elements wear out less and last much longer than collets, which are made of ordinary steel.
Modern routers are often equipped with a built-in dust removal element during cutting. An effective vacuum cleaner can be located directly in the housing.
The sole of the tool can be cast or stamped (in inexpensive models). The quality and speed of performing production tasks depend on the density and uniformity of the fit of the sole to the material being processed.
The base support has holes for accommodating rails.
The size of the hole diameter of the lining affects the maximum diameter of the cutter that can be installed on this device.
Distinctive features of a professional class router:
- The presence of a whole set of various additional elements for the device.
- The presence of metal bushings instead of polymer ones.
- The strength of metal sleeves with bearing assemblies. They guarantee the absence of backlash after repeated overheating and cooling.
Professional models are able to actively work for several hours without a break. Simpler devices require a fifteen-minute break after working for a comparable length of time.
The issue of choosing a tool is difficult to overestimate, but you need to learn how to manage it. It is necessary not only to read the user manual, but also watch a video tutorial on how to work with a wood router.
Basics of working on an electric mill
Before starting practical use, like any equipment, the electric cutter needs to be set up. First unscrew the safety nut and remove the clamping collet. Be sure to check that all threaded connections are tightened to the end and that all threaded connections are reliable. Then remove the dense protective grease.
The cutter is inserted into the collet chuck. If necessary, the cartridge is changed to a suitable diameter. The shank is tightened with a special key so that the cutter does not hang out. Then there is the clamping of the spindle.
The position of the cutter is fixed and the required depth of milling is set with the help of the limiter regulator. The correct speed of the device is determined based on the data of the table of correspondences between the parameters of the material and the size of the cutter. Turn on the device with the "Start" button and make a control cut.
Before real work, you need to check what stroke of the router, the value of the spindle speed and select the depth of penetration of the drill. This is done in draft version. If the product undergoes circular processing, then tool should move counterclockwise and away from you when moving on a flat base.
Beginners in carpentry work often make a common mistake: they change the speed of movement of the device with a figured processing contour. In this case, the machine overheats and burns appear on the workpiece.
Before working with a wood router, it is advisable to read application lessons in good sources.
Grooving
If the groove starts from the very edge, then the cutter should hang over the edge of the part. Then the required depth is set and the tool is started. When the edge is completely processed, the latch is loosened. The cutter is raised and the tool is switched off.
A blind groove is made in the same way, except that the cutting does not start from the edge of the part.
When the groove is very deep, it is cut in several passes. With each new pass, a new depth of no more than five millimeters is established. The depth of the last layer should be no more than one and a half millimeters.
End surface treatment
Creating a clean edge is one of the most common types of work with a hand router.
First, a shallow cut is made. The electric cutter moves in the direction of rotation, then in reverse side. After this action, the correct outlines appear at the end.
Working with Curly Templates
Templates allow you to make copies of parts and are used to create curly edges.
With the help of fasteners, the stop ring of the template is attached to the sole. The thrust ring is a plate that moves along the template and forms the necessary trajectory of the cutter.
decorative trim
Decorative patterns are often made to decorate wooden products. Manual machine perfectly copes with the task of artistic milling. You just need to learn how to properly process a pliable tree - and you can mill.
When working on a pattern, in addition to the router itself, you will need a vice, a chisel and a jigsaw. A wooden blank with a pattern on the surface is firmly fixed, and a special cutting nozzle walks along the contour, removing layer after layer of the blank. Gradually, the pattern becomes voluminous.
If you use a cutter of different diameters, you get an individual ornament.
Details of universal hand routers are described in the work of Jackson Day "Working with routers".


