The closer is needed for smooth movement of the door and a snug fit when closing. The design itself is simple, but depending on the model and operating conditions, the specifics of installation differ. Consider the existing mechanisms, which one to choose and how to install it correctly.
Functions
Before installing a closer, evaluate its capabilities. Based on the name, this simple mechanism provides smooth and silent closing of the door. Due to the tight fit of the canvas to the box, it is possible to keep the room warm in winter and cool in summer.
Standard functions: automatic closing and adjustment of the speed of the web, sometimes - fixation in the open position. Expensive models are equipped additional features: set access control, time to ventilate the room and lock the door position.

Types of mechanisms
To figure out how to properly install the closer on the door, consider their modifications.
According to the type of installation, there are:
- Overhead - such models are mounted on top of the canvas, box, wall or auxiliary structures.
- Floor - suitable for doors without a frame, for example, glass. Mounted from below, on one side to the sash, on the other - directly to the floor.
- Hidden - it is unlikely that it will be possible to install such closers with your own hands, since the mechanism is inside the canvas, in this case it is better to call the master.

According to the principle of torque transmission, there are:
- Lever - a simple mechanism that consists of a spring and a hydraulic system filled with oil for shock absorption.
- Slide - a free element slides in the body, the friction force slows down the movement of the web, due to this, smooth closing is achieved. This type of mechanism is installed parallel to the door, looks elegant and concise. It does not make it difficult to open, but rather helps. After plowing the canvas by 30 degrees, the closer is turned on, thus facilitating the work of children and the elderly.
The internal mechanism can be of two types: cam or gear. The first type provides smooth movement, therefore it is more often used for a slide design. Rougher is geared, such closers are installed on heavy doors with a combination lock in order to provide additional force when closing due to gears.
There are simplified models for interior doors, they are adjustable.
How to choose
To choose the right door closer, you should refer to the established standards. To determine the size of the mechanism, the width and weight of the door leaf are taken into account.

The manufacturer is obliged to provide a quality guarantee. Deciding to save money increases the likelihood that the mechanism will break soon. In addition, cheap products are not able to fully perform the tasks.
A certain type of door closer is selected according to the requirements. The more features, the more expensive the price.
For more information about the selection rules, see the video:
Mounting methods
The process of installing the door closer begins with determining the direction of opening the door, the choice of the installation scheme will depend on this.
Overhead models are more often used, they can be mounted on either side.
There is no difference for interior doors, but the entrance doors open outward, so when installing a door closer, you may need to Additional materials, since it is attached from the inside, from the side of the room. This protects the mechanism from dust, precipitation and freezing. The closer also reduces the load from the hinges, which increases the service life.
Before installation, determine the type of door opening:
- "Inside" - the body is mounted on top of the sash from the side where the hinges are located;
- "Out" - the mechanism is attached to the box, and the lever is screwed to the canvas.

How to install a door closer:
- The kit comes with a mounting scheme in natural size, with its help it is convenient to make markings. You can fix the template with tape on the door.
- Drill holes at the marked points or straight through the glued pattern.
- Screw on the housing.
- Do the same for the lever.
- Connect the construction details. In the closed position, you should get an angle of 90 degrees between the forearm of the lever and the door leaf.
- With the help of special screws located on the case, it is performed. The desired speed of the door movement, the closing mode (with or without closing), braking, force, etc. are set.

Decorative overlays mask the case of the mechanism.
Non-standard situations
If there are difficulties with the installation of the closer, the following tricks will help:
- Metal corner. On the door frame an auxiliary element is mounted horizontally, then a lever is attached to it. Another option is to install the mechanism body on the corner, and the lever is screwed to the door.
- Mounting plate. There are three possible ways here. First: the auxiliary element is attached to the upper edge of the door so that it protrudes slightly, then the mechanism is screwed to it. The lever is mounted on the door frame. The second way: the plate together with the closer body is installed on the frame, and the lever is attached to the canvas. The third option: with the help of a plate, the area of \u200b\u200bthe slope is increased, on which the lever is then mounted. The mechanism is installed as standard.

As you can see, the installation of a door closer is possible different ways. If the instruction seemed complicated or difficulties arose in the process, it is better.
In this article we will tell you how to install a door closer. This small device helps to smoothly and silently close both metal and plastic, and even glass doors. Need to install a closer on a wooden canvas? This is also not a problem, because the process itself will take some 20-30 minutes, and all the work can be done independently.
It is noteworthy, but closers have been around for a long time. True, not in the form in which we are accustomed to seeing them. The progenitors of modern mechanisms were ordinary springs, which were fixed at one end on the canvas, and at the other - on the box, and ensured automatic closing of the door. It was impossible to adjust such a design, so most often such a door either opened with difficulty or clapped loudly when closed.
Overhead closers - the most common and suitable for any door
Modern mechanisms allow not only to smoothly and silently close the door, but also have a whole range of useful characteristics. They can block open door in a certain position, contribute to a snug fit of the canvas to the box, allow you to ventilate the room. The installation of a door closer became mandatory during installation entrance doors equipped with intercoms, they are widely installed in public buildings, very often they are also used in private homes.
To date, closers have different design features, so they can be differentiated in different ways. According to the method of attachment, they are divided into:
- overhead. The most common and suitable for any door. Mounted on top and can be mounted on door leaf or a wall.
- hidden. Sophisticated mechanisms that are immediately built into the door leaf. They are installed by experts.
- floor. They can be found on glass doors. They are attached at the bottom of the structure, and their second part is built into the floor covering.

Floor closers can be found on glass doors
According to the method of transmitting torque, the structures are divided into slide (the closer is parallel to the canvas and slides, which makes the doors easy to use even for children) and lever (the models are very reliable and are installed on heavy doors).
Most often, closers are mounted on entrance and external doors. As a rule, installation is carried out indoors, but there are also frost-resistant models. They are placed from the side of the street, and they are also great for installation on gates and gates, as they are immune to changes in weather conditions. Their disadvantage is the high price, but this has to be sacrificed for the sake of convenience and if it is impossible to install a door closer indoors.

Most often, door closers are mounted on entrance and external doors.
When choosing a closer, pay attention to such a parameter as the weight of the door and its width. For this, there is a special gradation of mechanisms, where each cash register (and there are 7 of them) is assigned its own index (EN). The higher the class, the greater the loads the structures are able to handle, but, accordingly, their price will be higher. The cost of mechanisms also depends on the functionality. More simple models, the cost of which is low, cannot be adjusted to certain parameters (for example, smoothness of opening). When buying a door closer, do not chase the price - good and quality option It may not be very cheap, but it will last much longer.
Installing a door closer - a detailed guide
Installing the door closer on a plastic, wooden or metal door is nothing complicated. Of the tools, you only need a drill with the appropriate drill for each type of door, a marker or pencil, a ruler, a screwdriver or a screwdriver. Manufacturers have taken care of those for whom installing a door closer with their own hands is a new thing. They complete the product with a template that conveys the dimensions of the mechanism in full size and all the technological holes. The drawing is applied on both sides of the sheet: one - for opening towards oneself, the other - from oneself.
So, for starters, we combine the red lines drawn on the template. Horizontal corresponds to the upper border of the canvas, and vertical corresponds to the edge with loops. If the door closer is not installed on the side of the hinges, then it is necessary to measure the distance from the edge of the leaf to the middle of the hinges with a ruler, mark this point on reverse side doors and draw a strictly vertical line. With it, and align the line on the template. Next, mark the holes for drilling. We take a drill and drill holes in the door leaf and frame.
If the door opens towards itself, then we put the mechanism on the canvas, and the lever on the box, if from ourselves - the opposite is true.
Separate the body and levers on individual elements by loosening the screw. Attach the body to drilled holes and attach it to the canvas. We do the same with the closer. Important! In the kit, as a rule, two fasteners are offered: for a closer to a metal door and for a plastic (wooden) structure. We fix the traction to the body with a screw. We connect the lever and the rod, fasten them with another screw, or by snapping the mechanism (you need to apply force).
Adjustment and maintenance - for the correct operation of the system
So, how do we install the closer on the door correctly, we figured it out. Now that everything is installed, we make adjustments to the closing of the doors. To do this, open the canvas and look at the closing speed. If it does not suit you, then with the help of screws we make adjustments until the desired result is achieved. These adjustment screws may be positioned differently on each model, so please refer to the manual for this information. To increase speed, the screws are rotated clockwise, and to slow down and create a smooth ride - counterclockwise. Since the door opens to 180°, the design provides for adjustment of the closing speed in the range from 180 to 15° and from 15° to slam.
The first screw is responsible for the closing range, and the second screw is responsible for the finishing speed. Do not overdo it in unscrewing / tightening the screws. Sometimes a small shift is enough to change the stroke speed. Otherwise, you can not only knock down all the settings, but also disable the door closer. If the model is equipped with additional functions, then separate regulatory bolts are provided for them. For decorative design closers, special linings are offered, which give the mechanisms an aesthetic appearance and protect the body and adjustment screws from dust and dirt. Since all mechanisms loosen over time under the influence of temperature changes, humidity levels and other factors, we recommend that you check and adjust the smoothness of the movement at least twice a year.
All rubbing parts of the structure should be lubricated as needed. In addition, you can not leave the door open for a long time in order to preserve the closer. An exception can only be a design with a special stroke blocking function. If there is already a need to leave the door open for a long time, then the mechanism of traction and lever should be disconnected. If oil leaks are found, the closer must be replaced, as this indicates a malfunction. As you can see, installing a door closer on any door with your own hands is not a big deal, the main thing is to approach this matter responsibly. Do not forget to carry out regular inspection and maintenance of the mechanism for its smooth operation.
The oldest door mechanism that completed the slamming of the door was a cobblestone tied to a jamb on a twine. Then humanity, unwilling to bother itself, replaced the cobblestone with a spring, the ends of which were attached to the box and to the canvas. The spring, imparting momentum not only to the door, but also to not too nimble spins, to this moment performs the function of the main element in most modifications of door closers. Only her work became smooth and controlled due to the introduction of special devices. That's why home master you need to know how to install an improved mechanism, and how to adjust the door closer, if you decide to equip your property with automation for lazy users with your own hands.
Video instruction for home masters
Types of door closers and installation methods
The installation of a mechanical device that smoothly closes the door reduces the load on the fittings, protects the hinges and the structure itself from premature wear. You can equip them with both the entrance and interior door, and the door between the house and the bath extension or garage.
Differences in the method of installation determined the classification of door closers, which are divided into:
- overhead mechanisms installed on a box beam or on a canvas, or in door hinges instead of a rod;
- floor structures, the laying of which is carried out during the installation period floor covering and is usually designed in advance;
- hidden devices located either in a box with sufficient power, or in a canvas. To equip this type of mechanism, it is necessary to mill cavities, which should not be undertaken without experience.
The simplest and most accessible for an inexperienced performer will be the overhead installation of a door closer, the process of which in most cases is described in detail by the manufacturer. Caring manufacturers now apply to their products not only detailed description, but also a template exactly following the contour of the mechanism with a clear marking of points for fastening. Almost all actions are carried out according to the standard algorithm, but there are nuances that should not be forgotten.
Attention. Before equipping the door with a device, it must be repaired and the fittings adjusted. The canvas should not “shuffle” on the floor, hang crookedly on the hinges. The course of the loops should not be heavy.
Construction mounting options
Mechanisms with levers or sliding channels can be mounted both on the inside and on the outside of the interior door structure. Just on outside It is undesirable to install the device on entrance doors due to the negative influence of characteristic changes in atmospheric temperature.
The fact is that the smoothness of the spring control lever provides a variable flow of engine oil from one cavity to another. And it becomes more viscous and thick in frosts, and more liquid in the heat. Therefore, due to temperature fluctuations, the operation of the device will have to be adjusted more often than indicated by the manufacturer, which ultimately reduces the working life of the system.
You can choose from three common mounting schemes:
- The standard setting predetermines the fixation of the main working body on the canvas. The lever with this arrangement is attached to the lintel of the door frame.
- The upper scheme dictates the fastening of the mechanism on the lintel - the upper box beam, and the lever shoe is screwed to the door leaf.
- Parallel arrangement is similar to the standard version, but the lever is not mounted perpendicularly, but in parallel with the mounting bracket.

The installation scheme of the door closer depends on the location of the hinges. That is, from the direction of movement of the canvas when opening / closing. If the door is opened "on itself", then the installation of the device is carried out as standard on the canvas, and the lever is attached to the box beam. The option "on your own" obviously involves the upper fastening of the device to the lintel with the fixation of the lever on the canvas.

There are also non-standard cases, such as, for example, insufficient height of the door clearance. But cunning developers have found a way out of structurally difficult situations by offering mounting brackets and plates to home and professional craftsmen.
The installation of a door closer in such cases is carried out in parallel in two ways:
- the lever is fixed in parallel by placing its shoe on the mounting bracket fixed on the box;
- the main body of the closer is attached to the box beam using a mounting plate.

Briefly about guide rail closers
Devices with a sliding arm attract with an optimized design that practically does not disturb the decor of the interior. Among the advantages is the ability to upgrade the device with an electromagnetic lock or a fire alarm. Such closers function with great effort, and there is no way to control their work, but equipping with an elastic limiter-insert will allow you to set the required opening angle of the sash. Most modifications are installed according to schemes similar to the perpendicular version described above. But universal models with sliding duct rod can be mounted on both sides.
Attention. The installation of channel (slider) closers from the side, the reverse side of the location of the door hinges, dictates the equipment of the device with a door leaf opening angle limiter. It can be replaced by a specialized stopper built into the slider.
Door closer installation algorithm
After deliberately choosing the right location and determining the scheme, further actions are performed in an almost identical sequence:
- we apply the template included in the package and glue it with adhesive tape to the installation site;
- through the “kern” points indicated by the manufacturer, the places of future holes for fasteners, there should be 2 for the lever and 4 for the device;
- it is advisable to drill mounting holes in advance;
- we fix the lever first, followed by the body;
- After fixing the device and the lever, we will install the second half of the rod on the axis of the closer and perform an adjustment in length. The lever must be strictly perpendicular to the closed door leaf.
Attention. The adjusting screws should be directed towards the hinge bar of the box.

fasteners in complete set attached by the manufacturer, you do not need to buy or change it to other hardware. It is important not to deviate one iota from the instructions, and success is guaranteed.
Structural adjustment
After connecting the thrust and the main working body into a single mechanism, it remains to find out how to adjust the door closer. This procedure is usually carried out by adjusting two adjustment screws. Two screws are needed in order to set the speed of the web in two modes:
- by the position of the first screw we set the closing speed in the range of 180-15º;
- with the second screw we “program” the speed in the range of 15-0º.
The required speed is set by turning the screws along and against the thread. You probably won't have to do more than one turn.
Attention. You can not adjust the speed of the canvas too hard. Two turns will lead to leakage, loss of the screw with oil leakage.

If the door was equipped with closers with additional functions, such as:
- BC (abbreviation BackCheck) - a damper that resists too sharp efforts in the range of 70-110º;
- FOP (from Hold-Open) - blade lock in the open position;
- DC (in abbreviation Delayed Closing) - a prolonged moment of movement in the zone 110-70º,
After making sure that the speed characteristics correspond to the desires, and the movement ends with the required “click” or “boost”, we close the axis of the closer with a decorative cap.
Now the work can be considered completed and you can start using the automatically closing door. The closing mechanism will function properly if children do not swing on the doors, if the normal operation of the door closer is not interfered with by supporting devices and unreasonable hands, always striving to slam or slow down. Subject to the rules of operation, the device will last a long time.
Reading time ≈ 3 minutes
Door closer - the mechanism is quite old, but despite this, even today it is quite practical and is still used both in private houses and in apartments. To install it, no special knowledge or skills are required, all that is needed is a few tools, the closer itself and some information on how to properly install the closer with your own hands.
Preparing doors for installation
Before you figure out how to install a door closer, you need to prepare the door itself. Check if they are installed correctly. Are the hinges installed correctly and is the door rubbing against the floor? All this can adversely affect the installed door closer, which will either work incorrectly or not work at all.

In addition, it is recommended to check the condition of those very loops, make sure that they function well enough, in last resort, they must be lubricated with grease or any other available material of similar action. Doors must work perfectly, which, in addition to the normal operation of the door closer, can also guarantee the reliability of the door itself.

In addition, it is necessary to take into account some features of the closer type, and there are only a few of them, or rather three.

The first and so-called standard type of closer is the invoice closer. It does not have a special design and is a conventional overhead spring (the spring is hidden inside), which is screwed to the door by the most simple method- screws (the other part, respectively, to the door).

Second of existing options we can call a floor closer, which is really the second not only in terms of number, but also in terms of convenience, because even in comparison with the overhead closer, which is also much inferior to a better, hidden one, the mechanism can ruin the interior, since its installation on the floor is extremely conspicuous . Although it would still be foolish to criticize this choice, since with proper installation and some interior solutions, you can achieve an attractive appearance. Despite some inconveniences, the floor closer is the most reliable and can last about twice as long as other options.

The third type of door closer is the hidden door closer. Perhaps the most attractive option, since its design allows you to hide the door closer inside the doorway.
How to install a door closer?

Now it's time to figure out how to properly install the door closer and it can be noted that this will not be difficult.

Regardless of whether it is the installation of a door closer on a metal door or on plastic door, standard installation includes conventional mount box spring to the door (namely, in the corner) with screws (it is extremely important to fix it evenly, so before starting, make small measurements and draw the attachment points).

The lever is respectively attached to the doorway. It can also be added that the whole difficulty of installing a door closer lies solely in measuring its exact position for normal operation. In the case of installing a hidden door closer, you must make sure that the screws are well tightened and do not stick out.
I like
32By the nature of my activity, and this is the sale of components for metal-plastic windows and doors, I constantly come across the fact that often, it would seem, high-quality closers from world-leading manufacturers in this market segment, for some reason refuse to work after a year, but sometimes and six months of operation can not withstand. After several visits to customers, it was found that the main reason for the short-term operation is the incorrect installation of the door closer or the wrong selection of the door closer according to the weight and width of the door. Therefore, even the installation of a door closer by a door manufacturer does not always guarantee the correct and durable operation of the door closer due to the low qualification of the installers. Quite often, in order to save money, closers are purchased and installed by users on their own, and an unqualified installation also entails problems in the correct operation of the closer. And for some reason, no one bothers to read the installation instructions. In this article I will tell you how to install a door closer so that it works according to the European standard. EN 1154 , according to which door closers must ensure correct operation for 500 thousand opening-closing cycles.
How to choose the right closer?
Since the vast majority of installed closers are top-mounted closers with linkage (pictured 1), then in the text the main emphasis is on such closers.
When choosing a door closer, the main parameters of the door on which you are going to install the door closer are taken into account - this is its width and weight. The main characteristic of any closer is the closing force (or else they say “closer size”). European standard EN 1154 the efforts that the closer must develop are regulated. Depending on the size and weight of the door, door closers can exhibit different closing forces from EN1 before EN7 (Table 1).
 Tab. one
When choosing a door closer with the optimal closing force, they usually focus on the largest parameter. For example: door weight 50 kg (force EN3 ), and the width is 1000 mm (power EN4 ). In this case, choose a door closer with a closing force EN4 . It is not recommended to install a door closer that has a closing force several orders of magnitude higher than required. Since, the higher the force of closing the door, the more forces will have to be applied to open it. Now on the market there are many door closers of the most different manufacturers, their cost varies from 500 rubles and reaches tens of thousands. As a rule, most closers have a range of closing forces from 2 to 4. That is, for example, a GEZE TS 2000 V door closer can take on the values EN2 , EN3-4 and EN5 . The force is adjusted by shifting the closer relative to the hinges. The second important factor when choosing a door closer is the operating temperature range. A change in ambient temperature has a significant effect on the operation of the door closer. Depending on where the closer is installed, indoors or outdoors, close attention should be paid to its operating temperature range. So, for example, the same GEZE TS 2000 V guarantees correct operation at temperatures from -30°C. up to + 40°С. This door closer can be installed both on internal and external doors. The third factor is the presence of closer adjustments to ensure comfortable operation of the closer mechanism in various operating conditions. Closers in low and medium price category, as a rule, have two adjustments: 1. Closing speed from 180° to 15°; 2. "Final closing" - implies a slight increase in the speed of the door in the last 15 °. This function is required for latch doors in order for the lock to latch (fig. 1).
 Rice. one
There are closers with wider functionality, they have additional adjustments to solve additional problems:
- back check- opening damping or wind brake, which protects the door from hitting the wall during sudden opening or gusts of wind. At the same time, in some models, the function of adjusting the angle of operation is implemented;
- Delay Action- closing delay, allows you to delay the closing of the door for a short period of time, which is very convenient when carrying small loads;
- hold open- This is the ability to fix the door in the open position. Thanks to this possibility, it is not necessary to hold the door, and the door closer is not damaged.
How to install a door closer?
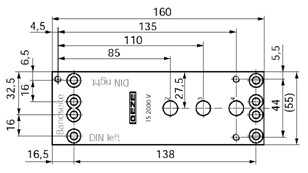
So, the closer is selected. Now you need to install it. Next, consider the installation using the example of a GEZE TS 2000 V door closer (photo 2). As a rule, all closers have in their configuration wiring diagram or installation instructions. The scale of the paper template 1:1, that is, in full size, is designed for easy and quick installation of the door closer on the door without using a measuring tool (photo 3).
 Photo 2
 Photo 3
1) To install the door closer, first of all, you need to decide which side of the door the mechanism will be on. This will determine how to mount the closer, on the door leaf or on the door frame (Fig. 2).
 Rice. 2
2) The template, using adhesive tape, is based on the door leaf (or on the frame) relative to the axis of the hinges, and then the mounting holes for the closer body and the rod are marked, and holes are drilled according to the marks. c) Then we determine the required closing force by the weight and dimensions of the door and fix the closer body in one of three positions (Fig. 3).
 Rice. 3
4) This closer has a telescopic rod, which has two movable parts: one extends from the other and is fixed with a special screw. Therefore, we relax the adjusting bolt of the thrust and install the second non-adjustable part of the thrust on the closer body (the thrust is fastened with a 6 mm hex bolt). We fasten the rod at an angle of 80 ° to the surface of the door as shown on the template. Then we set the angle to 90 °, slightly pushing the adjustable part of the rod, and tighten the fixing screw when the door is in the closed position and the lever is folded at the knee. So the closer will work with a clatter if the door is with a latch. Or we push the rod until the adjustable part of the rod is at 90 ° to the surface of the door, if the door is without a latch, for softer closing without a hitch. Important!!! The door closer transmits a lot of force to the door and works in conditions of constant vibration, so it is necessary to fasten the closer and the rod firmly and reliably.
5) After installing the closer, we make its adjustment. With the help of adjusting screws, we set the optimal speed for closing the door and the door closing for confident operation of the latch. It is not necessary to turn the screws in a full turn, since changes in the closing speed are already felt when turning the screw by only a quarter of a turn (see Fig. 1.). In case the installation of the closer is difficult, for example, when the width of the closer body is greater than the width of the door frame, or when the closer is installed on a door leaf with a lap, where the fixing screws can interfere with the correct functioning of the door closing, use a special adapter - a mounting plate, which is purchased separately (photo 4).
 Photo 4
The mounting board is installed using the same template (photo 3) on self-tapping screws, and the closer body is fixed directly to the board with screws.
Finally, I would like to list a few useful tips, which will extend the life of the door closer:
- don't block the doors foreign objects(stones, bricks, wedges, etc.), it is better to disconnect the rod from the closer if you need the door to be open for a long time (for convenience, many closers are equipped with detachable rods);
- once every six months, adjust the closing of the door (at the beginning of winter and at the beginning of summer);
- once a year, it is necessary to change the grease in the hinge connecting the two halves of the closer rod.


