If you are building your house and have already reached the stage of roofing, then from our article you can find out how to do it yourself. The roof is the most important element of any residential structure, therefore special attention should be paid to it. The quality of the roof affects not only the comfort in the house in terms of temperature, but also the overall safety of the building. So, let's take a look at the step-by-step instructions for building this unit of the house.
Preparation and calculations
It is important to understand that the roof of a house is a complex and important structural element. For its construction, it is necessary to clearly calculate the amount of material, and also take into account future loads. We suggest that you familiarize yourself (in the table) with the average options for building materials for construction gable roof.

Be sure to calculate the exact amount of material based on the size of the roof of your house. You can purchase material with a small margin, taking into account possible errors and defects. It is recommended to draw up a drawing of the future structure. To do this, by the way, you can use modern computer programs that will help you calculate the amount of material you need. After the calculations, we proceed to the direct implementation of the work.

Mauerlat is actually a load-bearing beam that is installed at the top of the erected walls and acts as a support for the entire roof structure. For the Mauerlat, we choose a beam with a section of 100 × 100 mm or 150 × 150 mm, depending on the size of the frame and its future weight.
Installation of the Mauerlat can be done in several ways. The most common of these is to attach the timber directly to the top of the wall. For this, metal studs are attached to the wall, and holes for fastening are made in the bar. A layer of insulating material is laid under the Mauerlat, after which the bar is “put on” on the studs and fixed with bolts. If the wall is wide, the timber can be overlaid with bricks, which will give the base for the roof more strength.
You can also fix the Mauerlat with concrete putty, but the best option would still be to fix the bar on special studs. However, for greater strength, you can use several installation options at once.
The gable roof of the house with your own hands is done strictly step by step. After installing the Mauerlat, we proceed to the collection and installation rafter system... In our roof version, this structure is an A-shaped element that works according to the expansion principle. Loads must be foreseen, therefore opposite walls must be reinforced before installing the system. For this, a bar is used (the section can be selected similar to the Mauerlat), which is attached at the level of the ceiling beams.

By the way, ceiling beams stacked before installing the rafters. The beams are fastened using corners. The pitch of the ceiling beams depends on technical features your house, but should not be less than 30 cm. Fix the beams securely and constantly check the strength of the structure.
If it is possible to lift a rather heavy load to roof level, the assembly of the system can be carried out on the ground. Otherwise, the system is assembled on ceilings. We take the beams necessary for the rafter legs and form a triangular structure, connecting the parts with nails. The triangle is installed with rafters on the Mauerlat. Be careful and be sure to take into account the desired roof height right away so that you do not have to redo the triangles in the future. Do not forget to check the vertical of the installation using a level and securely fix the structures to avoid distortions. Temporarily, you can use additional fasteners in the form of nailed boards, which can be easily dismantled at the end of the work.
Important: First of all, we install side structures on each side of the house.

We firmly attach the rafter leg to the Mauerlat. For this we use metal pads. You should have a securely fixed triangular structure, which will act as a kind of "template" to continue working. Taking into account the size of the timber and the angle of inclination of the rafters, we collect new triangles and install them one by one on the Mauerlat. The number and pitch of the rafters depends on the size of the roof.
We strengthen the sides of the triangle with transverse boards (we nail them in the center of each side) and set the racks on the beds. They will play the role of additional support and will prevent deformation of the roof. We attach the ridge girder to the top of the entire system.

This element is a frontal roof “wall” that extends the existing wall of the house. In order for the roof of a gable house to look beautiful and durable with your own hands, it is necessary to strictly maintain the vertical levels of the gables and, accordingly, the rafter system. It is also important to ensure a secure fit, as the roof will be exposed to precipitation and wind, which can lead to distortions. You should also take into account the weight of the future roofing, therefore, it is impossible to neglect attention to the reliability of the fastening in any case.

The pediment looks like a triangular structure, which can be assembled both on the ground and directly at the place of work. You can envisage having a window at the gable. From below, the pediment is attached to the Mauerlat, and from above to the ridge girder. The pediment can be sewn up both at this stage and at any subsequent stages. As a rule, boards of 50 × 100 mm or 50 × 150 mm are used for this. The boards can be mounted both vertically and horizontally - at your choice.
The inner side of the pediment must be insulated and covered with an insulating layer. You can use the materials and technology that we will describe in the next section. Concerning outside gable, you can leave it as it is, or you can sheathe it with siding, which will give your roof a beautiful look.
Lathing and insulation
To make a gable roof with your own hands reliable, be sure to insulate it. Various materials can be used in the role of insulation, for example, the very popular mineral wool or other options based on it. It is imperative to provide for the presence of a vapor and waterproofing layer.

We lay the waterproofing layer directly on the rafters and fix it. Next, we lay mats made of heat-insulating material, placing them between the rafters with a secure fixation. Next, we lay a layer of vapor barrier, which we place with inside roofs. We fix the connections of the layers with a special adhesive tape. On top of the insulating material, you can immediately mount a finishing layer, or you can postpone this stage for later.
Now let's move on to the crate. Along the existing rafters, we lay a bar - a counter-lattice. The task of this element is to create a gap between the roofing material and the insulation. This helps to remove moisture generated by the convection of warm air from the ceiling and attic.

Next, we mount the direct crate. It all depends on what kind of roofing material you are going to choose. For example, for shingles, the pitch of the lathing should be about 50 mm, and for slate or wide tiles - from 100-150 mm. In other words, it is imperative to consider the size and weight of the future. roofing material... In some cases, you can make a solid crate at all. By the way, this option is considered universal, that is, suitable for all types of coverage. But this significantly increases the consumption of building material and the very weight of the entire roof.
Installation technology differs depending on the type of coating. For example, when installing bituminous shingles First of all, lay the underlayment on the battens with an overlap of approx. 150 mm and fix it securely. The carpet can be laid both along and across the existing lathing, the main thing is to fix it securely.
Next, we install the cornices, if they are provided for in your project. The cornice strip is attached directly to the lining and fixed with nails or self-tapping screws. Do not forget to mount special brackets in the cornice for installing the drainage system. After that, attach the end strips to the ends of the roof and proceed to laying the tiles.

We start from the center of the eaves, in both directions to the edges, moving layer by layer to the top of the roof. There is an adhesive layer on the tile, protected by a film - we tear it off and glue each tile to the lining. We fix it with nails in four places. Then we repeat the procedure with each next tile. At the ends, the protruding edges of the tiles must be carefully trimmed and sanded. Do not forget to make roof penetrations - special holes for, for example, an antenna or a chimney. To do this, the tile is drilled in the required place, and the hole is reinforced with rubber at the edges.

A special ridge tile is mounted on the ridge of the roof suitable shape... Here it is necessary to overlap the installation by about 5 mm to avoid rainwater getting under the material. Installation of the roof using other materials is carried out in approximately the same way, taking into account certain nuances for each of the coating options.
Your do-it-yourself gable roof is ready. Now you can go to interior decoration attic and work on wood varnish, paint or other suitable materials. As you go, there is nothing complicated in this process: you will need the necessary materials, several assistants, tools and 2-3 days to work.
Is one of the most simple options roofs used in the construction of small houses. It has two sloping ramps towards the outer walls.
At the same time, pairs of rafters leaning against each other are united by a crate. At the ends, triangular walls are formed, or in another way, tongs.
Windows, called dormers, in them or on the roof slopes provide light and ventilation in the attic.
At first glance, it seems that there is nothing difficult in the device of a gable roof and in the installation of its rafter frame, but in order to reliably protect the structure from any aggressive external factors, you will have to approach the work very carefully and responsibly, because miscalculations in the frame mounting later it will hardly be possible to change it already.
In this article, you will learn how to make a gable roof, as well as a device gable roof.
The attic is a living space located between the roof of the house and the ceiling of the lower floor.
It allows you to make optimal use of the free space as additional living space, but at the same time requires effective insulation and careful selection of roofing material to avoid high thermal conductivity in summer and increased level noise during precipitation. You will see examples of attic design.
The attic has the same location, but in this case it is non-residential. It does not require insulation and serious construction costs. The buffer space provides ventilation and serves as a storage room.
Attic
Gable structure: mansard roof and what parts it consists of.
The gable mansard roof provides strength and reliability with a rafter system, which is a structure that includes a Mauerlat, the rafter legs themselves, lathing, beds, ties, racks and other elements.
Roof support - mauerlat- represents a bar or log on which the roof frame is also attached. He plays a significant role in the entire structure, distributing the load along the plane of the walls and not allowing the slopes to disperse under the influence of external factors.
Installation of the Mauerlat can be done in three ways: using steel wire, anchors or studs... How to make an attic with a gable roof:

Rafter legs — these are the constituent parts of the roof, which at one end abut the wall of the house, and at the other at an angle they close with the opposing rafter legs. They form the basis of the frame and the support of the future roof.
For effective protection buildings from any weather conditions, the quality of the material from which they are made is very important.
ATTENTION!
When installing the structure, monitor the quality of the material and be sure to treat the wood with insecticidal and protective solutions... Remember that a small number of tree-eating beetle larvae can destroy the structure over several years.
Lezhen is a bar placed horizontally on the retaining walls inside the building. All the pressure of the rafters of the rafter system falls on it, which he, in turn, forwards to the support wall.
When installing the bed, a bar with a section from 100x100 to 150x150 mm is used.
Before attaching the bed, it is important to establish the position of the midline on which the bed will be located.
Measurements must be made relative to the Mauerlat, because with its help the perimeter errors were corrected. From the side and pediment Mauerlats, it is necessary to measure the distance determined by the project.
Under the bar it is worthwhile to carry out a double .
The installation of the bed is carried out by fixing it to the inner walls using brackets or wire twists, which can be pre-laid during the construction of a house or fastened with anchors.
If the walls of the house are foam concrete or are built of other lightweight materials, before installing the bed, it is worth making an armature belt and releasing anchors, with which it will be installed. In the case of installing brick posts under the bed, it is also attached to the inner support walls.

Mauerlat

Gable structure plan
Tilt angle
The choice of roof depends on a number of factors, for example, the area in which you live and the nature of the natural precipitation.
So, for example, the wind has a strong effect on the rafter system and roofing, and a slight increase in its angle of inclination will aggravate the wind load at times. But a small corner is also unsafe - in this case, it will be easy for the wind to blow the roof off.
Snow, in turn, puts an intense load on the roof , when the angle of its slope is 30C, and at an angle of inclination of 45C, the load can be avoided altogether, since precipitation rolls off the roof.
Obviously, for regions with strong wind activity, a roof with a slope of 30C is suitable, and for regions with heavy snowfall, the optimal slope will be 45C.
The draft angle also depends on the material from which the roof will be made. According to building codes, each roofing material assumes its own minimum angle slope. For example, for this indicator is 30C, and for tiles 22C.
In principle, the optimal slope angle of the roof can be calculated by the ratio of the ridge size to half the width of the structure and multiplied by one hundred.
Puff installation rules
Tightening - fastening composite structures, connecting the rafter legs from below, forming a triangle and not allowing them to disperse. They can be made from stapled planks or square beams, which should be cut to an acceptable length and connected with nails and studs to the rafters.

Installation of puffs
The distance between the puffs should be equal to the distance between the rafter legs that they connect.
In order to prevent deflection in the puff under the weight of its weight, it must be connected to the ridge of the roof, the junction of the two slopes.
Rack installation rules
The uprights are made of square beams and are positioned vertically under the ridge, transferring the load from it to the supporting inner wall. Leaning on the benches, they serve to fasten the girder, a horizontal bar that provides auxiliary support for the rafters.
Before installing the rack, it should be marked for the subsequent fastening of girders, crossbars and other elements of the rafter system.
When installing the racks, it is imperative to ensure that the edges of the mating elements fit snugly.... Clearances at the joints should not be more than 1 mm. The presence of through holes is not permissible.
The uprights are mounted on dry and antiseptic-treated surfaces of the supporting structures. If the beams are supported on the rack, it is necessary that the load on the struts is carried out along the grain of the wood, and on the beams goes across.

Installation of racks
DIY gable roof: step by step installation
When preparing for the construction of a gable roof with your own hands, it is worth deciding on will it be residential or non-residential, take into account the climatic and wind load of the area and develop a plan, taking into account the dimensions of the house.
And now we will tell you how to make a gable roof with your own hands:
- The first stage is marked by the installation on the longitudinal walls of the roof support structure - Mauerlat... He takes all the load roof structure and spreads over walls and foundations. Mauerlat for a gable roof is prepared from a bar or log with a cross section of 50 × 150 - 150 × 150 mm, previously treated with insecticidal and protective preparations that resist fire and decay.
- If a log is used during construction, then the next step is the stage of laying it.
- Then you can get down to installing racks and girders.... Depending on your project, it can contain one ridge girder or have additional side girders. Or it can be without them, but with racks supporting the rafter legs. To facilitate the work, it is advisable to build scaffolding... The racks must be prepared of the same length, but if the heights of the walls of your house are not the same everywhere, then they will have to be cut differently in order to lay the ridge run in a horizontal position. In this case, the length of the uprights must be measured using a rope stretched horizontally between the two extreme points.
- When installing racks, it is necessary to check the vertical position of the structure in two planes and pre-attach the racks with boards to the erected scaffolding. Then the girders can be attached to the racks. Further, after making sure that the struts and the purlin are in the correct position, fix the nodes according to the project.
- Then you can start installing the rafter legs. If as a result preparatory work the output is a flat horizontal surface, one marked rafter leg is enough for you. In another case, if there are inconsistencies, you will have to mark each by pulling the rope between the two extreme rafter legs and cut each intermediate rafter separately.
- Slats equal to the length between the lateral planes of the rafter legs are made to withstand the required step. In other words, the thickness of the rafter legs must be subtracted from the step length declared in the project. Before attaching the rafters, which go end-to-end with the rails, the structure is carefully checked and only then fixed. Further, filly are installed - boards that lengthen the rafter legs in order to equip the eaves overhang.
Do-it-yourself gable roof (drawings and photos below):

Do-it-yourself gable roof step by step: photo of the scheme

Gable roof structure with attic

Roof installation
The choice of roofing material

Tiles and slates are ideal for roofs with slopes greater than 20C. Roofs with a lower slope will retain moisture in the gaps, which will spoil the coating. durable and easy to repair.
Slate is also a reliable material... It is moisture-resistant, frost-resistant and fireproof. In addition, it is fairly inexpensive and easy to install.
Roll materials are used for flat roofs or with an angle of inclination not higher than 30C, otherwise the material may slide under the influence of external factors.
Metal profiles and shingles are more often used on roofs with a slope greater than 10C... This is a fairly durable and lightweight material, but when using them on a flat surface, it is necessary to process the joints quality sealant... The greater the angle of inclination, the less the overlap of the metal profile sheets should be and. The same can be said for slate.
CAREFULLY!
The smaller the slope of the roof, the denser the roofing material should be chosen.
Another option is roofing panels. already containing heat and vapor barrier. Their installation is simple, but they are highly expensive.
Also, when installing a gable roof, it is important to ensure ventilation of the room located below. And for pitched roofs, a drainage system is required.
How to make a gable roof of a house and from what materials depends on you. In conclusion, it should be noted that it is worth approaching work competently and we build a gable roof only with quality material ... Then the roof will be durable, reliable and stable.

Comparative characteristics of roofing materials
Useful video
In this video, you will learn how to build a gable roof:
In contact with
A roof with two slopes is the most common option for completing the box of a private house. When manufacturing it, it is important to correctly select the cross-sections of the bearing elements, to securely fasten the nodes and to choose the right type of structure. The rafter system of a gable roof does not have great difficulties and can well be made by hand.
Classification of rafter systems by the method of support
The design can be classified in two ways. The first of them is the way of supporting the load-bearing elements. The gable roof truss system of the house in this case includes the following types:
- with layered rafters;
- with hanging rafters.
Types of gable roofs with layered and hanging rafters
The roofing device using layered rafters involves their support at two points. The design in this case avoids the occurrence of a serious spillage. To do the installation yourself, you will need the following basic elements:
- rafter legs;
- mauerlat;
- crossbar;
- intermediate struts and struts with a large span of load-bearing beams;
- lathing and counter-lathing;
- lining persistent bars.
At the top point, the installation provides for support on the transom. The installation also provides for support at the lowest point - the Mauerlat. You can assemble such a structure for a house with your own hands only in two cases:
Options for assembling a layered gable roof system
- The elevated system is possible if the distance between the gables is not large. That is, such an installation is suitable for small house do it yourself. The greatest length of the structure, which allows the construction of a wooden girder without additional reinforcement, is 6 m. For large spans, it will be necessary to install metal beams as a girder. Using timber it will be necessary to provide for intermediate racks, which are located on average every 2 meters. This can be avoided only when used as a crossbar of glued laminated timber of a sufficiently large cross-section. In this case, free space planning becomes impossible - the racks in the middle of the room cannot be removed.
- The second option, when it is possible to install a layered gable roof system with your own hands, is the presence of a wall in the middle of the house. The device in this case provides that the beam on which the rafters will rest at the top point will transfer the load to the inner wall. In this case, the supporting structure should not be confused with the partition. The partition rests on the floors, and installing the wall of the house with your own hands involves resting it directly on the foundations. Such a device is suitable for buildings with sufficient width, where it makes sense to install a wall fence in the middle.
The second option is hanging rafters. They are more complex in calculation, but they allow the device in the under-roof space of an open-plan house. The design assumes the absence of a supporting wooden or metal bar in the upper part. Installation involves the support of the rafters only at the lowest point. In the upper part, the bearing beams are securely connected to each other. Installing such a system is like a farm. The structure works on a spacer, so it is important to prevent excessive horizontal stress on the walls of the house. this can be done with the following activities:
- the device of a monolithic belt along the edge of the walls;
- it is necessary to securely fasten the Mauerlat of the gable roof to the wall of the house with your own hands;
- to eliminate the tension, a fight is established.
 Installation of a hanging truss system
The scaffold or screed becomes one of the significant elements of the gable roof of the house. It prevents the walls from expanding under the action of the expansion. The following types of contractions can be distinguished:
- located in the attic floor level;
- located in the attic ceiling level.
It is worth noting that the second option provides less reliability, since the higher the installation of the element is, the stronger the rafters have an effect on it. If the fight turns out to be too long, you need to make it stronger with your own hands. For this, installation of additional elements of the gable roof of the house - suspensions is carried out. They connect the ridge to the middle of the puff, thus preventing it from sagging.
The rafter system of a gable roof with hanging rafters allows installation with preliminary assembly of the trusses on the ground, after which they can be lifted onto the roof and secured.
This option is only suitable if you have lifting equipment, since the finished gable roof of the house will become too large and heavy to lift with your own hands.
Classification by type of ramp
The second division can be done depending on how the ramp line is designed. The views here suggest two options:
 Gable roof with broken and straight slopes
- Straight slopes... The easiest way to do it. Allows you to get the job done without serious difficulty. The disadvantage of this do-it-yourself roof option is a decrease in the space of the attic.
- With broken slopes. These types of roofs are more difficult to perform. It is assumed that there is a line along which the angle of inclination changes. The angle of inclination of the lower part of the slope must be made larger than that of the upper one. Thus, it turns out to raise the attic ceiling and increase the free space. Installation of the roof is carried out with the installation of an additional crossbar at the fracture site.
These types involve a choice between them, depending on the wishes of the future owner of the building.
The main elements of the roof
The rafter system of the gable final part of the building consists of many elements. Installation should start with a detailed study of each of them and the selection of their sections.
When installing elements for metal tiles or other coating, it is assumed that a bar with a section of 150x150 or 200x200 mm is used. It is this size that allows the most optimal distribution of the load. then you will need to choose a method of fixing it depends on the material of the walls. There are several options:
 Mauerlat fastening scheme to the wall
- Frame, timber or log walls do not require the installation of a Mauerlat. In the case of a frame building, the upper wall rail serves as a support for the rafter legs. when building fences from a bar or log, the upper crown becomes the Mauerlat. It is important to correctly fix these elements in the wall structure.
- When used for construction of lightweight concrete, additional reinforcement will be required. Lightweight concrete includes materials such as foam concrete, slag concrete, expanded clay concrete. They can collapse if the roof is not supported centrally on them. For even distribution of the load, a monolithic reinforced concrete belt is poured along the edge of the walls. During work, a special wire, pins or bolts are laid in it, on which the Mauerlat will be fastened.
- For brick funds, you do not need to provide a reinforced concrete belt... In this case, to connect to the strapping bar, a wire is introduced into the masonry, which is then wrapped around the Mauerlat and twisted. The second option - one row before the walls are cut, wooden blocks impregnated with an antiseptic are brought into the masonry from the outside. Such plugs and Mauerlat are fastened with staples. It is also possible to use studs and bolts, which will require pouring a monolithic belt.
An important point is waterproofing.
When installing, it is important to provide roofing material, linokrom or waterproofing at the junctions of concrete or brick with wood. This is required to prevent wood from rotting when it comes into contact with material with a different moisture content.
After fixing the Mauerlat, the rafter legs are installed. Their cross-section is selected depending on the pitch of the supporting beams, their span, snow load and the type of coverage. When installing a frame under a metal tile at a step of 60 cm, it is recommended to observe the following recommendations, depending on the span:
- 3 m - 4x15 cm;
- 4 m - 5 = 15 cm;
- 5 m - 5x17.5 cm;
- 6 m - 5x20 cm.
 Table of average values of rafter legs
These are average values, in order to perform a more accurate calculation, it is better to consult a specialist or study additional literature.
There are two ways to attach the rafter legs to the Mauerlat:
- with a notch;
- without her.
 Fastening the rafter legs to the Mauerlat with and without a notch
In the first case, a gash is performed on a strapping bar, in the second, a special plank is nailed to the rafter, which becomes a stubborn bar. Further, for both methods, the work is done in the same way. With the help of metal corners, the inclined beam is fixed so that it does not move relative to the design position along the Mauerlat. Additionally, nails are driven in at an angle.
 The scheme of fastening the rafters with wire and on staples
In addition, you will need to fasten the rafter to the wall. The implementation of this measure is provided for in the regulatory documents. There are two ways to do this:
- on staples (suitable for wooden buildings);
- using a wire twist (a more laborious option, but the only one possible for stone houses).
It is possible to carry out fastening according to the norms through one leg. This is necessary for a more secure attachment of the roof to the box of the house.
If you carry out the work correctly, you can not worry about its condition even in the strongest winds.
Racks, ties, struts
Such elements are most often made from planks. The optimum thickness is between 32-50 mm. Racks are an exception. Here you can use boards with a thickness of 50-100 mm. Fastening is carried out on pins or using support bars.
Gable roof rafter system: structure and assemblies
A gable roof is most common in construction. For proper installation, it is recommended to study the device of the gable roof rafter system.
The device of the rafter system of a gable roof
The gable roof rafter system is designed for roofing in the form of two rectangles located at a certain angle to each other in the upper part of the structure. This design is quite often used in the construction of private low-rise houses, various buildings for household and economic purposes. In industrial and commercial enterprises, a gable roof is installed on buildings for various purposes, which have a significant length that exceeds the width several times. The design contains two slopes of different lengths. On the front side, a short slope with a large angle of inclination is installed, on the back side - a long one with a smaller angle of inclination. This configuration allows the main part of atmospheric precipitation to be directed to the non-working area of the enterprise territory.
![]()
Figure 1. Scheme of fillies.
The construction of a gable roof is one of the low-cost options that does not require significant physical effort.
It is relatively easy to perform with little experience with wood material.
Typical load-bearing elements of the system, specific terms
![]()
Figure 2. Sheathing scheme.
In the manufacture of parts of the gable roof truss system, coniferous lumber is used. It is undesirable to use hardwood due to the large specific gravity... Most of the elements have specific names that are understood mainly by specialists:
- Lezhen - timber with a section of 150x150 mm, 180x180 mm. Fits on the surface of an internal load-bearing wall. Designed to level the surface and distribute the loads from the racks.
- A rafter leg, or rafter, is a piece of timber or thick boards. The main element of the triangular roof structure, bearing the main load from snow, rain, wind and other atmospheric phenomena. The distance between the rafter legs can be from 0.6 to 1.2 m. The step size mainly depends on the plumb line of the roofing material; in some cases, the peculiarities of the roofing material should be taken into account.
- Mauerlat is a square beam with a side size of 150-180 cm. It is laid on the surface of external load-bearing walls. During installation, it must be secured with anchor bolts or other reliable means. Distributes the load from the rafter legs to the load-bearing walls.
All parts of the gable roof are connected to each other in a different way. Previously, structures were assembled mainly using staples, nails, threaded studs. Now manufacturers of building materials offer a wide range of different brackets for assembling roofs of any configuration. Fastening of most parts is carried out with self-tapping screws of the required diameter and length, reinforced with special spikes in the brackets.
Additional elements of the rafter system
![]()
Figure 3. Schematic of an arch with three hinges.
In addition to supporting parts, additional reinforcing elements are used in structures:
- Fillets (Fig. 1) - are used to increase the length of the rafter legs. Installed at the bottom for eaves overhangs. The thickness of the filly is somewhat smaller sizes rafters.
- Roof overhang, or cornice overhang, is a roof element protruding from the edge of the wall by about 40-50 cm. Designed to protect the walls from precipitation.
- A ridge is an element that connects all the rafter legs of the system in the upper part. Installed horizontally.
- Lathing (Fig. 2) - boards or bars installed for roof fastening. They are located perpendicular to the rafter legs, additionally performing the function of their fastening. They take the main effort from the roofing material, distribute it to the rafters. For the device, it is desirable to use edged lumber... With limited funds, you can use unedged, cleaning it from the bark. If the roof is made of soft material, the lathing is made solid. This option can be made from boards or plywood treated with protective materials from high humidity... When corrugated board is used, the lathing is performed with a certain step, depending on the weight of the material and its design features.
- Braces are elements made of timber or thick boards that reinforce the main structure. Distribute the force from the rafter legs to the supporting parts. The assembled structure of struts and braces was named a farm - an enlarged part with the necessary safety margin.
- Racks - made of rectangular or square sawn timber. Installed vertically under the slope. The load from the roof gusset is distributed through the uprights to the internal load-bearing wall.
- Tightening - a bar or board that secures the rafters in a hanging system. Creates a rigid triangle shape between the rafter legs, compensating for the spreading force.
For the manufacture of additional parts, you can use lumber with a cross section similar to the supporting parts. In order to save money, you can calculate and purchase products of a smaller section.
Two typical ways of constructing truss systems
![]()
Figure 4. Connection diagram of the lower ends of the parts.
The gable roof rafter system can be arranged in two main ways:
- hanging rafter system;
- layered system.
The hanging system is used for buildings with a distance between external walls less than 10 m, without an internal load-bearing wall in the middle of the building. With a different configuration of the building, a layered rafter structure is used.
If the building has columns located along one of the central axes, it is possible to use the combined version. The rafter legs located above the columns are mounted with an emphasis on the surface of the columns, hanging rafters are installed between them.
Hanging rafter system
In structures of this type, the installation of rafter beams is carried out on the surface of the outer walls. The disadvantage of this method is the emergence of an effort expanding the walls. To compensate for the load, the beams are tightened by tightening. The structure takes the form of a rigid triangle that retains its shape under the influence of loads. In some cases, floor beams can play the role of braces. This scheme is used when installing in the attic space of the attic.
Hanging rafter constructions can be made in different versions:
![]()
Reinforced structure diagram.
- A simple version of the arch with three hinges (Fig. 3) - the structure is a rigid triangle, the two sides of which are the rafter legs. The main load creates a bending force on the parts. The force on the third side is directed towards the tension of the structure, so a steel tie can be used instead of a wooden part. The connection of the lower ends of the parts can be assembled different ways(Fig. 4), by inserting beams into a tie, using wooden elements or metal brackets.
- Reinforced structure (Fig. 5) - a gable rafter system used for the construction of roofs of large industrial buildings with a distance between the walls of more than 6 m. This system is not suitable for use in small residential buildings. A design feature is the distribution of the tightening weight on the ridge. Since it is almost impossible to find solid lumber of the required length (6 m and more), the tightening is made from pieces. The connection of all elements is performed with a straight or oblique cut. The center piece is called the headstock. The connection of the headstock with a tightening is performed by a collet twist with the possibility of adjusting the tension.
- An arch device with a tightening in the upper part of the rafter beams (Fig. 6) is used when equipping in the attic space of the attic. In this case, the tensile force in the rafter beams increases. The lower ends of the beams are attached to the Mauerlat beams. The fastening should limit the movement of the beams to the sides along the timber, but allow sliding across. This ensures an even load distribution and stability of the entire system. The roof beams should form an overhang.
There have been developed many variants for the arrangement of hanging-type systems. Most are used for relatively small structures without load-bearing structures inside buildings. For buildings bigger size you need to use a layered rafter system.
Roof rafter system
The main difference of this system is the installation of a vertical beam supported by an internal load-bearing wall located in the middle of the building. Such a design is necessary when a gable roof is installed on a building with a wall-to-wall size of more than 10 m.
![]()
Figure 6. Arrangement of an arch with a tightening at the top of the rafter beams.
- A properly executed system of non-thrust rafter beams allows you to get rid of the forces pushing the walls apart. The surface of the slopes is only subjected to bending forces. There are 3 main options for the device of such systems. In all variants, the lower ends of the rafter beams are fastened using the sliding support method. For belay, an additional fastener is installed between the support bar and the rafter leg.
- You can use a steel strip, wire tie. The options differ in the method of connecting the upper ends of the rafter beams, docking with the ridge bar. One of the options involves laying the rafters on a beam in the form of a sliding support with a cutout device. Mounting can be done using brackets or special brackets. The gable roof, arranged according to the following option, is the most popular due to the simplicity of the device. The top of the rafter beams can be made end-to-end or overlapped with grooves. The corner must be fastened with any of available ways and fix it on the skate bar. The third option involves a rigid connection of the purlin and rafter beams. For fastening to the rafter legs, pieces of boards are stuffed on both sides. A large bending force is generated on the beam, but the load on the rafter beams is reduced.
- A gable roof for a building with dimensions up to 14 m must have a reinforced rafter system. One of the options for increasing the strength is the installation of the brace. The part takes the load from the rafter leg, experiencing a compressive force. To correctly select the installation position of the element, you need to measure the angle 45-53 ° from the horizontal plane of the building. The additional support device turns a conventional beam into a reinforced version, consisting of two spans. To install the struts, calculations are not required, you just need to fix it under the rafter beam, cutting out the joining angle with maximum accuracy.
The technology for the device of gable roofs is simple, everything can be done by hand. Work must begin with the installation and fastening of the base to the walls, then mount the gables. It is advisable to carry out work on the manufacture of rafter beams and the enlargement of structures on the ground, lift the assembled elements, install them on the building, and fix them with temporary fasteners. After assembling and installing all the elements, you should fix the lathing and proceed with the installation of the roof.
Gable roof rafter system: installation and diagrams
The gable roof rafter system is designed for roofing in the form of two rectangles located at a certain angle to each other in the upper part of the structure.
Do-it-yourself gable roof rafter system: an overview of hanging and layered type structures
Rafters perform a number of significant roofing functions. They set the configuration of the future roof, perceive atmospheric loads, and hold the material. Among the rafter duties, the formation of flat planes for laying the coating and providing space for the components of the roofing pie. In order for such a valuable part of the roof to flawlessly cope with the listed tasks, information is needed about the rules and principles of its construction. The information is useful both for those who construct the gable roof rafter system with their own hands, and for those who decide to resort to the services of a hired team of builders.
Roof rafters for gable roofs
In the device of the rafter frame for pitched roofs, wooden and metal beams are used. The starting material for the first option is a board, a log, a bar. The second is built from rolled metal: a channel, shaped pipe, I-beam, corner. There are combined structures with the most loaded steel parts and timber elements in less critical areas.
In addition to the "iron" strength, the metal has a lot of disadvantages. These include heat engineering qualities that do not satisfy the owners of residential buildings. The need for welded joints is disappointing. Most often, industrial buildings are equipped with steel rafters, less often private cabins assembled from metal modules.
In the case of independent construction of truss structures for private houses, wood is a priority. It is not difficult to work with it, it is lighter, "warmer", more attractive in terms of environmental criteria. In addition, to make nodal connections, you do not need welding machine and welder skills.

Rafters - a fundamental element
The main "player" of the frame for the construction of the roof is the rafter, among the roofers called the rafter leg. Beds, braces, headstock, purlins, tightenings, even a Mauerlat may or may not be used depending on the architectural complexity and dimensions of the roof.
The rafters used in the construction of the frame of gable roofs, according to technical characteristics and the method of laying, are divided into:
- Fortified rafter legs, both heels of which have reliable structural support under them. The lower edge of the layered rafter rests against the Mauerlat or the ceiling crown of the frame. The support for the upper edge can be a mirror analogue of the adjacent rafters or a girder, which is a beam horizontally laid under the ridge. In the first case, the rafter system is called spacer, in the second it is non-spacer.
- Hanging rafters, the top of which rests against each other, and the bottom is based on an additional beam - a tightening. The latter connects the two lower heels of adjacent rafter legs, resulting in a triangular module called a rafter truss. The tightening dampens the stretching processes, due to which only the vertically directed load acts on the walls. The structure with hanging rafters, although it is a spacer, does not transfer the spacer itself to the walls.
In accordance with the technological specifics of rafter legs, structures constructed from them are divided into layered and hanging. For the stability of the structure, they are equipped with struts and additional struts. For the device of the supports for the top of the layered rafters, the beds and girders are mounted. In reality, the rafter structure is much more complex than the described elementary templates.

Note that the formation of a gable roof frame can generally be performed without a rafter structure. In such situations, the supposed planes of the slopes are formed by slugs - beams laid directly on the bearing gables. However, we are now specifically interested in the device of the rafter system gable roof, and it can involve both hanging or layered rafters, or a combination of both types.

The subtleties of attaching the rafter legs
The rafter system is fastened to brick, foam concrete, aerated concrete walls through the Mauerlat, which in turn is fixed with anchors. Between the Mauerlat, which is a wooden frame, and the walls made of these materials, a waterproofing layer of roofing material, waterproofing, etc. is necessarily laid.
The top of the brick walls is sometimes specially laid out so that something like a low parapet is obtained along the outer perimeter. So it is necessary that the Mauerlat placed inside the parapet and the walls do not burst the rafter legs.

The rafters of the roof frame of wooden houses rest on the upper crown or on the ceiling beams. The connection in all cases is made by cuts and duplicated with nails, bolts, metal or wooden plates.

How to do without furious calculations?
It is highly desirable that the cross-section and linear dimensions of wooden beams are determined by the project. The designer will give clear design justifications for the geometric parameters of the board or timber, taking into account the entire spectrum of loads and weather conditions. If the home foreman does not have design development at his disposal, his path lies on the construction site of a house with a similar roofing structure.
You can ignore the number of storeys of the building being erected. It is easier and more correct to find out the required dimensions from the foreman than to learn them from the owners of shaky unauthorized construction. Indeed, in the hands of the foreman, the documentation with a clear calculation of the loads on 1m² of the roof in a particular region.

The step of installing the rafters determines the type and weight of the roofing. The heavier it is, the less the distance between the rafter legs should be. For laying clay tiles, for example optimal distance between the rafters it will be 0.6-0.7 m, and for the installation of metal tiles and profiled sheets, 1.5-2.0 m are permissible. However, even if the step required for the correct installation of the roof is exceeded, there is a way out. This is a reinforcing counter-grid device. True, it will increase both the weight of the roof and the construction budget. Therefore, it is better to understand the step of the rafters before the construction of the rafter system.

Craftsmen calculate the pitch of the rafters according to the design features of the building, banally dividing the length of the ramp into equal distances. For insulated roofs, the step between the rafters is selected based on the width of the thermal insulation plates.
Roof structures of layered type
The rafter structures of the layered type are much simpler in execution than their hanging counterparts. A reasonable plus of the layered scheme is to provide full ventilation, which is directly related to the long-term service.
Distinctive design features:
- Mandatory support under the ridge heel of the rafter leg. The role of support can be played by a run - wooden beam resting on the racks or on the inner wall of the building, or the upper end of the adjacent rafters.
- The use of Mauerlat for the construction of a truss structure on walls made of brick or artificial stone.
- The use of additional girders and racks where rafter legs, due to the large size of the roof, require additional support points.
The disadvantage of the scheme is the presence of structural elements that affect the layout interior space operated attic. If the attic is cold and it is not supposed to organize useful premises in it, then the layered structure of the rafter system for the device of a gable roof should be preferred.

Typical work sequence for the construction of a layered rafter structure:
- First of all, we measure the height of the building, the diagonals and the horizontality of the upper cut of the frame. If vertical deviations of brick and concrete walls are detected, we eliminate them with a cement-sand screed. We reduce the excess of the heights of the log house. By placing wood chips under the Mauerlat, vertical flaws can be dealt with if their size is insignificant.
- The overlap surface for laying the bed must also be leveled. He, the Mauerlat and the girder should be clearly horizontal, but the arrangement of the listed elements in the same plane is not necessary.
- We process everything wooden parts constructions before installation with fire retardants and antiseptic preparations.
- On concrete and brick walls, we lay waterproofing for the installation of the Mauerlat.
- We lay the Mauerlat timber on the walls, measure out its diagonals. If necessary, slightly move the bars and turn the corners, trying to achieve the perfect geometry. Align the frame horizontally if necessary.
- We mount the Mauerlat frame. The splicing of the beams into a single frame is carried out by means of oblique cuts, the joints are duplicated with bolts.
- We fix the position of the Mauerlat. Fastening is made either with staples to the wooden plugs laid in the wall ahead of time, or with anchor bolts.
- We mark the position of the bed. Its axis should recede from the Mauerlat bars at equal distances on each side. If the girder rests only on racks without a bed, the marking procedure is carried out only for these posts.
- We install the bed on a two-layer waterproofing. We fasten it to the base with anchor bolts, with inner wall we connect with wire twists or staples.
- We mark the installation points of the rafter legs.
- We cut the racks to the same size, because The bed is on the horizon. The height of the racks should take into account the dimensions of the cross-section of the purlin and the bed.
- We install racks. If provided by the project, we fasten them with spacers.
- We put the run on the racks. Check the geometry again, then install the brackets, metal plates, wooden fixing plates.
- We install a test rafter board, mark the cutting points on it. If the Mauerlat is set strictly to the horizon, there is no need to adjust the roof rafters in fact. The first board can be used as a template for making the rest.
- We mark the installation points of the rafters. For marking, folk craftsmen usually prepare a pair of rails, the length of which is equal to the gap between the rafters.
- According to the markings, we install the rafter legs and fasten them first at the bottom to the Mauerlat, then at the top to the girder to each other. Every second rafter is screwed to the Mauerlat with a wire bundle. V wooden houses The rafters are screwed to the second crown from the top row.
If the rafter system is made flawlessly, the planks are mounted in no particular order. If there is no confidence in the ideal structure, then the extreme pairs of rafters are first installed. A control twine or fishing line is pulled between them, according to which the position of the newly installed rafters is adjusted.

The installation of the rafter structure is completed by installing the fillies, if the length of the rafter legs does not allow the formation of an overhang of the required length. By the way, for wooden buildings, the overhang should "go out" beyond the contour of the building by 50 cm. If the organization of the visor is planned, separate mini-rafters are installed under it.

Hanging truss systems
The hanging type of rafter systems is a triangle. The two upper sides of the triangle are folded by a pair of rafters, and the tightening that connects the lower heels serves as the base. The use of a tightening allows you to neutralize the action of the thrust, therefore, only the weight of the sheathing, the roof, plus the weight of precipitation, depending on the season, acts on the walls with hanging rafter structures.
The specifics of hanging rafter systems
Characteristic features of hanging rafter structures:
- Mandatory presence of a puff, made most often from wood, less often from metal.
- Ability to refuse to use Mauerlat. The timber frame will be successfully replaced by a board laid on a two-layer waterproofing board.
- Installation of ready-made closed triangles on the walls - roof trusses.
The advantages of the hanging scheme include the space under the roof free of racks, which allows you to organize an attic without pillars and partitions. There are disadvantages. The first of them is restrictions on the steepness of the slopes: the angle of their slope can be at least 1/6 of the span of a triangular truss, steeper roofs are strongly recommended. The second disadvantage is the need for thorough calculations for the competent device of the cornice nodes.

Among other things, the corner of the truss will have to be set with pinpoint accuracy, since the axes of the connected components of the hanging rafter system must intersect at a point, the projection of which must fall on the central axis of the Mauerlat or the lining board replacing it.

Subtleties of large-span hanging systems
The brace is the longest element of the hanging truss structure. Over time, as is typical for all sawn timber, it deforms and sags under the influence of its own weight. Owners of houses with spans of 3-5m are not too worried about this, but owners of buildings with spans of 6 or more meters should think about installing additional parts that exclude geometric changes in tightening.
There is a very significant component to prevent sagging in the rafter system installation scheme for a large-span gable roof. This is a suspension called a headstock. Most often, it is a block attached with wooden beads to the top of a truss. The headstock should not be confused with the racks, because its lower part should not come into contact with the puff at all. And the installation of racks as supports in hanging systems is not used.
The bottom line is that the headstock seems to hang on the ridge knot, and a tightening is already attached to it with the help of bolts or nailed wooden linings. Threaded or collet type clamps are used to correct slack.

Adjustment of the tightening position can be arranged in the area of the ridge assembly, and the headstock is rigidly connected to it with a cut. Instead of a bar in non-residential attics, reinforcement can be used to manufacture the described tightening element. It is recommended to arrange a headstock or a suspension also where the tightening is assembled from two bars to support the connection section.
In an improved hanging system of this type, the headstock is supplemented by strut beams. The stress forces in the resulting rhombus are extinguished spontaneously due to the competent arrangement of the vector loads acting on the system. As a result, the rafter system pleases with stability with minor and not too expensive modernization.

Hanging type for attics
In order to increase the usable space, the tightening of the truss triangles for the attic is moved closer to the ridge. A perfectly reasonable move has additional benefits: it allows puffs to be used as a basis for stitching the ceiling. It joins the rafters by cutting with a semi-rotary screw with a duplicating bolt. It is protected from sagging by installing a short headstock.

A tangible disadvantage of the hanging attic structure is the need for accurate calculations. It is too difficult to calculate it yourself, it is better to use a ready-made project.
Which design is more cost effective?
Cost is an important argument for an independent builder. Naturally, the price of a structure for both types of truss systems cannot be the same, because:
- In the construction of a layered structure for the manufacture of rafter legs, a board or a beam of a small section is used. Because layered rafters have two reliable supports under them, the requirements for their power are lower than in the hanging version.
- In the construction of a hanging structure, rafters are made of thick timber. For the manufacture of a puff, a material similar in cross-section is required. Even taking into account the abandonment of the Mauerlat, the consumption will be noticeably higher.
It will not work to save on the grade of the material. For the load-bearing elements of both systems: rafters, girders, stanchions, mauerlat, attendants, racks, 2nd grade sawn timber is needed. For crossbars and tension rods, grade 1 is required. In the manufacture of less critical wooden linings, the 3rd grade can be used. Without counting, we can say that in the construction of hanging systems, expensive material is used to a greater extent.

Hanging farms are harvested on open area next to the object, then transported assembled upstairs. To lift weighty triangular arches from a bar, you will need equipment, which you will have to pay for rent. And the project for complex nodes of the hanging version is also worth something.
There are actually much more methods for constructing truss systems for roofs with two slopes. We have described only the basic varieties, which in reality are applicable for small country houses and buildings without architectural ideas. However, the information provided is sufficient to cope with the construction of a simple truss structure.
Diy gable roof rafter system: device, design, installation
In order for the do-it-yourself gable roof rafter system to be built competently and firmly, information is needed about the rules and principles of the device, fastening and
Construction of houses

When constructing one-story houses, a roof with two slopes is very popular. This is due to the speed of construction. According to this parameter, only a single-slope roof can compete with a gable roof. The device has a gable rafter roof not too hard. And you will successfully master this work yourself.
The structure of the rafter system of a gable roof
The gable roof consists of two sloping surfaces that have a rectangular shape. Due to this, precipitation, which is represented by rain and melt water, flows down from the roof in a natural way. The gable roof has a rather complex structure. It consists of the following structural units: Mauerlat, rafter system, filly, ridge, roof overhang, bed, struts, puffs, lathing and racks:
- Mauerlat. This element performs the functions of transferring and distributing the load created by the rafter system on the load-bearing walls of the house. For the manufacture of Mauerlat, a bar is used, which has a square section - from 100 to 100 to 150 to 150 mm. It is better to use softwood. The beam is placed around the perimeter of the building and fixed to the outer walls. For fastening, special rods or anchors are used.
- Rafter leg. The rafters form the main frame of any roof. In the case of a gable roof, they form a triangle. The rafters are responsible for the uniform transfer of loads to the Mauerlat. First of all, those that arise from precipitation, wind and the weight of the roof itself. For the manufacture of rafters, boards are used that have a section of 100 by 150 or 50 by 150 mm. Choose a rafter pitch of about 60-120 cm, depending on the type of roofing material. When using heavy flooring, place the rafter legs more often.
- Skate. This element connects the two ramps at the top of the roof. The ridge is formed after connecting all the rafter legs.
- Filly. They are a continuation of the rafters and form the overhang of the gable roof. It is customary to install fillets if the rafter legs are very short and do not allow the formation of an overhang. For the manufacture of this structural unit, take a board that has a smaller section than the rafter. The use of fillies facilitates the construction of the rafter system, as it allows the use of short rafters.
- Eaves. This part of the structure of the gable roof rafter system is responsible for draining water from the walls during rain, while preventing them from getting wet and rapid destruction. The overhang usually protrudes 400 mm from the wall.
- Sill. It is located on the inner wall and serves to evenly distribute the load from the roof pillars. For the manufacture of a log, a bar is used, which has a section of 150 by 150 or 100 by 100 mm.
- Racks. These vertical members are responsible for transferring the load from the ridge to the interior walls. To create this element, prepare a timber that has a square section of 150 by 150 or 100 by 100 mm.
- Braces. They are needed to transfer loads from the rafters to the load-bearing walls. The braces and braces form a solid structure called a truss. Such a device is designed to withstand loads at large spans.
- Tightening. This structural unit, together with the rafters, forms a triangle. It does not allow the rafters to part in different directions.
- Lathing. This construction consists of planks and beams. They are attached perpendicular to the rafters. The lathing is necessary to evenly distribute the weight of the roof covering and the loads caused by weather events on the rafters. In addition, the lathing is required to fasten the rafters together. When arranging a soft roof, to create a lathing, you should use not boards and bars, but moisture-resistant plywood.

Varieties of gable roof truss system
There are gable rafter systems with hanging and layered rafters. Ideally, the design contains a combination of both. It is customary to install hanging rafters if the outer walls are located at a distance that is less than 10 m. Also, between them there should no longer be walls that divide the space of a residential building. The hanging rafter design creates a bursting force that is transmitted to the walls. It can be reduced if you arrange a puff of wood or metal and place it at the base of the rafters.
At the same time, the rafters and the tightening form a rigid geometric figure - a triangle. It is not capable of deforming under loads that are in any direction. The tightening will be stronger and more powerful if it is positioned higher. Floor beams act as braces. Thanks to their use, the hanging rafter system of the gable roof acts as the basis for arranging the attic floor.

The rafters in their design have a support beam, which is located in the middle. It is responsible for transferring the weight of the entire roof to an intermediate pillar or middle wall located between the outer walls. It is recommended to install layered rafters if the outer walls are located at a distance of more than 10 m. If columns are present instead of the inner walls, you can alternate the layered and hanging rafters.
Diy gable rafter system
The roof must be strong to withstand various loads - precipitation, wind gusts, the weight of a person and the roofing itself, but at the same time it must be light, so as not to exert much pressure on the walls of the house. A properly constructed gable roof rafter evenly distributes the load on all load-bearing walls.
Calculation of a gable roof
The choice of slope for a gable roof will depend on the material you choose to install on the roof and the architectural requirements:
- When erecting a gable roof, remember that it must slope at an angle greater than 5 degrees. It happens that the slope of the roof reaches 90 °.
- For areas with heavy rainfall, and when the roofing does not fit tightly, steep slopes are made. In this situation, the angle should be 35-40 ° so that precipitation does not linger on the roof. But such an angle does not allow building a living space in the attic. A broken roof structure will be the way out. It will have a shallow upper part, and there will be a sharp slope at the bottom.
- In regions with strong gusts of wind, flat roofs are arranged. If constant winds prevail in the area, then make a slope of 15-20 ° for high-quality protection of the roofing.
- It is best to choose the middle option. Equip a gable roof that is not too steep. But also the slope should not be very gentle.
- When choosing a large roof angle, its windage increases, and, accordingly, the price of the gable roof rafter system and lathing. Indeed, such a slope entails an increase in the area of the roof and, accordingly, the amount of required material - building and roofing.

When buying materials for the construction of a gable roof, it is useful to calculate its area:
- Find the area of one slope of the structure, and then double the result.
- Ideally, a ramp is a tilted rectangle that runs along a long load-bearing wall. To determine the area of the ramp, multiply its length by width.
- The length of the slope is equal to the length of the wall. In addition, the length of the roof overhang above the gable is added to the length. Remember that there are tabs on both sides.
- The width of the ramp is the length of the rafter leg. The length of the roof overhang above the load-bearing wall is added to it.
In order to properly design the structure, it is recommended to carry out an accurate calculation of the rafter system of a gable roof, including determining the loads and characteristics of the rafters:
- When erecting a roof for a standard building, which has one floor, the design load on the roof will consist of two values. The first of them is the weight of the roof, the second is the load from external factors: precipitation and wind.
- Calculate the weight of the roof by adding the weight of each layer of the "pie" - heat insulation, vapor barrier and waterproofing materials, rafter system, lathing and the roofing material itself. Calculate the weight per m2.
- Increase the result by 10%. You can also take into account the correction factor. In our case, K = 1.1.
- If you plan to change the roof structure over time and increase the angle of its inclination, then consider a safety factor. Take immediately higher load indicators than those that you received at the time of calculation. It is recommended to start from the value, which is 50 kg per 1 m2.
- When calculating the load exerted by atmospheric phenomena, take into account the climatic features of the area where the structure is located. In this calculation, take into account the slope of the slope. If a gable roof forms an angle of 25 degrees, then assume a snow load of 1.
- If the roof is equipped with a greater slope - up to 60 degrees, the correction factor reaches 1.25. Snow load for an angle greater than 60 degrees is not considered.
- The rafters transfer all the load from the created structure to the load-bearing walls. Therefore, their parameters must be taken accordingly. Select the cross-section and length of the rafter leg, depending on the current load on the roof and the slope angle. Increase the obtained values by 50% to ensure a high safety factor.
Mauerlat installation methods
The construction of any roof begins with the installation of the Mauerlat:
- If logs or beams were used to erect the walls, then the upper beam will act as a mauerlat, as shown in the photo of the gable roof rafter system.
- If you used brick to build the walls, then brick the metal rods into the masonry. They must have a pre-threaded thread for attaching the Mauerlat. Install rods every 1-1.5 m. Choose rods with a diameter of at least 10 mm. Lay waterproofing between the masonry and the Mauerlat.
- For walls made of ceramic or aerated concrete blocks, pour concrete on top. Be sure to make the layer reinforced. It should have a height of approximately 200-300 mm. Be sure to attach metal rods that are threaded to the reinforcement.
- For the Mauerlat, use a bar that has a cross section of 15 by 15 cm.It will act as a kind of foundation for the rafter system.
- Place the Mauerlat on the top edge of the wall. Depending on its design, the Mauerlat can be laid along the outer and inner edges. Do not place it close to the very edge, otherwise it could be blown away by the wind.
- Mauerlat is recommended to be placed on top of the waterproofing layer. To connect all parts into one whole, use bolts and metal strips.
- To avoid sagging, make a lattice of uprights, struts and crossbars. To do this, take boards 25x150 mm in size. The angle between the brace and the rafter leg should be as straight as possible.
- If using a rafter leg that is too long, install another support. It should rest on the beds. Each element is associated with two adjacent ones. The result is a stable structure around the entire perimeter of the roof.

Fastening the rafter legs
Most the best way gable roof rafter system - a combination of sloped and hanging rafters. This design allows you to create a reliable gable roof and reduce the cost of building materials. Consider the following recommendations when working:
- Use only the highest quality wood as material. Beams that have cracks and knots cannot be used.
- The rafters have standard sizes- 50x150x6000 mm. When the beams are longer than 6 m, it is recommended to increase the width of the board so that the beams do not break under their own weight. Take boards 180 mm wide.
- First, make a rafter leg template. Place the plank against the floor joist and the end of the ridge bar. Having outlined two lines, saw off the board along them. The template is ready.
- Cut the rafters using this pattern. After that, make the upper wash on them.
- Take the resulting workpiece, bring it to the floor beam to mark the bottom cut in place.
- Install all rafters. At the same time, remember that after installing one leg, you must immediately install the opposite one. This will quickly relieve the side loads on the ridge bar.
- If the slope is too long, then standard boards are not enough to make a rafter leg. In this case, two boards can be spliced together. To do this, wash a piece of wood of the same section on them. It should be 1.5 - 2 meters long. According to the scheme of the gable roof rafter system, the joint should always be at the bottom. Install an additional stand under it.
- Attach the rafter leg to the ridge bar with nails. Use self-tapping screws to fasten the rafters to the floor beam. Metal mounting plates are also suitable. In addition, a few nails are added.
- If you are building a structure exclusively from hanging rafters, then skip the next step. When erecting a structure with layered rafters, you need to think about the supports that are installed on the floor of them. To reduce the amount of deflection of the rafters, correctly calculate the location of such supports.
- If you are building a gable mansard roof, the intermediate posts will become the frame for the side walls.
- When doing this work, maintain a certain spacing of the beams. Set its size at the design stage.
- After installing the rafters, attach the ridge. It is placed on their top edge. For fastening use metal corners or staples. Bolts are the most popular.

Stiffening the structure
After installing the gable roof rafter system, strengthen it using the technology below:
- For small buildings, which are saunas, summer cottages, outbuildings, and roofs with the simplest hanging rafter system, connect each pair of rafters from the bottom using a tightening, and from the top using a crossbar.
- For large buildings that are lightweight at the same time, install a lightweight roof. The walls have to withstand it.
- If the house is 6-8 m wide, then the structure should be tightened. Install in the middle of the support. Such racks are called headstock. Place them at each pair of rafter legs.
- If the span of the walls reaches 10 meters, then reinforcing beams will be needed. The struts act as additional support for the rafter legs for tightening. They are attached to each rafter - closer to the ridge or in the middle of the rafter leg. Fasten them to the lower end of the headstock and to each other, as shown in the video on the gable roof rafter system.
- In situations with long roofs, the gable beams should be relieved. This is done by mounting braces. The upper end should rest against the corner of the pediment. The lower one is attached to the central floor beam. For fasteners, use a bar that has a large section. This will prevent them from kinking in the event of strong gusts of wind.
- In an area dominated by wind, the rafters must be resistant to such influences. Strengthen them by installing diagonal ties. Boards are nailed from the bottom of one rafter to the middle of the next.
- For greater rigidity when creating the most critical fasteners, it is better not to use nails. For this, use overlays and metal ways fasteners. Nails will not be able to provide high-quality fastening, since the wood can dry out after a while.

Roofing system lathing
The final stage of the device of the gable roof rafter system is the creation of the lathing. It is on it that you will lay the roofing covering. Carry out the work in the following sequence:
- Select dry timber for the lathing. It should be free of cracks and knots. Nail the beams from the bottom. Attach two boards near the ridge so that there are no gaps. The battens must be able to withstand the weight of the roofing material and not bend under the weight of the workers.
- If you will be equipping a soft roof, make two layers of sheathing. One is sparse, the second is solid. The same goes for roll roof... To begin with, parallel to the ridge beam, place boards that are 25 mm thick and no more than 140 mm wide. A small gap is allowed - no more than 1 cm. Lay a continuous layer on top. For this, it is better to use roofing plywood, slats or boards of small thickness. After that, check that there are no errors on the crate - irregularities and knots. Also check that the nail heads are not sticking out.
- Lay one layer of timber under the metal tile. It should have a cross section of 50 by 60 mm. Proceed in the same way when using slate or roofing steel sheets. Maintain a step between the timber, depending on the roofing chosen by you - from 10 to 50 cm. Drive nails closer to the edges of the board, and not in the middle. Drive the hats into the depths. So they will subsequently not be able to damage the roof. If you are making a crate for a metal tile, then remember that the connection of the timber at the same level should fall on the rafter.

When you have installed and reinforced the gable roof rafter system, you can start installing the roofing pie. Place between the rafters thermal insulation material, a layer of vapor barrier and waterproofing. When using insulation in slabs, calculate in advance the pitch of the rafters for laying it. At the final stage, fix the roofing material.
The device of the gable roof rafter system, Construction portal
Construction of houses When constructing one-story houses, a roof with two slopes is very popular. This is due to the speed of construction. For this parameter, with
We will send the material to you by e-mail
When planning the construction of low-rise residential, ancillary or commercial buildings, most designers choose a gable roof structure. This is due to the relatively simple installation technology, increased reliability of the structure, effective drainage of precipitation from the roof and unpretentiousness to operating conditions. However, to achieve all the advantages, you need to correctly design and install the rafters for a gable roof with your own hands.
Exterior of a house with a gable roof
Gable roofs are two rectangular inclined planes (slopes), which are supported by the rafter system. The side parts are made deaf or windows and cladding are installed on them. The main parameters of such a roof are: the angle of inclination and the location of the ridge relative to the center line passing through the walls perpendicular to the slopes. That is, the gable structure does not have to have the same slope of the slopes or have a symmetrical appearance.
Many original projects use an asymmetrical design of slopes to take into account some of the climatic features, or in order to improve the design of the facade. It is worth noting that such solutions are very original, but in practice they are quite difficult to implement. This is due to the following reasons:
- The load on the walls and foundation increases at the place where the roof ridge is displaced. As a result, calculations can be significantly complicated, especially when using heavy roofing materials such as slate or ceramic tiles.
- It is required to produce for each slope separate structural elements, which can significantly increase the construction time.
- The roof at large slope angles can be significantly influenced by the pressure of wind currents. Therefore, it will be necessary to take into account the preferred direction of the winds when calculating.
The main elements of the pitched roof system
Before making the rafters on a gable roof, you need to create a project, as well as study all the structural elements. You will need to design the following basic nodes:
- Mauerlat... Provides the transfer of the load of the roofing structure to the load-bearing walls of the object, creating its uniform distribution. The timber is made from hardwood such as larch, oak, ash. The minimum allowable section is 100x100 mm. It is allowed to use not only solid timber, but also glued timber, but with a section of 100x150 mm.
- Rafters... The main structural element, which is designed to form the supporting frame, to take the load of the roofing material through the sheathing and transfer the load to the Mauerlat. The distance between the rafters of a gable roof is from 0.6 to 1.2 m, depending on the weight of the roofing material and the amount of precipitation in the particular area.
- Tightening... A special design used to fix two inclined beams of slopes at a given angle of inclination, which is fixed at a level slightly above the beams or slightly below the ridge. It is used in layered types of roofs.
- Rack... It is a vertically installed and firmly fixed element that performs the load-bearing functions of the roof. It is usually installed on the walls of the building for partial transfer of the roof load. Provides additional rigidity to the structure.
- Run... There are two types: side and ridge. The lateral one is a bar resting on the racks and parallel to the ridge beam. Allows to prevent the slope from bending under significant loads. The ridge run is installed along the line of abutment of one slope to the other and serves as a support for the ridge.
- Brace... Represents auxiliary supports for racks, which are located at an angle of 45 0 to the load-bearing ramps in order to increase the contact area with the racks and reduce the risk of deformation of the ramp.
- Sill... Serves as a fulcrum for the brace and rack.
- Lathing... It is used to fix the rafter system in the transverse direction, transfer the load of the roofing material and its fastening, as well as provide resistance to loads in the purlins between the load-bearing beams.
Helpful information! Due to the increased snow and ice loads on the roofs, braces for the northern regions can be installed not only longitudinally, but also diagonally. Thus, it is the racks rather than the walls of the building that take up a significant part of the load.
Calculation of the length and pitch of the rafters
When installing rafters for a gable roof with your own hands, you need to observe the step of securing them 0.6-1 m. The choice depends on the design loads, taking into account the safety factor. The smaller the step, the more durable the structure and the greater the consumption of building materials. A large interval of 0.8-1 m is allowed to be used only when laying light roofing sheets and tilt angles 15 0 -20 0. It is recommended to choose a step within the range of 0.6-0.8 m.

The length of the beams, knowing the angle of inclination of the slopes and the distance between the two walls of the object, can be calculated quite simply by the Pythagorean theorem. However, the real length needs to be increased by 60-70 cm, which will go to their joining, as well as to the overhang of the slopes of about 0.5-0.6 m.
The rafter system is the roof frame, which is the base for the decking of the roof coverings.
The rafter system is designed to withstand the load of the roof, taking into account natural loads: winds, snow, rain.
The roof option is approved at the design stage.
The purpose of the roof includes several functions: warmth in the house, protection of the room from natural phenomena, therefore the rafter system must be given special attention.
You can read how to calculate the rafter system.
It is customary to classify rafter systems so that the task of choosing a future roof option is easier to solve:
- Single slope... The most simple ones. More suitable for utility rooms, baths, small private houses, gazebos... Provides for an inclined position of the structure at a slight angle (no more than 25 °);
- Gable. Used for small houses and summer cottages... They look like a triangle, in which the rafter boards are connected by a beam and are at a certain angle;
- Gable broken lines... They have two slopes with a fracture, due to which it is possible to increase the area of the attic;
- Three-slope (half-hip). Have two trapezoidal slopes, which are connected by one end triangular slope (hip);
- Four-slope (hip). Used for residential buildings, require significant labor costs. They have two end triangular slopes and two trapezoidal ones;
- Hip-roof. Used for square-shaped buildings. They consist of four triangular slopes, the upper corner of which is connected in the center of the roof;
- Multi-pliers. Consist of trapezoidal or other stingrays different forms, connected to each other.
The most suitable designs for - and broken gable. There are others, but they are less common and not as practical as the ones listed above.
Roof structures are also classified into:
- Hanging. With this type of roof frame due to the absence of load-bearing walls in the room;
- Forced. Rafter installation option, providing support on a load-bearing internal wall or support in a building.
The calculation of the material for the roof frame when designing a building is based on the intended configuration and load. Do-it-yourself rafters are not difficult to do, it is important to get down to business wisely.

Roof systems of the layered and hanging type
Calculation of the load on the rafters
To correctly calculate the load on the rafters, it is necessary to take into account many factors that can affect the severity of the structure.
Important metrics to consider:
- Constant load: includes the mass of the roofing cake, covering material;
- The load is temporary: constant and maximum amount of snow, rain, intensity of wind gusts, and in areas with high seismic activity - the action of storm winds, tornadoes, hurricanes.
In addition, one should bear in mind the mass and strength of the rafter legs, and also pay attention to the fastening of the rafters of the gable roof and the installation option.

Truss systems diagram
The distance between the rafters of the gable roof and the thickness of the rafters
 The step of the rafters of the gable roof is empty place between the rafters. The functionality of the roof depends on the correct calculation of the step. Typically, the step is about a meter.
For a more accurate calculation of the distance between the rafter boards, there is a certain calculation scheme:
- Determine the length of the slope.
- The length of the ramp is divided by the distance between the rafters.
- To determine the number of rafter boards, add one to the resulting value and round to the side of greater importance... This is how they determine how many boards are needed per slope.
- The length of the slope is divided by the number of boards, the distance between the rafters is obtained.
This calculation is not always final.
Additionally, you should take into account the load of the roofing (its weight), the thickness of the rafters, as well as the dimensions of the rafters for a gable roof.
The thickness of the rafter board largely depends on the covering material:
- . Boards are used with a section of 5x20 cm at a step from 60 to 90 cm with a sheathing flooring with a section of 4x5 cm;
- . Rafter boards - 5x15 cm, pitch - from 60 cm to 95 cm;
- . The section of the board is 6x18 cm or 5x15 cm, the distance between the bars is from 80 cm to 130 cm;
- . The rafter section is 5x15 cm, 5x10 cm with a step from 60 cm to 90 cm;
- . The cross-section of the timber is the same as for the corrugated board at a step of 60-80 cm.
All indicators should be taken into account and the thickness of the rafters should be accurately calculated so that there is no excessive load on the foundation.
Incorrect calculation of the length of the rafters of a gable roof, as well as incorrect calculation of the step indicators, can lead to sagging of the roof.
Installing the rafters of a gable roof with your own hands requires taking into account the weight of the rafter board and all additional fasteners of the structure.

What the rafter system consists of
Rafter structure - a complex system and installing a gable roof rafter system is not an easy task. Rafter system consists not only of rafter boards, but also of other additional elements:
- Mauerlat. An element that distributes all the load evenly to the supports;
- Run. The boards that fasten the legs of the rafters: at the top - the ridge, on the side - the side run;
- Puffs. A connecting beam that prevents the rafter legs from diverging;
- Braces, racks. Bars that fix the stability of the rafters, resting on the bed;
- . A lattice of bars, which is applied perpendicular to the rafters. Transfers the load of the covering material to the rafter frame;
- . Connecting beam, which serves as a union of the roof slopes;
- Filly. If the length of the rafter legs is insufficient, they are mounted to form an overhang;
- Roof overhang. It extends beyond the bottom line of the slope to prevent precipitation from entering the walls.
The rafter system implies rafters, braces, braces and racks located in the same plane. They are positioned in such a way that the main load of the roof structure falls vertically on the external load-bearing walls. Therefore, the manufacture of gable roof rafters is a very important process.

What does the gable roof rafter system consist of?
Installation of a rafter system with layered rafters
The layered rafter system is used when the span does not exceed 6.5 meters.
If there are supporting structures inside the building, it is possible to install additional racks.
The main support of the rafter legs is the Mauerlat.
Mauerlat installation
Before installing the Mauerlat, you need to install the armpole. It consists of a formwork, in which the reinforcement is laid and poured with concrete. At the base, when the concrete has not yet hardened, studs are installed, to which the Mauerlat is then attached.
Mauerlat is a beam that is laid on a support (load-bearing wall) and is the base of the rafter frame. A layer of waterproofing material is pre-laid. If the length of the timber is not enough for the length of the wall, then it is increased.
- Check that the diagonals are equal. A discrepancy of a few centimeters can lead to re-equipment of the frame;
- Fix the corners of the Mauerlat;
- Attach the Mauerlat with pins or wire. The studs are tightened in two steps, after having drilled holes for them.
The stability of the roofing structure depends on how firmly the Mauerlat will be installed.
Therefore, it is necessary to take seriously the fastening of the Mauerlat to the bearing support.

Mauerlat installation
Sill
After the Mauerlat has dried (after 5 days), mark the installation of the bed on the Mauerlat bar: its axis should be with the same indent on each side of the Mauerlat bar. The bed is attached to a two-layer waterproofing layer with anchor bolts. To the wall from the inside, the bed should be fixed with wire twists or staples. Next, markings are made for installing the rafters.

Installation of the rafter system of a gable roof
The anchor points of the layered rafters are the walls and posts inside the frame. The rafters are mounted with hinged attachment points. When using sliders for fastening, a slight lowering of the roof frame is ensured in the first years of the roof's service.
This installation method is necessary to prevent distortions., as in the early years the building subsides a little.
The rafter beams should be fastened either by installing them in the prepared grooves and reinforced with fasteners, or by attaching the board overlays.

Installation of rafters
Ridge knot
The rafters are connected end-to-end, cutting off the edge of the bar so that the angle when joining opposite beams corresponds to the angle of the slope. The rafters are hammered under the ridge with nails. An option is possible in which the beams are connected with bolts, a nail or a hairpin, that is, with an overlap.
If necessary (if provided for by the project), a cut is made in the rafter beams to fasten the ridge beam (run).

Ridge knot
Racks
The uprights are attached with a short span - in the center, on the sides and in the center - with a wider roof base. Fastening is done vertically from the ridge to the inner wall.

Run
Girder - connecting beam for securing the rafter legs. Bolts or brackets to the rack.

Installation of filly
The final stage in the installation of the layered system is the installation of fillies with a short length of rafter legs for the overhang. To install the visor, it is necessary to install additional small rafter boards.


Installation of a rafter system with layered rafters
Diy gable roof rafter system: installation with hanging rafters
Rafter system equipped with hanging rafters, is a triangular design, where the sides are the rafters, and the base is a tightening connected to the lower heels of the rafters.
Installation of a hanging type rafter frame can do without installing a Mauerlat: a board that is fixed on a two-layer waterproofing can replace it.
If the structure has a large span, then struts, headstock, crossbars are attached to it.
There are no racks in the hanging system.
Puffs
The brace is the longest beam of the roof frame. To prevent it from sagging, it is necessary to fasten the headstock - boards that are attached to the top of the structure on one side, and to the tightening on the other. Fastened with bolts or wood strips. Threaded clamps can be used to adjust the slack.

The device of the rafter system
Installation of brace beams
The headstock can be supplemented by strut beams, forming a rhombus, where two struts are the lower sides, and the rafter boards are the upper ones, the upper corner is the ridge. Thus, the struts rest against the headstock, distributing the load.

Strut beams
Rafters
Hanging rafters are mounted like a layered one. When installing attics, the tie is installed closer to the ridge, providing more space under the ceiling. The tightening is in this case secured by a bolt-in cut.
ATTENTION!
When installing a hanging system, a prerequisite for installation is the accuracy of calculations and the strength of the rafters and tightening.
The presence of errors leads to a displacement of the axes of the elements of the system, which ensures the skew of the structure.
This photo will tell you how to install rafters for a gable roof:

Installation of rafters

Hanging rafters
How to strengthen the rafters of a gable roof
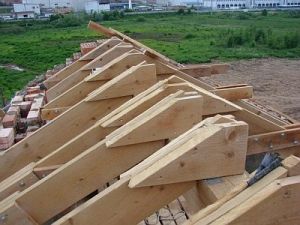 It is necessary to reinforce the rafters of a gable roof when the load calculation is incorrect or frame defects are found.
Strengthening can be done with:
- Beams, which are installed in order to transfer the load to them;
- Installation of struts with an inclined mount with an emphasis on the bed;
- Overlapping double-sided slats;
- Increasing the cross-section of the rafter beam in the place of supports on the brace by imposing planking from boards with nails or bolts;
- A wall of boards which are attached to the rafters in places of expected snow accumulation to increase the bearing capacity of the rafters.
You can resort to strengthening the Mauerlat bar and the base of the rafter bar. Due to the increased humidity and reduced ventilation, these parts of the frame are more susceptible to rotting, therefore, when arranging the roof special attention must be paid


