- a fairly popular piece of furniture found in living rooms, gardens, and terraces. They are made from different materials, have all kinds of designs and differ in designs.
Despite the huge range of materials, models made of natural wood are considered the most popular. They are elegant and noble, safe and durable.
When choosing materials of manufacture, preference should be given conifers. They are also often made from larch and alder. The advantages of these types of wood include low weight and low density. Due to this, products are easily moved from one place to another, and the low density of the tree does not create problems in the manufacturing process.

Important: coniferous products are obtained in a light gray shade. They fill the premises with a pleasant aroma and have a positive effect on the well-being of users.
The advantages of coniferous wood include:
- Ease and pliability in processing. Such chairs can be given any shape.
- light weight. This makes the products light and easy to use.
- Elasticity and viscosity. This allows you to create original models of different shapes.
Attention: conifers at high humidity swell. Therefore, furniture items must be treated with antiseptic compounds.
To the benefits larches worth considering:
- high density;
- resistance to deformation;
- resistance to temperature changes and high humidity;
- attractive appearance.
You can also make a rocking chair from oak, ash or beech. Such furniture will impress with its aesthetic qualities, durability and elite appearance.
Dimensional drawing
To make a practical and easy-to-use rocking chair, you need to consider its design, dimensions, materials of manufacture, type of construction. Next, a drawing is drawn with the designation of all dimensions. For the manufacture of a chair, it is recommended to take an ordinary chair as a basis.. Since he has simple design where all elements are at right angles.
reference: for a rocking chair, it is recommended to make a square seat measuring 50-60 cm. Its thickness can vary between 1 - 1.5 cm. For the rear legs, it is better to use a bar with a section of 4.5 by 4.5 cm. Their height should be in within 105 - 110 cm. But the height of the front legs will be 55-60 cm.

Tools
 To make furniture, you will need the following tools:
- jigsaw;
- plane;
- grinder;
- milling cutter;
- laser level;
- screwdrivers;
- tape measure and pencil;
- clamp.
How to make a wooden rocking chair?
The manufacture of a rocking chair begins with the preparation of all parts. They are cut according to the drawing. After manufacturing all the necessary parts, we proceed to their assembly. You can connect parts in two ways:
- thorn to thorn;
- with glue.
It doesn’t matter which option for fastening parts you chose, but all work is carried out with the help of clamps and gaskets. The gasket is placed between the rocking chair and the clamp. After that, the clamp is tightened, and the product is set aside for a day until the adhesive composition is completely solidified.
As for the installation of skids, here they also apply different variants.
Easy option
Method number one is simple and consists of the following steps:

With skids made of timber
The second option is more labor intensive. A bar made of wood is used here as skids. The work looks like this:

Advice: in order for the rocking chair to have a long service life, the wood for the runners must be taken of high quality.
After making a rocking chair from wood, it must be check for balance. The comfort of using a piece of furniture will depend on this:
- if, when standing up, the product leans forward strongly, cross bars must be installed on the skids behind the back;
- if the product tilts back, then the counterweight is installed on the front of the product.
Finishing
 When the product is completely ready, it must be given an aesthetic and noble appearance.
To do this, the chair will need carefully polish, cover with stain and varnish in several layers. This will not only increase the attractiveness of the product, but also extend its life.
After all, many people use a rocking chair outdoors in the warm season. And this contributes to the deterioration of wood under the influence of negative factors.
So that the tree does not succumb to various diseases, it must be treat with antifungal agents.
Photo
Selfless work will bring excellent results:


Useful video
How to make skids can be seen in the following video:
Then it's time to assemble the whole chair:
Conclusion
In conclusion, it is worth noting that making a rocking chair out of wood with your own hands is not so difficult as it might seem at first. Subject to technology, procurement of all necessary materials and tools, you can make a piece of furniture of any design and design.
Such a chair will not only be comfortable and cozy for leisure activities, but will also please you with an interesting design solution and high technical specifications. And rhythmic swaying in the product will strengthen nervous system, will help you relax after a hard day at work and relieve tension from your back muscles.
In contact with
We will send the material to you by e-mail
You used to look at a rocking chair in a store and think: it’s expensive and it takes up a lot of space. And you sit in it and you understand that it is simply impossible to refuse such a purchase. Unusual comfort and peace - would sit and sit in it on the veranda country house admiring the garden. Do not rush to spend money, because you can make this product with your own hands .. We have collected drawings and useful advice from craftsmen, as well as information on the cost of finished products.
Few things compare to the comfort of a rocking chair.
Rocking chairs may vary in design and material, but they all have common advantages:
- beneficial effect on the human muscular and nervous system;
- creation of conditions for comfortable rest;
- the possibility of using indoors and outdoors;
- use for different age categories;
- reliability and safety.
By the way, the opinion that a rocking chair takes up more space than usual is erroneous. Modern rocking chairs are compact and in terms of space occupied and are in no way superior to ordinary furniture. Rocking chairs are versatile, but if you are thinking about a chair for the garden, it is better to choose it taking into account the specifics of the installation. Soft seats should be removable so that they can be removed when it rains. The cover of the chair should be selected from a material that is resistant to sunlight and precipitation.
For your information! Whatever the design of the rocking chair runners, they will get stuck in soft ground. Therefore, you need to put this furniture on a solid platform.
Types of rocking chairs
| View | Main characteristics | Peculiarities |
|---|---|---|
 On skids | Pair base; The absence of unnecessary details; Weight limit up to 100 kg; Inertial control type. | The classic version, not intended for use on soft carpets and ground. Differs in extreme simplicity of a design and sensitivity to roughnesses. They can creak if there are problems in joining parts. |
 pendulum pendulum | fixed base; The presence of hinges; They can be equipped with a swing mechanism. | The basis of the glider is motionless, a pendulum mechanism is used for rocking. Are established on any floors, provide the uniform mode of swinging, are silent, indifferent to roughnesses of a floor. Can be equipped with touch and electronic control. |
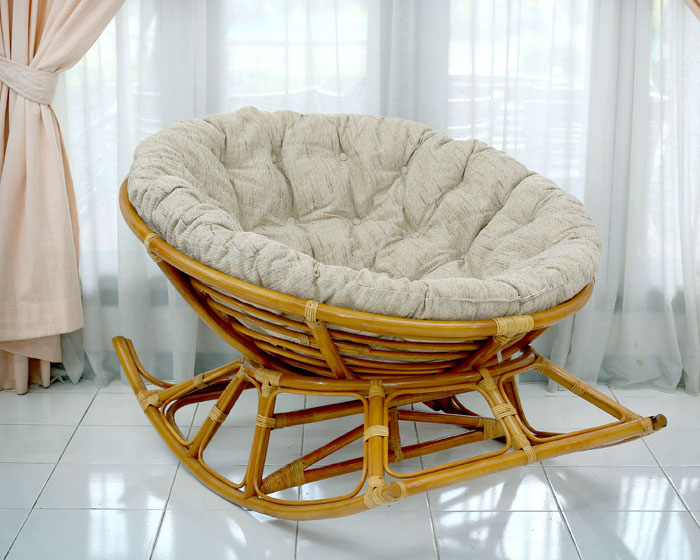
 Spring Spring | fixed base; Fastening on a large spring; | They differ in inertial swing mode, have round and inclined seats, usually made of rattan. |
Wood, plywood, metal or rattan are used as the basis for the frame. Exquisite models with bent elements are obtained from wood. Such products need to protect wood from moisture and insects. Budget options for rocking chairs are made of thick plywood. It is better not to leave such chairs on the street, as plywood is afraid of moisture. The best basis for garden tools- metal. Masters can even offer you wrought iron chairs, but they are very heavy.

The seats and backs of such chairs are made soft or hard. It is convenient if the soft mattress can be easily removed. They can be washed or removed for the duration of bad weather. Pillow filling can be made of foam rubber, synthetic winterizer, latex, coconut fiber or horsehair. Seat upholstery is selected from practical materials. You can find decoration from tapestry or jacquard, cloth, flock.
Genuine leather is more practical in this regard. If the material is well-made, it is soft and not afraid of moisture. But real leather expensive pleasure. An alternative can be eco-leather - durable and moisture resistant. Its only drawback is that using such a chair on a hot day will not be very comfortable. The pictures below show the most comfortable rocking chairs that we have found for you as an example.


DIY rocking chair: options
On the Internet, you will find many options for how to make a rocking chair at home. Craftsmen sometimes use the most unexpected ideas and achieve amazing success in this matter.

High-quality wood will provide the product with durability and strength. And minimal knowledge in carpentry will allow you to build a completely attractive design. If there are no carpentry skills at all, it is better to take plywood. It is easy to cut and process, in addition, reliable furniture fasteners can be found on sale. The hardest thing is to make something from a vine or rattan. A wicker rocking chair is difficult to make with your own hands, here without special knowledge not enough. To work with metal, you need a welding machine. If you know how to use it, there is nothing difficult. Some craftsmen suggest using plastic for structures, but such chairs can only withstand a child. For an adult, they are not suitable because of their fragility.

Let's look at some popular ideas on how to make a rocking chair.
Related article:
: for garden, children's room, kitchen, sauna, garden, arbor; how to restore pieces of furniture, helpful tips and recommendations of experts - read in our publication.
How to make your own rocking chair from an old chair
The easiest way to make your own rocking chair is to use an old chair or chair as a base. You will surely find such a piece of furniture in your home that needs to be redone. You can make a homemade rocking chair out of it in just a couple of hours. The only question is what to make the skids from. And you can make them from a pair of wide boards, or a bent pipe.
Skids for rocking chairs: drawings and dimensions
The most important thing about skids is their curvature. It depends on the range of motion. For this reason, do not make too rounded details. The easiest way is to use a thick and wide board - it is easier to fix it, and it is not difficult to make the element you need in size and curvature. A simple drawing with dimensions for a standard chair looks like this.

How to make chair rails
Option 1: plywood. To work, you will need a thick sheet of plywood (at least 1.5 cm). Two curly strips are cut out of the sheet along a pattern 100 cm long. For cutting, it is better to use a jigsaw. In the side part of the legs of the old chair, holes are made for attaching a spike-groove. You can, of course, go even simpler and use ordinary screws. It will not be very aesthetically pleasing, but quickly.

Option 2: bent timber. If you're not looking for the easy way out, try making bent timber skids. To do this, a wooden blank with a section of 45 × 45 mm must be soaked in hot water until elasticity is achieved. Then the beam is bent on a pre-prepared form and fixed until completely dry. Next, the skis are attached to the chair using a spike-groove method.
Option 3: board. A semicircle is cut out of a wide board. The thickness of the wood must be at least 3 cm. The ends of the runners must be carefully sanded. You can fasten the runners with self-tapping screws or the tenon-groove method.
Features of fastening with a thorn-groove method
For this method of fastening the legs of the chair must be drilled from the sides. After that, a groove is selected in the legs corresponding to the width of the runners. They are inserted into the grooves, the location of the hole in the leg is marked, and they are drilled in the same place.

For fastening strength, all parts are carefully processed with wood glue. After connection, you need to tightly fix the place of contact and leave to dry completely. This method of fastening guarantees a neat appearance and high reliability. The only caveat is that it is not suitable for models of chairs with thin legs.
Important! To balance a rocking chair from an old chair, use a system of counterweights and cross bars.
Related article:
: Photo best ideas. What can be done from a pallet for an apartment, office and cottage; rules for the selection and processing of pallets; master classes on making a table, sofa, bench, armchair and shelving - read in our publication.
DIY rocking chair made of wood: drawings and a master class
Wooden furniture has a number of advantages. It is environmentally friendly, durable, reliable.

These rocking chairs look great in the country and in the apartment, they can be used by children and adults. For a wooden rocking chair, it is better to use coniferous wood: spruce, pine, larch. Such a tree is relatively light and has a low density, which means it is easily processed at home. In addition, softwood is inexpensive, which means you can not be afraid to ruin some of the material if something goes wrong. Expensive woods such as ash, oak or beech are also suitable for making furniture, but it would be good to have at least some carpentry skills to work with them.
Important! Wood for furniture must be thoroughly dried, otherwise the finished product may deform over time.
Examples of drawings of wooden structures.


And now a master class on making rocking chairs with your own hands. Suitable for any drawings.
| Illustration | Action Description |
|---|---|
 | All details of the future design must be carefully sanded before assembly. |
 | Mark all connections. For precise marking, use a caliper or a regular ruler. |
 | To make grooves, use a milling cutter or drill. |
 | Carefully plan the spikes for mounting. They should not have bumps and burrs. |
 | Check all connections before final assembly. The spikes must enter the grooves with force. Use a rubber mallet. |
 | In the pre-assembly process, the chair is made first and the runners are made last. The smooth legs of the chair need to be rounded under the surface of the skis. |
 | To give the ends of the legs the desired shape, you must use a grinding wheel. |
 | Glue the batting or foam rubber onto the seat blank, cut it to shape. |
 | Cover the seat with upholstery. Use a construction stapler to secure fabric or leather. |
 | Final assembly is done with wood glue. All joints are carefully coated with glue. It is necessary to give the product some time to dry and gain a foothold. |
 | Lastly, fix the skids with hidden fasteners. |
How to make a simple rocking chair from a profile pipe with your own hands
For metal structure a round profile with a cross section of 20-25 mm is required. To make the seat, you need to buy a piece of durable awning fabric.
Drawing of a rocking chair made of metal for making with your own hands and a master class
The design of this chair is very primitive. You just need to weld the frame of the appropriate size and pull on it fabric strip seats. The drawing looks like this.

Working with metal will require the use welding machine and a primitive device for bending pipes. If you have difficulty bending, take the blanks to the master in advance. The photo shows a simple algorithm for making metal rocking chairs with your own hands, we will consider all the steps in turn.
| Illustration | Action Description |
|---|---|
 | Slightly bend the tubes for the skids. If there is no pipe bender, this can be done manually with the simplest device. |
 | For a snug fit of the pipes at the joints, you need to slightly grind the ends. |
 | Weld the side parts of the seat, as shown in the photo. |
 | Fasten the skids. Pay attention to the reliability of fastening. All welds must be sanded afterwards. |
 | Assemble the structure into one piece by welding the cross bars. |
 | Cut out the fabric for the seat. It is better to do this directly on the welded structure in order to adjust the depth and fit. |
 | Paint the frame with corrosion resistant paint. |
 | Fasten the seat by stitching the seams directly on the frame. Make double or even triple stitches for security. |
 | Simple and comfortable armchair will delight you every day. |
We have given you the simplest example of a metal construction. If you are ready for more serious work, watch the video on making a pendular rocking chair with your own hands, it is very interesting.
DIY rocking chair made of plywood: drawings and recommendations
Plywood is a light and pleasant material to work with. It is not difficult to make a rocking chair out of it. Such a product is easy to "fit" to any interior painting and decoration. For a chair, it is better to look for oak plywood, it is characterized by increased strength and resistance to a humid atmosphere. The optimal thickness of the plywood sheet is 1.5 cm. If you could not find such material, you can buy thinner sheets and glue them together with wood glue.

What is important to consider when working with plywood:
- plywood sheets are very large - prepare a convenient place for cutting, where you can easily turn the material;
- all parts must be coated with a protective compound before assembly: paint or varnish, stain;
- all end parts must be carefully sanded. Ideally, hide them with a plastic or metal edging;
- remember that plywood is not sawn across the fibers;
- nails cannot be driven into plywood parts, all fastenings are made only in drilled holes;
- if there is a need to make a part with a bend, the plywood is soaked in hot water and, after soaking, is fixed in the desired position until it dries;
- for strong gluing, the plywood surface must be sanded with sandpaper and only then the adhesive composition should be applied parallel to the wood fibers. The parts to be glued are pressed with a press.
We suggest looking at an example of assembling a plywood product of the most primitive design in a step-by-step instruction.
| Illustration | Action Description |
|---|---|
 | Mark out the skids using the templates. |
 | Finish the cut parts on the ends with sandpaper. |
 | Cut the seating boards to the same size. |
 | Fasten rectangular pieces of plywood to the inside of the skids as shown in the photo. Use self-tapping screws and wood glue for fastening. |
 | Attach the cross bars to the skids. |
 | Cover the structure with stain and varnish. |
 | WITH reverse side chairs stretch fabric or leather. You can not do this, but it looks more aesthetically pleasing. |
 | Place a foam cushion upholstered in fabric or leather on the chair. The chair is ready. |
Result in half an hour: video instruction for making a rocking chair from a car seat
Car seats are extremely comfortable, because they are developed by automotive engineers, taking into account the anatomical features of a person. It is a pity to throw out such a chair, but what if you decide to update the interior of the car? Use the driver's seat to create a cozy rocking chair.
If there is no time, but there is a desire: prices for ready-made models of rocking chairs
Any initiative takes time and effort. You need to look for suitable material, fasteners, engage in assembly and design. Does not work? You can always take the path of least resistance and just buy or order such a chair. There are a lot of ready-made products, for every taste and budget. You can buy a rocking chair inexpensively in large stores like Ikea at a price of 5,000 rubles. Products made of natural wood with a luxurious design are already worth tens of thousands.

13715 0 7
How to make a rocking chair from plywood with your own hands - drawings and assembly instructions are attached
A comfortable and beautiful rocking chair made of wood in a store is not cheap. However, it is not necessary to buy such furniture, because everything can be done with your own hands. Read in this article about how to make reliable and inexpensive furniture from plywood for a comfortable stay.
Advantages of a homemade plywood rocking chair

The use of plywood as the main material for furniture assembly guarantees the following advantages:
- Making furniture with curvilinear shapes. Plywood, unlike solid wood, can be bent in different directions, giving products complex curvilinear shapes.
- Ease of manufacture. Most plywood furniture can be made by hand using readily available tools from the home workshop.
- Affordable cost. Finished products will cost less than similar, but solid wood products.
- Great look. Plywood is glued from veneer with a solid pattern, and therefore the finished furniture looks no worse, and sometimes even better, than similar products completely assembled from wood.
- Strength and durability. Due to the special arrangement of the veneer in the board, plywood exhibits higher fracture strength compared to similar indicators of solid wood.
- Environmental Safety. Multilayer plywood is a product made from natural raw materials - wood, and therefore this material is safe for humans.
Types of rocking chairs
What chairs can be made from plywood? There are many options, consider only the most interesting.


How does it swing
The review shows that in terms of the device, all rocking chairs are of 3 types, namely, models with curved skids, models with a pendulum and hanging models. But regardless of the modification, the principle of swinging all rocking chairs is pendulum.
The seat in all of these models moves due to the forced displacement of the center of gravity relative to its original position. Subsequent displacements occur by inertia. As you swing, the inertia weakens and the pendulum stops until you set it in motion again.
Drawings of plywood rocking chair
When choosing a chair model for self-assembly, we give preference to those drawings that will be easier to translate into reality. I offer several such drawings.

The drawing shows a model of upholstered furniture assembled on solid sidewalls, cut out in the form of curved runners, turning into armrests. To connect the sidewalls, you can use transverse inserts made of plywood or planed board.

The supporting frame of this chair is assembled from plywood parts. Cross bars are stuffed over the frame. The lower part of the sidewalls is reinforced with a bent strip of skids. Such a design will be an excellent element of the surroundings of a country terrace or a personal plot.

Puzzle Rocker translated from English means "a rocking chair assembled from mosaic fragments." 4 fragments shown in the diagram are cut from multilayer plywood. Then these fragments are put together without the use of fasteners and the chair is ready. If necessary, the rocking chair is easy to disassemble.
Design requirements and dimensions
The dimensions of plywood furniture are selected so that the overall dimensions correspond to the thickness of the material used. That is, the larger the chair, the thicker the plate should be, from which the details will be cut. The preferred option for any chairs is plywood with a thickness of 25 mm or more.
What you need to work

Most important tool for working with plywood - this is a jigsaw that will provide sufficient cut accuracy
Required materials and tools:
- Multilayer plywood - thickness 30 mm.
- Fasteners self-tapping screws for wood and other hardware for furniture assembly.
- Joiner's glue.
- Paints and varnishes for decorative and protective finishing of furniture.
- Electric jigsaw.
- Screwdriver with a set of drills and bits.
- Clamps for wood.
- Sander or hand grater with replaceable sandpaper.
Chair making process

Making furniture from plywood is not much different from making chairs from other board materials. The process is step-by-step and all steps are performed in the following sequence:
- Cutting the material in accordance with the selected drawing.
- Preparation of parts - chamfering, drilling holes, forming grooves, etc.
- Furniture assembly.
- Finishing, including grinding and processing with paints and varnishes.
Let's consider the above points in more detail.

If the material is purchased for subsequent painting, simply select a sheet of the desired thickness, not paying attention to the texture of the fibers. If the finished furniture is supposed to be varnished at the end of the assembly, we don’t save money and get the plywood that initially looks good.
We try to purchase the material that was stored correctly - we are talking about moisture and the absence of sheet curvature. The purchased material must be even and dry. We pay attention to the cut line, all layers must be tightly glued together without peeling.
Preparation of plywood and general rules for working with it

Plywood is a board glued together from sheets of natural wood veneer. On the one hand, the layered structure of the material simplifies the work, since plywood can be bent.

On the other hand, this feature makes sawing difficult, since an improperly selected tool and unprofessional cutting lead to the fact that the layers of veneer along the cutting line of the slab crack and crumble. That is why, when assembling plywood furniture, we follow the instructions and recommendations proposed in this article.

How to prepare material for subsequent sawing? You don't need to do anything special, just make sure the slab is dry enough and free from curvature. If there is curvature, lay the plywood on the bars so that the sheet curves in the opposite direction of the curvature.
Pattern making and drawing transfer

After we decided on the choice of the drawing, it remains to mark the plate in accordance with it. That is, you need to transfer the drawing to plywood, while increasing the scale of the image to natural size. If the design of the furniture to be assembled does not have complex shapes, the drawing from the paper is transferred along the ruler and square.
If you plan to make furniture with complex shapes, for each part, patterns (templates) are cut out of thick paper or cardboard, which are subsequently traced on a sheet of plywood.
Cutting plywood into pieces
For a curved cut, it is preferable to use a jigsaw, as the tool is available. If possible, the workpieces are cut into band saw provided that a blade with a fine tooth is used.


Construction assembly

The chair is assembled according to the drawing. The strength of the finished product largely depends on the choice of fasteners. To achieve maximum reliability, we use self-tapping screws only in unloaded connections. In areas with a high degree of load, we use fasteners consisting of bolts and nuts.
The advantage of bolting when assembling furniture is that the nuts can be tightened during operation and thus eliminate backlash and creaking.
Final balancing

How to balance skids for smooth rocking? Make sure there are no ridges or flat areas on the skids that could impede rocking. If there are such areas, round them off using a sander with sandpaper.
In addition, for smooth rocking without sticking, use the chair on a flat hard surface. If the furniture is to be used on personal plot, it is preferable to make the skids wide so that they do not imprint into the ground.
How to bend plywood for a rocking chair
How to make curved parts out of plywood without cutting out their contour from a single sheet, but by bending the strips along a given radius?
| Illustrations | How to bend |
 |
Steaming and bending. This is a classic method in which the part is soaked in boiling water and then molded and fixed in a pattern. After drying, the workpiece retains the specified radius. The method is relevant for plywood of small thickness. |
 |
Cutting and bending. On the inside of the intended fold, cuts are made to ¾ of the thickness of the sheet. After that, the workpiece bends. To fix the radius, glue is poured into the cavity of the cuts and a strip of veneer is glued over the cuts. This method is preferred for materials with a thickness greater than 25 mm. |
How to make chair pads

Properly assembled furniture looks good on its own, but soft lining will make it more comfortable. The easiest option is to make pads in the shape of the seat and back on ribbon ties. You can make these patches yourself, or you can buy them ready-made.
DIY collapsible chair


Summing up
Now you know how to make a plywood rocking chair yourself. If after watching the video on choosing a design and assembling furniture, you still have questions, ask them in the comments to the article.
October 25, 2018If you want to express gratitude, add a clarification or objection, ask the author something - add a comment or say thanks!
A successful invention for those who appreciate the opportunity to relax and unwind without leaving home is a rocking chair. And if you put it in the garden, you can enjoy doubly.
The traditional material for such chairs is willow vine and its analogue - rattan. Products made from this material weigh little, are distinguished by the elegance of lines and a solid price.
Modern materials can also be used in the manufacture of wicker chairs - there are options from synthetic wicker. They are no worse than natural, absolutely not afraid of moisture and have a very long service life.
Armchairs made of metal, despite the reliability and plasticity of the material, are too heavy. A wrought iron chair will look great in the garden, but you will have to make a platform for it. In addition, certain skills are needed to work with metal; it is difficult for a beginner to make a metal chair.
Rocking chair made from pipe scraps
 Metal profile rocking chair
 Affordability and attractive appearance of plastic chairs. To these advantages, you can add resistance to wet weather, durability, bright non-fading color. In addition, they do not have to be repainted and processed.
For self-manufacturing wood is best suited - an inexpensive, easy-to-work material. At the end of the work, the wooden chair can be given any color or its texture can be preserved. For those who first thought about making furniture on their own, wood is best suited.
There are many models for home craftsmen, the simplest ones are presented below.
When developing a homemade rocking chair, the main thing is that it does not tip over when the seated one leans back. It is also important that the rocking process itself, for which the chair was made, does not force the person to strain too much.
Types of rocking chairs
 The simplest type is armchairs built according to the radius principle. These are the most affordable products for self-manufacturing, they are distinguished by the simplicity of manufacturing technology and design. The model below has a somewhat heavy and awkward look, such a chair is suitable for the garden.
Armchairs of this type are made with a fairly low seating position, which ensures smooth rocking and safety of the seated person. If the seat is set to a normal height, then the chair runners are equipped with bumpers - swing amplitude limiters. To get up from such a chair, you need to make a physical effort. Yes, and the buildup itself requires some tension. 
Much more stable chairs on skids of variable curvature, they do not tip over.
Nirvana chairs are very comfortable, it is worth leaning forward a little, it will gently “land” a person on his feet. Rocking chairs on elliptical skids, despite their comfort, can tip over, therefore they are equipped with bumpers, the front one usually acts as a step.
Overturning during swinging at sunbeds with awnings, on elliptical skids is excluded.
Where to begin
Below is a rocking chair for the garden, which, with some effort, even a beginner can make. On the  such a model, you can try your hand before moving on to a complex home version.
In any case, the drawing should be as simple as possible so that it can be reproduced even without much experience.

 Such a compact chair will look great in the garden, and it can be placed at home, it does not take up much space. This simple model will be used to describe the process.
Start with a drawing
The drawing is carried out on a scale grid, on which each cell corresponds to 10 cm. All markings on sawn parts must be made according to the drawing, taking into account the scale.
What can a chair be made of?
Euro plywood 3 cm thick is suitable for work.
- You need to cut the sidewalls exactly according to the pattern, three parts for each side;
- The remaining parts are made of timber 50 mm wide and 25 mm thick. For the seat and backrest, you need 35 elements from a bar, the length of each is 120 mm;
- In order to correctly calculate how much timber is needed, you must first visit the store and see what bars are presented and what is their length. Knowing the initial size of the material, it will be possible to minimize waste by varying the width of the chair;
- For example, if bars of the required thickness with a length of 2.3 meters are available for sale, then you can make the chair a little narrower - cut the bars for the back and seat by 115 mm. If the bars have a slightly larger width, then the chair can be made a little wider, so that there are not many scraps left;
- You will also need three crossbars from a bar; in their manufacture, one should proceed from the width of the chair - that is, the length of the bars for the back and seat.
Small fluctuations in width will not affect the stability of the chair, so you can do this without worrying about the result.
When the details are ready
After the parts are sawn, they will need to be processed. They should not be rough.
In addition, carefully processed surfaces will give the product a finished look and facilitate finishing.
Surfaces are treated with grinder, each detail must be sanded on both sides with sandpaper with different grains. If you have the skill, you can use the milling nozzle to soften and round the sides of each part. If this is not possible, you can simply grind the cuts with a grinder or sand them by hand.
Treatment with hot drying oil should be carried out in at least two layers. This is one of the most outdated methods, but after that the product can be painted with oil paint and used even on the street, without losing its quality and appearance.
Small parts can be dipped in boiling drying oil as a whole, while you can not hold them with your hands. It is better to make improvised tongs from wooden slats. Larger parts should be generously smeared with a brush, laying them out on cardboard, alternately on each side, and dry the rest of the parts in the same way. Working with hot drying oil requires great care, you should remember this during the impregnation process. Do not lean over a container with a boiling substance; wear thick work gloves on your hands.
Alternatively, the parts can be treated with antiseptics, stains, and other impregnations, of which there are a great many in stores. They should be selected based on the intended purpose of the item: where it will be used.
At the end of the work, it will be possible to walk with a fine sandpaper again by hand, bringing it to complete smoothness.
Assembly
- Be sure to put the attachment points of the transverse bars - these places are marked on the drawing, you should calculate their location on the finished parts, based on the scale grid step.
- Having assembled the sidewalls, you can begin to attach the parts of the seat and backrest. The back will be attached to the rack, the seat - to the sides.
We need to pay attention to that again. that the drawers must be fixed strictly symmetrically, and the assembled side parts, if put on top of each other, must completely match, without the slightest deviation.
- Now the side parts are fastened together by crossbars, they should be attached at the legs, in the middle and at the top of the chair. For attachment, it is better to use confirmations (type of connecting fastener);
- To attach the back and seat parts, four holes should be drilled in each bar, two on each side. In order for the heads of the self-tapping screws not to be visible, each hole must be slightly expanded from above with a drill of a larger diameter (it must be selected according to the diameter of the hats). When screwing on, the caps will be in recesses, which can then be masked with furniture putty.
Such a careful execution of the first part of the work will ensure the fulfillment of the following indispensable condition - all parts of the seat and back, all 35 bars must be located strictly horizontally.
Finishing
After assembly, the product must be processed again to give it a finished look. In addition, it will significantly extend its service life and maintain an aesthetic appearance.
If the parts were processed with drying oil, then at the end of the assembly, the chair should be covered with oil paint, in thin layers in two or three layers.
If you want the product to have a natural texture of wood, it should be treated with a stain of the desired shade and varnished.
Varnish should be chosen waterproof, as well as stain. There are varnishes that create a particularly durable coating that is resistant to abrasion and cracking. If the chair will stand on the street, it is better to take a yacht varnish or another with increased strength. In any case, it is better to keep the product under a canopy, this will extend the period of its functionality, or at least bring it into the house when it rains.
- For the chair you need to use strong types of wood. These are oak, larch, coniferous;
- Euro plywood, a 3 cm thick glued wood material, also has sufficient strength to make the chair reliable;
- Plywood sheets must be carefully inspected before purchase so that they do not have surface damage and cracks. This will eliminate the difficulties in cutting the product and its subsequent processing;
- The more time is spent processing the product and impregnating it with drying oil or compounds, the longer its service life will be;
- The chair does not need to be upholstered with foam rubber and dense fabrics, this will contribute to the accumulation of moisture under the upholstery, which will quickly render it unusable. For sitting and backrest it is better to get removable pillows;
- If the finished product falls too far back or, conversely, is oriented forward, it will have to be balanced after work is completed. For this, an additional cross member is installed at the rear ends of the sidewalls. Previously, notches are cut in it, where the weights are attached according to the slope. Also, if necessary, the front of the chair is loaded. By adding and subtracting them, trying to sit and swing in a chair, you can achieve the perfect balance of the product.
Making a rocking chair is a rather complicated process, but quite doable. If you correctly and accurately, following the drawing and the advice given in the article, perform all the steps, then the result will be a beautiful and functional product that will last a long time.
For inspiration, watch the video below. The video contains incredibly simple, affordable models for self-production, from available materials.
Hanging chairs are an alternative to a rocking chair on skids at home and a hammock in nature. Comfort and easy rocking will help you relax and unwind after a hard day. A variety of models and materials for manufacturing allows you to harmoniously integrate such a chair into any interior. And it is not necessary to spend money on the purchase. Some models are easy to make with your own hands.
Types of hanging chairs
They produce a variety of models and designs. They can be made of wood, metal, rattan, wicker, transparent plastic. There are models that you can easily make yourself.
- Swing chair. Fastening is carried out at two points. Due to this, the structure sways in one plane. There are soft models (hammock chair) or on a rigid frame:
- the basis of the first option is a soft fabric or woven fabric, which is easy to sew, weave with macrame technique or crochet - the ends of the panel are attached to the transverse bar with 4 slings, and it is already suspended from the ceiling or a stand-leg;
- the second option has a rigid frame made of acrylic, plastic, wood, rattan or metal in the form of a hoop covered with a soft base.
- Nest chair. The basis of the design is 2 strong hoops. The model has a flat bottom and low sides, which are braided with a cord, rope or tied with strong threads.
- The chair-cocoon (egg) differs from its counterparts in greater closeness, often up to 70%. The back and sides are high and connected above the head. The rigid frame is braided with a suitable material or sheathed with fabric. Varieties of this model - basket chair and drop chair - perfect option for the children's room.
Hanging chairs of various shapes - gallery
Techniques and finishing materials
Such chairs usually have a rigid frame and a seat made of various materials.
- Textile. An affordable and easy-to-use material, the density and strength of which is selected based on the expected load. Suitable raincoat fabric, tarpaulin. The chair for children from old jeans with pockets and rivets looks original.
- Knitted fabric. Craftsmen who know the technique of knitting or crocheting can use their skills to create an original chair from plain or multi-colored threads.
- Macrame. Weaving from a durable cord will not only last a long time, but will also give a special flavor to any interior.
- Vine, rattan. Armchairs made of eco-friendly materials will decorate any interior, but special skills are required to work with them. In addition, rattan does not grow in our country.
It is interesting! Unusual and very durable material for braiding a chair - a thread of plastic bottles. Such a chair will not get wet, does not deform, it can be hung on the street.
frame material
The base of the chair can be made from different materials.
- Gymnastic hoop. Suitable only for a child seat, for an adult its strength is not enough, because the cross-sectional diameter is 16 mm, and for the frame of the chair you need 2 times more.
- Metal pipe. The product from it will turn out to be durable, but heavy - at least 7 kg. For its manufacture, pipe bending equipment is required.
- Tree. The design will be durable, lightweight, environmentally friendly. Since the material absorbs moisture and dries out in the sun, wood for outdoor chairs must be treated with impregnations. This will protect the material from decay.
- Metal pipes. Durable, lightweight and non-corrosive material. When using coiled pipes, there is no need to bend them. The ends of the segment are connected with a wooden or plastic insert and fixed with self-tapping screws.
Do not use dilapidated material in the manufacture of chairs: such furniture will not last long.
Hanging rockers made of various materials - gallery
We make a hanging chair with our own hands
A handmade hanging chair will look good in the country house or on the veranda of a private house. The easiest to manufacture is a hammock chair. It can be done in several ways from different materials, but the most convenient and uncomplicated of them are macrame or textiles.
Hammock without frame
For work you will need:
- dense fabric - 1.5x1.5 m;
- durable cord;
- wooden rod for fastening;
- sewing accessories.
After preparing everything you need, proceed to the assembly process.
Swing on a rigid frame
To make it you will need:
- hoop with a diameter of 90–95 cm;
- durable fabric 3 m long and 1.5 m wide;
- lightning - 90–95 cm;
- strong cord or rope - 10 m;
- metal rings for attaching the structure to the ceiling;
- interlining;
- scissors;
- tape measure;
- sewing accessories.
When all the materials are prepared, proceed to the execution of the chair.
- Fold the fabric in half and lay it out on a flat surface.
- Place the hoop in the center, mark around the circle at a distance of 20-25 cm from it and connect the marks with a line. Cut out 2 circles.
- On one of the blanks, make a cut through the center with a length equal to the diameter of the hoop, sew a zipper in this place.
- Connect both blanks with a seam around the circumference.
- Make cutouts on the finished cover for attaching ropes to a 10 cm long hoop. To do this, fold the cover in half and measure 45 ° C from the fold line in one direction, 30 ° C in the other, put marks.
- Duplicate the marks on the second part of the circle. The distance between the cutouts in the front of the chair should be greater than in the back.
- Treat the slits with tape.
- Wrap the hoop with a strip of synthetic winterizer, to secure it, connect with a seam.
- Insert the hoop into the case, fasten the zipper.
- Cut the cord into 4 pieces 2.2 and 2.8 m long. Fold each piece in half and fasten to the hoop. To do this, thread a loop through the hole in the cover, and insert the ends of the cord through it and tighten them. Long cords should be in front of the chair, and short cords in the back.
- Tie a short and long cord on the right side to one ring, on the left to the other. Make strong knots.
- Hang the rings from the ceiling, a beam, or a thick tree branch outside.
- Put pillows inside or sew a round mattress. So the chair will become even more comfortable.
Instructions for making a rocking chair from a hoop - video
How to make a wicker nest chair: step by step photos
By making the seat flat and providing the structure with sides, you can get a nest chair. For such a rocking chair you will need:
- two hoops made of a metal-plastic pipe with a cross section of 35 mm: for a seat with a diameter of 70 cm, for a backrest - 110 cm;
- polyamide cord 4 mm thick - 900 m;
- sling or strong rope - 12 m;
- a thicker cord to connect the seat and backrest.
To make this chair, you need to be able to weave.
- First, braid both hoops:
- wrap the pipe with a cord (it is worth taking a cord with a polypropylene core, as it will help to make a stronger knit);
- pull the thread well (each next turn should fit evenly and tightly against the previous one);
- every 20 turns, fasten the thread, pulling it as much as possible and twisting it;
- for greater strength, coat the weaving with glue.
- At regular intervals, fasten with a double loop on the braid of the hoop pieces of the cord folded in half. They should take half the length of the hoop.
- Weave the bottom of the chair with flat knots in a checkerboard pattern, securing the remaining ends to a free semicircle. The tension of the cords when weaving should be quite strong. It's not scary if the hoop is slightly deformed, in the future the shape will be restored.
- Connect the finished seat and back hoop by wrapping them together with a cord in front of the structure.
- At the back, connect the seat and the back hoop with two wooden spacer rods, making cuts at their ends for a strong attachment. The length of the spacers is selected in accordance with the desired backrest height.
- Attach the cords to the upper arc of the back and weave from top to bottom. Fasten the rest of the cords to the seat and form brushes out of them.
- Connect the upper arch of the backrest and the seat with a thick cord parallel to the spacers, and then remove them.
- Tie to finished construction slings. They also need to be made using the macrame technique from cords.
- Hang up a chair.
Weaving "chess" with macrame technique - video
How to make an egg chair at home
An egg chair (cocoon) is the most difficult option for a home master. The design is closed on three sides, and the side surfaces and the back are closed over the head.
- For work, you can use metal-plastic pipes by assembling a frame from a hoop and additional arcs. To give additional rigidity, the structure is reinforced with several horizontal arcs, the elements are connected to each other with self-tapping screws.
- The finished frame is braided with a cord using macrame technique, sheathed with fabric or crocheted.
- For someone who knows how to work with wood, the frame is easy to cut out of thick plywood.
Fabric cocoon baby chair
For children, a cocoon chair can be sewn from fabric. It does not take up much space, organically fit into the interior of the children's room and is not traumatic.
To make it you will need:
- 2 meters of dense fabric 1.5 m wide;
- lightning;
- pillow or inflatable balloon;
- sewing accessories.
The technique for making a cocoon is simple, the main thing is to follow the instructions.

Instead of a pillow or an inflatable chamber, you can insert a hoop into the bottom of the chair, then you get a drop chair.
How to make a cocoon baby chair - video
Mounting suspended rocking chairs to the ceiling, rack, beam
For any suspended structures the main thing is a reliable fastening. The safety of those who will use the chair depends on it. There are several mounting options:
- to the ceiling;
- to the stand-leg;
- to a tree branch or beam (for the street).
If indoors stretch ceiling, then installing the mount will be problematic. In this case, you need to mount the structure before fixing the ceiling or you should purchase a special stand-leg.
Consider different mounting options.
- You can drill a hole in the concrete ceiling, install a powerful anchor with a hook for hanging the structure. On sale there are special sets consisting of an anchor, a hook and a chain. Fasteners must withstand a weight of at least 120 kg.
- Voids in the ceiling through the hole must be filled with a special solution of high strength polymers - chemical anchors. Such compounds are sold in tubes for building syringes. Then you need to insert the anchor into the hole and wait a day until the composition is completely dry.
- For a ceiling with solid floor beams or for a terrace and a street, bolting is suitable.
- For false ceiling it is worth purchasing a special suspension that has a bracket that is attached to the concrete ceiling and exits through the suspension. A hook is attached to it.
The mounting bracket is installed on the concrete ceiling, then the hook is screwed to it
- Slings are tied to a tree branch with a strong knot.
- The leg stand can be purchased at the store. It is convenient because the chair is not permanently fixed in one place and can be moved, and if necessary, disassembled and transported.
Do-it-yourself rack drawing
The simplest stand-leg for a hanging chair can really be done independently.
- The wooden rack consists of only 5 parts, but it cannot be made without special equipment, all parts are bent.
- The most common option is a metal rack. To make it you will need metal pipe, pipe bending equipment and welding.
- A simple version of a metal rack: the design does not require complex drawings and special skills.
For stability, a simple metal rack is attached to a vertical support with a chain or cable.
To fully relax, it is not necessary to spend a lot of money. With a creative approach to business, relaxation will become not only relaxation in a hanging chair, but also the process of its manufacture. And the product will cause legitimate pride.


