Older children will always find something to do in the country, but the younger ones need to be entertained with something. It is important that babies are visible and protected. Therefore, you should think about creating a children's sandbox with your own hands on the site. Model options are different, as is the material for construction. The main thing to consider is not only safety and comfort, but also the wishes of the children themselves.
Closing sandbox
A well-maintained children's sandbox with their own hands in the country will help decorate the site and give parents the opportunity to take a break from constant supervision of children. It is difficult to imagine a well-groomed and tidy place for kids to play without a sandbox. Such a design, if desired, can be supplemented with swings and benches, a sports complex. It does not take much time to create a children's sandbox with your own hands, and expensive material is not needed. The simplest models can be built with little to no experience in construction. Well, if you have skills, for example, wood carving or drawing, the site can be turned into a real work of art.

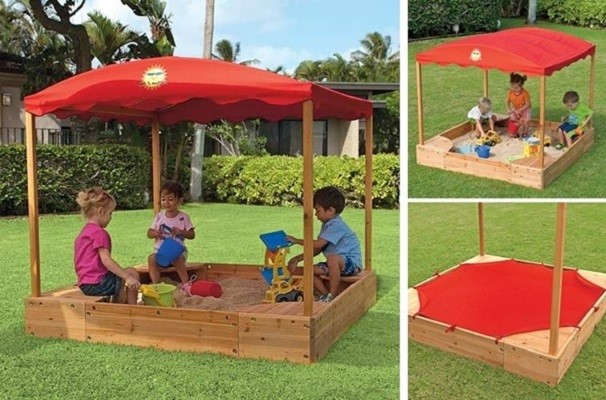
Square sandbox with protective awning
What is important to consider before starting the construction of the sandbox.

What places are not suitable for a sandbox
You can not place a playground in the far corners of the site and behind various buildings, bushes and trees. Because of the barriers, it will be difficult for parents to keep track of the kids. If the sandbox is not visible from the window, it should be visible from the yard.
 Folding sandbox
 Wet dark areas in the country are not a place for a sandbox. It cannot be located in the lowlands - these are the coldest places. Soil and sand in shady places keep moisture longer, especially in spring when the snow melts, and during rainy periods in summer and autumn. Playing on wet sand can cause children to catch colds and get sick. The lowlands are constantly in the shade, and the sand, even if it dries up, does not have time to warm up enough in the sun.
 Sandbox made of linear polyethylene in the form of a crab
 In the area of the playground, consisting of a sandbox and other structures, there should not be old diseased trees. Firstly, during the game, dust will constantly fall on the heads of children. Secondly, with a strong wind, there is a risk that the branches will fall on someone's head. If there are no open spaces in the garden, then the trees must be checked annually for the presence of dry branches and constantly cut them.
 sandbox truck
 Too open a place is also not suitable for a sandbox. In the heat, children can burn their heads, which will lead to heat or sunstroke. It is better to choose a space covered from the sun at noon, but well lit at other times of the day. To create a light shade in the area of the children's sandbox, you can use man-made canopies that protect from the sun.
 Sandbox made of wood with a roof
 What material to choose
For the construction of a children's sandbox with your own hands, you can use it as new material, and what is in garage stocks. These can be items that are enough to process, in this form it is convenient to use them to create a sandbox or decorative elements.
 Sandbox with protective awning and seats
 What can be built from:
- bars and logs;
- boards;
- summer tires;
- plastic bottles;
- nets and various awnings.
In addition to the sandbox from improvised materials on the playground, you can build slides, trampolines, ladders and turnstiles, playing tables with a bench, etc. This is especially convenient if children different ages- everyone will find something to their liking. Children need movement and active rest, they constantly play, run, climb wherever they can climb. Therefore, it is important to equip the site so that the games are safe.
 Bright sandbox with seats
 A sandbox built with your own hands in the country can emphasize landscape design, without getting out of it, or be an independent bright object. Often playgrounds for children are complemented by awnings, which are simply necessary in summer in hot weather. The canopy is made of tarpaulin or awning. If possible, you can build a full-fledged roof with slopes and tiles.
 sandbox boat
 The same material can be used to create a sandbox with a lid. It is necessary to protect the sand from rain and animal activity. The lid of the sandbox can be transformed into comfortable seats for children that fold out when raised.
 Sandbox with a mobile lid-house
 How to determine the size of the sandbox
It is necessary to choose sizes based on the age and number of children, the area of \u200b\u200bthe yard and the shape of the sandbox itself. When choosing the necessary parameters, it is important to consider several factors.
 Small sandbox with sides
 - Age and growth of small players.
The length of the legs of children of three years of age is still not enough to cross the side above 20 cm. For older children, this is not an obstacle, so you can make the side of the sandbox higher - 30 cm. - Amount of children.
If the child is alone, sandboxes 120x120 cm with sides 20 cm high may well be enough. Their friends will come to visit the children to tinker in the sand together and build castles or play with shapes. Sandbox 170x170 cm is enough for three children under 5 years old. This standard sizes, but nothing prevents to make the design even larger. - The depth of the sandbox for the game.
There should be enough sand so that the children, while playing, could not get to the ground. Usually, a standard sandbox takes at least a ton of sand, which must be periodically updated over time. - The height of the entire structure.
If there is a canopy or roof, they should be high enough so that the child, standing on the side, cannot hit his head or reach with his hands. Otherwise, he may try to climb onto the roof, which creates some risks.
So, the size of the children's sandbox in the country should allow children to sit and stand comfortably, and the height of the sides should not interfere with the game.
 Small sandbox in the yard
 Foundation preparation
So, let's say, a size of 170x170 cm is chosen with a side height of 30 cm. Such a sandbox is quite enough for two or three children from 3 to 5 years old to play. Before erecting the sides, seats and roof (if required), the foundation on the ground must be prepared.
 Small sandbox with lid
 To work, you will need pegs, a strong cord or rope, marking tape. The cord is needed to highlight the perimeter of the construction site on the ground. Now dig a hole 170x170 30 cm deep. The center (diameter about 50 cm) of the sandbox must be deepened to 70 cm. The resulting hole must be covered with rubble or small pebbles, this is drainage so that excess water leaves.
 Sandbox-transformer in the unfolded state
 A pit for a children's sandbox should have sloping slopes towards the center. This configuration will allow the sand to dry faster after heavy rains or snowmelt. A drainage well in the center of the structure will drain excess water into the ground.
 sandbox fungus
 Construction of the sides of the sandbox
For the construction of the sides you will need:


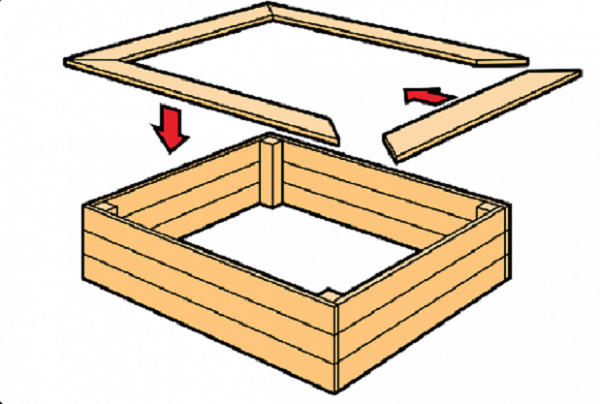
Do I need to make a sandbox with a lid?
A cover made of wood or tarpaulin is not a mandatory attribute of a sand structure, but it can be useful by protecting the sand from debris, branches from trees, animals, etc. In addition, it is a reliable protection against animals that decide to crap where children play. The sandbox can be covered at night with an ordinary awning made to the size of the structure. You can put together a cover yourself from the remaining boards, it is very convenient. It is enough to knock down a simple shield made of wood according to the size of the structure.
 Sandbox with their own hands will give the child a lot of pleasant moments
 A double-leaf lid is even more convenient, but more difficult to manufacture. The easiest part is to put together two shields instead of one. You will need to mount hinges to the sides and doors, attach handles and, possibly, a latch. When opened, the shields are behind the side, resulting in comfortable benches with a back, so there is no need to purchase additional items. Even kids 4-5 years old can open the hinged lid without the help of adults.
 A simple square sandbox made of several boards with a sunshade
 Benches and tables
So that the kids do not catch a cold, sitting on the cold sand and earth, from a young age they should be taught to a healthy lifestyle. Sitting in the cold can provoke various inflammatory diseases of the pelvic organs, which, of course, does not go away without a trace. For seating children, you can put together a bench right on the side or make separate seats. A full-fledged wooden bench, complemented by a table, looks good next to the sandbox. If desired, such a table can be in the sandbox itself - it is convenient to spread sand from molds on it.
 Simple square sandbox with corner seats and sunshade
 If the design is not square, but polygonal, the seats are usually located on two or three opposite faces. It would not be superfluous to arrange a nearby place for storing toys - scoops, buckets, small rakes and molds. This will keep the site neat.
 A simple square sandbox with wide sides-seats
 Sun protection
A classic umbrella or "mushroom" will protect playing kids from the sun. A full square-shaped wood roof is convenient - it is high enough not to knock heads against it for adults and children, and protects from rain. But such a roof has a drawback - during a sunny day, a shadow is cast in different parts of the children's sandbox. At the cottage or in the yard country cottage there is no need for such an attribute, it is enough to put a light folding umbrella on the south side of the site or use an awning. Unlike the roof, such canopies are easily removed and transferred to any place, it is convenient and practical.
 In the absence of children, the sandbox can be used as a corner of the sandy beach
 Where to get sand
A sandbox filled with river sand with your own hands is the most best option. River sand grains are quite small, they do not contain debris and sharp objects. In addition to sand from the river, quartz is suitable. Such sand is further processed by special means that repel insects and animals. Impregnation is safe for children, however, eating shortbread "cakes" is still not recommended. To fill a standard children's sandbox (170 by 170 cm) you need at least one ton of sand.
DIY sandbox - an easy way to diversify country cottage area and entertain the kids. If you wish, you can build entire gaming towns with turrets, walls, multi-level structures. For decoration, paints, carved figures of animals or fairy-tale characters, bright colors are used. soft pillows on benches etc.
Video: How to make a sandbox with your own hands
To paint the sandbox in a color that suits you, you need to choose high-quality paints and varnishes. This can be done most conveniently and quickly on the company's website http://www.promolak.ru/lkm
50 photo examples of sandbox design ideas:


A sandbox equipped with a fungus is an essential attribute of a child's carefree childhood. In an urban area, management companies should take care of a well-maintained area for children to walk. But when sending your beloved child to the village to his grandmother, or planning a joint vacation in the country, you should take the initiative and make a comfortable sandbox with your own hands.
Planning stage
Sandbox games are not only an interesting pastime. They contribute to the development creative thinking, improve fine motor skills, create balance. Therefore, it is important to make the design of the sandbox for the baby as practical as possible, taking care of safety and convenience.
The easiest option is to make a square or rectangular wooden sandbox, which will take several hours to make. But it will be possible to be in it only in the absence of a scorching sun, so it is better to immediately provide protection. Making a canopy or a fungus is quite simple, but by installing an additional sandbox element, you will solve several problems at the same time.
An important aspect is the location of the structure: it must be visible from many areas, including the house. The second prerequisite is the absence of trees nearby that can pollute the sand with fallen leaves, and the caterpillars will not bring much joy to the child.

Manufacturing process
Basically, a sandbox with a fungus is installed for several years, so it’s better to do all the work thoroughly so that it doesn’t take next year eliminate shortcomings.
Site preparation
The site preparation process includes the following steps:
- The perimeter of the future sandbox with a fungus or a canopy is marked, after which the soil is removed to a depth of 25-30 cm.
- Take care of drainage in the form of a pillow of coarse gravel with the addition of sand. A well-packed layer of material will ensure that moisture is quickly absorbed into the soil, contributing to the accelerated drying of sand after precipitation.
- It is recommended to make a base for a sandbox with a fungus. It can serve as various materials: dense polyethylene, plywood or paving slabs. The first two options for the sandbox are not very successful - the film practically does not let moisture through, and the plywood quickly deteriorates. They are used when there is an urgent need to save costs. In any case, holes for drainage should be made. It is optimal to make a base for a sandbox with a fungus from geotextile, which ensures the unhindered passage of moisture.
Remark ! You can refuse the last stage, but the reason wooden structure with a fungus prevents premature contamination of the sand as a result of mixing with the soil. The second important function is a kind of barrier against the penetration of insects or rodents.

Box formation
The box is a key part of any sandbox design, regardless of whether it will be equipped with a canopy in the future or not. The most common solution is to make a square or rectangular shape. Typical projects propose to dwell on the square size of the structure with sides of 2.5-3.0 m. Taking care of environmental safety, it is better to make a sandbox from pine boards 2.5-3.0 cm thick. Creative parents can make an imitation of a boat or make a round construction. Mounting standard model The box consists of the following steps:
- Bars are installed at the corners. The optimal size of wooden products is 45/5/5 cm. Approximately a third of the timber (about 15 cm) will be in the ground, therefore, in addition to antiseptic treatment, it is necessary to cover with bitumen. Dried bars are hammered at the marked corners.
- Next, in the future sandbox with a fungus, you need to make sidewalls. For their formation, several narrow boards connected into a shield are selected, or one wide board is fixed. The quantity is not important, the average height of the side of the sandbox with the fungus is 30 cm.
- After attaching the sidewalls, they move on to the seat equipment. This is easy to do - just nail horizontally to the sides of the board. Usually they are installed around the entire perimeter of the sandbox in the amount of four pieces, with a lack of material, two benches can be made. In the future, they will serve as convenient stands for demonstrating sand cakes.
Important ! All wooden elements of the fungus sandbox need careful sanding. The absence of knots, chips and notches will prevent unnecessary abrasions and scratches in the child. So that the child is not injured on the corner of the sandbox, it is desirable to make it rounded.
Canopy construction
Having finished work on the box, they move on to the second important structural element - the canopy. It can be made in various shapes, but most often they stop at the variant of the fungus. In addition to its decorative role, it perfectly copes with the protective function, whether it is the scorching rays of the sun or a fine summer rain. An interesting solution will draw around the fungus small table, serving as an additional place to store toys in the sandbox. The sequence of actions is as follows:
- Prepare a hole for the support of the fungus. To ensure the stability of the canopy of the sandbox, deepening the legs of the fungus into the soil by at least 1 m is capable of.
- The leg of the fungus is recommended to be made from a beam with a section of 10x10 cm. As in the case of beams for sidewalls, the wood of the fungus needs to be treated with antiseptic agents that prevent damage by rot or insects.
- To make a mushroom cap, you need to form triangles from the boards. The inner side of the parts is fixed to the support, it is desirable to sheathe the outer part with plywood or a thin board. The material is fixed with nails, with the next piece nailed in such a way as to hide the nail heads on the previous fungus board.
- For high-quality protection, the size of the fungus cap must correspond to the parameters of the sandbox.
- After connecting the cap and leg, the fungus can be installed in the prepared pit. You can fix the structure by wedging the legs of the fungus with stones and falling asleep with loam.
- If you want to make a stronger mount for the fungus in the sandbox, a crushed stone pillow is prepared at the bottom of the pit. The leg of the fungus is installed to a depth of 0.7 m and poured with cement mortar.
Remark ! If the leg of the fungus is planned to be concreted, then it is better to do this before installing the sandbox box.

After connecting and installing all the elements, you can proceed to the design of the sandbox. Which decorative ornament to do - depends solely on the creative abilities of the parents, the main thing is to finishing material was safe, and the kids liked the idea of designing a sandbox.
River sand is usually used to fill a wooden sandbox, it is well polished with water and practically does not contain impurities. Any sand, river or purchased at the mall, needs to be screened beforehand. Now you can find a special mixture for the sandbox containing clay and specific fragrances. This filler is ideal for sculpting figures, while repelling insects from the sandbox.
You can additionally protect the place for games if you make a lid on the sandbox. This improvement simultaneously solves several problems:
- Fully or partially protect the sand from rain and reduce its washout.
- Prevent debris from entering in windy conditions.
- Creates a barrier to unwanted visits by cats and dogs.
The easiest way to make a removable shelter for a sandbox is from a tarp. Even a child can cope with it. A wooden lid looks more attractive. Which option to opt for depends on your abilities and the availability of material.

Photo gallery of interesting ideas
There are many on the market interesting ideas for sandboxes. Some models are made of plastic, which does not fade in the sun and does not emit harmful substances. The original forms will appeal to inquisitive kids.

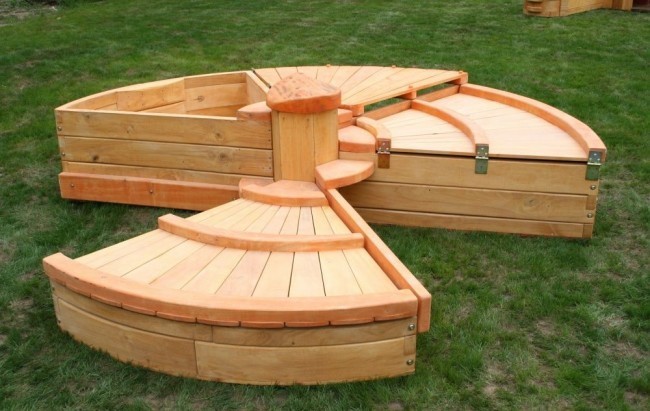
The design of the transformer sandbox is practical, where the lid is transformed into comfortable benches for children. If you have the desire and skills, this option can be done with your own hands.

The round closed sandbox looks original, where each child can sit in a separate compartment.
A children's sandbox is a useful element in the country. While the parents are busy gardening and gardening, the child has fun making cakes and building castles. Even an amateur master can make a sandbox in the country with his own hands.
Types of sandboxes
By type of material: wood and plastic
Photo example of a classic wooden sandbox for children
Traditional wooden sandboxes we have known since childhood. It will not be difficult to make such a stationary structure in the form of a square box. It is a little more difficult to build a collapsible sandbox, the installation of which is carried out according to the type of designer due to cuts of equal height and width. Other models of wooden sandboxes contain elements such as:
Wooden sandboxes are very convenient, environmentally friendly. However, the master should carefully sand the boards, round the corners and edges, treat with an antiseptic and varnish the surface. It is important to provide all measures so that children do not get hurt.
Sometimes other materials are used to make a sandbox, for example, natural stone or brick. A significant disadvantage of this design is the high probability of injury.
By type of placement: recessed and elevated structures
The first option is deepened into the ground to strengthen the foundation. In this case, drainage (15 cm) must be made of pebbles and stones. This is necessary so that moisture does not accumulate in the structure after rain. The drainage layer is covered with agrofiber or dense polyethylene, in which holes are made every 10 cm. Such a foundation will serve as an obstacle to the penetration of various insects from the ground and the germination of grass.
Raised structures suggest the presence of low sides (380-400 mm), which will allow the baby to climb into the sandbox himself. Half of the sides are covered with sand.
Sandbox Planning and Placement: Basic Requirements
When planning a sandbox, a key principle should be taken into account - this is the safety of the structure. However, other points are also important: 
- Sandbox location. Choose a place so that the child is always in sight of adults. Best of all - opposite the kitchen windows. Do not build a structure next to trees. Firstly, there will always be garbage in it (dry branches, leaves, bird droppings); secondly, because of the shade, the sand will dry for a long time after the rain. If the place you have chosen is located in the sun, then the installation of a canopy should be included in the project.
- Sand quality. It is best to purchase white river sand at a hardware store. Ordinary construction sand can ruin the baby's clothes and hands. In addition, it should be sieved to remove foreign materials: stone, glass, construction waste.
- Type, form of construction. Of course, the design that does not have sharp corners is the safest. However, even if the structure is rectangular, you can round the corners or decorate them with soft material, such as foam rubber. The structure with a canopy must be firmly strengthened so that the wind or a child does not knock it down.
markup
The place is selected - you can mark up the future sandbox. For this, wooden stakes and lacing are used. You should designate a square or rectangle, which will soon turn into a platform for sand entertainment.
The size of the sandbox depends on the number of children playing in it at the same time. If it is 1-2 children, then the side of the square will be from 2 to 3 meters. This area is quite enough for the free movement of children.
When the construction site has already been marked out, excavation can begin. This is important to ensure that the sand does not mix with the soil. Do not deepen too much: 15 cm is enough.
Foundation preparation
In place of the selected soil, a sand cushion is poured with a layer of no more than 5 cm. It must be thoroughly compacted with a roller or a manual wooden rammer.
The sand cushion is lined with geotextiles so that the sand itself does not mix with the cushion and soil. Thus, the sand will always be clean, without soil impurities. It is interesting that it can be placed nearby, which is suitable for both small children and older children.
Construction of sides
For the construction of the sides, you will need four bars 45 * 5 * 5 in size, four boards 150 * 30 * 2.5 in size and the same number of boards for horizontal sides. They need to be placed on top around the perimeter of the structure. Boards and beams should be carefully sanded and covered with drying oil or other antiseptic solution (for example, bitumen) in 2-3 layers. This is required to protect the wood from decay.
The bars are deepened by 15-20 cm, boards are nailed to them, then horizontal seat pads are attached. Here the children will relax or exhibit their "works".
Filling
 River or quartz sand is poured up to half the height of the sides. If you are using ordinary building sand (which is not recommended), then sift and clean it of stones and other debris. In quartz sand, substances that repel various bugs are often already added.
When buying river sand, pay attention to the quality certificate. The sand must be dust-free so that after wetting it does not turn into mud and is well molded. If such sand cannot be found, be sure to rinse any purchased material.
Protection
It is important that the wood is smooth, without knots and chips, so you need to grind it with a special nozzle on an electric drill. Wood must be carefully treated. It is better to fasten the frame of the structure not with nails so that children do not get hurt by them. The most important thing is to remember that this design is being built for children, so everything must be done competently and thoroughly.
Additional elements
A homemade sandbox can be equipped with additional functional elements.
Lid
The lid will serve as an excellent protection for the playing material - sand - from the ingress of debris and various insects into it. Thus, access to the sandbox with a lid will also be closed to pets. Possible options are:
- simple, which is removed and put in place at any time;
- cover-awning, which is stretched on the structure;
- hinged lid made from two shields. Wooden shields are necessarily supplied with handles and special hinged loops. In sliding form, they can serve as benches with backs;
- -transformer, which turns into a shelf or bench. It is convenient, practical, but will require a little more physical effort.
canopy

In the sandbox, you can provide protection from the sun.
A canopy in a children's sandbox is needed to protect the child from the scorching rays of the sun and sudden precipitation. A wooden canopy can be made in the form of an umbrella, fungus or roof. For this, a leg is installed - a beam 100 * 100 mm wide and 3 m long. A hat, umbrella or fungus is mounted on it. Often a table is installed nearby, which serves as a “working” surface for the child’s sand creations.
The canopy can be made not only from boards, but also from plastic, polyethylene, straw or reed. But still, wooden canopies are the most reliable and safe.
small house

The design with a house and a slide is suitable for older children.
Sandbox with a house - full-fledged. The house can be located next to the sandbox or above it. In the second case, you will need a ladder along which the children will climb to it. On the other hand, it is necessary to provide a slide along which it will be possible to go down directly into the sand. Of course, such designs with a house are designed for older children. For small crumbs, they will be unsafe.
benches
The role of benches can be performed by the sides of the sandbox or a sliding cover, which transforms into benches with backs. The latter option is convenient and multifunctional.
Design

A children's sandbox can be built in the form of a sailboat
Everything that fantasy tells you can be translated into reality, armed with bright colors and brushes. You can draw on the walls, sides and lid of the sandbox not only flowers and trees, but also numbers, letters and geometric figures. It will be not only colorful, but also educational for children. will change a lot.
The sandbox itself can be made in the form of a sailboat or a boat, a spaceship or a flying saucer, a turtle or any cartoon character. An interesting, truly boyish, sandbox will be a construction of wooden posts in the form of a labyrinth.
Video
Watch a video on how to make a wooden sandbox with a roof from improvised materials:
So, building a sandbox in the country with your own hands is not an easy task, but interesting. You can choose any design model, take into account the wishes of your child, and most importantly, you can involve him in business. Working on the project and design of the sandbox will help bring the family together. Such a common cause will be remembered by everyone for a long time.
When choosing the design of a small children's sandbox, it is necessary to take into account not only its direct (functional) purpose, but also pay attention to how harmoniously it will "fit" into the surrounding landscape.
The most suitable sandbox material would be plain wood. Let's look at how to make a sandbox with your own hands.
Main questions:
- what design to choose;
- how many boards will be required for its manufacture;
- how to choose the right color solution.
The design and dimensions of the sandbox for the playground
There are no special requirements for the size of children's sandboxes. If there is enough free space on the site, you can choose any dimensions convenient for you (within reason, of course). Most often I make the sandbox square, which makes it much easier preparatory work associated with cutting blanks of the same size.
Boards can have a length of 4, 5 or 6 meters with a width of about 12 cm. As for the height of the walls of the entire structure, the optimal size is about 24 cm, which corresponds to a bundle of two boards. Thus, if you have five-meter boards at your disposal, you will need eight of them to assemble the entire sandbox.
The thickness of the boards used for its manufacture is usually chosen equal to 30 mm. Blanks of such thickness provide the required strength and reliability of the structure and exclude the possibility of cracking. The depth of the sandy bulk layer used to fill the sandbox is chosen to be 15 cm.
The main stages of manufacturing a sandbox: the order of work

After all the boards are prepared, you can proceed to the construction of the frame. For bonding individual elements structures among themselves, you can use pre-prepared metal corners, fastened to the boards by means of self-tapping screws.
You can, of course, do without corners; but then half of the boards used to assemble the frame should be 6–7 mm longer. In this case, part of the prefabricated boards is attached to the ends of adjacent blanks using ordinary wood screws, which makes it possible to obtain a fairly reliable and durable frame.
In a suburban area, you will definitely need to worry about the bottom of the sandbox; and it is necessary to approach this issue with all seriousness. It is possible to protect the playground from penetration of rodents, in particular, by covering the bottom with a special agrofibre, the edges of which are fixed on the boards using a conventional furniture stapler.
Choosing a place to place the structure

When choosing a suitable place, the following considerations are taken into account:
- the place should not be open to the winds and the sun;
- the place for children's games should be clearly visible from all points of the garden, i.e. it would be "in plain sight";
- there must be a "visor".
It is best to place the sandbox under the canopy of trees or in such a way that a shadow from the nearest building falls on it for most of the day.
Concerning color solution, then it should be chosen at your personal discretion (to taste). The palette of colors should be quite diverse, as well as bright and saturated as possible. On the sides wooden frame you can apply patterns or drawings.

Here are a couple of tips:
- The shape does not have to be square at all. If you try to move away from patterns, then it is quite possible to imagine a triangular, trapezoidal and even polygonal design.
- In the sandbox itself, you can prepare some kind of labyrinths, passages and grooves in which it will be interesting for the baby to arrange outdoor games.
Video
Sandbox Photos: 14 Unusual Ideas


Schemes and drawings


In suburban areas, the question is sometimes acute - how to equip them so that young children are interested and safe to play. One solution is to make a sandbox with your own hands. The simplest structure can occupy the attention of kids for long hours.
When creating, you should take into account some rules for placing the playground:
- From the point of view of safety, children should always be visible, which means that it is better to place the sandbox in a well-visible and accessible place.
- According to hygiene requirements, the sandbox should not be under trees so that falling leaves and bird droppings do not pollute the sand.
- The direct rays of the sun for young children are more harmful than useful, so the place to play must be covered.
There are a number standard projects for children's sandboxes. As a rule, they are based on a square with sides of 2.5–3 m. To fill it, about 3 m 3 of well-sifted river sand is required. When assembling the structure, ecological materials should be used, and pine boards 25–30 mm thick are best suited here.

After choosing a place for construction, mark the perimeter. For a good foundation, it is preferable to remove the top layer of soil. Therefore, it is necessary to dig a shallow pit, about 25 cm. This could be limited, however, the sand, in contact with the ground, will quickly become contaminated and will have to be changed. The working volume of sand must be isolated from the ground, and geotextiles or agrofibres are perfect for this.
A sand cushion is poured at the bottom of our pit, which is carefully rammed, and a canvas is spread over it. Its structure is able to pass atmospheric moisture into the ground. This compares favorably with, for example, polyethylene, which will not allow water to escape, and the sandbox will be constantly wet. Geotextiles can be replaced with ordinary plywood, only it is necessary to drill drainage holes in it.

For the construction of the sides of the sandbox, you will need bars measuring 450x50x50 mm. They must be treated with an antiseptic and placed at the corners of the structure. The bars are driven into the ground at the corners by about 15 cm. These will be the support posts.
For each side of the structure, a shield of pine boards is assembled. Such a side should be about 30 cm wide. All surfaces should be well sanded so that no protruding chips and notches remain.
![]()
Also, along the perimeter of the structure, you can assemble benches on which children can sit down, put buckets or other toys. Of course, they must also be carefully aligned and even covered with paint or varnish so that the child does not risk getting a splinter.
Lid
The design can and should be improved by adding a cover to it. It will protect the sand from rain, leaves and other debris, and will also prevent animals from toileting in clean sand.

The lid will be a wooden removable shield, equipped with handles for easy lifting. Can be made in the form of doors planted on hinges.

In the simplest case, you can use an awning or a film. Such a canvas must be fixed with an elastic band or with the help of bricks, it will protect the sandbox.
Canopy or fungus

The fungus over the sandbox is great decorative element, which also serves as protection from the weather. Under it, you can wait out the rain or protect yourself from the sun's rays. Often, a table is attached to the column of the fungus, capable of performing various functions, including serving as a place to store toys.
For the legs of the fungus, you will need a bar with a section of 100x100 mm. In order for the canopy to be stable, a part of the beam, at least 1 m, must go deep into the ground. Wood should be pre-treated with an antiseptic to protect against rot and insects.
In order to make a mushroom cap, you need to build triangles from boards. FROM inside they should be nailed to the support, and on the outside they should be sheathed with thin plywood. The span of the hat is desirable about 2.5 m.
Choosing the Right Sand

River sand is usually used for children's games. The edges of its granules are polished with water and are not capable of injuring, moreover, there are almost no foreign impurities in it. If you decide to buy quartz sand, you can do it in shopping centers specializing in building materials. Any sand must first be sieved before being poured into the sandbox bowl.
Note! There is a special mixture for the playground, it is well suited for sculpting figures, since it additionally contains clay. Special fragrances are added to it, repelling animals and insects from the sandbox.
There are many different ways, allowing you to decorate the sandbox and increase its attractiveness for young children. The main thing in this case is the ability to show your imagination and are not afraid to embody ideas. And then your playground will become a favorite place for kids to play.
Video
A photo
Options for children's sandboxes:


Making a sandbox with a lid:


