Traditional fragrant pizza is cooked in a special oven. professional equipment indispensable in both large restaurants and tiny cafeterias. The range of ovens is wide, it is important to choose the one that matches the concept of the establishment and satisfies the needs of customers. Equipment differs in energy sources, capacity, method and time of pizza preparation.
Wood-fired pizza ovens
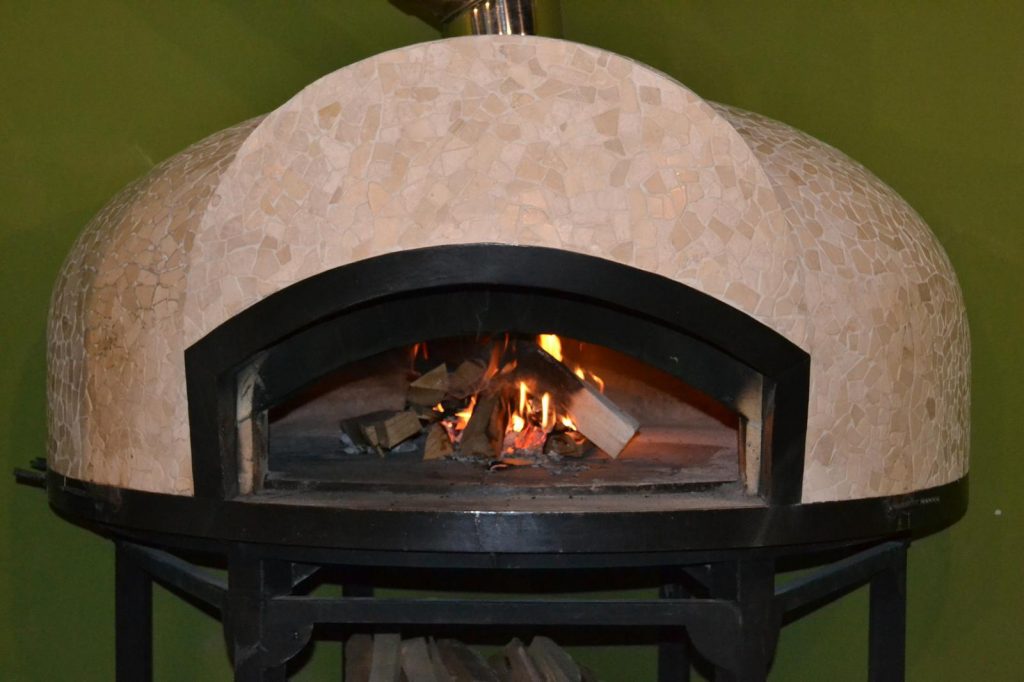
 Since time immemorial, a familiar attribute of an Italian pizzeria has been a wood-fired oven. Developers modern models applied the latest achievements of science to technologies proven over the centuries, as a result, today you have the opportunity to purchase copies of authentic samples adapted to the needs of consumers. Adherents of strict observance of the canons recognize the only method of making real pizza - over the hearth of a brick oven. Modernized technology uses different kinds fuel, including firewood.
Purpose. Traditional ovens - the best way for a pizzeria whose owner wants to get real pizzas and prefers classic ways baking.
Heat. In models of this type, three methods of heating work in parallel: contact heat transfer, convection and the effect of heat reflection from the hearth walls. The shape of the inner part of the dome creates conditions for the movement of hot air currents, the dough and filling are baked evenly from above and below. The dome and hearth are made of refractory materials.
baking conditions. The required temperature ranges from 370ºС to 540 ºС.
Energy type: wood, coal or gas. As an option, the devices can be equipped with an additional gas heating system.
Preheat duration - from ¾ hour to several hours. You can be sure that the temperature is high enough when you see that the dome has turned white. For the most part, professional models do not need visual cues for the chef, as equipped with thermometers, in addition, to measure the temperature in working area allowed to use an infrared pocket thermometer.
Baking time in a sufficiently heated oven is from one and a half to 5 minutes. The volume of the cake and toppings, as well as the number of pizzas cooked at the same time, plays a role.
Temperature recovery time. A certain amount of heat from the stone hearth is spent on cooking each pizza, but as long as the fire is maintained, the lost heat returns very quickly. It takes a few minutes after taking out - and you can bake the next batch.
Wood-burning pizza ovens in the catalog
Pizza ovens with stone hearths
 Hearth stoves are the second most popular after wood stoves, they are more economical and easier to maintain. Their distinctive feature is the presence of stone or ceramic hearths on which dough products are baked.
Purpose. Electric deck ovens are suitable for pizzerias whose owners want to get high quality pastries without investing big money in the purchase and maintenance of equipment.
heating method. The heating elements supply heat to the trays while heating the chambers. Thus, the dough is baked on a sheet, in parallel, the filling and cheese are ready. A heat-resistant glass viewing window and internal lighting allow the chef to control the process from the outside.
Baking temperature 200-350ºС, for some models maximum - 500 ºС.
Energy type. Gas can also be used to heat stone hearths, however, in the field of catering electric pizza ovens are more popular.
about 1 hour.
baking time. At 260ºС, it will take ~7 minutes to bake one pizza, a little more or less, depending on what kind of filling and what thickness of the dough.
Temperature recovery time. Baking uses the heat of the oven, so it takes some time for the oven to return to readiness. To avoid downtime during operation, make sure that the selected model fully meets the capacity requirements of your production.
Hearth pizza ovens in the catalog
Convection pizza ovens
Rising energy prices are driving restaurateurs to use it sparingly. This oven reduces energy consumption, baking time and labor costs.
Purpose. The equipment is optimal for enterprises planning to produce high-quality pizza at minimal cost, as well as for kitchens with a small area.
Heating method. From the name it is clear that these devices are equipped with convectors, thanks to which heated air circulates through the chambers.
Temperature and baking time. Convection significantly reduces energy costs due to the fact that at a temperature of 237ºС you can cook several pizzas at once in 5 minutes.
Energy type: gas and electricity.
Preheat duration is a maximum of 20 minutes.
Time to restore operating temperature: not required. Perforated shelves made of stainless steel retain heat and increase the efficiency of the machine.
Conveyor pizza ovens
 Relatively slow and at the same time highly productive way of baking. The semi-finished product passes through the chamber, being on the conveyor belt, and the finished dish comes out on the other side. This method provides an opportunity to cook not only pizza.
Purpose. Conveyor ovens are good for medium-sized pizzerias, as well as for organizing a pizza delivery service. You can also use the versatile equipment to toast sandwiches, bake fish and vegetables.
Heating way: movement of hot air masses.
Baking temperature.. The temperature range from 200ºС to 300 ºС is used.
Electric pizza ovens ITPIZZA (Italy)
Series MD and ML
ItPizza ML electric ovens are specially designed for pizza cooking, and you can also bake dishes that do not require steaming: focaccia, grissini, desserts (for example, cream caramel, biscuit and shortbread semi-finished products).
Features of ItPizza pizza ovens:- body made of high quality stainless steel
- heat-resistant glass door of the baking chamber
- internal illumination of the baking chamber
- two groups of heating elements (upper and lower) have independent adjustment
- standard control panel - mechanical; electronic panel supplied on request (option)
- the baking surface is made of refractory material (chamotte)
| Model | Buy | Qty. cameras |
Dimensions ovens, mm |
Dimensions cameras, mm |
Weight, kg |
Tmax, °C |
Nutrition, V |
power, kW |
|---|---|---|---|---|---|---|---|---|
| 1 | 585x540x258 | 360x410x80 | 32 | 350 | 230 | 1.6 | ||
| 2 | 585x540x450 | 360x410x80 | 62 | 350 | 230 | 3.2 | ||
| 1 | 1005x970x415 | 720x720x140 | 94 | 500 | 380 | 6 | ||
| Electric pizza oven ITPIZZA ML6 | 1 | 1005x1350x415 | 720x1080x140 | 122 | 500 | 400 | 9 | |
| 2 | 1005x970x745 | 720x720x140 | 149 | 500 | 380 | 12 | ||
| Electric pizza oven ITPIZZA ML66 | 2 | 1005x1350x745 | 720x1080x140 | 199 | 500 | 400 | 18 | |
| Electric pizza oven ITPIZZA ML66L | 2 | 1310x970x745 | 1080x720x140 | 194 | 500 | 400 | 18 |
MS Series
 |
 |
Features of MS series ovens:
|
| ITPIZZA MS4 | ITPIZZA MS1 | |
 |
 |
|
| ITPIZZA MS44 | ITPIZZA MS1+1 |
| Model | Buy | Qty. cameras |
Dimensions ovens, mm |
Dimensions cameras, mm |
Weight, kg |
Tmax, ºC |
Nutrition, V |
power, kW |
|---|---|---|---|---|---|---|---|---|
| 1 | 975x920x415 | 660x660x140 | 82,6 | 500 | 380 | 4.7 | ||
| 2 | 975x920x745 | 660x660x140 | 125,6 | 500 | 380 | 9.4 | ||
| 1 | 568x430x280 | 410x360x90 | 18 | 320 | 220 | 1.6 | ||
| 2 | 568x430x425 | 410x360x90 | 32 | 320 | 220 | 2.4 |
Electric pizza ovens CUPPONE (Italy)
Giotto Series
 |
|

|

| Model | Buy | Dimensions ovens, mm |
Dimensions cameras, mm |
Weight, kg |
Productivity, PC. |
Power, kW |
|---|---|---|---|---|---|---|
| 1350x1410x1670 | - | 517 | - | 13.4 | ||
| 790x1610x1940 | 1400 | 560 | 14 (∅ 30 cm) 10 (∅ 35 cm) 5 (∅ 50 cm) |
9,5 |
Tiziano series
Evolution Series
Thanks to its innovative shape, EVOLUTION stoves allow you to achieve high performance while making the most efficient use of space in a room that usually remains empty.
Exclusive to Cuppone ovens, the heat recovery system consists of two lateral ventilation pipes allowing continuous heat exchange between the bottom surface and the chamber, thus improving baking, oven recovery time and therefore energy consumption.
Thanks to the large area of the double pane made of glass-ceramic material, the operator has the best control over the entire baking process.
Donatello series
 |
|
Michelangelo series
 |
|
All models can be supplied with stand (with or without wheels) and umbrella (with or without 5 speed fan)
Tiepolo series

- Stainless steel front panel
- Panoramic glass door
- The working chamber is covered with aluminum
- Camera illumination - halogen lamp 12 V
- Separate adjustment of heating elements from below and from above
- Fixed vapor extraction from the chamber
- Cordierite refractory stones
- Mechanical control system with the ability to set the temperature of the chamber and the power ratio of 2 groups of heating elements (top and bottom) by 33% - 100%
Electric pizza ovens GAM (Italy)
GAM electric pizza ovens have a wide range of the lineup: furnaces differ in size, performance, number of chambers. Provide the required temperature, which is controlled by independent thermostats. There is air vent for couple. Pizza is baked on fireclay, which is equipped with each chamber. Most of the models have viewing windows.
Among the proposed pizza ovens, you can find both small (for small pizzerias or for heating pizza) and quite productive; in addition, for each furnace, you can choose an ideally suitable, convenient stand of the same manufacturer.
| Model | Buy | Qty cameras |
Dimensions ovens, mm |
Dimensions cameras, mm |
Power, kW |
|---|---|---|---|---|---|
| Pizza oven GAM MD1 | 1 | 585x500x258 | 360x410x80 | 1,6 | |
| Pizza oven GAM MD1+1 | 2 | 585x500x450 | 360x410x80 | 3.2 | |
| Pizza oven GAM MD4 | 1 | 1010x910x353 | 700x700x140 | 4,8 | |
| Pizza oven GAM MD4 tor | 1 | 1010x1120x430 | 670x685x145 | 4,8 | |
| Pizza oven GAM MD44 | 2 | 1010x910x708 | 700x700x140 | 9,6 | |
| Pizza oven GAM MD44 TOP | 2 | 1010x1120x770 | 700x700x140 | 9,6 | |
| Pizza oven GAM MD6 | 1 | 1010x1250x353 | 700x1050x140 | 7,2 | |
| Pizza oven GAM MD66 | 2 | 1010x1250x780 | 700x1050x140 | 14,4 | |
| Pizza oven GAM MD66 TOP | 2 | 1010x1310x740 | 700x1050x140 | 14,4 | |
| Pizza oven GAM M4 | 1 | 1010x910x350 | 700x700x140 | 4,8 | |
| Pizza oven GAM M4 TOP | 1 | 1010x1120x360 | 670x685x145 | 4,8 | |
| Pizza oven GAM M6 | 1 | 1010x1250x350 | 700x1050x140 | 7,2 | |
| Pizza oven GAM SB44 | 2 | 1010x1120x770 | 700x700x145 | 9.6 | |
| Pizza oven GAM KING 4 | 1 | 1080x1120x430 | 700×700×155 | 4.8 | |
| Pizza oven GAM KING 6G | 1 | 1080x1120x435 | 700x1050x155 | 5.6 |
Electric pizza ovens MORELLO FORNI (Italy)
 |
 |
 |
 |
| STANDARD | REGULAR DOME | MOSAIC DOME | COPPER DOME |
FRV100 E-vento is the latest model of electric pizza oven.
Suitable for any environment, thanks to its shape and unique dome design - "Palladiana" mosaic or antique-style metal cylindrical shape (option, ordered separately).
Equipped with a rotating surface with conventional heating, thanks to the patented Morello Forni system, the oven ensures the lowest baking temperature while evenly baking the product at the same time.
Artificially moving air optimizes baking and reduces costs. The refractory mass, reaching about 900 kg, and the specially designed geometry of the inner part, provide an unprecedented temperature stability. In the interval of 12 hours, the temperature drops to a minimum and quickly rises with minimal energy consumption. In just 20 minutes, an internal temperature of around 400°C is reached.
The spring-loaded door and the ergonomic grip on the handle make it easy to keep the oven open and closed. An automatic mechanism regulates and controls the air flow, which avoids heat loss when the oven door is opened. Software, completely developed by Morello Forni factory engineers using the latest technologies, provides and controls the automatic thermostatic functions of the oven. The exclusive "INTELTOUCH" control system allows you to set up various cooking programs.
Electric pizza ovens ZANOLLI (Italy)
Hearth pizza oven Zanolli POLIS
 Furnaces Zanolli Teorema Polis well suited for use in bakeries, pastry shops, pizzerias, restaurants and cafes. Modular sections can be completed in 2-3-4 tiers - this is one of the main advantages that allows you to choose best option by performance.
- Heating is made by reinforced stainless steel heating elements, with increased energy consumption next to the door to compensate for heat loss
- Large glass door for excellent thermal insulation
- Halogen lamps
- Steam release valve
- Maximum temperature 400°C
- Under furnaces in standard execution - from corrosion-proof material
- Furnaces without steam humidification, steam generator - option (issued separately)
Options:
- exhaust hood (with and without fan),
- stand without guides,
- proofing chamber,
- humidifier for the proofing chamber (required),
- steam generator for the oven (mandatory when baking bakery products),
- under the refractory stone (mandatory when baking pizza).
Pizza Conveyor Ovens SYNTHESIS

Conveyor ovens from Zanolli, designed for continuous cooking of pizzas, also allow you to quickly, simply and without taking up much space to cook various dishes such as sandwiches, lasagna, baked goods, chicken wings. Models 08/50V and 10/75V with a side window for visual process control and independent heat controls for the top and bottom surface, also equipped with stainless steel stands on wheels. The maximum temperature of these models of conveyor ovens is 320C. The baking time for one pizza is 3.5 - 4.5 minutes.
Thanks to the patented system, the hot air flow ensures even heat distribution, which prevents excessive drying of the products. Thus, pizza is baked at a lower temperature than in conventional ovens, which saves on electricity, while leaving a good result of baked products.
Conveyor pizza ovens SYNTHESIS , Eng, pdf, ~460 Kb|
|
1670x2150x590 | 800x1200x100 | 468 | 380 | 24+0,81 |
Electric pizza ovens MEC (Italy)
ML Series
ML series pizza ovens meet the highest quality standards and have a number of distinctive features:
 |
 |
|
| M.E.C. Piccolo |
MEC ML 4, ML 6, ML 9 |
|
 |
 |
|
| MEC MP-3T | MEC ML 44, ML 66, ML 99 |
| Model | Qty cameras |
Dimensions ovens, mm |
Dimensions cameras, mm |
Weight, kg |
Power, kW |
|---|---|---|---|---|---|
| 1 | 555x460x290 | 410x410x110 | 27 | 2,2 | |
| 1 | 1010x850x420 | 720x720x140 | 115 | 6 | |
| Electric pizza oven MEC ML 9 | 1 | 1370x1210x420 | 1080x1080x140 | 220 | 13,2 |
| Electric pizza oven MEC ML 6 | 1 | 1010x1210x420 | 720x1080x140 | 165 | 9 |
| Electric pizza oven MEC ML 6W | 1 | 1370x850x420 | 1080x720x140 | 175 | 9 |
| 2 | 780x600x530 | 410x410x110 | 78,5 | 6 | |
| 2 | 1010x850x750 | 720x720x140 | 200 | 12 | |
| Electric pizza oven MEC ML 66 | 2 | 1010x1210x750 | 720x1080x140 | 300 | 18 |
| Electric pizza oven MEC ML 99 | 2 | 1370x1210x750 | 1080x1080x140 | 400 | 24,6 |
| Electric pizza oven MEC ML 66W | 2 | 1370x850x750 | 1080x720x140 | 320 | 18 |
SMART Series
 |
 |
Electric ovens for pizza SMART provide uniform heating and maintenance of the set temperature in the working chamber. The oven walls are thermally insulated. The camera has a built-in light. The frying surface is made of refractory material certified for foodstuffs. |
| MEC SMART 4, 6 |
MEC SMART 44, 66 |
| Model | Dimensions ovens, mm |
Dimensions cameras, mm |
Weight, kg |
Power, kW |
Peculiarities |
|---|---|---|---|---|---|
| Electric pizza oven MEC SMART 4 | 980x880x420 | 660x660x150 | 88 | 4,5 | number of cameras - 1 |
| Electric pizza oven MEC SMART 6 | 980x1160x420 | 660x990x150 | 115 | 6,8 | |
| Electric pizza oven MEC SMART 44 | 980x880x750 | 660x660x150 | 152 | 9 | stainless steel coating steel, interior lighting, number of cameras - 2 |
| Electric pizza oven MEC SMART 66 | 980x1160x420 | 660x990x150 | 218 | 13,6 |
Recently, the popularity of the so-called "Pompeian oven" or pizza oven has been growing, as it is very easy to do it yourself. We use this oven not only for baking pizza, but also for homemade bread. In addition, it can make various dishes, pastries, meat dishes.
The design of the oven is such that it warms up to the desired temperature very quickly, faster than a Russian oven. And it keeps warm for a long time. You can bake in it using different modes: cooking during the heating period of the oven, cooking with active burning of firewood, as well as using residual heat.

Pompeii stove and its place in our life
The most common place for its placement is in the garden, in the open air. Such a stove can be placed separately or be part of a barbecue garden complex. In combination with a gazebo, the stove becomes a beautiful element of the landscape and a favorite place for family and friends to relax. By applying various types of stove decoration, you can get a stylish decoration for a homestead plot.

Despite the fact that the pizza oven is mainly considered as an option for placement on the site of a country house or cottage, it can also be installed indoors by making an appropriate foundation for it and the correct chimney. But now we will consider classic version Pompeii oven outdoors. The construction of such a furnace is quite realistic in our conditions, because. All materials are sold in hardware stores.
It should be said right away that the construction of such a furnace is not a quick, labor-intensive, and expensive business. But those who love fresh homemade cakes cooked in an authentic home oven are ready to work hard to have such an oven. And there are more and more such enthusiasts, and they are very pleased with the results of their work. 'Cause they get delicious homebaked bread, real pizza and a real home, around which it is always pleasant to spend time in sincere company. And if you carefully study the instructions, then the construction of the Pompeian oven turns out to be not so difficult. In addition, this process is creative and will bring a lot of pleasure, both in the process of the work itself and in the process of “reaping” its fruits.

Technical and financial side of the issue
The rather high cost of such a furnace is due to several factors. The first is that it is made of refractory bricks and this brick is more expensive. But the point is not only the cost of the refractory materials themselves, but the fact that the brick structure has a lot of weight. In order to make it convenient to use the stove, it should be at a height of 80-100 cm. And for this, it is necessary to make a stand on which the stove will be installed. At the same time, the design of this stand turns out to be quite massive, because. it must support the weight of the oven. And at the end of everything, an appropriate foundation is needed for such a massive structure.
But the stand and foundation can be made of any materials. Usually, during construction and repair, there is always a large amount of unclaimed materials and residues (blocks, bricks, rebar, rolled metal, boards, the same cement), perhaps friends and neighbors have them and they don’t know where to put them. Thus, using the leftover materials for the construction of the foundation and stand, you can reduce costs.

Another negative factor is the duration of the furnace construction process. The whole design of the stove consists of the following components: foundation, pedestal, countertop, stove itself. The foundation and countertop will be made in the form of a monolithic reinforced concrete slab. To set and harden concrete, you will have to take technological breaks for at least 5-7 days, and preferably even longer. But, on the other hand, those who come to the site for the weekend can even find a certain advantage in this and engage in construction in stages. You can even prepare a foundation or foundation with a pedestal and countertop in one season, and continue building the stove itself the next summer. Thus, it is possible to divide the financial investments into different periods. In addition, the foundation that has stood for the winter will show whether it was correctly made, and the defects that have appeared can be corrected before the laying of the stove begins. This applies to areas with unfavorable conditions for soils and groundwater levels.
It is important to choose the right time for laying the furnace itself. It is advisable to do this in the dry season so that the brick does not stretch excess moisture, and the furnace was easier to prepare for thermal operation in the future. During work, it is better to build a canopy over the site, or at least do not forget to cover the oven with foil after work.
How is the Pompeii oven
The Pompeian oven differs in its structure from. They say that it resembles the structure of an ancient Slavic oven. In any case, it has one definite advantage over the Russian oven - it heats up much faster and you can start cooking pizza in it already in the first hour of heating, which is very convenient. This is achieved due to the fact that the Pompeian stove has a less massive thermal mass (a layer of brick that must heat up and give off heat for cooking). In this oven, the layer of heating brick is 12 cm, and it warms up quickly and makes it possible to start baking pizza an hour after the start of the furnace. In 45 minutes, the temperature in the oven rises to 260 degrees, and to 370 after 60 minutes.

Structural scheme
The traditional Pompeian oven consists of the following structural elements:
- foundation;
- stand for the oven, consisting of a pedestal and countertop;
- bake.
The oven itself consists of the following parts:
- under (bottom or floor of the furnace);
- vault (dome);
- entrance arch;
- chimney.

The chimney at the Pompeian stove is in front, in front of the stove itself. In this it differs significantly from many other stoves and fireplaces. This is an important element for correct operation ovens. The flame of fire rises up along the dome, enveloping and heating the ceiling of the vault. Thus, the heating effect of cooking pizza is achieved both from above and below at the same time, heat is obtained from all sides.
The size and shape of the oven
The Pompeian oven has varieties. There is the so-called Tuscan type of oven and Neapolitan. The Tuscan type has a higher vault, while the Neapolitan type has a lower one, the Tuscan type of oven vault is more versatile, and the Neapolitan type is good if you are making this oven for pizza - this form is suitable for baking pizza a little more. Also, not all stoves must have a chimney; you can do without it.

The Neapolitan oven has a lower vault
Since many of us make this oven for baking bread, the Tuscan version with a round arch is more suitable for us.

The Tuscan type of stove has a round vault
As mentioned above, the size of the furnace can significantly affect the cost of the structure. The smaller it is, the lighter and cheaper it is, respectively. But there are certain sizes, smaller than which it is not effective to make a pizza oven. The most optimal size is the size of the inner diameter equal to 80-110 cm.
There are also rules that must be observed, tk. if these rules are followed, a furnace with the correct mode of operation is obtained. The oven consists of a spherical vault and an arched entrance for laying firewood into the oven and the pizza itself. The height of this arch is equal to 60% of the height of the dome (or 0.6 of the radius of the dome). The width of the entrance arch is approximately equal to the height of the furnace dome.
The vault of the Pompeian oven is multi-layered. It consists of the following layers:
- inner layer of refractory bricks;
- clay coating;
- the first heat-insulating layer of mineral or basalt wool;
- the second heat-insulating layer of perlite;
- covering protective layer from cement mortar.
The thickness of each heat-insulating layer can be made equal to 5-10 centimeters. Accordingly, the thicker the heat-insulating layer, the longer the oven retains heat.
The top layer serves to protect the stove from atmospheric action and can therefore be made using any protective and moisture-repellent materials. It is also a decorative layer. You can decorate the oven to your taste. It could be decorative plaster, painting or mosaic.

Materials for laying a wood-fired pizza oven
Refractory materials are used for laying the Pompeian oven: fireclay or oven bricks and oven masonry mortar. You can prepare the masonry mortar yourself from clay with the addition of fireclay or buy ready-made mixtures in the store. It is better not to use cement mortar with the addition of special additives, because. he behaves worse when laying and then leaves marks on it that are poorly washed off, which is completely unacceptable inside the furnace. The best thing is to buy a ready-made mortar - a special masonry mortar for furnaces. For such a stove, SHA-28 is suitable. It can be easily removed from the masonry surface without any traces. Another thing is that when laying a sphere of almost square bricks with outer side rather wide seams are formed, which are filled with mortar. And it is important that this solution is special refractory for laying furnaces, which does not crack at high temperatures.
Buying fireclay brick for masonry, you need to take a brick for laying the inner surface of the furnaces. You do not need to take the front or for the outside, because. all bricks will be inside the kiln and additional properties kiln brick, intended for outdoor masonry, will not be in demand here, and such a brick is more expensive. From facing brick you can lay out the outer entrance arch, if required by design. But this is not necessary, the temperature in the entrance arch is not so high and therefore nothing will happen to the brick, and the same internal fireclay brick can be used for the entrance arch.

To build a Pompeian oven with your own hands, you will need:
- fireclay bricks - for laying the hearth and arch of the furnace;
- mortar - mortar for laying furnaces;
- basalt or mineral wool - for warming the roof of the furnace;
- perlite - for warming the roof of the furnace and thermal insulation of the hearth from the countertop;
- reinforcing mesh or wire for reinforcing the roof of the furnace;
- reinforcement and reinforcing mesh for reinforcing countertops and foundations;
- metal profiles (beams, corner, pipe), if any are used in the structure;
- chimney pipe;
- formwork boards;
- polyethylene film for formwork and covering of slabs and ovens;
- boards and bars for props;
- brick or other concrete blocks for the podium;
- cement M500 for pouring the foundation and countertops;
- sand for preparing concrete for pouring;
Tools and fixtures:
- grinder with discs for cutting stone;
- or electric water-cooled tile cutter;
- concrete mixer;
- or a drill with a whisk for mixing the solution;
- hammer;
- chisel;
- mallet (rubber mallet);
- saw;
- protective glasses;
- respirator;
- gloves;
- other tools.

Instructions: making a wood-fired Pompeii pizza oven with your own hands
Options for building a Pompeian oven may differ, because. it depends on the design solution available materials and oven sizes. The instructions will give general recommendations and workflow for the construction of a traditional Pompeii oven.
Consider an example of building a Pompeian oven with your own hands with such basic parameters.
Foundation. The foundation is in the form of a monolithic reinforced concrete slab, 100-200 mm thick.
Stand for oven. The material from which the pedestal is being built is cinder blocks, the size of the cinder blocks is 200x200x400mm. The size of the pedestal in terms of 1200x1200mm. The height of the pedestal is 800mm. The thickness of the monolithic reinforced concrete slab of the tabletop is 100mm. The heat-insulating layer between the stand under the stove and the stove itself is made of fireclay bricks.
Bake. The size of the inner diameter is 840mm. Accordingly, the height of the dome vault inside is 420mm. The first layer of thermal insulation is mineral wool - 2 layers. Second layer of insulation cement mortar with the addition of perlite. Perlite can be replaced with vermiculite or expanded clay.
The whole process is conditionally divided into two stages:
Stage 2 - the manufacture of the furnace.

Stage 1. Construction of the stand for the oven.
Step 1. Foundation device. In the place planned for the stove, a hole is dug with a size of 1500x1500mm (100-150mm wider than the size of the pedestal on each side) and a depth of 350mm.

The bottom of the pit is compacted with crushed stone and a sand cushion 200 mm thick is made. Formwork is assembled from the boards. For ease of filling concrete mix a plastic film is laid on the sand.

A reinforcing mesh of rods with a thickness of 8 (12) mm is laid on it. It is necessary to place small supports under the reinforcement so that there is a clearance of 3-5 cm to create a layer of concrete under the reinforcement. The formwork is poured with concrete. The top of the foundation slab is leveled, checked for level. The concrete is wetted with water, covered with a film and left to harden and set for 5-7-10 days.

Step 2. The device of the pedestal. After the concrete has hardened, you can begin to build a stand for the furnace. In this case, it is made of cinder blocks.

We set the blocks with the letter "H". The plan should be a square with sides of 1200mm (3 blocks each 400mm long). The shape of the pedestal in plan can also be in the form of the letter "P". It depends on your decision.

But the advantage of the letter "H" is that the middle wall serves as an additional support for the furnace and thus the load from it is transferred to all structures more or less evenly.
Blocks are placed dry. After installation, the evenness and verticality of their installation is checked. Reinforcement is inserted into the holes so that the blocks do not move when pouring concrete. We fill the holes through one with concrete. After that, you need to let the structure stand for a couple of days to set the concrete.

Step 3. Installation of a monolithic reinforced concrete countertop. Formwork is being made for the countertop. In order for the tabletop to turn out right size 1400x1200mm in front, the formwork must be made 200mm longer. Tabletop height 100mm. Moisture-resistant plywood or boards covered with polyethylene can serve as the bottom of the formwork.

Inside, the reinforcement is laid out again on coasters with a gap of 3-5 cm.

In parts where the countertop extends beyond the pedestal, make additional reinforcement.

The formwork is poured with concrete, the surface is leveled, its horizontalness is checked. Next, the countertop is poured with water, covered with a film and left for several days (5-7-10) for the concrete to harden.

This completes the stage of creating a stand for a wood-burning stove.
Pizza oven masonry is discussed in the sequel.
Useful video
Continuation.
The construction of a traditional Pompeian oven is a lengthy process and requires compliance with the sequence of work and maintaining the necessary intervals so that the supporting structures gain the necessary strength. The whole process is conditionally divided into two stages:
- Stage 1 - construction of a stand for the furnace;
- Stage 2 - manufacture of the furnace

Furnace masonry
After the stand for the furnace is built, you need to wait until its supporting structures acquire the necessary strength. A monolithic ceiling, which is also a countertop, must stand for at least 2-3 weeks before the stove can be laid out on it, because. the weight of the furnace is large enough and it is not recommended to install it on damp structures. If the countertop subsequently cracks, then the oven may also crack, because in fact the countertop is the foundation for the oven. Therefore, it does not build to risk the efforts and finances spent on creating the furnace.

Stage 2. Furnace production.
Step 4. The device of a thermally insulating layer between the countertop and the oven and the device of the hearth. The device of a thermally insulating layer between the stand and the oven is necessary in order to cut off the spread of high temperature from the oven along the stand structures and thus save heat in the oven and avoid heat losses. This important point in the construction of the furnace and is required for implementation. Under - this is the brick bottom of the furnace.
Method 1. A cut-off heat-insulating layer can only be made under the furnace contour. This is the most correct option.
As a thermal insulation layer, use special calcium silicate insulating boards (Super Isol, Silca type) or other similar ones in terms of characteristics.
First, a preliminary layout is made on the countertop (without gluing to the solution) and cutting sheets of thermal insulation and a hearth.


Heat-insulating plates are laid out on the countertop. According to the template, the full contour of the furnace, including the entrance arch, is applied to them. The contour of the furnace is applied along its outer diameter, taking into account all layers of insulation. Sheets of insulation are cut out.

We prepare bricks for the hearth. Since the under is the future working surface of the oven, on which pizza and bread will be baked, the under is laid out from refractory (fireclay bricks). To do this, select right amount the most even and smooth bricks, so that the surface of the bottom of the furnace is as even and smooth as possible. Bricks are laid out on the countertop. It is recommended to lay out the bricks in a zigzag pattern so that there are no transverse seams that a shovel can then cling to. Using a template, the outer contour of the furnace is applied to them. The bricks are numbered so that later they can be laid out in the same order. Brick cutting in progress.

After that, you need to once again lay out the sheets of insulation on the countertop, lay the bricks of the hearth on top and make sure that all the elements of the insulation and hearth are cut correctly. Now you can glue the insulation on a thin layer of mortar (you can use any, cement or mortar). Next, the bricks of the hearth are laid out on the mortar. Thermal insulation and under the furnace are ready.
This is the most common way to build a hearth and insulate it. But it has a significant drawback: calcium silicate boards are materials for industrial production ovens. This material is very good performance, but at the same time it has a rather high price. In addition, it is not always and everywhere possible to purchase a small amount of this material.
Therefore, thermal insulation can be performed in other ways.
Method 2. Pouring a thermally insulating solution of perlite sand into a specially made hole in a monolithic countertop slab. To do this, first pour monolithic slab half height (100mm). Then they lay out a template for the plan of the furnace and formwork is made along its contour.

The next layer of concrete is poured around the template, another 80-100mm. After the concrete has hardened, the template and formwork are removed.

The resulting cavity is filled with a heat-insulating mixture of perlite sand or expanded clay and cement.

Method 3. Thermal insulation layer of perlite and refractory bricks under the furnace in a monolithic tabletop. This method is a variation of the previous one. The difference is that first a thermal insulation layer is made of perlite (vermiculite) and under, and then they are poured into a monolithic countertop.

In this case, first, formwork is laid out on the tabletop corresponding to the outer contour of the furnace. A solution with perlite sand is poured into it.

The bricks of the hearth cut out according to the template are laid on top.

An insulating material is laid along the ends of the hearth (maybe a layer of perlite, a width of 5-7 centimeters).

Formwork is being done.


Step 5. Laying the 1st row of the furnace. A circle is cut out of plywood equal to the inner diameter of the furnace. It is laid out on the floor. Around this template, the bricks of the first row will be laid out. In order to later remove this template from the finished oven, it is pre-cut into 2-3 segments.

In the center of the circle, a device is fixed on a hinged support to control the correct laying. With this articulated arm, it will be convenient to control the spherical shape of the inner vault of the dome and also to maintain the glued brick in the desired position.

The device is a wooden block, with the help of a hinged device, attached in the center of the circle. But he already has many options for execution.

The thickness of the masonry arch of the furnace is 12 cm, so the masonry of the dome is done with halves of bricks. To do this, the brick must be cut in half (using a grinder, tile cutter or chisel with a hammer).
We lay out the bricks that will mark the edges of the entrance arch. From them we begin to lay out the bricks of the first row. The flat factory surface of the brick should look inside the vault, as this place will then be visible from inside the furnace. Bricks should be laid on mortar for laying furnaces (mortar). The distance between bricks should be minimal. It is recommended that you first lay out the first two rows dry to determine exactly the right number of bricks.
Step 6. The inlet of the vault. The inlet is made in the form of an arch. To perform it correctly, a template is first prepared. Two blanks are cut out of plywood in the shape of a future arch. The blanks are interconnected into blocks so that a stable template is obtained, on which the bricks of the arch will be laid out.

We remind you that the height of the entrance arch should be 60% of the height of the dome, which in turn is equal to the radius of the circle. The width of the entrance arch should correspond to the height of the dome, or even be less than it for stoves with a large diameter.
But for small stoves, the inlet needs to be adjusted with such a concept as ease of use. A shovel will be inserted into this hole, on which pizza is laid in the oven.

Firewood is also laid through this hole and ash is removed. Therefore, it should be of such a width that it is convenient to do these manipulations. In this case, it is proposed to make the width of the inlet 530mm.
On the established template and lay out the bricks of the arch. Spacer wedges are installed between the bricks to fix the brick while the mortar is setting.

Step 7. Laying the next rows. A masonry mortar is applied to the lower and side parts of the half of the bricks and the bricks are laid in the next row. They start a row with extreme bricks, which are located near the entrance arch.

When laying in the next rows, it is necessary to shift the bricks relative to the arcs of the other vertically in order to avoid through vertical seams. The brick is placed with the smooth face facing inward. The bricks are laid as close together as possible so that the seams are minimal. To check the correctness of the spherical shape of the masonry, we control it with the help of an articulated lever.

In the higher rows, when the masonry is rounded, the bricks are laid at an angle to the lower row. Ideally, these bricks should be sawn at an angle. But this is too complicated and you can do without filing. It is necessary to put fixing wedges in the resulting expanded seams. These wedges can be made from scraps and broken bricks.

In places where the dome adjoins the entrance arch, the bricks should be wedge-shaped. For a better pairing of the dome with the arch, the extreme bricks of the row must be cut.

Step 8. Completion of the masonry of the dome. Laying the very top of the dome is a rather troublesome task. You can support the bricks from below with blocks.

The mortar, diluted to the correct consistency, copes well with gluing bricks, quickly adheres to the masonry and fixes the brick well. So at this stage it is important to have a properly made solution.

If the brick is too dry and quickly draws moisture out of the solution, then you need to dip it in water for a few minutes before laying.
The process of laying the dome can make it easier to use different patterns. Templates are made of plywood or chipboard. The most important thing in the manufacture of templates is to provide for the possibility of disassembling them so that they can be easily removed from the stove through the entrance arch.
Cell template.

Template made from stationary segments.

This template is made from cardboard.
Weather vane template from a rotating segment. Segments can be made 2-3 pieces. The segment is attached with screws to the embedded part, which rotates around the axis. For better stability of the axis, it can be attached to the plywood base using a threaded connection.

But if the template was not originally made, and there were problems when laying the last rows of the dome, then you can proceed as follows. In the center of the wood stove, make a stand of bricks of the desired height (approximately to the level of the existing masonry). Put a sheet of plywood on the bricks (from 2 parts, so that it would be convenient to remove it later), put a bowl on the plywood right size upside down (dome). From above, make a spherical surface of the desired shape from wet sand.

It will serve as a template for laying the last rows of bricks. After the mortar has set, the retaining structures are removed.
Thus, with the help of not tricky devices, you can cope with the construction of the dome.

Step 9. External entrance arch. Now it's time to make the outer entrance arch. The outer entrance arch should be wider than the inner one. This is necessary in order to form the correct door porch.

It is not necessary to make a door in the pizza oven, because. pizza is baked on an open fire. But for making bread, residual heat is used and a door is required.
A plywood template of the desired width and height is made. In this case, with a radius of 325mm.

An arched vault is laid out according to the template. At the top, leave a hole for the chimney. The hole must match in shape and size with the prepared chimney.

Step 10. Installing the chimney. The chimney is installed in the place intended for it and fixed with masonry mortar. The design of the chimney may be different.

It can be made of special metal or ceramic pipes. It can be made of a metal box made of galvanized or stainless steel, followed by coating with masonry (or clay) mortar.

You can make a chimney from the same refractory brick. It all depends on the design and available materials. Chimney height varies. For an open outdoor oven, it may be low. For a stove located under a canopy, it should be higher so that the smoke does not go into the eyes of those present, or even try to bring it out of the canopy or gazebo. Since the height of the pipe affects the draft, it must be sufficient to create good draft in the furnace. You may have to experiment with the height and width of the chimney in the future. But for small stoves in open space, you can make a low pipe.

After completion of masonry work, it is necessary to carefully seal all external seams with masonry mortar. The entire wood-burning stove can be coated with a layer of refractory clay (with the addition of fireclay sand) to store heat and create a flat surface before laying the next layers of insulation.

Step 11. Preheating and drying the oven. After the laying of the furnace is completed, the furnace must be dried and begin to prepare it for temperature regime operation.

If you sharply make a strong fire in the oven, the brick may crack. It is necessary to prepare the stove for an open fire gradually, starting with a small number of branches. It will take some time to "fire" the oven. It is advisable to do this within a few days (4-7 days). In this case, the brick is dried before starting to insulate the dome.

Step 12. Furnace insulation. After drying the furnace, the process of creating the heat-insulating shell of the furnace can begin. The stove is wrapped with the first layer of insulation - mineral or basalt wool.

For an even greater thermal insulation effect, a thin layer of aluminum foil can be laid, but not necessary. A reinforcing mesh is placed on top. Instead of a grid, you can tie the oven with wire. The warming layer of cotton can be 5-10 cm.

On top we impose a second heat-insulating layer. It consists of a solution of cement with perlite sand. The solution is prepared at the rate of 5-7 parts of perlite per 1 part of cement. Perlite can be replaced with vermiculite.
When working with perlite sand, be sure to wear protective equipment: goggles, a respirator, gloves. Perlite is very dusty, and getting it into the respiratory tract and eyes is highly undesirable, because. perlite is actually ground pumice, and this dust can be very harmful to health.

Step 13. Completion. When the solution of perlite insulation dries, you can proceed to the final finishing of the furnace. The surface layer can be made of clay or cement-plaster mortar.

If the stove is in the open air, then it is desirable to cover the top layer with a moisture-proof material. Depending on the design, the furnace dome, entrance arch, countertop and pedestal can be finished with various decorative materials: mosaics, tiles, facing bricks.

Now you can test your Pompeii oven for the first time and make a real pizza.

Useful video
We also recommend you:
An electric pizza oven is different from a conventional one. The special design ensures uniform and complete baking of the product. It must be taken into account that, unlike a regular pie, pizza requires the highest possible temperature and a short time. Normally, it is 3-5 minutes and the temperature is 300-450 degrees.
The electric pizza oven is a design with an oven (chambers) optimally adapted for baking pizza. The chamber contains a pallet or a special hearth stone that allows you to use more high temperature(some models can be heated up to 450-500 degrees using heating elements on both sides of the stone).
An example of an electric pizza oven
Advantages and disadvantages
Electric models are the best operational properties, they are more convenient to use, are more economical.
Of the benefits electrical structures it should be noted:
- high performance;
- availability of extended functionality;
- the ability to fine-tune the cooking time;
- the presence of heating elements in the upper part of the structure;
- compact dimensions.
Of the minuses, it is worth noting:
- high cost of construction;
- the need for wiring with the required power.

Expert opinion
Pavel Kruglov
Baker with 25 years of experience
For cafes and pizzerias, they are also most often used electrical models providing greater performance. But in some cases, wood-burning ones are used, which are considered more “natural” for the manufacture of such a product than gas or electric ones.
Purpose of the furnace
An electric pizza oven can vary in purpose, compact models are used for home use, large-sized and high-performance ones are used for catering establishments, pizzerias, and small cafes. The functionality of such ovens is almost the same, but parameters such as power, performance, number of ovens, and additional functions differ.
For home
Household models differ more compact size and reduced performance. Usually these are models for baking only one pizza at a time, the operation is simple and convenient. Some furnaces are equipped with electronic control systems, pre-installed programs.
4-5 minutes are enough for baking, heating can be 300-500 degrees, it all depends on the model and type of oven. Some models can be used for baking other baked goods, reheating ready meals, roasting meat or dishes.

Mini oven
Industrial
Industrial models are different from household ones, they are designed to cook pizza in large volumes. Most often, these are powerful conveyor ovens that allow you to bake from 12 pizzas per hour. The functionality is expanded, most often such furnaces are equipped with additional features, including the preparation of other dishes, fine-tuning of modes, setting the speed of movement of pallets.

professional oven
The sizes of such ovens are large, many of them are designed for floor placement, but there are also desktop ovens. Many of them are electric, available in operation, control is most often electronic (button or touch), but there are models with simple mechanical controls.
Why do you need an electric pizza oven?
For homeFor business
How to choose?
When choosing an electric pizza oven, you need to pay attention to the type of construction that can be equipped with a hearth stone or a conveyor (tunnel or disk).
Classic conveyor units provide excellent cooking results without the need for special experience. With the help of such ovens, you can cook not only pizza, but also other products; many models are equipped with electronic controls with installed programs for setting the required mode. The power of the equipment is 15-30 kW (for household models it is much lower), the baking temperature is on average 300-350 degrees, the cooking time is 3-5 minutes.
When choosing a device for baking, you must immediately decide on the following parameters:
- type (industrial or for domestic use);
- power;
- performance;
- cooking temperature, the presence of a temperature change controller;
- the presence of a regulator of baking time;
- the presence of extended functionality, the possibility of baking other products;
- the presence of a glass door for visual control of cooking.
When choosing hearth ovens, you need to pay attention to the following parameters:
- number of ovens;
- type of stone (natural or special ceramics);
- temperature level (the standard value is 450-500 degrees);
- the presence of mechanical or electronic control of temperature and heating time;
- furnace power;
- performance.
Overview of popular models
When choosing an electric pizza oven, it is recommended to pay attention to performance, control type, design dimensions, which will make it possible to select the model as accurately as possible. Among the most popular pizza ovens are the following:
| Model | Specifications | Performance | Price |
| EDMP-2 KP mini | Mini-oven for the home, power 2 kW, there is a chamber with two trays, mechanical adjustment, maximum temperature 350 degrees, a hearth stone is used for cooking | Simultaneous cooking of two pizzas with a diameter of 32 cm, cooking time 5-7 minutes | From 23 thousand rubles |
| EDMP-1 KP | Hearth single-chamber design, power 3.4 kW, mechanical control | Preparation of one pizza with a diameter of 32 cm, cooking time 5-10 minutes | From 16 thousand rubles |
| EDMP-1 KP (2 sections) | Hearth two-chamber modification, power 6.8 kW, mechanical control | Preparation of two pizzas with a diameter of 32 cm, cooking time 5-10 minutes | From 33 thousand rubles |
| Apach AMS1 ECO | Household model with a power of 1.75 kW, a maximum temperature of 350 degrees, mechanical control | Cooking only one pizza at a time | — |
| ITPIZZA MD1 | The oven for use in public catering, has mechanical control, doors with quartz glass, chambers with illumination, (there are models with electronic control) | Simultaneous cooking of two pizzas | — |
| Gastrorag EPZ-04 | Compact portable oven with timer and mechanical control, mesh tray, maximum temperature 300 degrees | Mesh tray, cooking only one pizza at a time. | — |
Features of care and operation
Caring for ovens is very simple, but be aware of the presence of crumbs and residues of other products. After each use, the oven is cleaned, the trays must be washed and dried. Some designs are equipped with easily removable crumb trays, dismantled doors and removable glass, which facilitates the operation of the oven.
The use of any model of the oven is also not difficult, if there is a mechanical control, you just need to set the temperature and other parameters using the knobs for this. Electronic control provides great functionality, here you can set an individual temperature, baking time.
Some models can be used for cooking other products, for which various pre-installed programs are available, which are controlled using a convenient panel.
Today, pizza is in great demand both in small eateries and in expensive restaurants. But if you decide to cook this delicacy on your own, and not even in a conventional oven, but in your own hand-made oven on suburban area then this article is for you.
After all, not everyone knows that real pizza is cooked in a special wood-fired oven at a high temperature. What is a real pizza oven and what materials it is built from, I will tell in this interesting article. Having a Pompeian oven at home or in the country, you can always please yourself and your loved ones with great dishes.
Pizza is one of the most famous culinary dishes in the world.
Its history begins around the seventeenth century, at which time special chefs appear who prepare a culinary dish for peasants in Italy. Subsequently, the dish received the status national dish Italy.
Today in every city you can find several pizzerias that attract with a wide variety of recipes with an incredibly large range of all kinds of ingredients and toppings.
As a rule, the entire cooking process takes place in front of visitors, which has a positive effect on the process of waiting for a fragrant dish and encourages visitors to buy fragrant pizza. Therefore, furnaces are indispensable equipment.
![]()
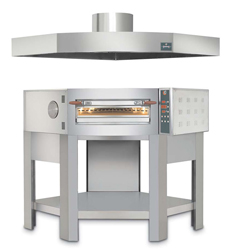
Pizza oven is a highly professional heating equipment used by restaurants Italian cuisine, pizzerias, fast food pizza outlets.
Despite its narrowly focused name, it is widely used for baking bakery products, frying eggs, and bringing semi-finished products to readiness.
A feature of this type of equipment is a stone tray that accumulates heat and maintains a constant high temperature (up to +500 ° C) inside the chamber. On this hearth, the process of cooking pizza takes place directly, which takes no more than 7 minutes.

Pizza ovens can be broken down into two main categories:
- Home. Used in everyday life, designed to meet family needs;
- Professional. It is used in catering establishments. Differs in the increased productivity, complexity of a design and high cost. They are designed for the possibility of simultaneous preparation of several pizzas at once.

The standard equipment of the furnace includes:
- an oven that can hold up to four pancakes of standard sizes;
- regulator of the intensity of heat flows with a temperature in the range of 100-500°C;
- safety thermostat that turns off all heating elements if there is a possibility of overheating.
Doors with a viewing window made of tempered glass, and internal lighting allow you to keep an eye on the cooking process and control its readiness. The presence of a thermometer will provide an opportunity to accurately set the temperature inside the chamber. Units are made partially of stainless and galvanized steel.

Pizza ovens are currently used in such establishments as:
- canteens;
- restaurants;
- bakeries;
- Cafe.
Furnace selection - not an easy task requiring several important factors to be taken into account.
If you rely on the originality and authenticity of the product produced, then best solution will be wood-burning brick.
This equipment came to us from antiquity. It provides the preparation of pizza with the highest taste and excellent aroma.
Hearth and conveyor ovens allow you to cook a mass product, but have a higher productivity than their wood-burning counterpart.
The choice of equipment is also influenced by the capacity of the device, its overall dimensions, the type of power supply (electricity, gas, firewood), the number of cameras, and, of course, the cost.
First of all, in order to choose the right pizza oven, it is worth understanding why it is still needed.
Of course, in the primary version, it is clear why, of course, in order to bake pizza.
But as you already hope you understood, you can bake it in different ways, and as a result, you will end up with a different taste of the prepared pizza.
So if your establishment will have seats, but will work for visitors, you will have a large bar counter, and you want to additionally make pizza baking in the oven an element of the surroundings, then this is definitely a wood-fired pizza oven.
With what thanks different sizes wood stoves for pizza, you can choose perfect option just for your establishment.
Pizza deck ovens, unlike conveyor ovens, cost significantly less, so they can be recommended as an initial option for a small pizzeria or pizza delivery.
Conveyor pizza ovens can be recommended if the budget is not very limited, and it is also planned to recruit unqualified personnel to work, since baking in pizza conveyor ovens is the simplest and does not require any professional knowledge and skills.
Types of pizza ovens

According to the principle of operation, all units are divided into three types:
- Compact dimensions;
- Low power consumption;
- Possibility to choose a certain chamber volume for a specific pizza size;
- Affordable cost;
- There is insufficient thickness of the lining of the chamber and the hearth, which affects the quality of baking (burns);
- Low level of thermal protection.
Wood-fired - today only expensive restaurants can afford it.
Other enterprises use them, as a rule, only as advertising, because of the high cost and complexity in operation.

Conveyor - the principle of operation is that the test base moves along the conveyor inside the chamber, evenly baking, and exits from the other side of the apparatus.
Such installations are designed for a large flow of customers.
The essence of the work of conveyor ovens is the movement of pizza through it with the help of a conveyor through the working chamber. The dish is prepared in the short time (from 3 to 5 minutes) that it is on the conveyor due to the operation of heating elements. The probability of burning pizza in a conveyor oven is minimal. Power consumption reaches about 30 kW, working temperature lies in the range from 300 to 350 C, weight reaches up to 500 kg.
More expensive models are equipped with a system that controls the uniform distribution of hot air flows throughout the working chamber.
Conveyor ovens are designed for the continuous cooking of pizzas and many other pastries from dough and toppings, as well as various gastronomic dishes (pies, sandwiches, snacks, meats, etc.).
The bodies of the furnaces are made of stainless steel, there are wheels for ease of use, and the degree of heating of the lower and upper surfaces of the furnace is independently adjustable.

Varieties of pizza conveyor ovens:
By type of food:
- gas;
- electrical.

By installation method:
- floor;
- desktop.

Advantages:
- Uniformity of baking;
- High performance equipment.
Flaws:
- High power consumption;
- high cost;
- Big sizes.
Hearth - take up little space in the kitchen and are considered the most cost-effective.
These ovens are more economical to use and have more compact overall dimensions.
The principle of operation of such an oven is to bake pizza on a stone or cast-iron surface, which is located under the chamber. Cooking time for pizza in a deck oven is about 5 minutes.
The operating temperature of hearth ovens is somewhat higher and ranges from 400 to 500 C. Hearth ovens are cheaper than conveyor ovens, but more difficult to operate and maintain.

Hearth pizza ovens are very similar to wood-burning ones - according to the cooking technology, as the dough is placed on a hot hearth.
But in hearth furnaces, it is made of stone, and they work from a tubular coolant, in which electricity, gas, or oil can act as a thermal agent.
Cyclothermal pizza ovens have metal tubes with oil built into the bottom, and electric ones have heating elements.
Steam-tube hearth ovens are heated by hot gas circulating around the baking chamber.
The body of the hearth ovens has a rectangular shape and includes several tiers, so several servings of pizza can be cooked in such ovens at the same time. Such appliances heat up faster than wood-burning ones, but the cooking process takes longer.

Advantages of hearth ovens:

Flaws:

Depending on how many products can be baked at the same time, there are one, two and 3-tier devices.
For example, for home use the usual single-tier is quite suitable, but this is not enough for a private house or cafe.

Typically, for a country house and a large family, bunk beds are used.
The structures are electric, made of metal, have a backlight and numerous convenient features that are not mandatory, but comfortable to use.
The criteria for choosing a pizza oven are simple. It is necessary to take into account its size, the presence of the necessary additional functions, the operating voltage and the size of the furnace.
Typically, designs are designed for sizes up to 30 cm, although there are also large fireboxes. Some models allow you to cook up to four pizzas at once.
The voltage in the pizza oven can be the standard 220V or 380V for catering.
Given such a criterion as a power source, all furnaces are divided into:


Pizza ovens for home use

When choosing a pizza oven, you need to focus on your own needs.
The market offers many ready-made devices from manufacturers. But the difference between them can be significant.
The main types of ovens:


Having bought a pizza oven for yourself, or having built a structure with your own hands, you need to learn how to cook your favorite dishes in it correctly. There are no big cooking secrets, but the basis of success is a high-quality stove and your attention.
Wood burning pizza ovens
The wood-fired pizza oven is rightfully considered a classic that has come to us from time immemorial. Such ovens are most often installed in front of visitors, allowing guests to observe the process of pizza preparation.
But, nevertheless, such designs are currently used quite rarely. This is due to the complexity of the operation, high demands to the skills of a pizzaiolo, the long heating time of the oven and the need for a permanent installation.
This type of oven is made of refractory materials and can withstand temperatures up to 1250 degrees (although the average cooking temperature is 300-450 degrees). The upper part of the structure has the shape of a hemisphere. Air currents circulate in this hemisphere, which ensure the baking of pizza. The average cooking time of the product is 2-3 minutes.
Firewood, fuel briquettes and charcoal are used as fuel.
The main advantages of these ovens:
- the aroma of a fire;
- pleasant appearance of the furnace;
- no need for gas or electricity.
Main cons:
- the presence of open fire;
- expensive fuel;
- significant weight;
- prolonged warm-up.
In a traditional stone-lined oven, the heat is evenly distributed. No less important is the light smoke emanating from the burning logs. It gives the pizza a delicate smoky taste.
Wood-burning pizza ovens are made of refractory bricks, have a dome and a hearth.
Wood-burning stoves are reminiscent of ancient baking ovens and are considered the only ovens in which real pizza can be cooked.
Wood-fired pizza ovens use the following types of heating: convection, heat reflection from the walls, and heat transfer through contact.
For heat convection, a natural airflow is created with the help of an internal dome.
Some wood-fired pizza ovens require up to 45 minutes of preheating. When the domes turn white, the oven is ready to bake, but most models are equipped with a special temperature sensor.

Today, wood-fired pizza ovens are divided into:
- Pompeian;
- Tuscan;
- Neapolitan oven.
Tuscan and Neapolitan, in fact, are a variety of Pompeian.
The difference is due to the region where the pizza ovens were used and due to small differences in size.
The size of the firebox of a traditional Pompeian oven is on average 100 - 110 cm.
In some regions of Italy, the stove may differ in the height of the dome and the dimensions of the entrance.
Pompeian is higher than Tuscan or Neapolitan.
Thanks to the higher dome and the entrance to the oven, it is possible to cook not only pizza, but also many other dishes in pots, on a spit, grills, etc.
Among the wood stoves, there are also several varieties.

By installation type:
- ready;
- mobile (installed on trailers and used at events);
- embedded.
By capacity:
- small (for 4 pizzas);
- medium (up to 10 pizzas);
- large (from 12 pizzas).
Advantages of wood burning stoves:
- It is unlikely that any stove will be able to give the same effect as a wood-burning one. Ready pizza in it can be obtained in just two minutes, and fragrant smoke will come from it, which gives a special piquancy to the cake.
- Due to the attractive appearance equipment, you can install such a pizza oven in the hall so that visitors can watch how the chef prepares a delicious tortilla with filling.
- No electricity and gas costs.
Flaws:
- Inconvenience of dimensions;
- Significant cost item for consumed fuel;
- Open fire.
The material a wood-burning pizza oven is made from directly affects its efficiency, so it is important to know its characteristics before making a final choice.
-
Brick ovens are exceptionally economical as they retain up to 85 percent of the heat generated. As a result of this, as well as the low profitability of wood, these pizza ovens are the most popular.
Natural or artificial stone has a thermal efficiency close to brick, so it can also be used as a building material for a wood-burning stove.
However, the cost of stone, especially natural stone, is quite high, so an intermediate option could be this: use stone to decorate the stove facade, and take traditional brick for the stove chamber, which can significantly reduce construction costs.
Clay is cheap natural building material for the stove, along with sand and straw. However, clay pizza ovens are not as popular as brick ovens due to the risk of cracking in the baking chamber.
Wood stoves can be made of concrete, with the addition of marble chips. Typically, these models are designed for outdoor installation. Their effectiveness is not inferior to traditional brick ovens, and the aesthetic component is immeasurably higher.
Most often, these ovens are supplemented with side-mounted worktops and garden furniture, allowing you to organize a comfortable dining area in the garden.
Wood-burning pizza ovens can also be made of metal: cast iron or steel.
They have the same domed vault as brick ones, but require less Maintenance and can be easily integrated into modern interior kitchens.
DIY pizza oven
There are many different variations of the pizza oven, ranging from small clay ovens to larger concrete ovens.
You can build a pizza oven on wooden pallet to be able to move it if needed.
Although, if you decide to do this, remember that the construction will probably be about half a ton, so you may need a forklift to move the finished furnace.
Many people find a more permanent place for the stove and build a brick stand for it so it's at waist level when you're standing in front of it. However, this option allows relatively little effort to move the furnace to another location.

Materials that will be required:
- Ordinary sand (general purpose sand, usually containing a small amount of crushed stone, gravel, etc.);
- Building sand (fine sand, or sifted);
- Cement;
- Aggregate (crushed stone or expanded clay);
- A bucket or a pipe for a chimney (you can not put it, then the smoke will come out through the front opening);
- Construction shovel;
- Trowel for laying bricks;
- Bricks (ideally refractory);
- Large piece of cellophane;
- Several wooden planks to form a vault;
- Particle board;
- Wooden pallet;
- Screwdriver;
- Self-tapping screws for wood;
- Saw.
The exact amount of building materials depends on what size you decide to build.
You can build this furnace in stages, so there is no need to know the exact amount when you start building.
When building a furnace, heat-resistant bricks should be used.

When heated to high temperatures, standard building bricks will expand and cracks may appear in the kiln.
The pizza oven can be equipped with a chimney.
The main advantage of a chimney is that the smoke does not come from the firebox directly into your face, but without a chimney, the design is greatly simplified, and heat loss is minimized.
Certain ratios must also be observed between the inner diameter of the furnace, its height and the height of the furnace opening.
The height of the opening should correspond to 63% of the height of the chamber - this is important for efficient fuel combustion. The height of the chamber should be 60-75% of its diameter.
A refractory brick must be laid at the bottom of the chamber, so the diameter of the chamber will to some extent depend on the number of bricks that you have.
The stove must be placed so that the firebox is directed in the direction opposite to the main direction of the wind. It is also desirable to build a canopy over it.

It is necessary to start construction from the foundation and the base under the slab on which the furnace should stand.
Bricks must be laid close to each other. The thicker the bricks, the more heat they can store.
To fit the bricks to the size you need, you can either use a grinder (you'll need a lot of spare disks), or lay out the base of the chamber with square bricks and brick the corners into the walls. Bricks must be laid so that they form an even base.
To shape the roof of the furnace chamber, you need to make a sand mold, having previously installed the firebox door. The door may be steel, or it may be wooden.
If you settled on a tree, then it should be fireproof, oak works well.
Before closing the wooden door of a heated oven, it will need to be moistened with water.
It is desirable to fasten a metal door not to clay walls, but to a concrete slab.
DIY clay oven for pizza
A clay wood-fired pizza oven can brighten up any garden.
Yes, and pizza cooked in such an oven will be incomparably tastier than bought in a store or made in the oven.
There are two technologies for kiln construction from clay.
In the first case, formwork is used, and in the second, a do-it-yourself adobe oven is formed from pre-prepared blocks.
The first option is complex and more suitable for small hearths intended for baking bread and cooking baked dishes, while the second can be used to build a functional Russian oven.

Now few people build full-fledged clay ovens with their own hands to heat the house, most often they can be found in the garden in the form of a primitive oven for bread and pizza.
This original model easily copes with baking dough products and effectively decorates a suburban area.
To make a stove for a summer residence with your own hands, the first step is to decide on the shape and size. The size of the oven depends on what you are going to cook in it, and, of course, on the availability of free space in the garden.
You are unlikely to be able to immediately determine the amount of materials, so it is best to take it with a margin.

In order to make a domed clay stove you will need:
- clay;
- sand;
- straw;
- sawdust;
- glass bottles;
- fireclay bricks;
- a couple of sheets of regular newspaper.
Furnace building process:
- Further, adding a little straw to the batch, they make an arch under the door.
Creation of sand-clay batch (adobe).
In the batch, the main thing is to pick up oily clay, which is easily molded in your hands and make correct proportion sand and clay.
Base with insulation.
Glass jars or bottles provide reliable thermal insulation. And fireclay bricks will be the basis for creating a dome furnace.
Making a sand oven.
More precisely, this is not the stove itself, but only its layout. Reminds me of how papier-mâché is made. Top tightly cover it with newspaper and moisten.
Creation of a thermal layer.
Coat the stove with clay to give a smooth surface to the stove and add sculptural decorative details.
Clay for work should be selected very carefully, since almost 100% depends on its quality for how many years your furnace will work. If you are using red clay that is in a solid state, grind it first and sift through a sieve. It is possible through the usual kitchen.

In order for the pizza to turn out to be of high quality, it is necessary to heat the oven for at least an hour before starting to cook it. After this time, a sufficient amount of coals will burn, and the heat inside the furnace will be distributed evenly. So the pizza won't burn.
Do-it-yourself wood-fired Pompeii pizza oven
The Pompeii wood-fired oven is an outdoor pizza oven of an unusual shape and design, which differs from the standard products laid out by the stove-maker.
It has a domed appearance, most likely reminiscent of the house of fairy tale characters, and not a device for preparing a gourmet meal.
Pompeii oven - domed hearth.
In its working area, two streams of hot gases meet: convective from the bottom, and reflected from under the dome.

Pompeii is heated in black, so it is self-regulating: if the fuel flares up too much, the flow of exhaust gases at the mouth will squeeze down the influx of fresh air that carries oxygen.
The combustion will weaken, there will be less flue gases. Then they will press against the top of the vault, more fresh air will come in, the burning will intensify, and the cycle repeats all the time.
For laying the inner surface of the furnace, refractory bricks are used. From the side of the entrance, a chimney is arranged, which is separated from the combustion chamber. For the arrangement of the chimney of the furnace, burnt solid bricks are used. In this case, the length of the pipe will be enough 1.5–2 meters.
The wood-burning Pompeian stove is characterized by certain proportions.
The height of the entrance is made small, and comparable to 1/2 of the height of the dome.
As for the width, it is the same for the entrance and the dome.
The choice of this ratio is not accidental, it allows you to optimize the working process of the furnace device:
- reduce the loss of thermal energy;
- ensure normal smoke removal;
- create good traction.
There are two types of pizza oven equipment:


There are various options for the construction of the Pompeii oven, which differ among themselves in the choice of materials for construction, the parameters and dimensions of the structure, and design.
The main parameters of the future furnace will be the following:
- The foundation, which will be a solid slab made of reinforced concrete, with a thickness of 10–20 cm.
Pedestal for oven.
It is made of cinder blocks, each measuring 20x20x40 cm.
Stand parameters: width and length of 120 cm, height - 80.
The tabletop will be represented by a monolithic reinforced concrete slab with a thickness of 10 cm.
Fireclay bricks will play the role of a layer that provides thermal insulation between the stand and the structure of the furnace equipment.
Its inner diameter is 84 cm, which means that the arch of the dome, in accordance with the accepted proportions, will be 42 cm.
At the same time, we will carry out thermal insulation work, laying the first layer of mineral wool, double thickness, and the second - a cement mixture with perlite additives.
Instead of perlite, you can purchase vermiculite or expanded clay, their properties are no worse.

The construction of the dome is one of the most responsible tasks.
It is made from brick halves, and is built in such a way that a certain slope is formed towards the center of the firebox.
When building a dome, do not forget to leave the entrance, do not build it up with bricks.
To make it easier to build a dome, you can use various frames: wood or foam (they are removed after construction is completed) and metal (it does not need to be removed).
You can also use a little trick if you are worried about the safety of the masonry - put a ball inside during the construction of the dome, and remove it only after the masonry dries.

The dome can have several varieties:
- The Neapolitan vault is lower and flatter. It is considered ideal for making classic pizza;
- The Tuscan dome looks like an almost flat hemisphere. It is easier to lay it, in addition, ovens with similar vaults are considered universal: it is convenient to bake various types of bakery products in them.
After the oven dries, the vault can be covered with thermal insulation.
Most often, plaster is used for this (from cement and perlite, in a ratio of 1: 5) or mineral fiber coated with cement plaster.
After that, the oven also needs to dry out for a couple of weeks.

After the finished stove has completely dried, it is accelerated.
To do this, carry out at least 7 ducts with an interval of 24 hours:
- the first heating is carried out with dry straw with a volume of up to 2.5 kg;
- the second heating is carried out with the addition of chips weighing 500 g to the straw;
- for the third time, 4 kg of wood chips are used;
- the fourth fire is reduced to the use of one dry small log;
- all subsequent ignitions are performed with the addition of one log each time.
If an outdoor furnace structure is being built, then it is advisable to place it under a canopy. This will increase the operational life of the furnace equipment.
Wherein street structure additionally plastered with two layers:
- a layer of heat-resistant plaster up to 1.2 cm thick;
- decorative plaster on a moisture-resistant basis 5 mm thick.

Only a wood-burning stove built with your own hands will make it possible to cook not only delicious pizza, but also other works of culinary art right on the site of your country house.
This will save a person from having to order tasteless semi-finished products heated in the microwave at the nearest pizzeria or look for a decent restaurant with a Pompeian oven.
When wood is burned in the combustion chamber of the Pompeian stove, two streams of hot gases arise:
- convective flow arising from the hearth;
- reflected flow arising from the dome of the furnace.

The temperature in the Pompeian oven is self-regulating.
Temperature control is as follows:
- If the firewood is very hot, a large amount of gases (combustion products) are released, which, leaving the furnace, presses the flow of incoming oxygen into the mouth section, thus, the intensity of fuel combustion decreases and the temperature in the furnace decreases.
- If the combustion process dies out, the flow of gas (combustion products decreases), and the amount of oxygen enters the furnace more. When there is more oxygen, the intensity of combustion increases.
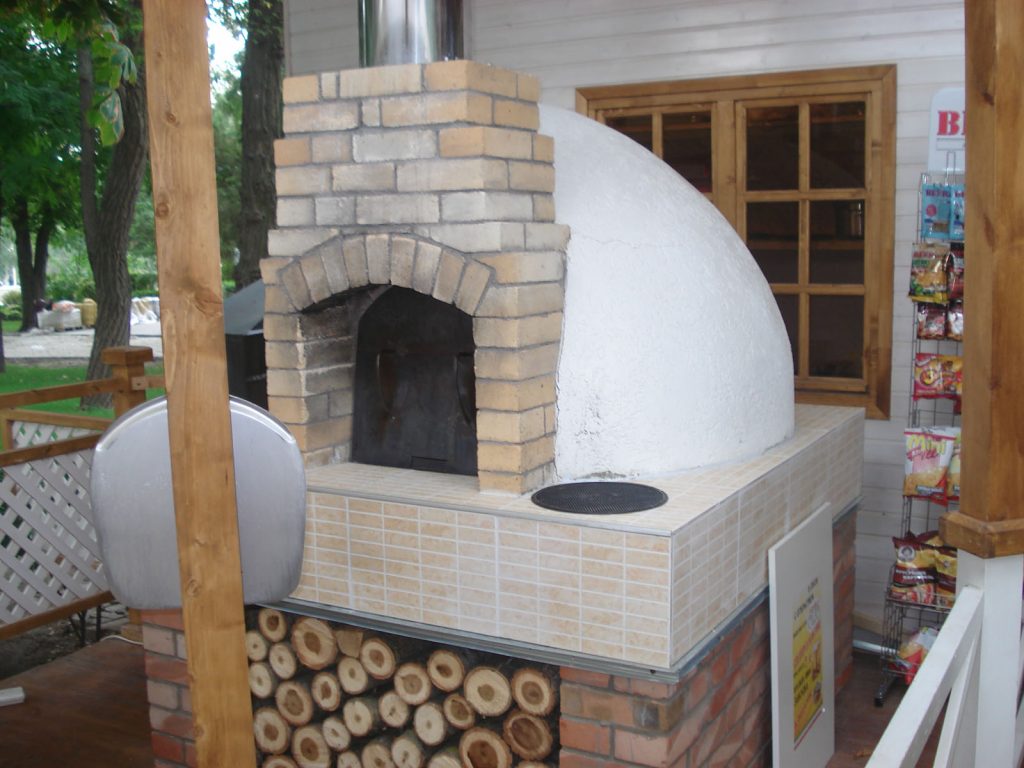
The main advantages of the Pompeian oven:
- This stove warms up quickly and gains a high temperature (compared to the usual Russian one).
- The brick walls of the furnace are heated to a thickness of up to 120 mm.
- From the moment of kindling to the start of cooking, no more than 1 hour passes, so already in 45 minutes the temperature inside is 250-260 ° C, and after 60 minutes - 350-370 ° C.
- The Pompeian oven retains heat for a relatively long time.
- The compact dimensions of the oven allow it to be installed in almost any environment, both indoors, in the yard and in the garden.
- Relatively high construction cost.
- High labor intensity of the furnace device.
- The need for a foundation in the form of a slab, since the weight of the Pompeian stove is quite large, about 80-1200 kg (the weight of the stove is about 600 kg + the weight of the table is about 500-600 kg).
A high-quality DIY Pompeii oven will give you the opportunity to cook the most excellent dishes (including, of course, pizza) in compliance with the technology.