Reading time ≈ 10 minutes
To improve your site, you can build a beautiful pond in the country with your own hands on the territory, using modern landscape ideas with photo examples and design techniques. An artificial reservoir will bring harmony to the surrounding space and add originality to landscape design.
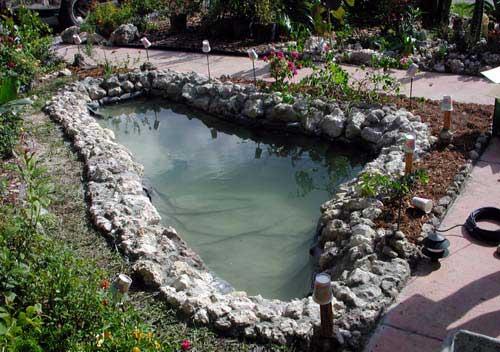
Natural green pond on the territory of your own summer cottage
Pond in the country
Sometimes an artificial pond in a suburban area is more of a necessity than a decoration. If a long stream flows through the territory or marshy soil is present, disadvantages can be turned into advantages. A do-it-yourself pond in the country will create an atmosphere of calm and relaxation.
What type of reservoir can be created in the country:

The first garden ponds appeared in the countries of the Ancient East, and only then this fashion reached Europe and Russia. Fountains and mini-waterfalls with massive stone edging began to be built near the palaces.
The pond can be:

The pond can be executed in different styles:

The improvement of a picturesque pond in the country, made by hand using landscape design ideas, is shown in the video below with photo examples and detailed instructions.
Competent planning
When arranging an artificial reservoir in the garden, it is necessary to draw up a detailed project plan and observe certain conditions.
Actions must be planned step by step:
- Location selection.
- Determination of sizes and shapes.
- Selection of the necessary materials.
- Stylistic decision.
- Plants and flowers.
- Decorative elements.
To begin with, you should walk around the territory of your dacha, carefully examining every corner and sketching on paper the shape of the future reservoir.

Place for a pond
This is an important planning stage in which several criteria should be taken into account:
- Soil features.
- Landscape relief.
- Climatic conditions.
- Illumination.
- Green vegetation.
- The presence of a natural reservoir in the territory.
In such a pond, it is unlikely that it will be possible to keep large fish or swim in hot weather, but there should be enough space for the location of the structure itself and water drainage. The home eco-system should resemble a mirror pond, not a swamp.

How to choose a seat:

Pond zoning:
- Coastal part. It takes about 12-30 cm, it is used for shallow water vegetation and for arranging the entrance area.
- Shallow part. Zone for plants and flowers - from 30 to 90 cm.
- Deep water part. The size can be from 1 meter, it must be below the freezing level of the soil. Fish for decoration or breeding can live here.
A great idea would be to complement the beautiful lighting with musical accompaniment. This design looks spectacular and impressive.

Material
Building materials must be strong, reliable and durable. Concrete is most often used, but today lighter materials and structures have appeared, for example, polyethylene or butyl rubber.
Most popular options:

To protect the film when laying the bottom, lay a small layer of geotextile under its surface. So gravel and sharp stones will not be able to damage the film structure.

Step-by-step instructions for arranging a "flexible" pond
It is easier to build a film-based pond than from concrete and more reliable than from a plastic mold. The recommended length of the film should be equal to the length and twice the depth of the reservoir itself + an additional 40-50 centimeters just in case. The desired width of the film is the width, double the depth of the pond and 40-50 centimeters for the remainder.
The main stages of arrangement:
- Soil preparation and marking.
- Earthworks to create a pit.
- Bowl installation or film flooring.
- Filling voids with river sand.

What may be required for work:
- Construction shovel.
- Irrigation hose.
- The pump for definition of pressure of the gulf of water.
- Compressor (for a fish pond to saturate the water with oxygen).
- Cleaning filter (for breeding fish).
- Cord, rope, pegs or light sand for marking the territory.
- Sterilizer for water purification.
- Construction wheelbarrow for the earth.
- Butyl rubber film.
- Adhesive for film ("Tangit", adhesive tape, etc.).
Pond making:
- Create a sketch. Drawing on paper the form, all details, decor and location of auxiliary equipment, taking into account the size and depth of the bottom.

- Transferring the mini-circuit to the soil with a garden hose or river sand. The contours must be marked with sand that differs in color from the ground. According to the applied outlines, a groove should be dug to a depth of up to 25 centimeters.

- Removing the fertile layer and digging a hole. This will require a shovel (a construction excavator for a pool or a large pond with a fountain) and a cart to remove the earth from the territory.
 The pit is dug according to the depth of the coastal, shallow and deep water zones calculated in advance. The deepest part should be in the center and be dug last. Each time, the depth line should be fixed using markings.
- Measuring the size of the pit. The walls of the pit are well compacted, and an additional 40-50 centimeters must be added to the edges to determine future size covering material. The parameters are measured with a cord or rope, and then transferred to the film.

- Film waterproofing. The bottom of the pit is covered with a small layer of sand and geotextiles to provide reliable protection for the film surface. When the substrate is ready, the film is carefully laid, tightly fixed to the base with glue and well pressed against all surfaces.

- Filling with water. Water is poured gently and gradually with a hose, while a sharp pressure must be excluded.

- Consolidation. The edges of the waterproofing are fixed in a pre-dug trench along the contour with a depth of 25 cm and covered with earth and rubble, after which they are well compacted.
 The edge of the reservoir is fixed with rods, stones or large boulders. This stage is suitable for placing and planting plants and flowers. Be sure to leave a small crease at the bottom so that when filling with water, the film does not tear.
- Standing water. The finished reservoir should be left for 1-2 days so that the water settles well, after which the excess ends of the film are cut off. During this period, you can form beautiful bumpers, arrange the remaining decor and complete the landscaping work.

To strengthen the gently sloping shore, you can use a geogrid or geomat in combination with clay and black earth to make the pond look neat and well-groomed.

The size and shape of an artificial reservoir depends not only on the size of the site, but also on the imagination of the owners themselves. The aesthetic and decorative component undoubtedly play an important role here. If you follow all the recommendations and strictly follow the instructions, you can create the pond of your dreams in the country. How to make a pond in the garden with your own hands, using landscape ideas with photos and diagrams, is shown step by step in the video below.
Almost every garden has a pond. And he definitely gets into the frame: the owners love their pond (or even the smallest pond), are proud of it and consider it perhaps their main garden achievement. And this is understandable. But the strict eye of a professional often notes the unfortunate blunders in the creation of reservoirs, which are repeated in many gardens with offensive constancy.

We asked landscape designer Valeria Ilyina to analyze some typical amateur mistakes and talk about what you need to know in order to do it yourself in the garden. decorative pond, stream or waterfall.
Are you building a pond? Make no mistake!
Perhaps it makes no sense to convince someone that a pond in the garden is good. Water like a magnet attracts everyone's attention and even in photographs it always looks mysterious and alluring. Is it any wonder that today the reservoir has become an indispensable attribute of the "gentleman's set" of any design project for the development of a new land plot or the reconstruction of an old one.
Unfortunately, as a result of a formal approach to business, one garden becomes similar to another. Gardens are churned out by professional designers like cakes are baked, and they actually turn out to be cloned. To be honest, the gardens of amateurs are closer to me, which, although they sin with some dilettantism, still attract more with their ingenuous sincerity. All actions of an amateur come from the heart, and therefore the path is often tortuous, but in the end the truth is found, and not least thanks to intuition.
To make the path to beauty shorter, let's try together to analyze the characteristic mistakes that miraculously repeat in many reservoirs, and analyze their nature. And after that, we will gradually analyze all the subtleties and secrets of a quick, easy and economical creation of a reservoir that is ideal for your garden. So, the most typical misses.
Wrong size
This is the most common mistake: the pond does not match the size of the garden and its surrounding plants. A small puddle located somewhere at the fence or at the entrance to the garden and squeezed on all sides by lush and beautiful garden plants, no matter how hard you try, will always look miserable.
Wrong place
In no case do not place a reservoir against the backdrop of unsightly buildings, a sloppy garden, a pile of garbage, a rickety fence, and who knows what else.
old fence- not the best background for a pond
Water always attracts the eye, so placing your pond in an unsightly place, you thereby focus on the shortcomings of the garden.
Mistakes in the selection of material
Purchasing garden supplies follow the law of similarity. If the house is made of brick or stone, then their color, texture, shape and size must be repeated in the material of the fence, paving, finishing of other buildings. The same applies to wooden house or a house sheathed with siding.
Often you can see a picture when individual corners of the garden are very good: beautiful plants are logically grouped, the reservoir is carefully and with fantasy decorated - and the overall impression of the garden is negative. You start to analyze, and it turns out: the brutal appearance of the house is made of red brick with white architraves plastic windows, a powerful fence is assembled from ready-made concrete blocks painted with bright pink paint with white scallops on top, a carved gazebo is gilded with turned beams, an asphalt tape of the path leads to it, over which the rocker arms of openwork white arches for roses are thrown, the presence here and there of colored plastic , various-sized borders, flowerpots, and to top it off - like a gold medal for bad taste - a plastic water lily on a living leaf of a nymph. As they say, comments are superfluous.
Conclusion: while arranging the garden, introducing new elements into it, try to predict the final result, predict how the garden as a whole will look like. The body of water should always match the garden, buildings and surrounding plants in size and style, and be positioned in the most advantageous position depending on the image you choose.

Defeat in the fight against the plastic mold
Common misconception: the finished plastic mold is best choice if you decide to create a reservoir, as they say, with small means. Yes, indeed, manufacturers offer a wide range of such "baths", and it seems that you can choose a shape for every taste. But everything is not so simple. Even the largest of them (and they are very expensive) will not be big enough in the garden, and the small ones just look like a misunderstanding. At the same time, all of them, although obviously small in size, have an overly intricate shape that will never turn out to be natural in place.The edges of such forms have a rounded profile, on which it is impossible to fix neither soil for coastal plants, nor stone, much less gravel. Some of the more expensive forms have quartz sprinkling glued with a wide tape along the upper edge, but most often it is so strikingly different from our local materials that it still cannot be decorated.
Plastic molds are made by stamping, and cheap products often have an annoying defect - the edges are skewed along the periphery, due to which, no matter how hard you try, you will not be able to dig such a shape neatly and evenly in principle. Needless to say, a piece of black plastic sticking out above the water will nullify all your efforts. For clarity, such a reservoir can be compared with a luxurious suit, in which a carelessly sewn lining is bristling in the most visible place. The sight of such a suit is at least regrettable.

Protruding black plastic of the finished form sticking out above the water- poor decoration of the reservoir
It is worth adding that transporting the finished form, especially big size, not easy and expensive, and as a result, the final cost of the structure increases significantly. I once had a chance to work with a plastic mold of small size and at the same time intricate design. She was hopelessly skewed. I spent a lot of time, effort and nerves to somehow neutralize this innate flaw, but, unfortunately, there are things that cannot be fixed.
However, rigid forms have a future. They have been produced in Europe for several years plastic molds regular geometric shapes: round, rectangular, trapezoidal. They have a wide, flat, horizontal edge, making them easy to mount under all sorts of flooring. It is advisable to use them for raised formal reservoirs, which are effectively decorated with stone, wood, plastic, metal; they can be located at different levels and combined with fountains and waterfalls.
Unfortunately, our trade so far only offers round shapes, but we must not forget: there will be a demand - there will be an offer. The breadth of the horizons of consumers shapes the market.

Conclusion: before choosing one or another method of waterproofing, you need to fully familiarize yourself with the positive and negative sides of each and carry out comparative analysis. The lack of information about the qualities of waterproofing materials in the presence of a large supply on the market leads to the wrong decision.
Primer QUICK PRIME PLUS 9.6 KG bucket 11.35 liters Firestone
16 480 rubles
RosPrud
Fountain pump CM 3500 Jebao
6 200 rub
RosPrud
Protective mesh for pond Aquanet 1 3 x 4 m
1 000 rub
RosPrud
Fountain pump WP 2350 F Jebao productivity 2350 liters per hour
3 400 rub
RosPrud
Trying to repurpose an old bath
Speaking of ready-made forms, it should be mentioned that amateurs often try to recycle enameled cast iron bathtubs. Once upon a time, in times of chronic scarcity and lack of available materials, this simple way to create a garden pond was welcomed by many. However, few people managed to decorate a white bath so that the enameled pond looked more or less attractive.
More often, such a structure looks miserable: greenish white walls, mounds of garbage at the bottom (after all, you can see everything against a light background!), round cobblestones are artlessly laid out along the edge, and a collectible beauty hosta is planted nearby. An unattractive spectacle…

But there are ways to embellish such a reservoir, you just need to move your imagination. The easiest way is to paint the bath with any dark or black paint. Visually, the container will look deeper, the reflectivity of the water will increase, and the edges will almost merge with the ground. In the presence of all kinds of plasticizers and modern mixtures (for example, Eunice-plus cement glue), the inside of the bath can be coated with a layer of 1–3 cm, give it texture, tint by adding mineral powder or liquid colored pigments or finely crushed brown peat to the solution. If desired, if such an image fits into the overall picture, a mosaic of colored pebbles or glass, pieces of a mirror, or simply glued pieces of crushed stone of different sizes can be laid on top of the cement.
If you have a whole arsenal of used household bathtubs, you can dig them close to each other in a chain or square-nested way, depending on the quantity, finish the inner surfaces as mentioned above, and mount a decorative flanging made of tiles, clinker, wood over the joined edges etc. You will get a channel or a pool with separate cells, each of which can be decorated in a special way: somewhere there are plants, somewhere a spring or a small fountain, somewhere there are fish or lights - an unplowed field for fantasy.
Such a structure can be made partially raised over the entire area, or you can place the cells at different levels, and even arrange the flow of water from one block to another. So an old primitive idea can be applied in a completely new way and achieve a wonderful result.

Conclusion: old, used containers can be successfully used to create reservoirs, you just need to be creative and never leave the inside out in sight.
stone beads
The most common decorating mistake garden pond- this is a rounded cobblestone laid out around the entire edge, like beads. More often such beads lie in one row, but some manage to lay two rows on top of each other.
Such a way of laying a stone will never look natural, not to mention the fact that it is absolutely impossible to decorate a film or a board of a rigid structure. So the multi-colored “monists” lie on the monstrous black shores, and no matter what beauty you arrange around, such an aqua garden will serve as a mute reproach to the owner.
When relaxing on the banks of rivers and lakes, try to pay attention to how nature "lays out" the stones, and what you like and remember the most. Usually, small fractions serve as a background, while larger ones are textured by contrasting groups.

The stone for decorating the reservoir must be carefully selected. Photo by Valeria Ilyina
Conclusion: stone for decorating a reservoir must be carefully selected. It is desirable to use a stone that is uniform in rock and color, but varied in size. This does not mean that the pellets are completely unsuitable, just that they “play”, you need to work with them even more carefully.
Toys around the pond
Another typical drawback that can spoil the most beautiful, carefully thought-out design: the simultaneous presence of a large number of decorative figures and various garden accessories in a small area.
An abundance of accessories and decor elements– a sure way to ruin any body of water
Nobody argues, some bright gnomes and funny lafs can really decorate some corners of the garden, bring a smile. But if plastic frogs, papier-mâché ducks and clay mermaids are already enough, and you were also presented with an “overturned” jug with Maya painting for a fountain, white bent furniture in the rococo style and black lanterns a la Montmartre, it is inevitable there will be overkill. Any of these items can be quite attractive on their own, but put together within line of sight, they will most likely do you a disservice by turning the garden into a haberdashery.

Do not abuse accessories and decor. Photo by Valeria Ilyina
Conclusion: The thoughtless use of decorations will break the garden harmony. Try to look at the garden as if from the outside, and if you tend to get carried away with "decoration", at least spread the decorative "gadgets" in space and time.
Next time we will finish the analysis of the most common mistakes that gardeners make when creating ponds and think about what kind of body of water - a pond, stream or fountain - will suit your garden. Read the article. landscape design,
Even the smallest and seemingly unremarkable personal plot can be made cozy and interesting if you equip an artificial reservoir on it. A decorative pond in the garden is not only able to harmoniously fit into the landscape of a personal plot, but also visually expand the space.
An artificial reservoir in the landscape of a personal plot

The presence of a pond or a small artificial waterfall in a personal plot is determined not only by aesthetic considerations, but also by a practical component. On a hot summer day, even from a small pond, it blows cool, the air seems much cleaner and fresher, and a calm smooth surface or measured murmur will help to remove nervous tension and fatigue.
The most popular types of artificial reservoirs in landscape design:
- pond;
- stream;
- fountain;
- waterfall.
In terms of shape, reservoirs on personal plots can be either round, with an irregular coastline, or regular geometric shapes - square, rectangular and diamond-shaped. It all depends on the style of the site as a whole, its location, the features of the site and your imagination. The main rule in this case is that the reservoir should ideally fit into the surrounding landscape, become its integral element.

The most common shape for an artificial pond is round or oval. This is what natural lakes look like, so if you want to create a corner of nature near the house or in the garden, then this option will be the most acceptable. In this case, the wrong coastline and asymmetric planting of the reservoir with plants may even appear.
If the reservoir is located on a site where everything is done in classical style, straight lines dominate and there is no place for natural forms, then they equip a pond correct form. Often, this is the basis for the fountain, which is the center of the exposition. Since such a pool does not have a natural barrier in the form of vegetation and stones, its sides must be placed higher to prevent falling into the water. As an option - to protect such a reservoir with a low forged grate.
It should be noted that the most common and least expensive in terms of labor and financial investments is the pond. But it is quite possible to equip one on your own site without the involvement of specialists.
The key here is experience. When it appears, the pond you created can become the first in the whole complex, connected by waterfalls, streams, decorative bridges.

DIY decorative pond - where to start?

If a wonderful idea came to your mind about how to equip an artificial reservoir on your personal plot, you should not rush headlong after a shovel. First of all, you need to choose a good place. In doing so, the following factors must be taken into account:
- plot size;
- illumination;
- relief;
- degree of landscaping;
- soil type.

It is best to equip the pond closer to home. At the same time, it should be positioned in such a way that the entire area of \u200b\u200bthe reservoir is illuminated by the sun for at least 5 hours a day. Otherwise, the once beautiful pond can eventually turn into just a fetid swamp.
The terrain is also of no small importance. The best place is a low-lying area where the water level in the well or in the well is closer to the surface of the earth.
In the selection process, you should also pay attention to the presence of vegetation - large trees located along the banks will pollute the reservoir with fallen leaves in autumn, and tree roots can damage protective film at the bottom.
Soil type is important. For the arrangement of the reservoir, loamy and clay soils, as well as peat, chernozem is less preferable - it contributes to the formation of silt. On acidic soils, it is impractical to equip a reservoir without reliable protection of the side walls and bottom.
Once the site is selected, the shapes and sizes are determined - it's time to stock up necessary materials and tools. Most often, ready-made rigid containers are used to create a pond, which can be purchased at a specialized store or flexible waterproofing, much less often - concrete (the most costly and time-consuming process).

Types of waterproofing for an artificial reservoir:
- polyethylene film - inexpensive material, not resistant to ultraviolet;
- PVD - high pressure polyethylene. Visually, it practically does not differ from polyethylene, but it has greater flexibility and durability.
- PVC - polyvinyl chloride - strong and durable material, the edges of which are welded together.
- rubber and butyl sheets are the most optimal, but expensive option. The service life of this material is practically unlimited.

Experts recommend avoiding polyethylene film for arranging waterproofing. It copes with its function, but it lasts no more than 2 years. If you want the pond to please for a longer time, choose more durable materials.
Materials and tools:
- shovel;
- protective film or reservoir;
- pipes for supply and discharge of water;
- valve;
- geotextile or sand
It's better to see once. The whole process of arranging a pond in pictures looks like this:
Construction of a decorative reservoir

There is another way to equip the pond - a concrete bowl, but this method is laborious and costly, so it is not currently used. Construction begins with the fact that markings are made on the selected site and the turf layer is removed. After that, you can start digging a pit of the desired shape. At the same time, be sure to leave the edges slightly sloping (sloping, not steep). Further, if you plan to make a decorative pond using a PVC film, and not a finished tank, you need to lay out the bottom of the future reservoir waterproof material. For these purposes, clay is quite suitable. You need to lay it in two layers - the second after the first has completely dried (between them you need to lay a waterproof film). After that, the bottom should be covered with gravel.
Important: if you plan to plant a pond with plants, special recesses should be made at the bottom and filled with fertile soil.
How to make a decorative reservoir in such a way that the water in it is always clean and fresh?
In order for the appearance of the reservoir located on your site to always please with its appearance and give freshness and coolness, it is necessary to make sure that the water in it is running. For these purposes, two pipes must be laid: flow and waste. Through the flow pipe, water will flow into the reservoir, and through the waste pipe it will be discharged into the ditch. Please note: the level of the drainage ditch should be slightly lower than the level of the pond. For ease of use, you can install a valve on the sewer pipe or simply close the hole with a plug as needed. The first option is the most practical.
The device of a decorative reservoir with the use of "galoshes"
Labor costs will be much less if you purchase a special tank for an artificial reservoir. The people called these containers "galoshes". Why is that? Everything is very simple: they are made of black plastic, and the shape of such tanks resembles rubber shoes in its external outlines. But if you wish, you can always find and buy a bowl for a reservoir of a shape that suits you.

In order to equip a decorative pond in the country , you will need to purchase a special tank right size and forms: the cost of those is relatively low.
The main stages of arrangement of the reservoir:
- contour marking;
- digging pits;
- container installation.
In order to correctly mark the contour of the reservoir, it is necessary to install the tank on the ground and vertically install slats along its perimeter with an interval of 40-50 cm, then tie them with twine. Thus, you will get the outlines of the future pond.
The container must be installed strictly horizontally. The tank should be filled with water gradually, while the gaps between it and the walls of the pit should be carefully filled with sand.
Note: if you want to equip the fountain in artificial reservoir, it is important to purchase a special pump and nozzles in advance, which are installed during the installation of the reservoir.
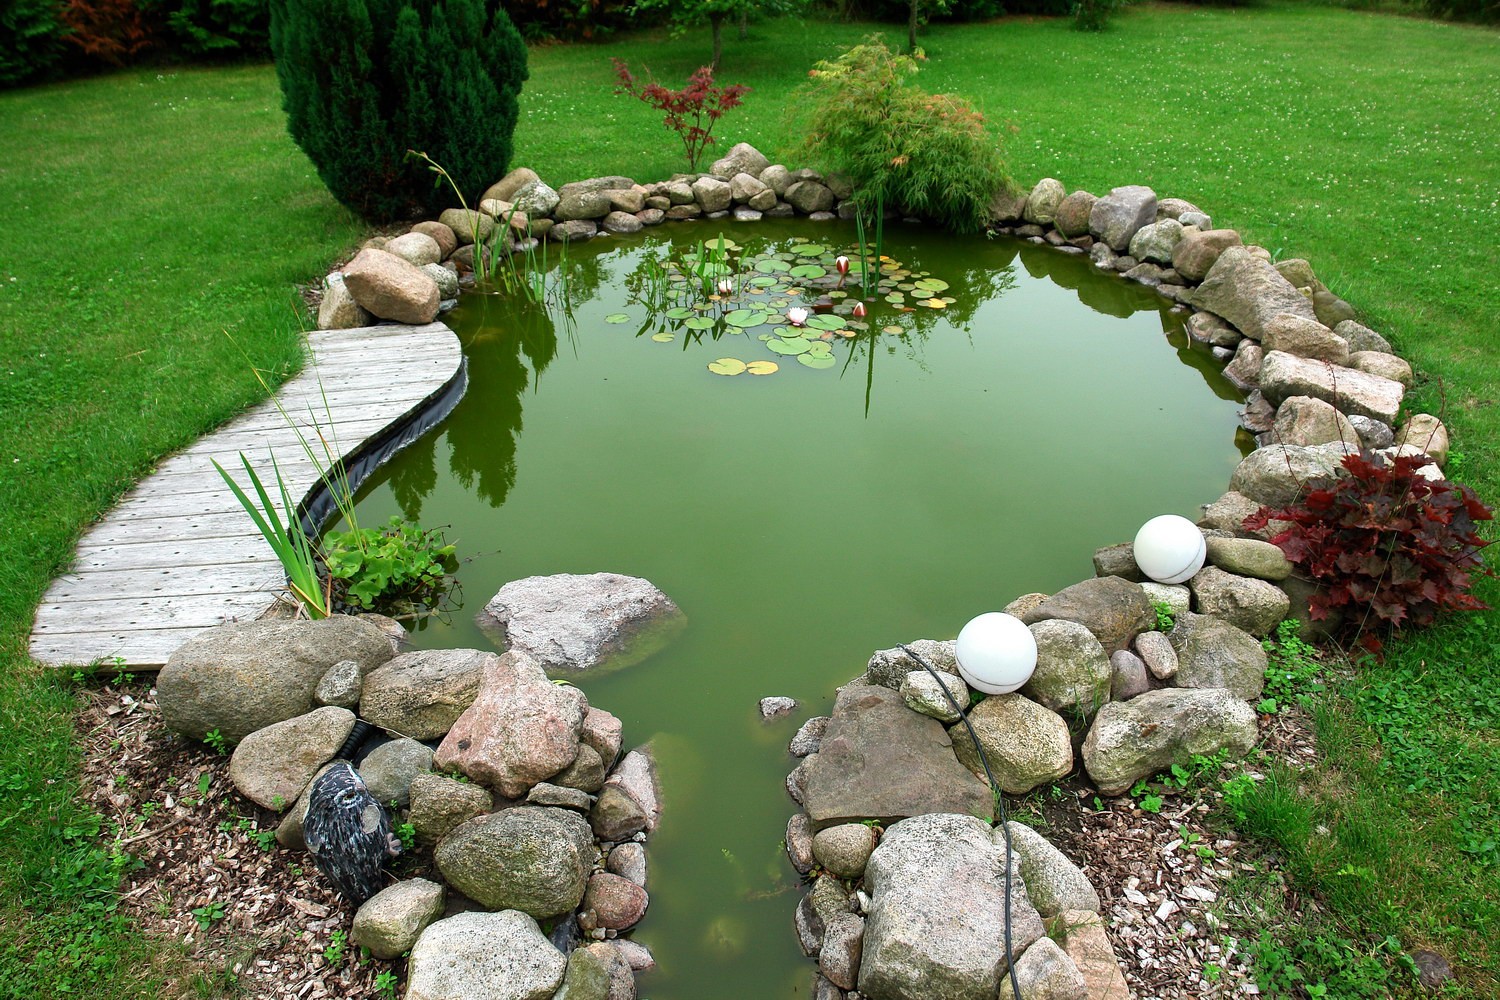
The final stage is the design of the reservoir. In order for your man-made pond to look really stylish and beautiful, for example, just like the fancy decorative ponds, the photos of which we posted, you need to properly arrange its banks.
Decoration of the banks of an artificial reservoir
At this stage of work, you can not limit the flight of your imagination. To decorate an artificial reservoir, you can use ceramic tiles, marble, granite, artificial stone, pebble, wood, etc. These materials need to mask the edges of the reservoir, in appearance close to natural. It is important to fix them with cement mortar. If you are planning to additionally equip your pond with a fountain, in the process of work, you need to make sure that the pump hoses are hidden under tiles or stones.

Then you can sprinkle the bottom of the reservoir with pre-washed sand, lay small pebbles and plant aquatic plants in pots or baskets. You can plant an ornamental shrub or just a flower bed around the pond.

Decorative inhabitants of ponds are always a joy. It can be both aquarium fish and dwarf turtles. And if you hold a backlight along the bottom of the pond or place floating lanterns on batteries on the surface, you can create a real extravaganza of light and water.

Pond Care
- To keep an artificial pond in good condition, it will need maintenance.
- First of all, you need to get a bottom vacuum cleaner for collecting garbage.
- During the period of leaf fall, you will need to cover the pond with a net so that the foliage does not fall into the water.
- If fish live in the pond, then they will need filtration and aeration of the water.
- To avoid greening of water, it is either filtered and purified (for this, the reservoir must be flowing), or planted with oxygen-producing plants: swamp, hornwort, elodea.
- If water lilies or capsules are planted in the pond, then with their wide leaves they will prevent the sun's rays and overheating of the water.

artificial pond on your personal plot - this is an important element of landscape design, the arrangement of which must be approached with sense, feeling, arrangement! And then the beauty created by your hands will delight both you and your guests!
01.03.2016
45 782
How to make a pond in the country with your own hands - stepwise technology and mistakes

Beautiful decorative ponds, photos and pictures of which can be seen everywhere, have become an integral part of many garden and summer cottages. However, not everyone knows how to make such an ornament with their own hands. The pond is an element of decor, a place where they relax, get distracted from the bustle of the city. Water is the most the best remedy from stress. Recommendations, a photo gallery, tips for arranging will help you overcome the steps on the way to the beautiful, serene, and also teach you how to ennoble your home area with minimum investment. The arrangement of a pond in the yard, its design will not take you much time.
What style to choose, where to place?
The initial stages of the improvement of the reservoir are important and necessary. Thoughtful styling in harmony with landscape design will be the basis for creating a reservoir. You need to choose a style in accordance with the architecture of the house, buildings. In the interior of the garden, you can arrange a formal version (of the correct geometric shape), or a free natural reservoir, forming an integral composition with other decorative elements.
Formal views are the main decorative element in the garden. They are suitable for small and large areas, there are different sizes are placed in the center. Free reservoirs are equipped in arbitrary forms, giving a natural look, hiding artificiality.
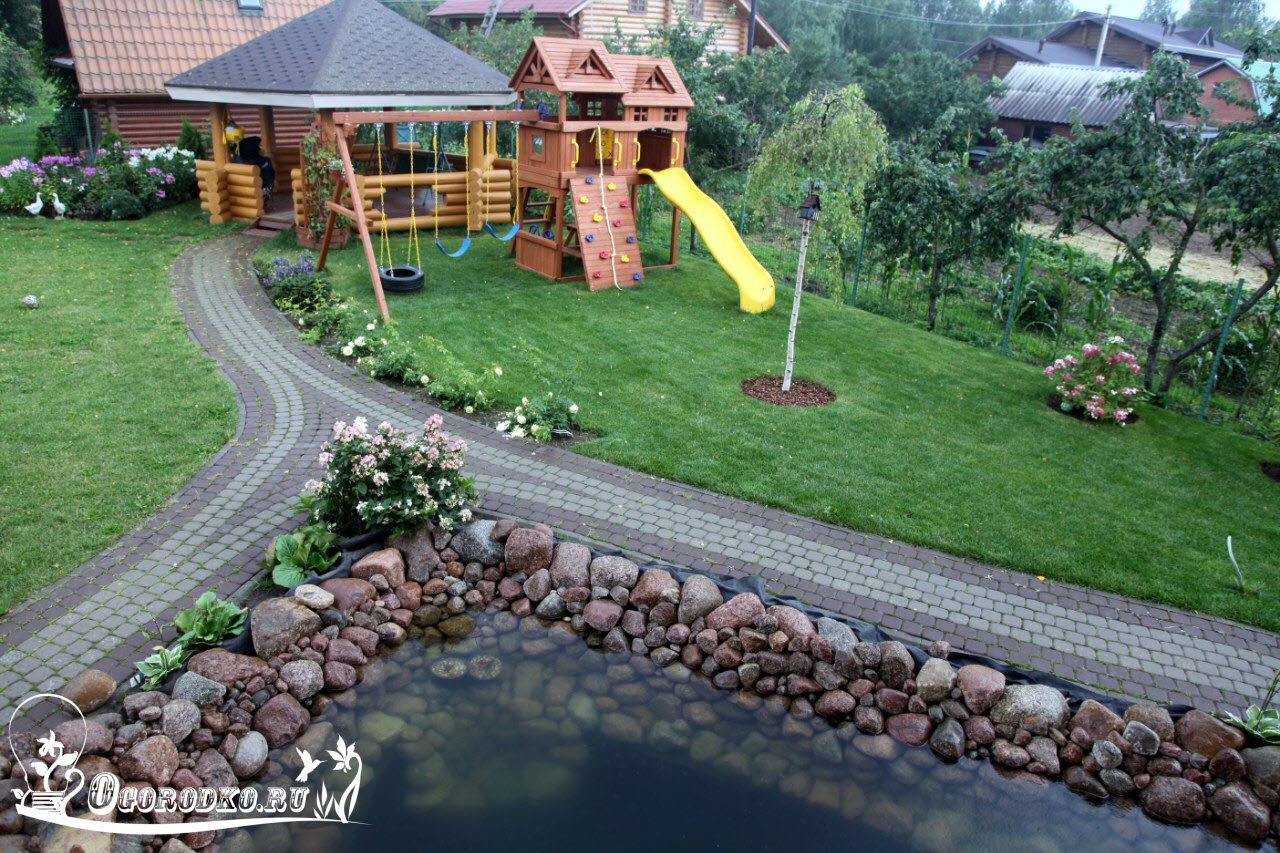
 do-it-yourself pond in the country - in the photo
  small pond in the country with their own hands
 in the photo - a pond at their summer cottage
  in the photo - a pond in the garden
Choosing Japanese style, remember, stone, water and lanterns are the basis of the image. Think in advance of the shape, location. Bonsai-style trees, a tea house will complement and decorate the garden. Garden walls, windows, moon gates are considered an indispensable attribute of Chinese manners. The entrance to the structure is equipped with an entrance gate. The English garden seeks to merge with nature, the French one is filled with majesty and large space with fountains, cascades, and sculptures. Italian mini-pits with fountains are placed in front of the main entrance of the house and are the central composition.
Choosing a place and material for arrangement
Many craftsmen know how to make a pond with their own hands, given the size, location, choosing sunny open areas. Trees located in close proximity will create additional trouble. Fallen leaves, constant shade of trees impede the growth of ornamental plants, pollute the water. You can arrange the structure under the trees, but the obligatory stay in the sun for 5-6 hours a day.

 do-it-yourself pond in the country house
Regarding the size, consider the scale of the site. The pond should harmoniously fit into the landscape design. small garden plots an area of 6 acres is equipped with small structures that are easier to build, the financial costs will be negligible. Deep and voluminous make for large areas and fish breeding. Do not plan to run fish, do not dig a big pit.
 do-it-yourself pond in the country house
  on the picture - country pond do it yourself
To build a pit with your own hands, you need to buy, prepare materials for future construction. There are great opportunities for your imagination here. You can build a decorative lake on the site from any materials. A capital pond with a concrete base will take time and money. Various plastic containers, a lake from an old bathroom, tires from large tractor wheels will cost less, they will look beautiful if done right. It is easy to make a design using a special elastic durable film.
 in the photo - a pond on its site
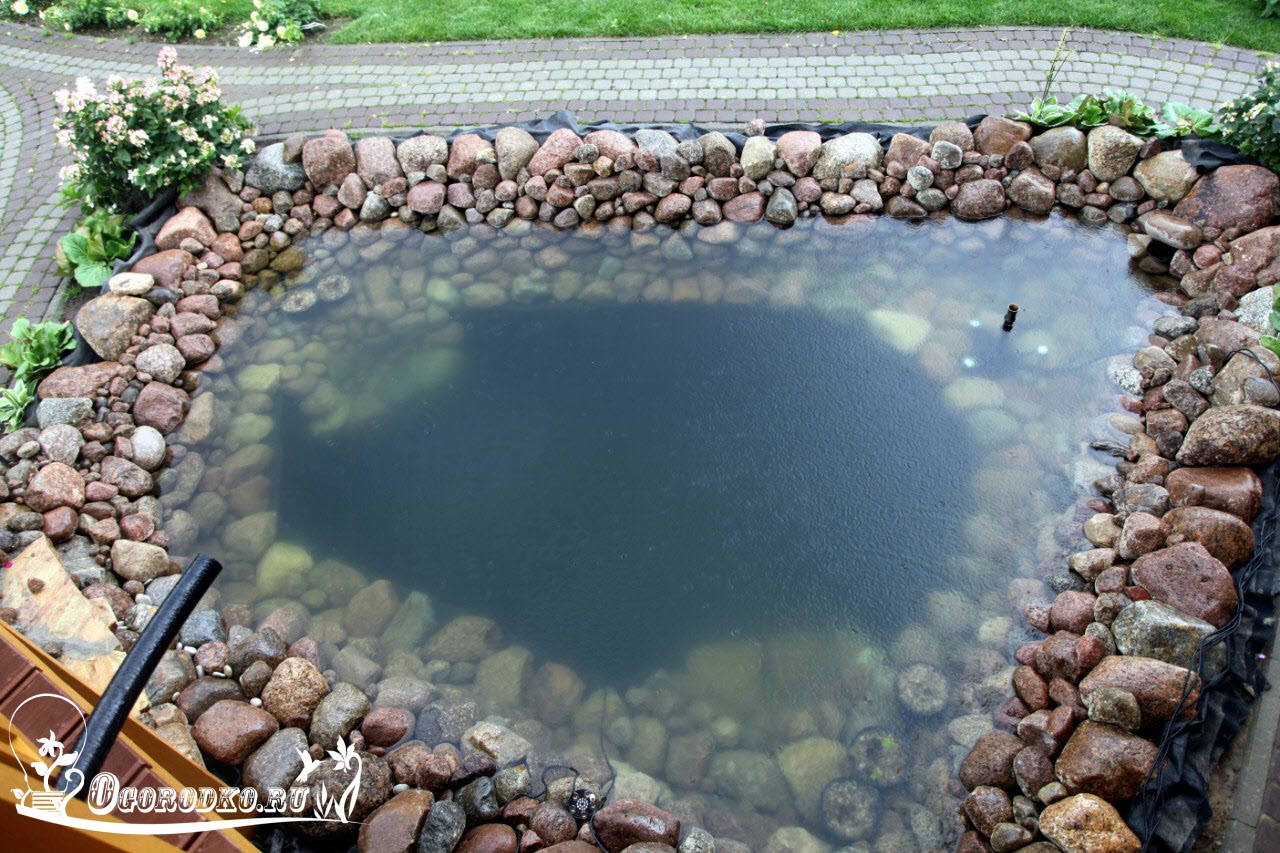
How to Create a Lake Step by Step Using Black Film
— Schematically outline the project of the future reservoir, indicating the width, depth, location of curtains (thresholds for planting). The drawn drawing will allow you to correctly position the plant, decor elements, avoid misses, alterations.
 step 1
  step 2
- Draw the outlines of the lake with a garden hose, sand, spray paint, or whatever you can find. uneven surface must be level.
- A pit is dug to the depth of the near threshold (for plants and flowers), the next tier is marked, and dug out. The lake can be made in several tiers. You can do without thresholds if it is small.
 step 3
- To buy a film of the required size, the finished pit is measured with a cord, added 40-50 centimeters on each side of the bowl.
- The next step is to fill in the sand and tamp. No sand, start laying the next layer. small variant can be done without sand.
- You can protect the material from cuts and damage with the help of geotextiles, which are laid on the bottom, the walls of the pit after a layer of sand. You can replace the purchased material with the existing old unnecessary linoleum, carpeting, roofing material.
 step 4
  step 5
- It is more convenient to fix the material by tearing a shallow trench along the edges. The edges of the film are laid in it, sprinkled with a layer of earth, rubble.
- A stream and a submersible pump, which is placed at the bottom, will help rid a large pit of stagnant water. The pump is connected to the cleaning filters. The stream is placed above the level of the lake, so that the water flows down freely, rises with the help of a pump. You can hide it under beautiful stones, plants. They plant a hill from a stream beautiful flowers, decorate with various decorative elements (sculptures, clay pots).
 step 6
  step 7
- The coastline along the entire perimeter is laid out with decorative stones (natural cobblestones), preventing the earth from sliding into the pond. Place the plants, sprinkle the bottom with small pebbles, fill with water.
The construction of the lake with your own hands is completed, keep the pond clean and tidy, remove debris and algae in a timely manner. Use biological balancers, plant fertilizers, anti-algae products, water clarification. Find the right place, do it right, decorate it beautifully. Mistakes, miscalculations can turn an attractive good body of water into a continuous problem, keep this in mind.

Let the dacha be a place where work first goes on, and then rest, we do not forget about the beauty that helps us not to lose heart and enjoy every day spent there. Therefore, today we invite you to feel like landscape designers and build a pond in the country with your own hands.
Do-it-yourself pond creation rules and material requirements
A pond in the country is not a luxury, but in some way even a necessity. As the ancient philosophy of Feng Shui says - water next to the house brings financial well-being and soothes.

In addition, it allows you to maintain relative humidity in a single area, pleases the eye and allows you to create an original solution in a designated area. Therefore, more and more often summer residents create ponds and ponds with their own hands, as in the photo.


Not everyone on the territory has a reservoir that can be put in order, surrounded by stone and made into an element of the landscape. More often we create a pond in the country with our own hands from scratch, faced with many issues that have to be addressed during construction.
Let's start with the fact that it is necessary to determine the location of the reservoir. For this the following factors should be taken into account:
- relief of the territory;
- the location of trees and other plants with a powerful root system, as well as foliage;
- illumination of the selected area.
Study the terrain carefully. You may already have well-placed indentations, pits, or ruts that you made earlier. All of them will simplify the process of digging the pond itself.
In addition, do not forget that plants tend to grow and take up more and more space underground. The roots can spoil or even destroy the bottom of your pond over time, and the foliage, seasonally falling into the water, will rot and exude an unpleasant odor. Which will require you to pay more attention to the care of the pond, but not the joy of having it. Therefore, before digging, it is worth considering how far trees and bushes are located.
Most landscape designers recommend placing a pond near your home. This will make it easier for you to illuminate it without requiring separate lights and lamps for yourself. In addition, there is always enough free space near the house with natural light, because. there are no tall trees and dense vegetation nearby, blocking the light.

If you have found a place that meets the above requirements, then you can start work.
But for starters, it’s worth stocking up on materials and an approximate design of your future artificial reservoir.
Exists several ways to create a pond with their own hands in the suburban area:
- from the finished bowl;
- PVC film, polyethylene or rubber;
- with the help of available materials.
Besides in addition to materials for the bottom device, you will need:
- shovel,
- measuring tools,
- finishing and decorative materials,
- water.
After creating a pond, you can launch fish into it. But then the depth of your artificial reservoir should be at least a meter so that the fish do not freeze in winter.

The order of work on the arrangement of the pond
If you decide to arrange the landscape, choose a place and think about the appearance of your future pond, then first decide the main question - what will it be like? Will you choose a ready-made bowl or cover the excavated pit with foil? It's up to you to decide. And we will help you create it according to all the rules.
We dig in the finished bowl
The prefabricated mold, molded at the factory, is an excellent and simple solution for those who want to enjoy a charming and calm view of the pond after a busy summer day.


Now in specialized stores they offer bowls of different sizes, types and contents. They may be:
- simple plastic baths;
- containers with several levels of depth;
- bowls with complex contours of the coast.
Therefore, everyone will be able to choose the shape that best suits the territory and landscape without extra costs by time.
In addition, there are other advantages of ready-made bowls:
- the plastic form is durable and not exposed to ultraviolet radiation;
- the bowl is non-toxic and easy to install;
- the average shelf life of this form is calculated in tens of years, which makes the pond durable and of high quality.
The main thing is not to damage the bowl during its installation in the future pond. The form is not subject to repair and restoration. However, if you are building to last, you can pick up a fiberglass bowl, it is famous for its strength and lasts 2-3 times longer.


So, you have chosen a bowl, found a suitable place, cleared it and are ready to create a pond with your own hands in the country. What's next?
First you need to transfer the contours of the bowl to the ground so that it fits exactly into the dug pit. For this you will need:
- bowl;
- pegs;
- shovel;
- rope.
To make the contour as similar as possible to the shape of a bowl, you need to install it on the ground and step back 10-20 cm from its edge. Repeating the shape of the bowl, stick the pegs into the ground and pull the rope along them.
So you will get the outlines of your future pond, under which you need to dig a foundation pit 20-30 cm more than the height of the bowl.
Don't forget to keep an eye on the top level. It is very important that the surface of your pit is even, otherwise the ground around the pond will always be wet and viscous, spoiling appearance coast.
When you achieve the desired depth and shape, be sure to sprinkle everything with sand and carefully tamp it down. This sand cushion will become the foundation for your pond. After you can set the form and fill the free space between the side of the bowl and the ground with sand.
When your future pond becomes stable, you can start filling and decorating it.
You can overlay the shore decorative stone, plant water lilies or other water-loving plants along it. Install small figurines of swans or others created by yourself.


Making a film pond
If for some reason you do not want or cannot buy a finished bowl, then you can always make a pond with your own hands without it.


Enough to stock up:
- shovel;
- a rope or hose to outline the contour of the future pond;
- thick film.
The rest (water, decorative elements and figurines) you will need later, when the main stage is completed - creating a foundation pit for a pond.
As with creating a pond with a finished bowl, first you need to decide on the size of the future reservoir and its contour. Then apply its borders to the ground with a rope or hose, which can simply be laid along the lined border, or can be wrapped around driven pegs.
When you are sure that you like the shape and approximate appearance of the future pond, you can start digging. Here the process will always be the same, because we just need a foundation pit.
The level of the pond should be the same. Therefore, check the evenness of the banks with the help of a building level or a beam laid on both sides of the pit.

When you reach the desired depth, fill the bottom with sand, compact it well, and then lay it with geotextile so that the film does not tear over time. To do this, you can use special material sold in hardware stores, or you can do it on your own. Take, for example, old carpets, rugs, roofing material or linoleum, suitable for the area of \u200b\u200bthe dug pit.
Now that the bottom is ready, measure your future pond and calculate the size of the film you need to create it. Usually, it is enough to know the area of \u200b\u200bthe pit and its depth. After that, add an allowance of 50 cm on each side to strengthen the film along the shore. And you can go shopping.
The film must be very strong and dense in order to withstand the weight of the water that we eventually pour into the pond. Therefore, do not save on this primary material and choose it wisely - the film thickness must be at least 300 microns so as not to tear under constant pressure.

So, as soon as the film is laid out on the bottom:
- Flatten it so that there are no folds and swelling.
- Line the shore with stones so that when filling it does not gather at the bottom.
- Prepare the plants if you want the pond to be with water lilies or other living decor.
The trick of how to arrange plants and flowers in a film pond will be shared with us Maxim Maximov in my master class:
The film pond is quite economical and allows us to create it in any shape and depth, which is impossible to do with a finished mold cast at the factory. That is why many choose this option to create their own reservoir in the country with their own hands.


But do not forget that the deeper you want to make the pond, the more likely it is that the shore may crumble. That is why we recommend that you, after the pit is dug, strengthen its walls. Depending on their height, you can use tiles or slate. And how best to do it, he will tell us Talla Khukhrianskaia in my master class:
When all technical issues are resolved, the pit can be filled with water. To do this, just throw a hose connected to the water supply into it.
In addition to the stone, which has an important function and holds the film on the shore, you can put decorative figurines, flower pots and handicrafts that you have made for giving your own hands. Decorate the pond to reflect your creative nature and pleasing to the eye.
Do not get carried away with decor, because periodically the pond needs to be cleaned so that the water does not fade in it and does not turn a beautiful country pond into a large puddle. And for this, be sure to leave a place on the shore so that you can go to the pond. Better yet, provide a stream that will drain the water.
We create a pond in the country from improvised materials
Unfortunately, it is not always possible to find the right and high-quality Construction Materials, but if the desire to create a pond with your own hands does not go anywhere - do not despair. Simple improvised materials will also come to the rescue, which any summer resident has enough of.
A pond can be made from a variety of things:
- from an old car tire;
- from old bath remaining after repair;
- from a barrel, basin or bucket.

Bathtub pond...

... from old tires ...

...and from an old barrel
If you really want to create an unusual and original pond, then the lack of capacity will not stop you.
Using old containers
As we have said, a pond can even be made from an old bathtub. After all, in fact, it is no worse than the finished form.


The process of creating such a pond will be similar to the previous ones:
- dig a pit under the form;
- fill it with sand and make a cement screed;
- insert bath;
- fill with water.
Due to its weight, the bathtub will sag heavily in the pit, which is why it is recommended to tighten its bottom with cement - to strengthen it. So that over time the pond does not go deeper.
Also, do not spare sand and earth to stabilize the tub inside the pit. For a snug fit of our handy bowl to the shores, fill in all the voids.
And do not leave the side of the bathtub open, it will not look aesthetically pleasing and will spoil the appearance of the future artificial reservoir.

And how to dig a bath and arrange it in a pond with your own hands will clearly show and tell Vitaly KIY in your video tutorial:
However, if your country cottage area not so large as to place a full-fledged pond on it, do not be discouraged - you can also make a pond with your own hands in the country from small containers, as in the photo.

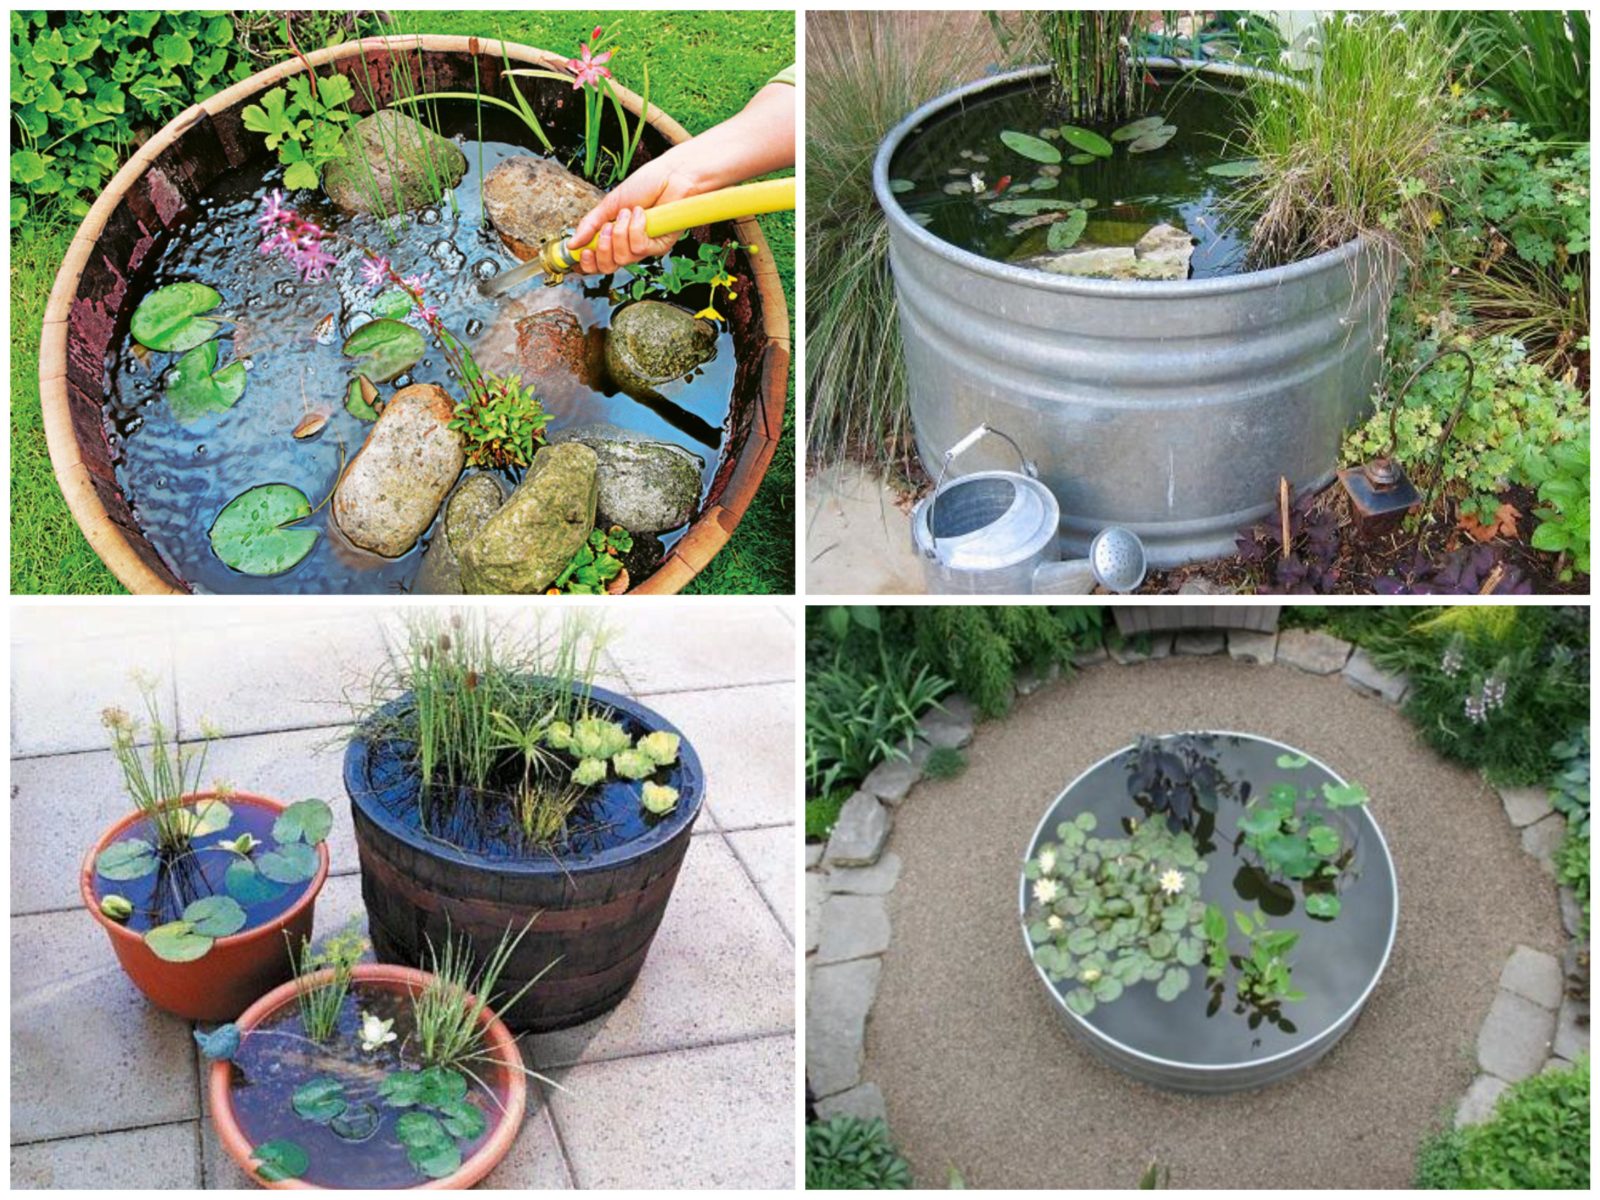
Take an old metal or wooden basin, a small barrel or tub. All of them can become an original decorative reservoir, which does not even have to be submerged below ground level.
At the little pond from an old basin there are many benefits, so do not deny yourself the joy of creating a modest artificial reservoir, if the area of \u200b\u200bthe site does not allow more:
- does not require excessive costs - everything you need for its device is at hand;
- it will take a little time to arrange it - from several minutes to a couple of hours, but not a day or more;
- it can be placed anywhere;
- if you installed the pond on the surface, and did not dig it in, then you can always rearrange it to another place by simply pouring out the water and refilling it after being carried;
- it does not require special attention to care - it is enough to change the water from time to time and wash it from the inside so that the bottom is clean.
Ponds from a basin or a small barrel can be installed on a reinforced, flat surface, filled with water and decorated with decorative figurines or flowers.


But if your pelvis has long lost its decent appearance and there is no way to restore its former gloss, then simply dig a small ditch to fit its size, install it there according to the principle of an old bath and overlay it with pebbles along the shore.

As you can see, old containers allow us to fantasize and create incredible ponds with our own hands in a country house of any size. And it helps us realize our creative potential.
Pond to the cottage from the tire
However, if repairs are not planned in the apartment, and the old basins have long been worn out or turned into flower beds, do not despair, you still have a chance to get your own pond.
And for this you will need the most indispensable and affordable material - a car tire. Tires in modern dacha society have long become a universal substitute for building materials.

And no wonder - the strength and shape of the tire allows you to make anything out of it, including a pond. And the size of the future reservoir will depend only on the size of the tire you choose.
First you need to prepare your future container - cut it off along the top edge so that only the sides remain. To do this, you need a jigsaw or sharp knife(if you have chosen a tire from a passenger car).
After you can go to the pond itself.
Installation steps:
- Outline the tire and dig a pit along the height of the prepared bowl.
- Fill the pit with sand and tamp the bottom.
- Insert the cover inside.
- Cover the tire and the bottom of the future pond with a thick film.
- Fill the edges of the film with sand, and then decorate with turf, stone or embankment so that the film is well fixed.
- Fill the pond with water and decorate with pre-designed decor.
Your tire pond is ready. And it will not yield in beauty to either ready-made bowls or large film ponds located in large spaces.

In addition, it is easier to care for and keep clean, and it does not require a lot of water or effort to arrange it.

As you can see, if you have long wanted to feel like a landscape designer in order to turn your dacha into a beautiful vacation spot where you can not only work, but also enjoy nature away from the noisy city, you can always create a pond with your own hands at no extra cost.
If you like our ideas, check out the other articles in the series!


