It's no secret to anyone that building a porch in the country is not the most simple task, considering that it must necessarily fit into general form building and also be truly functional.
In most cases, it is the originally designed porch that can become unusual for the house. calling card.

There are a huge variety of different options the final stage in building a house. Everything primarily depends on how you see a truly beautiful porch for yourself and what budget you have.

At the same time, it is worth noting that if you are interested in how to make a porch with your own hands, then it is quite simple and all you need to do is read this article and perhaps use some of the advice of builders.
What is a porch?
In fact, a constructive porch built in a private house is the simplest open area with a staircase that is made right in front of the entrance to the building. In this case, the porch can be of the most diverse form, with or without an additional canopy.

If we talk about the design itself, which can be chosen for the porch and which determines the design for the most part, then they can be divided into three main types: simple, attached or built-in.

The porch of the latter type is almost always designed at the stage of building a house.
The most popular simple type of porch is the platform, which has additional steps and a canopy above them.

During the construction of this type of porch, the most difficult thing is pouring the necessary foundation, which will be needed anyway, even if it is a lightweight structure and you planned to make a wooden porch yourself.

The attached porch is very similar in appearance to the beautiful built-in porch, but it is very often rebuilt and modified in various ways.
Foundation - foundation
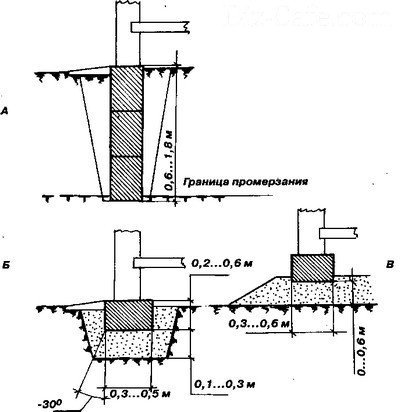
An important point that you should definitely pay attention to when laying the foundation is that its depth during construction work must necessarily coincide with the depth of laying the foundation directly for the entire building. Otherwise, after the settlement of the soil, it is quite possible that deformation will occur completely at the entire structure of the porch.

If, after the settlement of the soil, the structure is shifted towards the house, then the destruction will begin from the foundation of the porch. In this case, cosmetic repairs will not be possible and you will have to build a porch from the very beginning.

During the construction of the foundation, special attention should be paid to the waterproofing of the foundation being built.
Varieties of the porch for the future home
First of all, before starting the construction of the porch, it is imperative to decide which material you like best. Most often it is either concrete, or expensive metal, or stone, classic brick, affordable wood.

Having decided to make a porch to the house out of wood, many simply hope that this is the easiest and affordable option, in fact, not even suspecting a large number of nuances.

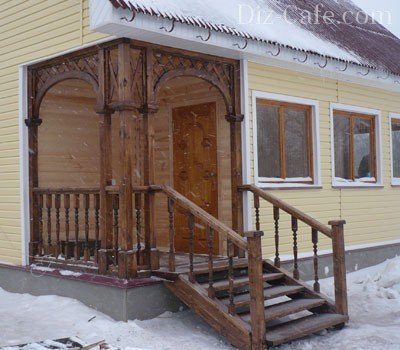
It is a photo of a porch made of wood that can be easily found in various magazines more than others. This is due to the fact that wood is considered by many to be a traditional material.

All you need to build such a porch is minimal building skills, a circular saw, and a construction square.
Note!

If possible, it is best to use either larch or any coniferous species as a material. They are distinguished by good strength indicators, and are also quite easy to independently process.

After a specially made impregnation, the material will definitely not be inferior, for example, to material from any other hard rock.

Above the porch, you should definitely take care of the visor. This will not only protect the steps of the stairs and its platforms from various precipitations, but also allow you to decorate the wooden porch in an interesting way in a short time without serious financial investments.

Photos of a wide variety of canopies can also be found on the Internet and magazines dedicated to the construction of various country houses.

DIY porch photo


Note!


A wooden porch is an integral feature of a city house or a country estate. Assembling it with your own hands is within the power of every homeowner. To do this, it is enough to familiarize yourself with the construction technology and stock up on materials.
A wooden porch is a multifunctional structure and one of the most important parts of a home's exterior. In winter, it reliably protects the front door from snow drifts and provides additional thermal insulation, and in summer the porch with a canopy can be used as a gazebo.
There are several varieties:
- Simplified - the most simple design, consisting of a small platform and several steps. The main advantages of such a porch are low cost, ease of construction and the ability to attach it to the house at any time.
- Attached - a porch equipped with a railing and a visor. This option is the most common, a wooden extension can function properly for more than ten years.
- Built-in - this design is the most complex and reliable. It is being built simultaneously with the main building and has a roof in common with it. If the construction of a house is only planned, this option is considered ideal.
V Lately comes into fashion original design, which came from Western Europe- patio. It is a kind of attached porch, resembling an open terrace.
A standard wooden porch consists of several main parts: the foundation, supports, steps, railings and a canopy.
This carved porch is a real work of art.
Before starting work, it is necessary to carefully plan all activities. When choosing a place for future construction, the following nuances should be taken into account:
- natural conditions. Depending on the soil, the ground can freeze in winter or swell during the rainy season. The first leads to bulging of the pillars from the soil, and the second leads to damage to the foundation of the porch and the appearance of cracks. To avoid these problems, the hole must be dug below the freezing level of the soil.
- A wooden porch should be attached to a house made of the same material. Otherwise, there is a difference in pressure on the soil, which leads to the appearance of cracks and mowing.
It is very important to determine the level of soil freezing before starting work. This is necessary in order to calculate the depth of the foundation both under the porch and under any other structure. To do this, in cold weather (about a month before the maximum frost) drill a well in the area where construction is planned. A soil sample is taken every 10–15 centimeters. This work is done by a professional geologist, but you can take a map of the standard freezing depth and compare readings with it.
The main mistakes made during construction wooden porch, there are two: the construction is too close to the entrance and the foundation is not deep enough. Both shortcomings lead to the inability to open the door to winter time due to the impact of frozen ground on the stairs. You can solve the problem by setting the porch 7-10 centimeters lower front door or by equipping a small threshold directly in the doorway.
Calculation and design of the structure
When designing a wooden extension, some important points must be considered:
- A standard step has a height of 15–20 cm and a depth of 30.
- Steps are often located at an inclination of 2-3 degrees. Thanks to this, melted ice or rain puddles will not accumulate on the surface.
- Railings make it much easier to get up and down stairs. Ergonomics experts say that the best height is in the range of 80-100 cm.
- The height of the porch is the distance from the front door to the ground.
- Total run - the distance from the first to the last step, taken in a horizontal projection.
A standard step consists of a riser (vertical part) and a tread (horizontal element). To accurately determine the number of steps of the future porch, it is necessary to divide its planned height by the size of the riser.
The standard width of a human step is in the range of 60–64 cm. There is a porch safety formula: 2a + b \u003d 62, where a is the height of one step, b is the width. Marches are optimal for operation, where the step height is 15–18 cm and the width is 25–32.
The canopy must not be made too narrow, otherwise it will not be able to provide protection from wind and precipitation. The optimal length is 80–85 cm, the width should be half a meter larger than the doorway. To prevent water from accumulating on the roof of the visor, it must be made slightly sloping.
Tools and materials
The best choice for building a porch - pine boards
There are no serious restrictions in the choice of wood for the porch. Budget extensions are built from birch or spruce. They are short-lived, because in conditions high humidity rot quickly. Cedar or oak is much more stable in this regard, but they are more expensive, therefore they are used in the construction of capital structures.
Pine beams and boards are ideal in terms of price-quality ratio. They are inexpensive, highly resistant to decay and external influences.
Before starting the construction of a wooden porch, you need to prepare the necessary materials:
- Pine timber, having a section of 100 * 200 mm, necessary for the construction of rafters and beams. For log houses, beams can be replaced with logs up to 200 mm in diameter.
- Edged pine boards for steps. The thickness of each is 40 mm, the width is 300 mm.
- Pine boards for the riser. Width - up to 200 mm, thickness - 20 mm.
- Boards for bowstrings, railings, canopies, top decking. The width is small, 150–200 mm is enough, the thickness is 50 mm.
- Small stones and sand, necessary for the installation of supports.
- Cement.
- Bitumen, roofing material.
- Varnish and antiseptic.
For the construction of the porch, only dry wood treated from decay should be used.
Also in the process you will need a set of tools. You can use both professional models and amateur ones (depending on the complexity and amount of work).
- Hacksaw for wood.
- Hammer-claw.
- Electric drill, screwdriver, screwdriver set.
- Electric or manual planer.
- A drill for digging holes in the ground for installing supports (can be replaced with a bayonet shovel).
- Measuring instruments - building level, tape measure
- Container for mixing cement mortar.
- A set of fasteners: nails, screws and so on.
Step-by-step instructions for building a porch with your own hands
Installation and fastening of supports
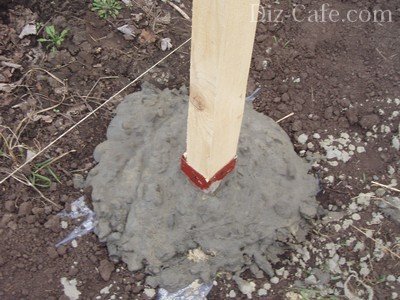
The first step for a wooden porch is to equip a quality foundation. The ideal option is an inexpensive and uncomplicated construction on piles. Such a foundation is built independently in a short time.
Small gravel is poured into the pit and cement mortar is poured
- Bars or logs chosen as supports are treated with antiseptic preparations.
- Holes are dug for mounting racks. The minimum depth is 80 cm, this figure depends on the characteristics of the soil, the type of porch and its size.
- Prepared supports are immersed in the ground, covered with mortar and rubble, and compacted. For reliability, you can fill them cement mortar. But in this case, work cannot be continued until the foundation is dry.
- After mounting the supports, they are aligned in height and, if necessary, cut to the optimum level.
- For reliability, the stand extreme from the house can be attached to the wall with nails or self-tapping screws.
There is an opinion that a foundation is not needed for a wooden structure. This is not true: a solid foundation will protect the porch from premature deformation and destruction.
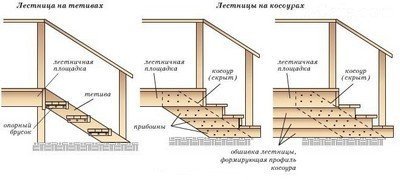
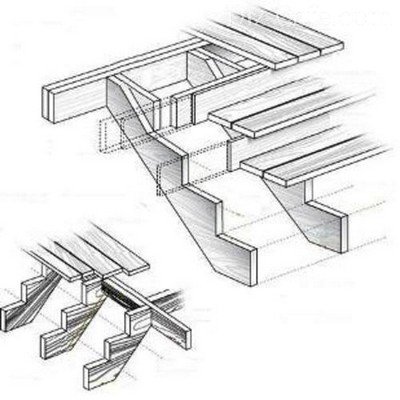
Mounting the bowstring
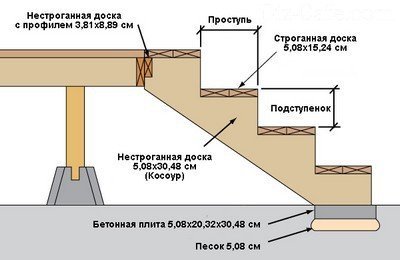
The bowstring and kosour are load-bearing boards to which steps are attached. The main difference between these inclined beams is in the position of the steps: in the first case they are hidden, in the second they remain visible. The number of stringers and bowstrings depends on the width of the stairs; four supporting beams are enough for a standard 700 mm.
The ladder can also be attached directly to the foundation
- The board is drawn according to a pattern cut out of cardboard. It is a right triangle, the legs of which correspond to the dimensions of the riser and tread, minus the width of the step board.
- Marked up on carrier board parts are cut with a jigsaw or a hacksaw.
- Finished products are attached with the upper end to the supports and leveled. For reliable fixation, you can use metal staples and strips.
Sometimes the required width of the bowstring noticeably exceeds the dimensions edged board. In this case, you can use one of the following methods:
- Use an unedged board. It allows you to make a bowstring from 400 mm.
- Attach several outer boards to the supporting structure. They will expand, hide and strengthen the bowstring.
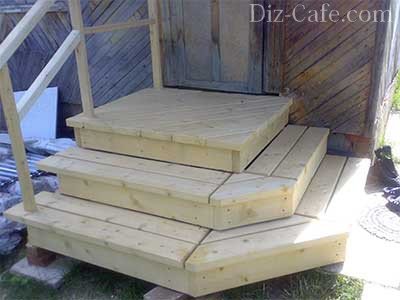
Site manufacturing
Installation of the upper platform takes place in several stages:
- Pine boards are being cut. Exact size and quantity depend on the dimensions of the porch.
- Boards are laid in place. On the one hand, they are attached to the stringers, on the other - to the wall or to the transverse beam. For fixing, a tongue-and-groove connection is used; the use of nails is not recommended.
- Boards are laid close to each other. In the future, this will avoid problems associated with the drying of wood and the formation of large gaps in the coating. During operation, the surface is leveled.
The boards must be tightly adjacent to each other.
When installing a platform, especially a closed one or with a railing, you need to make sure that there is enough free space left for the free opening and closing of the front door. Therefore, it is necessary that the upper part of the porch be one and a half times wider than the front door.
Laying stairs
Installation of steps on a bowstring is simple and is carried out in a few steps:
- The lower riser is laid, which is attached to the bowstring with a tongue-and-groove connection or with the help of self-tapping screws.
- The lower tread is attached to the riser and bowstring in the same way.
- Similarly, other risers and treads are fixed to the very top.
Steps are installed after the risers
If a kosour is installed as the basis for the stairs, the steps are laid from the bottom up (as in the photo). When using a bowstring, the boards are laid from top to bottom.
During the fastening of the steps, it is necessary to ensure that the individual boards fit snugly against each other: the cracks increase as a result of the drying of the wood, so the structural elements can loosen, and the porch will have to be repaired or rebuilt. If necessary, it is recommended to use special glue. If the planned step width allows, one wide board can be laid.
Installation of balusters and railings
With the help of the railing, you can give the porch a harmonious and finished look. Their installation is mandatory if the staircase has more than two steps.
- A baluster is cut out of a wooden block. This is the main vertical support to which the railing boards will be attached.
- A small hole with a diameter of about 10-12 mm is drilled in the lower end of the support.
- A metal pin coated with glue is inserted into the drilled hole. Its second end should protrude from the board by 70 mm.
- A hole with a diameter of 14 mm is drilled in the bottom step (at a distance of 7–8 cm from the edge).
- The rest of the baluster pin is coated with PVA glue and installed in the hole. The support is leveled. First, the extreme balusters are attached, then the intermediate ones. Places of installations are preliminarily marked on the bowstring.
- Before installation, the upper ends of the balusters are sawn off at an angle to install the railing.
- Support racks are installed. They are attached to the porch platform with the help of special anchors and fasteners. Before installation, all wooden parts are treated with antiseptics and protective agents.
- With a large length of the visor, additional supports are installed along the edges of the canopy. If they go out of bounds and get on open ground, the base must be concreted. This will ensure the strength of the structure.
- Guides are attached to the carrier racks. They are located perpendicular to the pillars and are fixed with anchors.
- The visor crate boards are nailed to the guides.
- The finished frame is painted, the quality of the work performed is checked.
- penetrating. The solution penetrates the wood structure and minimizes the effect of high humidity. It is enough to process the surface once (during the construction of the porch).
- Film-forming. Such impregnation does not affect the structure, it creates a film on the surface of the tree. In the future, periodic treatment with the same composition is required.
Balusters are mounted on metal inserts or wooden dowels.
Canopy fixing
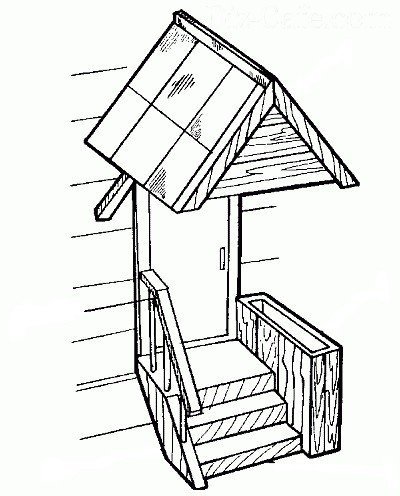
A canopy (regardless of shape and material) includes two parts: a frame and a roof.
According to the type of installation, the visors located above the porch can be suspended and supporting. The former are small in size and are attached to outer wall buildings. Support type canopies require preliminary installation of supports.
The long canopy provides the best protection for the porch area. However, in winter, a large amount of snow accumulates on it. Before making a choice in favor of a long or wide canopy, you need to clarify the average annual rainfall in the region.
Work on the manufacture of a canopy begins with the assembly of the frame:
Finally, a facing material is hung, for example, a profiled sheet or roofing material.
Video: How to make a wooden porch with a canopy yourself
Protection of a wooden porch from damage
To exclude premature destruction of the material, it is necessary to treat the tree with special impregnations that protect the surface from fire, moisture and other external influences.
To protect wood from moisture, there are two groups of impregnations:
To protect the porch from decay, it is recommended to use antiseptic preparations in the form of diluted solutions or pastes. There are specially designed fire-resistant impregnations that can protect wood from fire. When ignited, the composition forms a refractory film capable of resisting the flame for a certain time.
Insecticide solutions can be used to control insects. They scare away bugs and prevent new ones from appearing. Many homeowners use porch impregnation folk remedies- tar dissolved in turpentine, chlorophos or paraffin.
Probably everyone knows that the porch in any house must necessarily have functionality, and also harmoniously fit into the exterior of the building itself, because it is it that is considered a calling card. There are many different options for how best to implement the construction of a porch for a private house. All this directly depends on your taste, the chosen material and the general budget. With all this, we can easily say that building a strong and durable porch with your own hands is quite realistic.
The porch itself to the house consists of a completely open area, often with a staircase in front of the entrance to the inside of the house. It can be absolutely any shape, optionally with a canopy and even without, as well as made of different materials.

In principle, the entire structure of the porch to the house can be divided into three types:
1. Attached;
2. Built-in;
3. Simple.
How are they different?
Simple - this is a regular platform along with steps and always a canopy. During the assembly of this type of porch with your own hands, the most difficult thing is to fill the foundation, since it is necessary even for a simple wooden porch construction.
A do-it-yourself built-in porch is initially designed in conjunction with the house, so it is being built capitally.

The attached type does not have any external differences with the built-in type, the only thing is that it is slightly modified and slightly rebuilt. The advantage is that such a do-it-yourself porch can be easily attached with a slight alteration.

Remember! For any porch, a foundation is required, it is he who prevents the slightest deformation of the steps during seasonal temperature changes.
Building a foundation for all types of porch
The most important thing is that the main foundation of the porch to the house should be similar to the foundation of the house. If this is not the case, then during the sedimentation of the soil, winter frosts, your structure is simply deformed. It is also possible that during the settlement of the soil, your structure will move towards the house and then the foundation of the porch will suffer first of all, since it is less massive. To remedy this situation, minor repairs will not be enough and you will have to rebuild everything.

Since the glazed porch is not intended for habitation, and there is no huge furniture there, it is possible to use an ordinary concrete pad, which will be the foundation itself.
However, when choosing concrete, any brick (white, red) or facing stone, the foundation must be reinforced. The fact is that this design has a much greater load on the foundation itself than a wooden porch to the house.

To arrange the foundation for the porch with your own hands, you must begin directly with the markup. First, define a rectangular area right size, the main thing do not forget that the porch itself must fit in here. Then, piles should be driven into each corner of the rectangle and then, along the contour, begin to dig a pit. Its depth should be no less than the main foundation.
Advice! You don't need to lay the foundation very deep. Of course, the load during the displacement of the foundation will become a little less, but it is simply impossible to avoid them completely, with the slightest subsidence of the soil or sudden changes in temperature.

If you decide to install a visor above the porch, then you will need to install supports, but the rectangle for the pit should be increased on all sides by another 20-30 cm, and the piles can be driven in after the porch is built.
In order to fulfill our plans, you will need to leave small rectangles of an unexcavated area (about 20x20, possibly 30x30 cm) at the points where the support will be installed a little later. Then it is necessary to drill wells at each site, install the support well, drive it in as much as possible and be sure to carefully fill it with concrete.

In this case, formwork is very suitable, although if the soil is stony, then in principle it is possible without it. To make it, you can use absolutely everything - chipboard, wood-laminated board and ordinary boards, which turned out to be superfluous after construction. The main thing to remember is that plywood (laminated board) and chipboard are quite hygroscopic, so during rains, lifting ground water, they will begin to spread quickly, which is why, after the concrete has hardened, it is recommended to remove the formwork.
In no case should you throw away the remaining trimmings of boards, which are coniferous species, because the lumber of this tree has only positive features: after complete saturation with water, they become much stronger and retain their elasticity.

Advice! If there is a strong deformation in the soil, for example, if your house is located on a slope or on a mountain, then coniferous formwork works as a damper.
The most important and main element in the construction of the foundation of the porch with your own hands is waterproofing. In order to equip it, you need to lay the bottom in the pit with roofing material, and then the entire surface inside the formwork. Reinforcement is carried out using high quality bricks, on which it is necessary to lay a mesh and fix the grate with pre-prepared pieces of reinforcement.
Similarly to this principle, the pit is filled with several layers, which include bricks along with the grid, and then this structure is completely poured with concrete. To avoid the formation of voids, after each filled layer, it should be carefully tamped with a shovel.

Advice! In order to compact the concrete well, it is better to purchase an electric vibrocompactor, if you do not have one, then rent it.
Due to the fact that the concrete dries out for about a week, you will need to immediately level the surface of the foundation and be sure to cover it with roofing material with an overlap of about 50-60 cm from each edge, you can also take a regular building film. They will help protect the surface layer from any rain, as a large amount of water can make it brittle enough in the future, and then your foundation will simply be damaged.

If the need arises, then you can cut off the top in the finished timber, then the piles will be at the same level. But try to calculate the height of the supports taking into account the front door, so the height difference should be about 5 cm. The logs are attached using self-tapping screws or dowels - it depends on the material of your wall.
Porch to the house with their own hands. Projects. Photo
Often, traditional materials are used for construction:
- tree;
- white, red brick;
- facing stone;
- metal;
- high-quality concrete.

Do-it-yourself wooden porch
How to make a wooden porch with your own hands? Today it is the most common building material. This is due to the fact that the tree is quite simple to manufacture and therefore building a porch from it with your own hands is quite easy and fast. To do this, it is enough just to have circular saw(you can use the most common one, but it must be with the smallest teeth - this will help a lot in cutting accuracy), a special construction square and skillful hands.
Larch has long been considered the ideal material, followed by spruce and other conifers. Each of them is very durable and quite easy to process. The most interesting thing is that at the end of the impregnation, the material that is made from them is practically in no way inferior to oak or some other species that are several times harder.

Important to remember! To work with solid elements, you will need a good skill, the right tools, and most importantly, specific knowledge in this area. For example, the quality of drying oak material can only be determined by an experienced carpenter.

First of all, you will need to make a kosour (kosour). Since it is not very practical to make a porch to wooden house with your own hands less than 120 cm wide, then you will need at least three beams. It is best if the distance between them is about half a meter, so it will be much easier for you.
This approach will help provide your porch with strength, and most importantly, the durability of a self-made structure, regardless of how often the stairs will be used and with what weight load.

You need to know! The kosour is called the carrier beam, in which the teeth are cut, it is she who plays an important role inside the support. It is advisable to lay the steps only on the horizontal edges of these same teeth.
The bowstring (it is also called an inclined beam) must necessarily be several times thicker than the kosour itself. They are connected with cross beams. At the end between them is fixed right amount kosourov.
You will definitely need a square to cut out the ribs and make even steps. The void between the teeth, even if it is 5-6 mm, will quickly provide the steps with a slight subsidence on one side and swelling on the other. Sudden changes in temperature will greatly increase the difference in the levels of the steps.

It is customary to make the width of the steps according to the size of the foot of an adult, but it is better to take it with a margin, it is about 40 cm somewhere. The height between each step (riser) does not need to be more than 20 cm.
It should be remembered that the number of steps must necessarily be odd and for this one additional edge should be provided. With four steps or more, you will need to make a railing for the porch to the house.
With a glazed porch and a securely covered staircase from moisture, you can do without an overhang of steps. However, if the staircase is outside, then an overhang is simply necessary, since thanks to it, water will drip onto the lower step, and not between them into the riser.

Advice! The finished staircase should be installed according to a special principle so that the plane of the steps is slightly inclined (about 1-2 cm). This will help the water run down instead of pooling and forming ice.
The design is installed directly on a pre-prepared site, which is the foundation. To make your porch to the house as strong as possible, you should install the stairs exactly in the place in the foundation where the lower beam was previously laid along with the stringers. Also, with the help of it, you can push a small depression if the concrete is not completely frozen. Thus, you will get a fairly strong stop.

For flooring in the upper platform, you can take the material that was used for the stairs. In this case, there is only one requirement: it is recommended to use the widest and longest boards that are available, and make the joints as accurate as possible. When the boards are as close as possible to each other, you can not be afraid of deformation, even if the whole tree begins to dry out over time.
It will take about 3 to 7 days of work to equip a wooden porch with your own hands. It all depends on the size of your site, on the stairs and of course on the skills of working directly with the tree, but a beginner can handle it all. The most important thing is to divide the work into stages and do everything one by one, adhering to the recommendations and instructions.

metal porch
How to make a metal porch? The porch, which is made of metal, has a very big plus - it is mounted in about a few hours, if you know how to use electric welding in your work. In addition, a metal structure will cost several times cheaper if you do not buy forged elements. However, there are also disadvantages - you will have to assemble a standard porch with your own hands, and therefore it will not look very beautiful and original, unlike others. If you want to make a beautiful porch with your own hands, then you can buy forged products, but they will need to wait up to 4 weeks (it all depends on the volume of your order).

Do not be upset if the budget is limited, because even a primitive metal staircase can be made very imposing and beautiful, the main thing for this is desire and imagination. For the lightest option, channels, corners and necessarily filling material are used. They can be: porcelain stoneware, wood or chipboard.

For an ordinary metal porch, two channels of the same length will definitely be needed. They are attached parallel to each other at a distance that is equal to the size of the steps. After that, mark the corners and cut them to the same length as the steps, but at the same time adding a few centimeters along the edges to apply the weld.
In the same way, small pieces are cut off from the corners and these two segments are welded with the letter “G” (the edge-frame must be cut). The number of such details should equal the number of steps on your porch. Then they are closely welded to the channel, and as a result you get a high-quality metal oblique. Similarly to this principle, another oblique angle is made using the second channel.
After all these actions, the resulting elements must be connected in pairs from the side where the corners are cut to fit the width of the future staircase. This creates the contour of the steps, and the corner under the riser should turn upside down (thus creating a side).

Your staircase is almost ready. Now it all depends on your taste. The wooden step attached in any way to the resulting frame will look most beautiful. Even if you do not have much experience in working with welding, it will generally take 2-3 hours to assemble such a porch with your own hands.
Concrete porch
How to make a concrete porch? This option is considered a continuation of the laid foundation, but only with the reinforcement of all steps. This is done so that after a couple of months chips do not form due to constant heavy loads. Due to the fact that it is customary to cover a concrete porch with special facing tiles, gradually collapsing concrete immediately forms chips and then cracks in the lining itself.

On a pre-prepared foundation, you can assemble the formwork, which will be the bottom step. In this case, it should be borne in mind that the height of the step, due to the weight load, must necessarily be 2 cm more than the rest. Next, a similar procedure is carried out, as in the construction of a reinforced foundation for the porch. The only difference is that in this case there is no need to spare the reinforcement.
Advice! The resulting gap between the two foundations is recommended to be closed mineral wool. This method will create a good expansion joint.

Formwork for steps can be prepared in advance - this will save time. However, it is much more reliable and easier to pour concrete into each step in turn, and even better if, before pouring a new step, the solution of the previous one will have time to set.
In the end, it is necessary to level the already completely frozen structure, and then cover it with any tile intended for a metal porch or stone.

The time spent on work directly depends on the use of full formwork, as well as on the formation of each step in turn or all at once. On average, you will need a week to work if you do everything at once, or a week for each step for the concrete to completely set.

Porch made of brick or stone
How to make a porch out of brick or stone? This is probably the most difficult version of the porch. This is because it is much easier to work with a brick foundation where you don't need precision than it is to lay out the stone as evenly as possible.

Bricks should only be laid if there are several assistants who will thoroughly mix the concrete all this time. With a stone, everything is much more complicated, because the chipped edges cannot be matched perfectly to each other. In general, if there is at least some experience in this activity and at least two people to help, then this type of porch should be abandoned immediately, otherwise you will simply waste your time and all the material.

It will be much easier to do concrete stairs, and then pick up the material for the steps to it, which will be of a similar size. After that, they should be laid in one layer on the "frame" of concrete, which is pre-aligned. This method has a huge advantage, since, having made a mistake, you can easily chip off the lining of the desired area and re-finish.
Visor construction
The visor is primarily the protection of the platform and steps from various natural precipitation, as well as the ability to independently decorate the porch with your own hands in the house or in the country, beautifully and in a short time. Often it is made of durable metal pipes, coniferous trees are used for the frame itself or, in last resort, metal, but for sheathing they take any wood or plexiglass.

Canopies made of wood will need to be touched up at least 2 times a year or treated instead by special means, otherwise it will begin to gradually dry out, and then split longitudinally. When using plexiglass, it is better to make spans between them of about 0.7 m2. It is strongly not recommended to use glass, as it can easily crack in winter during snow or due to frame deformation.

The total area of \u200b\u200bthe visor must necessarily be half a meter larger than the porch itself, otherwise it will not be able to fulfill its main function - protection.
The simplest and most fast option is to do something similar to metal ladder. Then the distance between each step can be made approximately 0.5 m. In this case, you will no longer need L-shaped elements and a channel, because the load on the visor itself will be many times less and only the corners in the outer frame will be enough. But filling with wood or porcelain stoneware can easily be replaced with any other material.

When pouring the foundation, during the formation of the foundation, piles are necessarily installed, and it is precisely on them that a visor should be laid. In addition, it will help in the future to completely glaze the veranda in just a couple of days, if there is a desire.
For coating, it is better to take a metal sheet along with tiles, but it will be much more effective and beautiful if you use plexiglass and polycarbonate.

Advice! To avoid rust on a worn metal sheet, you can easily paint it with paint in several layers.
Be sure to make the visor pitched, and in the place where the lower edge will be, carefully weld a metal gutter with a slight slope. Fasten an ordinary chain at the very end, which will reach the ground and thus, water will not splash during rain. Due to the fact that water has excellent viscosity and easy fluidity, it will slowly flow down this chain. If you want to somehow get rid of the appearance of puddles near the porch, make drainage.

How to glaze a porch yourself
The most common option is a closed porch. In this case, the concrete and stone foundation, together with the visor and the stairs, is very popular, while it is necessarily attached to piles.

With the help of corners, which must match the height of the piles in the visor, a frame is formed. They are well welded to the piles, and then double frames made of wood with glass are inserted.
Advice! A glass sheet can be absolutely any height, however, the width should not be more than 120 cm, because the windage of this glass is high and even a light wind can severely damage it.

If the void between the piles turned out to be more than one meter, then break them with pseudo-piles. To do this, at the top and bottom, to the end of the piles, a corner is welded with a step inward, and then between them - a double angle, which will form pseudo-piles. Similarly, you need to divide the height, which forms a horizontal beam from several double corners. This will significantly reduce the load on the glass, and the design itself will look light and beautiful.

The most common mistakes that are made during the construction of the porch
1. Building a porch with your own hands using low-quality concrete (below grade 200). This concrete itself is quite friable, which is why it will be difficult to complete the cladding, since other mixtures have much higher strength after complete drying. In this case, temperature changes can seriously damage the lining. The foundation itself, which will subsequently remain open, will begin to collapse in the summer, and brick steps will collapse even faster.
2. Lack of good waterproofing. If waterproofing is not done in a timely manner in the porch to the house, this will lead to a huge accumulation of moisture below, as a result of which, during frosts, the structure will begin to gradually collapse. The steps will suffer the most, since it is they who get wet in the very first place.
3. Leveling of steps and plastering was done only a few days after the completion of concreting. If there is a long break in time, then all layers will cease to hold without additional gaps in the structure itself, or at best they will, but very weakly. Do not forget that the place where the plaster adheres together with the screeds is considered the most vulnerable.
4. The foundation was erected without reinforcement in the base. If you do not have fittings, then the porch to the house will simply be divided into two separate parts at the slightest subsidence. This would be impossible to repair.
5. Do-it-yourself porch was attached to the foundation of the house itself without special expansion joints. You can securely attach the porch only if the house with the porch has a joint foundation. If this is not done, then a sedimentary crack will appear right at the border of the two foundations. To avoid this, seam facing brick or the tiles need to be placed on the same border, and the gaps must be filled silicone sealant and in any case not grout.
So, you do not need any specific skills for building a porch with your own hands. Each operation is considered basic in construction and therefore everything is within the power of even a beginner with skillful hands.
Porch to the house with their own hands. Video
The porch performs not only decorative functions. In winter, it protects the front door from snow drifts, and in summer - from rain or heat. It can be made of metal, stone, brick, concrete, but the best option for wooden house there will be a porch of solid wood. You can build a porch to a wooden house with your own hands if you approach this matter prepared, and for this we recommend that you read our article.
Porch dimensions
For a free approach to the front door and its opening, you need free space. According to building codes, the upper platform of the porch, adjacent to a single-leaf door, should have a width of 1.6 m, to double doors- from 2 m. The distance from the door to the first of the steps is 1 m. To protect against rain and snow, the visor above the porch is made slightly wider than the platform (by 30 cm).Must be normalized width and height of steps, while the average step width of a person is taken as a basis. Their optimal height is 16-19 cm with a width of 25-33 cm. Since a person starts climbing stairs and finishes it with one foot, the number of steps should be odd.
Standard step sizes
V winter period steps are often covered with ice, so the porch should be equipped with handrails. If there are more than 3 steps, their manufacture is mandatory. Standard railing height- 80-90 cm.
Important! The top platform of the porch should be lower door sill by 5-10 cm. Otherwise, during seasonal fluctuations in the soil, it may rise and block the door.
Foundation
The simplest foundation for a wooden porch are piles. They can be made from wooden beam, treated with an antiseptic or burned in a fire, or metal pipes. Depth such supports should be slightly lower (by 20-30 cm) than the level of soil freezing.To install piles, a small layer of sand is first poured into the pits prepared for them, and then gravel. Such a pillow will remove moisture from the supports and protect them from premature decay.

Porch foundation on wooden piles
After installing the supports and leveling them, the space between them and the ground is filled with concrete mortar. Extreme supports attached to the wall of the house with large nails or self-tapping screws. Further work should be carried out only after the concrete has completely cured.
Important! In the event that a concrete foundation is chosen for the porch, it is necessary to provide between it and the base of the house expansion joint. Otherwise, during seasonal ground movements, due to the difference in the load on the supports, the foundation at the junction with the structure may crack. To avoid moisture ingress, such an expansion joint can be filled with any flexible material (rubber gasket, mineral wool, etc.), and then closed with a flashing.

An expansion joint should be provided between the base of the house and the porch
What is a kosour?
The side sloping boards to which the steps are attached are called bowstrings. The steps in them can be inserted into special grooves cut in the bowstring, fastened with screws, dowels, studs or special steel fasteners.
stair bowstrings
But most often stairs are made, the bowstrings of which have cutouts on which the steps lie. This type of bowstring is called kosour.
Stairs with one stringer are rare. Most often, the steps are mounted on two or (if the span is large enough and ranges from 1.2-1.5 m) on three supports.


Making a kosour

Staircase on three stringers
All kosoura are divided into two main types:
Ordinary stepped; have cutouts of a triangular shape, placed at an equal distance from each other; a significant disadvantage of this method is the thinning wooden beam after cutting it
WITH "fillies": small bars (dowels) to support the steps, which are inserted into the slots of the stringers; quite complex, but more durable design.

Kosour with fillies
The kosour is the most complex structural element, so its dimensions and the width of the cutouts should be measured with great care. To facilitate the process, you can use a stencil made from a piece of plywood or thick, even cardboard.
Horizontal cutouts for steps in the stringer should be equal tread(step width). The size of the vertical section is riser(step height).
Important! When measuring the size of a kosour or bowstring, it should be taken into account that the tread of the first step should become a continuation of the site.
So that the support beams do not bend under the weight of people walking up the stairs, the boards from which the bowstrings or stringers will be made must be thick enough - from 60 mm with width from 30 cm. They are made of high-quality hardwood (spruce, pine, maple, oak or beech), which does not have cracks and knots.
More durable and reliable are stringers made of a metal profile. For this you can use steel corners.

Stringers from the channel
Porch Assembly
Before starting the assembly, to protect it from decay, the wood should be carefully treated with any antibacterial agents and painted several times with drying oil or varnish.1. After the concrete mortar has hardened in the supporting pillars holes are punched for laying the upper part of stringers or aunts (they are attached without nails). The lower part of the bowstring should lie on support pads, resting on nickels.

Fastening the upper part of the stringer

Cuts for fastening the bottom of the stringer
2. On the supporting piles are placed lags and fastened with self-tapping screws. For their manufacture, 5-centimeter durable boards are used. They lay on the logs floorboards thickness from 2.5 cm.
3. To ensure ventilation between them, be sure to leave a small 20mm gap. The same gap is left between the steps and the tread. It is not necessary to make too large a distance between the boards - after all, during operation, the wood will dry out and the size of the cracks will increase.
4. Start laying steps from the bottom. If desired, you can do without risers, laying one tread.

Steps for the street porch can and should not be done
5. Treads and risers are attached to wide head screws. They are slightly (a couple of millimeters) recessed into the boards. For fastening, you can also use metal brackets. The ideal option there will be the use of boards with a tenon-groove system.

Fastening steps and risers
The porch is a functionally significant element of the architectural ensemble country house, which, in addition to its practical purpose, performs an aesthetic function, emphasizing the beauty of the entire building. Acting as the front part of the building, the porch of a private house can tell a lot about its owner: about his tastes, attitude towards his site, material wealth. That is why many of us try to design the facade of the house so that it stands out from the others. And even if at the construction stage the owner does not have the opportunity to attach a beautiful wooden porch to the house, he can always realize what he wants after a while.
The porch of a wooden house is an extension in front of the entrance to the building, which performs the function of transition from ground level to floor level.
Since the height difference between the ground and the floor often reaches from 50 to 200 or even more centimeters, the porch is equipped with a staircase laid out from the steps.
The practical function of the porch also lies in the fact that the wooden extension is designed to protect the front entrance of the house from snow and rain. Therefore, the platform adjacent to the front door is also equipped with a canopy. Depending on the shape and purpose, the porch may have one of the design options, consider some of them.
Option # 1 - an open area on the steps
A compact platform with steps adjacent to it is an excellent addition to the architectural ensemble of a one- and two-story wooden house of small size.
Option # 2 - a platform with partially closed walls
When arranging a porch located on a small elevation, low fences perform a protective function, protecting against falls and possible injuries.
On the porch, the height of which does not exceed half a meter, such railings and partially closed walls act more as a decorative design.
Option # 3 - closed porch
The owners of country houses most often equip a glazed porch if they have the opportunity to build a more spacious platform in front of the entrance.

The space of such a porch is a veranda furnished with comfortable garden furniture, allows you to receive guests and enjoy a pleasant outdoor recreation
Self-construction of a wooden porch
Before proceeding with the construction of the porch to the house, it is important to determine not only the size of the structure, but also consider the presence of steps, the height of the handrails and the general appearance of the porch.
A detailed project of the future structure, or at least a drawing of the porch, will allow you to visually draw up the idea and calculate the required amount of material
When designing a structure, a number of points should be considered:
- The width of the porch area must be at least one and a half width of the main entrance. The porch is located on the same level as the first floor of the building. In this case, a margin of 5 cm from the level of the porch platform for the front door should be provided. This will allow you to avoid difficulties in the future in case of surface deformation. wooden platform exposed to moisture when opening the front door. Indeed, according to the requirements fire safety The front door should only open outwards.
- The number of steps is calculated with a reference to the fact that when climbing, a person steps onto the porch platform leading to the front door with the foot with which he started moving. When arranging the porch in country house usually do three, five and seven steps. The optimal size of the steps: a height of 15-20 cm, and a depth of 30 cm.
- Wooden steps leading to the porch should be placed at a slight slope of a few degrees. This will prevent stagnation of puddles after rain or ice melt during the cold season.
- It is desirable to provide for the arrangement of a canopy that protects the main entrance from precipitation. The presence of fences and railings will make it easier to climb and descend the stairs, which is especially important in winter, when the surface is covered with a crust of ice. From the point of view of ergonomics, the most comfortable railing height for a person is 80-100 cm.
- During the construction of the porch, it should also be taken into account that when attaching an extension to a monolithic building, it is highly undesirable to connect the building structures "tightly". This is due to the fact that the house and the porch, having different weights, create different shrinkage. This can cause cracks and deformations at the joints.
Stage # 2 - preparation of materials and construction of the base
For the manufacture of a wooden porch, materials will be required:
- A bar with a section of 100x200 mm for the installation of support pillars;
- Boards 30 mm thick for arranging the platform and steps;
- Rails with a section of 50 mm for side posts and railings;
- Antiseptics for wood surface treatment;
- cement mortar.
From construction tools should be prepared:
- Saw or jigsaw;
- Hammer;
- Level;
- Screwdriver;
- Fastening materials (nails, self-tapping screws);
- Shovel.
Erection of any building structure starts with laying the foundation.
The best option for laying a reliable and durable support for the construction of a wooden porch to the house is the construction of a pile foundation
Unlike traditional concrete types of foundations, pile foundations do not require large financial costs for construction. In addition, it is quite simple to install: any owner who has basic construction skills can build a pile foundation.
Wooden beams intended for supports should be treated before installation. This helps to prevent wood decay and extend the life of the supporting structure. In the places where the supports are installed, we dig holes 80 cm deep, the bottom of which is lined with a sand and gravel "cushion".
Having leveled the base, we install the support pillars vertically, align them according to the level, check the height, and only after that we fill it with cement mortar
The height of the piles should be calculated taking into account the fact that even after the platform has laid on them, the distance to the door remains at least 5 cm.
Having poured vertically installed support pillars with cement mortar, we wait for it to dry completely. Only after that we fix the extreme row of support posts to the wall of the house with the help of self-tapping screws. This will significantly increase the strength of the structure. The logs are laid horizontally directly on the supporting pillars.
Stage # 3 - making a stringer and installing steps
To equip the flight of stairs, you will need to make a special inclined board - a kosour or a bowstring.
The flight of stairs can have two design options: with embedded steps or with cut ledges
Using a special triangular pattern, we make recesses for the bowstring. You can make such a template yourself by cutting out a blank from thick cardboard. One of the sides of the pattern corresponds to the horizontal part of the future steps - the tread, and the second to the vertical - the riser. The number of steps depends on the size of the porch area and the expected load that they will have to withstand.
Having calculated the required number and size of steps, we mark the profile of the future bowstring on the board. As a basis for making a bowstring, it is better to use unedged lumber, which is an order of magnitude wider than ordinary edged boards.
To secure the lower part of the bowstring, it is necessary to pour a concrete support platform. To protect the lower stage from rising steam from the ground, it is advisable to lay a vapor barrier with the top layer.
At this stage of construction, it is also necessary to provide for a “cushion” device to remove excess moisture.
Having filled the supporting platform with cement mortar, we wait for the base to dry completely and only after that we proceed to the installation of the bowstring. We fix them on the supports using self-tapping screws or nails. The distance between the bowstrings should not exceed one and a half meters.
Stage # 4 - assembly of a wooden structure
Finished kosour by sawing, or using the "thorn-groove" method, we attach to the lags of the site. To do this, we fix the boards with grooves to the areal beam so that subsequently the spikes of the bowstrings are inserted into the grooves of the board.
After that, we proceed to the installation of the wooden floor of the site. When laying boards, it is desirable to fit them as closely as possible to each other. This will further avoid the formation of large gaps in the process of drying the wood.
The final step in the assembly of a wooden porch is the installation of steps and risers.
We start laying from the bottom step, performing fastening using the “thorn-groove” method and additionally fixing them with self-tapping screws. First we fix the riser, and then tread on it.
The porch is almost ready. It remains only to make a railing and equip a canopy. To give the structure a more attractive and complete look, it is enough to cover the surface with varnish or paint.
Video clips with examples of a porch device


