Platbands are special strips for hiding the mounting seams between the window frame and the wall. In addition to their direct purpose, platbands can be used to decorate the window and the facade of the house. To choose the right platbands and make their correct installation, read our article.
The main rule when choosing platbands is that their material matches the material of the window. If you have a wooden window, then the casing should be wooden, if plastic, then plastic. Although there are exceptions, in the form of a successful combination of platbands and windows made of different materials.
Wooden architraves
Wooden platbands - made from planks with a thickness of at least 30 centimeters. The width of wooden architraves can be different, depending on the profile pattern and design. The profile pattern of simple wooden architraves is made using a milling machine.
Advantages : affordable price, easy installation.
Disadvantages: poor design, poor resistance to moisture and temperature changes, the need for regular painting or varnishing.
Release form: rounded or beveled planks with a convex pattern, or smooth, 1.5-2 meters long.
Application area: hiding mounting seams on wooden windows. Additional protection seams from environmental factors.
Carved architraves
carved wooden architraves, are made by hand or using a jigsaw. There are many options for the pattern of platbands: from a simple ornament to sacred symbols that protect the house from evil spirits. Independent production of carved platbands is a job that requires skills in carpentry. If you want to make platbands with your own hands, but do not have experience, choose a pattern without complex elements.
Pros: very pretty appearance, the ability to ennoble the facade of the house without significant financial investments.
Disadvantages: high price, manufacturing complexity, fragility, the need for regular painting.
Release form: depending on individual order or manufacturer's design.
Application area: decoration of windows and the facade of the house, hiding assembly seams. 
Plastic architraves
Plastic architraves is a common name for slats made of plastic, polyvinyl chloride and foam. Platbands made of plastic are often included with the installed plastic window. Due to the specifics of the production of this type of platbands, they cannot be made at home. Plastic platbands can have a regular and carved pattern. Installation of planks is carried out on special fasteners, liquid nails, glue or double-sided tape.
Advantages: resistance to moisture, long-term operation, easy installation.
Disadvantages: the fragility of some products, a small choice of design when imitating carved platbands.
Release form: smooth, carved or profiled strips, 1.5-2.5 meters long.
Application area: hiding mounting seams on plastic, sometimes wooden windows. Additional protection of mounting joints from environmental factors. 
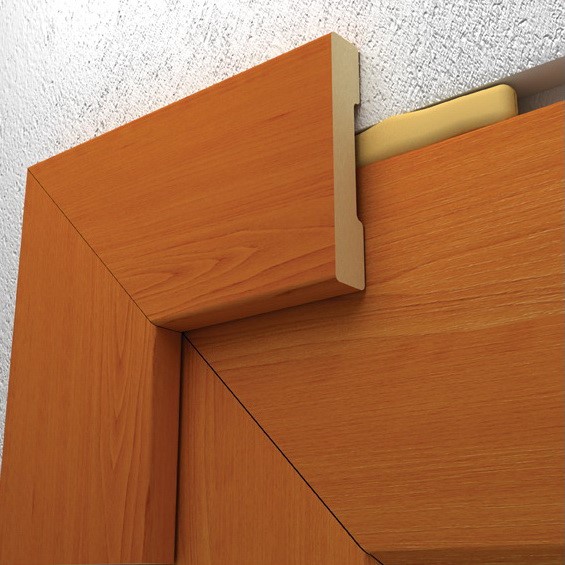
Platbands from MDF
Due to poor resistance to moisture, medium density fibreboard trims are only recommended for interior window trim. MDF planks are great for wooden windows, especially if they repeat the color and texture of the tree. Platbands are fastened with nails, screws or glue.
Advantages: low price, good appearance.
Disadvantages: poor resistance to moisture, inability to use for exterior decoration.
Release form: smooth, rounded or profiled strips, 1-3 meters long.
Application area: interior decoration wooden or plastic windows. 
Aluminum architraves
Aluminum platbands are mainly designed to hide assembly joints when installing windows and stained-glass windows made of the same material. In appearance and design, aluminum architraves strongly resemble plastic trims. Fastening of aluminum platbands is carried out on a special profile or latches.
Advantages: strength, durability.
Disadvantages: poor combination with windows made of other materials.
Release form: aluminum strips with different kind drawing except carved, 1.5-2.5 meters long.
Application area: external and internal finishing of windows and stained-glass windows from aluminum. 
Making platbands with your own hands
You can make platbands yourself only from wood. To do this, you will need a special tool and wooden planks.
simple platbands
To make simple wooden platbands, you will need:
- Electric jigsaw.
- Planer (simple or electric).
- Sander.
- Mill (manual or machine).
- Fine-grained sandpaper.
- Wooden planks with a section of 30x100 mm.

Manufacturing technology of simple platbands:
- Treat all sides of the wooden planks with a planer.
- Install the profile drawing attachment on a manual or stationary machine.
- Process front side platband with a cutter.
- Make the final polishing of the platbands with sandpaper or a grinding machine.
In the absence of a milling machine, platbands with a smooth surface can be made. To do this, using a planer, bevel the front side of the plank at an angle of 20-30 degrees and sand it with sandpaper.
Carved architraves
If you are going to make wooden platbands with carved pattern, keep in mind that this is not a fast business and requires "iron" patience. To create carved platbands, in addition to the basic tools, you will need a set of special chisels with different form blades and manual jigsaw. To make it easier to navigate in a large selection of patterns, below are a few templates for cutting: 


There are two ways to make carved platbands - conventional and overhead. V the usual way, the pattern is cut directly on the casing itself. In the overhead method, the pattern is made in the form of overlays, at least 10 millimeters thick, in which case the overlay is attached to the main casing. For beginners, it is recommended to use the overhead method, because in the case of an unsuccessful pattern, the overlay can be replaced with a new element.
The right choice of wood species for carved platband is very important. It is easier to carve softwoods because they are soft. Platbands made of hard larch species will last longer.
If you have not done wood carving, for the first time choose a very simple pattern and as your skill increases, move on to more complex ornaments. 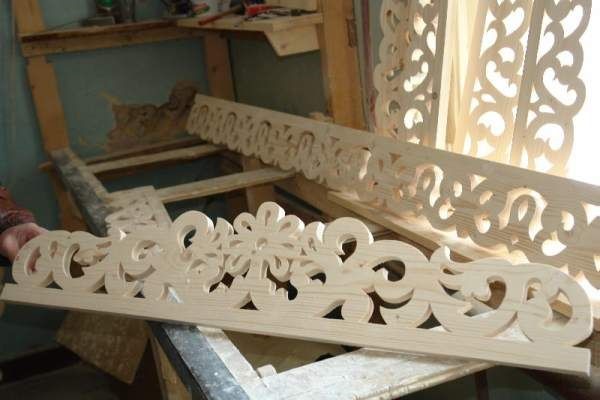
Stages of manufacturing a carved platband in an overhead way:
- Prepare the basis for the platband, for this, process the planks with a thickness of 30 millimeters.
- Make overhead strips with a thickness of at least 10 centimeters.
- Draw on thick paper or cardboard the elements of the future pattern.
- Cut out the pattern elements with scissors.
- Install the cut out stencil on the overlay bar and transfer the pattern to it.
- Using a drill and a jigsaw, make notches according to the markup.
- Finish the edges of the recesses with chisels, round the edges and finish the contours.
- Grind the finished lining element.
- Install the overlay on the main casing, securing it with glue or nails.
- Having collected all the overhead elements in one composition, proceed to install the platbands on the window.
Platband installation
Installation of wooden platbands

You can install wooden platbands on the window using nails, screws or glue. Planks are attached to the sides and top of the frame. In some cases, the platband is also installed on the lower part of the window, if this is provided for by the design.
For a beautiful docking of simple platbands, their edges are cut at an angle of 45 degrees. This can be done with a hacksaw and a miter box.
In the case of a deep location of the window in the opening, the platbands can be placed on the wall using extensions.
The fastening of the platband to the wall depends on the material from which it is made. For wooden wall it will be enough to use nails or screws, for concrete or brick - dowel screws.
Installation of carved platbands mainly depends on their pattern and composition. Docking carved platbands produced in such a way as not to disturb the overall pattern.
After installation, the platbands are treated with impregnation for wood, then painted or varnished.
Installation of plastic and aluminum platbands

Correct installation plastic and aluminum platbands, requires a special installation profile, which is attached to the frame. The platbands are installed in a groove located on the profile. In the absence of a profile, platbands are installed on fasteners-latches attached to the frame or wall. In rare cases, plastic architraves can be fixed with glue, but this type of fastening is unreliable.
When using telescopic architraves, fastening is carried out by inserting the edge of the bar into the groove, which is located on the frame.
Foam platbands, fastened only with glue.
Installing the outer frame window openings usually practiced in wooden houses, where you need to cover the gap between the frame and the wall with something. The issue can be resolved in different ways: nail planed boards around the perimeter or first cut out trim on the windows, and only then attach them to the walls with your own hands. There is a third option - to put finished goods bought in the store. Our task is to explain how to make such a cladding yourself.
Types of decorative flashings
For exterior window framing and entrance doors platbands made from the following materials are used:
- wood, thick plywood;
- metal;
- Styrofoam;
- polyurethane.
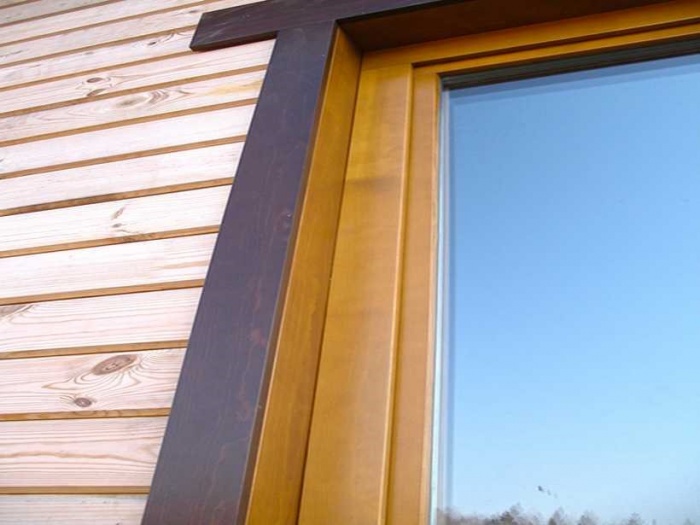
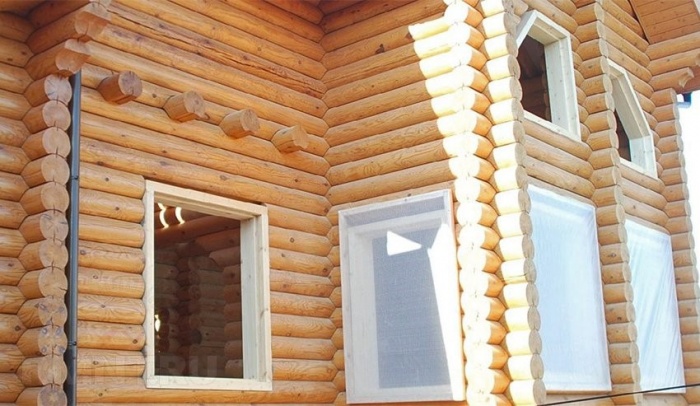
Wooden cladding decorating log houses from time immemorial, remains popular to this day. It is performed in two styles - Russian, where beautiful carvings with rich ornaments prevail, and Finnish - more concise. The latter is distinguished by the direct forms of the elements and a small hinged visor, which is shown in the photo:
Framing in Finnish (left) and Russian style (right)
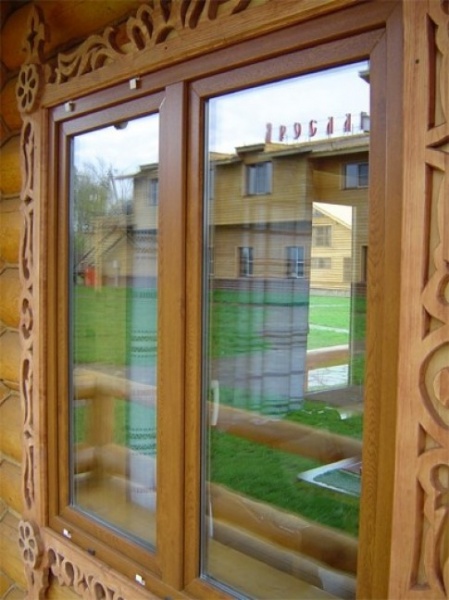
Reference. The scope of wooden flashings is not limited to log houses. Now they can be found on country cottages built of timber and bricks, including plastic windows. As the photo shows, the openwork pattern looks great even on a stone wall.

The main advantage of wood is by no means ease of processing, although it also matters. Another thing is important here: carved architraves, made according to an individual sketch, will give the facade an exclusive appearance that you will not see anywhere else. This good reason take on independent production, because ordering such products from the master will cost a lot. This equally applies to metal flashings - you can also cut them yourself if you wish.

Window cladding made of foam and plastic is a more modern way to solve the issue. And although polymer elements for windows do not differ in exorbitant prices and are easy to install, they are completely devoid of individuality. The reason is clear - many enterprises have mastered the production of polyurethane decor.

Facade decor made of polyurethane
Cut out a wooden platband without a stencil
This method is suitable for those who want to decorate door and window openings, but do not have experience in woodcarving. First you need to choose the material - boards 2-4 cm thick, whose width is determined by the selected pattern, and the length - by the size of the window.
Advice. Choose lumber from softwoods - linden, alder or aspen. Sawing a pattern in solid beech or oak is not an easy task. Spruce is too knotty, and pine cracks easily along the fibers, so it is undesirable for a beginner to use it.

The window trim consists of 4 main parts shown in the drawing: two sidewalls, a frieze and a window sill. The design can be supplemented with a decorative top (in other words, a kokoshnik). The elements are joined together at an angle of 45 or 90 ° - at your discretion.
To make flashings with a simple pattern of flowers, proceed in this order:
- Draw a line down the center of the board. Focusing on it, draw circles along the entire length with a pencil (you can outline a round object of a suitable diameter). Using a square, draw lines through the centers of all circles at an angle of 90 and 45 °.
- Take a drill and drill a hole in the center of the circle and two more on each line. Draw the petals of future flowers around them.
- Using a jigsaw, cut out each petal and circle the outer contour of the product with a pencil, as shown in the photo. Cut off the excess part and carefully clean the resulting ornament. In the same way, make all 4 parts.

Advice. If you are not very good at drawing, use a regular pattern to draw curved lines.

After cutting, home-made platbands must be carefully processed inside and out with a rasp, and then with coarse sandpaper. The last stage is antiseptic coating and staining (or applying yacht waterproof varnish). To better understand the process, watch a video where a little boy does all the work:
An important point. Nothing bad will happen if the board cracks into 2 parts during work. They can be fastened together with steel plates screwed with reverse side.
Manufacturing according to a template
This technology involves the application of a complex pattern on wooden surface with the help of a stencil, according to which the platbands are cut out with their own hands. Some sample templates available for sale are shown in the picture:

Note. You can make an individual stencil yourself by drawing an ornament on a sheet of cardboard, thin plywood or plastic, and then cutting it out with a jigsaw or scissors.

Drilling a workpiece for a jigsaw
There are 2 ways to make wooden window flashings:
- Take the boards and make a slotted pattern, as described in the previous section.
- Cut complex elements separately, and then attach them to the boards with glue, self-tapping screws or spikes. This is how patterns with protruding details are made.

Regardless of which method you choose, the cutting process looks the same. An ornament is applied to the surface with a pencil through a stencil, after which the outer contour of the product is formed with an electric jigsaw. Where you need to cut out the inner drawing, holes are first drilled for the entry of the jigsaw blade. For confident work with thin curved cuts, it is better to take a file with a small width.

Finished element, which is then attached to the frieze or side frame board
Note. The same technology is used for the manufacture of platbands from sheet metal or corrugated board. Just need to pick up a different cutting tool.
We bring to your attention another video that tells how to make a window cladding according to a template without using a jigsaw, coping only with a drill with a crown drill:
Installation instructions
There is no particular wisdom in installing platbands with a slotted pattern. The design can be assembled on the table, and then put on the window as a whole or mounted in parts. In chopped wooden house for the installation of the cladding, it is necessary to prepare platforms along the perimeter of the opening by cutting the logs to the width of the board.

Element-by-element assembly on self-tapping screws is carried out in the following order:
- Treat all carved details with varnish and lay them in place on the prepared board to form a pattern.
- If you need to make a large pommel, then use several boards interconnected by corners as a base.
- Screw each element to the base by screwing the screws on the back of the board.
- Install the finished trim flush with the window frame so that it closes the gap, and secure with long screws. For doors that open outward, leave a gap of 1-2 cm so that they swing open 90 °.

Advice. To prevent the elements of the ornament from moving during fastening, gently pull them to the base with clamps.
How to properly install carved flashings is shown in the video:
Conclusion
Cute architraves with a beautiful ornament look great on any windows, both wooden and plastic. This is not to say that they are difficult to manufacture, but you will have to work. Success largely depends on the quality of the wood and your qualifications. In order to avoid mistakes, beginners are advised to select a simpler drawing and “fill their hand” on the facades facing the backyard. Then you will decorate the front side of the house flawlessly.

Structural engineer with over 8 years experience in construction.
Graduated from East Ukrainian National University them. Vladimir Dal with a degree in Electronic Industry Equipment in 2011.
Platbands are an important component for any window. Often they are associated with beautiful carvings that serve purely decorative purposes. But far from always they have a catchy appearance, and they have much more functions. This universal element, which is necessary to protect windows and improve their insulating qualities. Therefore, their installation is recommended in almost any wooden house.
What are platbands for?
The platband decorates the window and makes it much more colorful. But initially its purpose was defensive. Platbands are used as an external element of the window frame, which not only protects it from damage, but also closes the mounting gap between the frame and the wall of the house.
This approach provides:
- Reduced heat loss;
- Elimination of through holes;
- Protection from dust and noise;
- Moisture protection.
Interesting ! Previously, platbands were also used as amulets. Because of this, they were given a colorful and non-standard look.
Although these advantages are not so significant in concrete and brick structures, they are extremely important for wooden houses. Over time, the wood can dry out and deform, which leads to gaps between the frame and the rest of the structure. Platbands allow you to slow down this process, as well as reduce the harm from existing holes.
Types of platbands
For houses, a lot of varieties of platbands are used. Often they differ in the material used, since they have a similar design. The main classification of platbands is according to the method of installation and marks two types of platbands:
- overhead;
- Telescopic.
The overhead version is considered the most common, being the old type. It is installed simple method over the window frame, thereby blocking access to the sun and precipitation to the joint. Installation of this type is very simple and does not require much effort.
The telescopic casing is more modern. Its fastening does not require additional elements such as screws or nails, because it is placed in the gap between the wall and the frame. Through this, it is securely fixed around the entire perimeter.
Priority is to use the telescopic mounting method. It is more convenient, because it more reliably covers the gap and prevents its deformation. However, its installation is complicated by the fact that for it it is necessary to completely remove the window, which is not always possible in wooden houses. In such cases, it is easier and more efficient to use an invoice platband.
Trim materials

Materials for platbands may be different. Often, wood is used for these tasks, which is recommended for wooden structures. But here several options are allowed, among which:
- Wood;
- Plastic;
Wood is a practical and natural option that is suitable for any structure. Due to its versatility, it can be given any ornament and style, and the use of the same type of material will allow it to perfectly complement.
Advice ! For better alignment, it is recommended to make platbands from the same wood as the structure. But if the texture is the same, then the color can be changed through special formulations.
Often it is chosen precisely because of the variety in the decor, because other materials require special processing on machine tools and rarely have similar decorating elements.
Although wood is reliable and durable, it does have its drawbacks. Among them are vulnerability to moisture and high temperatures. In addition, frost also has a negative effect on it, destroying and deforming the structure.
Plastic in this regard is much more convenient. It is practical and reliable, and the wide possibilities in production allow you to give it any texture, including wood. But at the same time, it does not deform from moisture and temperature changes, and its lifespan is much longer. Another advantage of plastic is that it has fastener elements in advance, which allows you not to spoil the appearance of the platbands with nails or screws.

Perhaps the only drawback of plastic is its artificiality. Many owners do not want to complement their home artificial materials and reduce its environmental friendliness. A third option may help here.
MDF is boards made from wood waste. They are natural, but impregnated with special compounds, which significantly increases the life of the material and protects it from exposure. external factors. Often such platbands are laminated, which increases their lifespan and reliability. The only drawback of such elements is their relatively low strength compared to plastic and wood.

What material to take - the choice is purely individual. Each of them has its own advantages, but there are also disadvantages.
What wood is better
If the choice fell on wooden platbands, then it is important to note the choice of wood species. In fact, almost all options are suitable for this task, because they do not need to carry any load. But even here there are nuances.
The best option for platbands is oak or beech. This is a durable breed that can serve for a long time and not deform from moisture or heat. But the problem is that it is extremely difficult to work with. It is extremely difficult to cut patterns on such material on your own, and not every master will undertake this.
Advice ! The way out of this situation are special milling machines, the pattern on which is loaded into the program in advance.
If you need a softer and more inexpensive breed, then you can choose linden. It is easy to work with, but without careful processing, it will quickly collapse. You need to use high-quality antiseptics and some kind of coating, which can worsen its appearance.
An intermediate option for such a task is birch or pine. This is a fairly durable variety that requires only basic care. But it will be easy to work with her.
Preparing for installation
First you need to take all measurements from the window. It is important to choose the appropriate dimensions so that the frame outline does not peek out from behind the casing and is securely hidden. Next, the preparatory stages with the material are carried out.
If wood is used in the process of work, then you must first cut out the blanks of the platbands, decorate them at your discretion and process them. Plastic and MDF do not require processing, but wood needs impregnation with protective compounds against moisture, as well as to protect against insects.
Important ! All work is carried out with dry lumber. If it is poorly dried, then deformation after installation is possible, which will ruin all the work.
After measurements and processing, it is important to pre-mark the joints and fasteners on the platbands. All holes are pre-drilled. The platbands are carefully polished.
It is also important to prepare the place of work itself. Window joints are carefully isolated, because in the future access to them will be limited. If any insulation or repair work is planned, then they need to be done before installation.
You must first select the method of attachment. It is not required for telescopic architraves, but for invoices there are several options. Among them, the most popular are:
- Nails;
- Deaf spike;
- Through spike.
The first option is the simplest, but spoils the overall picture and creates an extra load on the material during installation. Therefore, spikes are more comfortable. A blind spike involves the installation of small spikes on the window frame, and small holes are made in the casing for them. A through spike implies the same technology, but the hole in the casing is through.
If the house is built from a log house, then you need to make room for platbands. To do this, cut off the protruding edges, which can be done at an angle.
Installation of platbands in a wooden house
After carrying out all the preliminary procedures, the installation phase begins. To begin with, all the components of the casing are interconnected. To do this, you can use the same technologies of spikes, nails or glue. But the latter is often used as an auxiliary component.
During installation, when using spikes, you need to do the following:
- Mark the future location of the spikes on the frame and casing;
- Make or purchase spikes for this task;
- Drill appropriate holes in pre-marked places;
- Put the casing on the spike and fix it.
The first stage includes preliminary marking of the perimeter where the fasteners will be placed. It is important to evenly distribute the load, so it is worth placing them around the perimeter of the structure.
After acquiring or making spikes, future holes are drilled for them. This is a simple step, after which the actual installation process begins. The platband is carefully positioned so that all the spikes fall into the holes.
The task is quite simple, it is only important to accurately mark the future location of the fasteners. It is recommended to use glue during work to securely fix the structure after installation. This will reduce the risk of it falling and improve the insulation of the holes.
You can simplify the process with ordinary self-tapping screws. Although they will worsen the appearance, their use greatly simplifies installation.

Upon completion of the work, it is worth treating the working holes with a composition so that they do not absorb moisture. Further, it is only necessary to monitor the condition of the structure and take care of it if necessary.
The whole process is quite simple, it is only important to qualitatively connect all the elements and not to neglect preparatory stages installation. Thanks to this, this design will last a long time, decorating the house and protecting residents from drafts and moisture.
We will send the material to you by e-mail
The platband is an ornament and a functional part of the window on the facade of the building. This tradition has been going on for a long time and does not lose its relevance today. You can make beautiful platbands on the windows in a wooden house on your own. At the same time, many products are made not only from wood, but also from other materials. The creation of such elements requires certain knowledge and skills, as well as suitable tools.
Unusual color and style make carved platbands a real decoration of the building.
Currently, the installation of platbands on windows in a wooden house is again in demand. The photos below show the best examples. This element emphasizes the desire to revive the traditional decor.
The advantages of this element include the following:
- performs a decorative function and helps to visually expand or stretch the building;
- complements the overall style of the architectural solution;
- protection of the space between the window opening and the wall surface from moisture and dust;
- reduction of heat loss and noise level;
- emphasizes the individuality of the building and the style of the era you like.

Also, this design has some disadvantages:
- wood requires a certain treatment from high humidity and swelling;
- the need for constant processing and regular care;
- not compatible with metal-plastic windows.
Helpful information! When combining wood with metal-plastic, they must be made in a single color scheme.

Do-it-yourself patterns of carved platbands on the window
There are various platbands for windows in a wooden house. Their varieties often depend on the method of fastening to the window.

There are two types of fasteners:
- telescopic products have L-shaped protrusions that coincide with the grooves of the window box;
- overheads are installed on the window frame using building glue or nails with screws.
The original solution is the installation of carved platbands. At the same time, on the Internet you can find a lot of patterns of carved platbands on the window. With your own hands, such structures can be made only with the help of special equipment.

You can consider the following types of materials for creating such structures:
- wood is considered a traditional material;

- plastic models are resistant to temperature fluctuations and ultraviolet rays;

- MDF is made from waste wood production, therefore, it is more environmentally friendly than plastic products;

- polyurethane varieties are characterized by practicality.

How to choose the right wood?
Wooden platbands are popular. At the same time, the performance of the product depends on the variety of the selected tree.
The following options are worth considering:
- ash, beech and oak are hardwood varieties. They are durable, but it is difficult to cut patterns on them;
- it is much easier to process soft hardwoods - linden, aspen and alder. On their surface, patterns can be cut even by hand. Such surfaces must be carefully treated with special compounds;
- it is recommended to create small elements from cherries and apple trees that can be attached to the base;
- characterized by ease of processing and good operational properties pine and birch.
Helpful information! You can use different combinations of wood types. In this case, special protective impregnations should be used.

The secrets of making do-it-yourself window trim templates: stencils and design
You can find various templates for window frames on the Internet. You can print stencils with your own hands. The selected ornament should be combined with the overall style. In this case, do not mix geometric and floral patterns.
When making platbands, it is worth considering the following points:
- the color palette of walls and decorative products should be combined;
- it is important to choose the right suitable size. Products should not be too small or wide;
- you need to pick quality option coatings. In this case, special paints and varnishes are used;
- a template is required to create external carvings.
Helpful information! It is necessary to correctly place the drawing on the workpiece. Details should be located along the grain of the wood.

Platbands for windows in a wooden house: manufacturing steps
Before you start creating window decor, you can pick up carved platbands for windows in a wooden house from a photo. A template is preliminarily made, which must be the same for the design of all window openings.
There are two main ways to create patterns:
- overhead thread is different separate elements patterns that are attached to one base;

- with slotted carving, a through ornament is made that looks like wood lace.

With any method of manufacture should be used. You will also need special tools: a hacksaw for wood, a set of knives and chisels, and a drill. Platbands for windows are made in a wooden house from prepared materials. The process of creating products includes several stages:
- precise measurements are made;
- The selected wood must be dry. The width of the boards depends on the dimensions of the window opening. The thickness of the material must be at least 30 mm when performing slotted thread and at least 10 - with an invoice;


- the resulting holes are rubbed with sanding paper;

- prepared parts are attached to the base. In this case, an adhesive composition or special nails are used.
Helpful information! When installing platbands, self-tapping screws cannot be used, since such fasteners cause cracking.

Mounting Features
The finished platband is mounted to the window opening in the following ways:
- mounting on a blind spike. These items are installed on inside. Under them, special holes are created in the frame. Glue is distributed on the spike and it is inserted into the groove. Such fasteners protect the platbands from dust and moisture;

- a through spike is used. In this case, the junction must be carefully treated with varnish.
Similar techniques are used if the window is wooden. For mounting on metal-plastic, a special liquid adhesive is used.
What care is needed?

Carved items are primed, varnished or painted. Such treatments are carried out every few years. This will extend the life of the products, as well as maintain their attractive appearance.If plastic or metal products are installed, then they do not require special care. It is important to protect products from corrosion and occasionally renew the paint.

Making beautiful architraves with thematic patterns with your own hands will allow you to decorate window openings in an original and unusual way and bring a special zest to the intended architectural style.

Save Time: Featured Articles Every Week by Mail
In most cases, carved platbands are used to decorate the windows of wooden houses. But in view of the fact that it is rather problematic today to buy a ready-made platband, it is easier to do it yourself.
Important! All platbands, albeit the highest quality, have one significant drawback - they need protection from precipitation. Making platbands on windows traditionally begins with the preparation of everything you need.

Stage 1. Equipment
In the process, you will need the following tools:


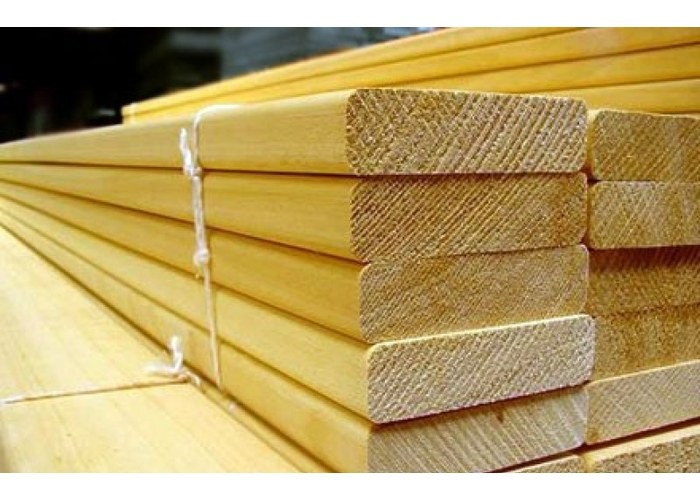
Stage 2. Material selection
For ordinary architraves, it is better to use pine, while for carvings it is recommended to take soft rocks, for example, linden (the latter, moreover, is much easier to process by hand).


Important! The only disadvantage of linden - hygroscopicity - is easily eliminated by applying several layers of paintwork.
Hardwoods should be chosen in three cases:
- at high humidity climate;
- with too dry air;
- in the presence of significant temperature fluctuations.
Hardwoods include birch and oak. They are quite difficult to process with hand tools, so it will take milling machine, but such a tree will last several times longer than a linden.

Stage 3. Important points in the manufacture
Finished wooden platbands should not prevent the opening of the wings by at least 90ᵒ. As for other parameters, they are selected individually in accordance with the size of the opening. For fasteners, you can use spikes or connect the elements in half a tree.

Important! In the future, for applying large images to the surface, the upper part of the casing can be extended. Spikes are used for fastening, and the decoration itself is popularly called "kokoshnik".
The lower part of the product is made in the same carved way and must include a bevel necessary for the drain. It is characteristic that the thickness of the lower part should exceed the thickness of the upper one by at least 1 cm.

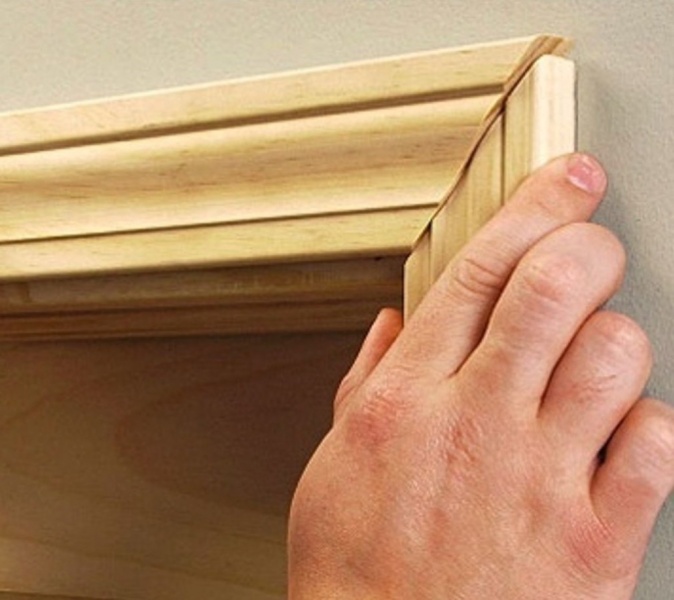
On both sides of the opening, small slats are nailed - they will hide the differences in the walls (if any). The thickness of the rails should match the width of the gap, at least approximately. Final fasteners are carried out only after careful fitting of the joints.
Important! If the sashes open to the street, then the platbands must be installed 3 cm above the window itself.
Stage 4. Pattern selection
Since ancient times, platbands have been decorated with the most bizarre patterns, which, it was believed, protect the house from evil spirits and the evil eye. Today, carved architraves are mainly made by skilled craftsmen.
Important! To dodo-it-yourself window trims, you first need to choose a good stencil that will allow you to create a pattern of any complexity even without special woodcarving skills.
Often, professionals themselves use stencils; without them, only one-time individual orders are carried out.
Stencils today are freely sold in a fairly wide range. They consist of the following components:
- bottom bar;
- top bar;
- vertical rails.
In addition, there may be additional decorative details - hangers, and so on.


Stage 5. Making the frame
First, a frame is formed from pre-cut elements. Fastening is carried out with the help of spikes, which are fixed in the hole with nails. To create spikes, an electric jigsaw is usually used, although a regular hacksaw with fine teeth will do. A small knife is used to remove sawdust.
The width of the finished frame, as well as the platbands described above, should not interfere with the free opening of the wings by 90ᵒ. The frame itself should be at least 2 cm larger than the window frame.
Stage 6. Making platbands

Step 1. First, the drawing from the stencil is transferred to the tree by means of carbon paper.

Step 2. Then a jigsaw with a thin blade is taken and small figured elements are cut out.
Step 3. With outer side the contours of the pattern are cut so that the canvas runs along the edge of the workpiece.


Step 4 In any case, you will have to turn the saw in the workpiece. To do this is quite simple, you just need to use one of the two existing methods:
- upon reaching the turn, several mutually parallel cuts are made (the saw must be able to turn to any angle inside the hole);
- you can go the other way - make a small loop that will allow you to go from the back.
Important! Modern jigsaws allow you to make cuts at an angle of 45-90ᵒ, thanks to which you can not only make the smallest cuts, but also give decorative element more saturated and voluminous form.
Step 5. If it is necessary to cut a closed figure in the center of the product, then a hole is drilled in the middle of the part to be removed. After that, the jigsaw blade will be easier to move in one direction or another.
If the workpiece is thin enough, then when processing it, you can do without an electric drill. To do this, take a jigsaw and rests on the workpiece at a right angle. Next, the tool turns on and the hole is scratched as it were when the canvas is deepened into the tree.

These are all key aspects of manufacturing window frames. Actually, the whole procedure comes down to repeated repetition of the actions described above, but their specific combination depends only on the skills and complexity of the pattern.


It is worth noting that there are other manufacturing methods that differ from those described above. For clarity, we recommend watching a thematic video.
Video - Production of window frames
Find out which ones are better to choose, as well as consider the types and methods of installation, from our new article.
Prices for platbands and extensions for windows and doors
Trim and trim for windows and doors
Fundamental rules. What Not to Do
Below is a list of rules that will help you avoid the most common problems.
- As source material It is recommended to use a board with a thickness of 3-4 cm.
- Do not immediately grab on to complex patterns. At first, it is better to practice on ordinary round parts, which are easy to do with a drill.
- The width of the workpiece should be such that it is enough to cover the ends of the walls and protect against moisture.
- Carved elements should be placed along the fibers of the tree - this will prevent cracking.
- When choosing a stencil, it is better to pay attention to patterns with large elements, because small ones will look crumpled, as a result of which the finish will not have the desired decorative effect.
Important! Before starting work, you should calculate the future costs of time and money, as well as the feasibility of the venture itself. In the absence of high skills in working with wood and interest in the process itself, it is easier to buy ready-made platbands.
Moreover, it is advisable to first familiarize yourself with the photographs of different products. So you can find suitable option or draw inspiration for your own creation of something.

Stage 7. Installing the product on the window
Now it remains only to install the finished carved platbands on the windows, for which special glue is used. It is important that it is not organic, otherwise, due to susceptibility to biological influences, it will harm the products themselves.

You can also use plumbing glue - there should be no problems with it.
Important! If fastening will be carried out with the help of nails, then the spikes and joints should be coated with an adhesive solution in advance.
Another option that can further simplify the installation procedure is to use self-tapping screws instead of nails. It will be easier, if only because there is no risk of damaging the casing or the surrounding surfaces with a hammer.

Important! Self-tapping screws are very easy to disguise. It is necessary to mix sawdust with glue and spread the hats with the resulting mixture. It is advisable to do this even before painting the windows, so that the hidden fasteners also acquire the desired color.
The final painting procedure is also quite simple. Some kind of protective material is applied over the finish (not only paint, but also, for example, varnish, impregnation). It is advisable to do this in any case, since such a coating significantly extends the operational life of the products.

The paint, as you know, peels off, so it is advisable to take it instead. It is much easier to periodically renew the impregnation than to repair cracked paint. And the latter, as you know, will definitely crack.
As a conclusion

It is commendable that people strive to follow the traditions of their ancestors, because this is especially true in the current conditions of active urbanization. For self-manufacturing window platbands will take a little time and appropriate equipment. The procedure is complicated, but the result will more than pay for all the costs. Moreover, this way you can save a considerable amount of money, since the manufacture of platbands for one window to order will cost an average of 2.5-15 thousand rubles.
Video - Trim Options


