In many private households there is an old liquefied gas cylinder. Many useful things can be made from this object, for example, a simple heating device.
If there is a desire and welding machine, then a do-it-yourself potbelly stove from a gas cylinder can be made without any problems. Of course, some additional materials will be needed.
A potbelly stove is a primitive version of a metal one. Such a device works extremely simply: firewood is laid in the furnace, they burn out, the furnace body heats up and gives off heat to the surrounding air. Smoke gases are removed through the chimney, and the ash is poured through the grate into the ash pan, which should be cleaned periodically.
They heat a potbelly stove with other combustible materials: diesel fuel, coal, peat, household waste, etc. If desired, on such a stove you can cook quite successfully. This point should be considered even before the start of the manufacture of the structure in order to make a smooth hob.
The potbelly stove is a combustion chamber made of thick metal with a loading door, a chimney, a grate and a blower. You can use an old one as a case. gas bottle
For a potbelly stove, you need to choose a special place, finished with fire-resistant materials. It is desirable that she stand to the side, where no one accidentally touches the body and does not burn herself.

If desired, the upper part of the vertical potbelly stove from an old gas cylinder can be turned into a hob of modest size
Weighs such metal structure a lot, so there is no question of any mobility of the device. Move potbelly stove for heating different rooms it will be difficult.
Such stoves are usually used to heat utility rooms in which there is no electricity or where it is supplied intermittently: a garage, a barn, a workshop, etc.

From two gas cylinders connected perpendicularly, you can make an improved version of the potbelly stove, which allows you to save more heat and get high returns when burning fuel
Another problem is the low efficiency, since part of the thermal energy during the combustion of wood literally flies into the chimney. There are various ways to keep warm and modify the potbelly stove a little to make it work more efficiently.
Finally, you need to take care of good ventilation of the room in which the potbelly stove is installed, since such a device burns a large amount of oxygen during operation.
So, a potbelly stove consists of a metal case, the role of which is usually “invited” to an old gas cylinder. In the case it is necessary to make two doors: large and small. The first serves to load fuel, the second is needed as a blower through which air enters the combustion chamber to ensure the combustion process and traction.
To begin with, it is recommended to open the cylinder and bleed off the remaining gas. Of course, this should be done outdoors, not indoors. Then you need to drain the remaining liquid from the cylinder, condensed inside. This substance usually has a pungent and unpleasant smell, so it is best to prepare a small container with a lid for it in advance so that it can be neatly packaged and discarded immediately.

There are no particularly strict requirements in terms of parameters for the design of the potbelly stove. The larger the combustion chamber, the more spacious the room will be able to heat the unit
If condensate is accidentally spilled on the floor in a room, the peculiar aroma may remain very long time. After all these operations, the cylinder is still not ready for contact with the welding machine, because residual gas vapors remain inside.
It is necessary to fill the cylinder with water to the very top in order to completely expel all the gas from it. After that, the water is drained, now the balloon can be cut without problems.
Stage number 2 - manufacturing and filling the case
Image Gallery
The brazier is often used in the summer cottage, representing a rather popular design. Often, craftsmen make real works of art with their own hands instead of a simple metal box. As a material, as a rule, old waste car receivers, fireproof safes, industrial pipes, etc. are used. Of the considerable variety of various solutions, it is considered the simplest and most affordable to make a brazier from a gas cylinder with your own hands. The initial blank can be found both at the scrap metal collection point and in your barn or garage. So how and in what sequence can you implement such a design yourself, and are there any drawbacks to such a popular solution?
Advantages and disadvantages of using an old cylinder
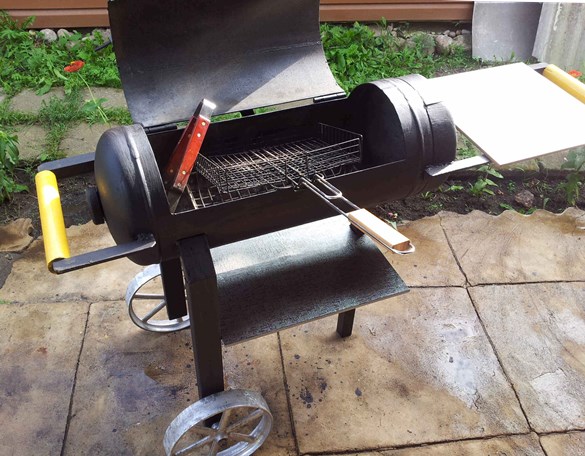
The choice of material for the barbecue is easy to do: best solution there will be a 50-liter cylinder, because the length and width of the container will be 85 and 30 centimeters, respectively, which will be just perfect for cooking. Of course, 40-liter containers can also be used, but in this case, the coverage will be much less, therefore, it will not be so comfortable to cook!

The main advantage of the gas cylinder body is high quality metal used. Needless to say, in the production of cylinders for the subsequent storage of gas under pressure, manufacturers make serious demands on the material, which translates into a considerable 3 mm thickness of the body walls. Thanks to this, when using a gas cylinder, you can count on an inexpensive, but high-quality capacity for barbecue.
Key Benefits:
- Ease of use . After cooking, there is no need to sweep the ashes from the summer cottage and fill the fire with water - just turn off the draft and you can proceed to the meal;

- Durability . Steel grade 30 HGSA, D and 45, in addition to the large thickness and reliability of the structure as a whole, will offer excellent resistance to negative factors, so that the brazier can last more than 10-15 years without corroding or burning out;
- Versatility . Under a closed or open lid, you can bake, smoke and fry any food and product;

- Mobility . Even if the brazier from a gas cylinder is not equipped with wheels, the dimensions of the structure allow you to safely move it to any convenient place or simply change direction from the wind.
But, like any product, the use of a gas cylinder to create a brazier with your own hands has some disadvantages, namely:
- High-quality heat-resistant coloring compositions cost a lot of money, and therefore, most likely, over time finished construction will not acquire the most successful look, resembling a faded photo. Remember that with outer side the brazier from the cylinder burns quickly enough, so it’s attractive appearance can not count;

- In a cylindrical container, it is problematic to achieve uniform heating, as a result of which, for example, when cooking barbecue, the meat will remain raw for a long time around the edges, while in the middle it will start to burn;
- If you want to cook meat in the cold season, you will have to prepare a lot of coals, firewood and patience in advance - the low heat capacity of the metal affects the rapid cooling of the cylinder capacity, which makes the brazier much more voracious;

- And the most important drawback: even a very old and not used gas cylinder for a long time can store the remaining explosive substances, so it is worth using it as a barbecue for cooking with extreme caution, having taken the necessary precautions!
How to cut a balloon?
Almost always inside metal container what remains is some of the liquid hydrocarbons called gasoline. The danger lies in the fact that with the remainder of this substance, the liquid can instantly evaporate, increasing the risk of rupture of the cylinder. Therefore, before cutting metal, it is necessary to remove gasoline and other gases from the internal container, and also prevent oxygen from penetrating from the inside to the cut!

All of the following is done:
- Using a shock load and an open-end wrench, unscrew the valve, thereby allowing the remaining propane to vent out.
- Fill the gas cylinder with water, leaving it in this position for a couple of days. Water during this time will dissolve liquid hydrocarbons. Soapy water can be used if desired.
- Pour out the water, then refill the container. Firmly cover the hole with some kind of sealant, and then start cutting the metal according to the pattern.

An opened cylinder should only be left outside, away from sources of fire and children, or in a well-ventilated area!
According to the experience of many masters, it can be said that not everyone can unscrew the valve the first time, because for many years it “sticks” firmly. Of course, you can use a sledgehammer, but it, as a rule, does not always help. There is a simpler, albeit more patient, method to fill the tank with water: unscrew only the bushing, below which there is an 8 mm hole. Through it, calmly fill the container with water using a dropper, and then cut the balloon.

While cutting, water will flow out - continue sawing the metal as usual. Since the smell of gasoline can hardly be called pleasant, it is recommended to do the work yourself away from residential buildings in open areas. For an identical reason, it is worth taking care of the presence of a respirator with gas protection! The resulting parts cannot be immediately used to assemble the barbecue, you must first ignite the components on a fire in order to get rid of the dirt accumulated inside.

We assemble the brazier with our own hands: a complex and simple design
The simplest model is considered to be a brazier from a half of a gas cylinder, which will be placed on any support assembled from improvised materials, whether it be stones, bricks or just a mound of earth. Time costs will be minimal, but working with such a barbecue afterwards will not be very convenient! In addition, you will not want to brag to your friends or neighbors either. With at least a little welding skills, you can create an interesting and unique brazier with your own hands.


Container with lid or barbecue grill
It will be possible to bring more functionality to the design of the brazier due to the second half of the cylinder, which can be used as a cover. The air supply system will also be useful, because natural traction in the form of wind often, in addition to uneven traction, creates a lot of additional trouble for the grill man.
Work order:
- Mark the balloon half in such a way that side parts remained more- in the future, this will not allow the wind to inflate the coals.
- Make a horizontal cut with an electric jigsaw or grinder. Don't forget about safety which we wrote about above !
- Immediately weld a couple of loops, then you can cut the lid to the end.

- Burn the surface, filling it first with a wooden chip. You can use it if you wish.
- To avoid a situation where the metal "takes away", weld a corner measuring 32 by 32 along the perimeter of the cut. Subsequently, it will serve as a support for the skewers.
- Weld one metal strip in the center or two on the sides to secure the cover.

- Make a support for the barbecue: for this you can use a steel strip 1 meter long, a corner and a 4-meter profile pipe with a diameter of 15 millimeters.

- For greater convenience when cooking, it makes sense to weld a small limiter between the hinges, which will allow you to hold the lid in the open position. A simple steel strip, slightly curved towards the opposite grill, will do.
- On one side, make cuts to place the skewers, on the opposite side, drill small holes for them. An 11 mm drill will suffice, cuts and holes should be done on the same level!

- Make holes in the bottom of the container for traction. An 8mm drill will suffice.
- For a convenient side from you, weld the handle to the lid, also do not forget about the side handles for the possible transfer of the barbecue.
- Place the structure on the bed, treat the surfaces with a primer and a heat-resistant coloring compound.

If necessary, a brazier from a gas cylinder can always be supplemented with a canopy, shelves and other elements. In addition, ideal traction will be ensured if an exhaust pipe is welded in addition to the structure.

Barbecue smokehouse from a pair of cylinders
Having stuffed your hand in the manufacture of one brazier, you can make a two-in-one brazier with your own hands, which will allow you not only to conveniently fry any food, but also smoke them for your pleasure.

Of the tools and materials you will need the following:
- A piece of pipe with a height of about one meter and a diameter of about 100-150 millimeters;
- A pair of gas cylinders with a volume of 27 and 50 liters;
- pipe elbow;
- Electrodes and a welding machine (we also recommend getting a chameleon mask);
- Rods for a frame made of reinforcement or corners made of metal (legs from some old equipment will also fit, for example, sewing machine);
Similar to the previously described technology remove the remaining gasoline and propane from the cylinder! Even before starting work on assembling the barbecue from the gas tank, thoroughly clean all surfaces from accumulated dirt and rust. Cut and shape each balloon the way you want your barbecue grill to look.

The main difference between the first option and the second one is that in the second, a smaller container that acts as a gas generator will have a small hole in the upper part of the body for fixing a 50-liter cylinder - a hot smoking chamber.
In addition to the above, a corner with small holes should be placed at the bottom of the working chamber, which will play the role of a smoke divider. You can change the draft in the barbecue-smokehouse due to the exhaust pipe with dampers and the blower in the gas generator. To avoid burning in the lower part of the cylinder of a smaller capacity should be placed grate.

This must be done in the following sequence:
- At the bottom of the gas generator tank, cut a square-shaped hole for the blower.
- On the opposite side, place a screen with a sliding shutter, as in the photo below.
- Weld corners for the grate on the sides, and a smoke-cutting corner below.
- Based on the dimensions of the exhaust pipe, cut a hole at the top of the larger container.
- All gas cylinders need to cut out the side sections, while the smaller one is at the top, and the bottom one is at the bottom. The holes must be equal in both cases - this is very important!
- Connect the containers at the cutouts, and then hermetically weld them together.
- Make the hood by aligning it with the damper.

At the end, it remains to place the brazier-smokehouse on the frame, having previously leveled the position according to the level, and fix the structure with a welded seam.
Video instruction

Having assembled a brazier from a gas cylinder with their own hands and having tested the design in work, the masters often begin to share their experience, tips and recommendations on what changes can be made for greater comfort and effect. Below is a selection of proven advice from experts who have verified each statement in practice:
- Temperature is one of the key factors during smoking and cooking, so it makes sense to equip the working compartments of the smokehouse thermometer;

- To avoid heat leaks, having achieved a uniform distribution of heat, it will turn out if an additional steel plate is welded to the joints of the body and cover;
- The bottom of a smokehouse or barbecue can be easily strengthened with reinforcing bars by welding them to the structure. It is important to note that the distance between the food and the coals in this case was at least 14-18 centimeters;

- Of course, a barbecue grill can always be purchased at the store, but it is much more pleasant to complete the job to the end and make it yourself. As a material, for example, a two-shelf from a non-working refrigerator, welded crosswise, will fit;
- Do not forget to regularly clean the chambers with a metal club, dragging coals from the far chamber into the near compartment, pouring them into a bucket through a blower;
- Fat, when it gets on the coals, causes an unpleasant aftertaste of bitterness, which becomes noticeable already when eating the products. To avoid this, it is worth placing a tray under the food during cooking;

- Practice shows that a brazier from a gas cylinder usually turns out to be quite heavy, especially when it comes to a double design. In this regard, it makes sense to pre-install a pair of wheels for ease of movement.
And the last piece of advice: many craftsmen recommend immediately installing another additional chamber during work - for cold smoking. To do this, you will also need a gas cylinder with a capacity of 50 liters. The container will be placed vertically, and not horizontally as in the first case! The installation procedure is identical to the method described above, while the installation of the chimney is much easier.


Most likely, making a brazier from a gas cylinder with your own hands, as in the photo, will not be as easy as it seems initially. Nevertheless, the efforts and expenses invested will easily pay off, allowing the whole family to spend time outdoors every weekend. In addition, buying a ready-made brazier will not be cheap: the cost of a model with identical capabilities starts today from 15 thousand rubles, and, as a rule, purchased devices offer thin-walled metal as a material. Thus, you should not immediately discount the choice in favor of assembling with your own hands.
But really, what can be done from a gas cylinder with your own hands? It has been so customary since the times of the Soviet Union that many products can be fundamentally recycled and new designs can be obtained from them that will perform completely different functions. As it turned out, a lot can be done from a gas cylinder and, mind you, everything will be done with your own hands.
balloon stove
First of all, when you are looking for an answer to the question of what can be done from a gas cylinder with your own hands, a potbelly stove comes to mind. Such a unit has many advantages, as well as in the very principle of installation. Firstly, the thickness of the walls of the gas cylinder is 3 mm, and this is quite enough so that the potbelly stove from it does not burn out in the first season of operation. Secondly, it will take quite a bit to finalize the gas cylinder - the stove is made in one day with your own hands. The third advantage is huge selection structures: you can make a stove from one cylinder or two, a vertical structure or a horizontal one. Your own fantasy or tips from the Internet - and you can make a product out of a gas cylinder that will help you out in a cold winter.
Disadvantages are also present. Or rather, these are not even shortcomings, but features that must be taken into account so that they do not turn into shortcomings. For example, it is necessary to remove paint from outside balloon parts. Otherwise, the paint will begin to fade and fill the room with acrid smoke. It is also MANDATORY to take care of fire safety. The walls of the stove from a gas cylinder can heat up red-hot and this is fraught with many troubles. It may seem to you that such heating is only a plus, because it will be warm inside the room. But everything that can flare up from such strong heating will certainly flare up if it is too close to the potbelly stove. And the walls of the room itself need to be taken care of: in our workshop, the cinder block wall cracked vertically over its entire height after just a few evenings of use. What can be done to protect the wall: install the stove at a distance from it, protect it with a galvanized screen mounted on the wall at a short distance from it, or heat the potbelly stove in moderation. The latter, by the way, is not the best - it will be difficult to “guess” the optimal amount of firewood. And most importantly: a stove from a gas cylinder with your own hands (and even strangers too) will cool down very quickly. As long as the fire burns inside, while firewood is thrown up, it will be warm. But as soon as the firewood burns out, the stove instantly cools down. The insulated walls of the room where such a potbelly stove will be used, and the elimination of even minimal gaps in the area of \u200b\u200bwindows, doors or gates of the room, will help.
Feeders for animals and birds
This is another option for what you can do with your own hands from a gas cylinder and at the same time get excellent quality. Such feeders seem to be, if not eternal, then 100% durable. The gas cylinder is cut along its axis and you get two halves, each of which will be an excellent feeder for pigs, sheep or a bird drinker. It remains only to weld the stand, since the lower part of each of the halves will be semicircular and, of course, will not stand on the ground. You can also cut off the top and bottom of the cylinder along the line of the lining rings and get round small feeders. They are suitable for medium-sized animals and provided that we are talking about one or two individuals. Or maybe it will be drinkers for chickens - you decide. 
Here you also need to take into account some features, so as not to be upset later. Since food will be poured inside such feeders, you should especially carefully clean the inside of gasoline. If the cylinder has survived multiple refueling and has not been cleaned, then gasoline is collected inside, which has a very strong odor. A strong smell plus oiliness over the entire surface - this must be removed so as not to poison the bird and animals. How to do it yourself: a set of actions helps, including washing in boiling water using various cleaning agents, burning with a blowtorch and cleaning with a drill or angle grinder attachment.
Manual rammer roller
And also from a gas cylinder, and also with your own hands. The skating rink is a rarely used thing, but if you really need it, it is difficult to find it. Compact the asphalt surface if you have to do it yourself and you don’t have to rely on the skating rink; ramming the base under paving slabs, soil compaction - there can be many situations. The main thing is that making a manual ice rink from a gas cylinder with your own hands is even easier than the previous crafts that we mentioned above. A U-shaped pipe with a diameter of about an inch, the ends of which will be attached to the center of the upper and lower parts of the cylinder by means of bearings and a handle of a shape and length convenient for your hands - that's the whole design. Water or sand is used as a filler. Water is lighter, sand is heavier, so the choice depends on the purpose of the rink. 
The main thing is safety. Since parts will be welded to the gas cylinder, care should be taken to clean the gasoline to prevent trouble. We will talk about this in more detail at the end of the article.
Other balloon crafts
If you thought that a stove, a feeder and a skating rink are the whole list of what you can do with your own hands from a gas cylinder, then you are mistaken. There is no limit to ingenuity: various containers for storing something, a smokehouse, a brazier, a feed cutter, an autoclave, a compressor and even a boiler - this is a relatively complete list of crafts. Another thing is that some of these designs are not always justified and it will be easier to purchase (buy) a ready-made unit for safety reasons. If the master knows what he is doing with his own hands and it is so safe for operation, then the question is removed. But if the mind is not enough, then you can either ruin yourself or your relatives. We do not want to offend anyone, but cases are different. 
How to disassemble a gas cylinder
We promised above that we will teach you how to disassemble the cylinder safely and we keep our word. First of all, do not think that everything is so simple and safe - if you act incorrectly, you can get burned in the literal and figurative sense of the word. Let's take our youth as an example. This is exactly the period when there is little experience, there was no Internet, but there was a burning desire to use the gas cylinder for other purposes. Logic dictated that even that small fraction of gasoline inside should be wary of, but I didn’t want to get too dirty. Therefore, knocking down the valve with a sledgehammer, we began to fill the cylinder with water, shake it off and drain the liquid. After repeating this five times, we decided that the threat was gone. The grinder began to cut the cylinder along the axis and already 90% completed the work. And only then (!) the remains of gasoline flared up and the master was enveloped in a cloud of flame. It's okay - just burned eyebrows and hair all over the open body - but it's unpleasant.
The instruction will help you disassemble the cylinder (cut) without consequences:
- Even if you are sure that the cylinder is empty, you must open the valve. By venting even that small amount of gas, you once again insure yourself.
- The valve must be removed. Here everyone tries by virtue of their capabilities and imagination. Some knock it down with a sledgehammer, others cut it off with a grinder or a hand saw for metal, and still others unscrew it. The last option is the safest, but difficult to do at home. Clamping the cylinder so that it does not scroll under the force of the key is difficult. If cutting the valve at the very base of the cylinder is used, then ONLY with the help of hand saw! No cutters and angle grinders!
- The hole that formed after removing the valve is small in diameter, but this is enough to pour water inside. Why is it necessary? The water will displace the remaining gas and nothing will flare up when cutting. Here is a little difficulty, or rather, an inconvenience: you need to cut a bottle with water inside and water will surely flow out of the resulting cut. There's nothing you can do about it - this is such a feature that you need to be able to adapt to. For example, the place where you will work with your hands should be such that spilled water does not collect and you do not have to knead the dirt with your feet. Naturally, this operation should take place outdoors, not indoors.
- If an abundance of water cannot be avoided, then you can risk rinsing the cylinder several times, washing off the remaining gasoline. Just note: we specifically wrote the word “risk”, since we cannot give security guarantees. in our case, as you remember, there was almost no gasoline, but a flash of it followed already at the end of the cut.
- Cutting with a grinder is the most fast way. Mark the line with a marker (pencil graphite will quickly fly off the surface from vibration) and start cutting. Since the gas cylinder is round, it is better to put something under it from the sides so that it does not roll during operation.
- Cleaning the inside is necessary even if the balloon structure is not to be used for poultry or animal feed. The smell is strong and persistent, so you need to remove it. To begin with, you can wash it with boiling water using various kinds of cleaning products. This will help partially, so next comes the burning. Blowtorch or a bonfire - decide for yourself. Both options will help 100% and you just have to complete the cleaning with a metal brush. It is better to use the appropriate nozzle on a drill or grinder to make things go faster.
Instead of a conclusion
As you can see, the question “what can be done from a gas cylinder with your own hands” has many answers. The main thing is your safety, because you are going to work with your own hands, which means you are risking them. Any design that you make from a balloon will last you a long time. Reason: high quality steel, which is now rare. But we also advise you to think through everything thoroughly - is it worth doing the thing with your own hands, if the store option is more reliable. For example, we would not risk working with a self-made compressor from a cylinder or a boiler - life is more expensive.
To make a barbecue from a gas cylinder, you must first understand the device. For cooking barbecue, fish or vegetables on an open fire, different devices are used: barbecue, grill, tandoor, etc. Barbecue in many ways resembles these devices. However, it is more similar to a grill. It is easier to make a brazier with your own hands, since it is not equipped with a lid, and for cooking it involves the use of skewers. A mobile barbecue and grill are made according to very similar schemes. Both designs are equipped with a grill, often have a cover.
High-quality brazier and similar devices are quite expensive. If you make a barbecue from a balloon with your own hands, the cost of construction will be lower. As a result, you do not have to spend a large amount. Other benefits of this solution:
- significant length (about 120 cm), which allows you to cook a large number of products in one go;
- relatively simple installation process;
- a minimum of materials used, since barbecues are made from a propane cylinder;
- the basis of the design is heat-resistant metal (wall 3 mm thick);
- the presence of a lid protects food and fire from precipitation, in addition, it can be used to regulate the flame.
However, there are also disadvantages. For example, the volume of the cylinder is quite large, which makes it difficult to operate in a yard with a small area. Another disadvantage is the significant weight. It is difficult to move such a barbecue. This work is best done together. Propane cylinders are distinguished by their considerable length and wall thickness.
Another disadvantage is the unattractive appearance. The design is not recommended to be painted, as it is constantly exposed to high temperatures, but you can choose Decoration Materials with the right properties. They also note the impossibility of using firewood. And the thing is that the barbecue from a gas cylinder is characterized by an insufficiently high height. Considering that the free space is also limited by the grate, it is not possible to lay firewood inside.
Tools and materials
To get an idea of the barbecue device, it is recommended to look at the photo / video. First you need to prepare tools and materials:

First you need to draw up drawings or sketches, where the overall and auxiliary dimensions will be indicated, as well as information about the characteristics of the finished product. Based on the developed documents, the type of support is determined: brick or metal legs. In accordance with this, a additional material(corner, pipe). If a barbecue is made from a gas cylinder with your own hands, at the initial stage, the method of opening the lid is determined. For convenience, a metal handle is used.
Preparation for work
Tip: Before you start cutting, you should make sure that there is no gas inside, otherwise the risk of an explosion increases.
Vapors of a gaseous substance may remain in the cylinder. To make sure that the container is empty, it is filled with water. If it is necessary to release gas and its vapors, follow the instructions:
- The container is turned upside down, then the valve is opened and it is completely emptied.
- Condensation remains inside. To remove it, the outlet of the balloon is lubricated with soap. Due to this, the process of condensate release will proceed more clearly: the liquid foams, splashes appear under pressure.
- The structure must be freed from gas residues, for which water is poured inside. How to do it safely if the valve is still installed at the inlet? You need to put it on its side. Further work should be done together with an assistant. So, one person saws off a valve with a hacksaw, the other pours water on the cut, which helps to cool the metal. As a result, the risk of sparks and ignition of residual gas is reduced.
- Now it is possible to pour water inside. This is done with a hose, it is also allowed to use a funnel.
- At the initial stage of filling, it is recommended to shake the cylinder, which will wash its inner walls, removing the remaining condensate.
- After filling the container with water, it is recommended to withstand several days.
- The liquid is drained, and this should be done as far as possible from residential buildings due to an unpleasant odor.
If you plan to make a barbecue from a gas cylinder with your own hands, you can consider using a hammer. With it, knock down the valve. However, this method is more dangerous. More sparks may occur due to the greater impact force. It is unlikely that it will be possible to exclude their appearance by metal spraying.
Balloon cutting
When the water from the tank is removed, you can proceed to the main stage - making a barbecue. To do this, rust is removed from the gas cylinder, if any. Then move on to cutting. If the hole layout is already ready, cut the metal with a grinder. In order to protect the flame from the wind in the future, it is better to leave the side rings. The cut should be made as close to the weld as possible. Dimensions as in the drawing below. 
To make even cuts, you must first outline them. If you need to get open, just cut it in half. In this case, the cut will also pass through the side rings. To make a barbecue from a gas cylinder with your own hands, you need to study the drawings, photos and videos of the entire process before starting work, because such a design is somewhat more complicated due to the configuration of the hole. 

All step by step instructions work can be seen in the video.
You should be guided by the parameters: horizontal lines run along the center of the cylinder, along; vertical - parallel to the side rings at some distance from them (10–20 cm). Working with a grinder, they move from the center of the cylinder to its edges. Considering that the length of the product is significant, the grinder disk may burn out. To avoid this, it is recommended in some places to cut the metal not completely. In these areas, the walls are removed with a chisel. To create the possibility of blowing the flame, holes are drilled at the bottom and in the side rings (up to 10 pcs.).
support mount
The barbecue is characterized by a round base, so you need to consider what the structure will be located on. If you make a support out of brick, stone, you get a stationary product that cannot be moved when necessary. The preferred option is metal legs, they can be made from pipes, corners. If there is an unnecessary metal thing, for example, a support from an old sewing machine, it is used to install a barbecue.
There are two ways to attach the base to the bottom of the structure:

Or you can use legs from an old sewing machine. 
The height of the legs can be any. It all depends on personal preference. Convenience should be the guide. Too low legs will not allow you to stand at the barbecue evenly, you will have to constantly bend over. It is better to focus on the average height of adult family members. At the same time, we must not forget that the balloon is characterized by a significant height.
Welding hinges, covers, handles
Having fixed the brazier on a solid foundation, proceed to the next step. In order not to have to suffer with opening the hot cover, it is recommended to weld it to the bottom of the structure. If it is non-removable, use loops. They are welded or fastened with bolts and nuts. Rivets are not a good option because they can withstand moderate temperatures and can be melted when exposed to an open flame. 
If you arrange the hinges in one direction, the cover can be removed in the future if desired. Welding them in the opposite direction, they act differently:
- loops are fastened on one side;
- then put on the lid;
- install hinges on the lid on the other side and begin to weld to the barbecue.
In this case, the design will be non-separable. To freely use the barbecue grill, fix the handle. It is located in the center of the metal cover. This element can be welded, which is more reliable, or connected using standard fasteners. The second option involves the need to drill two holes on the cover. This is where the handle is installed. It is desirable that it be made of metal. Wooden elements will quickly burn out and may rot, as ready product will remain in the open at all times.
If the structure is used only as a barbecue, a grate can also be welded. It is usually located directly above the rounded bottom. The design can also be used as a brazier, then it is better not to fix the grate. A store barbecue with a handle is installed on the ribs of the former cylinder. In this position, it will be difficult to close the lid due to the protruding elements of the large grille. It is also made removable, but then you need to weld corners near the edges. Lattice is laid on their lower shelves. 


Well, the video of all the work done.
You can even try to do everything in the form of a steam locomotive, as in the photo below. 
To avoid completely opening the lid, you can weld a metal bar or chain. Due to this, this element is limited in movement. It is allowed to paint the barbecue, but it is better to do it outside. Inner part still remains hidden from view. High temperature resistant paints are used. They must withstand up to 800? It is recommended to apply the paint only after the surface has been covered with a special primer.
Optimization of heating costs country house is a very urgent task for its owner: what to use as fuel, which thermal unit is the best. Home-made gas cylinder stoves are very popular, allowing the use of very cheap, sometimes just junk fuel. In this case, heating costs are minimal.
Making a thermal unit with your own hands from a cylinder
A zealous owner carefully insulates his house, trying to reduce the cost of heating it. In addition, there are a number of objects that need to be heated periodically: workshops, garages, outbuildings. Greenhouses or conservatories need to be heated regularly.
Therefore, home craftsmen are constantly developing and implementing additional thermal units of the most various designs. The most popular are products from gas cylinders. The reason for this is a convenient form and almost ideal proportions and characteristics of the material.
Coefficient useful action cylinder stoves reaches 85-90%, which is a very high figure in comparison with home-made stoves of other forms. The rounded shape is ideal for intensive fuel pyrolysis and allows you to arrange holes for the exit of smoke and the supply of oxygen to the combustion zone at the lowest cost.
A simple and efficient gas cylinder stove will last a long time
What is a balloon oven
The well-known "potbelly stove" is a classic representative of thermal units from an old cylinder. She received this name for her extraordinary voracity, consuming a large amount of fuel. But its main advantage is the rapid ignition and heating. This is especially important in extreme situations, when for some reason the operation of the main heating stops.
In the design of such a furnace, the cylinders can be in both vertical and horizontal positions. Heat transfer occurs through the surface of the furnace and can be significantly increased by welding metal fins onto the surface. In addition, it is possible to utilize the heat of flue gases by passing them through a pipe embedded in a water tank. Water heated in this way is used in the heating circuit or used in the household through a boiler indirect heating.
Pyrolysis furnaces occupy a special place in heating devices from cylinders. Pyrolysis is the thermal decomposition of fuel that occurs with minimal access to oxygen. At a temperature of more than 300 degrees, the fuel in the furnace does not just burn out during the oxidation process, but decomposes into gas fractions, which give higher temperatures when ignited.
Photo gallery: types of furnaces with a cylinder body
What bottles can be used
Not every gas cylinder is suitable for the manufacture of the furnace body. For example, composite cylinders are not recommended. Despite its strength, the composite does not tolerate high temperatures well.
A container of 5 liters cannot serve as a furnace body due to its small size, but containers for liquid fuel are successfully made from it.
You can use cylinders with a volume of 12 and 27 liters. They make excellent thermal units with a capacity of 2–3 kilowatts and 5–7 kilowatts, respectively.
Most often, furnace bodies are made from cylinders with a capacity of 50 liters. Its dimensions - a diameter of 30 centimeters and a height of 85 - are optimal for the installation of a thermal unit. A furnace of this volume is capable of heating a small country house with high quality.
A propane tank with a volume of 50 liters is best suited for a homemade stove body
Oxygen cylinders for stoves are rarely used. The size ratio is not very convenient for the furnace device, and a significant height makes such a unit unstable.
Types of long-burning stoves from a gas cylinder
There are many options for making furnaces from cylinders. Each home master makes changes to them, corresponding to the possibilities and understanding of the process. At the same time, pyrolysis ovens are the most popular. long burning. In such designs, the combustion time of the flue material varies from 12 hours to a day or more, which can significantly reduce fuel consumption.
Furnaces with conical stacking of fuel
A popular type of pyrolysis oven is the conical fuel stacking design. In such a furnace, a pin is installed along the axis of the furnace from the grate. When loading, a wooden or tin cone is put on it with the base up. The furnace is filled from above with sawdust, shavings or wood chips. At the same time, the furnace material must be well compacted so that the bookmark is as dense as possible.
When the fuel is loaded, the cone must be pulled out and the lid closed. Fuel is ignited through a blower with a small amount of wood chips or a dry fuel tablet. As soon as the fuel flares up well, the blower door must be closed, limiting the flow of air into the furnace. Further, the fuel simply smolders, but this is enough to reach the pyrolysis temperature. Smoke is removed through a pipe in the upper part of the body. With this design, "samovar" hot water tanks are also used for a radiator heating system or water heating in an indirect heating boiler. It is convenient to use a gas or oxygen cylinder as a heating container, passing the chimney pipe along the axis of the vessel. A fitting is welded in the upper part for hot water, at the bottom - for the return. The circulation occurs naturally without the use of a pump, which makes the heating system energy independent.
The burning time of one bookmark is 12-16 hours.
Sawdust should be compacted as tightly as possible
Liquid fuel pyrolysis ovens
For these thermal units, fuels such as diesel, diesel fuel or used oil are used. The use of other energy carriers is considered exotic due to the high cost.
Consider the option of using used oil as a fuel. For the manufacture of the simplest furnace necessary:
- Install a pipe with a diameter of about 100 millimeters in the upper part of the cylinder.
- About 30 holes with a diameter of 10 millimeters must be drilled in the walls of the pipe.
- Place a bowl-shaped container with a diameter of 120–140 mm with sides 25–30 mm high at the bottom of the cylinder.
- A tube with a diameter of 10 millimeters with oil and a fuel supply regulator is connected to the container through the wall of the cylinder.
- The removal of combustion products is carried out through the side pipe in the upper part of the body.
Ignition of a cold furnace is carried out in the following order:
- Open the cock on the fuel tank and pour used oil into the bowl up to about the middle of the walls.
- On top of the oil you need to pour up to 50 grams of gasoline. Having a lower density, it will remain on the surface.
- Ignite gasoline. When the temperature rises, the oil boils and begins to emit vapors that also ignite. The flame is drawn into the perforated pipe by the air flow.
- With a further increase in temperature, pyrolysis of the fuel occurs, and the intensity of combustion increases. Flue gases are removed through the upper chamber along the side pipe. The temperature in the combustion chamber is such that the pipe heats up red-hot, and the furnace body quickly heats up from it.
- Under these circumstances, it is desirable to partially cool the furnace gases in the chimney using a samovar-type water heating tank.
With all the positive qualities of such a thermal unit, including the simplicity of design and low cost of fuel, there is a significant drawback. In the room where such a furnace operates, the smell of burning petroleum products is constantly present. Therefore, the structure must be taken out of the residential or industrial premises.
An old cylinder and used oil will effectively heat the house
Video: waste oil furnace from a gas cylinder
Long-burning solid fuel stoves
Solid fuel appliances use the following types of fuel to generate heat:
- firewood;
- woodworking waste in the form of sawdust, shavings, scraps, chips;
- peat;
- coal.
There are known cases of using used tires for heating after their grinding.
One of the most popular designs of this type is considered to be a home-made stove with the funny name "bubafonya". It can be made with minimal labor and materials. The basis for the manufacture is a body made of a gas cylinder with a capacity of 50 liters.
The fuel for such a unit can be technological chips, crushed remains of branches and twigs, sawdust and shavings. The only requirement for it is that the humidity should not exceed 12%, which corresponds to the standards for fuel wood stoves. The duration of burning of one bookmark is from 14 to 24 hours, depending on the density of its laying. The fuel is ignited after the weight and cover are installed. The fins on the weight form channels for air, allowing the fuel to burn and decompose into pyrolysis gases. The gases enter the upper chamber, where they burn at a high temperature.
As the fuel burns, the piston moves down.
Slow burning pyrolysis furnace "Bubafonya"
It is impossible to describe or simply list all the designs of furnaces that can be made from cylinders, but it is advisable to consider in detail the design of the “boubafonya”. Such a model can be made at home with your own hands.
Safety
Before describing the design of the furnace and the technology of its manufacture, let's pay attention to safety issues. It will be a question of preparation of the cylinder for processing. Despite the dense structure, the inner surface of the metal is dotted with a network of microscopic cracks. At long-term operation containers for their intended purpose, a considerable amount of gas condensate and its precipitation accumulates inside these defects. Such a substance may be explosive and is in no way beneficial to health. Before you start working with the balloon, you need to fill it with water and let it stand for 2-3 days. The operation is best done away from home. When the liquid is drained, the reasons for such a recommendation will become clear - it has an extremely unpleasant and strong odor.
Video: how to safely disassemble a gas cylinder
Tools and materials for the manufacture of the furnace "Bubafonya"
To make such a thermal unit with your own hands, you will need:
Table: required materials and tools
| Name | Purpose | Notes |
| Cylinder for furnace body | Manufacturing of the main product | boo |
| Steel bar with a diameter of 10 mm | Production of handles on the lid and body of the furnace | From waste |
| Corners 45x45, any profile, pipe cuttings | For support legs | From waste |
| Bulgarian | Cutting blank parts, cutting the cylinder in the manufacture of the body | |
| Steel sheet 6–10 mm thick | pancake making | |
| Steel strip 40x4 mm | Manufacturing of support ribs | |
| Cement, sand, gravel and fireclay bricks | Production of the supporting base of the furnace | |
| Reinforcing bars | Foundation reinforcement | |
| Trowel, shovel, container for mixing mortar | Foundation pouring | |
| Welding machine for working with ferrous metals and electrodes for it | Making welded joints when assembling the furnace | Rent possible |
| Electric drill not less than 0.7 kW, a set of drills for metal | Hole drilling | |
| Measuring tool | Taking measurements and marking | |
| Locksmith corner | Positioning of parts during assembly, quality control | |
| Kerner | Hole marking | |
| Files flat and semicircular | Removing sharp edges and burrs, sizing | |
| Black marker | Markup production | |
| Personal protective equipment | Glasses, welder's mask, face shield, mittens, gloves, special shoes, rags. |
In addition to the above, you will need some tools from the standard locksmith set: a hammer, pliers, etc.
The procedure for the manufacture of the furnace "Bubafonya"
The advantage of this model is that the cylinder body is subject to the least intervention. The manufacturing procedure for the bubafonya furnace is as follows:
- Separate the head dome of the cylinder using a grinder.
- Make a hole in it along the axis with a diameter of about 80 millimeters. Since the domed part will later be used as a cover, two bar handles must be welded to it. The cap will have to be removed every time you load fuel.
Cut off the top of the cylinder - a detail for the manufacture of the cap
- In the bottom of the cylinder, make a hole of approximately the same diameter. Its purpose is periodic cleaning of combustion residues. This hole must be closed with a reliable damper.
- Approximately 5 centimeters from the top edge of the body, you need to make a hole for the chimney pipe. Usually it is a pipe with a diameter of up to 15 centimeters with a wall of at least 4 millimeters.
- At a distance of approximately 10-12 centimeters from the bottom of the cylinder, drill three holes with a diameter of 10 millimeters. They are arranged in a circle at an angle of 120 degrees with respect to each other. Bars with a diameter of 9.0–9.5 millimeters are inserted into the holes so that they protrude inward by 20–25 millimeters. Outside, the bars must be welded to the body.
- Cut a circle from a sheet four millimeters thick with a diameter two millimeters smaller than the internal size of the case. Drill 20-25 holes in it with a diameter of 10 millimeters. This part will play the role of a grate.
- Install the part on the protrusions of the pins.
- Next, you need to make a piston, which will also perform the function of a load. The piston consists of several simple parts. The first is a pipe with a diameter of about 80 millimeters with a wall of up to four millimeters. It is allowed to use an electric-welded straight-seam pipe. The second part is a pancake, in the center of which you need to cut a hole equal to the diameter of the pipe. The pipe is welded to the pancake at a right angle coaxially.
Fins on the pancake provide air for fuel pyrolysis
- Ribs are welded to the lower surface of the ring from a strip with a width of about 40 millimeters or a corner of the appropriate size. They are located from the center to the edge of the pancake. The number of ribs is 4–6 pieces.
- A damper must be installed at the upper end of the pipe in order to be able to completely close the hole in the pipe.
Flue gas outlet and damper to shut off the air supply
The order of laying fuel and ignition of the furnace
The sequence of actions in this case is as follows:
- Fuel preparation consists in grinding large fragments to the state of technological chips (5x20 mm) and mixing it with sawdust and shavings.
- Pour fuel into the furnace; at the same time, it is necessary to compact it, achieving the highest mass density.
- Lightly moisten the surface of the fuel insert with lighter fluid.
- Install the piston in the furnace body with the pancake down, fully open the damper on the pipe.
- Close the lid.
- To ignite the fuel, take a small rag soaked in the ignition fluid and lower it into the pipe. If you just throw a match there, it will go out along the way.
Photo gallery: how to light the bubafonya stove
When the fuel is ignited, the furnace heats up. Combustion air will flow through the pipe from top to bottom. When the temperature reaches 300 degrees, the process of fuel decomposition begins. Pyrolysis gases penetrate into the upper compartment and ignite there. From this point on, you can completely close the damper on the pipe.
The combustion process takes place as follows:
- After closing the damper, air enters the furnace through the slotted gap between the pipe and the edges of the hole in the lid. The combustion of pyrolysis gases creates a sufficient temperature for the decomposition of the following layers of fuel.
- The ribs on the bottom of the pancake prevent it from sinking onto the fuel layer and blocking the combustion. Through the cavities between them, gases enter the upper chamber.
- Thus, there is a layer-by-layer consumption of combustible material with the formation of a large amount of heat.
The burning of one bookmark lasts up to a day or more.
Such stoves are no less successful in coping with fuels such as peat or pellets.
Heat recovery occurs by heating the furnace body. However, it cannot be complete. It is also desirable to use the samovar method of taking energy for heating through a radiator heating system.
Video: review of the bubafonya furnace: device, kindling, advantages and disadvantages
Calculation of the main parameters of the furnace "Bubafonya"
The effective operation of a furnace of this design directly depends on the combination of many indicators and their optimal interaction.
Furnace wall thickness
According to the experience of operating long-burning furnaces, 4-5 millimeters are recognized as the optimal wall thickness. This is just such a parameter that a fifty-liter cylinder has. If the wall is thinner, heat transfer is disturbed and the body burns out rather quickly.
Calculation of pancake parameters
The gap between the pancake and the inner wall of the cylinder is determined by the ratio s = 0.5D. That is, with a diameter of 300 mm, this value will be 300 x 0.05 = 15 millimeters. It should be noted that compliance with this parameter is very important. With a larger gap, the fuel near the walls will burn more slowly, as a result of which the pancake may fall into the bookmark and combustion will stop.
As established in practice, the height of the pressure ribs is 40 millimeters.
pancake thickness
This parameter is inversely proportional to the body diameter. That is, the larger the diameter, the thinner the part should be. There are tables of such dependence on the Internet, for our case this parameter is 6-10 millimeters. Exact data and calculation methods are not given, but it is quite enough to adhere to the published recommendations.
Chimney section size
The minimum allowable cross section of the chimney is determined by the amount of energy released per hour of operation of the furnace, which is determined by the ratio S = 1.75E (kW / h). Here E \u003d mq, where m is the mass of fuel in the load, q is the specific energy of the fuel burning for an hour, a tabular value. The necessary information is given in the table.
Table: data for calculating the section of the chimney
Having made the necessary calculations, we obtain the minimum required diameter of the chimney for the Bubafonya stove is 150 millimeters.
Air intake pipe size
Preparing for assembly, choosing an installation site
Before starting work on assembling the furnace, it is necessary to prepare the place of its installation. After pouring the foundation, it will take time for the concrete to harden. During this period, you can slowly make the oven itself. The foundation can be used no earlier than 7 days after pouring. On top of the concrete base, you need to lay out a platform of refractory bricks.
A good foundation is essential for the safe operation of the furnace.
When choosing a place to install the furnace, you need to consider the following circumstances:
- the distance to the nearest walls of combustible material must be more than one meter; if there is no such place, the walls must be additionally protected from heating with an asbestos sheet 8–10 millimeters thick; on top of it, install a sheet of galvanized metal with a thickness of 0.5–0.7 mm;
- the chimney in the vertical part must not fall on the supporting beam;
- if an external chimney is used with an outlet through the wall, the length of the horizontal part should not be more than one meter; otherwise, you need to make a chimney with a slope of 45 degrees.
The preparation of parts and assembly of the furnace is best done indoors, for example, in a garage. This will save the neighbors from unnecessary noise when working with a grinder and from the sparkling of an electric arc. The room needs to be furnished exhaust ventilation. If welding is carried out in the open air, the place of work must be protected with protective screens.
Furnace modernization
Improving the parameters of the furnace is associated with an increase in its heat transfer. For this, additional heat exchange surfaces on the furnace body are used. Such parts can be made from various metal profiles, including strips, corners, profile pipes. The choice of material depends on what is available from the leftovers.
Additional metal profile heat exchangers increase the efficiency of the device
Additional heating surfaces can be installed not only on the outer surface, but also inside the furnace, which allows you to intensively heat the air in the room. The negative result of such a decision will be the burnout of oxygen at high temperatures.
Features of the operation of the pyrolysis furnace
The main difference between pyrolysis furnaces is the ability to use a wide variety of fuels. In solid fuel stoves, it is allowed to burn not only traditional combustible substances, but also rubber, plastic and other materials that are categorically not recommended for heating conventional stoves.
This feature is associated with the complete decomposition of the fuel and the secondary combustion of the resulting gases in a separate chamber. After that, only carbon dioxide and water vapor remain in the smoke emissions. There are no harmful emissions into the atmosphere during pyrolysis.
But when using such fuel at the ignition stage, a persistent smell of burnt rubber remains in the room. Therefore, such thermal units must be installed outside residential premises.
Maintenance of pyrolysis ovens
Pyrolysis ovens require much less attention compared to conventional devices. This is due to the fact that there are practically no solid particles that form soot in the flue gases. The presence of water vapor in the exhaust predetermines the formation of condensate on the walls of the chimney. Therefore, it is necessary to install a condensate collector with a drain cock, which must be used regularly as it accumulates.
This statement is true for perfectly balanced furnaces, where complete decomposition of the fuel occurs. But a breakthrough of conventional furnace gases cannot be ruled out, therefore regular inspection of the inner surface of the chimney is necessary. If necessary, it must be cleaned. Inspection is carried out at least twice a year.
On long-burning furnaces, an insulated stainless steel pipe is mandatory.
Waste oil stoves should be cleaned regularly as carbon deposits and slag deposits form in the fuel bowl. In the first combustion chamber of the fuel, normal combustion occurs with the release of solid particles. The design of the furnace allows you to visually monitor the condition of this unit.
At self-manufacturing there are no trifles for heating stoves. Each circumstance must be carefully weighed and thought out. Otherwise, all efforts will be in vain. I wish you success!