Almost all wooden houses that were built in the last century have a very low ceilings. This is due to the fact that then there was no such wide access to various building materials. In addition, over the past years, the houses have given serious shrinkage, which affected the height of the ceilings in them.
Old wooden house, the ceilings in which are most likely very low
The main reasons for low ceilings in wooden houses
As mentioned earlier, mainly the height of the ceiling was initially made small in wooden houses. In addition, the shrinkage of the house also makes itself felt. For this reason, today many owners of such housing are forced to face problems when installing modern furniture and door blocks.
Errors in design calculations
Not always a low ceiling is a sign of old age wooden house. Such metamorphoses can happen with new wooden houses. It may happen that after construction the ceiling will be not only low, but also lopsided. This happens for several reasons:
- During the construction of the house, according to all calculations, the ceiling height should have been at least 2.4 m.
- When the construction was completed, it actually turned out to be 2.1 m. All this happened due to the fact that miscalculations were made during the design, namely, the thickness of the floor beams was not taken into account.
- Sometimes the cause of the discrepancy is elementary negligence. When buying a bar, no attention is paid to its thickness, instead of 150 mm it turns out to be 144 mm. It would seem a trifle, but from the entire height of the wall, in total, at least 10-15 centimeters run up, which is very significant. But this could easily have been avoided with great care.
home shrinkage
However, this is not all the trouble that builders of a wooden house can expect. After a while, you can notice that the ceiling sank even more. In some places, its height is slightly more than 180 centimeters. What is the reason here? Quite simply, the builders forgot about the usual shrinkage. Well then, why did the ceiling also squint? And this despite the fact that the foundation was erected in compliance with all the rules with the necessary capacity. And the reason for this is the usual incompetence that appeared during the purchase of materials. Problems may be as follows:
- The acquisition of logs or timber was carried out in different time and from different parties. They had different humidity, as they were stored in different conditions.
- Stress on wooden structures was distributed unevenly.
- Different types of wood were used in the construction of the crown, for example, spruce and pine.
wood shrinkage table
How to raise the ceiling
Now let's figure out how to raise the ceiling in a wooden house. It should be remembered that it is always better to prevent a problem than to heroically solve it later. Therefore, it is necessary to purchase building materials with special attention. But if, nevertheless, problems have already appeared, then you need to know how to fix the current situation in which you find yourself. The issue of raising the ceiling in a wooden house is quite complicated, so its solution must be taken with great responsibility.
The main factor is individuality.
There are many tips and instructions that are designed to help in resolving this issue. However, not all of them can be used; on the contrary, many of them can lead to more serious consequences, up to the destruction of the building. The point here is that each house is strictly individual and it has its own characteristics and a certain period of operation.
How not to do
One of the recommendations is that with special means all ceilings can be raised completely. However, it does not say that before this it is necessary to carefully examine the technical condition of the beams.
In this way:
- The poor condition of the beams can lead to the complete destruction of the entire roof when exposed to lifting mechanisms.
- Even with the beams in good condition, the roof can slip and move to the side, and it can no longer be installed in place.
- This will lead to the fact that the entire roof will have to be disassembled and reassembled.
- When moving, the roof can cause damage to the entire structure.
- The result is the complete destruction of the building.
Lowering the floor is a dubious way out
Some people, when they see that it is impossible to raise the ceiling, simply lower the floor. Here it should be noted that this will help someone, and harm someone. Individuality is shown in full measure. For example, we have a house that has low ceilings but normally spaced windows. What can we expect:
- It is important to know that, although the height of window sills is not standardized, it is physically most convenient to have them at a height of 900 mm and no higher.
- If we lower the floor at least 30 - 40 centimeters, then we will actually get the height of the window sills 1200 - 1300 millimeters.
- Naturally, such a distance is admissible only for industrial premises, and for the house it is completely inconvenient.
The importance of design features
The solution to the issue of floor displacement depends on the height and the foundation itself. For this reason, it needs to be studied very carefully. Otherwise, excessive lowering of the floor will have a bad effect on the condition of the whole house. One way or another, finding the floor too close to the ground is unacceptable, as this can lead to the appearance of mold and fungus, as well as a decrease in the overall cold resistance of the home. It is best to provide for the possibility of replacing individual parts and beams in the crowns of the house already in the design process.
The foundation needs to be carefully examined.
By the way, in the old days, when people built a wooden house, they understood that its lower crowns could rot over time. Therefore, it was possible to replace rotten logs with new ones without disassembling the entire building.
What are the advantages of whole building lifting technology
In the case when it is impossible or impractical to raise the roof or lower the floor, then it is necessary to raise the entire house completely to a certain height. This will kill two birds with one stone at the same time. First of all, we will increase the height of the ceiling and at the same time align the ceiling and the floor.
Ways to raise ceilings
Let us consider in detail several ways by which you can fearlessly raise the ceilings in a wooden house.
Change of floor device
A good way to increase the ceiling height in a wooden house by 150 - 250 mm without distortion is to use beams. All ceilings in a wooden house contain floor beams, insulation and filing. It is most economical to produce beams with a thickness of 50 mm and a height of 150 to 180 mm. In this case, this parameter must be changed depending on the length of the floor span. It is not worth making the height of the beams less than 150 millimeters. The ceiling sheathing is attached to the bottom of the beams. The method lies in the fact that this filing is removed, getting a gain in height exactly by this number. What do I need to do:
- Clear the attic of various trash and insulation.
- Remove trim from bare ceiling beams.
- Inspect carefully all the beams and replace those unsuitable for further use.
- After that, you can proceed to the device of a new floor.
In carrying out such work, attention should be paid to the fact that ceiling beams lifted structure will carry not only a load-bearing, but also a decorative function. Most likely, these elements have a very unpresentable appearance, as they were covered with a binder. Now they will be outside. Therefore, they must be brought in accordance with the new circumstances. If the beams cannot be beautifully arranged, then you can close them with decorative false beams.
It may look like a decorative false beam
After that, sheathing and insulation are made already on top of the load-bearing beams. This approach to raising the ceiling in a wooden house will allow you to complete the entire operation without restructuring all the elements, and visually the ceiling height will increase significantly. If you come up with fantasy to finish the bare beams, then this can bring additional flavor to the interior of the home.
In some cases, lowering the floor is also shown. To do this, you need to study the method of laying its beams. Often they are placed after one or two rows have been folded in the crown. In order to find this, you need to tear off a couple of boards somewhere on the edge and see how they lie. If everything is really as we said, then you need to cut the beams from the crown and put them directly on the foundation. After that, you can lay the floor again. Important advice - to protect against dampness, place pieces of roofing material under the beams. This method perfectly allows you to increase the height of the premises in a wooden house.
Where to start lifting at home
If design features buildings do not allow using one of the methods proposed above, then the whole house will have to be raised. This is a very responsible matter.
- You need to study the entire structure of the house
- In the presence of furnaces, attention should be paid to cutting the pipe that needs to be disassembled.
- It is necessary to calculate the weight of the entire structure to be lifted, at least approximately. It depends on the moisture content of the wood and its type.
The lifting is carried out by several jacks, which have a load capacity of at least 5 tons. It is necessary to use just a few jacks, as this will not only avoid damage to parts of the structure, but also speeds up the whole process. However, not everyone can boast of having several tools, and they are quite expensive. Therefore, sometimes you can get by with one jack, if the lifting is carried out correctly. You need to do this as follows:
- It is best to take a 10-ton jack, but if it is not available, a five-ton one will do.
- The main thing in this matter is the lack of haste. In one pass, you need to raise the house by no more than 5 cm. This will avoid violations and deformation.
- After raising one side, wooden wedges are inserted into the foundation and move on to the next corner. Having passed around the entire perimeter of the house, you can go to the second round. Rising 50 millimeters per pass, you need to raise the house to the desired height.
Jacking up the house
The installation of wedges must be done correctly. Loose wedges must not be placed under the raised structure. It's better to do the following:
- Decide on the height of the house.
- Calculate the number of points to lift.
- Select the exact lifting height for one pass.
- Divide this value by the total lift height.
- Prepare in advance the number of wedges for all passes of different thicknesses.
- Wedges consisting of several parts must be securely fastened.
- If in the course of work there is any malfunction at the jack, then it must be replaced immediately, and work should be resumed only after that.
- After raising the building to the required height, it is necessary to add right amount rows into the crown and lower the jack.
- After these manipulations, it is necessary to lower the floor to the distance by which we raised the house.
The process of raising the ceiling in a wooden house is quite laborious and requires great care, but it is quite possible to do it yourself if you know the rules outlined above.
Heating, water supply, boiler room.
Qualitatively under the contract, guarantee:
site How to raise the ceiling in a wooden house - Building a house with your own hands
Let's do it professionally:
- installation of a heating system;
- installation of autonomous water supply;
- maintenance of boiler equipment;
- repair, replacement and restoration of the pipeline.
We have worked and are working here. Moscow The Moscow region Tver region Kaluga region Vladimir region Tula region Abramovka Abramtzevo Avdeevo Avdotyino Avsyunino Abramtzevo Akatevo Alabino Alabushevo Aleksandrovo Aleksino Alpatieva Alferevo Andreevka Astapovo Ateptsevo Afanasovka Ashitkovo Ashukino Babenka Baksheyevo Barabanov Baranowski Barvikha Barvikha sanatorium Barybino Barynin Bezzubov Bekasovo Beloozersk Beloomut White Kolodezi White Columns White Rust Bielany mountain Birch holiday Birch Biorki Birevo Biserova Bobkov Bogatisheva Bolychevo Big Vyazemy large yard large Alekseevskoe large Gridino large Gryzlovo Borisov Borovkova Borodino Bortnikov Botovo Boyarkina Bratovschina Bronnitsy Budenovets Buzhaninovo Buzharovo Bunkovo Bunyatino Burtsev Vaskino Great Yard Velyaminovo Verbilki Veselevo Vishnyakovsky Villas Leader Proletariata Volkovo Volokolamsk Volchenko Vorobyevo Raven Voskresensk Vostryakovo Vyshegorod Vyshegorod Ganusovo Gar-Pokrovskoye Waterworks Settlement Glubokoye Golitsino Go Lovkova Gorbovo Factory Goretovo Slides-Kolomna Horlovks Mound pot Grishino Gubin Davydkovo Davidovo Darischi Dashkovka Dvoriki Dedenevo Dedinovo Demikhova Denezhnikovo Denkovo Dmitrov Dmitrovo Domodedovo Donino Dorokhovo Drezna Dubky Dubnevo Dubrovicy Durykino Dukhanino Dyutkovo Evseeva Elgozino Elizarovo Eldigino Ernovo Ershovo Efremovskaya Zhavoronki Zhitnevo Zhuravno Zavety Ilicha Zavorovo Zagorski Dali Zakubezhe Zaovrazhe Zaprudnaya Zaraysk Dawn Communism Zakharovo fur farms Green Grove Zelenogradskiy Green Zendikovo Banner October ZYKOVA Ivakino Ivanovka Il'inskii Il'inskii Pohost Ilinskoe Ilinskoe-Teryaevskoe Ilinskoe-Usovo Ilinskoe-Yaropoletskoe Industry Istra Kabanovoy Kalininets Kalistovo Kamenskoe Karinskoe Kashino Kashira Klemenova Klementievo clamping of Sovhoz Klenovo Wedge Kliazma Knyajevo Kokino Kokoshkino Kolychevo Kolyubakino Konobeevo Korystovo Kostomarovo Kosyaevo Koshelevo Krasnaya Gora Krasnaya Zarya Krasnaya Poima Krasnovidovo Krasnozavodsk Krasny Tkach Krasny Kholm Kratovo K rivandino Krutoe Kuzmino Kurovskoye Kurovskoye Curtino Kuryanovo Ladygino Lenkovo Leontyevo Lesnoye Lake Summer vacation Mendeleevo Mendyukino Meshcherino Mesherskoye Mistsevo Mityakina Mikhailovskoe Misheronsky Mishutino Mozhaisk Youth Moskvich Mostovik Muranovo Muhanovo Nazarevo Naro-Fominsk Nara Narynka Nakhabino Nekrasovsky Nelidovo Nepetsino Nerastannoe Lower Khoroshevo Nikitskoe Nicholas Kropotki Nikolskoye-Gagarino Nikon's New Village New Olkhovka Novobrattsevsky Novoegory Novozagare Novopetrovskoye New Noginsk Obukhovo Odintsovo Vakhromeeva Lake Ozeretskoe Beloe Sanatorium Lakes Olgovo Olyavidovo Onufrievo Opalikha Orudyevo Osanovo-Oak Ostashevo Pavlovskaya Sloboda Pavlovsky Posad May Day skoe Perkhushkovo Petrovo Pecherniki Pirochi Povarovo suburbs resort Podolsk Podosinki Podkhozhee Podyachevo Pokrovka Pokrovske-Sheremetyevo Polbina Poluryadenki Polushkino Pominovo Porechie Pochinki Pravdinsky Privokzalny spaciousness Priokskaya Proletarskii Protekino Psarki Ptichnoye Heath Pushkino Pyshelitsy Radovitsky Rainbow Ramenky Ramenskoye Rassudovo Rahmanovo Redkino Rechitsy Reshetnikovo Reshotkino Rzhavka Rogachevo Springs Ruza Fish Ryazanovo Savvinskaya Sloboda Svatkova Selkovo Selyatino Semenovo Semkhoz Senezh Sennitsy Sergiev Posad Silver Ponds Serednikovo Serpukhov Simbuhovo Sinichino Sitnya-Schelkanovo Skoropuskovsky Sloboda Smenki Snegiri Sobolevo Sokolova Pustyn Sokolnikova Solnechnogorsk Sosnovka Sofrino Spassov Satellite Staraya Kupavna old Ruza old Sitnya Starikov Old town Stegachevo Stepanovski Stepantseva Stepanschino Stolbovaya Stremilovo scab Sudnikovo Sychev Taldom Taraskovo Tarbushevo Tatarinovo Tashirovo Tempi Teryaevo Timonino Tishkovo Tolstyakovo Topkanovo Torgashino Trail Revaux Labor Tugolessky Boron Tumenskoe Tuchkovo Tyutkovo Uvarovka impactor Specific Uzunovo Ulyanina Usovo Uspenskoe Fedortsova Fedosino Fedyukovo Fryazevo Harlampeevo KHATUN Holscheviki Hotkovo Hripan Chemodurova Cherkizovo Chernevo Chernogolovka Cherusti Chismena Churilkovo Shalikovo Shatura Shaturtorf Sheino Shestakovo SHUBIN Shugarovo Shustikova Electrogorsk Electrougli Yurlovo Yurtsovo Yakimovka Yakovlevo Yakovskoe Yakot Yam Yamkino Yaropolets Yahroma Minskskoye Highway Varshavskoye Highway Kiev Highway Kashirskoye Highway Novoryazanskoye Highway Yaroslavskoye Highway Novorizhskoye Highway Leningradskoye Highway Kaluzhskoye Highway Dmitrovskoye Highway Egoryevskoye Highway Rublevo-Uspenskoe Highway Ilyinskoye Highway Volokolamskoye Highway Borovskoe Highway Podushkinskoye Highway Ostashkovskoye Highway Rogochevskoye Highway Schelkovskoye Highway Altufevskoye Highway Kurkinskoye Highway Skhodnenskoye Highway Novoskhodnenskoye Highway Lotoshinskoye Highway Rublevskoe highway Ilinskoe highway Uspenskoe highway
Ceiling decoration in a wooden house can be done different ways. A large number of options that are not available for an apartment will look very appropriate and harmonious in a private house. And this is due to the fact that here the ceilings are often higher than in apartments, and also because of the configuration of the roofs, they can have original shapes, which allows you to develop an unusual design of your own.


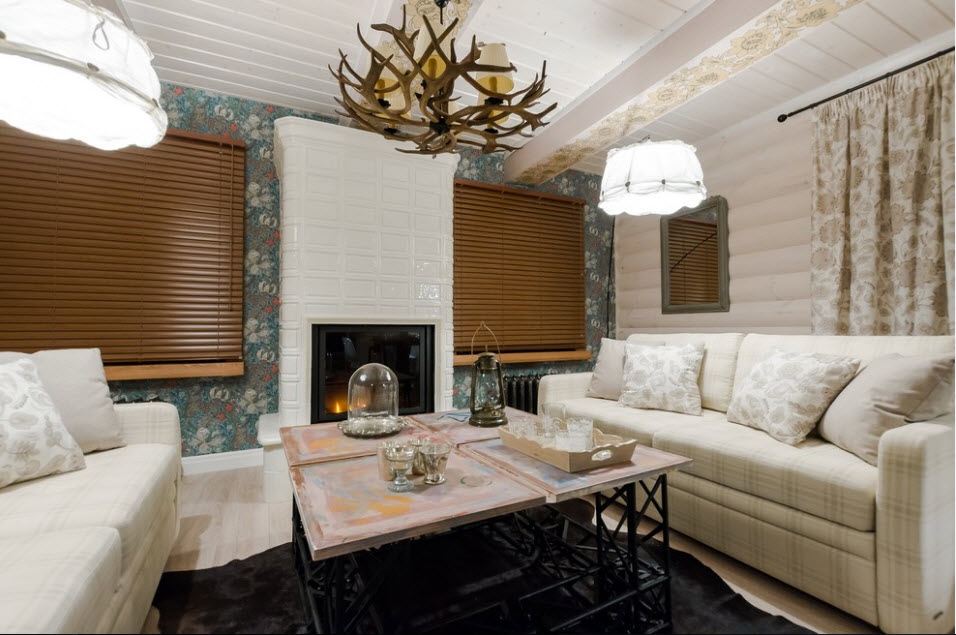


 Independent work ceiling sheathing in a wooden house requires certain knowledge and skills. The specifics of the work will depend on the type of ceiling. So, a hemmed beam ceiling consists of boards hemmed between the beams, between which insulation is laid, and covered with boards or plywood on top. The ceiling is made of solid logs. This design requires the preliminary manufacture of the crate.


wood finish
The best option for a wooden house, as this material is environmentally friendly, which allows you to maintain a favorable microclimate in the room. Wooden cladding between the beams can be made of several types - from budget lining to a noble expensive array. Alternatively, you can use a combination of materials, then the ceiling will be original and unique.


The ceilings in a wooden house are also finished with plywood. But no less popular is the finishing of lumber - beech, oak, cherry, beech, ash, maple, birch, alder. Of the conifers, these are spruce, cedar, pine, larch, cedar, fir. They differ in texture, shade, pattern. When choosing lumber, it is important to take into account the level of humidity, no more than 16% is allowed.


clapboard
Lining is a board processed in a special way with a tongue and groove to simplify installation. The eurolining, unlike the usual one, has a higher quality and design of the lock. The peculiarity of lining is durability, strength, good sound insulation. Due to its naturalness, the surface of the ceiling always “breathes”, and the attractive price of such material makes it affordable for everyone.


Design options are as follows:
- clapboard lining in one direction is best used for small rooms, in a large room it will look boring and monotonous;
- if the lining is laid between the beams, its shade and direction of the lining can be changed, thus dividing the space into zones;


- the continuous surface of the ceiling from the lining can be decorated with carvings or paintings. This solution looks very elegant and resembles colorful old houses.
Plywood
Although plywood is not often used to finish the ceiling, it can be used to create interesting design, designing the house effectively without extra costs. Plywood is distinguished by the number of glued layers and by such indicators as:
- grade - construction plywood of one of 5 grades is used for cladding;
- moisture resistance - the parameter is especially important during the period when the house is not heated. Coating plywood with laminate increases moisture resistance;
- type of wood - maple, birch, alder are most often used for the top layer of plywood, and the middle layers are most often made from coniferous species;
- processing method for country house raw plywood is quite suitable, for a cottage it is better to use plywood sanded on one side. Double sided sanding is not required;
- appearance - the decorative component of plywood can be made of asbestos paper, plastic, decorated with a pattern or imitation of wood.


For sheathing the ceiling with plywood, you must immediately construct a crate from wooden beams or aluminum profile. You can fix the plywood to the beams using self-tapping screws or nails, and then seal the joints with a decorative rail or putty.
Plywood - practical and inexpensive material, which is perfect for facing the ceiling in a private house. With the help of plywood, you can create an individual design for any room or attic.


Veneered panels
Veneered panels - the same wood planks, only covered with veneer to create a decorative effect. After all, veneer quite successfully copes with imitation of any type of wood, and here it's all a matter of your taste. The price of the panels is slightly higher than the cost of lining, but the plating options are much more diverse.
A significant plus of the material is ease of installation. Each owner can install veneered panels, even without the appropriate skills and experience. Uncomplicated installation is carried out due to the locking connection of the panels. Thus, to make a ceiling, you will need a minimum of tools and time.


wood mass
Perhaps the most prestigious type of finish with wood is natural wood in the form of practical panels. The main properties of the material:
- strength and durability;
- high quality - depends directly on the type of wood itself;
- luxurious appearance;
- easy and quick installation, which you can do yourself, thanks to special built-in locks.
Such panels are made from hardwoods that meet certain characteristics.


Plaster
Finishing the ceiling of a wooden house with plaster was previously very relevant. Although today it is often found in modern cottages, but still slowly becoming a thing of the past, because the range of materials has become much wider.
The plaster is applied to a mesh of shingles, previously stuffed between the crossbars. The durability and strength of the coating is ensured by the reliable adhesion of the solution to the shingles and embossed mesh. It is impossible to plaster the ceiling on your own without certain skills and knowledge. This is a rather time-consuming and complex process that requires the hand of a professional.

 Advantages of plaster:
- attractiveness, rich colors and the ability to create a variety of relief on the surface;
- practicality and durability;
- affordable price of both the material itself and plastering services. Do-it-yourself work also does not require large cash costs.


The only inconvenience of such a finish in a wooden house is the need for thermal insulation of the walls, which is carried out from the inside of the room. Thermal insulation boards are a good basis for further installation of reinforcing mesh. However, this technology hides a valuable area, which is very undesirable if it is already not very large.
Drywall
Drywall panels are a versatile material for finishing any surface. With drywall, you can create individual project with amazing design. A variant of a two-level ceiling and other intricate designs is possible.


Drywall is mounted on a wooden or metal carcass, subsequently can be painted, pasted over ceiling tiles or wallpaper. You can also install false beams on the slabs and mount spotlights. Gypsum stucco looks spectacular, which goes well with a plasterboard surface.
Stretch ceiling
It is quite suitable for installation in wooden houses. The only thing to consider here is one nuance - stretch fabric it is not mounted immediately after the construction of the house, but at least after a couple of years, since each house shrinks. Stretch the canvas under the beams, due to which the height of the room may decrease. Stretch ceiling go well with drywall in multi-level designs, and a true professional can create a really great design, and your interior will become unique.


Plastic panels
Facing the ceiling with plastic panels in a wooden house is quite simple. The smooth surface of the draft ceiling allows you to mount plastic panels without additional trim. Otherwise, a crate will be required, for example, from a wooden beam or a metal profile.


Important! The disadvantage of all artificial materials is that they do not allow air to pass through, which can cause mold to appear under the panels. So it's best to use natural materials for a wooden house.
Tags: ,It is well known that in many older houses the ceilings are rather low. This can be explained by the peculiarities of the architecture of buildings of the last century, as well as their subsidence over many years of operation. Of course, this state of affairs does not quite suit the owners, who sometimes fail to place in the house modern furniture or install door jambs without trimming them.
That is why many of them would like to know how to raise the ceiling in a wooden house in the simplest way.
Solution options

To solve the problem set before us, one of the following methods can be used:
- removal of false ceiling;
- lifting ceiling beams;
- lowering the genital lag;
- the rise of the entire building as a whole (with the addition of crowns).
Note that the choice suitable option increasing the height of the premises in the house depends on many factors and is associated with certain difficulties.

The method, which involves the dismantling of a false ceiling, is, of course, the simplest, but with its help it is possible to build only longitudinal (in relation to the beams) walls by 15-20 cm.
The rise of the ceiling beams themselves is possible only if complete dismantling roofs, since attempts to raise the entire roof structure can lead to irreparable consequences (as an extreme option - to the complete destruction of the structure).
Reducing the level of placement of the floor lags will require the contractor to make a mandatory alteration of window blocks (it is unlikely that anyone will be satisfied with unnaturally high window sills), or build up the foundation.
Lifting a building with the help of jacks is usually carried out either to add additional crowns, or to build up its foundation (with the subsequent lowering of the floor lags). Next, we briefly consider the implementation features of each of these methods.

On closer examination of the ceiling, you can see that its lower part is formed due to filing from boards, which is closed from above by one or another finishing material(drywall, for example). From the side of the attic, there is usually a flooring arranged along the upper cut of the beams. Even if there is no such flooring, you can still gain about 15-20 centimeters in height (depending on the thickness of the supporting beams) by removing the filing.

Naturally, in the latter case, you will have to make a solid flooring and insulate it on top in accordance with the basic requirements of SNiP. At the same time, the remaining bare beams are quite capable of fitting into the interior of the room and can act as an original decorative element.
Lifting ceiling beams

This method of raising ceilings in a private house is allowed only if the following conditions are met:
- the possibility of complete dismantling of the roof;
- good condition of the beams;
- availability of jacks of the required class.
In the process of implementing this technique, you will also have to dismantle the hemmed ceiling and completely expose its load-bearing beams, which are then removed, and the walls of the house are built up by 1-2 crowns. After adding beams, the entire chain of operations described above is performed in reverse order.

In the event that you have chosen the option of lowering the floor, you will first need to make the following assessment:
- carefully examine the sexual lags themselves;
- examine the condition of the foundation;
- define underground.
After a thorough visual inspection of the technical condition of all elements of the structure, it will be possible to make an informed decision on how to raise the ceiling in a wooden house.
It is assumed that you will be able to decide whether you need to build up the foundation or choose the option of simply lowering the sex logs below the level of the latter.

In the event that it is not possible to either raise the ceiling of the house or lower its floor, you will have to deal with raising the entire wooden structure as a whole, followed by adding crowns or building up the foundation. This variant of the solution can be used as a complex solution that allows solving two problems at once. At the same time as increasing the height of the ceiling, you can also renovate the foundation of the building.

You can find a detailed description of the very technique of lifting a house in the sources, in many presented on the Internet.
Before starting the procedures, it is necessary to make a rough estimate of the weight of the entire structure to be lifted. In this case, the calculation should be carried out based on the fact that the density of dry wood is approximately 500-700 kg / m3.
For work, you will need to stock up on three or four powerful hydraulic-type jacks with a lifting capacity of at least 5 tons.
Video
In this video, the process of raising the house is also given attention.
Wooden houses of old construction often sin with low ceilings. There can be many reasons for this: from elementary savings in materials to incorrect calculations during construction. In new buildings, such things also happen, but correcting miscalculations in this case is even more challenging task, since the tree shrinks noticeably, and this makes correction very difficult.
Solutions
Methods for solving this problem are divided into two groups. It should be remembered that the issue must be addressed individually, taking into account the characteristics of a particular building. Most of this kind of work is quite doable with your own hands.
- The actual lifting of the ceiling - that is, any work is carried out with the ceiling or roof of the building. The general advantage of the methods is the preservation of the level of window and door openings.
- Lowering the floor - if for some reason it is not possible to correct the ceiling, then lowering the floor level helps to correct the situation. A technique is used in cases where the foundation of the house allows it.
Raising a building is a very radical option, in which the entire building is raised on jacks, and the wall or foundation is completed.
Changing the ceiling height
Each of the methods is characterized by its own advantages and disadvantages. Their application depends on design features building.

Hemmed ceiling stitching - in wooden houses of old construction, the ceiling is fixed to the ceiling beams from below, that is, it takes at least 10–20 cm. By removing the old boards and sewing up the space between them with finishing material, you can increase the height of the room by the mentioned 10–20 cm. This includes various decorative techniques, for example: a combination of dark ceiling beams and light PVC slats, as shown in the photo.
- The advantages of the method include a small amount of work, low costs.
- The disadvantage is that the change in height is small, if the ceiling is so low that family members hit the beams with their heads, then this method will not solve the problem.
Removal of ceiling beams - an option is possible if the building is built according to all the rules, there are both ceiling and rafter beams. The difference between the levels of the beams is very noticeable. The order of work is as follows: removed finishing boards, the beams are removed - they are cut off, the new ceiling is hemmed onto the rafter bases.
- Advantages: a small amount of work, a noticeable increase in height, repairs are easy to do with your own hands.
- The disadvantage is that the option is feasible if there are rafters. At the same time, thermal insulation worsens, which can be compensated by laying a new layer of insulation in the attic.
Roof rebuilding - if the old wooden house is small, and the beams and rafters need repair or partial replacement, then it is easier and ultimately cheaper to disassemble the roof, remove the beams and grow the walls by laying out a couple of crowns. Then you should make a new floor and lay the roof.
- Advantages - in addition to adjusting the height to any required amount, the roof is repaired, as well as a new ceiling finish to your liking. At the same time, doors and windows remain at the same level.
- Disadvantages - a very fair amount of work.

Changing the floor level
The methods of this group have one drawback - not only the height of the room, but also the windows and doors change, which can create significant inconvenience.

Changing the position of the beams - in old buildings, floor beams are fixed between the second and first crown, that is, a cavity is formed between the foundation and the floor. The method comes down to removing the floor beams and installing lags on the foundation. It should be noted that the disappearance of the air cavity under the floor reduces thermal insulation, so it is recommended to take care of the heat insulator before laying a new one.
- Advantages - a small amount of work, the removal of beams does not affect the condition of the foundation.
- The disadvantage is the change in the level of windows and doors.

Lowering the floor level below the foundation - the method is fraught with the danger of foundation movement, and therefore should be used with caution. It is feasible only if the base is of the tape type. The procedure is as follows: the flooring and floor beams are removed, part of the soil and bedding is removed. It should be remembered that the depth of the excavation cannot be greater than the depth of the foundation. Then the base is backfilled and poured at a new level, the lags and flooring are laid.

- Advantages - a significant change in the height of the room.
- Disadvantages - the danger of displacement of the foundation, a fair amount of work, a long period of implementation.
The video about shows several ways to change the height of the ceiling.
The last way
It is used in cases where none of the above is suitable. This decision is quite risky, since a mistake when lifting can lead to a displacement of the house to the side and damage to the latter.
First, it is necessary to correctly estimate the weight of the building, based on the thickness of the walls and the type of wood, since the difference in the density of wood can be quite significant. Also, if a furnace is built in the building, then it is necessary to disassemble the chimney before lifting.
It is recommended to use several jacks with a lifting capacity of 5 tons when lifting. You can also raise the building with the help of one device, but the first method is somewhat faster. The process is reduced to a gradual - no more than 50 mm at a time, raising a wooden house to the required height. When lifting, fix with wedges or props, as shown in the photo.

After the desired height is reached, in the formation crowns are added to the opening - you can use both logs and timber, but be sure to use the same type of wood as the rest of the wall material, or the foundation is built up. Then the house is raised again, the props are removed and the building is lowered. Walls, interior decoration, the roof does not change at all. However, the amount of work is significant, and window and door openings are at an unusually high level.
The old buildings are low ceilings. If you are the owner of such a house and want to increase the height of the ceilings, it is not necessary to disassemble the roof - you can raise it on your own. Our master class will help you with this.
Tools and materials for work
We will need:
- at least three jacks (preferably oil jacks) with a lifting capacity of 5 tons or more;
- their corresponding amount of compressive strength wooden beams, metal channels (optimal) or pipes of suitable length;
- the corresponding number of hard floor pads, which will redistribute the point load from the jack to the area load (thick boards, pieces of channel, etc.);
- cushioning material that will be laid under the beams and jacks in the process of lifting the roof (trimming boards, bricks, etc.): their number must be calculated so that it is enough for all beams on both sides to the full height of the roof;
- the material from which the walls will rise (brick, shell rock, adobe, etc.), as well as mortars (sand, clay, cement, etc.): their amount must be calculated depending on the length of the walls and height, on which the roof will rise.
So, let's begin
As part of the first stage of work, it is necessary to adjust the jacks to the ceiling beams. Beams can be initially visible or sewn from below, in this case, you need to calculate their position (it corresponds to the location of the load-bearing frame of the roof) and mark it on the walls from the inside in order to know where to install jacks. There will be a lot of dust in the process, so the furniture should be covered or taken out of the room.
We start from the corner. We install the jack on the distribution pad strictly under the beam and slightly wedged the channel between the beam and the jack by extending the jack rod. The jack should still have a power reserve of 5-10 centimeters for the upcoming lift. Next, you need to make sure that the channel is located vertically in all planes. If necessary, you can loosen the jack, correct the channel and wedge it slightly again.

If you do not plan to sew up the beams in the future, put a cushioning material between the channel and the beam, so the beam will not get damaged. Now you can try to carefully lift the beam. Watch the mutual position of the jack and the channel. If you see that there is a break at the point of contact, loosen the jack and move it slightly in inside fracture. Do not ignore this break - under increasing load during lifting, the channel can jump out of the connection, which is fraught with injury. If there is no break, extend the jack rod by 5 centimeters, no more, and fix this position by placing a gasket between the beam and the wall. Do not loosen the jack while doing this.

Repeat the same operation with all the jacks on one side of the house.

The more jacks you have, the better - you will save time on reinstalling them.

When all the jacks are raised 2 inches, you can start again from the first to the penultimate one, raising them another 2 inches and increasing the thickness of the spacers between the beam and the wall. It is not worth lifting higher yet: in case of a large skew, the roof can “move out” in the process of raising the opposite side.

Next, we weaken and rearrange all the jacks under the following beams, except for the last one, raised by 5 centimeters. We repeat the whole process from the beginning. When all the beams on one side are raised by 10 centimeters and gaskets are placed under them, we move to the other side of the house and lift them in the same way. From this side, you can already raise it by 15-20 centimeters, we also do all further ascents to the required height. This will compensate for the small displacement that occurs during the skew of the roof.

Additional difficulties
The first and last beams are usually hidden by the wall, so they will need to be lifted manually, using an enlarged shoulder. It will be much easier to do this when the second and penultimate beams of the house are already raised by 5 centimeters.
![]()
The distribution pad under the jack must be strong enough to avoid damage to the flooring.
We fix the roof at the desired height
When the beam is raised to the required height, a support must be erected under it. Even if you use clay when laying the openings, it is better to use mortar for the construction of supports, as it dries faster and acquires the necessary strength. It will be necessary to erect the support at the moment when the beam rests on the raised jack, after the jack is loosened, the load will immediately fall on the support - freshly laid clay at this moment will most likely give a drawdown.

Of particular difficulty will be the sections of the wall where the beams lie above window openings. You will probably want to increase the height of the windows, to do this you will need to raise the lintels and fill the voids at the moment when the beams rest on the jacks.

Try to effectively organize the whole process so that it takes as little time as possible. While the roof is on temporary supports, this is a rather shaky structure - a gust of strong wind can spoil the result of your work.

Once the interior masonry has been laid and the roof is firmly in place, the exterior masonry can be raised.

Since raising and repairing a roof is a rather laborious task, you should immediately think about updating the roof so that this issue does not bother you anymore.


