Building a lightning rod suburban area guarantees not only safety for a person, but also protection for the house from possible fire, in the first place, if it is wooden. The correct lightning protection system includes a lightning rod, a down conductor and a ground electrode.
Let us dwell in more detail on how the listed elements of this system should function, as well as how to design a lightning rod with your own hands.
The principle of operation of a lightning rod
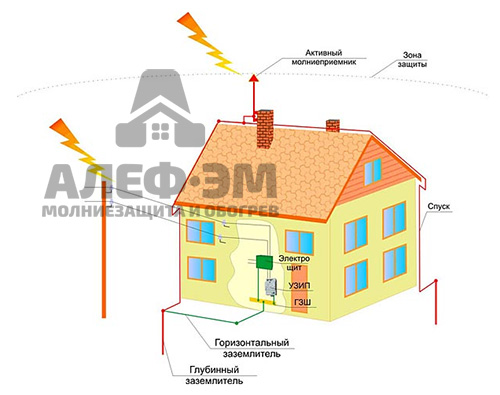
First of all, let's consider how the lightning protection of a private house works and what is required to fully ensure it. You can study all the components of the system in this diagram:
As you can see, the metal rods located on the roof act as lightning rods that redirect the lightning discharge to the ground with the help of a down conductor and grounding.
It is widely believed that if there is a telephone tower near a private house, then a lightning rod can not be done. This is an erroneous approach, because it is better to spend a certain amount of time in order to eventually provide yourself with full protection from a lightning strike. In order for you to understand how a lightning rod is arranged and how it can be made independently, we will gradually analyze the features of the selection of each of the elements of this system.
Video about lightning protection of a private house
Lightning rod protection elements
Lightning rod
The main task is to choose the right lightning rod, which is responsible for guaranteeing the protection of the house in a certain coverage area. A cable, mesh, pin, or even the roof itself can be used as such a receiver. Let us describe in detail the specifics of the application of each of these options.
Regarding the pin, we note that on sale you can find finished goods already having a secure fastening and the required shape. Usually, steel, aluminum or copper acts as the metal for the production of a lightning rod. The last option is considered the most effective. In order for the receiver to fully perform its functions, its cross section must reach 35 mm2 or more (if copper is used) or at least 70 mm2 (if steel is used).
Important is right choice the length of the receiver, which should be from 0.5 to 2 meters in a domestic environment. The pins are very convenient to use for the purpose of placing a lightning rod on the bath, garden house or construction of a total kind.
Sold ready-made metal grid. Standardly, a mesh lightning rod is a cellular frame made of reinforcement, the thickness of which reaches 6 mm. Cells can have sizes from 3 to 12 meters. Often, this type of lightning protection is used in large buildings (for example, shopping centers) or apartment buildings.
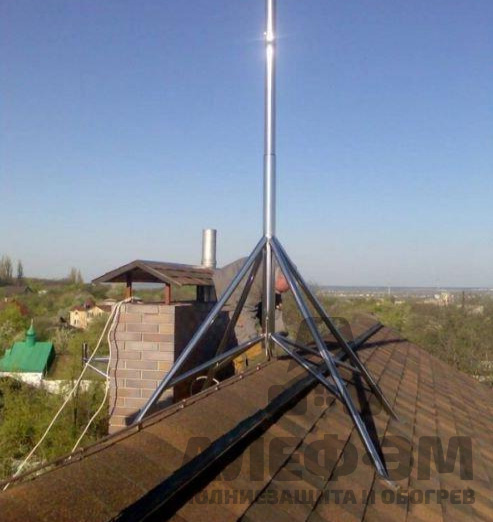
The most convenient at home is the cable, which also performs its functions better than the mesh. In order to build a lightning rod from a cable in a private house, you should stretch it along the entire roof (along the ridge), namely on wooden bars. How it looks can be seen in the photo below. The diameter of the lightning protection cable must be at least 5 mm. This option is usually used if the task is to build a lightning rod on a building with a slate roof.
Another option is to use the roof itself as a receiver. This is possible only if the roof of a residential building is covered with metal tiles, corrugated board or other roofing material from metal. In addition, the roof must meet two important conditions.
Firstly, the thickness of the roofing material (metal) cannot be thinner than 0.4 mm. Secondly, the presence of any easily flammable materials under the roof is not allowed. It is quite simple to build a lightning rod in a house with a metal roof, while saving money on the purchase of special lightning rods.
Please note, if you want to use a mesh, its installation should be carried out at a height of at least 15 cm above the roof!
Down conductor
In a private house, 6 mm copper, aluminum or steel wire is often used as a down conductor. This wire must be connected to the grounding system and lightning rod by welding or bolts.
Only one, but a very important condition is put forward to the down conductor - it must be completely fenced off from the environment, and also laid to the ground along the shortest path. Regarding insulation, we note that in country houses, standard cable channels are mainly used. They are also appropriate if you need to independently make open wiring.
grounding conductor
The last but no less important element of the lightning rod is the ground loop. We will talk about it briefly, since we talked about creating a ground loop in detail in an article about.
It should be located close to the house, but not on the walking part of the adjacent territory, but next to the fence. The discharge of the lightning charge to the ground is carried out with the help of metal rods deepened into the soil by 0.8 meters.
These rods should be laid in accordance with the triangle pattern shown in the photo:
Thus, we have considered all the elements of lightning protection, and now we will describe how to properly build a lightning rod with our own hands so that it functions as efficiently as possible.
Instructions for making a lightning rod
So that you can better understand how to independently assemble a lightning rod system for a private house, we have prepared step by step instructions with photo examples:

private house and country cottages often located in open space, where the only elevation is the buildings themselves. Because of what, during the thunderstorm period, there is a significant threat of lightning hitting buildings. Such a situation threatens not only electric shock to all people in it, but also the possibility of fire, which will lead to a fire and significant damage to property. Since no one can foresee the place where the discharge will strike, the most effective way prevention of its negative consequences is a lightning rod.
That is why it is important for most owners of private houses and summer cottages to install a lightning rod with their own hands. An exception may be buildings located in a lowland, the roof of which is below the top point of the ground or falling into the protection zone of a neighboring building and its lightning rod.
The device and principle of operation of a typical lightning rod
Figure 1: lightning rod deviceThe whole design of the lightning rod is represented by three elements: a lightning rod, a down conductor and a ground electrode. Depending on local conditions and your preferences, each of them may have a different design. Now we will analyze why each of them is needed, and which option to choose in a given situation.
Lightning rod
Its purpose comes from the very name of this element; in fact, it acts as an electrode that receives an electric lightning discharge. The main criterion for it is good conductivity and thermal stability, since the current value can reach 100 - 200 kA, which can easily burn out thin conductors. As a lightning rod can be installed:
- bar structures;
- lattice;
- cable;
- the roof surface itself.
Rod lightning rods can be installed either directly on the roof itself or on a special metal mast. At the same time, their height should provide the necessary protection zone for all structures of the building. Therefore, such a lightning rod is relevant for buildings with a small area and height.
 Rice. 2: lightning rod
 Such rod devices can be copper, aluminum or steel. The first two have good resistance to corrosion damage, due to which such a lightning rod practically does not lose conductivity and cross section even when long-term operation. The metal pin made of steel, unlike the previous two, is much less prone to melting from the flow of high currents, which is why it is much better suited for areas with frequent lightning strikes.
 Rice. 3: mesh lightning rod
 The grid as a lightning rod is used for a large area, for example, multi-storey buildings or shopping centers. Unlike the previous version, it does not affect the design of the building, so it can be used in any modern exteriors. Such a lightning rod must have a given cross section and cell size, as a rule, reinforcement of at least 6 mm 2 is selected. Its installation is carried out at a safe distance from the roof (at least 15 cm) through thermally insulating load-bearing structures.
 Fig 4: wire lightning rod
 A lightning rod is a flexible wire that is stretched over a protected area or building. Allows you to protect a long section at a lower cost of materials for a lightning rod. It is carried out both on free-standing supports and on the roof of a country house. In the first case, the supports are installed at the beginning and end of the section, and in the second, at the beginning and end of the roof.
If conductive options are used as roofing material (corrugated board, metal tiles and others), they can be used as a lightning rod for a lightning rod. However, the following conditions must be met:
- the thickness of the metal layer is at least 4 mm for steel, 5 mm for copper or 7 mm for aluminum;
- there are no flammable materials under the roofing material (insulation, rafters, etc.);
- the outside of the metal is not coated with a dielectric material.
Making a lightning rod from metal roofing allows you to save money on a lightning rod.
Down conductor
It is a conductor that diverts electric current from the lightning rod to the ground electrode. It can be made of metal wire or tire. Must have a cross section of at least 16 mm 2 if made of copper, 25 mm 2 of aluminum, 50 mm 2 of steel. The following requirements are imposed on the current collector:
- Must be isolated from walls and other structures of the house;
- For him, the shortest path for the flow of current is selected;
- Absence of bends and coils, on which breakdown of the air gap can occur;
- Sufficient conductivity at electrical connections.
If necessary, the down conductor is isolated from the surface of the house using a cable channel or in any other way. This procedure is especially relevant for buildings with conductive finishes or combustible surfaces.
grounding conductor
It is made in the form that is buried in the ground. The material used is steel or copper elements that are buried in the ground. It is formed from reinforcement or tires, the requirements for which are established by clause 1.7.111 of the PUE and are given in Table 1
Table 1
| Material | Section profile | Diameter, mm |
Cross-sectional area, mm | Thickness walls, mm |
| Steel | Round: | |||
| black | 16 | — | — | |
| 10 | — | — | ||
| Rectangular | — | 100 | 4 | |
| Angular | — | 100 | 4 | |
| Trubny | 32 | — | 3,5 | |
| Steel | Round: | |||
| galvanized | for vertical grounding; | 12 | — | — |
| for horizontal earthing | 10 | — | — | |
| Rectangular | — | 75 | 3 | |
| Trubny | 25 | — | 2 | |
| Copper | Round: | 12 | — | — |
| Rectangular | — | 50 | 2 | |
| Trubny | 20 | — | 2 | |
| Multiwire rope | 1,8* | 35 |
All parts of the ground loop can either loop and form a closed circuit, or line up in a continuous line. Of course, the closed version is considered more reliable. The dimensions of the contour are selected depending on local conditions.
 Rice. 5: earthing switch installation example
 The main requirement for the ground loop is to ensure the specified value of the metal-to-earth transient resistance, therefore it is better to place it in a wet layer, periodically water it or treat it with materials that reduce the transient resistance and increase the spreading current area ( charcoal and salt). According to clause 1.7.103 of the PUE, the resistance should be no more than 5, 10 and 20 Ohms for networks with a phase voltage of 380, 220 and 127 V, respectively.
The location of the ground electrode is made no closer than 1 m from the walls and 8 m from the footpaths. Since at this point a step voltage arises that can inflict an electric shock on anyone who is within the radius of the affected area, therefore it is strictly forbidden to approach the circuit during a thunderstorm, as well as to touch its current-carrying elements.
Training
On the preparatory stage before installing lightning protection, it is necessary to calculate the parameters of the future lightning rod and select all the elements. This will allow you to determine whether the buildings will fall into the protection zone and what parameters need to be changed in case of shortcomings.
Protection zone calculation
If the lightning protection device provides a grid or a roof surface as a receiver, then the protection zone will completely cover the building. But for cable and rod lightning rods it is necessary to calculate the protection zone.
 Rice. 6: lightning rod protection zone
 Look at the figure, the protection zone is a cone in space, where the probability of a lightning strike is significantly reduced. To determine the parameters of this cone in relation to the lightning rod itself and the building, a calculation is made. Methods for calculating the lightning rod zone for each type are performed on the basis of SO 153-34.21.122-2003.
 Rice. 7: parameters of the protection zone of the lightning rod
 Look at the figure, the following parameters are shown here:
- x and y are the distance from the installation site of the lightning rod to the contour of the building boundary.
Depending on the installation height of the lightning rod and the required reliability, a formula for determining the zone it protects is selected. To do this, use the data from table 2
table 2
| Reliability of protection | Lightning rod height h, m | Cone height h 0, m | Cone radius r0, m |
| 0.9 | 0 to 100 | 0,85h | 1,2h |
| 100 to 150 | 0,85h | (1,2-10 -3 (h-100))h | |
| 0,99 | 0 to 30 | 0,8h | 0,8h |
| 30 to 100 | 0,8h | (0.8-1.43 10 -3 ( h-30))h | |
| 100 to 150 | (0,8-10 -3 (h-100))h | 0,7h | |
| 0,999 | 0 to 30 | 0,7h | 0,6h |
| 30 to 100 | (0.7-7.14 10 -4 ( h-30))h | (0.6-1.43 10 -3 ( h-30))h | |
| 100 to 150 | (0,65-10 -3 (h-100))h | (0.5-2 10 -3 ( h-100))h |
To determine the radius of the lightning rod zone at a certain height, the formula is used: r x \u003d r 0 × (h 0 -h x) / h 0
 Rice. 8: lightning wire protection zone
 The figure shows circuit diagram protection zones for a cable lightning rod with its small length. At large distances, due to poor tension at the midpoint, sagging may occur, which will slightly distort the boundaries of the area protected by the lightning rod.
 Rice. 9: Parameters of the protection zone of the lightning rod
 Look at the figure, here the lightning rod zone is characterized by the following parameters:
- h is the height of the lightning rod itself;
- h 0 - the height of the protection zone of the lightning rod;
- h x - height at a certain point (set at the level of the roof of the building);
- r 0 is the radius of the lightning rod protection zone on the ground;
- r x is the radius of the protection zone of the lightning rod at the selected point;
- L is the length of the lightning rod.
According to the required reliability, depending on the height of the lightning rod, the parameters of the protection zone are calculated using the formulas from Table 3.
Table 3
| Reliability of protection | Lightning rod height h, m | Cone height h 0, m | Cone radius r0, m |
| 0.9 | 0 to 150 | 0,87h | 1,5h |
| 0,99 | 0 to 30 | 0,8h | 0,95h |
| 30 to 100 | 0,8h | (0.95-7.14 10 -4 ( h-30))h | |
| 100 to 150 | 0,8h | (0,9-10 -3 (h-100))h | |
| 0,999 | 0 to 30 | 0,75h | 0,7h |
| 30 to 100 | (0.75-4.28 10 -4 ( h-30))h | (0.7-1.43 10 -3 ( h-30))h | |
| 100 to 150 | (0,72-10 -3 (h-100))h | (0,6-10 -3 (h-100))h |
The radius of the lightning rod zone at the height of the building is calculated by the formula: r x \u003d r 0 × (h 0 -h x) / h 0
The choice of material for the lightning rod
As a material for a lightning rod, it is customary to use three options: copper, aluminum and steel. Copper lightning rods are characterized by a long service life and are distinguished by the ability to maintain their parameters throughout the entire installation period, even in underground areas. But the main disadvantage of a copper lightning rod is its high cost.
Aluminum is characterized by much less weight, therefore, it creates an insignificant load on the supporting structures of the building. It also has good electrical conductivity. But, over time, it is subject to destruction from atmospheric factors and is easily amenable to mechanical deformation.
Steel is the most durable, they easily withstand wind loads, and the elements of such a lightning rod can be connected by welding, unlike copper and aluminum. It is also characterized by low cost. The disadvantages of a steel lightning rod are high resistivity and susceptibility to corrosion.
Installation location
To install a lightning rod, the highest point should be selected. Therefore, it is placed on the roof of the building, if its height is not enough to get the entire building into the protection zone, special supports or nearby trees can be used. To determine the actual installation location of the lightning rod, it is necessary to plot the protection zone obtained during the calculation on the site plan.
 Rice. 10: protection zone on the building plan
 The roof is the most advantageous option, since the peak of the protection zone will be located above the building. A free-standing support or several allows you to move the area protected by a lightning rod to the desired point on the site, and is great for situations where buildings are dispersed on the site. The use of wood as a support allows you to save on the purchase and installation of a metal or reinforced concrete structure, but causes a number of difficulties during operation, therefore it is considered an undesirable option.
Step-by-step instructions for making a lightning rod
Most simple options for a country lightning rod is a rod and a cable, you can implement them yourself. To avoid mistakes and extra costs when installing a lightning rod, follow the following sequence.
Rod
To build a rod-type lightning rod, perform the following manipulations:

The distance between them and their height is selected so that the conductor does not sag to the surface of the roof and walls.

Rope
Installation of a cable lightning rod is carried out identically. Depending on the specific situation, the cable can be stretched with a flexible cable between supports or mounted on brackets. In the first case, the lightning rod will sag when the tension changes, so mounting on a bracket with a rigid copper or steel wire much more profitable. This procedure is performed in the following sequence:

After completing the installation of any of the proposed types, be sure to check the resistance of the entire structure. Ideally, the test is performed using a bridge, but at home, a regular multimeter or test light will do.
Video instructions
Most of the communications that were connected to private houses have long served their useful life. Because of this, the risk of their failure is significantly increased. That is why the problem of protection against thunder and lightning is becoming more and more urgent. Making a lightning rod with your own hands is not so easy, for this you need to calculate the parameters of the site and take the tools: a screwdriver, a hammer, a shovel.
The creation of such a design is the protection of your family from a potential threat. A properly installed lightning rod will protect your home from lightning. Consider the phased creation of the structure.
How is a lightning rod arranged?
The principle of operation of a lightning rod is quite simple - lightning is redirected to the ground, which allows residents of the house to avoid the threat of an accident. When creating a structure, it is important to take into account existing security measures: do not reach into electrical appliances, de-energize switchboard, do not work during precipitation on the street. Don't know how a lightning rod works? The design consists of 3 elements:
- A lightning rod that intercepts a lightning charge.
- A current collector that redirects energy.
- Grounding. Thanks to him, a stable connection between the device and the ground.
Devices are installed both near a residential building and directly on its roof.
Parts of the lightning rod can be individual elements of the roof. When creating a structure, it is necessary that all elements are made of a single metal. Otherwise, there is a high possibility of incompatibility, which will lead to the inefficiency of the device.
Correctly making a lightning rod in a private house is not as easy as many people think. This is partly hampered by legislative documents, because before the start installation work it is necessary to make sure, for example, that there are no communications nearby.
A properly installed device will withstand even the most severe impact. Lightning rod is most often a device in the form of a rod, which is located on top of the house. Some parts of the building can also play its role: pipes, fences. The roof on which the lightning rod is installed must be intact. This will increase the degree of reliability of the design. In this case, the surface should not have an insulating layer (except for anti-corrosion paint). The device can also be fixed on a tree that grows near the house.
Next, we turn to the creation of a current collector. In its manufacture, the following sections should be used: 16 mm2 for copper, 25 mm2 for aluminum, 50 mm2 for steel. It should be located between the lightning rod and the ground. Turns and bends are undesirable for the down conductor, because from this it is seriously damaged. It is worth noting that it can be located both outside the wall and inside it.
The ground electrode is made of steel or copper. You will need to dig a trench, the depth of which is up to 0.5 meters. Rods are driven into the ground, which are joined together by welding. Then the resulting element is connected to the down conductor.
lightning rod circuit
The scheme of operation of a lightning rod is extremely simple. In the event of a charge in the atmosphere, it hits the lightning rod and is redirected directly to the ground. During a thunderstorm, electrical appliances are the first to be at risk. The problem with them has become especially acute now, when many private houses have old wiring, and modern technology is designed for completely different conditions. The lightning rod instantly reacts to a threat and 100% eliminates the possibility of lightning hitting a residential building.
The installation scheme of the structure should include all elements: from conductors and fasteners to the final sequence of actions. It is important to indicate the route along which the down conductor passes. Also note the location of the ground.
The most economical option for the owner of a private house would be to install a simple rod that is located vertically. Mounting height is directly related to the risk of lightning strikes. The higher the installation site, the less likely negative consequences will occur.
A separate topic is lightning protection in wooden house. A whole range of procedures will be required to ensure maximum security: installation, configuration, verification. For wooden house lightning poses a particular threat. natural materials flash instantly. Despite the fact that there are few such houses left, they are in a high-risk area.
The complex type lightning rod interacts closely with the external and internal leads, which converge in the ground. The material for the structure should be selected based on the angle of inclination, size and type of roof covering. As for internal communications, the bus is especially important for them. It counteracts the momentum that occurs during a thunderstorm.
Proper creation of a lightning rod
Particular attention should be paid to materials during creation. It is better to buy a little more material in reserve than you are supposed to use. This will allow you to properly make a lightning rod, as it is written in the instructions.
To correctly calculate all parameters, use the special formula: h = (rx + 1.63hx) / 1.5. Here h is the height of the lightning rod, rx is the radius of the potential zone protected by the structure. Such a calculation scheme is ideal for private houses with lightning protection not higher than 150 m. This is more than enough for a standard building. In the most common rod models, the angle of inclination reaches 50 degrees.
As for the characteristics of various metals, the most the best choice becomes copper. However, most users choose steel profiles primarily because of their cost. The structure should be located as high as possible, the protection cone itself covers the entire house. This will provide the necessary security. Therefore, if the lightning rod is located far from the building, then it should be located as high as possible.
If you appreciated own forces and have not made a decision on how to make a lightning rod in a private house, it is better to turn to professionals. Alef-M specialists have extensive experience and will solve even the most complex tasks in the shortest possible time.
Manufacturing of lightning rods
The easiest way is to make a medium-sized design. Non-professionals can also try to make a lightning rod, as indicated in the instructions, after carefully studying the information on its creation. The easiest way is to make a lightning rod, which is placed on the roof. The advantage is that no additional support is needed.
Do not mount the pin directly in the middle of the roof. It is better to use the already indicated formula, which will help determine the final location.
The grounding conductor must be placed in such a way that in the event of a thunderstorm there is no crowd of people next to it. It is better to choose a place that will be a couple of meters from the house. By placing a flower bed there or simply putting up a fence, it will be possible to make the site outwardly attractive and provide yourself with maximum security.
It will be useful to read: "Thunderstorm: the rules of survival."
You can create a lightning rod in the country with your own hands, the scheme of which meets all safety requirements, but it is better to consult with a specialist who will tell you his vision of this issue. A do-it-yourself lightning rod scheme in a private house must also be agreed with the self-government authorities. In addition, after the installation is completed, it is better to go to the local departments of the Ministry of Emergency Situations so that they testify to the work done.
Since the device is made of metal, it may be susceptible to environmental influences. A lightning rod for a home is also subject to corrosion - in order to prevent its occurrence and spread, periodically inspect the device. Even at the installation stage, immediately process the bolts and connections with special tools.
Grounding and especially its circuit must be checked for integrity once every 2 years. This will allow you to monitor how good the condition of the structure is and whether it has received any damage. System independent control is the key to stable and durable functioning of lightning protection.

The manufacture of lightning rods by independent efforts requires proper knowledge in the field of installation of the structure. First of all - the calculation of the parameters of the site and the area of \u200b\u200bthe residential building. Professional advice or advice from people who have already done the installation will help you deal with the specifics. It is important to know not only how to make a lightning rod in the house, but also how to install it correctly.
How to make a lightning rod in a private house
First you need to deal directly with earthworks. Lightning rod for country house with their own hands choose one of two types. It can be a linear grounding or closed. If a new house is under construction, then protective equipment It is recommended to install at an early stage. Good lightning protection and high-quality results will be provided. Grounding depth varies from 0.5 to 1 meter, depending on the specifics of the soil. In this case, it is better to choose a soil that would have good electrical conductivity. If this does not work, then there are several ways to improve it. For example, a saline solution is suitable for sandy soil.
If the lightning rod is organized in the traditional way, then it should be checked that the structure is connected to all conductive parts of the roof. The roof can also serve as a kind of conductor if its thickness exceeds 0.5 mm. The discharge will independently pass along the shortest path. Poor soil conductivity can be one of the factors that reduces the effectiveness of the lightning rod as a whole.
The summer cottage is a particularly vulnerable place, so such houses are under particular threat. When preparing lightning protection, it is important to consider the size of the dacha and the materials used (even the smallest, for example, wire).
Before deciding to make a lightning rod in a private house with your own hands, consider whether it is worth the risk. To protect yourself as much as possible, it may be better to use the services of professionals. They know how a lightning rod is made and will give advice on its operation so that the design lasts as long as possible.
The Alef-M company has been working in this market segment for many years and finds an individual approach to each client. Thanks to our services, your soul will be calm and your property will be protected.

Works are carried out in a clearly defined time frame. The price for the services will be called to you immediately after the inspection of the object. Thanks to our extensive experience, the installation of lightning rods is carried out with the same quality for all buildings. Alef-Em specialists have everything necessary equipment to complete even the most difficult tasks. They know how lightning rods are made and will perform the work taking into account all modern quality and reliability requirements.
Installing such a design is a real chance to protect yourself and your family from unforeseen consequences. It's not worth the risk, because every year nature presents new weather surprises. Install lightning rods that will become reliable protection for many years.
A lightning rod is necessary primarily because the charge accumulated in thunderclouds can cause a lot of damage if it enters residential buildings.
Why are lightning dangerous? Usually their power is 100,000 A, but sometimes this figure reaches 200,000.
Getting into something, such a powerful flow of energy causes heating, which in turn causes fires.
That is why it is necessary in houses that there is no danger of fire, and the charge is discharged into the ground.
Lightning rod design

The lightning rod should consist of these elements:
- lightning rod (takes charge, intercepting it);
- down conductor (its function is the direction of the received current into the earth cavity);
- grounding conductor (allows you to provide a connection between the house, the device and the earth).
The lightning protection system must be made in accordance with the design features elements.
It is important that the metal used in the production of the entire system is the same.
Do-it-yourself lightning rod for a lightning rod
The receiver will be a rod made of steel. It should be higher than the highest point of the house. Key Features:
- section 50 mm square;
- wire rod should be with a diameter of eight mm;
- the rod can be replaced with a copper one, but then the cross section should be 35 mm.

Even a drain pipe can be a lightning rod, since it consists of metal.
You can also stop at the roof, if they are similarly made of metal.
The installation diagram will look like this:

A lightning rod in the house is installed if the roof is made of aluminum, iron, copper.
It is important that the material is intact, otherwise the current will not enter the outlet elements.
Also, when arranging a lightning rod, the presence of heat-insulating material of the roof should not be allowed.
In general, there should be no coatings. The exception is a thin layer of paint, which is designed to give an anti-corrosion effect.
To connect all elements of the lightning rod, it is necessary to use one-piece fittings.
If the thickness of the roof material exceeds the specified values:
- for aluminum it is 7 mm;
- for copper 5 mm;
- for iron 4 mm.
Also, if covered heat-insulating material, you need to use a pipe as a lightning rod.
If the roof is divided into several individual elements, you can connect them with fittings.
Do-it-yourself current lead for a lightning rod

The down conductor will be the same material that the lightning rod consists of. The following indicators will help to calculate the cross section:
- aluminum - 25 mm square;
- copper - 16 mm square;
- steel - 50 mm square.
The direct installation of lightning protection does not imply a down conductor, which leads along a long path.
The length should be as short as possible. Also, do not allow turns and, especially, sharp corners.
In this case, the likelihood increases that a spark will appear at the turn, which will lead to a fire.
The down conductor consists of a metal strip and wire rod. It can be carried inside the wall if it does not consist of a highly flammable material.
Fastening is carried out with metal brackets in any case. If the walls are flammable, the down conductor must be installed no closer than 10 centimeters from them.
If you are conducting during the construction phase, make sure that there is a distance of more than 10 cm between the wires and the down conductor.
Attention: it is impossible to isolate and paint the lightning rod elements!
How to make a ground electrode for a lightning rod

Grounding conductors are made from the following materials:
- copper - section 50 mm square;
- steel - section 80 mm square.
How to install a grounding conductor?
Very easy: you will need to create a hole about 1-2 meters deep, insert steel or copper bars, weld them together, fix and connect with reinforcement.
All elements are easier to install from steel, since it is considered the most reliable equipment for lightning rods.
To avoid, it is better to install a lightning rod as high as possible.
.jpg)
It’s great if there is a tall tree near the house, on which the system element will be installed.
The grounding conductor is installed no closer than 1 meter from the wall of the house. This is due to the fact that sufficient space is needed for the distribution of the diverted energy.
Otherwise, a short circuit may occur in the house, there will be voltage drops.
It must also be remembered that roads and fences, especially if they are made of metal, must be at least 5 meters from the ground electrode.
Why is it important to install the lightning rod as high as possible? In this case, he will be able to capture energy from lightning at a large angle. The lower the receiver, the worse the capture is.
It will help you find answers to your questions.
We all know that lightning is beautiful only at a distance, and for a person, its strike can be fatal. Also, a lightning strike can damage equipment or cause a fire. IN private house lightning does not strike so often, but if it does, it will be extremely difficult to cope with the consequences.
Today we will talk about the lightning protection of a private house and how a lightning rod is arranged.
Features of lightning protection of a private house

When thunderclouds move in the sky and lightning pierces it, a warning and clever man will not be afraid of them, because he protected his home from their direct hit.
So, a good owner will definitely show interest in how to make lightning protection for a private house. You don't have to worry if your private house is located next to a tower equipped with a lightning rod or power lines. But in the zone of risk of lightning strikes there are buildings that:
- have a single location;
- built on high ground;
- are located next to the water.
A lightning rod should be planned at the stage of building a private house. Yes, it should make a lightning protection circuit during construction. Private houses belong to the third class fire safety, respectively, they are subject to the installation of a lightning rod on them without fail.
The choice of the right type of lightning protection for a private house depends on a number of factors:
- The original state of the house.
- Location conditions.
- Climatic conditions of the area.
- Soil type.
Necessarily consider location conditions your house. So, if lightning hits a tree, an antenna, a pole near the house, they can create a screen effect and the building will also fall into the affected area.
remember, that different types soils differ in their current conductivity and resistance, which should be taken into account when choosing the strip section and the size of the contour penetration.
If the climate of the area is such that the number of thunderstorm periods per year exceeds 40 times, and the house is located near the water, then the risk of lightning strikes increases several times.
How a lightning rod is arranged for a private house
 The principle of operation of a lightning rod is quite simple: the house is protected from lightning due to the fact that the discharge is discharged to the ground.
However, the effectiveness of a lightning rod is possible only with the complex construction of a system that consists of two protective systems: external and internal.
Internal protection should protect equipment from power surges during thunderstorms. And even if the discharge strikes within a radius of several kilometers, a surge suppressor is still needed.
If you do not have such protection, then when a thunderstorm front approaches within three kilometers in advance turn off all electrical appliances.
And an external protection system is needed to ensure the safety of the house and its inhabitants during a thunderstorm. A simple lightning rod consists of the following elements:
- Lightning rod.
- Supports.
- Down conductor.
The lightning rod is metal conductor up to one and a half meters in length, which takes on a lightning discharge. Install such lightning protection in country house follows at its highest point:
- roof;
- chimney;
- TV antenna.
Such lightning protection is suitable for installation on a metal roof, and if the roof is slate, then you need pull a metal cable on wooden supports up to 2 meters long and cover it with insulators.
On roofs made of tiles, you need to stretch a special lightning protection mesh with down conductors along the ridge. Down conductors are needed to connect the lightning rod to the ground loop. They represent steel wire, which should be laid along the wall of the house and welded to the lightning rod and the ground loop.
Lightning protection grounding includes two coupled electrodes, which hammered into the ground. grounding rules household appliances and lightning protection should be common. The range of a lightning rod depends on its height.
If the lightning rod is made correctly and with high quality, then it will be the least resistance, through which the lightning discharge will be redirected from the house to the ground.
How to make lightning protection for a private house with your own hands
 So, we figured out how lightning protection for a house is arranged, and how to choose it depending on the type of roof. Now we will talk about how to make high-quality lightning protection for your home with your own hands.
The lightning protection mesh will serve metal wire construction six meters in diameter, which is made by welding. It should be laid on the roof and connected to the ground loop with several down conductors.
Such a mesh is suitable for non-metal roofs in order to protect one building, since other buildings are located one level below. Also, the grid can be laid on the roof even at the stage of building a house.
You can make a protective wire like this:
- Stretch the cable on insulators between two supports made of metal or wood.
- Installation is carried out at a height of 0.25 m on a ridge.
- The wire diameter must be at least 6 mm.
You need to make a loop around the wire pipe and connect it to the lightning rod using soldering or welding. The current lead is made from the same wire. As a result, we get a hut-like protective zone that is suitable for roofs made of any material other than metal.
Pin lightning rod is a pin with the following parameters:
- the section shape can be round, rectangular or square;
- pin length at least 0.25 m;
- cross-sectional area 100 square mm.
It is the pin that takes the key lightning strike, so it must be able to withstand maximum loads. dynamic and temperature nature.
The material for the pin is selected so that it is not afraid of oxidation, it can be galvanized steel or copper, therefore, it is impossible to paint such a lightning rod. The cross-sectional diameter of the rod or pipe must be at least 12 mm. In a hollow pipe, you need to weld the end. The structure should be installed on the roof ridge on a mast of the required length.
The current collector sends an electrical discharge to the ground. It must be attached to the overall structure by soldering, welding or bolting. The contact area must be at least twice the cross-sectional area of the parts that are connected to each other.
Such protection is suitable for metal roofs, while remembering that the roof itself is also subject to grounding.
Grounding for lightning rod
 A grounding conductor is needed to divert the lightning current to the ground; it has a small amount of electrical resistance. Grounding should be laid away from the porch of the house and the paths next to it, preferably at a distance of about five meters.
If the soil is wet and ground water lie less than one and a half meters, then you need to use horizontal earthing. It can be made by hand in the following way:
- Dig a ditch along the length of a shovel about six meters long and about a meter deep.
- Drive three galvanized water pipes 20 m in diameter and 2 m long into the bottom of the ditch every three meters. Leave about 5 cm on the surface.
- Take a wire with a diameter of at least 8 mm and weld it to the pipes. The down conductor still needs to be welded to the middle pipe. Also, bolts can be welded to the pipes to connect them with a copper cable.
- Lubricate the bolts with grease, and bury the pipes.
If the soil is dry and the groundwater is deep enough, then do vertical earthing:
- take two rods 2-3 m long;
- drive them into the ground to a depth of about half a meter and at a distance of three meters from each other;
- connect them with a jumper with a cross section of 100 square meters. m.
Such grounding can be used for the purpose protection electrical appliances and shields. Remember that during a thunderstorm it is extremely dangerous to be within a radius of four meters from grounding, otherwise there is a risk of falling under step voltage.
Lightning protection can also be installed on a tree if it is more than twice as tall as the house, together with the antenna, and is located at a distance of 3-10 meters from the house. In this case, lightning protection is made of a wire with a diameter of about 5 mm, with a one-sided descent and one grounding in the form of a loop.
If you installed lightning protection against a linear type of lightning, it will be ineffective during a ball lightning strike. In that case, to ball lightning did not enter the house close all windows tightly, doors, chimneys, and check that the ventilation units are equipped with copper or steel mesh wire with cells of the order of 3 cm and reliable grounding.
When installing and maintaining lightning protection, remember the following tips and recommendations:

Remember, in order for the lightning protection of your private country house could serve you regularly for many years and protect you in cloudy thunderstorm weather, her must be installed correctly and take care of it regularly.


