Reading time ≈ 8 minutes
If you have to repair an apartment, then perhaps you will need information on how to make an arch, and do it yourself at home beautifully and correctly, without resorting to the help of builders. V Lately such interior elements are attracting more and more attention. The door is removed, and the opening itself is made in the form of an arch, which can have the most varied, sometimes bizarre shapes.
Arched opening of an unusual shape
Apartment options for arched openings
The owners can pursue several goals: create a common space, expand the room, create a light and elegant design, and so on. If you wish, you should buy a ready-made arch in the construction department, in last resort- put a little effort and take a little time to create an original and interesting option, which will definitely be exclusive.

The arch has acquired an extraordinary distribution
To refine the passage from room to room without using a door, it is not at all necessary to call a hired team of craftsmen. Choosing the right type and format of the building, you can easily do everything yourself. It is equally important to competently approach the choice of materials that will be used to create this element. The step-by-step instructions below will show you how to do everything as correctly as possible and avoid common mistakes.
Various types of arches have some differences in design, which affects their further installation. The main differences lie precisely in the structural supports.
It should be noted that interior openings are not load bearing. Therefore, it is important to choose an arch based on the relevant parameters.

Beautiful arch between rooms
The arched opening, which is used instead of a regular door, is made of several materials. Now we are talking specifically about the frame of the entire structure:
- metal profile on which they are mounted on top drywall sheets(GKL);
- wooden bars with a cross section of 20-30 mm.
This type of arch can easily hold its own and total weight along with the finish. Here the main task- reliable and rigid fastening to the walls. This will preserve the elements and remain in place in their original form for more than one year.
If we are talking about a private house or apartment, then the open arch is used only as a decorative element. But the entire bearing load in this design option is transferred to the side concrete walls or a lintel over the structure itself.

Purchased plastic arch
Possible types of arches and features of each of them
Before you make an arch with your own hands at home, you need to choose a form of construction that will look beautiful and correct in the future. The most common forms are:
- classic;
- romantic;
- modern;
- elliptical;
- trapezoidal;
- portal.

Austere arch portal
The arched opening of the classical form is based on a regular semicircle. But the arch-portal consists of strict rectangular outlines. Other varieties are marching from these two main varieties. In addition, there may be asymmetry with only one support on the side. Or the shape may be unthinkable at all.

The most common form of openings
The choice of both the shape and finish of the future arch should be chosen based on the overall design of the room, so that it harmoniously fits into the interior. For example, semicircular arch will fit perfectly into. It is necessary to initially take into account the following parameters:
- ceiling height;
- doorway dimensions;
- individual features of the apartment.
You must understand that one living space looks great with a classic arch, and a portal will harmoniously flow into the second. But here it all depends on the personal preferences of the owners.

Art Nouveau arch
- A classic arch will look great where the ceiling is over 3 meters high.
- Art Nouveau design - perfect option for panel apartment building and registration of the entrance to the kitchen;
- The romantic with wide supports frames well the entrance from the corridor to the hall;
- Portal structures fit into the interior with clear lines (both vertically and horizontally). They are well suited for installation in beautiful houses made of wooden beams or logs.

Log house with arch
Material selection
To quickly decorate an arched opening, you can buy a ready-made kit for creating an arch in the store. But this option is not suitable for everyone due to the rather high price. And their appearance is not very different from each other. However, the selection of the required model may come to a standstill due to the difference in the parameters of the opening and the future structure.

The main components of the arch
Most often for self-made acquire the following materials:
- drywall;
- plywood sheets.
The winner is drywall, which is lightweight and fairly easy to use. It is also considered an advantage that it is gypsum plasterboards that can be easily finished with many finishing materials. And plywood lends itself better to bending.

Arched opening finishing
To create the frame part, apply:
- wooden bars with a section of 20 * 20 mm and 30 * 30 mm;
- metallic profile.
As an option: you can create similar structures from bricks, concrete, aerated concrete. The top will only have to give a neat appearance. But not everyone will like it. After all, such an interior is an indicator of solvency and status. It is also necessary to take into account the weight of such a structure. If the floors are old and fragile, then this type of arch should be thrown back.
Metal frames are little used, not only because of the additional weight, but also their considerable cost. If you want to build an arch complex shape, then they must understand that it will be very difficult to do this on their own. To design an arch with your own hands, it is better to choose drywall and a suitable profile.
DIY step-by-step arch creation
Below are photos and step by step descriptions the whole process, with the help of which it will be much easier for you to make your masterpiece in the doorway. Initially, you need to take care of creating the wireframe part. And only after that, do it trim and finish. The main thing is to be as attentive and accurate as possible. Then your idea will be implemented in the best possible way.

Plasterboard arch (diagram)
Before proceeding with the installation of the arch, you need to properly prepare the doorway.
- The door leaf and frame of the old door must be removed.
- Expand the opening to the dimensions required for installation works.
- Do not plaster the trimmed walls on which the frame will be installed. In any case, they will be covered by the casing. You just need to align the edges and dismantle pieces of old building materials(plaster, concrete particles, falling bricks).
- The main task is to create a base and securely attach a frame to it. This requires that it be upright. Slopes are not allowed.
- If the arch will have lighting or illumination, then the wiring is carried out before the start of installation work.
- Measurements are taken not at one, but at several points of the opening. When the walls do not shine with perfection, it is worth choosing the widest part of the opening. This will be the width of the structure.
- A cardboard template will help make the markup easier. So you can indicate what is necessary and not make mistakes. Moreover, you can see on the spot how the future arch will look like.
Important! Do not forget that the arched opening at the top absorbs about 15 cm of the total height. The minimum distance between the arch and the ceiling should be 20 cm. This information is entered during preliminary calculations.

The arch reduces the height of the doorway
The construction of the supporting frame is an important stage, because the entire structure of the arch will be supported on it.


Fastening the sheathing to the frame
Dry or wet method is used to bend drywall. For the first, you need a jigsaw to carefully make cuts. For the second, it is better to use a needle roller for quick and even wetting of the panel. With the help of self-tapping screws, the cut out elements of the arch are installed in their places. The final stage is plastering and finishing with the selected material.

Finished arch
Now you know how to make an arch with your own hands at home, and you can design it beautifully and correctly. The main thing is to fantasize and choose, but do not forget to follow the dimensions and assembly instructions exactly. And in the video below you will find the entire process of creating an arch.
Starting a large-scale cosmetic or even major renovation with a complete change of the interior, the owners often want to bring many interior design ideas to life. One of them may be the transformation of an ordinary rectangular doorway into an arched doorway. If you figure out how to make a drywall arch, then it is quite possible to carry out its installation yourself.
An arch can influence the structure of the entire interior design solution, and an additional decorative overlay of a certain style will set the design of the entire room.
After examining detailed instructions for the installation of the arch, having prepared in necessary materials and tools, it is quite possible to make an arch from a rectangular doorway in literally one day.
It should be noted that an arch made using the same technology can transform not only a doorway, but also wider passages that divide large rooms into zones.
Materials and tools for the manufacture and installation of the arch
In order to bring a bored doorway to a new state and get a neat aesthetic arch, you need to prepare the following materials:
- GKL gypsum plasterboard with a thickness of 9 ÷ 12 mm.

- Galvanized metal profile or wooden bar for the manufacture of the frame.
- Perforated metal corner for strengthening the joints of drywall planes. Fiberglass mesh is also fine for this process.

- Self-tapping screws for fastening drywall and perforated corners to metal profiles.
- Plaster based putty - coarse (starting) and finishing.
To carry out the installation, the following tools must be available:
- Electric jigsaw and drill.
- Ruler, construction square, tape measure and pencil.
- Grinder or scissors for metal .
- Screwdriver.
- Construction knife.
- Roller with metal spikes.
- A flexible plank that will help create an even arch shape.
- Spatula and trowel for working with putty.
- Sponge, water container, thick soft cloth (you can use an old terry towel).
Prices for drywall and sheet materials
Drywall and sheet materials
Taking measurements and preparing structural elements
- Before starting the manufacture of arched elements, it is necessary to measure the opening where the arch will be mounted. Its width and the required vertical distance are measured, from the top down, on the side walls of the opening. How much the arch will be rounded will depend on these parameters.
In addition, it is necessary, starting from the thickness of the drywall, to determine the depth of its installation, since it must be fixed at the same level with the plane of the wall - it must be drowned deep into the doorway.
- From the corners of the doorway, you need to retreat inward to a distance that will be equal to the thickness of the drywall and make the appropriate markings by drawing the installation lines for the frame profiles.
- According to the obtained parameters of the size of the opening, using a grinder or metal scissors, sections of a metal profile are cut - two for fixing horizontally and four for fixing on the side walls of the doorway. They are installed along the previously marked lines, leaving space for drywall.

- If the walls of the opening are lined with bricks or erected of concrete, holes are drilled into them with a drill (puncher) right through the metal profile in the wall, into which plastic dowels are hammered, into which the fastening screws will be screwed.

On this structural element - a frame, plasterboard parts will be attached.
- The next step is, according to the previously obtained dimensions, two panels of drywall are marked and cut out. They must fit exactly into the doorway between the walls.
- Further, on these panels it is necessary to draw and then cut out two arched parts from them. In this case, you need to act very accurately, since by making an incorrect marking of the arc, you can easily get an ugly arch skewed to the side.
- Curvilinear "trajectory" cut, that is, the arched part of the arch itself can be marked different ways and they are all equally available.
The first way
The markup is carried out as follows:
- First, the panel is laid on a flat horizontal surface.

- Then, along the upper horizontal and on both vertical sides, the thickness of the metal profile, already fixed in the opening on the walls, is marked. Usually it is 50 mm. Along these points, straight lines are drawn parallel to the edges of the panel;
- To draw a semicircle, a pencil and a piece of inelastic cord are taken, which is tied to the pencil so that it rotates freely in this loop.
 Homemade "compass" applies the necessary arc of the arch
 A self-tapping screw is screwed in the center of the circle. Then a cord is attached to it, so that the sharpened pencil lead falls on the intersection of the previously drawn lines parallel to the left and right edges with the bottom edge of the panel. It turns out a kind of compass, capable of drawing circles of the required diameter in this case.

The markup can be transferred to the second panel by simply copying from the first.
Second way
For the second method of marking the line of the arched arc, you will need a flexible plastic strip, a pencil and two pairs of hands.

- First you need to determine what height the curved part of the arc will have at the highest point. To do this, the bar is applied to the door opening between the profiles fixed on it. One end of the bar must be attached to the bottom edge of the profile, fixed on the side left wall of the opening, its highest point on the bend should touch the midpoint of the horizontally fixed profile, and the third point of contact of the bar will be bottom edge of the profile on the right wall.
- At the last point of contact with the profile, a mark is made on the bar - it will determine the length of the same arc that will determine the curved section to be cut.
- Further, the same is done on the drywall panel, where, as in the first version, 50 mm are already marked along the edges. One of the masters holds the bar so as to combine its beginning and the mark made with the lines, and the second draws the border of the arched semicircle along it.
- Then the marked area is cut with a jigsaw.
The third option
The third option is a template of an arched section made on hard cardboard according to the dimensions taken from the door. It can also be marked using a homemade "compass" made of a cord and a pencil.
— Ready template put on a drywall panel, outline its outline with a pencil, and then cut the removed part with a jigsaw.
- The template will not allow you to make a mistake and the semicircle will be perfectly flat.
The next step is to prepare a metal profile for the curved frame parts, onto which the lower part of the cut drywall panels will be fixed. To cut off the desired length of the profile section, you can use the same flexible strip on which the mark is made for the length of the arc that forms the arched vault.

You need to prepare two such profile segments. Then, cuts are made on them with the help of metal scissors or a grinder, thanks to which it will be easy to bend the profile into an arc with the desired bending radius.

It should be especially noted that if the arch will have a small thickness, then sometimes one wide metal profile with it notches to secure on it two panels on both sides. The profile must be recessed inside the arch to the thickness of the applied drywall, since later the lower arch bar will be attached to this curvilinear part of the frame.
The rest of the elements will be in the course of the installation work - usually there are no special difficulties with them.
Installation of the frame base of the arch
Galvanized profile metal frame
- Installation of the arch begins with the installation of plasterboard elements with cut semicircles that fixed in the doorway on metal profiles screwed into it.

To fix the drywall, special screws and a screwdriver are used.
These elements are fixed on both sides of the doorway.
- Further, with inside of the cut-out arched opening, the incised and bent metal profile is screwed on. When carrying out work, it is necessary to hold the profile with one hand, pressing it exactly in the shape of the arch.

This part is screwed first to one side, and then to the other.
- The frame will not have the proper rigidity and completeness of the structure if it is not installed between the metal arched elements of the perpendicular sections of the profile. They will tie the plasterboard walls of the arch together. These lintels are installed in several places in the arch structure.

To fix the jumpers to the profile, self-tapping screws with wide heads and a sharper nose are used.
Installation of a wooden frame arch
If making a frame from a metal profile seemed too complicated process, then you can mount it from wood.
- To do this, you need to prepare bars measuring 20 × 20 mm - to attach to drywall, and 30 × 30 mm - to attach to opening walls.
- Further, an arch is marked on drywall, cut out, and then wooden blocks with ends located along a bow circle are screwed onto the inner surface of the element.

- A free space of 30 mm is left along the edges of the part, which will be occupied by the bars installed in the doorway.
- The walls of the doorway are marked in the same way as when attaching a metal profile, only instead of it, bars of 30 × 30 mm are fixed along the markings
- Then, the prepared arched panel is applied to its "regular place" and screwed into the opening, to the wooden bars installed in it.
You can do it differently - fix the bars to the edges of the drywall, and then screw the finished stasis panel to the wall. But in this case, it will not be very convenient to work, especially when the second panel with an arch is fixed, since it will be difficult to climb between the two arched elements with a hand with a screwdriver.
Cable routing
Before proceeding to the manufacture and installation of the lower part of the arch, an electric cable is drawn if a backlight is provided in the opening.

The contact ends of the cable are fixed to the metal profile at approximately the place where the electric spotlights are to be installed. It is best if the cable is enclosed in a plastic corrugated pipe- to avoid accidental damage to the insulation on the sharp edges of the galvanized profiles.
When the prepared bottom strip of drywall is installed, it will perfectly cover all the unsightly wires.
Manufacturing and installation of the lower plasterboard arch panel
When the frame and frontal parts of the arch are installed, you can proceed to making the bottom strip, which will cover the entire unsightly look of the frame.
First, the total length of the arched bend of the arch and the width of the distance between the installed arch framing parts are measured with a tape measure.
The dimensions are transferred to drywall, and a rectangular strip of the required dimensions is cut out of it.
Further, the plasterboard strip needs to be bent into an arch, however, the material is hard and fragile, so it can be easily broken, damaging the part. To process etc went smoothly, you can use two methods to bend this material:
1. The prepared part is marked along its entire length into transverse strips 50 mm wide.

- Further, along the marked lines, cuts are made, approximately half the depth of the drywall.
- The piece is then gently bent and immediately, without delay, screwed to the metal profile that is inside the arched structure.

Video: a simple plasterboard arch
2. The second method of bending drywall, in principle, is even simpler than the first, but it will take a little longer, since you have to wait for the material to take the desired shape.
First, a needle roller is passed with effort over the plasterboard strip, which pierces the top layer of cardboard with its sharp spikes.

If there is no such roller in the master's arsenal, you can use a sharp construction knife - with the help of it, cuts are made on the surface of the drywall with a size of 20 ÷ 30 mm, at a distance of 15 ÷ 20 mm from each other, both in length and in width.
In the next step, the panel, from the side of the punctures, must be moistened with a sponge with water and leaned against the wall, placing the long side vertically.

After about 15 ÷ 20 minutes you can see the first results - the panel will begin to bend under its own weight. Then the part is wetted again and left for another 40 minutes.
It is possible, especially for the perfect bend of the arch, to knock down a structure from three boards with the letter P (a kind of conductor) with the dimensions of the place of the doorway where the arch will be installed. Then turn it over, placing it on the horizontal part.
Further, in the same way, having moistened the drywall part with water, it is laid on the legs of an inverted letter P, moistened side up. After 20 minutes, its middle will begin to sag inside the structure. Then, it is moistened again and left for 40 ÷ 60 minutes for complete subsidence to the horizontal lintel of the structure.
By the way, a similar method of bending a plasterboard strip sometimes allows you to make an arch without a frame at all, as shown in the attached video:
Video : giving bending drywall arch
Still wet drywall on a metal profile with self-tapping screws, which are screwed in at a distance of no more than 100 mm from each other.
The next step is to cut holes in the designated places on this part of the arch, into which, after finishing, it will be possible to install spotlights (if their installation is provided).
Having made the holes, you need to pull the cables inside the structure to them, but they should not be completely pulled out of the holes, since the protruding ends of the wires will interfere with the finishing.
Arch finishing
After completing the installation of the frame and cladding, you can proceed to finishing the arch with putty. Only by closing the seams and grooves from the heads of the self-tapping screws with a putty mixture and leveling it, you can get a neat arch.
The filling process is carried out in three stages:
- the first layer evens out deep flaws;
- the second - displays the even shape of the arch;
- the third finishing layer, and with its help the ideal surface smoothness is achieved.
- However, before tackling the filler, it is recommended to strengthen the corners of the arched openingspecial perforated corner, which the easily takes any curvilinear shape.

Fiberglass mesh can be used instead of corners, but it will not give as clear, even and reinforced edge as a corner can. Installation of the corner is carried out using self-tapping screws, which are screwed in at a distance of 150 ÷ 200 mm from each other.
- Next, you can go to work with.
For work with drywall, an acrylic or gypsum-based putty is used, intended for interior work.
Acrylic composition can be purchased in a ready-made pasty form, while gypsum mix is sold as a dry construction mix. Knead it just before use. This is best done using a mixer attachment that attaches to the drill.
You need to know that you cannot immediately knead a large amount of putty, since it sets very quickly, so it must be prepared in small portions. There is always an instruction on the packaging of the building material, which must be carefully studied in order to find out the exact time of the "life" of the prepared composition and the complete drying of the plastered surface.
- The first step is to finish the drywall joints and the main walls of the doorway.

The work is carried out using wide and medium-sized spatulas. One of them is putting putty on the joint, and, as far as possible, smoothed it out, comparing the surfaces of the drywall and the doorway.

- Having sealed the joints between the drywall and the wall in the doorway, you can immediately close the caps of the screws on this part of the structure with putty. Carrying out this process, you need to remember that the surface must be perfectly flat, therefore it is necessary to achieve exactly this effect. For this stage of work, you can use a metal trowel, which will immediately cover a large area.

- The first layer is the deep joints of the drywall with the wall. It is very important here to distribute the putty into all the recesses and chips, since it is necessary to bring the seams on the same level with the wall and the arched structure.
Do not apply too thick layers of material, as the wet putty can quickly separate from the wall surface. It's okay, if necessary, you can put four layers of putty instead of three - they will hold much more reliably than two or three very thick layers.
- Putting putty on all wide joints until dry, apply a fiberglass mesh reinforcement on top. This easy-to-use material can be purchased in any desired width, so there will be no problems with strengthening wide gaps.
The desired length of mesh is measured from the spool, and with the help of a spatula, this tape is then pressed into the putty, stretched and leveled.
- An arched bend, finished on both sides with a perforated corner, must also be treated with a layer of putty, comparing the surfaces.

If the joint of two drywall planes on an arched opening is reinforced with a fiberglass mesh, then if necessary, it can be cut in some places, since it should lie perfectly flat on the surface, without waves and folds.
- When all seams have been sealed and reinforced with reinforcing materials, the first layer is left to dry.
- After it dries on the surfaces, it is necessary to walk with medium-grit sandpaper to level the dried filler. By doing this, you need to try to "knock down" all the sharp protrusions so that they do not interfere with further work. But, at the same time, the structure must be processed extremely carefully so as not to expose the reinforcing elements.
Aligned joints must be well cleaned of dust with a damp sponge.

- Next, you can move on to the second thin layer of finishing putty, which should cover and level all surfaces.
- After it dries, the entire structure is cleaned with fine sandpaper (with a grain of about 220).
Before applying the third layer, you need to take again measures to clean all joints and smooth surfaces from putty dust.
 The finishing layer should make the arch "clean"
 - The top coat should give the finish a smooth finish. The putty is applied in a very thin layer, in which case a ready-made paste-like material made on an acrylic base is best suited.
In the process of work, it is necessary to smooth out all traces left by a spatula.
- When finished, the structure is left to dry for at least 8-12 hours. The level of dryness of the material can be determined by its color - it should lighten to pure white.
- Next, there is a grinding process, and it is better to carry it out with a special grinder, on which fine-grained sandpaper (grain 280 ÷ 400) is fixed, and then a soft polishing cloth.

Sanding is carried out until the surface is perfectly smooth.
- After the arch has been sanded, you can paint it if it was planned. After painting, special recessed fittings are installed in the doorway

Making and installing an arch is not such a difficult process. The main thing is to figure out the little things, how each of the stages of work goes, and having understood the nuances in the session, you can purchase materials and get down to business.
Prices for popular types of putty
Putties
And for those who have already got their hands on, you can offer a more difficult task:
Video: monumental arch with columns
Owners of small apartments prefer not to close open openings with a door, but to decorate them with arched structures. Due to this, the space visually increases, the interior of the room becomes much more elegant and the two rooms are combined into one.
You can use ready-made arched structures that are sold in hardware stores and are a set of parts, or you can assemble an arch with my own hands, having previously prepared the necessary materials.

How do you make graceful items? Look at the photo of the arch with your own hands. The list of technologies and materials used is huge - fantasize!


Installing an arch in an apartment
You can do it at home without resorting to help construction crew and engineering skills to install an incredibly beautiful arch. It is enough to choose the arched structure you like and the material with the tool to make it. If you follow the instructions below, you can avoid the most common mistakes that beginners make.

The structures of arches themselves in the construction industry usually play a role support elements in the construction of ceilings and walls. In our example, doorways are not load-bearing structures. For the first case, materials are taken, given the serious load on the walls, decorative arched structures must only support their own weight.

The door arch in the apartment replaces the door; it is installed in the same place as the movable structure. This is a future design element.

DIY arch ideas are diverse, we will describe the simplest ones in our article. You can make an arch using a 2-3 cm bar or a light profile. This design in any design will perfectly support the weight of the finish. The main thing is to securely fix all the elements on the wall so that beautiful decor did not fall down after a couple of days.

Note! The decorative arch plays more of a design function in apartments, it is not a support for the main structures. The main load in a similar situation is on concrete walls and lintels.

Exists huge selection arched forms and design solutions, each of which is selected for a specific case.

The arch presented above as an illustrative example has the shape of a semicircle correct shape... In the latter case, a pass with strict rectangle outlines. Further there are intermediate options for arched structures.

There are tons of other examples where only one support or curved posts are used. Appearance door arch directly depends on the chosen design of the room.


The dimensions of the openings, the height of the ceilings and some possible features the layout of the room. Someone's house in a classic retro style will perfectly fit an elegant arch with a semicircular shape, while others in a modernist style will have a rectangular portal shape.

These things are influenced by the taste of the owners and the design features of the apartment. Someone even chooses cone-shaped arches.

Having chosen the classics, pay attention that the ceilings in the apartment are high and have a height of at least 3 meters. If you have a typical panel apartment with low ceiling, use the "modern" arch system.

Wide racks of the "romance" model will perfectly complement the arch of the opening with wide racks. The portal arch model is suitable for interiors with clearly dominant straight shapes. This option is the perfect choice for log houses.

Do-it-yourself arch
You can quickly make an elegant arch using plastic and laminated elements, step-by-step instruction how to make an arch is presented below. They are trimmed to the right sizes in height, and then attached according to the instructions in the right places. These are standard options, which are made according to a single template, they do not surprise the buyer with anything, and the price is not always tempting. Yes, and choosing a model of the required size for your opening is sometimes very problematic.

To make the structural elements of the arch, the following materials will be needed: fiberboard plates, gypsum plasterboards and plywood. How to make an arch with your own hands? If you watched how professional builders work with gypsum plasterboards, you probably guessed that it is best to choose them for cladding. They can be finished after installation various materials... In turn, thin plywood has one big plus - it bends easily.

The arch frame is made from a bar with a section of 20 x 20 mm (30 x 30 mm) or a metal profile.

How to make an arch in the opening correctly?
An arch made of red brick, concrete or aerated concrete blocks will be bright and defiant. Red brick can be used without finishing materials... Such an arch will emphasize the solidity and material security of its owner.

Perfect for modern design premises. The weight of such a structure is very large and it is not recommended to build such a structure in old apartments, there is a large load on the walls.

Complex shaped metal structures should be left for work by professional designers and engineers. It is difficult and troublesome to work with metal, these projects are very complex in their implementation and engineering documentation is prepared in advance for them.

Profile and drywall are the simplest and most affordable things that allow you to make designs of any shape and style.


Arch made of wood
Not everyone likes pine, but for finishing works any other noble wood material: oak, ash and others. Beautiful arches in the interior will complement the elegant classic wooden furniture.

In general, working with any tree without experience is very difficult. It is better to entrust all the work to professional builders. Focus on your own capabilities and experience.

The opening of an arched structure made of wood is created by assembling many small fragments. With the help of pressing, they make round elements, then they are glued or twisted together. This step will take a lot of tools and time.

DIY photo of arches


The arched vault gives the room an elegance, looks modern and stylish - they are classified depending on the shape, material of manufacture, and style.
Material

Style

Form

Interior arches are used to create the effect of a whole space - this is current trend modern interior design.
note! Arched vaults are used in small apartments: they visually make the room more spacious, freer.
The most popular are drywall arches:

- The material allows you to embody any, even complex and asymmetrical, shape.
- A person who does not have narrow knowledge of construction can handle drywall - the material is easy to process.
- Drywall does not create additional stress on the structure of the house.
- Such an arch can be decorated with all kinds of decorative elements: shelves, niches, spotlights.
- Drywall is an environmentally friendly, safe material. You can even use it in children's rooms.
- Compared to other materials for installing arches, drywall is the most affordable.
Attention ! For the installation of an arched vault, you need to buy a special drywall. It is distinguished by its lesser thickness, the presence of special reinforcing fibers, and high quality. For ease of installation, it is recommended to buy ready-made sets of arch frames. Backlighting must be done at the stage of mounting the frame.
Stages of installation of arched plasterboard vaults

A popular design option for a doorway is an imitation of an arch. This design option can be used in the case of a high doorway. Pseudo-segments of the structure are attached to the edges of the opening and at the corners. Imitation is suitable for oriental-style rooms.

note! A common way to decorate arched openings is a polyurethane stucco molding. The interior in the styles of classic, baroque, empire will decorate such stylish decorative elements... The stucco molding is fixed with special glue. The polyurethane decor is made in the form of overhead strips - moldings, protruding parts - sandrids, artificial columns.
The choice of the arch option for the doorway depends on:
- Doorway parameters;
- Ceiling heights;
- The style in which the room is made.
Any owner of a residential building with an arched passage, one way or another, thought: how to arrange the design of an arch so that it would take a stylish beautiful view... In addition, it is necessary to observe the complete harmony of the general style of the room.
As a rule, the arch is used in order to delimit the space in the kitchen, living room, balcony, corridor and hallway. The design can take any shape, configuration and size, take different variants decor.

How to paint an arched passage?
The photo of the arch in the interior shows the most popular way of decorating the structure - this is the initial plastering, then painting. This method is equally suitable for classic luxurious as well as trendy modern style.

Please note that for a start it is important to correctly select the base for the paint (the plaster itself), which is divided into several types:
- to create a relief effect;
- traditional putty;
- textured version of the composition;
- apply a special pigmented solution.


Previously, before starting work, it is necessary to align the contours of the arch in the apartment as much as possible. For these purposes, plasterboard sheets, corners and putty are used. The joints and possible cracks should be filled with a serpyanka. To obtain the most even and clear contours of the structure, it is necessary to fix the corners with a profile.

Then you should ideally clean the work area evenly by applying paint with a roller. If you intend to further decorate the element with embossed accessories, it is reasonable to immediately apply a pigmented solution. After the end of the main work, overlays or decorative curtains can be introduced into the opening.

Decoration with stone and tiles
No less relevant way beautiful design arches are decorated with facing materials, which include: tiles, natural or artificial stone, imitation of bricks. Less often the opening is decorated tiles, or a mosaic.

An important advantage of this method is the introduction of arch decor in absolutely any style. The combination of stone can be completely different: with paper, textile fabrics (wallpaper), plaster, paint.
When finishing the opening with this method, gypsum materials are usually used, but clinker and porcelain stoneware raw materials are not excluded. Due to their high strength and durability, they are usually located at the entrance to the house, or on the balcony area.


In order to decorate the arch with a stone, that is, its initial cladding was of high quality and reliably served its households, it is required to make the surface perfectly flat, and then select a good desired glue composition.

The cladding can be made with an individual non-standard pattern, therefore it is recommended to first apply the markings for further precise orientation of the masonry.

You can also revet the opening with natural durable stone, but this will be a very expensive repair. Moreover, it is worth considering that the arch needs to be in the opening only load-bearing wall, or a solid partition.

The use of panels and stucco in the interior
A popular way to decorate a door arch is framing with special decorative panels and overlays. Most relevant and relatively inexpensive material serves as MDF, which is in perfect harmony with classic style premises.

The surface is treated with artificial veneer or foil. Please note that imitation with natural wood is always at the height of fashion.

For the correct fixing of the panels in the aisle, it is worth using special studs without hats and an adhesive solution. There are situations when you have to remove the level, you should use a spacer and foam for installation. This process is practically no different from installing a door frame.


As with other methods, you first need to level the surface and eliminate all possible cracks and joints. Markets and specialty stores for building materials offer ready-made overlay options that can be fixed with a simple click.

An interesting way to decorate an arch in an apartment is stucco molding, which is not at all difficult to do on your own using glue or liquid nails. Most often, polyurethane is used, which gives the interior a special grace, chic and luxurious rich look.


You can make relatively simple shapes, or make the most complex bulky cast parts. The main disadvantage of stucco molding is rapid mechanical damage and failure.

Curtains and curtains
The arched opening has been decorated with ordinary curtains for a long time, but even now this design option is, at least less often, but acceptable. The entrance is masked with light tulle, a curtain or a thick curtain, which will serve as a kind of door itself.

Usually, the doorway is masked with bamboo curtains, beautiful threads, decorative beads. This method is very simple to do with your own hands, using the cornice above the opening for fastening the curtains. There are curved cornices that match the very shape of the opening.

It is no secret that the arch serves as a continuation of the wall, which is why, when making it out, it is necessary to take into account the decoration of the walls.


As you know, wood is the noblest and most durable raw material, which is successfully used to decorate classical household items. It is better if the design is simpler, but very refined in shape. It is also possible to hang a wooden arch with an elegant curtain with gilding, which will successfully set off the classics.


Lighting solution
The beautiful design of the arch is complemented by built-in lighting fixtures, which can be point, side or contour types. The easiest way is to integrate the lamps into a drywall element in the end part.

A decorative opening is equipped with recesses, where bulbs are subsequently installed. To hide the backlight a little, you need to mask the recesses with glass. It is relevant to use colored or translucent glass, which in itself will serve as an additional detail of the interior and the structure itself.

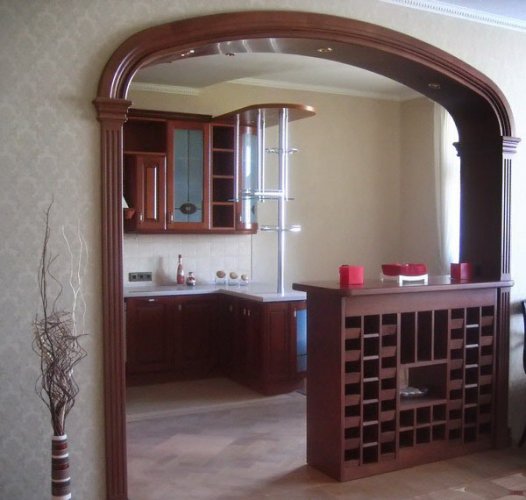
The arch looks very beautiful, dividing the space of the kitchen and living rooms, and its lower part smoothly turns into a bar counter.

Photo of arch design options


