Many construction teams undertake the installation of a fence from corrugated board. The process is not troublesome and fast, but the earnings are substantial.
You can eliminate this expense item from the total estimate for the improvement of a summer house or a private house by deciding to make a fence from corrugated board with your own hands.
The purpose of the fence on the site is to protect the territory. At the same time, it has another function - representative.
Previously, the main material for the construction of fences was wood - an affordable material, but requiring care and protection from destruction, at present, other building materials also compete with it: brick, concrete, polycarbonate, mesh, forging, corrugated board.
According to the ratio of the parameters "price-installation-durability- appearance» Leadership belongs to corrugated board, which led to its wide distribution among users.
Advantages of corrugated fences
- ease of material and installation;
- strength (rigidity);
- resistance to corrosion;
- uniform and very slow fading (like paint on a car);
- aesthetic appeal;
- undemanding to care;
- long service life;
- relatively low price.
Few building materials have such a list of advantages. But, all these properties are fully disclosed only with proper installation. So, you need to know how to make a corrugated fence correctly. Within the article, we will talk about the nuances of choosing a material, the specifics of its calculation, the types of a frame for a fence, we will describe how to attach a corrugated board and much more.
Do-it-yourself fence from corrugated board -
step by step guide from A to Z
Installation of a corrugated fence includes only screwing the sheet to the frame, this is a process consisting of several stages. Each of which we will describe in detail in the form of step-by-step instructions.
Stage 1. Scheme of a fence from corrugated board - from a sketch to a drawing
An arbitrary schematic drawing (sketch) is needed in order to visualize design features fence.
There are two types (types) of a fence made of corrugated board:
- solid;
- sectional.
 It is the type of fence that determines the consumption of material and the methods of installing structural elements.
Apply to the drawing diagram:
- the location of the fence on the site. Helps to take into account the features of the site: relief, plantings, buildings, access roads, gate installation site, etc.;
- if the site is uneven (hill, low) put a place where there will be elevation changes. Manufacturers producing quality material profiled sheets are made with a length multiple of 50 mm. this allows you to achieve visually the same height of the fence, despite the height differences on the ground.
- dimensions: fence height and length of individual straight sections;
- the location of the columns (supports);
Note. With a sectional fence, the width of the section is determined by the width of the sheet. It must be a multiple of 1, 1.5 or 2 sheets.
A detailed diagram simplifies the calculation of the material.
Stage 2. Corrugated fence materials
Construction will proceed quickly if the necessary materials for manufacturing are prepared in a timely manner.
What materials are needed for a corrugated fence:

1. Decking
When choosing a profiled sheet (corrugated sheet), you need to pay attention to the thickness (0.45-0.5 mm +/- 0.06 mm), wave height, absence of a capillary groove, parameters, coating, color and texture.
The profiled sheet has a high windage, this must be taken into account when planning the frame.
Note. The dimensions of the profiled sheet for the fence differ in different manufacturers, this must be taken into account when choosing a material. It is also worth knowing that the warranty period for galvanized corrugated board is 20-30 years, and with polyester coating - up to 50 years (depending on the thickness of the layer).
2. Support posts (pillars)
 Theoretically, any material can be used: wood, stone, metal.
When deciding which poles to use for the fence, keep in mind that the most simple and affordable option - metal pipes.
Rack parameters depend on the expected load. Usually pipes 60x40x2 mm or 40x40x2 mm are used. For round pipes diameter - 60-100 mm.
 You can use purchased ready-made pipes for the fence (photo) (for any type of soil) or piles (normal soils and loams).
The advantage of ready-made supporting pillars is the presence of a “heel” for mounting on a pillow, holes for attaching corrugated board and a top plug that prevents water from entering the pillar.
3. Cross beams
 For logs (beams) it makes sense to use square pipes 40x40x2 mm. or 40x20x2 mm. The general recommendation is that the width of the log is equal to half the width of the supporting column.
It is unacceptable to use wooden logs, due to the fact that the wood tends to rot at the place where the sheet is attached. This will not only reduce the life of the fence, but also prevent the sheet from being reused. Metal corner also not suitable for logs, with a thickness of 2 mm it will not provide adequate resistance to wind load, and manufacturers do not recommend using a thicker one.
Note. A special self-tapping screw for corrugated board with a drill is designed for drilling metal with a thickness of not more than 2.5 mm. So the use of a thick-walled profile is fraught with additional drilling efforts.
4. Plate holder (bracket) for corrugated board
 Special fasteners (brackets) are used when assembling the fence frame by a non-welding method, on hardware.
5. Plugs for poles (supports)
 Plastic plugs perform a protective function so that water does not get inside the pipe.
In practice, the post is closed with a special pad or plastic bottle. Not very aesthetically pleasing, but certainly cheap, and good as a temporary fix.
6. Hardware
 Needed for weldless assembly of the fence frame. To do this, use a bolt or screw M6 (30 and 20 mm). As well as self-tapping screws for fastening corrugated board or rivets.
 Professionals advise using a self-tapping screw, because. it is equipped with an additional gasket (neoprene rubber), which allows you to tightly press the profiled sheet without damaging its surface. Its length is 15-35 mm.
Advice. When using rivets, the edges of the holes for them are recommended to be treated with special paint. This will prevent the rapid appearance of rust at the attachment point and the formation of rusty smudges on the corrugated board, which are very difficult to eliminate.
 The paint is used to touch up scratches that may appear during the installation of the profiled sheet, as well as to paint over the cut on the sheet. Consumption is small, one can, as a rule, is enough.
8. Decorative end plate for decorating the fence
 U-shaped bar (fence, cover), which is installed on the upper edge (edge) of the profiled sheet and protects users from possible cuts, and the sheet from rust.
The material was prepared for the site www.site
 Note. When buying, please note that the edges of the bar must be bent (rolled). Otherwise, they will not only scratch the metal during installation, but will lose their shape (the edges will move away from the sheet) during operation.
Additional materials and tools:
- cement, gravel, sand - for installing support pillars or arranging the foundation;
- level, plumb, welding machine(and consumables), a screwdriver, mortar containers, formwork boards (if necessary), a shovel or drill, a primer and an anti-corrosion solution for metal, a riveter (if necessary), a rope, goggles and gloves, a grinder (if necessary, cutting profiled sheets ).
Stage 3. Calculation of material for a corrugated fence
How to determine how much building material is required for manufacturing.
1. Calculation of the number of corrugated sheets:
- with a continuous fence - the total length of the fence is divided by the useful width of the sheet. Rounding goes up;
- at sectional. If the size of the section (span) is equal to the width of the sheet, the total width of the sheet is used. If it is planned to install one and a half or two sheets there - useful.
Note. The sheet can be installed both vertically and horizontally. With horizontal fastening, the height of the fence will be equal to 1, 2 or 3 working widths of the sheet. When vertical - is determined by the customer.
Advice. When calculating, do not operate with such a concept as total area required corrugated board. Keep calculations in pieces at a given sheet height.
2. Calculation of the number of posts for a corrugated fence
The number of supports depends on the distance between the corrugated fence posts
- with a solid fence, the total length of the fence is divided by the estimated distance between the posts (racks). Taking into account the windage of the sheet, it is taken equal to 2,000 - 3,000 mm. It is not advisable to increase the distance, since this will lead to an increase in the thickness of the racks or the number of longitudinal logs.
- at sectional. The number is determined by the expected number of sections. When installing racks for mounting fence sections, you need to calculate in advance the distance between the posts so that it corresponds to the total (when installing one sheet per section) or useful (1.5-2 sheets) area of \u200b\u200bthe corrugated board.
Note. The calculations take into account that the support posts (pillars) must be installed at the corners of the fence, as well as at the installation site of the gate and / or gate. The number of intermediate supports is rounded down. And the difference is compensated by the deviation from the specified distance between the racks.
The size of the post is determined by the height of the fence, taking into account that the posts go deep into the soil by 30% of their length. Thus, with a fence height of 2,000, the height of the support post for a fence made of corrugated board should be 2,600-2,700. For intermediate posts, an installation depth of 25% of the total fence height is permissible. Then the length of the rack will be 2,500 mm.
3. Calculation of the number of transverse logs
The amount depends on how the fence is installed.
- Masters advise using 2 logs with a fence height of up to 2,000 mm. Moreover, their distance from the edges of the corrugated board is 300 mm.
- With a fence height of more than 2,000 mm - 3 logs.
 Thus, the total lag molding is determined by multiplying the total length of the fence by the number of crossbars.
4. Plate holder
The number of plates is equal to the number of support posts multiplied by the number of rows of logs.
5. Pole cap
The number of plugs is equal to the number of support posts. Plus 2-3 spare ones (useful during the operation of the fence).
6. Hardware
When calculating self-tapping screws, it is taken into account that fastening is carried out in two extreme waves and through two in the middle of the profiled sheet in each of the transverse logs. Thus, with two transverse lags, 6 pieces are required per sheet, with three - 9 pieces. The number of hardware is rounded multiple of the package (standard package - 250 pcs). Since, in the process of tightening the self-tapping screw, defects may occur.
When fastening with rivets, their consumption increases, since they are fastened along the edges and through the wave.
Standard packing of paint 50, 100, 200, 500, 900 gr. The choice depends on the length of the fence. Usually 50 gr. banks are enough.
8. Decorative end strip
The amount is equal to the length of the fence divided by the working length of the bar. The standard length of the plank is 2,000 mm, the working length (including overlap) is 1850-1950 mm.
Stage 4. Do-it-yourself fence installation from corrugated board
Installation technology step by step:
1. Site preparation
Cleaning the ground surface of everything that will interfere with the installation of sheets and poles.
2. Foundation and / or installation of support posts
Note. The destruction of the corrugated sheet begins at the point of contact with the ground surface. Pebbles, dirt, mechanical damage lead to the appearance of defects precisely from the bottom of the sheet. In addition, the uneven terrain of the site often creates difficulties in the installation of supports. That is why the foundation for a fence made of corrugated board is an obligatory stage in the installation of a fence.
What is the best foundation for a corrugated fence?
Soil research usually helps to decide on which foundation to put a fence from a profiled sheet in a particular area. But since the fence made of corrugated board is a relatively light construction, the usual one is suitable for it. Its optimal depth is 300-400 mm, and the minimum width of the foundation for a corrugated fence is determined by the width of the support post (columns).
We will not dwell on how to fill the foundation. But we note such a nuance, the depth of the pit at the place of installation of the base support posts (along the edges of the fence, corners, at the place of installation of the gate) should be 1/3 of their height + 100-150 mm for installing a pillow under the sole of the stand. For intermediate posts - 1/4 of the height of the support + the height of the pillow. This will remove the influence ground water and freezing soil on the rack.
The preparation and installation of formwork is no different from the arrangement strip foundation under the house or gazebo.

 First of all, base support posts are installed (along the edges of even sections of the fence), a rope is pulled between them and intermediate posts are installed along it. At the place of installation of the support posts, the soil is removed with a drill, a gravel-sand cushion is poured, on which the posts are installed. In this case, metal pipes should be treated with an anti-corrosion solution.
Users note that it is better to concrete the racks by 100-150 mm. So they remain stable when reinforcing the formwork and filling it with concrete. If it is planned to compact the pillars, then the pillow should be made 200-250 mm high and the racks should be hammered into it. This method is more laborious, but less costly and reliable.
Advice. The use of a level and a plumb line when installing racks is mandatory.
More simple option will be the installation of support racks without arranging the foundation. Installation requirements are the same. The depth is equal to 1/3 or 1/4 of the length of the rack, depending on the place of its installation, the thickness of the gravel-sand cushion is 100-150 mm, the mandatory treatment with an anti-corrosion solution, checking the level and reliable concreting.
Note. In practice, corrugated fence posts are installed with deviations from the above technology. This is justified with stable soils.
Alternative ways to install the racks are shown in the diagram.

3. Mounting lag
Fastening of a professional flooring is carried out on cross logs. They are mounted on support posts after they are securely concreted. In this case, it is impossible to rush work, because. this can cause the rack to deviate from the vertical.
The cross joists can be welded or screwed to the support posts. Masters recommend using a holder plate (bracket) for these purposes. Thus, the plate is screwed to the support post, and the lag to the plate, this makes the project a little longer and more expensive, but the fastening is considered more reliable.
Three ways to attach the log to the support posts (photo)
 - in front of the column butt. The method is ideal for the construction of solid fences;
- behind the post using a holder (bracket). Suitable for sectional fences;
- side of the post. The advantage of this method is that the corrugated board can be attached not only to the log, but also to the supporting column, which makes the structure more stable. But, the duration of work and the consumption of self-tapping screws increases. Suitable for sectional fences.
 Note. With a significant slope of the site, the transverse logs are mounted with an offset, as shown in the photo.
A fully finished frame is covered with an anti-corrosion primer and paint.
4. Decorative design of columns
This stage is possible only if a sectional type of corrugated fence is selected. Here, the installed metal support posts can be overlaid with bricks or lined with stone. According to many users, a fence made of corrugated board with brick pillars looks more beautiful and presentable than with metal racks or even solid.
Note. A similar decor of the fence supports is thought out at the planning stage. Because the presence of brickwork makes adjustments to the distance between the pillars, and hence the number of sheets mounted in the section.
Of course, you can make a decision to finish the racks with bricks at any stage, but you should be prepared for the fact that the profiled sheet will have to be cut to length, and this will lead to waste not only of the sheet, but also of paint, and cutting tools, time and money.
Users agree that this work should be entrusted to mason masters, because. it is bricklaying in this case that will determine the aesthetic properties of the fence. If you decide to do the work yourself, then you should know:
- it is expedient to use decorative brick high quality (chips and efflorescence are unacceptable);
- adhere to the same thickness of the masonry seam;
- tie every third row metal mesh(reinforce);
- the void between the masonry and the support pipe is completely filled with concrete mortar;
- make a decorative element at the top of the pillar.
5. Installation of corrugated board on the fence
To avoid the appearance of rust, you need to know how to fix the corrugated board correctly.
Rivets or special self-tapping screws are used to fasten the profiled sheet to each other and to the log. Installation begins based on the configuration of the sheet. One of the extreme waves of the sheet is covered (left or right depends on the manufacturer's equipment). The first sheet is mounted in such a way that the covering wave of the next one closes the wave of the previous one, and not vice versa. In order not to encounter a situation where a sheet cut near the gate refuses, installation must begin with these elements.
Advice. To ensure ventilation, it is necessary to make the distance of the sheet along the soil surface 50-100 mm.
The profiled sheet must be fixed along the edges to each of the transverse logs. One mount is in the middle of the sheet. If the fence is being built in a windy region, it is advisable to fasten the hardware through two waves.
How to properly fix the profiled sheet?
To screw a self-tapping screw into corrugated board, you also need to have certain skills. Namely, to know that a self-tapping screw:


- “jumping off” of the screw threatens with damage front surface corrugated board.
6. Installation of additional elements
In fact, the installation of a fence made of corrugated board ends with the steps described above. However, manufacturers, craftsmen and experienced users recommend covering the upper end of the profiled sheet with a special decorative U-shaped strip (end fence strip).
 The overlay will give the fence an aesthetic appearance and exclude damage to users from the sharp edges of the sheet.
The bar is simply put on the sheet, so when ordering, pay attention to its width.
For corrugated board with a wave height of 8 mm, you need a strip 10 mm wide (including rolling) or 8 mm (without rolling).
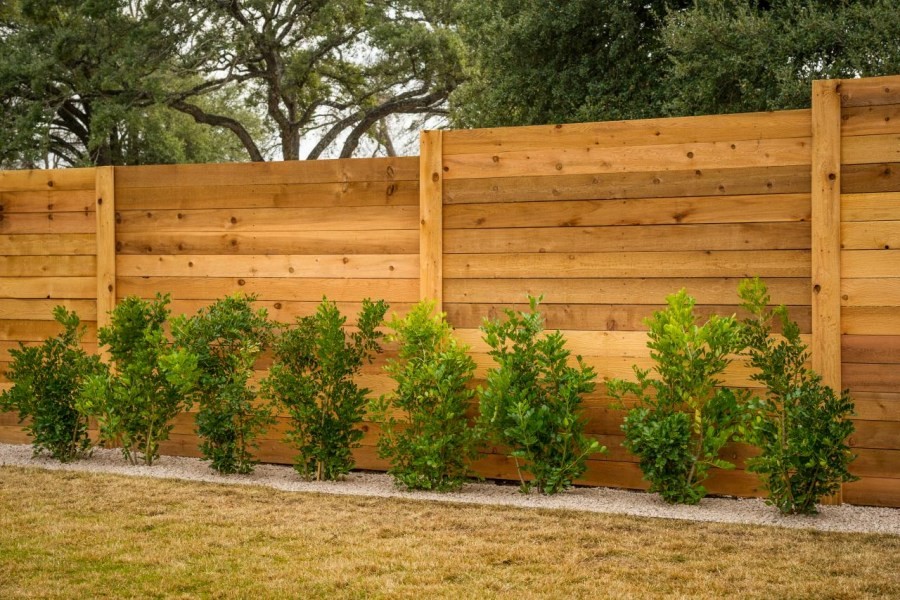
Please note that the corrugated board of most manufacturers is painted in color only on one side. The unpainted gray side looks towards the house. If trees, shrubs or grapes are planted along the fence, this will hide the unpresentable appearance of the fence.
Stage 5 Cleaning the area after the construction of the fence
Cleaning is the logical conclusion of the construction process. Cleaning is necessary in order to avoid injury by cuttings of corrugated board, scattered self-tapping screws and to give the site a well-groomed appearance.
Do-it-yourself fence installation from corrugated board - video
Installation of corrugated fences - price for work and material
| Material | The cost of a fence from corrugated board
with manual installation |
The cost of installing a fence from corrugated board
subject to the involvement of hired workers |
|---|---|---|
| Decking | 140-680 rub/sq.m. | |
| Pipe 60x60x2 | 110 rub/m.p. | |
| Pipe 40x40x2 | 70 rub/m.p. | |
| Pipe 40x20x2 | 60 rub/m.p. | |
| Plate holder | 80-150 rub/pc. | |
| Pole cap | 1.7-59 rub/piece | |
| Hardware (self-tapping screw) | 2.5-5.3 rubles / piece. | |
| 180 rub/piece (cylinder) | ||
| End plate (2000 mm) | 60-110 rub/pc. | |
| Cement | 175 rubles / 50 kg. | |
| Sand | 80 rubles / 50 kg. | |
| Gravel, fraction 20-40 mm. | 100 rubles / 40 kg. | |
| Nerjamet-Grunt - alkyd primer for metal | 210 rub/kg. | |
| Foundation device | 0 | 5 000 rub. per sq.m. (price depends on soil type) |
| Drilling a hole or driving a pile | 0 | From 200 rubles / piece. |
| Pillar concreting | 0 | From 500 rubles / piece. |
| lag mount | 0 | From 50 rub/m.p. |
| Fixing a corrugated sheet | 0 | From 200 rub/m.p. |
The total cost of building a corrugated fence is determined based on the need for one or another type of material.
The cost of installing a turnkey corrugated fence (price per meter of work, materials with installation) is shown in the table.

Conclusion
The fence made of corrugated board looks great, endures any temperature changes and all kinds of atmospheric phenomena. But there are two weak points- windage and poor-quality installation. We hope that the information provided here will allow us to take into account and eliminate both of these shortcomings in a timely manner.
It is not difficult to come up with a fence design, it is more difficult to realize the idea of \u200b\u200bhow to do exactly what you want. But when there is a desire to also make money on it, then you need to evaluate the attractiveness from the very beginning. consumable. After all, the overall design is often assembled from everything that is idle or sold for a penny.
From improvised materials
Now, it is on the territory of the Russian Federation and the CIS countries, that's what you can choose from:
- Pallets;
- Used slate;
- Plastic (various containers);
- production grid;
- Cutting from a sawmill (the most budgetary rural option);
- Shrub branches (gathered with their own hands, if there is one near the construction site);
- (for a fence or a barn, there is no budget option);
- Dismantled wooden barrels(a rare case, but sometimes in production workshops they are forced to sell already broken barrels of strong wood by self-delivery);
- Scrap metal (if you have transport, you can visit retail outlets and collect poles, crossbars and even some handmade decor by weight);
- Professional sheet. The most inexpensive;
- Concrete, cement and decorative.
How to make a cheap fence out of all this? Let's analyze in detail.
Designer novelties
Beautiful photos with original ideas: 
Simple design layout. In the photo - a homemade picket fence from wire, hazel, willow. You don’t even need to nail anything on a simple fence made of branches with your own hands, it’s enough to make turns between the supporting parts, and a low fence will be ready very soon. It is a pity that such constructions do not last very long because of strong winds and precipitation.
The garden option decorative fence in a private house, assembled on their own. And the more paint residues are used in this version, the brighter the garden itself will look. Boards can also be selected from pallets, creating a simple decoration element. 
Worth noticing! Such a garden fence is also an impromptu bird feeder and drinker. Very original and inexpensive.
Brick, cement and glass. American novelty. The materials are not cheap and improvised, but it looks great. Unfortunately, such a design, most likely, will not stand for a very long time due to the rapid interest. In total there is someone who cannot repeat this. 
Copper or other metal at work. Of course, an element for an amateur. And yes, there is a lot of welding. But if you make, for example, from iron beds of past eras, then it will be original, free and forever. 
Plastic. Even greenhouses have been made from containers for a long time. And don't forget about fences. It is desirable, of course, to make small pieces of even material from empty containers, with which buildings or fences are then sheathed. But the above method is also suitable, just prepare a strong frame in advance. 
Europallet. Suitable everywhere: firewood, building a barn and a fence. Interestingly, the technology for creating the pallets themselves has a drying stage. It turns out that pallets from the warehouse are ideal construction material for an inexpensive fence. And often unloading pallets are sold simply by weight. On small-sized boards, there should be no knots and defects. 
It is not necessary to dismantle pallets for the construction of the fence. It is best to do as in the photo above - expose and fix each of them in turn.
Branches, tree and slab
Quite inexpensive, an example in the photo: 
You can’t imagine it easier - they insert or drive in something for support, and then weave the way the soul desires. Everything that lies under your feet goes to work. Even dry, crooked and heavy oak branches can be the end of the composition.
Below is a picture of a fence. From a thin branch such a design, of course, does not differ in strength. But you can fix a ready-made home-made fence with a mesh over the entire area. 
Like this ( next photo) much stronger, more economic and more beautiful. Livestock, pests from the forest or abandoned dogs will not violate your territorial space. Moreover, the grid can be installed not the smallest, and it is enough for one meter from the ground. Above, such protection is no longer needed.

Mesh combined with a wooden frame performed according to right technology(a tree under a cone, columns are processed by bitumen). Modest, not very expensive and reliable. You should not sin on a tree, because a fence made of absolutely any material will not last forever. And even monolithic structures are destroyed by atmospheric changes.

carved grace. This is a small work of art. Although earlier, when most of the population of our country lived in private lands, carved elements were in every yard. It had several meanings: prosperity, accuracy, skill and respect for traditions. 
Below - pallet garden fence treated with protective compounds. 
fence board blends very nicely with concrete base and pole.
By the way, it is the “fence board” that comes in several varieties (grade 1-3). If there is a lot of crooked wood at the sawmill, then grade 3 fence boards will accumulate in cubic meters. Externally, of course, there are differences, but this is the same wood that is used in construction. There is more trouble with her, but for such a low price she is forgiven. And if grade 1 costs from 3 thousand per 1 cube, grade 3 will cost 1.5-1.8.
It is also interesting that cheap lumber is not bought quickly, so it is easy to find a dry inexpensive fence board in warehouses or squares.
Original wood processing
By Japanese technology now you can burn fence boards giving it a brown tint. Similar processing for natural material only needed once. Moreover, a thin layer of burnt wood is resistant to moisture, and natural processing can only be replaced by expensive paint, the service life of which leaves much to be desired. Burn several dozen boards with oxygen or blowtorch comfortable, practical and original.
Slate, profiled sheet, concrete and mesh
If you take a new slate into work, then it would be better to order it flat version calculated for 1 span. Such material is easy to replace in case of breakage, and it looks discreet, solid, more solid. 
Used slate more often with a wave. It is rarely used on the front part, except for visors. However, the back side of the site, closed from the eyes of everyone and everything, also needs to be fenced. That's where they find use for the old slate from the grandfather's house or barn.
Interesting fact! Slate, released in the 70-80s of the 20th century, is very fragile, but durable. If no cracks are made during transportation and installation, then it will stand in the fence for more than one decade.

Classical rules for working with your own hands on a profiled sheet and a metal frame. As shown in the figure, for a high fence (above 2 meters), it is more correct to make 3 logs. Well, the span is not more than 2.5 meters. 
Patterned grids. Long and hard work. It must be carried out according to the project or pattern. Of course, you will have to work hard, but you can sell such works. Or get hired for design, if there is interest in your ideas. 
Cheap, beautiful and original. Everything can be used in decorative elements: from forks to car hubs. And it doesn’t matter how it all will look exactly in the overall picture, because it’s impossible to ugly assemble different elements made of iron or other material into one design. 
Profiled sheet or corrugated board wooden frame . An option for those who do not know the welding craft. It is better to make the frame itself more stable, although sheets arranged horizontally will give the necessary rigidity. It is desirable to treat wood with protective agents based on drying oil.

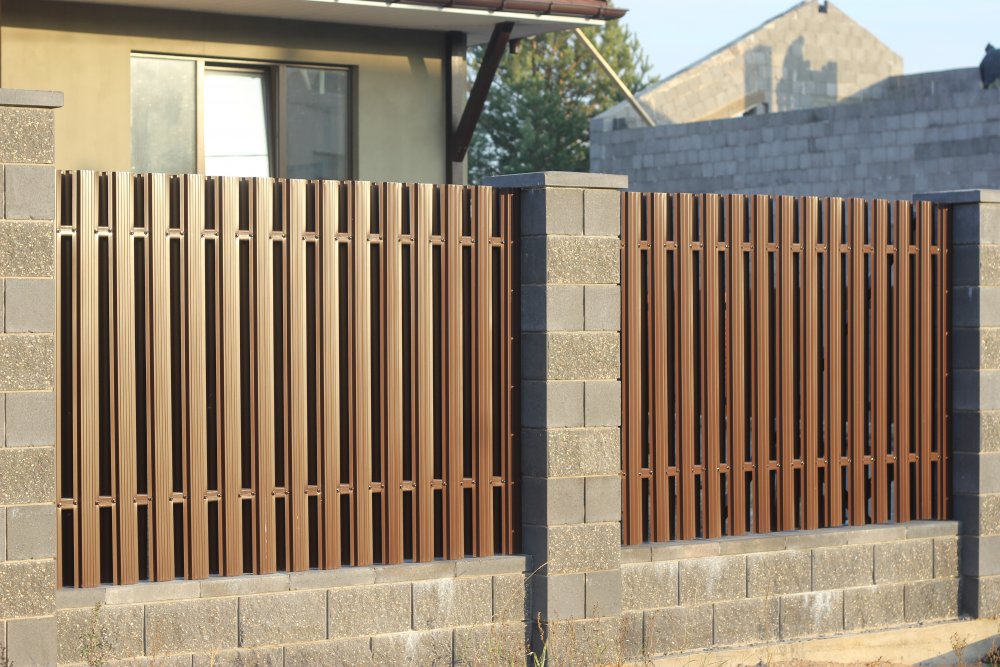
Concrete or brick fences. Lots of shades here. decorative elements and, consequently, costs. It is more profitable to make only the base from stone, placing it in the center of each span wood, forging, decking or even factory plastic.
Estimated cost
Let's take a look at the example of a standard 6 acres of a summer cottage:
| Type of fence | materials | Number of materials | Cost per unit, rub. | Amounts, rub. |
| Wooden fence with concrete base | Cement (concrete); | 11 cubic meters; | 3 thousand; | 33 thousand |
| pillars (logs); | From 50 pieces; | 450; | 22 thousand | |
| logs (beam); | 40 pieces; | 150; | 6 thousand | |
| fence board (grade 2-3). | 200-250 pieces. | 60. | 15 thousand | |
| Result: 76 thousand for building materials. | ||||
| Mesh with concrete base | Concrete; | 11 cubic meters; | 3 thousand; | 33 thousand |
| Pipes for the frame; | 89X40; | 1500; | 78 thousand | |
| Logs made of wood; | 50 pieces. 200-250 pieces; |
108; | 3.7 thousand | |
| Grid. | 170 square meters. | 60. | 9.4 thousand | |
| Bottom line: material without delivery 124 thousand. | ||||
These are prices for the central region. And if you call to count the fences of the above materials on a turnkey basis, then you need to add up to 50 thousand for work and delivery.
Results
Fences made of stone, brick and a decorative component cost twice as much as a fence made of mesh or wood.
It is easy to guess that it is most profitable to do what you have planned with your own hands, using the same euro pallet or used pallet. After all, at quality installation they look much more original. The price of the work is cheap, the material itself can be ordered from 100 rubles apiece. 1 element is a whole meter of an almost assembled fence. Consider for yourself what is better for a conventional fence.
Video instruction
Ivan Galkin tells how to make an inexpensive fence.
It is worth protecting your territory, if not from the encroachments of intruders, then at least from the scattering of your own living creatures around the village. And to minimize costs, you can build a fence with your own hands.
The cheapness of improvised materials is very conditional. For example, the owner of a tire shop does not know what to do with tires, and his own sawmill is a constant supplier of sawdust and lumber. But for an ordinary resident, the search and collection of a large amount of such waste will become a problem. If the difficulties do not frighten, and the neighbors will gladly chip in a couple of hundred bottles, their fence will learn almost free.

Firewood
A few cubic meters of firewood is not only heating for the whole winter, but also an excellent material for a fence! Almost any tree is suitable, except for birch, which rots in a couple of years. For example, oak becomes stronger from exposure to moisture, and conifers practically do not rot.
To build a wall of logs, special skills are not needed:


The only drawback of such buildings is their fragility, since the tree is still exposed to moisture and begins to rot over time.
bottles
Plastic and glass bottles- a great way not only to save on the construction of the fence, but also to dispose of household waste. The device of such a barrier is extremely simple:

In addition, plastic, when heated, can evaporate harmful substances therefore it is not advisable to expose it to direct sunlight. But due to the materials used, the glass container fence will last for more than a dozen years, having managed to get bored with several generations of residents.

Tires
Tires are used everywhere - as flower beds, playgrounds and even foundations. So why not make them also a fence? For this, almost nothing is required:


The only drawback of a tire fence is that when heated, it will smell rather unpleasantly of rubber. Therefore, it is recommended to locate it far from residential premises and places of rest.
Reliable and simple fences
Of course, the usual fences are much easier to implement. After all, carrying tires is a difficult task, the hand will get tired very quickly. But to stretch the grid between the pillars or put together a wooden fence - what could be easier?
From the grid
The most common type of fence is chain-link. Gardens, large plots and even yards are fenced with it. If the appearance does not cause aesthetic delight, you can use more modern version- welded mesh. Its installation is also simple, but allows you to make the fence more accurate.

To build a mesh fence you will need:

You can cope with the work alone, but it is better to get an assistant:
- The area for the future fence is marked. To do this, reinforcement is driven in in the corners, between which a string is stretched.
- The lower part of the pillars (150-160 cm) is smeared with two layers of enamel against rust.
- First, corner posts are installed. A well is drilled with a depth of about 1 m and a pipe is immediately hammered into it with a sledgehammer for another 30 cm. After that, the pillar is immediately covered with sand and gravel, spilled with water and carefully rammed.
- Pillar pitch - up to 3 m.
- Since the mesh fence is light and does not have a high windage, it is better not to concrete the pillars buried above the freezing level of the soil. Otherwise, the concrete will “squeeze out” along with the post and the fence will begin to stagger after the first winter.
- If it is necessary to make reliable supports, wells are drilled 1.5 m deep, a sand and gravel cushion is poured onto the bottom, formwork is made of roofing material, a pipe is clogged and poured with concrete.
- After all the posts are installed, the deformed tops are cut off and the mesh is stretched. It can be attached to poles using welded hooks, wire or mounting screed.
- If the mesh is installed with reinforcement broach, then after it is fixed on the poles, a steel bar is threaded through the cells, which is welded to the pipes. This will increase the strength of the fence and prevent the mesh from sagging.
- Pillars and corners are treated with enamel against rust and painted. To simplify the work, it is better to use a paint sprayer - with a brush it will take longer and less economically.


And to make the fence look interesting and unusual, it can be decorated with wire weaving. It's so nice to go out into the courtyard, fenced with a real work of art!

From corrugated board
Decking is a durable and relatively inexpensive material. You can choose a color coating of almost any color, and even a novice builder can handle the installation:
- For corrugated board, you will need buried below the freezing of the soil and concreted pillars. On heaving soil, to prevent subsidence of the pillars, it is better to expand the supports according to the type of TISE foundation.
- As with the construction of a mesh fence, before deepening the pillars, the pipes must be treated with a rust primer.
- When the foundation is completely frozen, transverse logs are welded to the posts - profiled pipes 4x2 cm. They should be located 4 cm from the upper and lower edges of the corrugated sheet. For fences up to 170 cm high, two crossbars are enough, but if the fence is higher, you need to make a third one in the middle.
- All metal parts are treated with a primer - after installing the corrugated board, this is problematic.
- Profiled sheets are attached to the lags with metal screws with an overlap into a wave.


If you overlay the racks with bricks, the fence will look more presentable. To do this, use 4 bricks laid in a circle in a run. Each row of bricks is checked by level in two planes so that the pillars do not turn out to be oblique. A sand-cement mixture is poured inside around the pipe.

At the same time, metal racks are lined with bricks along with welded logs. This is much more reliable than trying to fix the leagues on facing brick after completion of laying.
You can ennoble the fence from the inside with tall living plants. In the meantime, the thuja are growing, you can stretch the photo grid.

Its service life is 3-4 years, after which it will begin to fade. But during this time, the planted bushes and trees will have time to rise.
from wood
Wooden fences are traditional for the countryside. After all, you can find building material at an extremely attractive cost, but if you look well at sawmills, illiquid goods with self-pickup will cost almost nothing.
To build a wooden fence you will need:
- manual circular saw;
- screwdriver and screws or hammer and nails;
- grinder or grinding wheel and Bulgarian;
- spray gun;
- gas drill or shovel.
Installation of a wooden fence attracts with its simplicity:


For such a fence, the selection of boards is important - they must be free of flaws and cracks. A planed board looks much neater, but any 2 cm thick is suitable.
The only drawback of wood is its short lifespan. On the other hand, repair separate sections such a fence is much easier!
original fences
It is better for a novice builder to try his hand at simple objects. But for those who have already eaten a dog while erecting fences, there are several non-standard options that will surprise your neighbors and please your loved ones!
Stone
Masonry, despite its external simplicity, is much more difficult to perform than brick. Dry stone masonry will be a real challenge for masons. To do this, two trapeziums are installed along the edges of the future wall, between which a string is stretched - this will be a guide during masonry.

The trapezoidal shape of the fence is needed so that the stones do not begin to crumble, because they are held only by their own weight. The main difficulty in such construction is to choose the right stones so that the rows do not deviate from the horizontal.

Gabion fences are becoming more and more popular. Their device will require finished construction, installed on compacted soil with concreted supports - the weight of the fence is decent. And so that in the process of filling the cage with stones the structure does not burst, after each row the mesh is fastened with special hooks.

live

And if the fact that it will take more than one year to grow a meter-long boxwood fence does not scare you, you can begin to implement this idea.
First of all, you need to decide on the height of the desired fence:
- high - thuja, maple, juniper, irga will do;
- medium - rowan, euonymus, barberry are used;
- low - you can plant boxwood, cinquefoil, yew.
Deciduous, fast-growing shrubs are often chosen for tall hedges. After all, you want to protect yourself from prying eyes as quickly as possible, and not after ten years. But in the future, you will have to cut such a wall very often, otherwise you can be hidden behind a five-meter fence. Plus, deciduous hedges - leaves that have flown around in autumn allow you to get maximum light from the meager winter sun.
You should not believe the photos, which show one and a half meter boxwood hedges - it took more than two decades to form them. You can buy already grown bushes, but the cost of such a fence will turn out to be far from democratic.
Wicker
Wattle is a traditional fence, undeservedly forgotten today. Artificial rattan constructions, which cost a lot of money, are becoming more and more popular.

But after all, it is very simple to build it with your own hands:


A house fenced with such a wattle fence will become a cozy family nest.
forged
Forged fences attract attention with their delicacy and airiness. This great option for a small area, allowing you to visually expand the space.

Of course, one cannot do without a good farrier. But it’s very easy to install ready-made spans:
- the foundation is poured with pillars, the distance between which is equal to the finished spans;
- when the concrete has hardened, forged elements are welded to the pillars;
- hinges for the gate and gate are welded;
- the fence is primed and painted.
Very simple and inexpensive option fence devices for fencing the site are shown in detail and accessible in the video:
Despite its apparent simplicity, the fence is a rather complex architectural structure. In order for the construction to turn out to be aesthetically attractive and reliable, it is necessary to divide the project into several stages, completing each of them with high quality and accuracy.
The choice of fence design
First you need to determine the general features of the future fence. Will it be a facade structure or a small module based on the fence of the neighboring area.
When enclosing a cottage with a capital fence, most often they choose options with brickwork or stone.

In order to significantly reduce the load on the foundation, a natural stone combined with polymer elements, mainly on a polycarbonate basis. At the same time, they try to use only solid bricks.

In order to give the masonry the necessary strength, waterproofing is carried out: with an interval of several horizontal rows, a grid with a large cell or reinforced rods is laid.

Fence with a brick base and inserts made of polymer elements

The simplest type of fence is a chain-link fence. It exerts minimal pressure on the ground, is cheap to maintain, but has poor aesthetics.

Chain link fence
Fence structures that combine several materials look more harmonious. Most often, combinations of an array of rubble (in the lower part) and spans of treated boards, corrugated board, colored polycarbonate, fastened with ceramic brick pillars are used.

Pouring the foundation for the fence
Having decided to build a capital fence, before pouring the foundation, it is necessary to conduct geodetic surveys for the presence of groundwater. The choice of the type of foundation depends on the established properties of the soil.
In swampy areas the best option there will be a tape-pillar base, in which, before mounting the tape, mines are drilled in the soil and filled with concrete mortar.

Tape and pole base for the fence
A roofing material is laid between the soil and the foundation, making it difficult for moisture to reach the concrete. The foundation for a brick fence is reinforced with 12 mm reinforcing bars.

Tape-pillar base for the fence after pouring concrete
Installation of fences from corrugated board and chain-link mesh
The next step is the laying of columns and brick spans. The exact number of sections is calculated using the "empty seam" method and using preliminary sketches. Fences made of chain-link mesh or profiled sheet are erected using a simpler technology. It is also used for the construction of combined fences.
First, markup is carried out for the bases, which are used as pillars from pipe scraps. For one standard roll of chain-link, 4 posts are enough. Mines are drilled in the ground with a rotary. A depth of 1 meter will be sufficient. The diameter of the drill must be at least two hundred millimeters.

Recesses for pillars-supports for the future fence
For reliable waterproofing, before installing the pillars, rolled polyethylene or roofing material is inserted into the drilled shafts. First of all, the first and last pillars are installed, which are held in the channels by stretch marks. Then rope beacons are pulled from above and below along one side of the pillars.
Important! Usually, when erecting stone and brick fences, mortgages are made in advance in the masonry. These are metal plates installed in an array of masonry. Subsequently, hinges for gates and gates and locking strips are easily welded to them. Also, sleeves cut from plastic pipe rolling are laid in the masonry. Through them it is easy to stretch electric cables that feed street lamps, electric locks and video cameras.
When marking for vertical supports for fences from a profile sheet, it must be borne in mind that the distance between the posts should be from two and a half to three meters. It is recommended to raise the corrugated board slightly above ground level, by about 10 centimeters. This will prevent the occurrence of congestion from snow and rainwater.

as transverse supporting elements for fences from profiles, logs are used - trimming pipes of small diameter. They give the fence the necessary rigidity and stability.


Logs and supports must be treated with a special compound to protect the metal from various weather phenomena
For standard fence two lags are quite enough. They are attached to the supporting pillars by welding.

Important! Logs are mounted at a distance of 30 cm from the top edge of the fence and from the edge of the earth. For fences made of corrugated board up to 1.7 m high, two transverse logs are sufficient; for fences from 1.7 to 2 m, it is recommended to install 3 logs.
Sheets of profiles are fastened to the lags with self-tapping screws and overlapped with each other, placing them in one wave.

Fastening corrugated board on logs
Important! To fix the sheets of corrugated board, self-tapping screws 35 mm long with a pitch of 500 mm are used.
Using a level, the pillars of the bases of the future fence from the chain-link mesh are given a strictly vertical position and the shaft is filled with concrete mortar.

After the concrete has hardened, wire guides are pulled between the posts.

Then, with the help of a millimeter wire and pliers, they begin to attach a chain-link web to them.
Learn more about how to install a chain-link fence yourself in the video.
The second way.
The depth of the foundation for combined fences does not exceed 60 centimeters. Support poles up to 120 centimeters high will be a reliable foundation. Screens made of forged gratings or profiles along the perimeter are reinforced with pipe cuts or corners. After installing the support pillars, the screens are hung on steel tabs prudently built into them. At the last stage, waterproofing tops are installed on the columns.
It is very important that at the dacha the eye rejoices not only with plantings, but also with the environment. About, and we have already told, it is time to talk about how to make fences for a summer residence with your own hands. Without them, the arrangement of a summer cottage is not complete, and therefore it is better to take care of creating a strong and good fence. And even better, it fits into the overall picture of what you are creating on your site.
Do-it-yourself fences for summer cottages cheap
Don't be put off by the length of the fence or its height. Let's start with the fact that the fence is easy to make with your own hands and quite budgetary, because if you have the desire and basic knowledge of the "fence theory", then you can safely proceed to the next step - the choice of materials.
Country fence can be made from:
- tree;
- picket fence;
- metal profile;
- grids;
- yes, anything!
You just have to choose what you like more and fit into the overall design.

Wood fence
The tree is one of the best materials. It looks noble, withstands bad weather perfectly, it can be purchased without problems and at the same time it is environmentally friendly.

It is not necessary to purchase an already prepared board. It is enough to get stock and leftovers that have accumulated in the backyard and are still suitable for use - for example, ranch fences allow the use of untrimmed and uneven board. You only need to dig wooden poles along the intended path and nail the boards to them in a horizontal position.

This is a fairly simple and cheap fence for giving, and given its environmental friendliness, then it is worth giving preference to just such fences.
In addition, depending on the length of the board, you yourself choose its direction, so you can build both a ranch fence and a simple vertical or horizontal fence that has long proven itself.

To install a wooden fence with your own hands, you will need:
- timber;
- boards;
- nails;
- hammer;
- shovel;
- sand.
If desired, cement and bitumen can be added to this list if you want the timber to be installed as stable as possible.
The principle of installation of a wooden fence is very simple. You dig holes for the support beam and fill them with cement or densely cover with sand, tamping it down. So the supports will not deform under the load of the boards and become more stable.

Then you just have to nail the boards to the pillars. If you want to fasten the boards vertically, then between the supports you will have to stretch and nail two planks, on which the boards will then be attached. If you still want to see a ranch fence on your territory, then it is enough to immediately fasten the boards from pole to pole. More details - on the video Ivan Galkin:
Do not forget only that the tree has its own shelf life and does not like moisture. Therefore, be sure to paint the fence after construction and periodically inspect it for damage in order to repair or replace the board in time.


picket fence
And picket fences are the most popular of the varieties. wooden fences. And no wonder, because the fence is so easy to install, economical to purchase and beautiful in finished form.


Before proceeding with construction, it is necessary to mark the territory where the building will be located, determine its height and frequency of installation of the picket fence. Although we install a fence for protection, but if the area is tightly closed, then we can deprive the plants of light, which will lead to crop failure.

A set of materials for building a picket fence is similar to what we cited above:
- beam for supports;
- board for horizontal screed;
- cement;
- sand;
- nails or screws.
Tools can be different - from a shovel with a hammer to a screwdriver and an electric drill. Only the speed of construction will depend on this, but not the quality of the fence.
First you need to install the pillars, which will become the basis of the fence. Therefore, dig holes for the timber at an equal distance from each other, but no further than the length of the board, which will serve as a screed for us. After that, install the supports and pour them cement mortar.
While the solution hardens (and this will take at least 3 days), you can proceed to the installation of sections. To do this, cut the board to a length sufficient to attach its ends to the support. We place the sections on supports with the help of nails or self-tapping screws and then attach the picket fence to them at an equal distance.
As you can see, the process of building a fence is quite simple and does not require special building skills - only patience to wait for the mortar to harden. After that, you can create a fence to your liking.


Well, in order to understand the intricacies of working with a picket fence and its installation, we recommend watching a video master class Andrey Krylov:
Metal profile fence
And yet, despite the beauty and cheapness of the fence and the tree as a whole, it has one drawback - such a fence is short-lived and its maximum service life is only 15 years. Therefore, many, wanting to save money, are looking for a more durable, affordable and strong material - a metal profile.

Due to its strength and availability, corrugated board has long been widely used by summer residents. It is used for beds, roofing and, of course, for fences.
The metal profile does not have the most aesthetic appearance, so most designers categorically bypass the profiled sheet when creating beautiful and original fences. But its accessibility and ease of use plays into the hands of summer residents, allowing you to make a good fence for giving your own hands.
The construction of such a fence is a little different from others. You will need all the same support poles and boards for a horizontal screed, on which the profile itself will be attached.

And since the metal profile is still not the most popular material for creating a fence, it’s worth dwelling a bit on basic requirements for its installation:
- The distance between the supports should not exceed 2.5 meters. And it is better to stop at a more frequent, half-meter installation. This is due to the fact that the profiled sheet is flexible enough and under the pressure of the wind it will deform, losing beauty and, most importantly, strength. Therefore, the shorter the sections, the better the fence will turn out.
- The supports must be immersed in the ground by at least 1.5 meters. Despite the flexibility of the metal profile, the sheet itself is quite heavy and requires stable support. Therefore, it is recommended that all supports be cemented at the base.
- It is best to use not a beam as a pole, but a pipe with a diameter of 6-8 cm and a wall thickness of at least 2 mm, such supports will definitely become a good basis for a stable and strong fence.
- It is recommended to use 3 horizontal lags when mounting the profile - top, bottom and in the middle. So the fence will be more resistant to deformation and it is better to keep its shape under any pressure.

And so that you are convinced of the simplicity of building such a fence, we suggest you watch the video master class of the channel Do it yourself 36, where they share with us all the tricks of working with a metal profile:
Mesh fence
And yet, one of the most budget options is a mesh fence. Like any metal product, the grid tolerates most natural phenomena. And even rust can be prevented by timely processing. Therefore, fences from it come out quite durable.

There are several types of mesh for fences:
- chain link, which is sold in rolls, is treated with polymers to prevent corrosion and is easily installed between poles without unnecessary partitions,
- corrugated, formed from a wire with a cross section of 6-7 mm and bent by a wave. It has a strong weave. And it keeps its shape well.
- Welded, has a smaller wire cross section than in the case of corrugated, but due to welding it is stronger. True, using it for a fence will be more expensive than in the case of a chain-link.
Fencing from any mesh can be made in two different ways:
- Stretch the canvas around the perimeter and attach to the support posts.
- Pull the mesh onto the frame, and then assemble the fence from the resulting sections.


Allows you to keep track of your pets
Both methods have their own characteristics, so it is impossible to single out one of them as more profitable or easier.
So, for example, with a simple stretch of the grid from post to post, you will reduce the time for preparing materials. After all, you will only need to drive in a support, determine the height of the future fence and stretch the mesh, attaching it to the posts with wire.

This method is easy to perform and practical if you are short on time and want to make a temporary fence.
And yet, it should be borne in mind that for the chain-link mesh, the pillars will have to be placed at intervals of 1.5-2 meters, and this will increase the budget for the material. While for a corrugated mesh, a distance of 3-4 meters is sufficient.

But if there are height differences on your site, then this is the only solution if you have chosen the mesh as the material. The sections are already prepared metal profile frames, which brings us to the limitation - if you install them downward, there will be an open space under the fence, which does not add either security or aesthetic beauty to the site.
Installation of sections is easier than stretching the mesh fabric. The finished frames are simply attached to pre-installed poles equipped with the necessary anchors, or even welded to them.

As you can see, the choice of grid and method depends entirely on your desire to ennoble the site, the time you have and, of course, the budget allocated for this.
To figure out which material is right for you, you can familiarize yourself with a detailed master class on selecting materials and installing it in a fence.
If you want more clarity and understanding of how to do everything right, with explanations from an experienced master, then you should watch a video lesson from the channel RemontHelp.com:
The grid itself consists of cells, i.e. your site will be clearly visible from the side of the street. Therefore, it is usually recommended to use this material only between areas, so as not to cover the plantings from the light.

Original ideas for a fence in the country from improvised materials
Every practical summer resident will consider it his duty to save as much as possible and use everything that remains from other projects. Therefore, before undertaking the construction of a fence with our own hands, we suggest thinking about whether it is worth rushing to the store for a net or picket fence? Maybe get by with improvised materials?
Then let's see what we have accumulated over the entire period of ownership of the cottage? And is it possible to make worthy fences out of this rubbish?
There is only one answer - yes, you can.
And car tires, and, and covers from them can become a fence or its decoration. And it will be no worse and no more boring than assembled from high-quality materials.
Tire fence
Let's start with tires. A lot of this good always accumulates, so over time the question arises of where to put them. Disposal costs money, and a fence will also bring benefits. The choice is obvious.

Somewhat eclectic

It remains only to fill the territory well and start installing tires on top of each other in a checkerboard pattern, as if laying out bricks, or fix them on a previously installed chain-link fence.
By the way, if you build a pyramid fence out of tires, then the earth in the protruding parts can be used for flower beds, thus creating a whole green wall.

Fence from plastic bottles
Plastic can be considered an ideal material for a fence. After all, it decomposes in at least 60 years, which means that the fence made of it will not suffer from rain or sun. Although bottle plastic is still soft, and at first glance its shape is not suitable for building a fence, many began to give it a chance and use it for other purposes.
To cover the whole country cottage area so " plastic fence”, you will need to accumulate a lot of bottles to create a full-fledged fence.
The small weight of the material makes it easily deformed from physical damage. In addition, if you have accumulated mostly transparent bottles, then such a fence will not provide protection from prying eyes. But the cost of the finished fence will be small.
If you combine bottles of different colors, you can collect whole mosaics. Therefore, creative individuals are willing to endure shortcomings for the sake of an original fence that attracts the attention of passers-by.
To create a complete fence from plastic bottles It is recommended to take the same type of material. And it can already be assembled into a wall, strung on a wire like a curtain, or exposed to each other, filling the voids with cement mortar. The result will depend entirely on your desire to strengthen the fence or make it more airy.

By the way, bottle caps will also come in handy. After all, you can make a movable fence out of them, and even with any pattern.
This will require a lot of covers with four drilled holes and meters of wire. Based on the colors that you have, select a pattern, or rather a pattern for beadwork, and then simply string the caps in order, as in embroidery, in rows. After that, pass the wire through the vertical holes, thus connecting the rows.

If you are just bored with the old fence, but you still want to use the covers, then just screw them with screws, creating a bright panel pattern on the fence. And now you have interesting wall on the site, attracting the attention of kids and pleasing your eyes.
A master class from Soloremont.
However, an ordinary palisade or an old picket fence can simply be painted in an original way.


funny pencils


You create your own mood and desire to visit the country house more often!
Do-it-yourself wattle in the country: a master class for lovers of rural romance
And if you have ever seen a Ukrainian farm or met huts in the south of Russia, then your heart could not remain indifferent to this peaceful romance. And not even these cute, like toy houses, sink into the soul, with thatched roof and whitewashed walls, and a wicker fence with clay hanging on it upside down.
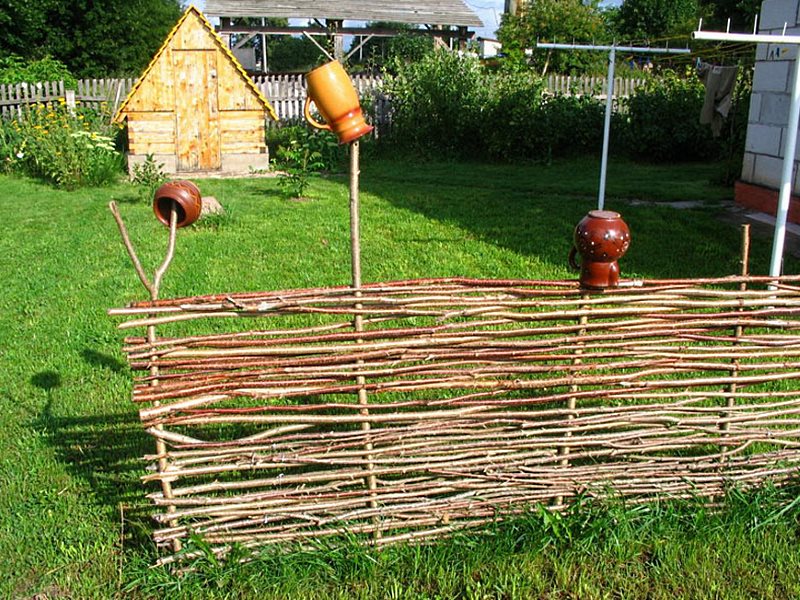
And yet, in addition to the decorative component, wattle is an excellent solution even for a modern summer cottage. Such a fence will not yield in strength to either a wooden or metal one. And in terms of beauty and attractiveness, it will be in the first place among them.
And from the point of view of economy, it fits well into our criteria. After all, weaving such a fence will allow you to realize your creative part, and save your budget.

Flowers are clearly visible
But first you need to prepare the material:
- timber or logs as a support and basis for weaving;
- material for weaving (willow rods are preferred, although rods of other trees are also suitable, the main condition is their plasticity);
- gloves;
- shovel;
- sand.
If you are going to weave along the already driven pillars, then first dig them in and fill them with sand, tamp. After that, you can proceed to the rods themselves. It is necessary to treat the rods with steam so that they become more ductile and do not break when deformed.

You can weave in different ways:
- horizontally, passing the rods in a figure eight between the pillars. This method was borrowed from weavers;
- vertically, between horizontally arranged lags. Such weaving comes out more decorative than practical. That is why it is used for fencing between neighboring areas, but not external ones;
- diagonally, forming the original wooden grid. This type of weaving is the most time-consuming, because the rods must be long so that the fence comes out at least of medium height. In addition, each rod is recommended to be dug into the ground for greater stability.

To understand the intricacies of simple weaving and try to make your first wattle fence, we recommend that you look at the video tutorial Oleg Bryukhanov, where he shares the secrets of creating a simple but beautiful fence.
If you prefer sectional fencing, then a master class will come in handy. Yura Kulakevich, where he shows how to create a wicker wattle base.
As you can see, a fence is not just a protective structure that hides a summer cottage from prying eyes, lovers of someone else's crops and stray dogs. A self-made fence is also a decoration of the territory, allowing you to enjoy every day spent in nature, among the plants planted by us with great love.


