There are many options for flooring in a private house. One of them is flooring on the ground - a multilayer structure that serves as a universal basis for any finishing materials.
The device of the base in this way has its pros and cons. Of the positive properties, the following can be noted:
- A wide range of heaters helps to prevent heat loss of the structure.
- The temperature of the soil located under the multi-layer floor structure never drops below zero.
- The load is distributed on the soil base - to produce complex calculations not necessary.
- No moisture or mold.
- The resulting subfloor can be lined with any floor material.
- Excellent soundproof properties.
- Fast and uniform heating of the room when installing water or electric heat carriers inside the screed.
There are also disadvantages:
- The dismantling of the structure for the purpose of repair, especially if the floor heating pipes are damaged, is a time-consuming and financially costly process.
- It is impossible to arrange such a floor with close passage of groundwater to the surface of the earth and loose soil in composition.
- The construction of such a design belongs to the category of expensive and taking a lot of time and effort.
- A significant reduction in the height of the room.

Features of the floor on the ground
The floor on the ground is a multilayer structure. Its features and properties are directly related to the quality and characteristics of the soil. The main requirement is related to groundwater, which should be located below 5 m from the surface of the earth. This will eliminate the mobility and swelling of the soil masses.

Formation of a flat, rigid surface for laying decorative flooring is main task Also, with its help, you can easily create a floor slope for natural drain water in the bathroom and shower on the first floor, bath or sauna.
The depth of soil freezing and the seismic activity of the construction region are also important.

Construction conditions
Reinforced monolithic concrete slab, which is a floor system on the ground, is made on a sand-gravel compacted base. Ballast bedding forms the base and cover of the required height and transfers the load from the slab to the ground.
The cost of measures to protect the slab from moisture depends on the depth of the passage of groundwater. With a depth of 3 meters and more problems will not arise.

To protect the structure from below from the effects of moisture and heat loss allows a layer of heat and waterproofing, laid on a supporting base. The soil can be protected from frost heaving by cutting off the cold bridge, which causes moisture to freeze. For this, the basement of the house with outer side insulated with sheet foam.

Requirements for the height of the floor relative to the strip foundation
There are no special requirements for choosing the height of the floor structure relative to the foundation tape. The only parameter that needs to be considered is the location of the front door and the ground level of the floor relative to it. It is important to avoid a serious difference in the height of the porch and the floor of the interior, providing for this nuance at the design stage.

With the correct manufacture of the doorway at the stage of pouring the tape support, the manufacture of the floor on the ground boils down to the fact that its top, taking into account the finishing layer, must coincide with the level of the threshold.

In the process of pouring strip foundation it is already necessary to have an idea about the location of the doorway and its parameters.
Material selection
A rough screed with a thickness of about 8 cm is poured over a layer of polyethylene film, and two more layers of polyethylene are overlapped on top of it to create waterproofing. At this stage, it is necessary to ensure the tightness of the connection of polyethylene sheets to each other.
A rough screed does not require special qualifications of the builder, but, nevertheless, it involves a large number of works associated with its creation. Features of the device and a calculator for calculating the amount of ingredients for a floor screed solution can be found in
The multilayer construction involves the sequential laying of layers: sand, and crushed stone or expanded clay on top. After that, a footing, protective layers and a finishing screed are formed, which will serve as the basis for finishing material. If the soil is too wet, then it is recommended to refrain from using expanded clay because of the ability of the material to absorb excess moisture and change its shape under its influence.
Sand and gravel in this design protect the room from moisture. At the same time, both layers are carefully tamped, and the crushed stone is treated with bituminous mastic.

The heat-insulating layer is created using the following materials (optional):
- extruded polystyrene foam;
- mineral wool
- foam glass;
- Styrofoam.

At the final stage, a reinforced finishing screed is laid. It is important to make it as even as possible, so the solution is poured along the beacons, controlling the process with the help of measuring instruments (level).
Requirements for the type of foundation
The presence of a foundation does not affect the properties of the floor on the ground, only the nature of its interaction with the main one changes. constructive element building.

Depending on the type of foundation - tape or column, the method of adjoining the floor system depends.

Columnar supports are arranged in such a way that the floor is in contact with the grillage, if it is low or located under it.

When the grillage is high, the resulting gap between it and the floor is closed during the pouring process with the help of boards and left inside the structure.

As for the slab foundation, it is a floor structure resting on a soil base. The device of the floor on the ground, subject to the existence of a strip foundation, is carried out in such a way that the floor is adjacent to its inner wall.
Types of structures
Regardless of the type of floor construction on the ground, it consists of several main layers.
Table 1. Floor construction
| floor construction | Laying process |
|---|---|
| 2. Pour a sandy layer. 3. Pour a crushed stone layer. 6. Lay a waterproofing layer of roofing material. 7. Lay a layer of insulation. 8. Fill in the finishing screed. 9. Lay the finish coat. |
| 1. Compact the soil base. 2. Pour a sandy layer. 3. Pour a crushed stone layer. 4. Lay a layer of polyethylene. 5. Fill the footing. 6. Lay a layer of insulation. 7. Pour the solution. 8. Lay the finishing material. |
| 1. Compact the soil base. 2. Pour a sandy layer. 3. Pour a crushed stone layer. 4. Spilled from above with a liquid concrete solution. 5. Lay a layer of insulation. 6. Pour the solution. 7. Lay the finishing material. |
| 1. Compact the soil base. 2. Lay a layer of polyethylene. 3. Fill the footing. 4. Lay a layer of insulation. 5. Fill in the finishing screed. 6. Lay the finish coat. |
| 1. Compact the soil base. 2. Fill and compact the sand layer. 3. The crushed stone layer is poured and compacted. 4. Fill the footing. 5. Lay a waterproofing layer of roofing material. 6. Lay a layer of insulation 7. Fill in a finished reinforced screed (without a gap) with coolants. 8. Lay the finish coat. |


Nuances to consider
The design of the floor is selected depending on the conditions of its operation. There are several leading factors:
- The level of operational loads. If they are over 200 kg, then the reinforcing mesh should have a bar diameter of 4 mm, if the load is less than the specified value, then 3 mm is sufficient.
- The distance from the earth's surface over which groundwater flows. It is recommended to take the highest value into account (during floods or seasonal snowmelt).
- The purpose of the design is with heat carriers (the "warm floor" system) or conventional. A floor with a water or cable heat carrier involves a 2 cm gap between the finished concrete coating and the wall along the perimeter of the room. The lower layers are adjacent to the walls.
Now in the construction market there are several varieties of "warm floors". They differ in the type of coolant and work efficiency. How to choose a warm floor? We'll tell you in

Question answer
Table 2. Most popular questions
| Question | Answer |
|---|---|
| Are broken bricks and construction debris suitable as a replacement for crushed stone in the bedding | Chipped brick will not cope with the protection of the slab from moisture. They are also not suitable as a leveling bed due to the difference in size. individual elements, which are not subject to high-quality ramming and do not ensure the normal operation of the entire floor structure. |
| Is it possible to abandon the mesh for reinforcement and replace it with unrelated bars | Reinforcement will only “work” correctly when using rigidly fixed bars that form 10 x 10 cm grid cells. |
| Is it possible to use expanded clay in bedding instead of crushed stone | Expanded clay is not suitable as a material that protects the floor from below from the capillary action of moisture, since it itself absorbs moisture and changes under its influence. Although as a leveling layer on dry ground, this light, inexpensive material quite suitable and can replace gravel. |
| Is it possible to perform pouring instead of a footing device | If the purpose of laying crushed stone and sand is to create a layer that prevents the passage of moisture, then spilling will prevent the crushed stone from coping with its function. |
| Can polyethylene under the rough screed replace the waterproofing layer | No, since this layer is technological, protecting the bedding from cement laitance. |
| Is it possible to refuse screed reinforcement | No. This process can be abandoned only when the footing is installed. |
| Is it possible to refuse to perform the footing, and lay the waterproofing and insulating layer directly on the bedding. | Lay the waterproofing layer on a flat, solid base - this allows you to extend its service life. The same applies to the laying of insulation, which must be fixed motionless and not provoke the formation of cracks on the floor surface. |
Features of heat and waterproofing
The role of the thermal insulation layer is as follows:
- To reduce or eliminate heat loss.
- In protecting the structure from moisture coming from the ground.
- In the soundproofing of the room.
- In the exclusion of the process of vaporization.
- In creating optimal microclimatic indicators.

When installing a simple floor on the ground, it is possible to use a conventional plastic film. The process goes like this:
- When laying polyethylene (150 microns) on a finished, compacted base, the film sheets are overlapped (15-20 cm) and the joints are carefully glued with adhesive tape. The edges along the perimeter of the room lead to the walls to a height of 10 - 20 cm. To be sure of the reliability of the waterproofing layer, the film laying procedure can be done twice, carefully fixing the material each time.
- The thickness of the insulation (foam or expanded polystyrene) should not be less than 10 cm. Due to the fact that the foam is afraid of moisture, it is protected from both sides in the manner described above.
- A reinforcing mesh with 10 x 10 cm cells and a wire diameter of 3 mm is laid on top of the insulation.
- After that, the screed is poured to a height of 5 cm.

Important! Do not neglect the external insulation of the foundation, the blind area and the organization of water drainage from the basement.
This way of organizing the floor has its pros and cons. Of the positive qualities, the following can be noted:
- Suitable for most soil substrates.
- High-quality insulation of the foundation increases its resistance to the load during frost heaving of the soil.
- The consumption of the solution is less than with the construction of a slab foundation.
- This floor is durable.
- There is no need to carry out additional insulation of pipes and other communications passing through the floor structure.
- Suitable for laying finishing material.
- There is no need to create high-quality ventilation of the underground space.
The disadvantages include the fact that the cost of work may increase with the construction of a high base.

The location of the reinforcement in the screed array depends on the presence of coolants in it. If it is a warm floor, then the reinforcing mesh is placed above the pipes and about 3 cm of the screed layer is provided on top. In an ordinary floor, the mesh is placed approximately in the middle of the screed array (3 cm to the top).


Manufacturing technology
Before proceeding with the pouring of the floor, it is important to carefully prepare the base, consisting of several layers. The main recommendations are to use a fine-grained filler in the concrete mix and lay it on the lighthouses in one go.
Underlayment
This layer consists of a compacted sand cushion and crushed stone bedding (fraction 30-50 mm) with a height of 7 to 10 cm each. The purpose of this layer is to protect the bottom of the slab from moisture from the soil and as a leveling base.
The features of the soil that must be considered before proceeding with the installation of the floor include the following:
- It is important to remove the vegetation layer of the soil when preparing the base. Otherwise, due to shrinkage, the concrete structure will simply collapse.
- Sand is used when groundwater is low to the surface, as it is able to absorb moisture.
- When using crushed stone on wet soil, capillary rise of moisture is excluded.

Important! It is possible to replace the footing if the layer of rubble is leveled with sand so that the layer laid on it waterproofing film not damaged. Previously, cement milk is used to pour the underlying layer.

To reduce the cost of work and get a quality result at the stage of preparation and design, it is necessary to take into account some of the nuances:
- After laying the finishing material, the level of the finished floor must match the level of the threshold of the entrance opening.
- It is necessary to prevent the floor screed from resting on fragments of the plinth or foundation that protrude from the internal walls.
- In the process of tamping the sandy layer, it is irrigated, and not spilled through with water.
Underlayment and waterproofing
The purpose of the waterproofing material is to prevent the insulation and screed from getting wet due to moisture.
- When guiding bituminous roll materials, two layers are created. The overlap is at least 15 cm with a perpendicular arrangement.
- When using a film, the direction of gluing the sheets does not matter. The main thing is to overlap and carefully seal the joints.
- The EPDM membrane is laid in one layer.

The device of a footing with a height of 5 to 10 cm allows you to make an even and rigid base for a waterproofing layer (sticking a film, fusing bitumen). Otherwise, when using rolled bituminous materials or PVC film, their laying becomes much more complicated due to the divergence of the joints on loose ground.

Important! To create a rough screed, it is possible to use lean concretes, in which the cement content is minimal. It is not necessary to reinforce this layer. Under the ban, rigid fixation of a rough screed with a foundation and a plinth.
Insulation laying
As a damper layer, strips of insulation or a tape of the same name are used. Tape sticks directly to inside foundation or plinth around the perimeter of the room.
The thickness of the insulation (from 5 to 15 cm) is taken in accordance with the operating conditions in the construction region.
Being, in fact, an overlap, the floor on the ground is not fixed rigidly to the walls of the room. Therefore, it has the following qualities in the field of insulation:
- The places of contact between the floor and the base, due to the presence of the lower insulated layer, are completely protected from heat loss.
- With the help of a damper layer installed along the perimeter of the room between the screed and the wall, the room can be protected from vibration and noise.
- Sealing and leveling work, which is required when laying the slabs, will not be required in this case.
- The advantage is the lack of free space (subfloor) under the floor structure.

A floating screed involves, before pouring the solution, the establishment of utility lines in the room - heating, cold and hot water supply, sewerage.
It is important to understand that input nodes with a similar floor design have zero maintainability. Therefore, in order not to resort to the destruction of the screed, the risers are laid inside pipes of a larger diameter, so that it is possible to perform timely replacement or cleaning of pipes.

Concrete pour options
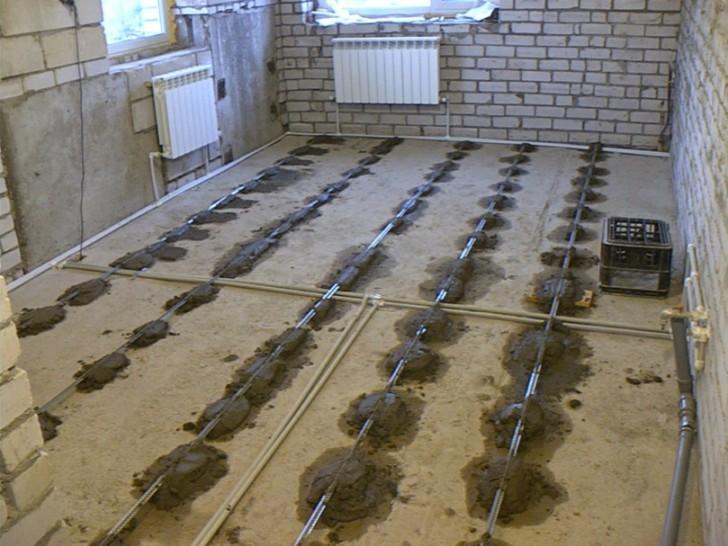
Plaster beacons or metal profiles, which are used when pouring the mortar, can increase the productivity of the work performed and obtain a high-quality coating.
The peculiarity of the work is that it is impossible to walk on the reinforcing mesh in the process of pouring the floor, so there are two ways to perform the work.
When pouring the solution from the far corners of the room towards the door, the reinforcing mesh inside the concrete is given the necessary level of rigidity, so the free sections of the reinforcement do not move. This method is called "tracks".
Movement around the pouring area can be carried out with the help of ladders - suitable supports made of bricks or timber installed in the cells of the grid, on which the boards rest.
After 3 days, you can finish the floor.
Prices for reinforcing mesh for screed
reinforcing mesh for floor screed
Video - Do-it-yourself floors on the ground
When building private houses, the least expensive way of arranging is concreting the floor on the ground. In the process of performing this work, a reinforced screed is poured onto the compacted soil, a waterproofing layer is laid, and thermal insulation is performed.
With proper observance of all technological subtleties a solid rough base is formed on which any type of flooring can be laid. In addition, in this case, there is no release of radon into the environment. Concreting on the ground is not particularly difficult, this work can be done by hand, you just need to know how to do it right.
Concrete floor in a private house on the ground is quite popularThe scheme and conditions for pouring a concrete floor in a private house on the ground
In order to qualitatively equip concrete floors in a private house, certain conditions must be observed. These include the following circumstances:
- the need to form a solid base for the installation of a finishing coating;
- there should be no contact of the floating screed with the walls.
The floating screed is supported by well-compacted soil, so it is not threatened with deformation as a result of subsidence or swelling.
In addition, there is no need for underground ventilation, there is no accumulation of radon, and heat loss is reduced. Financial costs for the construction of the formwork are also excluded, since soil acts as its lower part. Schematically, a concrete floor on the ground is made as follows:
- the upper part of the soil is removed, which is difficult to compact fertile layer, the base is compacted;
- alignment is provided with an underlying layer of up to 40 centimeters of sand or gravel;
- to prevent damage to the waterproofing layer, it is carried out under concrete screed;
- then waterproofing material is laid;
- on top of it - a heater;
- then a concrete solution is poured onto the reinforcing mesh;
- to prevent contact with the walls, a damping layer is laid along the perimeter;
- with the help of special corners, an expansion joint is made.
 Scheme of the device of the concrete floor on the ground
 Such a do-it-yourself flooring scheme makes it possible to ensure high performance of a concrete floor poured over the ground. Trying to save on its arrangement, some owners of private houses exclude from the scheme the implementation of individual elements of preparing a concrete screed, which leads to the risk of damage to it in the future.
When performing work, it must be understood that a floating concrete screed is not a power element, therefore, for separately located structures with significant weight, a fundamental foundation is made.
Do-it-yourself step-by-step floor concreting technology
Before proceeding with concreting, it is necessary to mark zero level gender. Then you need to properly prepare the base, while not forgetting about engineering communications. Next, a pillow is made with a pile of crushed stone and sand, and an underlying layer is laid on it.
Next, waterproofing, insulation and reinforcement of the structure are carried out. The formwork and guides are mounted, the concrete solution is prepared, and it is poured. A separate foundation is provided for junctions, partitions, walls and stairs.
 An example of the stages of laying a concrete floor on the ground
 It is necessary to fill the floor with concrete along the lighthouses. It should be understood that it is necessary to equip a concrete floor on the ground only if private house regularly heated, otherwise deformation and destruction of the coating will occur due to freezing of the soil.
The advantage of this design is the ease of implementation installation work, strength and reliability of the base, high resistance to negative ambient temperatures. An important factor is the low cost Money compared to traditional floors.
First, mark the "zero" level of the floor
In order to mark the zero level of the floor, the following steps are performed. At a height of one meter from the future floor surface, marks are made on the door jamb and all corners of the room at the same level, which are connected by a common line. Now, in order to set the floor level, you should step back from the markup down, based on the level of the highest point of the prepared base, where another line is drawn, indicating the zero level of the floor.
 Zero level marking scheme for arranging a concrete floor on the ground
 The concrete mixture will be poured along it. The desired thickness of the coating is achieved by moving the markings to the appropriate distance. The use of a laser level greatly facilitates the implementation of these manipulations. Nothing prevents you from setting the correct level with the help of a conventional hydraulic level in the form of a tube of water.
Then prepare the base
To prepare the base for pouring concrete, its surface is cleaned of different kind garbage. Then the arable layer is removed, since organic compounds are always present in it, which, decomposing, will lead to subsidence of the concrete screed if they are left in the base. Soil extraction is carried out to a depth of approximately thirty-five centimeters from the zero level of the floor, this is the total thickness of all layers of the concrete floor.
Then the soil is compacted. It is best to use a vibrating plate for this, but if it is not available, an ordinary meter-long log can be adapted to perform this work. To do this, a board is nailed to its lower part, and a rail is attached on top as a handle.
 It looks like tamping the soil manually
 The use of such a tool is costly. physical strength. After compacting the soil in one way or another, a dense base is formed, when moving along which there should be no prints of work boots.
Don't forget about communications
When concreting on the ground, one should not forget about engineering communications. Repair of network entry points in a floating concrete screed is not possible, so plumbing and sewer pipes placed in pipes of larger diameter so that, if necessary, they can be removed and replaced from there.
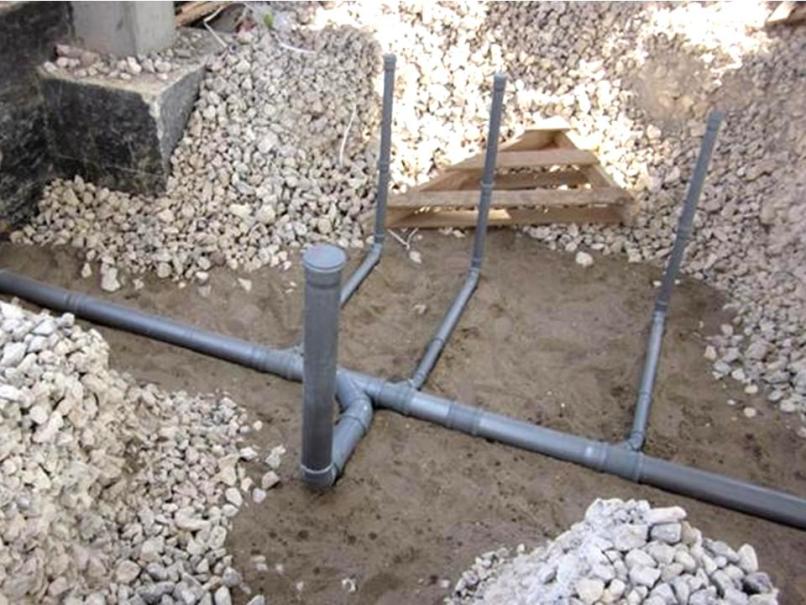 Obviously: sewers must be laid before concrete is poured
 The ground under the heated house does not freeze, so the water lines are buried by a value of about one and a half meters, and one meter is enough for sewer networks, since the sewage is warm enough. Power electric cable is laid under the house at a depth of fifty centimeters.
Now you need to make a pillow of rubble and sand
A pillow is laid on the compacted soil, which is about eight centimeters of crushed stone and sand. It protects the structure from the influence of soil water that has risen during the period of rains and snowmelt. In addition, the arrangement of the pillow allows you to better align the base.
 After the sand has been properly compacted, the builder's shoes should not leave marks on it.
 First, a layer of sand is poured, moistened with water and compacted, followed by a layer of gravel, consisting of fractions, with a diameter of about five centimeters. The sharp edges sticking out are sprinkled with sand, and the pillow is leveled.
Underlay required
The underlying layer serves as a support for the floating concrete base. The underlying layer is compacted in layers of fifteen centimeters.
 An example of the arrangement of the underlying layer of crushed stone
 Sand can be used for its manufacture only at a low level of groundwater, as it has a good ability to absorb moisture. In soils with a high level of moisture, crushed stone should be used, since in this material the rise of water through the capillaries is impossible.
Arranging insulation and waterproofing
 Waterproofing can be done, for example, with a polyethylene film
 Warming can be carried out using a wide variety of materials. Most often, foam, mineral wool or expanded clay is used for these purposes. Installation of the selected insulation is carried out in accordance with the recommendations of the manufacturer of this type of product.
 Styrofoam used as thermal insulation
 Reinforcing the structure and laying the "warm floor"
Reinforcement of the structure is carried out using a mesh made of metal or plastic. Lay it on pre-made stands, the height of which is approximately 2.5 centimeters. This is done so that during the curing of the poured concrete, the reinforcing mesh is inside it, providing the required strength characteristics.
 Plastic fittings for the floor are quite appropriate, linings are a must!
 In the event that significant loads on the base are expected, reinforcement is performed from reinforcement rods up to one and a half centimeters thick. The laying of a warm floor is provided by a 2-cm thermal gap between the floating concrete screed and the wall ceilings. Cracking and damage to the concrete can occur if the gap is not left.
 An example of installing a water-heated floor after insulation and fittings
 Installation of formwork and guides
The surface on which the concrete mixture will be poured is divided by guides made of wooden bars or a metal profile into cells with a side of about two meters. They should be well fixed with a thickly mixed solution and be sure to be placed on the same level, as they act as beacons for leveling the surface. Laying guides is carried out according to a pre-compiled scheme.
 The lighthouses have been set and the concreting can begin.
 To ensure the separation of the concrete layer into fragments, a formwork made of boards or moisture-resistant plywood is placed as guides. The whole structure is carefully leveled using a building level, wooden blocks or boards are placed under the formwork elements in the right places, which are hemmed in the upper part. To facilitate the removal of the formwork after pouring the mixture, it is lubricated with oil.
Mortar preparation and pouring
The solution is prepared from 1 part of cement, 2 parts of sand, 4 parts of crushed stone and 1/2 part of water. The composition is thoroughly mixed to the desired consistency and is first poured into the cells most remote from the entrance in order not to walk on the concrete mixture until it is completely cured. Of course, before pouring the floor, you need to remember to insulate it.
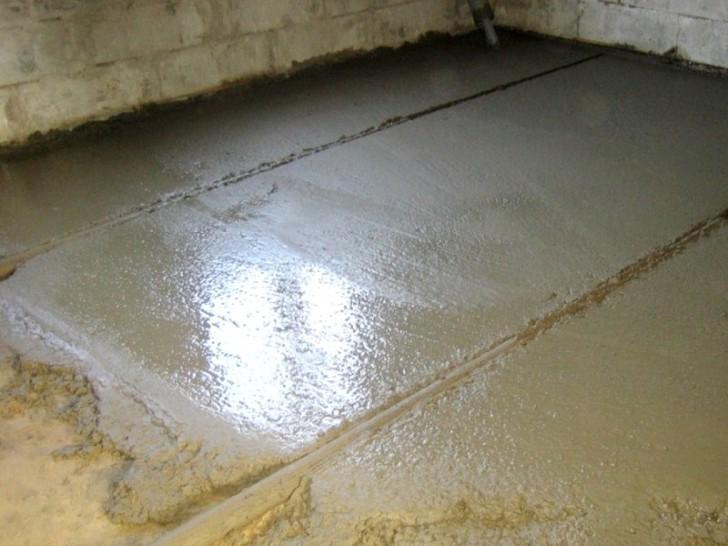 Concrete laying on lighthouses
 After filling in several cells, the surface is leveled with reciprocating movements of the rule. Having poured the solution over the entire area of \u200b\u200bthe base, it is necessary to give it time for complete curing, covering it for this period with a waterproof film. To prevent cracking of the surface, it should be periodically sprayed with water.
Junctions, partitions, walls and stairs
To reduce heat loss in the junction nodes, a single layer of heat-insulating material is laid. Partitions, walls and stairs exert significant local pressure on the floating screed, which is not a load-bearing element of the structure, so a separate fundamental base is arranged under them. You can do it differently and in the right places increase the thickness of the concreting to the required level.
 Penoplex is laid in the places where concrete adjoins the walls
 Arrangement of the floor in a wooden house with an underground
To arrange a concrete floor in a wooden house with an underground, first of all, you should properly prepare the base. Then the supports are installed, and the logs are fixed. Next, the mortar is poured onto the manufactured flooring.
In this case, there is a gap filled with air between the floor and the soil, and in regions with severe winters this helps to save heat. In addition, the washing away of the concrete structure by groundwater located close to the surface is prevented.
When preparing the base, fertile soil is removed from the surface of the earth. Instead, a layer of 15 cm of ordinary soil is placed, and it is compacted. This manipulation is repeated with gravel poured on top.
 Preparing the base for the floor
 A mixture of limestone and gravel, which can be replaced with crushed brick, covers the prepared base. An additional layer of waterproofing should be laid on top of the compacted soil.
Arrangement of supports
The supports for the logs are made of red brick and are columns with wooden bars fixed on top, treated with an antiseptic composition approximately three centimeters thick. They are placed evenly over the entire area of \u200b\u200bthe base at a distance of 70 cm to one meter between the posts. To prevent the aggressive effects of water, the supports are wrapped in sheet waterproofing material.
 Supports are ready for laying the log
 We fasten the logs
Logs are strengthened on the supports, made of logs cut in half, treated with a composition that prevents the development of pathogenic microflora in them. The joints should be placed above the supports, while maintaining a gap between the logs and the walls of approximately 3 cm. The fabricated structure must be carefully leveled using a building level, and the maximum height difference should not exceed 3 cm.
We equip the flooring and pour concrete
The most reliable arrangement of the flooring is made of uncut boards tightly nailed to the logs, a layer of waterproofing laid and the subfloor boards fixed on top. The mixture is poured onto the flooring in the usual manner. In the corners of the underground, square ventilation holes with a side of ten centimeters, covered with a mesh made of metal.
Updated: 19.02.2019
May differ from , although specific differences depend on:
- groundwater level;
- planned load on the floor;
- use of "warm floor" technology.
If groundwater lies closer than 2 meters from the surface, then the presence of waterproofing is mandatory, as well as "pillows" of sand and coarse gravel. The use of a "warm floor" implies a 2-centimeter thermal gap between concrete and walls, otherwise the fill may be damaged during operation.
The filling procedure must be carried out in compliance with a number of requirements:
- the soil should not be mobile;
- groundwater must lie at least 5 meters;
- the ground must be dry.
In winter, the room must be heated, otherwise the structure may be deformed due to freezing of the soil and, as a result, mechanical loads will increase.
Note! If we are talking about a house that is still under construction, then the flooring should be started only after the roof is ready. So subsequent work will be performed as efficiently as possible.
Stage 1. Definition of the "zero" level
First, determine the "zero" (fill level of the solution), which should be equal to the bottom of the doorway, and mark it around the perimeter. To do this, make marks a meter from the bottom of the opening (as shown in the diagram) and transfer them to the walls of the entire room (obviously, it is better to use a laser level for this). Further, from these marks, measure back 1 meter down and draw the second line - it will be the “zero”, along which the floor will be filled. In order to simplify the procedure, hammer nails in the corners and stretch the cord.
Stage 2. Foundation preparation
After determining the "zero" level, take out construction debris and remove the fertile soil layer. The floor in our case will be a multi-layered "pie" approximately 35 cm thick. Therefore, remove the soil until the depth from the "zero level" is equal to the thickness of the future "pie".
Next, tamp the surface. It is advisable to use a vibrating plate for this, although in its absence you can take an ordinary meter-long log, nail a board from below, and two handles from above, and compact the soil with such a tool. The result should be an even and, most importantly, dense base. From walking on such a basis, no traces should remain.
Note! If it happens that the soil level is lower than 35 cm, then simply remove a little fertile layer, tamp and fill it with sand to the desired mark. Then compact the sand itself.
To improve the waterproofing properties of the base, cover the “native” soil first with a layer of clay, then sand, pour water over it and compact it thoroughly.
Stage 3. Further backfilling
Having finished with the main layer, start backfilling the gravel. Fill the material with a layer of 10 cm, pour and tamp. To facilitate thickness control, drive a number of pegs of the required thickness into the base and set them at a single level. After tamping, pull them out.
Cover the sand with a similar layer of crushed stone (fractions of the latter should be approximately 5 cm). Compact the rubble, sprinkle a thin layer of sand on top, level and tamp. If you notice that protruding edges of rubble remain on the surface, then remove them or lay them in a different way. Remember that the result should be a flat plane without any corners.
Note! Check each filled layer with a mounting level.
Stage 4. Isolation
For waterproofing, you can use an insulating membrane or ordinary polyethylene film, the thickness of which will be equal to 200 microns. Cover the entire area of \u200b\u200bthe room with an overlap of several centimeters with material, bring the edges to the walls slightly above the “zero” level. Seal all joints with tape.
There are a lot of materials for thermal insulation, you can choose any. So, for a concrete floor may be suitable:
- expanded clay;
- isolon;
- Styrofoam;
- moisture resistant plywood;
- mineral wool, basalt wool;
- perlite;
- expanded polystyrene (both regular and extruded).
Stage 5. Reinforcement
In order for the future floor to be strong enough, it should be reinforced. You can use both metal and plastic mesh for this, and if large loads are planned, then tie reinforcing bars 0.8-1.6 cm thick together by welding.
Do not lay rebar directly on the base pie. Use small pegs ("chairs") - lay them in rows, substituting a plate cut from asbestos under each to raise it to a height of at least 20 mm. In this case, the reinforcement will be inside the concrete screed and form one whole with it.
Note! Using plastic mesh, pull it over pegs driven into the ground, with a similar purpose.
Stage 6. Formwork and guides
In order to withstand the "zero" and at the same time facilitate the filling procedure, install the guides. First, divide the room into equal segments no more than 2 m wide, then divide them with guides. For the manufacture of the latter, you can use both bars or boards, and iron pipes. Make sure that the height of the guides is equal to the "zero" level. Lock them thick cement mortar.
Then proceed to install the formwork between the guides, forming special "cards" (identical rectangles, the dimensions of which are selected in such a way that each of them is poured in one go). The use of "cards" will greatly simplify the work, especially on a large area, and will help to withstand the "zero". For the manufacture of "cards" use fresh boards (not dry) or moisture-resistant plywood.
Note! Align the guides with the formwork under the "zero" level, otherwise the floor may turn out to be uneven. Use the building level for this. Also, treat these elements with a special oil (such as Agat-C5, for example) so that they can be easily removed from the concrete.
Stage 7. Preparation of the solution and pouring
Fill the solution in a maximum of two passes, although it is advisable to do this in one. To this end, you can order "factory" concrete (it will be delivered immediately in large quantities) or do the cooking yourself (it will cost less). If you resort to the second option, then you will need:
- shovel;
- concrete mixer (you can rent it);
- "four hundredth" or "five hundredth" cement;
- crushed stone;
- sand;
- one assistant.
| Concrete grade | Mass composition, C:P:Sh, kg | Volumetric composition per 10 l of cement P/Sch, l | |
|---|---|---|---|
| 100 | 1: 4,6: 7,0 | 41/61 | 78 |
| 150 | 1: 3,5: 5,7 | 32/50 | 64 |
| 200 | 1: 2,8: 4,8 | 25/42 | 54 |
| 250 | 1: 2,1: 3,9 | 19/34 | 43 |
| 300 | 1: 1,9: 3,7 | 17/32 | 41 |
| 400 | 1: 1,2: 2,7 | 11/24 | 31 |
| 450 | 1: 1,1: 2,5 | 10/22 | 29 |
| Concrete grade | Mass composition C:P:Sh, kg | Volumetric composition per 10 liters of cement P/Sh, l | The amount of concrete from 10 l of cement, l |
|---|---|---|---|
| 100 | 1: 5,8: 8,1 | 53/71 | 90 |
| 150 | 1: 4,5: 6,6 | 40/58 | 73 |
| 200 | 1: 3,5: 5,6 | 32/49 | 62 |
| 250 | 1: 2,6: 4,5 | 24/39 | 50 |
| 300 | 1: 2,4: 4,3 | 22/37 | 47 |
| 400 | 1: 1,6: 3,2 | 14/28 | 36 |
| 450 | 1: 1,4: 2,9 | 12/25 | 32 |
Video - How to mix concrete or how to make concrete
To prepare the mortar, pour cement, sand, crushed stone and water into a concrete mixer in a ratio of 1: 2: 4: 0.5 and mix everything until a homogeneous mass is obtained. Pour the finished solution from the corner opposite the front door. After filling in several "cards", level the solution with a shovel and spread it around the perimeter. To compact concrete, use a vibrator - it will not only compact the mixture, but also remove air bubbles from it.
Having processed the filled cards with a vibrator, proceed to leveling. To do this, you need a 3-meter rule - put the tool on the guides and pull it towards you. This will remove excess solution. In the aligned "maps", dismantle the formwork and fill the resulting voids with concrete. When the entire floor is filled, cover it with plastic wrap and leave for two to three weeks to dry completely, do not forget to periodically moisten the surface with water.
After this time, you can apply a self-levelling mixture to the finished floor, which is able to smooth out minor defects and make the surface perfectly even. Wait three more days for this mixture to dry.
Such a floor is distinguished by the presence of an air layer between the soil and the screed, which is advisable in those areas where the level of soil moisture is increased, that is, if groundwater is closer than 2 meters from the surface. Also, this technology can be used when the site is located in the northern region of the country, and the heating system will work periodically.
Note! It is very important that the ground level be at least 10-15 cm below the concrete floor. If the gap is large, then heat loss will increase, and if it is smaller, then ventilation will be less effective.
Consider how the flooring technology in this case differs from that described above.
Stage 1. Preparation
Prepare the soil first.
Step 1. Remove the vegetation layer and fill in with regular soil instead. Pour the soil with water and tamp in such a way that in the end the layer height is approximately 15 cm.
Step 2 Pour gravel on top, re-tamper.
Step 3 Cover the finished base with a crushed stone-lime mixture (although it can be replaced with broken bricks or, for example, construction waste).
Next, at the same distance from each other (about 70-100 cm), install brick posts under the logs. Use red brick for this, but in no case silicate. Having installed the posts, cover each of them with roofing material for the purpose of waterproofing, and on top of it attach bars of 3 cm thickness, pre-treated with an antiseptic.
Stage 3. Lags
For the manufacture of lags, use halves of logs, also covered with an antiseptic. The joints between the lags should be located above the posts, but place the extreme lags 2-3 cm from the surface of the walls. Check the logs with a level, if necessary, place wooden bars under them. Remember: the maximum allowable horizontal unevenness in this case is only 3 mm.
Note! Instead of brick for posts, you can use metal pipes.
Step 4. Next steps
Nail the floorboard to the joists. Try to keep the boards as tight as possible. If you wish, you can use a more reliable scheme:
- 1 layer - uncut boards;
- 2 layer - waterproofing;
- 3 layer - floorboards.
The subsequent stages of pouring are no different from those described above.
Note! High-quality ventilation is required in the underground, so make ventilation windows measuring 100x100 mm in the corners. Close the windows with metal bars. Equip special air vents in the basement (at least two per room).
Video - Arrangement of the floor on the ground
This set of rules applies to the design of floors in industrial, warehouse, residential, public, administrative, sports and domestic buildings. Free download
From this article you will learn:
- What are the advantages of a subfloor on the ground
- What layers should the rough floor on the ground consist of
- How to make a rough floor on the ground with your own hands
- What do professionals advise regarding the subfloor on the ground
Building a house in Moscow is a long and multi-stage process, including work of a completely different nature and complexity: laying the foundation, erecting walls, roofing, finishing and a host of other processes. Among the main stages of construction is a rough finish, in particular, pouring the screed. Its essence is to create a base on which a finishing coating will subsequently be installed. finishing materials. Despite the fact that the draft floor on the ground is often subject to a builder of any qualification, it has a number of nuances and requires various kinds works. This article will talk about them.
What does a draft floor on the ground mean?
This method is applicable to any type of soil, regardless of the proximity of groundwater. A high-quality and reliable rough screed on the ground is provided with concrete grade M300 and higher. In particular, use more high class concrete is needed for a floor that is expected to be heavily loaded or if the soil properties are unsatisfactory. In this case, a reinforcing mesh is also required.

All recommended options necessary materials specified in the design documents. If there are none, it is necessary to make the appropriate calculations yourself, taking into account all the conditions for the further operation of the floors.
Benefits of a subfloor on the ground
Among the advantages of carrying out a screed on the ground, the following are distinguished:


Subfloor layers on the ground
In order for the filling of the subfloor on the ground to be of high quality, it is necessary to take into account all the following layers:
- compacted base;
- a mixture of purified and sifted river sand with gravel;
- rough concrete screed;
- vapor barrier membrane or other insulating material;
- insulation made of expanded polystyrene or other similar material;
- polyethylene film;
- reinforced concrete screed;
- flooring, which, if necessary, can be laid on a special substrate.
This diagram is not the final version. The stages may vary depending on the characteristics of the soil, types of flooring and other nuances.

Do-it-yourself rough floor on the ground: step by step instructions
Step 1. We prepare the base.
First of all, the zero point is searched using a level (and adjusted for the relief and surface level). This will make it possible to objectively assess the scope of the forthcoming work with the soil. The surface of the earth is carefully compacted in order to reduce the risk of subsidence of the soil and cracking of the finished floor.

- the first layer should be 25% higher than necessary;
- the poured layer is moistened and rammed, due to which the thickness comes in line with the original calculation;
- compaction is carried out by means of a vibrating machine or a roller.
A layer of gravel or expanded clay is poured on top of the sand, which will make the sand layer denser and become a solid foundation for the following layers.
Step 2. We produce sub-floor concrete.
The first layer of the subfloor is lean concrete. It performs technical functions, being the basis for vapor and waterproofing. For the rough screed, lean concrete (class B 7.5-10) with crushed stone filler (fraction: 5-20 mm) is used. When using gravel bedding, the screed can be poured with concrete of class 50-75.
Filling the first screed is not troublesome and does not require adherence to precise technology. The thickness of the rough layer should vary between 40-50 mm and not exceed 4 mm horizontally in accordance with the level.

Step 3. We carry out waterproofing of the rough base.
To eliminate capillary suction of moisture from the soil, waterproofing of the floor should be carried out.
- The most suitable for waterproofing will be bitumen in rolls or a polymer membrane. Sometimes a gasket made of a single piece of thick polyethylene film is allowed. If the material is joined, it must be overlapped, followed by sealing the seams with construction tape. It is necessary to inspect the surface of the materials for integrity damage or manufacturing defects.
- The insulating sheet is displayed on the walls by about 15-20 cm. After laying the finishing screed, excess material fragments are removed.
- Sometimes it is impossible to lay waterproofing in front of the rough screed. In this case, a concrete base is poured, on which a coating waterproofing layer of bitumen or polymer is applied.

Step 4. Insulation of the subfloor on the ground.
The next step is the installation of a vapor barrier layer. The most suitable material for this is a polymer-bitumen membrane, based on fiberglass or polyester. Despite the high quality and durability, the price of such material will pleasantly surprise you. A more expensive analogue of such a material is a polyvinyl chloride membrane. However, in this case, a high price is by no means an indicator of durability. In practice, such material is subject to rotting and other damage.
The vapor barrier layer will help save a lot of money on space heating, because the level of heat loss during its use is reduced by 20%. The laying of this layer is the key to creating warmth and comfort in the house.
Warming is carried out using materials such as:
- Extruded polystyrene foam is one of the the best options insulation that protects the floor from frequent deformations during compression and withstands heavy loads.

- A variety of polystyrene foam is PSB50 and PSB35 class foam. The first option is for garages, storage or industrial premises, the second - for dwellings. To avoid damage to the foam plastic with cement mortar, foam sheets are sheathed on both sides with a polyethylene film. Such insulation will be quite reliable.

- Another common option for insulation is mineral wool. However, such a material is able to quickly absorb moisture from the cement layer and screed. Therefore, as in the case of foam, mineral wool must be insulated on both sides with polyethylene film.

Step 5. Reinforcement.
It is important not to confuse the rough floor screed on the ground with the foundation, which experiences loads from heaving forces. In this regard, a single-layer reinforcement with a welded mesh of rods with a diameter of 3-5 mm will be sufficient.
It is important to take into account some of the nuances:
- The mesh should be laid as close as possible to the base of the structure (in the concrete tension zone).
- The thickness of the protective layer should be from 1.5 to 2 cm, so the mesh is mounted on polymer or concrete pads placed on polystyrene foam.

Along the perimeter, the structure must be protected with a similar layer. Most often, cards with a cell from 10x10 to 15x15 cm are used. In this case, the overlap must affect at least one cell. The contour of the warm floor is placed on the grid and fixed with nylon clamps.
Step 6. Damper layer and fill.
The screed is separated from the walls, grillage, plinth and foundation by means of a damper layer. It is formed from strips of expanded polystyrene installed on the edge, which are placed along the perimeter of the enclosing structures. Another option is to stick a special tape on the walls also around the entire perimeter. The height of such a damper must exceed the thickness of the subfloor on the ground. Excess parts will be cut off at the stage of installation of the plinth.

It is worth noting that the screed of the subfloor on the ground is done in one step to ensure the greatest resource of the structure. For large areas (over 50 m2), expansion joints are created from a special profile.

To make it easier to level the layers, plaster beacons are often used, which are attached to a quick-hardening solution of gypsum or starting putty.
Then a mixture is applied between the beacons, which is leveled by the rule. Beacons can be left embedded in the floor or removed after the mixture has set a little. The resulting gutters can be filled with concrete and leveled again. To prevent cracking, the surface must be moistened periodically during the first 3 days.

Answers from professionals to popular questions about finishing screed
To save money in general and ensure better performance in particular, some builders sometimes try to replace the recommended materials for a rough floor screed on the ground with others.
- Is it advisable to change crushed stone to expanded clay for adding screed?
Such an original solution can provide additional thermal insulation. However, professionals do not recommend using expanded clay for soil with closely spaced groundwater, which can lead to wetting of this material.

- Can crushed brick or other construction waste be used instead of gravel?
The use of such materials is strongly discouraged. Brick is not a waterproof material, it absorbs water and quickly collapses. Consequently, such a draft floor on the ground will lose its strength and integrity. In addition, waste and broken bricks have a different fraction, so it will not be possible to compact them tightly.

- Is it possible to install hydroprotection only under a rough screed and not to use it in the future?
The answer is negative. Firstly, the polyethylene film is responsible for other functions: it prevents the cement laitance from leaving the solution. Secondly, after some time, the waterproofing loses its tightness and breaks under the influence of uneven point loads on the floor.

- Is it possible to replace the rough screed by spilling the floor on the ground?
Spilling involves spilling onto the bedding under the rough screed with a special layer of liquid solution. Its height depends both on the thickness of the bedding layers and on the intensity of compaction. If the bedding is very dense, the liquid solution will not be able to penetrate more than 4-6 cm. As a result, the bearing performance of the floor base will be reduced. Thus, the answer to this question must be given, taking into account the possible loads on the floor surface.

Draft floor on the ground for a warm floor
The design of a warm floor on the ground will be optimal subject to the following steps:


How much does a rough floor on the ground cost
Detailed cost of work subfloor on the ground is displayed in the price lists of various construction and repair organizations. They can be found on the websites of these companies. You can also find out the price and get additional advice by phone. In addition, many companies offer a free visit of a measuring consultant to your facility in order to calculate the price as accurately as possible, taking into account all possible nuances and wishes.

Cooperate with the company "My Repair" - it is reliable and prestigious. The specialists working here are professionals of the highest level. The company "My Repair" operates throughout Moscow and the Moscow region.
When arranging a concrete floor in a private house, the option of laying them on the ground with simultaneous insulation is most often chosen. This method makes it possible to obtain a durable monolithic screed, suitable for laying any floor covering, at medium investment and labor costs, and to prevent heat loss through the bottom of the building. All stages of work can be done with your own hands, the mandatory requirements of the technology include the correct alternation and sufficient thickness of the layers of the cake.
The design is a multi-layer cake, laid on dry and stable soil layers, taking into account a pre-measured level. The mandatory conditions for its construction include GWL below 4.5-5 m, the presence of an established foundation and constant heating. Standard scheme includes the following layers (from bottom to top):
1. Compacted soil, by analogy with monolithic slab accepting the main weight loads.
2. At least 10 cm of sand, which reduces the forces of frost heaving of the soil and performs drainage functions.
3. From 10 cm or more of compacted crushed stone and / or expanded clay, distributing weight loads and preventing subsidence and displacement of the remaining layers of the floor.
4. Flooring of waterproofing materials, combining two functions of protection: from capillary moisture and water loss when pouring the solution. In this case, it is the roll varieties that are laid with a mandatory overlap of 10 cm and above that have the optimal characteristics.
5. Draft base, which performs separating, bearing and protective functions.
6. An insulating layer of expanded polystyrene or stone wool.
7. Another waterproofing that protects from getting wet and extends the life of the cake.
8. Reinforced screed with a thickness of at least 5 cm, which performs the main load-bearing functions and serves as the basis for the installation of floor building materials.
The above scheme is the only possible one; pouring a concrete base over the beams is extremely difficult due to its massiveness. The resulting screed can withstand significant loads, including its own weight, the weight of furniture and ceilings, and is suitable for installation of any type floor coverings: from self-levelling mixtures to light linoleum. You will find more information about pouring concrete floors.

What to consider during the preparation stage?
The main requirement is the presence of a stable bearing layer; when building on sites with an unsuitable type, the expediency of sampling the soil and replacing it is considered. In other cases, the emphasis is on compaction and alignment. Work begins with markings - a zero level is marked around the entire perimeter of the premises of a private house and a cord is pulled, after which the soil is removed to the desired depth (if necessary, on the contrary, it is poured). Chernozem or soils with a high organic content are recommended to be selected until stable layers are reached, loams and sandy loams are simply leveled. It is difficult to perform high-quality ramming without the right tool yourself, at this stage it is advisable to use a vibrating plate, in its absence, a log with a nailed handle is used.
Sand and gravel are poured in layers (from 10 cm each), ensuring the maximum possible shrinkage. On heaving and frozen soils, the thickness of the first layer is increased to 20 cm, under normal conditions 10-15 cm is enough. Sand is poured with water and compacted every 10 cm, its quality and grain size do not play a special role, but small and dusty varieties are not recommended.

The next layer is filled with dense crushed stone or gravel from a coarse fraction (20-40 mm, from 1000 kg / m 3). Dolomite rocks are not suitable for it because of the low grade strength. By analogy with the sandy layer, this layer is carefully rammed (but without watering). In order to increase the waterproofing properties, it can be impregnated with liquid bitumen, heat-insulating - covered with expanded clay.
The preparation stage is completed by rough concreting - a thin layer of lean mortar with a strength grade within M100. There is no need for its careful smoothing, but air distillation is mandatory. The thickness of the layer in this case depends on the parameters of the soil and the expected loads and varies from 3 to 10 cm; when building on stable and dry soils, it can be replaced by pouring cement laitance over crushed stone; at the risk of frost heaving and significant weight of structures, the feasibility of reinforcing with metal is considered .

The nuances of thermal insulation and reinforcement
Given the high thermal conductivity concrete surfaces the presence of an insulating layer between them and the ground is mandatory. Moisture-resistant varieties have suitable characteristics: foamed chips or foam boards impregnated with hydrophobized compounds stone wool, granules of expanded clay or perlite. The thickness is determined by thermal calculation, in middle lane RF, the recommended minimum is 50 mm of extruded polystyrene foam, in the northern latitudes - at least 100. Insulation is placed above the flooring made of polyethylene film or roofing felt, with its sides protected from moisture. The second waterproofing layer is made of similar materials, with a 15-20 cm upward bend and fixation. The stage is completed by placing a damper tape or strips of polystyrene foam around the perimeter of the room and around the supporting columns, if any.
Reinforcing products are placed on top of plastic supports at a distance of 3-5 cm from the upper layer of waterproofing. Has suitable characteristics metal grid from a wire with a cross section of about 3 mm and an interval of cells 5 × 5. It is important to leave the plastic film or membrane intact; wetting of the insulation during the process is unacceptable. Simultaneously with the reinforcement, the installation of beacons is carried out: taking into account the future level and the recommended minimum screed thickness of 5 cm, on mortar or with welding to a fixed element.
As beacons, a T-shaped plaster or ordinary galvanized profile or even rods are used, the placement step depends on the length of the rule (10-15 cm less) and the experience of the installers.

Instructions for concreting
The most important stage is started after setting the composition under the leveling elements. Taking into account the high expected loads, a strength grade of at least M200 is needed, which does not form cracks after solidification. The recommended ratio of binder and filler is 1:3 (PC M400 or M500 and sand) or 1:2:4 (PC, sand, fine crushed stone, respectively), in case of doubt as to the quality of the components or the possibility of compliance exact proportions it is better to use ready-made dry mixes, in particular - sand concrete.
An important requirement is a monolithic screed, with a large amount of work it is extremely difficult to prepare and level the required amount on your own, the forces of at least two people are involved. In any case, the mixture is stirred mechanized way(using a concrete mixer or mixer), and not with your own hands. Filling is carried out from a far corner, with simultaneous alignment and compaction of the resulting area. The process is completed by removing the beacons and carefully filling the gaps, then the surface is covered with a film and gains strength within 28 days with constant wetting in the first week.
Ideally, the thickness of each layer justifies the calculation; when choosing a heater, it is mandatory. The use of expanded clay when laying floors requires caution: at the risk of underflooding or constant dampness, it is prone to moisture accumulation and increases the strength of frost heaving. The only problem-free insulation is polystyrene: taking into account the pouring of concrete from all sides, its poor combustibility does not matter, with a minimum thickness of the layer, it effectively retains heat. In case of doubt in the GWL, a drainage system is placed around a private house.
Possible errors and violations of technology include:
- Lack of compensatory materials around the perimeter of the room. Ignoring the laying of the damper tape leads to cracking of the screed during the thermal expansion of concrete.
- Filling at a groundwater level of less than 2 m on the surface, it will not be possible to provide reliable waterproofing in this case, dampness will penetrate inside a private house. The ideal occurrence is 4.5-5 m and below.
- The laying under the leveling beacons of materials subject to decay, this leads to subsidence of concrete floors during operation.
- The laying of an insulating layer below the zero mark in the absence of a heat-insulated base, such an error is fraught with the formation of a freezing zone.


