How to make a table for the country. DIY garden table and benches. We will talk about installing a new table with benches in the garden at the dacha. To unite the family, it was decided to carry out the installation of a new table by collective efforts. The old wooden table, according to the rapidly erected scheme, ceased to suit, it had to be updated every 5-7 years. In the construction of the table and benches, new and traditional Construction Materials- metal and wood. The table turned out to be reliable and, in comparison with the previous options, it will last a long time. Detailed step-by-step instruction with photos and videos.
How to make a table with benches with your own hands

The design of the table has been worked out by collective efforts, taking into account material possibilities, skills and the availability of tools. The table is made and probably the choice of design option is no longer worth discussing. old table was built from wood. Raw poles were buried in the ground in the open air and bench boards and tabletops were attached to them. The lifetime of the pillars is 5-7 years, depending on the thickness, the boards withstood up to 10-12 years. The table and benches were actively used from April to early October. Table and benches all year round exposed to precipitation in the form of snow and rain. The new table is made on metal frame, and the flooring of the table and benches from the boards. The boards are dismantled in October and removed to a protected place, and in the spring they are fixed back to the frame. In this way, the life of the flooring and the entire table is extended. For critics, I want to say that there is a place to rest under a canopy in the garden ( ).

 Pile "Juventa"
Materials for the construction of the table and benches:
- Six screw piles "Yuventa" for installing a fence, 2400 mm long, head with a section of 50 × 50 mm;
- 10 — 12 edged boards 2000 mm long with a section of 150 × 50 mm, to speed up work it is better to purchase planed ones, pay attention to the thickness of the boards - it should be the same;
- metal pipe of square section 60 × 60 mm, 4 m long;
- metal corner with a shelf 40-5o mm 3.5 m long;
- paint for metal 1 liter;
- yacht varnish 1-4 liters;
- paint brush;
- solvent for paint and varnish 0.5-1 l;
- self-tapping screws for fixing boards 50 pieces;
- cement, sand
Table structure construction tool:
- welding inverter;
- a circular saw;
- laser level, tape measure, bubble level;
- electric planer;
- grinder with cutting and cleaning discs;
- screwdriver with a set of drills and bits.
Instructions for making a table with benches with your own hands


A drawing was prepared to install the table. See photo. The width of the table is 1100 mm (6 boards 150 mm wide and one 200 mm wide). When changing the width of the table, pay attention to the distance between the posts of the bench and the table.
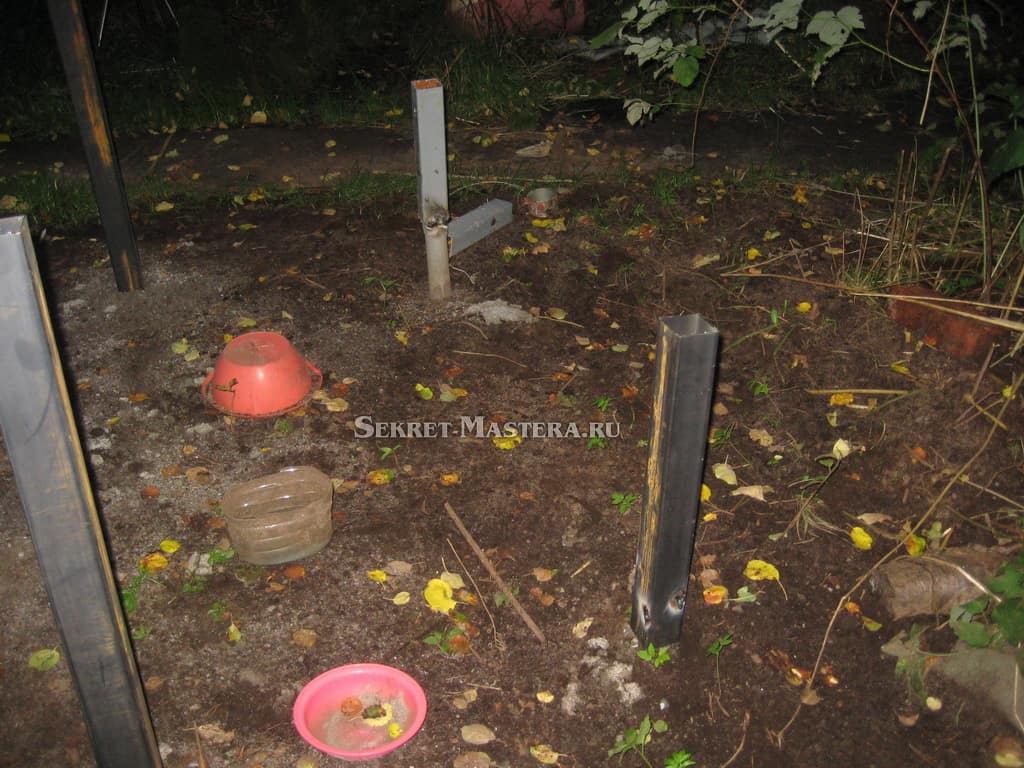
- The location of the table was chosen long ago, under the crowns of apple trees and next to artificial pond with fish. Places of installation of piles are marked with pegs.
- We install piles "Juventa". For this, a device for wrapping was made from a piece of pipe 60 × 60 mm. See photos and videos. In view of the peculiarities of my area, which are detailed during construction on sandy soil, I had to make recesses for each pile. Without this deepening, the pile would have collapsed before it was completely twisted. recess done petrol drill
. The recesses for the piles of the bench are dug at a right angle. And for two table piles at a certain angle towards each other. This is done deliberately for greater stability of the table.

 Digging a hole with a drill
 Piles "Juventa" for the table
 - The twisting of the Juventa piles took place along standard scheme. Watch the video. Be sure to control your efforts so as not to destroy the pile until it is completely twisted. In my case, it was a team effort. When twisting, you must try to observe the intended location of the pile and their slope. Small flaws in accuracy can be compensated for during subsequent assembly. See details of work video example
.


 Pile "Juventa" twisted
 - After twisting the piles of the pit covered in layers of sand with humidification and tamping.
- For a long service life of piles inner space piles are necessary, small-scale mechanization was applied. After concreting, we close the heads from the effects of precipitation and let the concrete harden. Immediately it is necessary to clean the piles from contamination.

 Pile concreting
 - We cut square pipes 60 × 60 mm into 4 pieces of 550 mm and 2 pieces of 900 mm.
- We insert the pipes into the pile heads at a distance of 10-20 mm from the ground.
- We weld pipes 60 × 60 mm on the heads, while using the mounting gap, we eliminate the inaccuracies in the installation of piles. Try to install the racks of the benches strictly vertically, and the racks of the table coaxially to each other. Welding was carried out at 6-8 points at the points of contact between the head and the rack. We immediately clean the welding spots from scale.

 Racks welded to piles
 - mark the pipe cutting lines. Do it exactly. The cutting level from the ground surface of the bench legs is 500 mm, the table legs are 760 mm.
- We cut the racks according to the marking with a grinder with a cutting disc. Cut carefully and accurately. The surface of each cut must be horizontal. Corners will be installed and welded on the ends of the racks.


- We cut corners. The size of the corners for fastening the boards of the bench is 250-300 mm, only 4 pieces are needed. The table will require two corners of 1000-1100 mm (determined by the selected table width). The edges of the corners in the vertical plane are cut into a cone, and all edges are rounded. The surface must be smooth and free of burrs.
- We weld the corners to our racks, controlling the horizontal plane of the shelf along two axes using a bubble level. Just in case, scarves are welded to reinforce the place of welding to the rack. When welding the corners of the benches, you can slightly shift the center of welding of the corner to compensate for errors in the installation of the pile (distance of the table post from the bench post).

 Welding corners
 Corners welded to posts
 - Boards for the table and benches I used from the remnants of construction frame house. The boards were uncut. Therefore, half a day was devoted to partial planing and sanding of the boards.
- We try on the boards, put them on the corners. The boards of the benches should be parallel to the boards of the table. Boards are marked for subsequent assembly. The position of the boards on the corners is also marked.

 Trying boards
 - We mark holes on the corners for the screws for fastening the boards. A total of 14 holes per table corner and 4 holes per bench corner. We drill holes.

 Drilling holes in the corner
 Holes in the corner of the bench
 Holes in the corner of the table
 - The boards are impregnated with an antiseptic and, after drying, covered with paint or varnish. I covered the boards with yacht varnish.


- Simultaneously with the varnishing of the boards, the racks and corners are painted with a protective paint. Plugs are made to prevent water from getting inside the racks ( polyurethane foam) on the ends of the pipes.
Of course, today everyone has the opportunity to buy any furniture in the store, including a table. But why not make it yourself, with your own hands?
This is not as difficult as it might seem at first glance. In addition, you have the opportunity to make such a table that will fit perfectly in size and appearance to the interior of your kitchen or other room.
In addition, do-it-yourself furniture is not only saving money, but also some kind of, but a reason for pride, since not every man knows how to make something these days.
What are the tables
If you decide from the boards with your own hands, then you need to figure out what types of tables are, and decide what exactly you need.
The simplest is an ordinary table with four legs, a table top and a frame. It will not be difficult to make it even for those who are not experienced in woodworking.
If you are experienced enough in this matter, you can do dinner table round or oval, decorate it with carvings, painting or burn out drawings and patterns on the surface.
A more difficult option is from the boards. In fact, this is the same ordinary table, but rather thick and long crossbars are attached to its legs, on which seat boards are laid on top. So we get a table with benches on both sides. Such furniture is well suited for both the kitchen and for installation in the courtyard of a private house or cottage.
If there is free space in the room only in the corner - make corner table, which will fit perfectly into this unoccupied space. It may not be as convenient to dine behind it as at a classic table, but you can put a TV, microwave or kettle on it - there will be enough space there.
 Another interesting option can become a window sill table.
In fact, this is the same window sill, but significantly expanded and adapted, for example, for a convenient workplace for a student.
The advantage of this solution is that the table will be well lit for most of the day.
There is also a minus: sitting at such a table in winter, you will have to rest your feet on a very warm, even hot radiator, which is not very convenient.
Materials and tools
 Buying everything you need to make a table with your own hands is quite simple and will not be difficult or expensive. The main material for the dining table is wood, or rather:
- Boards 25 to 50 mm thick, 100–150 mm wide, quite long.
The thicker the material for the tabletop, frame and legs, the heavier, but at the same time more durable they will be.
Choose boards from good tree, without any defects. - Bar. It is necessary for the manufacture of table legs, so choose thick enough and strong samples. The beam can be replaced with the same boards, if you arrange them with the letter "G", or use purchased aluminum table legs. You can also use balusters (curly carved wooden posts that support the railing on some stairs) as legs.
- Chipboard or plywood sheets, which can be used as countertop materials. Choose samples that are thick and strong enough to withstand daily stress.
 As with the materials And Do-it-yourself tools and fasteners are easy to get, they are in most homes. If something is missing, you can buy it at the nearest hardware store.
- pencil, corner, roulette and ruler;
- jigsaw or hacksaw on wood;
- screwdriver with a set of nozzles and drills;
- plane, if it is necessary to pre-treat the boards from irregularities and defects;
- kit self-tapping screws, furniture bolts and nuts;
- sandpaper or Sander;
- varnish or stain, roller or tassel for processing the finished table.
Attention! When working with a jigsaw, always remember the safety rules and keep small children or pets away!
simple plank kitchen table
 First we need to make a countertop.
There are several options here:
- Cut out a piece of the desired size from a sheet of chipboard or plywood using a jigsaw;
- Lay several fairly wide boards and subsequently fix them on the frame;
- Take a large number of relatively narrow boards, place them side up and glue them together with wood glue.
The result is a fairly thick, heavy and durable countertop.
Stages of work
Step 1. Collecting from boards countertop.


Step 2 We make a frame from boards or their wooden bars. In size, it can be made equal to the tabletop or with a slight indentation, about 2–2.5 centimeters on each side of the table. Having fastened the parts of the frame with screws, connect the frame with the tabletop with them.
Step 3 After we from put together the frame and the tabletop, half the table is ready. It remains to make only his legs. If a timber is used for this, drill two holes in it for furniture bolts. Moreover, they can be made both on the one hand, one above the other, and on two different ones for more secure fastening to the frame.
Important! Carefully check the length of the table legs, they should not differ from each other. Otherwise, the table will stand unevenly and stagger. If you do not want it to spoil the floor material, fix rubber “shoes” at the bottom of the legs.
After that, make similar holes in the table frame and fasten the legs and frame with bolts and nuts. Also, the legs can be fixed from above, using screws, but over time, this fastening may weaken.
 If you want to make table legs from boards, fold two boards into an “G” on the outer or inner corner of the frame and secure them with all the same furniture bolts or screws.
To prevent the legs from loosening, connect the folded boards together at the bottom and middle parts with screws or nails.
That's all, simple and reliable, do-it-yourself, ready!
Advice: Before proceeding, do simple drawing, preferably from several sides. Constantly check the dimensions of the parts. Some parts of the same size can be sawn out at the same time if you fix the boards or timber with clamps.
pallet table
 Wooden pallets are widely used in shops and warehouses as cargo pallets.
If you wish, you can get a few pieces for free and use them as a basis for making an original and unusual kitchen table.
If at least one side of the pallet surface is solid, then you no longer need to make a countertop, it is ready.
You just need to process it and, if desired, round the corners.
Note! Since initially the pallets are intended for warehouses, no one is engaged in their grinding and cleaning. Therefore, before making a table out of them, carefully sand them and remove all burrs. Irregularities and defects of the boards can be hidden with putty.
Stages of work
Step 1. Most of the pallets are open and there is plenty of space between the boards. distance, due to which to use the surface of the pallet as countertop not too convenient. There are two ways to solve this problem: either boards appropriate size and to fix with their screws between the boards of the pallet, or install a sheet on top plywood or chipboard.


Step 2 As for ordinary table, table legs from pallets can be made from timber or boards. The best thing fasten them with thick enough and strong pallet beam with nails, screws or furniture bolts.


To prevent the legs from loosening, connect them to each other with crossbars.
Dacha is, of course, the place where you want to take a break from the bustle of the city, breathe in fresh air and just drink fragrant herbal tea on the veranda at a table made for giving with your own hands. Such a table will not only give a special charm to such a simple ceremony, but will also become a source of pride for you and your loved ones.
Option 1. Table with legs
When choosing materials for a table, first of all, you should pay attention to the quality of wood - not all wood is suitable for use. Softwoods, such as spruce and pine, are malleable and easy to work with, but such material is more flammable without proper processing, and the resins released can ruin the tablecloth.


Hardwoods (aspen, oak, ash) are more advantageous, products made from them are strong, durable and have an attractive appearance.
| wood species | Brinell hardness) | Density (kg/m3) | Stability | Color Trends |
|---|---|---|---|---|
| Birch | 3,0 | 600 | average | the color gets deeper |
| Larch | 2,6 | 500 | good | takes on shades of gray |
| European oak | 3,7 | 700 | good | the color gets deeper |
| 4,0 | 700 | average | light to straw yellowish brown | |
| Pear | 3,3 | 680 | average | blushes |
| Cherry | 3,0 | 580 | good | light pink to deep reddish tint |

Materials and tools
For interior design of cottages and country houses long narrow ones are more acceptable, allowing you to move freely around the room. This should be taken into account when preparing everything necessary for work and designing the table itself.
For a table, it is preferable to use a board with a thickness of at least 30 mm. This thickness will ensure the strength of the table and the ability to withstand heavy loads. The optimal length ranges from 150-200 cm. Two ready-made wooden shields 30-2000 mm in size can be purchased.

Balusters or wooden bars for legs. Curly balusters will give the homemade table a production chic and luxurious look. And for the manufacture of legs from a bar, you need to choose boards with a minimum section of 50x50 mm. A comfortable table height is provided with a leg height of approximately 73-75 cm.

Other materials and tools.
- Boards 20 mm thick and 8-10 cm wide for the tabletop frame.
- Wood putty.
- Screwdriver and self-tapping screws 30 and 50 mm.
- Sandpaper of various grits, as well as a holder.
- Clamps for fixing legs and countertops.
- Electric drill.
- Sander.
- Building level.
- Square.
- Roulette or centimeter.
- Marker.
- Glue.
Prices for various types of building timber
Construction timber
Manufacturing steps

When preparing materials, all boards and beams are processed with a planer, grinder or coarse-grained sandpaper to remove bumps, the remains of cut knots, and clean up cracks. The boards must be even and smooth, so they are sanded from all sides, including the ends, edges and corners.
If it is planned to manufacture a solid shield without gaps, then it is better to purchase grooved materials - this will create a stronger adhesion of a single web and save time on fitting elements. Chamfers are cut from the edges of the bars for the legs.

Table frame assembly
The frame helps to increase the strength and stability of the table, its dimensions are completely dependent on the parameters of the tabletop, but there are several general rules: both in length and in width, the frame should be 30-25 cm less than the countertop.
Video - DIY garden table


The frame itself is assembled from 4 boards that form the outer frame, and 6 internal cross bars. The boards are installed on the edge at a right angle using a square and tightened with 50 mm self-tapping screws. The joints are pre-lubricated with glue (PVA or carpentry). To prevent splitting of the boards, you can drill pilot holes in them and only then screw in the screws.


Along the length of the frame, markings are made for the cross bars, and guides are drilled. It is very important that the cross members are strictly perpendicular to both sides of the frame frame. The ends of the cross bars are smeared with glue, and the whole structure is fixed with self-tapping screws. Make sure that the screw heads do not protrude, but are completely “drowned” in the wood.

 Table frame (manufacturing option)
 The boards of the tabletop are connected, leveled with a tape measure and stacked face down on the floor, a frame is placed on top so that the cross planks lie tightly on the tabletop. Guides for self-tapping screws are drilled in the slats, and all elements are tightened with 30 mm screws. There are 5-6 self-tapping screws for each cross board.
Assembling the table legs


The tabletop is laid on a workbench or several stools for the subsequent installation of legs. The table leg is fixed in the corner of the frame with clamps, and guides for self-tapping screws are drilled in the frame.


Before attaching the legs, glue is applied to the end of the bar - this will protect the table from loosening and will contribute to greater strength. It is recommended to fix the leg on each side with four screws, but if desired, you can additionally use metal corners. Round balusters are fixed with long self-tapping screws with front side table, and square - on the corner fasteners.
Prices for popular models of screwdrivers
Screwdrivers
Finishing
After installing the legs, the table is turned over and placed on the floor. Depending on the design of the table, corners are sawn off with a jigsaw along the radius or the end is completely rounded. Bevels can be cut from the edges of the tabletop and everything is carefully sanded.

If necessary, scratches and cracks resulting from work are repaired on wood. It is better not to touch the heads of the screws so that it is possible to tighten the structure.

After the final grinding, all dust and chips are removed from the table, and the product itself is covered with stain or several layers of varnish.


Tables with elements of decoupage decor or a single painting look beautiful and unusual. But to hide the beauty of natural wood under a layer of paint is not worth it, modern varnishes and impregnations will do all necessary work to protect the product from moisture.

Video - Table with legs for giving
Option 2. Stump table
An unusual and non-standard way to equip a backyard space is to create interior items from natural materials. When ennobling the territory, old or threatening trees are often cut down. If there is or was just such a tree at your dacha, then there will definitely be no problems finding a suitable stump. If the idea came spontaneously, then you can look for the desired stump in the clearings, in the nearest forest, or ask the owners of neighboring plots.

Materials and tools
To make such a fantasy table from a stump, you will need quite a bit:
- wood for the countertop, the recommended thickness of the countertop is from 20 mm, when choosing boards, you must follow the rule “the larger the countertop, the larger the cut of the board”;
- stump. For work, you will need a dried stump of any kind of wood, the main thing is that the wood is whole, not damp and not rotten. If the tree was cut down recently, then the stump must be properly dried. And it is better to do this by placing the stump in a warm, dry room or outdoors in sunny weather. It must be remembered that several weeks is not enough time for high-quality drying. As a rule, the whole process takes at least two months. You can determine the condition of the wood by the ease of separation of the bark - if the bark moves away without effort, then you can get to work;
- water-based wood varnish in a natural shade or transparent. It is this composition that will best emphasize the texture and dignity of natural wood;
- sandpaper of various grain sizes and a holder;
- planer or grinder;
- chisel;
- building level;
- roulette;
- hammer and nails;
- screwdriver and screws;
- abrasive fibre.
Manufacturing steps

Stage 1.
The dried blank of the future table must be cleaned of bark. For this step, a chisel or chisel will come in handy. It is necessary to remove the bark very carefully and carefully so as not to damage the wood and prevent the appearance of cracks and splits. All soft and rotten areas also need to be removed.


Stage 2.
After the bark has been removed, the stump must be leveled relative to the horizontal plane. To do this, using a level, a flat surface is prepared, and the base of the future table is installed on it.
If curvature is observed, then the shortcomings are eliminated with a planer. At the same stage of work, excessively large rhizomes of the stump and all unnecessary parts are sawn off with a hacksaw, the cuts from which are then polished.

Stage 3.
The leveled stump is polished with a disc grinder, especially its horizontal parts. The sides of the stump are also polished, and hard-to-reach places are processed with coarse-grained sandpaper. This is a rather laborious process that requires a significant investment of time.

Stage 4.
Cracks and recesses in the trunk must be cleaned of dirt and dust with a chisel, after which they should be carefully folded in half (working layer outward) with sandpaper to carefully process them from the inside. The remains of wood dust are cleaned with a brush or a building vacuum cleaner.
Stage 5.


To prevent rotting of the stump and ensure air circulation between the table and the floor, furniture legs can be attached to the base from below. The presence of legs will make it more convenient to move the table.
You can choose any legs: metal, furniture wheels or special rubberized stands. It is best to fix them with self-tapping screws to the base of the stump, the number is chosen arbitrarily, based on the size of the table.

Stage 6.
After installing the legs, we proceed to the crate of the upper part of the stump. To do this, we fill two parallel strips perpendicularly on the sidewalls, and on top two more rows of holders - a total of 6 strips fastened together with nails. This will be the frame for the countertop.
Stage 7.

We fasten the prepared tabletop boards from below with transverse slats. The shape of the tabletop can be very diverse: round, rectangular, with rounded corners. The winning option looks like a table with a round or oval top.

To give this shape, you can use a home-made device made of thread, pencil and nail: the end of the thread is tied around the pencil, and the tip of the nail is placed in the middle of the tabletop, outlining the circle with a selected radius, after which all the excess is sawn off, and the edges and surface of the tabletop are processed with a grinder.


Stage 8.
Holes and defects in the boards can be decorated with finely chipped shiny stones, filling them with varnish and processing after drying again with a grinder to smooth the surface.
The finished tabletop is fixed from below on the crate with holders on nails or self-tapping screws matched to the size.

The finished table is varnished in several layers. After applying the first layer, the product is thoroughly dried and processed with fine-grained sandpaper. This will prevent flaking of the varnish, and subsequent layers will lie more evenly.


After removing the dust, the second and subsequent layers of varnish are applied without grouting. If desired, after drying, the last layer can be treated with abrasive fiber - this will remove excessive shine and give the surface a dull finish.

Such a creative table will decorate any veranda, especially in a pleasant frame of green bushes or flower beds.


Prices for paintwork materials
paints and varnishes
Video - Do-it-yourself table for giving from a stump
Beech - quite often used by furniture manufacturers, as it is a hard rock that is quite plastic and durable. In terms of strength, beech is not inferior to oak. Compared to oak, beech is cheaper. The color of such wood can be from reddish-brown to pinkish-yellow.

- has high decorative qualities;
- dries quickly;
- easy to process.
- afraid of moisture;
- poorly polished.
Oak is a hard rock with great strength. The natural color of oak stretches from yellowish white to yellowish brown with a slight hint of gray or green. Oak has a number of other advantages - very easy to use, easy to glue, practically does not rot and has a beautiful appearance.

- despite the high viscosity of wood, it is processed quite well;
- bends easily;
- decay resistant;
- lends itself well to artificial aging techniques.
- price;
Ash wood is harder than oak. The color of the wood is light and delicate golden. Most often it is used in the manufacture of bent and carved furniture or as a facing veneer.

- bends well after steaming;
- cracks a little when drying;
- when discolored, it acquires an unusual shade of gray hair.
- in conditions of humidity, wood is quickly damaged by a wormhole;
- poorly polished.
Aspen is deciduous tree. It belongs to the genus Poplar. This is a very large tree, it grows up to 30 meters in height and may well reach a thickness of 1 meter. Since it grows very quickly, a lot of wood is obtained from it.

- very high moisture resistance;
- the ability to retain heat, but not give it away;
- bactericidal (you can put such furniture in the children's room without fear that it will harm).
- not very presentable appearance;
- the possibility of darkening, both partially and completely;
- it is worth fearing that the inside of the product may begin to rot.
Pine is a soft wood, which is most often used in the manufacture of frames for upholstered or cabinet furniture. The main advantage of this type of wood is its high resistance to decay, humidity and temperature extremes. In addition, pine is one of the most common and affordable materials.

- ease of processing;
- easy to glue;
- pleasant medicinal smell that releases phytoncides.
- easily scratched and damaged.
We will send the material to you by e-mail
Not everyone likes to buy finished goods for home use. The soul of some people requires creative and practical self-realization. The editors of the online magazine, the site invites those who wish to learn how to make a wooden table with their own hands, what is required for this, and whether there are pitfalls in such work.
A beautiful piece of wood for the kitchen or living room, made with love
Professional carpenters are unlikely to need our step by step recommendations, but for beginners, advice will come in handy. To begin with, consider what products you can make with your own hands from wood.


Of course, the more skills a person has, the more complex the model he can make. But in order to build a table with your own hands from wood, there are ready-made drawings and photos to help beginners.
How to choose material for self-production of a wooden table for home and garden
What to make a dining table with your own hands? The best is wood. The most malleable for the newly-minted master will be pine. Poplar products will look more solemn. For the street, you can take mahogany.
If you want an option for the home and easier, then you should consider laminated chipboard with an optimal thickness of 25-35 mm. You can take it on the table wooden planks, birch plywood with a thickness of 35 mm. Legs can be made of metal or wooden beam(about 50 mm thick).
In order not to be mistaken with the amount of material, a preliminary drawing of the future design is made with exactly the specified dimensions.
Advice! Suitable product height varies between 750-800 mm.
Related article:
DIY furniture made of wood: for garden, children's room, kitchen, sauna, garden, arbor; how to restore pieces of furniture, useful tips and recommendations from experts - read our publication.
What tools are needed to make a wooden table with your own hands
It doesn’t matter what shape the future table will be: a certain set of tools is required to work with wood. You can’t do without a jigsaw, and it will be much easier to work with electric model. To fix all structural elements, either a drill with a multi-stage drill for holes, or confirmations is used. To grind the product to perfection, you need either a special nozzle for a drill.

For greater fastening strength, carpentry glue is included in the tools.
How to make a wooden table with your own hands - step by step instructions
We have selected four types of structures that you can make on your own, even with a minimum of carpentry skills. We offer you to learn about the stages of manufacturing round and rectangular table, coffee table and models for garden gazebo.
Making a wooden round table
It is easiest to make a round table top and a binder ring from either 1500 × 1500 mm and 1280 × 1280 mm. You will also need two strips of chipboard (1110 × 120 × 25 mm). We will make the legs from four wooden bars measuring 120 × 50 × 750 mm.

How to make a tabletop
How to draw a circle perfectly even? On a sheet of plywood in the center place their own thumb hands with a string attached to it with a pencil. The length of the rope from the base to the top should match the radius of the future tabletop. Holding your finger in one place, draw a circle with a pencil around the full length of the rope. It remains to cut it with a jigsaw.
The circle-underframe is cut out in a similar way.


Leg manufacturing
A round table made of wood or chipboard will look charming if done consistently. You don’t have to mess with the legs if there is no excessive originality in the plans. The bars are divided into 4 parts according to the desired table height minus the thickness of the tabletop. First, one leg is cut off, and the other three are already aligned along it.
All processing grinder carried out immediately.
Advice! Sanding should not be rushed, as the first coating with varnish will give out all the shortcomings.
Assembly of the structure and processing of the finished product
Assembly is carried out in stages. First, the strips are aligned groove into groove. Then the crosspiece of the slats is connected with the legs with confirmations, as in the figure below:

If you want to make the structure stronger, before connecting the legs to the tabletop, their upper base is smeared with glue.
Advice! Nails are not used in such work: a self-tapping screw or confirmation can be unscrewed without problems, and the connections will be much stronger.
Making a rectangular wooden kitchen table
The rectangular design is classic and very useful in everyday life: it is convenient to cook on such a table and you can comfortably dine at it.

How to make a tabletop
The tabletop made of wood for the table is made either from a whole sheet of plywood, or from individual edged boards processed to perfect smoothness.

Having fastened the boards with screws and glue, they begin to manufacture the frame.
Production of wooden legs for the table and frame
At the heart of quadrangular models is a frame. It serves to securely fix the legs, ensuring the stability of the entire structure. The tabletop is turned over, measured 3-4 cm deep on each side and the measurements are transferred to the boards. As a result, you will need two boards of smaller length and two larger ones.

The frame is made of four elements: according to the approximate ratio, these are two boards of X cm and two of 2X cm. They are overlapped with each other in turn, building a rectangle. In order not to break the angle of 90 °, any board is used while working with a screwdriver: they press the structure with it while tightening the screws.
As soon as the frame box is ready, they begin to make legs. You can take ready-made balusters for the table, buy metal supports, or cut them out of bars according to the desired length according to the drawing.

Both the frame and the legs are subject to obligatory thorough polishing!
Product assembly and finishing
The frame is screwed to the countertop with glue or self-tapping screws. Then the product is turned over and the legs begin to be attached.

Important! It is better to make holes for the screws in advance. This eliminates the possibility of splitting the tree.
Why not use nails and a hammer? Not everyone has the skills to work with a hammer - here it is dangerous not only to hit your finger. From excessive zeal, it is easy to damage the wood by splitting it. Confirmates and self-tapping screws hold the tree much stronger.
As soon as the leg is fixed, the angle is immediately checked: there should not be any deviation from 90 °. The operation is repeated with other legs. You can attach the legs directly through the countertop, but this will affect the aesthetic component of the product.


Related article:
: a photo best ideas. What can be done from a pallet for an apartment, office and cottage; rules for the selection and processing of pallets; master classes on making a table, sofa, bench, armchair and shelving - read in our publication.
Making your own wooden coffee table
Not only a beautiful element of the interior, but also useful. No need to look for where to put a book, gadget, glasses, TV remote control in a conspicuous place. Such desired designs make out different materials: metal, glass, plastic, chipboard, wood. But let's leave other materials alone and concentrate on working with wood.


The choice of a wooden tabletop for a table depends on the expectations of the owner of the product. Someone wants something massive, while someone prefers lighter options. Let's go with a simple solution.
We buy five boards 30 × 150 mm and process them to perfect smoothness. We immediately saw off the desired length on the countertop: you should get 6 identical canvases. We take four bars on the legs, 6 canvases of shorter length on the lower tabletop, 4 narrow slats for the frame.
| Illustration | Action Description |
|---|---|
 | For brushing wood, use a grinder with a brass brush head. The procedure will expose the structure of the tree, giving the product a special flavor. |
 | We pass back and forth on each board from the side that will be the front. |
 | We process wood with fire. The flame is gradually moved from place to place: the board will acquire a beautiful darkish tint. The procedure will finally destroy unnecessary soft wood fibers. We actively wipe the entire surface with a felt boot or a piece of felt. |


We proceed to the process of assembling a small table with our own hands from wood.
- The bottom and top tabletops are laid on the work surface with the wrong side facing you. The boards are laid tightly to each other, gluing them together. As soon as the boards grab, slats are attached to the top tabletop. They will serve as a frame and a fastening element. They can be glued or screwed with screws. The self-tapping screw is screwed in the center of the rail into each of the boards.
- The legs are screwed to both the table top and the rails. You can use furniture corners.
Video: the process of making a wooden coffee table
Making your own wooden table with benches in the gazebo
It's time to take the time and build a garden wooden table.


It is best to take boards standard sizes. Studs are purchased at a hardware store (suitable with a length of 16 cm), washers (24 pieces). Long nails (8 cm) will fit for a garden gazebo.

To paint a product or just varnish it is already a matter of taste.

In order to provide comfortable living conditions in a suburban area, you need a lot of different household items. Some of them can be moved here from a city apartment, but some are easier to make on the spot. A table for giving with your own hands can be made by anyone who has these same hands that do not grow from the hip girdle. A table in the country is an essential item, it is difficult to do without it. In addition, this work can be turned into pleasure.
So, we build a table for giving with our own hands
For work, we need dry softwood lumber. It is cheaper and easier to handle by hand. The lumber must undergo primary processing with a planer and thickness gauge. To design a table at home, all boards must be sized in thickness. When building a table for a summer residence with your own hands, you should have an idea of \u200b\u200bwhat should be the result. You should first familiarize yourself with various designs wooden garden furniture. They are presented in abundance both in specialized literature and simply around us (with our neighbors in the village).

Someone else's experience can be very valuable, because it will help to avoid common mistakes. Usually garden tables are divided into two types - those that stand in one place, and those that allow them to be moved as needed. A stationary table can be made on supports dug into the ground - metal or hardwood (like larch). And by their design, tables are also of two types - on a cruciform support and on four legs with tsar connections.

The most rational design should be chosen based on your aesthetic and practical priorities. And it would be nice to sketch the future product in the form of a sketch before building a table for a summer residence with your own hands. It is not necessary to work out the drawings in detail, it is enough to delve into only the general dimensions and principles of connecting parts. This will greatly facilitate future work. when assembled, it usually ranges from 70 to 75 centimeters. And the dimensions of the tabletop should be chosen based on the calculation of the number of people who will sit at the future table. In order for a person to feel comfortable at the table, it must be at least 60 centimeters wide. The cross-shaped design of the table support allows you to place more people behind it.

After completion of work
After we have made a table for giving with our own hands, it would be nice to think about how to cover it. This is especially true if it is intended to stand not under the canopy of the veranda, but in the open air. Best of all, our product will be protected from exposure by oil. Acrylic-based varnish behaves well. Nitrolac is not suitable due to its fragility. Before varnishing, wood can be treated with a stain or antiseptic.
In addition to the table, we also gained valuable experience. It should be developed by constructing various furniture for summer cottages and detailed drawings of which can be easily found on many different resources.


