Without such a structure as a toilet, one simply cannot do in the country. And if you decide to build a country toilet with your own hands, then you will have to make some efforts and diligence. The most difficult stage in construction will be digging a foundation pit. As for the aesthetic side of the building, this is rather a secondary issue, because the main thing is to competently arrange a cesspool and create a reliable foundation for the above-ground structure.
The following points will be discussed in detail below:
| The choice of a place for the construction of a toilet and its design. | |
 |
What you need to build a toilet. |
 |
Features of the cesspool device. |
 |
Building a house country toilet. |
 |
Using a dry closet in the country. |
 |
Biological agents for toilets. |
How to build a country toilet with your own hands: photos, drawings, video
It should be noted right away that it is better to do all the work once and then not return to this issue for many years. It is especially important to build a capital structure if you spend a lot of time at your dacha. If you do not want to spoil the design of the site by installing an ordinary toilet, then you can always hide it in the far corner behind the country house or come up with original design, which would allow it to harmoniously fit into the landscape.
The choice of location for the toilet and its design features
As a rule, the toilet is installed closer to the far border land plot, as there will be an unpleasant smell near the room, even if it is insignificant. But sometimes they use another option, making a cesspool not far from the house, and a free corner of the house is taken away to place the toilet, leading sewer pipe into the pit. Basically, this design is used in cases where water has been brought into the house and it is planned to install an insulating container designed to collect waste.
Be that as it may, it is worth adhering to sanitary and epidemiological standards. They must be observed in order to protect yourself and the environment from negative consequences, such as soil contamination or infectious diseases.
If you are planning to install a cesspool, it is important that it is at least 30 meters away from water sources. Moreover, its depth should not reach ground water.
If you are going to install a septic tank, then place it no closer than 15 meters from the house.
If you are going to use an insulated container that cleans out as it fills up, you can install it almost anywhere as the waste won't seep into the ground.
Also, an insulated container is suitable in cases where groundwater does not run very deep and it is impossible to make a cesspool in the ground.
Most often, the pits of the simplest toilet for a summer residence have an area of \u200b\u200babout 1 m 2. If the pit is round, then its diameter should correspond to about 1 meter. Its depth is 1.5-2 meters, depending on how the groundwater occurs.
Once you decide on a place for the pit, proceed to the choice of toilet design. First of all, you must take into account the weight of the future structure - the choice of material that you are going to use for construction largely depends on it. Moreover, the house itself should not be made very heavy, because over time, under its weight, the soil can begin to sag and the building is deformed and damaged.
As building materials wooden boards or bars or thin material - corrugated board and galvanized profiles are great.
If you decide to build a toilet booth out of bricks or logs, then you should think about the quality strengthening of the foundation. But there is no point in building such structures, since they will not be warmer than light buildings. Unless you have a need for thermal insulation of the room with the help of insulation, which has a small weight, for example, foam. This building will be warm, light, windproof in winter and not too hot in summer.
Having decided on the choice of material, you can begin to choose the size of the booth. If you decide to build a country toilet with your own hands, then we offer you the following drawings.
As a rule, a standard toilet, as you noticed in the drawings above, has a height of 2.3 meters, a width of 1 meter, and a length of 1.3-1.5 meters. But these dimensions can vary, and should not be considered as a dogma. Be that as it may, the room should be as comfortable as possible for all family members to be in it.What you need to build a country toilet with your own hands
Having chosen the design and dimensions of the toilet, you need to buy building materials. You can buy a metal or wooden "house" ready-made. If you decide to build it yourself, then be prepared for the fact that you will need the following materials:
- wooden bars and boards;
- fasteners - self-tapping screws and nails;
- metal corners to reinforce the wooden frame;
- roof covering material - corrugated board or slate;
- door handle, latch or hook for closing;
- wooden or plastic toilet seat with a lid;
- foam for insulation and material for sheathing insulated walls: thin board, chipboard or plywood (if necessary).
For the device of the cesspool you will need:
- crushed stone, cement, sand;
- reinforcement for strengthening the foundation structure;
- a metal chain-link mesh (intended for covering the pit) and metal pins or brackets for attaching it to the ground.
Also, instead of the grid and its plastering with concrete, you can use a brick, which will be lined with the walls of the pit. Moreover, for the device of the pit is often used concrete rings that have holes in the walls. Many summer residents prefer old rubber tires.
Another good environmentally friendly option would be a ready-made container - a septic tank. You can find the most different sizes, so you will choose the one you need, depending on the length of your stay outside the city and on the number of family members.
Of course, when building a country toilet with your own hands, you cannot do without special tools, so prepare in advance:
- bayonet or shovel with a short and long handle;
- a hand drill that will help when digging a pit;
- perforator (if the site has rocky soil);
- screwdriver or hammer;
- grinder - "grinder" with discs for metal and stone;
- jigsaw;
- marking tool - tape measure, ruler, square, pencil, building level or marker.
How to make a cesspool with your own hands?
Of course, it’s worth starting with marking and digging a hole, which can be round or square (depending on which design scheme for the country toilet was chosen).
If you are planning to install a two-chamber plastic septic tank, then the hole is dug so that the inlet pipe is in the toilet cubicle, since a toilet seat will be installed on it. The neck of the second chamber - remains outside the room, as it is required to adjust the pumping of fecal matter.
Tanks can be of different shapes, since the shape and dimensions of the pit depend on this. The size of the pit must be made 20 cm larger than the capacity, since it is necessary to compact the soil around it as best as possible.
If the walls of the pit are finished with brick or concrete, it can be made square or round.
After you dig a hole of the required depth, at the bottom it is necessary to arrange drainage from stones, large rubble, fragments of bricks.
Then, by throwing on the walls, a concrete solution is applied. It is left to dry completely. The total thickness of the layer may be approximately 50-80 mm.
When the first sketched layer grabs, the walls are plastered to a perfectly even state with the same concrete mortar. Then wait until the plastered pit dries.
The pit is covered either with a finished reinforced concrete slab, or you can make it yourself. It will act as a foundation and a platform around the toilet.
Boards are laid on the pit itself. They should go beyond its limits by about 700-800 mm and be sunk into the ground to the level with the ground. They are treated with antiseptic agents. It is quite possible to replace such a wooden substrate with concrete columns.
Two holes are left on the surface for the cesspool and the installation of the toilet seat. Formwork is installed around them.
A dense polyethylene film is spread over the entire area of \u200b\u200bthe foundation.
A reinforcing mesh is laid on top of it, which along the entire perimeter is enclosed in the formwork of the future foundation.
With regard to the height of the formwork of the holes, it must be exactly the same as the formwork of the entire foundation structure. When leveling the surface, formwork boards will act as beacons.
The concrete solution is mixed, after which it is poured onto the site, carefully leveled and left to dry. For the strength and durability of the concrete layer after the initial setting, you can iron the wet surface with dry cement.
After the site has matured, a toilet booth can be installed on it. On the hole, which is designed for pumping waste, you will need a hatch. You can buy it in the store or make it yourself. The hatch cover should be easy to close and open.
Another good option is round form pits made from tires. But do not forget that this type of hole cannot be used for a regular user. Such a toilet can only be operated in a dacha, and then if the owners come occasionally, for example, for the weekend, otherwise you will have to resort to pumping out waste very often.
To make a pit, a round pit is pulled out of car tires 150-200 mm larger than the diameter of the tires.
Drainage is laid at the bottom of the pit, having a thickness of 15-20 cm.
Further, tires are laid exactly in the center of the pit to the surface of the soil. As it is laid around the tires, a drainage layer of sand and gravel is filled up and well rammed. This process is carried out to the top.
When the tires are laid, it is recommended to arrange around the pit strip foundation. To do this, a trench breaks out along the entire perimeter of the future structure, about 500 mm deep, where concrete is poured.
The bottom of the trench is compacted, after which it is covered with sand of 50-70 mm. It also needs to be compacted and covered with a layer of rubble of exactly the same thickness.
Waterproofing is made of dense polyethylene.
Then you can weld a lattice from the reinforcement, install it and mount the formwork 100-150 mm above ground level, and then pour it with concrete mortar. Make a foundation of brick, and then plaster it with cement.
After the mortar has hardened, remove the formwork from the cement foundation, and level the brick on top. Further, roofing material is laid on its surface. He will separate concrete surface from wood.Then it is installed on the foundation finished construction country toilet, or it is built independently.
For the convenience of building on the foundation, the base-frame, consisting of powerful bars, is first fixed, and the rest of the structural elements are further mounted on it, depending on the model of construction that you choose.
It is worth noting another option for arranging a cesspool - metal barrels with a cut bottom. They are installed on top of each other and then act in the same way as in the case discussed above. A mixture of sand and gravel or a gravel mixture is tamped around the pipe.
It would seem that such a method is simple to implement, but it has many more disadvantages than advantages. Metal barrels under the negative influence both from the outside and from the inside will quickly begin to corrode, and this toilet will not last long.
Do-it-yourself country toilet: building a house, photo
After the pit and the platform for installing the toilet are ready, you can proceed with the installation of the house according to the previously drawn up scheme.
It should be said right away that houses for a country toilet can have a variety of shapes. Many make them even in the form of a fabulous hut, and others may not immediately understand what kind of room fits so harmoniously into landscape design. Such a structure can be made with your own hands, having an idea of \u200b\u200bthe scheme for its assembly.
In the photo you will see an option partially made of logs, which give the structure a decorative effect, masking the purpose of the building.
In the diagram you see the basis for building a log house, only boards are used instead of logs. It is perfectly visible how the walls of the structure are assembled and the slopes of the roof rise. The internal space is distributed, and a place has been chosen for the toilet seat.
The next step will be the roof lathing, roofing and wall decoration using the selected material (both wood and metal can be used).
The house can be installed on a pit or used as a room for a dry closet.
This variant of the structure of the toilet was called the "hut". In this case, the house is built in the form of a triangle, and its side walls act as a roof. The form is extremely simple, so the construction process will not cause you any difficulty.This design is easy to build, as well as easy to use - it is very stable and quite spacious inside.
In the photo you will see the entire internal structure, the installation location of the toilet seat and the lathing of the roof walls. Finishing of the front and rear walls has begun. You can put the “hut” house on a well-equipped cesspool, as in the above case, or use it as a room for a dry closet.
In this photo you see a house for a country toilet of a traditional form, which is found in many areas. However, even such a seemingly simple design you can decorate according to your preference. For example, a toilet in this area was made to look like a Japanese house. This is evidenced by the hieroglyphs on the tablet, which is suspended on chains, an additional roof and a Japanese lantern at the entrance. Furthermore, inner space also kept in the same style.
This attitude to design suggests that even from such a structure as a toilet, you can make a real work of art if you put in a little more effort.
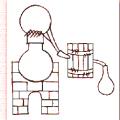
An approximate scheme of the building is shown in the photo. It clearly shows the cesspool, the installation of the structure of the toilet and the hatch for cleaning. This design is quite simple in the device and it is easy to build. However, in order for it to be reliable, it is necessary to achieve the rigidity of the ligaments of each of the parts among themselves. Internal space arranged above cesspool, during the construction of the walls may look like this. That is, a base of bars is installed directly on the foundation, on which the frame of the structure is subsequently fixed.
Upon completion of finishing the country toilet from the inside, the room will have a cozy and neat appearance, such as you see in the photo.
If you wish, you can come up with a different toilet design, but perform interior decoration necessary from warm materials. We do not recommend using ceramic tiles for decoration, as this is a cold material, and in winter the tile will also become slippery.
Dry closet in the countryside
If you cannot build a country toilet with your own hands or you do not have the desire or time to get involved in construction work, then use a dry closet. This option will save you from having to dig a hole and from installing a house.
A biotoilet is nothing more than an autonomous toilet bowl that does not require either connection to branch communications or a separate room. It consists of two chambers, the upper of which acts as a toilet bowl, and the other is used for biological waste processing. In the lower chamber there are active substances that decompose feces, turning them into a homogeneous, odorless mass. The action of the bioactive liquid is enough for 10 days, after which the chamber is cleaned, the contents are poured into the soil or the central sewer.
The choice of disposal method depends on what substances were used in the dry closet. They come in three types: chemical, composting and microorganic. Each of them is ideal for a specific type of dry closet.
For composting, peat is used as an active substance. It is highly absorbent - 1 kg of peat is able to absorb 10 liters of liquid. Compost, which is odorless and obtained as a result of active processes, is perfect for fertilizing the garden.
As a rule, in the compost with this dry closet there are ventilation pipes that remove unpleasant odors during processing.
The work of a dry closet is based on the use of chemicals. It has an indicator that indicates that the container needs to be cleaned. Recycled waste is discharged into the sewer, and you do not harm the environment. For these models, there special means with non-freezing property.
The third type is a dry closet, in which microorganisms are responsible for the waste processing process, turning them into compost. The material obtained in this way is environmentally friendly and absolutely safe for animals and soil, so it will not be difficult to dispose of it.
If necessary, you can install a dry closet in a normal room, which is located in the yard, and in winter bring it into the house, allocating a convenient place for these needs.
What biological agents are used for toilets
Owners country houses those who have pit toilets on the site are offered special tools (they are similar to those used in dry closets).
As you can see, there are many ways to solve the problem of a toilet in a country house - you can always choose the most suitable option.
Everyone knows the popular expression that says that acquaintance with the theater begins with a hanger. We will not be mistaken if we say about the dacha that it begins with a toilet. According to him appearance and the device can be judged by the owner. The “handy” owner has this building beautiful and neat. It has no drafts and no bad smell.
It will be useful for beginners of country life to learn how to build an inexpensive and comfortable outdoor toilet with their own hands.
In this article we will talk about the most common types of closet structures, their arrangement and consider the possibility of combining with other summer cottages.
According to the method of disposal of sewage, these facilities are divided into three types:
- Powder closets;
- Toilets with a cesspool (septic tank);
- Water closets.
The first type of outdoor toilet is easy to arrange and operate. Its main part is a seat (stool), under which a removable container is installed. After each visit, a peat mixture is poured into it with a scoop, which absorbs liquid and unpleasant odors.

A toilet seat with a sealed lid and a bucket of peat - that's all you need to equip an outdoor latrine
A significant drawback of this design is the small capacity of the bucket. For those who rarely visit the dacha, powder closet is optimal. If you plan to spend weekends on your site or your family has more than three people, you will often have to empty the container.
An improved version of powder closet is a peat dry closet, offered on the market today. It consists of a plastic case, inside which one or two containers are placed. A tank with a peat mixture and a dispenser is installed on top.

1, 2 – containers for the solid fraction; 3 - funnel for liquid; 4 – funnel for solid fraction; 5 - a tank with a dispenser for peat; 6 - ventilation pipe; 7 - drainage tube
To eliminate unpleasant odors, the structure is equipped with an exhaust pipe leading to the roof of the cabin. Empty containers in such a toilet should be no more than once a week. This is achieved by separating the liquid and solid waste fractions.
When using a dry closet, the liquid enters a funnel located in the front of the body and is discharged through a tube into the ground or a plastic container located on the street. Dense fractions of sewage accumulate in the inner container.

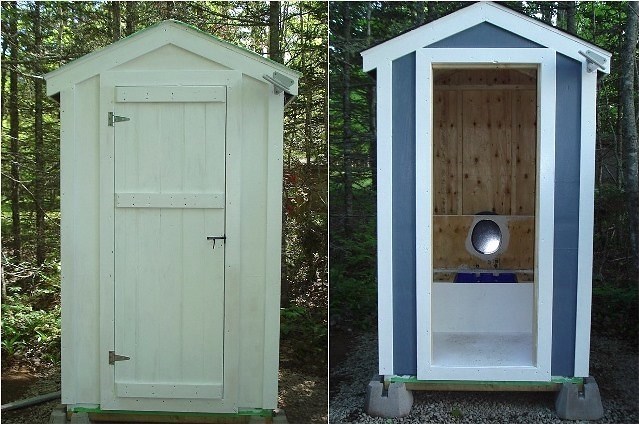
Dry closet in the "combat position" and in the process of installation. In the first case, the closeness of the booth catches your eye, so we do not advise you to save on its area at the expense of comfort.
Despite the advantages of a peat toilet over a classic powder closet (conversion of waste into fertilizer, good ventilation and extended use), many summer residents choose the option with a cesspool (septic tank). Its device is cheaper than buying an "advanced" dry closet, and the frequency of cleaning is 1-2 times a year.
At the same time, one should remember two serious problems that the cesspool can present to its owners if it is built incorrectly:
- Infection of the soil with pathogenic bacteria;
- Bad smell.
It is not enough to simply dig a large hole in the ground and put a closet over it. The sewage tank must be securely isolated from the ground. A concrete tank treated with a waterproofing impregnation is best suited for this purpose.
The second condition is the introduction of special bacteria into the cesspool. They quickly decompose sewage, disinfect them and eliminate odor. Dry concentrates of bacteria for septic tanks and cesspools can now be bought at any household supermarket.
The design of the backlash closet (air toilet) cannot be called too complicated. Its main part is a concrete pit with a hole. A booth is installed on it. To eliminate unpleasant odors, an exhaust pipe is placed on its back wall. Its lower end is in the pit, and the upper one rises above the roof. Due to the difference in height, thrust is formed. The air from the cabin is sucked into the pit and expelled into the atmosphere through a pipe.

Scheme of the design of the backlash closet
Another popular option for a summer cottage toilet is a water closet. Its main part is the well-known toilet bowl with cistern. There is a water lock in it, which excludes the possibility of the smell coming out of the pit into the booth. Unfortunately, it is impossible to use such a system without heating, because in winter time the water in the toilet and cistern freezes. Therefore, this design is designed for the warm season.

Drawing of a street water closet
With the onset of warm days, the container on the roof of the booth is filled with water. The outlet channel is connected to through a tee equipped with a vertical ventilation pipe.
Toilet cubicle options
You can build a toilet cubicle from different materials. Most often, the basis of the design becomes wooden frame, sheathed with OSB, grooved board, plywood or siding.

The toilet, sheathed with a planed board, looks neat and cozy
Moving away from the use of the frame and sheathing, the house can be folded from, thereby creating a picturesque imitation of a log house.

Lovers of natural wood can also be advised to use a blockhouse for sheathing. It is cheaper than a massive log and is easily mounted on a frame. No less attractive are the walls of the toilet, lined with wooden clapboard"herringbone".

Many dacha owners are not satisfied with the rustic look of the "birdhouse" toilet. Striving for originality, they erect luxurious log mansions on the plots for "solitary reflections."

Brick and blocks as materials for the construction of latrines are still very popular. Whatever one may say, but the capital structure will stand for more than a dozen years. Neither dampness, nor wind, nor the sun will harm him.

If not at hand facing brick, then the walls can be built from the remains of red and silicate. High-quality plaster will hide the irregularities of the masonry.

A booth built from mixed bricks is waiting for a plaster finish
Translucent polycarbonate can be used for lining a metal profile booth. This material looks very aesthetically pleasing and is not afraid of moisture.

Sheet corrugated board is a practical and durable material for a toilet cubicle. You can put it on both wooden and steel frames. The only condition is the internal lining of the walls with insulation. Without this addition, there will be a hot “oven” in the summer, and a freezer in the winter.

Interior decoration of the booth with plastic clapboard - concise and hygienic
Straw blocks can be attributed to the category of unusual materials used for the construction of latrines. The cabin built from them is warm and cozy. Anyone who wants to impress the imagination of neighbors and guests does not go to the construction base for materials. Having collected a certain number of empty bottles, he builds a toilet out of them "to everyone's surprise."

In addition to rectangular and rounded structures, "huts" of various sizes are very popular.

There are two rational grains in this solution:
- The slopes of the steep roof replace the walls;
- The unusual appearance of the building adorns the landscape.
Very often, the toilet becomes part of the hozblok. This solution allows you to place several rooms in one building. As a result, savings are achieved during construction ( common walls) and increases the comfort of use (a warm toilet is always at hand).

A solid combination of a latrine with a shower, lined with siding and covered with a hipped bituminous roof

A variant of a brick toilet interlocked with a shower cabin

Aesthetically not a very good combination in one outbuilding (toilet-shower) log cabin and plastic slate roofs

Some owners combine two toilets in the building: "for gentlemen and ladies."
How to build a simple toilet for a summer residence on your own?
Having decided on the waste disposal system (powder closet, cesspool, septic tank), you can begin construction.
Minimum cabin dimensions- width 1 meter, depth 1.4 meters and height 2.0 meters.
The basis of the structure, the step-by-step construction of which we will consider, is a wooden frame made of antiseptic bursa. It can be placed on a block foundation or on a shallow concrete "tape". A thick sheet of plywood or OSB board with a rectangular hole cut into it is attached to the frame from above.

Having assembled the base, the vertical racks of the frame and strapping bars are set according to the level.

Having made the frame, it is sheathed with plywood using a jigsaw and a screwdriver.

The next step is the installation of the roof rafters. They are made from a dry beam with a section of 5x10 cm, cutting it into the upper belt of the wall binding. In the upper part, the bars are connected to a horizontal ridge board.

Having completed this stage, the rafters are sheathed with plywood. This is the best basis for shingles, which will lie on the roof.

Having finished with the roof, proceed to the assembly of the "podium" frame. It will have a powder-closet storage tank and a hole for a seat with a lid.

The toilet door is assembled from a tongue-and-groove board fastened with transverse strips for greater rigidity.

Having completed the strapping of the doorway with a bar, they attach to it with the help of hinges door leaf. Finishing operation - painting the closet booth from the outside and from the inside.
In conclusion, let's say that we considered the option of building a summer outdoor toilet. For the winter season, the walls from the inside must be insulated with foam plastic (minplate) and sheathed with any sheet material (plywood, OSB, board, plastic).
If you decide to bring light into the booth, then along the way you can increase the comfort of use at minimal cost. Install an electric fan heater. In just a few minutes, it will warm the air to a positive temperature.
Even if the dacha is just a bare piece of land without a single building, you still can’t do without the main thing - the toilet. The need for this uncomplicated building arises after a few hours of stay on suburban area. Despite the fact that we all imagine how a toilet should look like and what needs to be done, it’s still not worth rushing. First of all, you should study the site in order to understand what type of country toilet can be built in a particular case, because there are several of them. Then you need to decide where exactly you can put the toilet, while observing sanitary rules and regulations. And only after that you can proceed directly to the construction. There is nothing complicated in making a country toilet with your own hands. However, it is not necessary to make a toilet box yourself. Modern market can offer ready-made toilet houses for every taste. In this article, we will analyze the instructions on how to make a toilet with your own hands, starting with choosing the type of toilet and ending with making a house.
What kind of toilet in the country can be equipped - types and features
In a well-equipped dacha, where there is a house and you can actually live, it is advisable to have two toilets - one in the house and the second on the street. The toilet in the house is convenient to use at night or in bad weather when it rains. Still, the house is warmer and more comfortable. An outdoor toilet for a summer residence is necessary in order to use it during the day after garden work on the site and not carry dirt from the street into the house.
In total, there are several types of toilets that can be used in the country:
- Outdoor toilet with a cesspool.
- Powder closet.
- Backlash closet.
- Dry closet.
- Chemical toilet.
The choice of toilet is influenced by such an indicator as the level of groundwater. If the water is far away (deeper than 2.5 m) and never rises above this mark, even during the rainy season or spring floods, then any of the proposed toilet options can be used. If the groundwater level is high, the water is close to the surface, then it is impossible to equip a toilet with a cesspool.

Outdoor pit toilet- the good old time-tested design. It is a cesspool up to 1.5 m deep, on top of which there is a toilet house. Impurities in the pit accumulate and gradually decompose. If the intensity of use of such a toilet is high, then the filling of the pit occurs rapidly, the sewage does not have time to ferment. Previously, such a problem was solved simply - they rented a toilet house, dug in an old hole, and dug a new one in another place and put a toilet on top. Now they prefer to clean cesspools either with the help of a sewage machine or manually.

Powder closet- a toilet option for areas where water is close. In its design there is no cesspool at all. Instead, a container (bucket, barrel, box) is used, which is installed immediately under the toilet seat. So that sewage does not remind too much of itself with an unpleasant odor, after each trip to the toilet they are sprinkled with dry peat, sawdust or ash. The process itself resembles powdering, from which the name of this type of toilet "powder-closet" came from. After filling, the container is taken out and emptied in compost pit, heap or other place. Over time, sewage, sprinkled with peat, will turn into a wonderful fertilizer.

play closet- a toilet with a sealed cesspool, which is cleaned with a cesspool machine. Usually backlash closets are equipped directly in the house next to outer wall Houses. The cesspool is located outside, sewage enters it through a pipe. The pit itself has a slope away from the house for easy cleaning.
dry closet- a booth familiar to urban residents with a container into which active microorganisms are poured to process sewage. Probably the easiest way to equip a toilet in the country, since you don’t need to build anything - you can buy a ready-made dry closet of any size, both outdoor and home.
chemical toilet differs from a dry closet only by means of sewage processing. Chemical reagents are used here, so the contents of the container after processing cannot be used as fertilizer in the garden, unlike a dry closet.

peat toilet- This is a homemade version of powder closet. In fact, the powder closet is also a peat toilet, because in it peat is used to powder feces. The home peat toilet is a modernized achievement of civilization. It is very similar to an ordinary toilet, only in the water tank instead of water there is dry peat, and instead of sewer pipes, a sewage container.

Such a toilet can be safely installed inside the house. To eliminate unpleasant odors, ventilation is provided in its design, which must be taken outside.
The choice of a toilet for a summer residence depends entirely on your personal preferences and on the conditions that dictate the rules of SanPin.
There are certain restrictions on the placement of an outdoor toilet. First of all, they concern those toilets in which sewage can come into contact with soil and groundwater.
- There must be at least 25 m from the toilet to the water source. Whether it is a well, well, lake, stream or other water body. If the summer cottage is located under a certain slope, then the toilet must be installed below the source of water intake. This will prevent effluents from entering drinking water.
Important! Please note that you should consider not only your source of water, but also the nearest neighbors.
- From the toilet to the house and the cellar or basement there should be at least 12 m.
- From summer shower or baths, saunas at least 8 m.
- The distance from the building for keeping animals to the toilet should be 4 m.
- From tree trunks - 4 m, from shrubs - 1 m.
- From the fence to the toilet should be at least 1 m.
- Also, the wind rose must be taken into account when choosing the place and location of the outdoor toilet, so as not to annoy either yourself or your neighbors with unpleasant amber.
- The door to the toilet should not open towards the neighbors.
- If the groundwater is below 2.5 m, then any outdoor toilet can be equipped. If it is higher than 2.5 m, then a toilet with a cesspool cannot be made, only a powder closet or backlash closet, and dry closets can also be installed. Such structures are safe in the sense that sewage cannot enter the groundwater and pollute it.
Please note that when choosing a place for a toilet, you need to focus on objects not only on your site, but also on the neighbor's. This applies to trees, and sheds, and houses, and everything else. For toilets of the powder-closet and backlash-closet types, the above restrictions do not apply, since sewage does not come into contact with the ground in them. The only thing that will have to be considered when placing them is the wind rose and ease of use.
Do-it-yourself toilet in the country - instructions for building a powder closet
It’s not so difficult to equip a country toilet with your own hands, it’s enough to have basic carpentry skills, engineering thinking and stock up on the help of a friend. Let's consider an example of building a toilet in a country house like a powder closet. As we already wrote, its peculiarity is that there is no cesspool under the toilet. And this makes the task much easier. Firstly, such a toilet can be located next to a residential building. Secondly, the construction technology itself is somewhat easier; you don’t have to dig a foundation pit. Thirdly, groundwater pollution is excluded.
The construction of the toilet must begin with a drawing so that all elements and details have the appropriate dimensions, and not by eye. Due to the fact that there is no cesspool in the powder closet, only the design of the toilet house will be shown in the drawing.
Schematically powder closet can be represented as follows:

The dimensions of the toilet are selected so that it is convenient to use. For example, the most common size: width 1.5 m, depth 1 m, height 2.2 m. Dimensions can be increased if the dimensions of the owners require it. The material for making a toilet can be different: the most common are wooden toilets, but you can sheathe the walls with a metal profile, slate or other material, as well as build brick walls.
Country wooden toilet - sectional drawing.
Example 1.


Example 2.

You can use the ready-made drawing, or you can make your own. The main thing is compliance with the dimensions during construction.
Foundation and support for the toilet

A country toilet is a structure that does not require a heavy foundation. In some sources, you may come across a proposal to fill a strip foundation under the toilet. In fact, this is superfluous, especially if the toilet is wooden. A support for a toilet house can be made in two ways: the first is to bury the pillars, the second to lay bricks or concrete blocks around the perimeter.
Can be used as support poles wooden beam or a log, and concrete columns. The latter are more resistant to aggressive environments and will last longer.
- First of all, we mark the area. It is extremely important to accurately determine the angles of the structure.
- We take 4 asbestos-cement pipes with a diameter of 150 mm and coat them outside bituminous mastic.
- In the corners of the toilet house, we dig wells and bury the pipes to a depth of 50 - 70 cm. The depth of the pipes may be more, it depends on the structure of the soil. Can be made 90cm or 1m.
- To a height of 1/3 of the pipe, they must be poured with concrete mortar. Carefully compact the concrete to remove air bubbles.
- Inside the pipes we insert wooden or concrete poles. To fix them, add concrete mortar.
Support pillars in this case can also act as a vertical part of the frame, i.e. they must be driven to a height of 2.3 m from the ground. It is also necessary to constantly check that the location of the pillars is even relative to the corners.
There are cases when it is enough to fix concrete blocks or bricks as a support, on which the frame will then be installed. In this case, it is necessary to remove the top layer of soil to a depth of 20 - 30 cm and compact the base tightly. For greater reliability, a layer of sand can be covered at the bottom. Concrete blocks, bricks or concrete curbs are installed on top.
We make the frame of an outdoor toilet

The frame of a country toilet can be made from a wooden bar 50x50 mm or 80x80 mm. It is not necessary to take a thicker and more massive timber 100x100 mm and more. You can also use metal corners.

The frame should be a structure:
- 4th bearing vertical supports.
- Toilet roof lining. The longitudinal bars for the roof should protrude 30 - 40 cm beyond the toilet body. In front, the canopy will serve as a visor, and in the back - to drain rainwater away from the toilet.
- Strapping or screed at the level of the future toilet seat. Usually, the strapping bars of the toilet seat are attached to the bearing vertical supports. The height of the toilet seat should be comfortable - 40 cm from the floor of the toilet.
- Diagonal struts for structural strength on the rear and side walls of the toilet.
- Frame for fastening the door. Two vertical supports to a height of up to 1.9 m and a horizontal lintel on top at the same height.
Be sure to calculate the height of the toilet seat, as too high a seat will be uncomfortable, especially if there are short people among the owners. Indicate at what level the final floor in the toilet will be, and set aside 38 - 40 cm from it upwards. Please note that on top of the strapping there will be a sheathing 20 - 25 mm thick.
We sheathe the body of the toilet, make the roof
Further construction of the country toilet is to sheathe the frame. Since wooden toilets are always popular due to their original beauty, convenience and comfort, the walls of the country toilet can be sheathed wooden planks.

Wooden boards 15 - 25 mm thick are nailed to the frame, tightly fitting them to each other. Boards must be placed vertically. Since the roof will be sloped towards the rear wall, the upper part of the sheathing boards will have to be carefully cut at an angle.
Instead of wood, you can use sheets of corrugated board, slate or other material. They are much easier to work with, as you only need three sheets for the back and two side walls. But in such a toilet it is much less comfortable to be than in a wooden one. And all because there is no natural moisture and air exchange through the walls.
On the back wall of the toilet, it is necessary to make a door through which it will be possible to remove the container with sewage. Usually it is made over the entire width of the back wall to a height of 40 cm (up to the height of the toilet seat). Such a door is fixed on hinges. You can make it from the same wooden boards.
The roof of a country toilet is usually covered with the same material as all the buildings on the site so that the buildings do not stand out from the composition. You can use sheets of corrugated board or metal tiles. A hole must be made in the roof for the ventilation pipe, which should then be carefully sealed.
If you want to make the roof of the toilet wooden, then it must be covered with roofing felt or other rolled material so that the tree does not get wet.
We hang the door
The door for a country toilet is usually made of wood. We hang the door on hinges. The number of hinges 2 or 3 depends on the severity and massiveness of the door. The heavier the door, the more hinges should be. The mechanism for closing the door to the toilet, everyone does as he likes: a latch, a hook, a latch or a wooden latch. A latch must also be installed inside the toilet.
A window should be made above the door through which natural light can penetrate. Usually it is made as close to the roof as possible so that water does not get inside during rain. The window can be glazed, then neither rain nor insects that often fly through such windows will be terrible. What a country wooden toilet looks like can be seen in the photo.
Country toilet: photos - examples


We equip the toilet seat
The seat or toilet seat in the country toilet is made of wooden boards, lining or moisture-resistant plywood. It is better to use pure wood without additives, so we exclude plywood. The frame of the future toilet seat was made at the stage of arranging the frame, so now it is enough to carefully sheathe it with wooden boards and paint it. In the middle we cut a hole through which we will relieve ourselves. Be sure to check at what depth from the beginning of the toilet seat a hole should be made so that it is convenient to use it.

Under the toilet seat we install a container for sewage with a volume of 20 to 40 liters. By the way, the toilet seat cover can be made reclining on hinges, or it can be stationary.
We hang a container for peat on the wall in a convenient place. Below we put a bucket for toilet paper. A washbasin can be installed inside the toilet, if the dimensions of the building allow it. Then we install a bucket for slops under the washbasin.
How to build a toilet in a country house with a cesspool

The construction of a pit latrine is somewhat more complicated, as a waste pit will have to be equipped. The toilet house for this type of toilet is no different, so we will not touch it. We will only indicate how to make communications. The diagram shows how the cesspool should be located relative to the toilet house. Based on this, we carry out the marking of the site and proceed to earthworks.

- We dig a cesspool with a slope towards the rear wall of the toilet with a depth of 1.5 m.
- We tamp the bottom and walls of the pit with clay with a layer of 15 - 25 cm. Some people make the walls of the pit from wood, brick or concrete instead of clay. If the groundwater is at a sufficient depth, then it is not necessary to make the walls of the cesspool completely airtight. Enough clay castle.
- We knock down the base for the toilet from a wooden bar 100x100 mm. You can also use a sidewalk curb or concrete blocks, laying them on the ground. If you use a wooden beam, then it must be treated with an antiseptic.
- Above the cesspool we equip the flooring from the boards. First, we knock down the frame of the bars. We make such a distance between them that it is convenient to clean the pit. Please note that the flooring is done outside the toilet house, leaving a free space under the house of sufficient size for sewage to fall into the pit.
- The flooring must be upholstered from below with roofing material or other rolled material.
- Behind the toilet we install a hatch, which is a hinged lid. The hatch will be used when clearing the pit. We treat the wooden hatch with an antiseptic.
- We are laying ventilation pipe from the pit. We install it next to the back wall of the toilet, display it 70 - 100 cm above the roof of the toilet. For these purposes, you can use a regular sewer pipe. We fix a visor on top of the pipe so that water and debris do not get inside. We fix the pipe to the back wall with clamps. The bottom edge of the ventilation pipe should be 15 - 20 cm below the level of the toilet floor.
- A toilet house is installed on top.
- Around the toilet with a cesspool, it is imperative to make a blind area and drain rainwater so that it does not flood the sewage pit.
If in the future it is planned to clean the cesspool with the help of a sewage truck, then the toilet must be located on the site so that the car can drive up to a sufficient distance. Remember, the sleeve of such a machine is only 7 m.
Country toilet backlash-closet and its features

Most often, a country toilet of the backlash-closet type is installed next to a residential building or inside the house. The sewer pit is located outside the building, behind its walls. A toilet of this type can only be built where it is possible to heat a sewage pit in winter period. If they don’t use the toilet in winter, then before the end of the season, the cesspool must be completely cleaned.
The main difference between the backlash closet and other types of toilets is that the cesspool in it is completely sealed and is regularly cleaned with a sewer machine. Here are a few differences in the construction of a backlash closet:
- A sealed pit so that sewage does not soak into the ground. You can fill a pit of concrete, make it out of brick and plaster, or you can use ready-made plastic containers- caissons.
- There must be a ventilation pipe from the cesspool. It must be carried out through the chimney of the stove or fireplace. In turn, a pipe should go from the chimney into a pit through which warm air will flow. This is necessary so that the pit does not freeze. The material of the exhaust pipe is asbestos-cement or ceramic.
- If the house does not have an ordinary stove or fireplace, but only gas heating, then the heating of the cesspool must be carried out using a low-power electric heater.
- A cover / hatch is made over the pit. To prevent the lid from freezing, it is made double: the upper one is metal or cast iron, and the lower one is wooden. Between the covers we lay heat-insulating material.
- The slope of the pit should be away from the house for easy cleaning.
IN Lately peat toilets for summer cottages are becoming increasingly popular. Their convenience is that they can be safely placed in the house in any room. Peat toilets are easy to clean, practically do not emit a smell, even a fragile woman or woman can cope with them. old man. Also, such toilets can be made on the street, the same powder-closet is just the predecessor of the modern peat toilet.
The first building that appears in the summer cottage is not a house or a shed for inventory, but an outdoor toilet. This uncomplicated building cannot be dispensed with within a few hours after appearing in the country. But before asking the question: "How to make a toilet in the country with your own hands?" and start building, albeit temporary, but not the simple structure, you need to study your own site well and understand where it is better to build a toilet, and what design it will be.
And only then you can look for drawings, prepare building materials and take up the tool.
What is the best toilet for a summer residence?
Even on a well-equipped site where there is a house, many summer residents prefer to have both a street and a home bathroom.
- The toilet in the house is indispensable at night and in bad weather. You can’t do without it if the cottage is used all year round.
- An outdoor toilet for a summer residence is very convenient in the midst of garden work, allowing you to quickly relieve yourself and not bring dirt into the house.
Types of outdoor toilets
- Toilet with a simple pit latrine. When the pit fills up, the house is moved to another place, or cleaning can be done with the help of vacuum trucks.
- The play closet also has a cesspool, but here it is airtight and can only be cleaned with a special machine.
- applicable where aquifers are closely located. Here, instead of a pit, a container is provided for collecting feces under the toilet seat. Backfilling with dry peat or sawdust after each use saves from the smell.
- Country toilets, operating on biological additives or chemicals, can be equipped both on the street and in the house.
Making a toilet in the country with your own hands is easy. The main thing, when choosing its device, is to take into account the level of groundwater under the site. If the water layers here are deeper than two and a half meters, then you can safely build a toilet of any design. Otherwise, a toilet with any cesspool can be a dangerous structure.
Rules for placing a toilet in a summer cottage
Before starting the construction of a toilet in the country, it is important to determine its location, taking into account the existing restrictions, which, first of all, relate to structures with cesspools.
And here, in addition to the level of groundwater, you should pay attention to the fact that:
- to reservoirs, wells or other sources of water was at least 25 m;
- to or shower, arranged on the site, at least 8 m;
- the toilet was located below the water intake point;
- to the house, cellar or basement was at least 12 m;
- to trees - 4 m, and up to fruit bushes and fences not less than a meter;
- a car could drive up to the cesspool, the pumping hose for which most often has a length of 7 m.
When choosing a place, the predominant wind direction and the location of the toilet door are taken into account so as not to annoy unpleasant odors and other awkward moments to either neighbors or relatives.
DIY
It will not be difficult to equip a toilet if the summer resident even has basic skills in working with various building materials and tools. You need to start building a toilet in the country with the selection of a drawing or with its own development. The easiest way is to calculate and build a toilet without a cesspool. It does not require any foundation construction, nor the inevitable earthworks.

The dimensions of the toilet house are selected so that the structure is convenient to use.
The most common version of the country toilet has:
- width from one and a half meters,
- depth of at least one meter
- height at the highest point of at least 2.2 meters.
If desired, the dimensions can be increased.
Country toilet drawings
You can use one of the ready-made drawings that are now available on the Internet, the main thing is that the toilet for giving in the photo is accurately calculated, fits in size and fits into the selected area. If there is necessary training, then the calculation can be carried out independently.

What is the best way to make a toilet?
 Although the most popular are wooden toilets for summer cottages, other materials are used along with boards for sheathing country toilets. This metal siding and slate, multi-layer plywood and other materials, toilets are also built from brick.
Asking the question: “What is better to make a toilet in the country?”, Many summer residents choose sheet materials, which reduce the time for sheathing the frame. However, it is much more comfortable to be in a wooden toilet house, since the tree breathes, exchanging air and removing excess moisture. However, it should be remembered that all wooden details, and especially those in contact with moisture, must be treated with a special impregnation.
Toilet foundation
 A country toilet most often does not require the arrangement of a large-scale foundation, since the structure itself is made of fairly light building materials. It is worth pouring the foundation for the toilet only when it is built from bricks or from blocks, as well as when constructing a concrete pit.
Both wooden beams and concrete structures are used for supports, which turn out to be more durable due to their resistance to humidity, temperature and other environmental influences.
- First, the construction site is marked out, determining the corners of the toilet house.
- Then, asbestos-cement pipes of suitable diameter coated with bituminous mastic are dug into these points to a depth of 50 cm. The depth at the same time depends on the equipped design of the toilet for the dacha and the characteristics of the soil.
- Then the pipes are filled with concrete by a third, which is carefully compacted.
- Now, pillars of wood, concrete or angle are inserted into the pipes, and mortar is added again to give the structure strength. These pillars can serve as vertical frame guides, which means that their location should be verified using a level or plumb line.
If the supports on which the frame is to stand are made of blocks or bricks, then before installing them, you need to remove a 30-centimeter layer of soil and compact this base. You can additionally seal the bottom with sand filling, on top of which concrete blocks are installed, or a brick base is made.
toilet frame
It is easy to make a frame for a toilet in the country with your own hands from a bar no thinner than 50x50 mm or metal corners.

With a traditional toilet design, the frame consists of:
- four vertical supports that carry out the bearing function;
- roof strapping and at the level where it is supposed to make a toilet seat;
- frame for a doorway;
- diagonal ties on the back wall and on the sides of the toilet.
Already at the stage of construction of the frame, it is important to calculate the height of the toilet seat. To do this, you need to designate the level of the future floor, and then count up 40 cm, taking into account the thickness of the strapping.
Toilet roof
The roof is made from any available materials, for example, metal tiles or sheet corrugated board. With a wooden crate, the roof is made of roofing material or other material that provides reliable protection against moisture. The roof can be gable or shed, the main thing is that it is reliable and does not retain moisture. We must not forget about the hole for the outlet of the ventilation pipe, which is sealed to prevent leaks.
In the toilet for a summer residence, a ventilation pipe is removed from under the floor level, from a pit or container for collecting feces. Moreover, it should be above the level of the roof of the toilet house.
Toilet wall cladding
The next stage in the construction of a toilet in the country is the sheathing of the erected frame. At this stage, you can choose any of their favorite materials. More often you can see wooden toilets for summer cottages - such structures are convenient, practical and quite durable. When used for wood sheathing, it is better to take boards from 15 to 25 mm thick, which are tightly fitted and attached to the frame. To prevent moisture leakage, it is better to place the boards vertically.
Toilet seat and floor
 When calculating the toilet seat, it is important not only not to make a mistake with its height, but also to make a hole at a comfortable distance from the edge. The frame of the toilet seat is carefully sheathed with boards and treated with sandpaper and painted. The seat cover is conveniently hinged.
Toilet door
The door in a wooden toilet for a summer residence is made of the same material as the walls. The structure is hung on loops, the number of which depends on the weight and size of the structure. Both from the outside and from inside mount any closing mechanism, be it a hook, latch, latch or other device.
Another door is made on the back wall. It can serve to remove the waste container or to immerse the sleeve of a sewage truck.
To provide at least a small but natural light, a window is cut above the door.
When construction is completed, drainage must be performed around the house, especially if the toilet for the summer cottage is located above the cesspool.
Video: building a country toilet with your own hands
The restroom at their summer cottage allows you to work without being distracted. And you don’t want to go home just to get into the toilet - you can put dirt on the floor. Therefore, one cannot do without a restroom located in the garden. But how and from what to make it? There are rules in building a wooden toilet.
Features of a wooden structure
Summer residents prefer to build a toilet from boards on their site. It is a latrine with a cesspool (backlash-closet) or a structure where a container for biological waste (powder-closet) is used instead of a pit. Both types of toilet are very convenient, but the powder closet needs to be cleaned much more frequently.
It is worth stopping at a backlash closet for a summer resident who has a large family who constantly works on the site. A powder closet is suitable for two or those who spend not so many days a year in the country. In this case, a special container for collecting biowaste will need to be emptied no more than once a month.
This restroom is made of planks
A wooden toilet is in greater demand than a plastic or metal one. A toilet made of wood has a lot of advantages, however, there are also disadvantages.
Advantages
- The wooden structure looks beautiful and, most importantly, is combined with nature. It becomes more original after painting;
- A minimum of finance is spent on the construction;
- It is operated for a long time if it is processed once a year and periodically cleaned;
- Wood masks unwanted odors and smells pleasantly like a forest at first;
- When the life of a wooden toilet is over, it can be taken apart and burned in an oven.
disadvantages
- Wood is a material susceptible to fire. To avoid unexpected fire, you can cover the boards with a heat-resistant agent;
- The wood gradually becomes damp and rots, which can be prevented by treating it with a special preparation;
- Over time, the wooden structure deteriorates, because bugs start up in it. So that they do not eat wood, the toilet will have to be treated with a pesticide.
Preparation for construction
First of all, they make a drawing of the future structure, that is, a wooden cabin with a cesspool under it. A toilet schematically depicted on paper will greatly simplify the assembly of the restroom frame.
Drawings and correct dimensions
A summer resident can use ready-made drawings of a wooden toilet. He will only need to thoroughly study them and strictly follow the recommendations. Otherwise, the design may turn out to be twisted and sloppy.
Among all types of outdoor toilets, the most common is the "birdhouse", the shape of which is a rectangle. Unlike the "hut", it requires less skill in construction.
View of the toilet from different sides
Toilet frame and interior decoration
A latrine in the form of a "birdhouse" is usually built 2.3 meters high. The standard width of this design is one meter. And the length of the wooden toilet is less stringent, it can vary from one to one and a half meters. But if you wish, you can slightly increase all other indicated sizes.
Required materials and tools
For the construction of the toilet, materials will be needed in a certain amount. According to calculations, only for the construction of a cesspool, the summer resident will have to prepare in advance:
- 4–6 reinforced concrete rings or a metal barrel;
- 0.25 m3 sand;
- bag of cement;
- 2 buckets of rubble.
When creating the base and booth, you will need the following:
- 4 concrete blocks;
- 2 m2 roofing material;
- 2 buckets of sand;
- 3 six meters edged boards size 100 mm/ 50 mm;
- 3 six-meter floor boards 9 mm thick;
- Edged board 25 mm (6 meters long);
- Wooden six-meter beam 0.05 / 0.05 m;
- Reinforcement cuttings of 0.5 meters;
- Galvanized meter sheet.
The top of the booth will need to be covered with 8-wave asbestos-cement slate, of course, painted.
The building can be sheathed with clapboard made of needles (length - 3 meters, width - 87 mm). The lining will take 4 packs of material.
The assembly of the frame must be carried out using nails 1.2 cm long, 70 mm, 40 mm and 100 mm long (for slate) and self-tapping screws 70 mm long.
A summer resident who plans to independently build an outdoor toilet with a "podium" and a window needs to purchase Additional materials and items:
- Sedushku;
- Glass 0.5 / 0.1 m, galvanized hinges and bead (1.5 meters) for the window.
The door is constructed from a block with dimensions of 0.9 m / 2 m. To frame it, you need 5 running meters clypeus. You will also need to purchase hinges, door handles and a latch in advance.
To work with wood materials, you need to arm yourself with a hacksaw, planer, hammer and screwdriver. And when creating a cesspool, you will need a shovel.
Instructions for building a simple wooden toilet
- Looking for a suitable location for the toilet. According to the rules, it should stand 25–30 meters from the groundwater flow. If it is impossible to maintain the sounded distance, then the summer resident needs to immerse a sealed container in the cesspool so that biowaste does not seep into the ground.
- Take a shovel and make a hole in the ground. There are no special requirements for its size, but it should slightly go beyond the walls of the toilet or be strictly under it. It is advisable to put tires on the bottom and walls. However, instead, a metal barrel with a volume of 200 liters can be lowered into the pit. The container immersed in the ground must be filled up on the sides, and the soil around must be tamped. Not a bad replacement metal barrel- special containers made of plastic, reinforced with metal ribs.
Installation of a container for collecting biowaste
- Concrete blocks are placed at the corners of the runners of the future restroom. The foundation with "pillars" is covered with roofing material for waterproofing.
Creating a foundation from blocks and boards
- They begin to create a base: skids are made from the bars, and then they are connected and placed on a ready-made platform. The boards must be covered with an antiseptic.
- Floor coverings are laid on the runners. To ensure that cold air does not enter from below when using the toilet, with reverse side floorboards are sheathed with OSB sheets. Between the boards put heat-retaining material, that is, foam. OSB sheets are again attached to the floor from above. At this stage, a round hole is created in the floorboards for the drainage of feces.
Here they made a square hole in the floor
- The walls of the restroom are assembled from boards 100x50 mm, using nails and self-tapping screws. The wall frames are fixed to the platform using the same self-tapping screws, as well as corners.
Frame construction
- Proceed to the construction of the supporting system of the pitched roof. Notches are sawn in the rafters, and then they are installed on the top board of the gable and side walls. Then they are nailed. OSB sheets are placed on top of the structure, that is, under the roof, laying insulation between them, and a material that protects against moisture penetration. Lastly, slate is attached to the top.
- Make a door. To make it strong, it is pulled diagonally with two bars. The door is sheathed in the same way as the walls of the restroom. After that, hinges, handles and a latch are attached to it.
Completely finished restroom
Do I need to sheathe a country toilet inside and out?
Finishing the country restroom inside is not necessary. But if the summer resident is not too lazy and sheathes the walls, floor and ceiling of the toilet, then the structure will last much longer. As a material for interior decoration of the restroom, you can use:
- Styrofoam sheets that are attached to the walls tightly to each other, providing insulation from wind and moisture;
- A film stretched over supports slightly separated from the outer walls. It serves as a barrier to the penetration of cold air into the room;
- Ordinary or decorative edged boards that lay out all the walls inside the toilet;
- Lining, that is, the most aesthetic material for decoration.
If you took up the interior decoration of the restroom, then do not forget about the outer skin. Covering the outside of the toilet is a guarantee of its long service life, despite the effects of precipitation, low temperatures and winds. External protection material wooden structure restroom can be:
- Drywall;
- Siding;
- plastic panel;
- Metal profile.
A wooden toilet in the country is the right solution, as it fits perfectly into the rural landscape and does not require a lot of money. Usually summer residents build it in the form of a "birdhouse" with a height of more than two meters. If desired, you can extend the life of such a toilet by completing the internal and exterior finish clapboard and siding, respectively.